


Toddler Socks
Like most four year olds, my son can display stunning defiance, like last week when I asked him to take my first Toddler Sock for a test drive. After some coaxing, begging and finally bribery, I succeeded in getting the sock on his foot. Determining that it indeed fit, I reached down to remove the sock and was met with even more resistance, “Uh-uh, I’m never taking it off!” At last I had to admit defeat, because let’s face it, hand knit socks are a total delight!

These simple socks are so cute and cozy, even a toddler can appreciate them. Plus, little socks for little people are really fun to make. All the fascination of sock knitting is in fast forward with one interesting step right after another, kind of like a great short story!

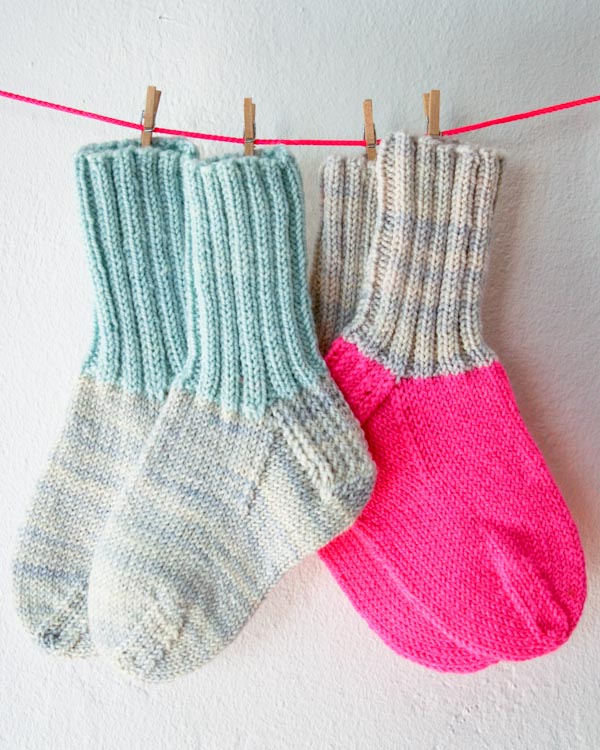
I knit up these Toddler Socks in Koigu Premium Merino, one of our all-time favorite merinos. Soft, machine washable, stretchy, and gorgeously hand-dyed, KPM is the ultimate yarn for adorable socks and happy, little feet!
To take a peak of my son, Bear, wearing his favorite color pink socks, check out Purl Soho’s March 2013 Instagram feed right here. And to get started making your own Toddler Socks, read on! -Whitney
Designed by Purl Soho designer, Whitney Van Nes.
Share your progress and connect with the community by tagging your pics with #PurlSoho, #PurlSohoBusyHands, and #PurlSohoToddlerSocks. We can’t wait to see what you make!
Materials

- 1–4 skeins of Koigu Premium Merino, 100% merino wool. Each skein is 175 yards/ 50 grams; approximately 175 yards required for 1 solid color pair. We used the colors, shown above from left to right, 1155, 1503, 1051, and 1010.5.
- A set of US 2 (3 mm) double pointed needles
NOTE: One skein will make one pair of socks (to ensure you don’t run out of yarn, the final foot length for the 4-5 size should not exceed 5¾ inches, unstretched [7 inches stretched]).
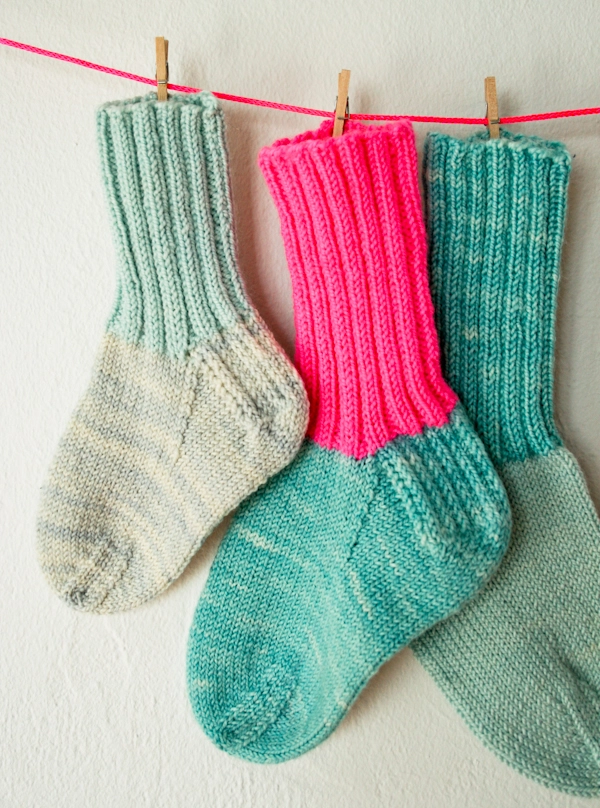
And here’s another colorway we like…

The colors of Koigu Premium Merino above are, from the left, 2200, 1503, 1051, and 1010.5.
Gauge
8¼ stitches = 1 inch in stockinette stitch
Sizes
2-3 years (4-5 years)
- Foot circumference: 5⅓ (6⅓) inches, unstretched; 7 (8) inches, stretched
- Foot Length: 5 (5¾) inches, unstretched; 6¼ (7) inches, stretched. The length is easily adjustable.
(Again, if you’re hoping to get one pair out of one skein of KPM, the final foot length for the 4-5 size should not exceed 5¾ inches, unstretched [7 inches stretched]).
Notes
Here are the four color combinations that I used (if you have the Orange set of yarns, just replace 1155 with 2200):
- Color A – 1155; Color B – 1503
- Color A – 1503; Color B – 1051
- Color A – 1051; Color B – 1010.5
- Color A – 1010.5; Color B – 1155
The photos in this pattern show the 2-3 year size.
Pattern
The Leg
With Color A, cast on 44 (52) stitches. We used a basic Long Tail Cast On.
Join for working in the round, being careful to not twist the stitches.
Round 1: *K2, p2, repeat from * to end of the round.
Repeat Round 1 until piece measures 3 (4) inches from cast one edge.
Cut yarn.
The Heel Flap
With Color B, knit 11 (13) stitches and turn the work so the purl side of the fabric is facing you.
Purl 22 (26) stitches. (The 22 [26] stitches that you just purled are the beginning of the heel flap. For this section, you will be working back and forth on just these 22 [26] stitches.)
Arrange the stitches so that the 22 [26] heel flap stitches are on one needle. Put the remaining stitches on hold on two needles (11 [13] stitches each).
(Again, work the following rows back and forth, turning the work between each row.)
Row 1 (right side): *Slip 1 purlwise, k1, repeat from * to end of 22 [26] stitches.
Row 2 (wrong side): Slip 1 purlwise, purl to end of 22 [26] stitches.
Repeat Rows 1 and 2 nine (eleven) more times.

Turning the Heel
Still just working the heel flap stitches:
Row 1 (right side): K13 (15), Slip Slip Knit (ssk), k1, turn the work so the wrong side is facing you and there are 15 (17) stitches on the left needle and 6 (8) stitches on the right needle.
Row 2 (wrong side): Slip 1 purlwise, p5, Purl 2 Together (p2tog), p1, turn the work.
Row 3: Slip 1 purlwise, knit to 1 stitch before the gap, ssk (with the stitch before the gap and the stitch after the gap), k1, turn.
Row 4: Slip 1 purlwise, purl to 1 stitch before the gap, p2tog, p1, turn.
Repeat Rows 3 and 4 until all the heel stitches have been worked and 14 (16) stitches remain on the needle.

The Gusset
Knit across the 14 (16) heel stitches.
With the same needle (now called “needle #1”), pick up 11 (13) stitches along the edge of the heel flap. (25 [29] stitches on needle #1)

With a new needle (needle #2), knit across the 22 (26) stitches that have been on hold.

With a new needle (needle #3), pick up 11 (13) stitches along the other side of the heel flap.
Still with needle #3, knit 7 (8) stitches from needle #1.
Now there are 18 (21) stitches on needle #1, 22 (26) stitches on needle #2, and 18 (21) stitches on needle #3. The first stitch of needle #1, at middle of the heel, is now the beginning of the round.

Round 1: Needle #1 – knit to last 3 stitches, Knit Two Together (k2tog), k1. Needle #2 – knit all the stitches. Needle #3 – k1, ssk, knit to end.
Round 2: Knit.
Repeat Rounds 1 and 2 until 44 (52) total stitches remain.

The Foot
Knit evenly until the piece measures 1 1/4 (1 1/2) inches less than the desired final length, measuring from the back edge of the heel and gently stretching the foot. (I knit the 2-3 year size to 3 3/4 inches [unstretched] and the 4-5 year size to 4 1/4 inches [unstretched]).
The Toe
Round 1: Needle #1 – knit to last 3 stitches, k2tog, k1. Needle #2 – K1, ssk, knit to last 3 stitches, k2tog, k1. Needle #3 – k1, ssk, knit to end.
Round 2: Knit.
Repeat Rounds 1 and 2 until 28 (32) total stitches remain.
Then, repeat just Round 1 until 12 total stitches remain.
With Needle #3, knit 3 stitches from Needle #1 so that there are 6 stitches on each of two needles.

Use the Kitchener Stitch to close the toe.

Weave in all the ends, then get started on your second sock!


Is there a way to size the pattern up to fit a 7 yo?? I would love to make these for my daughter!! Thanks!
suzyq720 – on twitter and instagram
suzysticks – on ravelry
Susan
gorgeous yarn and colours – and many thanks for the sock pattern.
Hi Susan,
You could follow this pattern at a different gauge and end up with a good fit for a seven year old. If you knit at 8 stitches to the inch (instead of 8 1/4), your finished foot circumference would be 6 1/2 inches; and if you knit at 7 3/4 stitches to the inch, your socks would be 6 3/4 inches around.
Of course, you would also want to adjust the cuff length to maybe 5 inches and the foot length to whatever length your daughter's foot is.
I hope this helps! Please let us know if you have any other questions and good luck!
Whitney
Hi Whitney! I've never attempted socks before, but this looks like a good place to start! I'm wondering if there is a yarn that you could recommend to make these slip resistant? That might be a silly question, but my son is still a new(ish) walker, and gets going a pretty good speed on our hardwoods. Thought I'd ask! Thanks!
I am knitting these socks for my granddaughter who is 21/2 yrs old and was reading the comments and noticed this one regarding slip resistant. I remembered reading a tip about using puff paint that you would decorate tshirts with. I have not tried it but thought I would mention it. The tip said to just squeeze little dots of puff paint on the sole of the sock. I suppose you could try it on a scrap or swatch to test it out. sounded like a good idea to me. Happy knitting everyone.
Hi Kelly,
What an interesting question! I have never heard of a yarn like that, although there are leather bottoms available that people sew to the soles of hand knit socks. One brand I found doing a quick Google search is called Regia. There are probably others too!
Thanks for asking and good luck!
Whitney
Not sure if you'd want to put this stuff on a hand-knitted item, but I've heard of people using this for the bottoms of slippers and socks. It's a clear, anti-slip spray. I think you can buy it in hardware stores like Lowe's or Home Depot. Or, you can order it online. 🙂 http://www.amazon.com/Performix-075815100139-Super-Fabric-Spray/dp/B000UDCC8K/ref=pd_sim_sbs_hi_2
Is there a printable version of this pattern?
would like to print instructions without all the photos
Hi Claudette,
Thanks for reaching out! You absolutely can! If you’re on a desktop version of the site, you will find a “print” icon in the right column just below the date and tags. If you’re on a mobile version of the site, you will find a “print” icon below the pattern and above the comments.
Follow the easy on-screen instructions to delete whichever parts of the pattern you don’t want to print or save. For example, you may decide to shorten the pattern by omitting certain images or the list of materials. To remove images, click the drop down next to the image icon and change from 100% to 0%.
Best,
Cassy
Hi Sharon-
You can print this pattern by clicking the "print" icon at the bottom of the pattern. Because of all of the photos however it will be very long (16 pages!) If you'd just like to print the text and a few select pictures we suggest that you copy and paste the text and whatever photos you need into a Word or Text document and print from there.
Thank you so much for getting in touch and good luck with the project!
Molly
I made my first sock thanks to this careful and thorough explanation. I so appreciate your time and excellent photos for this sock pattern. I've bought several books and pamphlets for making socks over the past 15 years and have never been able to get past the heel flap. I followed your instructions and completed my first sock. It is adorable and I am so excited because socks are so practical and functional.
just wondering…when your toddler grows up how do you adjust the pattern..i now have a 5 and 7 year old!!!
thank you
I would like to make a pair for my self , could you please tell me how many stitches I would need to cast on ? to make these beautiful socks (I'm an adult) I wear a shoe size 6 1/2 or 7 if u could give me for both sizes too . thank you 🙂
im not very good at figuring out the adjustment ~~~~
Hi Cathy,
I'd recommend following our Tulip Sock pattern (http://purlbee.squarespace.com/the-purl-bee/2008/6/26/whits-knits-tulip-socks.html) which uses the same yarn and is sized for women. Of course, instead of knitting the fair isle section, you will work the cuff and leg in a 2 x 2 rib. Otherwise, everything is the same!
Thanks for your question and please let us know if you have any others!
Whitney
This link is no longer available. Do you know where I can find this adult pattern?
Hello Jessa!
The patterns all should be restored to our site at this point. Thanks for your patience as we undergo a big transition! Here is a free adult sock pattern from our blog: https://www.purlsoho.com/create/2014/05/01/whits-knits-striped-crew-socks/
Enjoy! -Alyson
Thanks for the pattern! I had knit up another child's sock pattern before and wasn't enthralled with the way it turned out. This one way way better, so I am glad to see it wasn't (entirely!!) due to my novice skills. Thanks, this will go into my repeat pattern rotation!
Hi- I see someone already posted the question of a pattern adjustment for an adult sized sock and you recommended the Fair Isle Tulip Pattern. Is there any way that someone could possibly take the time to adjust THIS sock? For us novice sock makers, it would be soooo helpful if someone could please do this only because this is the best pattern I have EVER seen for someone new to socks to follow, and for many this could be a "go to" pattern for many socks to come!
Thanks so much!
Hi Nancy-
We will consider it but unfortunately we just don't have time right now. Using the numbers of the Tulip Socks, as Whitney suggested earlier really isn't that difficult and if you have any questions along the way we would be happy to help. We also recommend our Perfect Fit socks: https://www.purlsoho.com/create/the-purl-bee/2011/6/5/whits-knits-perfect-fit-socks.html as a great "go to" sock!
Thank you for your question!
Molly
My grandson is two and would like to make this cute socks for him. This is my first time knitting socks, so I need some help. How many stitches should I cast on since he is only two. Thank you so much in advance, I can help it, they are so darn cute I need to make them!
HI Christina,
You should follow the direction for the 2-3 size, which is a cast on of 44 stitches. Continue to follow the first set of instructions, i.e. the number before the parentheses.
I hope this gets you on the right path and that your grandson loves his special socks! Please let us know if you have any more questions and good luck!
Whitney
I just want to know how wide the top of the small size is supposed to be (the ribbing), because I am concerned that it could be too small. The gauge on the pattern does not give this info, and I would like to know before I have completed too much of the pattern.
Thank you!
Hi Caryn,
The small size's cuff is 4 inches unstretched and about 8 1/2 inches stretched. In theory, if you stockinette gauge is correct, then your rib gauge will be correct too!
Thanks for asking and please let us know if you have any other questions!
Whitney
I did these on magic loop and they are beautiful. Worked up quickly. Thanks so much for this great pattern.
First time knitting socks, pattern is wonderful and I still have a dumb question! I just finished the cuff, knit my eleven stitches, and turned the work. It seems with purl stitches facing me, for the moment the yarn is coming from the left hand and I am purling over the stitches I just knit over? I knit German continental and usually the yarn comes from the right…..help!
Hi Susan!
You’re doing just fine! When you turn back, you are switching to knitting back and forth in rows. For the first stitch of each row, your yarn will come off the left needle (just like when you knit a scarf). Plow on ahead with confidence!
Happy Knitting!
Thomas
Thank you Thomas, I did plow on and I am one snow storm away from completing my first sock :-))
This is truly the clearest and most well illustrated sock pattern out there. I’ve tried several times over the years and always got hung up on turning the heel but here it makes sense.
Thank you Purl Soho for your gift to knitters everywhere. It looks like 2015 will be my Year of the Sock as I am planning for next holiday season already…lol. I hope to make it to your doorway one day and thank you in person.
wad determined to give it a go as I was drawn to the fluoro colours and wanted to challenge myself.
It all went well until the heel part. I made mistakes that j could not recover sigh. I do not understand “Knit to one stitch before the gap and purl to one stitch before the gap.”
Can you please explain to me again or even better pics instructions 😉
Thanks a lot >_^
Hi Nicholas!
When you are turning the heel, you will be turning back and forth without knitting the entire row. As you go back and forth, the place where you previously turned creates a “gap” – two stitches will appear to be further apart on you needle than the rest. You might check out this video!
Thanks for your question!
Thomas
I am still persevering. The video was helpful. Still could not get it right. I am still trying.
hi I was wondering the best way to block socks this size. are there sock blockers for feet that small? could i use something else to effect?
Hi Jen,
Yes, baby sock blockers do exist, I would look on Etsy. You could also make your own to fit any size, there are instructions for a DIY Sock Blocker on Ravelry: http://www.ravelry.com/patterns/library/diy-sock-blocker-tutorial. The instructions say to use cardboard which will not hold up great to wet socks so I recommend using a piece of rigid foam instead, like foamcore board which available at most art supply stores.
Thanks for your question,
Jake
Hi,
I’m just a beginner of both double pointed knitting and knitting socks. Is there a way to print the pattern off.
Thanks a lot.
Hi Susan,
Thank you for the comment! If you look on the ride hand side of the screen there is a print icon. Click on that and you will get a print preview page where you can edit the pattern, remove images and material list if desired, and then get a print friendly version!
Happy Knitting!
Jake
How are 52 stitches evenly distributed between the three needles? It doesn’t seem to quite make sense. Does one needle have 18 sts and the rest have 17 sts?
Thanks
Eva
Hi Eva,
Thank you for the comment! The stitches are not distributed evenly on this step. You should have 13 stitches on needle #1, 26 stitches on needle #2 and 13 stitches on needle #3. That way you are all set up to do the decreasing for the toe.
I hope this helps and feel free to write back if you have anymore questions!
Happy Knitting!
Jake
Hello Purl Bee,
I am totally confused at the Gusset step. I have knit across the 14 heel stitches, and then am specifically at the step where you “with the same needle, now called needle 1, pick up 11 stitches from the heel flap (25 sts on needle 1).” I have done that and see that the working tail of the yarn is now between the 14 heel sts, and the newly picked up sts from the heel flap. The next step is where I am stuck. “With a new needle, needle 2, knit across the 22 sts that have been on hold.”
How does this work, when the working yarn is stuck between a column of sts that haven’t been knit, only picked up? Am I to break the yarn and re-attach it? Am I to stretch the yarn across the unknit sts? Please help!
Hello Sarah!
We’re so sorry for the confusion! You will need to knit the stitches that you picked up so that the working yarn is correctly placed. You can either pick the stitches up one at a time and then knit each one immediately, or you can pick them up by inserting your needle into the work, gather all the stitches, and then knit them all in a row. Feel free to write in again if this isn’t clear.
Congrats on getting it this far with these cute little socks! -Alyson
Hey there! Thanks for the adorable pattern! Question about the yarn used here: as far as sock-making goes, how would you say it compares to Tosh Merino Light? Which would you rather make socks/have socks made out of?
Hi Carina,
That’s a tough question! Both the Koigu Premium Merino and the Tosh Merino Light are hand dyed, machine washable and totally beautiful, but for socks, I might go with the KPM. Its spun plies make the yarn a bit more durable than Tosh Merino’s unspun single ply.
Thanks so much for asking and please let us know if you have any more questions!
Whitney
What size needles for this? I’m sorry if it’s there and I just missed it.
Hello, Penny!
No problem! For this project we used US#2 double pointed needles. Thanks for writing in!
Best,
Kumeko
I’m knitting my first sock (ever) and I’m turning the heel. I’m making the larger of the two sizes and when I get to row 2, where I turn to the wrong side and there are supposed to be 8 stitches on my right needle. It doesn’t seem like this is enough stitches to complete row 2, as I can’t purl the last stitch if there are only 8 stitches? Thanks in advance for the help!
Hi Karrie,
I am so sorry for the delay in answering your question. We try to answer questions in a much more timely manner, but sometimes we get overwhelmed and behind!
About the Heel Flap… When you begin Row 2 of the Heel Flap, you should have 8 stitches on the right needle and 17 stitches on the left needle. You will work Row 2 over the first 9 stitches that are on the left needle.
Perhaps you were counting the stitches before you turned the piece for the second Row, so that it seemed there were 8 stitches on the left needle, instead of 17?
I hope this puts you on the right path. Please let us know if you’re still confused, we’ll do a much better job of getting back to you! Thank you for your question,
Whitney
wow amazing woolen socks with marvelous design. I have really liked a thing that these are stechable on the legs places. You have done a great work by providing step wise step information that how to make these socks. I will definitely try to make these superb socks.
These are adorable, and I’m trying to make them for my daughters and niece for Christmas. What cast on method did you use? Thank you!
Hi Katy,
Thanks for writing in and for your kind words! Unless otherwise stated, we use the long tail cast on for all of our projects. This was also the case here for these adorable socks!
Best of luck and happy knitting!
Cassy
Hey, Purl! I’m working on these, but I’m making them solid. How does that effect starting the heel flap? Thank you for your help!
Hi Katy,
Thanks for writing in! If you are knitting these fun socks in one color instead of 2, the heel is not affected. When you get to the end of the leg, you will not cut your yarn and just continue on with the pattern as written!
I hope that this helps!
Cassy
Hello.
Thank you for this pattern.
As you slip one purlwise, is the working yarn in the front or in the back? I’ve looked at a number of sources where the answers differ, so I wanted to know what you specifically did for this pattern.
Thanks,
Nance
Hi Nance,
Thanks for writing in! For this pattern and most others, if the placement of the yarn is not specified, you will just leave it where it would ordinarily be for either a knit or purl row. For instance, on Row 1 of the heel flap, you will always be slipping with the yarn in back because it is a knit row, and on Row 2, you will slip with the yarn in front because it is a purl row.
I hope that helps!
Julianna
It would be fantastic if you could post a tutorial video on knitting the sock gusset and how you pick up the stitches. I am knitting the Baby socks and the gusset never seems to look quite as neat as the photos depict.
Thanks
Patricia
Hello Patricia,
Thank you for reaching out! I will certainly pass along your recommendation, but in the mean time I would check out our tutorial on picking up stitches, I find it to be a useful reference.
I hope this helps and happy knitting!
-Marilla
These are beautiful but help! I want to use size 3 dpns and what I think is worsted weight yarn, it doesn’t say. It’s Caron simply soft. I knit a swatch and got 9 stitches in an inch. I’ve gone blank and don’t know what to do from here. I need to make the 4-5 year old sock. Thank you.
Hello Linda,
Thank you for writing us! It sounds like you are off gauge by 3/4ths an inch. To get gauge I would recommend going down to a US2 dpns. However if you want to go forth with your US3 dpns your socks will just come out larger than the pattern, not necessarily a bad thing for a growing kid!
I hope this gives you some guidance and let us know if you have any further questions!
WArmly,
MArilla
I am having an issue with my slipped stitches. On K rows, I slip as to purl with yarn in the back and on P rows, I slip as to purl with the yarn in the front. My purl slipped stitches are much larger than those on the K rows no matter how tight I pull them. Am I doing something wrong? Thanks for some guidance.
Hello Phyllis,
Thank you for reaching out! I think I know what is happening. On row 2 you should only be slipping your first stitch and the purling every stitch for the rest of the row. This means you are only slipping every other stitch on your “row 1” or your knit row.
I hope this helps and let me know if I can clarify anything for you!
Happy knitting,
Marilla
Never made socks and would love to try. Do you start on dpns or circular needles
Hi Emma,
Thanks for reaching out! Our pattern is written for double pointed needles, so although I would recommend sticking with the double pointed needles for your first pair of socks, you could easily adapt this pattern to be worked on two circular needles or using the Magic Loop method once you are comfortable with sock construction.
Best of luck and happy sock knitting!
Julianna
Hi! Thank you for this pattern. New sock knitter here. On the heel flap, where it says Row 1 (right side), how do I know which side of the ribbing is the right side? Currently the side I dubbed “right side” is facing out. But if I turn the work so that the yarn is coming off the left needle (the one with the 22 heel flap stitches), the “inside” is facing me. I can’t figure out how to get the right side facing me while having the yarn come off the left needle. Am I missing something? Thank you!
Hi Sarah,
Thanks for reaching out! It sounds like you might be working in the round inside out, which is a bit hard to catch when using a reversible stitch such as ribbing. Whenever you are working in the round, either on double pointed needles or circular needles, you should be knitting on the near side of the tube. If you are knitting and find that your hands and active yarn are on the far side of the tube, you will need to flip your sock right side out by pushing it through the center of the double pointed needles. However, you can knit an entire sock inside out without changing anything and it will be fine! Since you have already purled one row before Row 1, simply use that as your guide for determining right side and wrong side in order to work the next row.
I hope that helps!
Julianna
Hi there, I’ve got a question regarding the heel flap, where it says Row 1 (right side), how do I know which side of the ribbing is the right side? My “right side” is facing out. This is my second time making these socks and have the same problem. Can I use the actual “wrong side” to be the “right side?” Also, are there any recommended tutorials to watch or read about the work being inside out? I’ve knitted on circular needles but have never had this problem.
Hi Anna,
Thanks for writing in! Before beginning the heel flap, the inside and outside of the cuff are identical, so you could theoretically choose either side to be the right side at this point. Once you start knitting the heel flap, the placement of the knit side of the flap will determine the right side of the entire sock. I’m not aware of a tutorial showing this particular issue, but if you scroll down to the section of our Double Pointed Needles tutorial and take a look at the pictures in the section titled “The First Stitch Of Each Needle,” you can see two pictures that show how the needles should be oriented. As you can see, the knitting is happening at the join of the needles closest to the knitter, rather than the ones farthest away.
I hope that helps!
Julianna
Qstitches? I have made a few pair following this excellent pattern. Perfect for beginners. But theres one part I don’t get.
“With Color B, knit 11 (13) stitches and turn the work so the purl side of the fabric is facing you. Purl 22 (26) stitches.”
What is the reason for this step? Why not knit or purl all 22 heel stiches?
Hi Lynn,
Thanks for reaching out! This step ensures that the small jog caused by changing colors is centered at the back of the heel flap. It wouldn’t be a huge difference to start by knitting 22 stitches after changing colors, but this step does keep everything a bit more symmetrical!
I hope that clears things up!
Julianna
How can I make these in a worsted weight? Thank you. I love your yarn & patterns.
Hi Jeanne,
Thank you so much for writing in and for the kind words! Unfortunately, socks have quite a few different components that require gauge to fit and we do not have a worsted weight pattern for toddler socks. I will be sure to pass your request along to the design team!
Best,
Julianna
Could I use a weight 2 yarn or it dosen’t work fine for the pattern
Hi Laura,
Thanks for writing in! This pattern is written for a fingering weight, or #1 size, yarn. A #2 yarn might work, but you would definitely need to knit a swatch to make sure you are able to match our gauge.
Best,
Julianna
Hello,
Is it possible to knit these magic loop and both socks at once? I’m getting confused on how I could do this with the heel flap.
Hi Cathline,
Thank you for writing in with this question! You can certainly knit these two-at-a-time on magic loop if you’re comfortable with both techniques. However, I do see what you’re saying about figuring out how to knit the heel flap sections with magic loop. The heel flaps will need to be knit flat (transfer the remaining “top of foot” stitches off your magic loop needle to scrap yarn or stitch holders), but once you’re ready to knit the gussets you can return to magic loop.
I hope this was helpful!
Gaby
Okay, that makes sense! Thank you. I’m still fairly new at knitting socks… should I transfer the remaining stitches after the first two steps of the heel flap? so I’ve completed the knit 11, turn & knit 22 ?
Also if I’m not changing colours is it necessary to knit 11 before going into the 22 stitches for the heel flap?
Hi Cathline,
Yes, I would complete the k11, turn, k22 before transferring your remaining stitches to scrap. The first few steps will set your heel up nicely, even if you aren’t switching colors. Please let us know how it goes!
Gaby
I have a question about the yarn in this pattern. Is it a sock yarn or a heavier weight?
Thank you
Hi Jane,
Thanks for writing in! Koigu KPM is a fingering, or sock, weight yarn.
Happy knitting!
Juulianna
I love this pattern and the instructions are so helpful. One question on gauge… how do you determine the 1/4” of a stitch? Thank you!
Hi Donni,
Thanks for reaching out! That is a great question, since this is one of our older patterns the gauge is a bit less traditional! We now provide a gauge measurement for 4″ rather than 1 that is much more accurate and easier to measure. So for this pattern, the gauge should measure 33 stitches for 4″!
I hope this helps, happy knitting!
Gianna
Thank you! ☺️
Would love to make these for my 3-year-old granddaughter. Trouble is, the yarn I have is 4 ply (rather than 2 ply) and I get 6 stitches to the inch, rather than 7. How would I adjust the numbers in terms of how many stitches to cast on and all the subsequent calculations in the pattern. Is there a formula one should use? Thanks very much.
Hi Elaine,
Thanks for your question. Unfortunately, at the moment we don’t have the resources to rework the pattern in a different gauge of yarn. We’re very sorry for the inconvenience! However, it looks like you’re working with a sport weight yarn, which is fairly close in gauge to a fingering weight. Since it looks like your gauge is similar already, I would recommend adjusting needle size and getting gauge that way rather than modifying any calculations in the pattern. Then you would be able to follow the pattern as written. I hope this helps!
All the best,
Cat
Turning the Heel on the Toddler socks
Row 3: Slip 1 purlwise, knit to 1 stitch before the gap, ssk (with the stitch before the gap and the stitch after the gap), k1, turn.
Row 4: Slip 1 purlwise, purl to 1 stitch before the gap, p2tog, p1, turn.
I don’t see a gap on row 4 as I saw before. Can I just knit to a certain number instead and p2tog, p2, with the other rows? I have 4 stitches on the right needle and 15 on the left. I might need a video support? Not sure. Would welcome some help.
Actually, I found the gap – it was hard to see. Now, however, I don’t know how to do this part – “Repeat Rows 3 and 4 until all the heel stitches have been worked and 14 (16) stitches remain on the needle.” How can you tell all the heel stitches have been worked? Do you mean that the needle with only a few stitches will be empty? Please let me know. Sorry to ask.
Hi Nora,
Thanks for writing in! I’m glad to hear that you were able to find the gap in the end, and I’d be happy to answer your other question. You’ll be able to tell that all the heel stitches have been worked once you have worked both the first and last stitch on your needles and there are no more gaps between any of the stitches at all!
All the best,
Lili