Striped Stockinette Snake

A dear friend of mine, Natalie, and I both recently became aunties, and like me, she wants to shower the new baby in her life with handsome hand-made treasures. It’s been quite some time since Nat picked up her needles, and so she turned to me for some tech support and basic hand holding. Together we each knit up a Striped Stockinette Snake. For Natalie, it proved a very helpful reintroduction, and for both of us, it became the perfect present for our new family members!
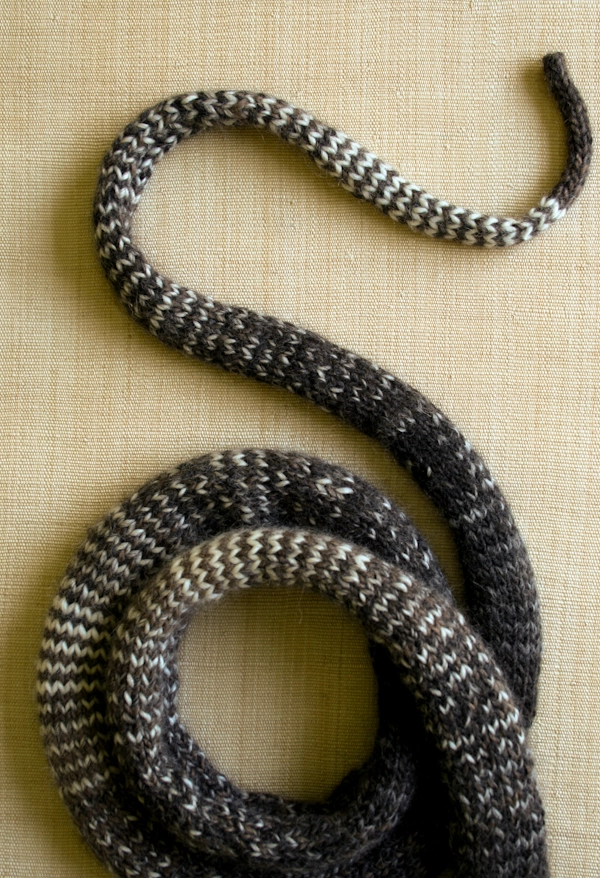
Along the way, we conquered the I-cord, learned how to increase and decrease both to the left and the right, and explored the characteristics of stockinette stitch. As seasoned knitters know, fabrics made out of stockinette stitch curl along the edges. Often stockinette is paired with another stitch pattern to keep the piece laying flat, but for our purposes here, the naturally curled edges are just what we needed! We were able to knit flat (rather than in the round) and still create a tubular, snake-like object. Pretty nifty!
To add to some more snakiness I incorporated single-row striping, using two beautiful self-ombreing yarns, Cascade’s alpaca-merino Eco Duo. With rows and rows of easy stripes, boredom never strikes as the two yarns fade in and out from darks to lights. It’s nearly hypnotizing.

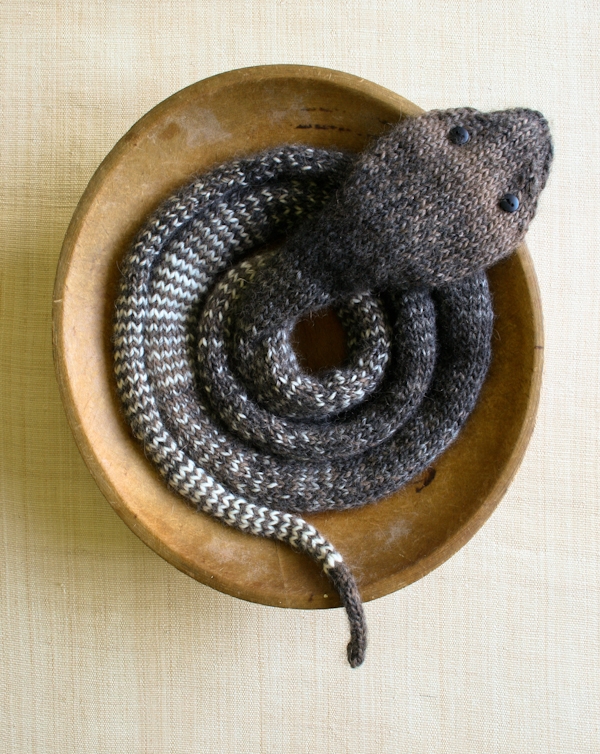
Whether it gets lovingly dragged around or slyly stacked on a shelf, this super simple Striped Stockinette Snake will slither its way into your dear little one’s heart! -Zia (Aunt) Laura
Designed by Purl Soho designer, Laura Ferguson.
Share your progress and connect with the community by tagging your pics with #PurlSoho, #PurlSohoBusyHands, and #PurlSohoStripedStockinetteSnake. We can’t wait to see what you make!
Materials

- Color A: 1 skein of Cascade’s Eco Duo. Each skein is 197 yards/ 100 grams; approximately 197 yards required. I used the color Chicory.
- Color B: 1 skein of Cascade’s Eco Duo. Approximately 197 yards required. I used the color Zebra.
- US 8 (5 mm), 8-inch, 12-inch, or 16-inch circular needles or long double pointed needes
- 1 pack of Buttons. I used Small Buttons (⅜-inch, 2-hole, size 15) in color Black.
Gauge
20 stitches = 4 inches in stockinette stitch
Size
Finished Length: 68 inches long
Notes
During the stripped portion of this pattern, each row in this pattern starts with the instructions to either “Turn” or “Slide” the work:
“Turning the work” means to do what you would normally do when knitting rows with a circular needle. That is to say, put the needle in your left hand into your right and the needle in your right hand into your left, and flip the work around so the opposite side is facing you.
“Sliding the work” means to keep the same side of the work facing you, and to push all the stitches to the right end of the circular needle. Without turning the work, start the new row as you normally would.
You will know that you’re doing this right if the yarn you need to complete the next row is magically there waiting for you!
Pattern
The Tail
With color A, cast on 4 stitches. We used a basic Long Tail Cast On.
Work in an I-cord for 1 inch.
The Body
Continuing with color A, you will now begin working in rows of stockinette stitch.
Row 1: Purl.
Row 2: Knit.
Repeat Rows 1 and 2 three more times.
Next Row: Purl.
Add the Stripe
Row 1: Turn work, knit with A.
Row 2: Slide work, knit with B.
Row 3: Turn work, purl with A.
Row 4: Slide work, purl with B.
Repeat Rows 1-4 one more time.
**Increase Row: Turn work, with A, K1, make 1 right (m1R), knit to last stitch, make 1 left (m1L), k1. (2 stitches increased)
Repeat Rows 2-4.
Repeat Rows 1-4 four more times.
Repeat from ** 11 more times. (28 stitches)
Repeat Rows 1-4 until piece measures approximately 65 inches. End the last repeat with Row 2.
Cut B.
Shaping the Head
Row 1: Turn work, purl with A.
Continuing with A, you will now be working back and forth in stockinette stitch.
Increase Row: K8, m1R, k1, m1R, knit to last 9 stitches, m1L, k1, m1L, knit to end. (4 stitches increased)
Next Row: Purl.
Repeat last two rows 6 more times. (56 stitches)
Next Row: Knit.
Next Row: Purl.
Decrease Row: K8, ssk, k1, ssk, k1, ssk, knit to last 16 stitches, k2tog, k1, k2tog, k1, k2tog, knit to end. (6 stitches decreased)
Next Row: Purl.
Repeat last two rows 4 more times. (26 stitches)
Decrease Row: K8, ssk, knit to last 10 stitches, k2tog, knit to end. (2 stitches decreased)
Next Row: Purl.
Repeat last Decrease Row. (22 stitches)
The Mouth
Cut yarn, leaving an 8 inch tail. Thread tail with a tapestry needle. With the right (knit) side of the fabric facing you and your tail on the left, thread the tail through all 22 stitches, starting with the far right stitch. You’ll be creating a circle of stitches like the top of a hat. Pull the tail taut and weave in the end to secure.
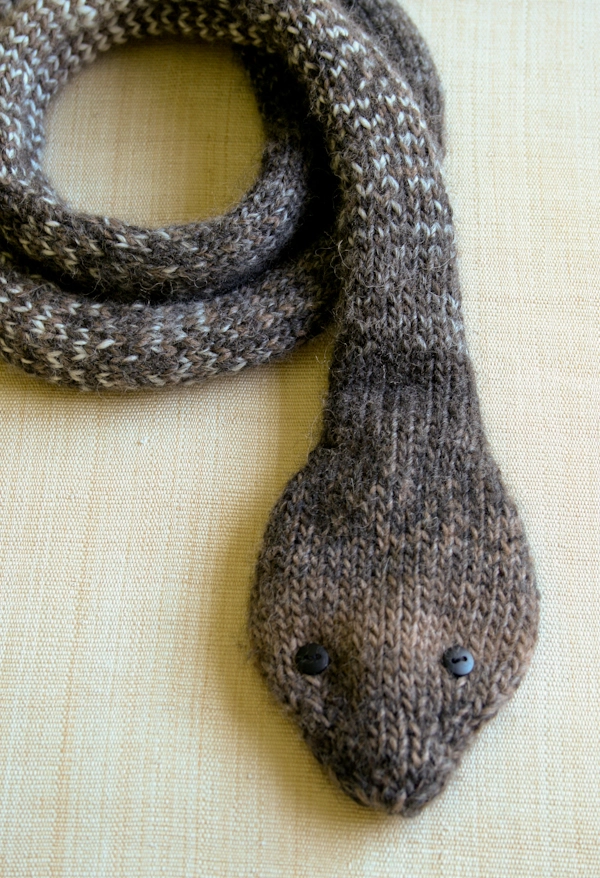
The Eyes
Using thread to match, sew on two buttons for eyes. I placed mine low towards the mouth and fairly wide apart. Different placement will give your snake a different attitude!
Finish
Weave in any remaining ends and you’re finished!


This is such a great pattern. I’m making it for my grandson, but would like to just use one color of variegated yarn (i’m rather a new knitter). I thought I could figure out when to add the m1R and m1L throughout the pattern, but I’m finding that I’m getting lost. Also, I’m assuming that I don’t have to slide the work if I’m only using one kind of yarn, yes? Thank you so much!
Hi Carolyn,
What a lovely gift for your grandson! You can work in stockinette, turning the work every row if you choose to use one color only. Simply follow the directions as written using the one color instead of switching colors. This should also help with the placement of the increases as well.
I hope that this helps!
Cassy
I think if you are only using one colour then you can just work back and forth in stocking stitch without any sliding and do second increase row 20 rows after previous one for the body of the snake.
Hi Su,
Thanks for your interest in this pattern! You can certainly do this project in one color. You will not slide your work, rather simply turn it. Please follow the pattern for the same amount of rows, just ignoring the direction to slide. Hope this helps!
Best,
Adam
I used two colours and slid. It is finished and looks great. Also the sliding has given me ideas for other work. Thanks so much.
Hi Su,
So glad! You are welcome!
Best,
Adam
If knitting with one color, I don’t understand why you wouldn’t just knit in stockinette stitch like normal. Cassy said you will still need to slide the work. Then Adam said you will not slide your work but simply turn it. ???
Hi Michelle,
Thanks for writing in and for catching this! I can confirm that you will not need to slide your work if you are knitting with one color only. Sliding the work is for the i-cord portion at the beginning and for creating a one-row stripe. It is confusing because the pattern tells you to start in an i-cord but does not tell you to start knitting flat for the body of the snake. We will fix Cassy’s response and talk about rewording the pattern. Please continue the snake in stockinette, turning the work after every row. Best of luck and let us know if you have any other questions!
-Adam
Did you ever update the pattern for one color-no stripe.
Hi Jenny,
Thanks for reaching out! We do not have a one color version of this pattern available, but you can easily adjust the pattern to be one color without the stripes by working the stockinette consistently in one color instead of switching colors every row!
I hope this helps, happy knitting!
Gianna
So pleased I found this. Went straight in to town to try and find yarn. I am in Bulawayo (Zimbabwe) so wasn’t sure what I would find. Using a plain black and a variagated that switches between black/grey and grey/ecru. Eight inches in so far. Thank you!
I LOVE this scarf and am going to make 3 of them WOW
Could you tell me the instructions for just knitting with the eco duo in Chicory. I am not understanding even after all these post.
I am ordering the yarn tonight. I just don’t understand the part of adding the stripe, the rest I get. Thank you!
Hello Christa,
Thanks for writing us! If you’d like to knit the snake without the stripe, then you can just use one color. There are no further directions for knitting the snake one color. I hope you like this pattern. It’s pretty fun!
Best,
Adam
Wonderful creation! I am just a little bit confused where the pattern calls for you to “repeat from ** 11 times.” Does this mean to repeat the increase row, then 2-4 , and then 1-4 FOUR more times 11 times? Thank you:)
Hi Olivia,
Thanks for writing in and sorry for the confusion! You will repeat the increase row, rows 2-4 and then rows 1-4 eleven times. In other words, that whole sequence is repeated eleven times. I hope this helps! Best of luck and happy knitting!
-Adam
Am I correct that you don’t actually stitch the snake body or head together, like up the belly? It is just left with edges curling in?? I was kind of wondering why it wasn’t just done in the round or on double pointed needles, but it’s not actually meant to be a sealed tube??
Hi Jane,
Yes, that’s correct!
All the best,
Lili
I’ve rechecked the pattern and see no info about stitching up the snake? I can see how the body of my snake would be ok but the head definitely needs something….your suggestions? Thank you.
R Schenk
Hi there!
I think that wet blocking would really flatten out the edges of the body and head. The pattern doesn’t require that you stitch the snake closed and the edges are supposed to curl in on themselves. When you wet block I would let the body lie flat but I would pin the head flat so it maintains that shape better. Best of luck!
-Adam
I cannot knit, sew or crochet to save my life!! But I LOVE this snake! Could someone please make one for me?? Thank you.
Shaping head. Row 1 knit row 2 purl. Do you increase on both rows? Decrease row. Do you also do that on both rows and do you continue in the knit and purl while doing this? When I add color B, do I add it to the same side of the color A or do I add it after I slide. Hope I’m not confusing you. I don’t know exactly which side I add color B when I start the project.
Hello Kimberly,
Thank you for reaching out! When shaping the head you are knitting back and forth in stockinette. The first row is a purl row and the second row (an increase row) is a knit row. For each row it will tell you if you are knitting or purling, but you should be alternating knitting and purling every time you turn your work.
I hope this makes sense and let me know if I can further clarify anything for you!
-Marilla
Can I just do this using magic loop?
Hi Gina,
Thanks for reaching out! Yes, if you are familiar with the magic loop method, you could certainly use it for this snake!
Happy knitting!
Julianna
Hi…love this pattern. I just have to add the eyes. However…do we sew up the seam ? I actually thought it would be slightly stuffed as well. Did I miss Something? Thank you.
Donna
Hello Donna,
Thank you for reaching out! Often stockinette is paired with another stitch pattern to keep the piece laying flat, but for our purposes here, the naturally curled edges are just what we needed! We were able to knit flat (rather than in the round) and still create a tubular, snake-like object. Pretty nifty! There is no need to seam or stuff!
Happy knitting,
Marilla
If I want to use a different yarn, what thickness would I choose.? 4 ply, DK, ARAN, WORSTED, CHUNKY. One that the label says “use #8 needles”?
Hi Paula,
Thanks for reaching out! This pattern was written for a worsted weight yarn, which does often call for a US 8 needle. It sounds like your yarn might work out, but I would recommend knitting a gauge swatch to make sure it will knit up to 5 stitches per inch!
Best,
Julianna
It sounds very sexist to say a snake should be made for boys. I haven’t tried this yet, but I’m going to and hope it is not a confusing as all the questions make it sound. I’m planning to make several for both boys and girls.
Hi Susan,
Thank you so much for reaching out and sharing your thoughts with us! For quite a few years Purl Soho has had an editorial policy of gender neutrality, but this Striped Stockinette Snake story pre-dates that change (it’s hard to believe we shared it over seven years ago!). But even then, we did not mean to suggest that this little snake was only intended for boys. It just so happened that the designer and her friend had brand new nephews, but in fact, we have all made lots of these cuties for all the boys and girls in our lives.
In any case, we’re happy to report that we have brought this story up to our current editorial standards. It was never our intention to exclude anyone, and we heartily agree that this pattern is wonderful for everyone who loves or will-soon-learn-to-love snakes!
Thank you again for your insights!
Best,
Cassy
I love this pattern so much! It was a bit of a challenge for me since I haven’t been knitting for long. (The i-cord was completely new for me!)
But it was easy to understand and the results are so cute!
I’ve made this snake twice and I love it! But…I’ve slept since then and I can’t remember how to slide it!! HELP!!
Hi Gina,
Thanks for writing in! When you see this instruction in the pattern, instead of turning your work as usual, you will slide all the stitches to the opposite end of the needle – just make sure you are using circular or double pointed needles for this snake!
I hope that clears things up!
Julianna
Hello, I am trying to make your knit snakes for my boys for Christmas. I noticed that the tail and the body are both turning in seperate directions . I feel like I follow the pattern but I’m not sure how that happened. It had to be after I increased the knots after making the tip of the tail.
Hope you are able to reply.
Thank you,
Amber
Hi Amber,
Thanks for writing in! I’m afraid I don’t understand what you mean by the two parts are turning in different directions. If you’d like, you can send us a picture of your snake at customerservice@purlsoho.com and we’ll be happy to try to trouble shoot this for you!
Best,
Julianna
How many total yards do you need to make this snake? Can you make it with one skein of eco duo?
Hi Peggy,
Thanks for the question! For this lovely little snake, we used right about 197 yards or one half of a skein of each color of Eco Duo. Looking at those who have made it over the years, some have used a little more than half of each skein. This may well owe to personal gauge or a preference for a bit longer of a snake. With this in mind, if you are careful with gauge and length, you should be able to squeak a snake out of a single skein!
Best,
Cassy
Thank you for such a wonderful pattern! What an ingenious way to make use of the way that stockinette stitch curls into itself. I love that it’s not seamed and stuffed. The end results are beautiful, charming and infinitely versatile. I am grateful to have come across this pattern during a difficult time when my mind is in need of distraction. Thank you!
FYI I searched “snake” to find this pattern and got no results though, obviously, the pattern is here. I’m a librarian so proper indexing is important to me. I had to scroll through pages and pages before I finally found the pattern. And why I needed to find it was to find the washing instructions for the Eco Duo yarn ( my grandson was dragging his snake around the neighborhood trying to scare people. He’s 3). And then I couldn’t find the yarn. Any help from you on washing the yarn? Probably would be safe to squeeze it in Euclan then set it out to dry but I wanted to check and be ready when my daughter asks me. Thanks.
Hi Maralie,
Thanks for reaching out! I will be sure to pass along that you were having problems finding this pattern! As for the yarn, we have discontinued Cascade’s Eco Duo so it is no longer available on the website but I would recommend hand washing the snake with any type of sweater appropriate detergent like our Sweater Soap and laying it flat to dry!
I hope this helps!
Gianna
I love this snake! Is it possible to knit the entire body in I-cord?
Hi Kat,
Thanks for reaching out! If you wanted to work I-cord for the entire snake then it would be the same (smaller) width all the way through. That is why we only suggest using the I-cord for an inch and then moving on so that the body of the snake is tapered!
Warmly,
Gianna
Thank you for your help!
I am confused with the m1r and m1l. Is this done on every row. I’m using two colors and I’m getting lost because the color I need is on the other side but it for purl.
Hi Sharon,
Thanks for reaching out! You are not increasing every row, for the body you will work rows 1-4 the total amount of times instructed. You will then work the increase row! For the increase row you will Turn the work and with A, K1, make 1 right (m1R), knit to last stitch, make 1 left (m1L), k1. (2 stitches increased) You will then work rows 2-4 and then Repeat Rows 1-4 four more times. Then you will work from the ** and repeat the increase row and repeat Rows 2-4 as well as Repeat Rows 1-4 four more times. You will work this entire section 11 times until you have 28 stitches.
I hope this clears things up!
Warmly,
Gianna
Fantastic pattern….I just finished it…very easy and cute.
Thank you so much.
Great pattern. So easy and very effective.
I’m trying to make a smaller one with less stitches and wonder if you have any suggestions for the increases & decreases on the head for say starting with 14 sts rather than 28.
Hi Irene,
Thanks for writing in! I’m afraid that the instructions for the head are difficult to modify for different stitch counts. But I think in general, you could just work fewer Increase Rows and Decrease Rows to make a smaller head. I’d also recommend decreasing the number of stitches you work at the beginning and end of each of these rows–so instead of 8 stitches, 4 might work best!
All the best,
Lili
Ready to start this snake project, and needless to say, really excited about it! (Thank you so much for the pattern!!!!) I am using the Red heart Camoflage yarn, which has a lot of greens and browns, and blacks. Not sure if I will blend in another color, and will see if it looks okay first. I love snakes and spiders, and this is the perfect project for me!!!!! Thanks again!