Baby Bonnet
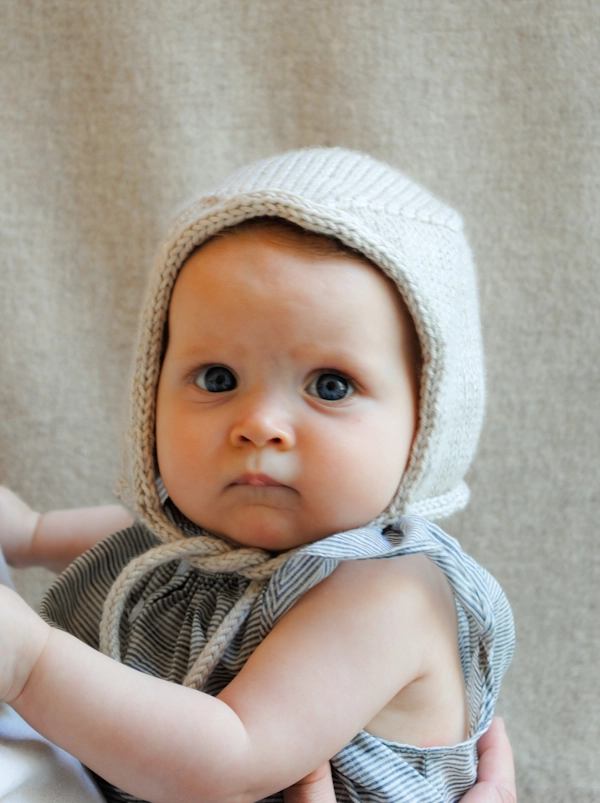
Easter is about the only time of year you might hear talk of bonnets, but for babies, bonnets are a fact of life! Snuggly and warm, bonnets embrace the delicate contours of a baby’s head, while under-the-chin ties prevent the famous “stroller fling”.

The engineering of these little Baby Bonnets was inspired by the small miracle in sock knitting that is “turning the heel”. I thought it would be neat to isolate that magical moment, using it to structure the planes of a bonnet. First from the front peak to the mid-crown and then across the entire back, you essentially “turn the heel”, but somehow instead of a sock, you end up with a sweet Baby Bonnet!
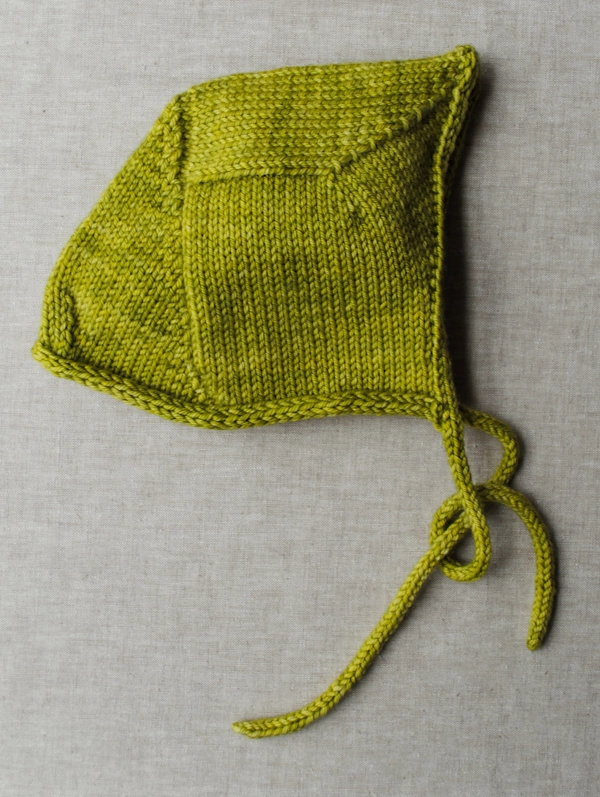
Thinking about tender babies, I turned to one of Purl Soho’s most exquisite yarns, Anzula’s For Better Or Worsted. A beautiful blend of superwash merino, cashmere and nylon, it is soft, sumptuous, and stunningly hand dyed. Just right for babies!
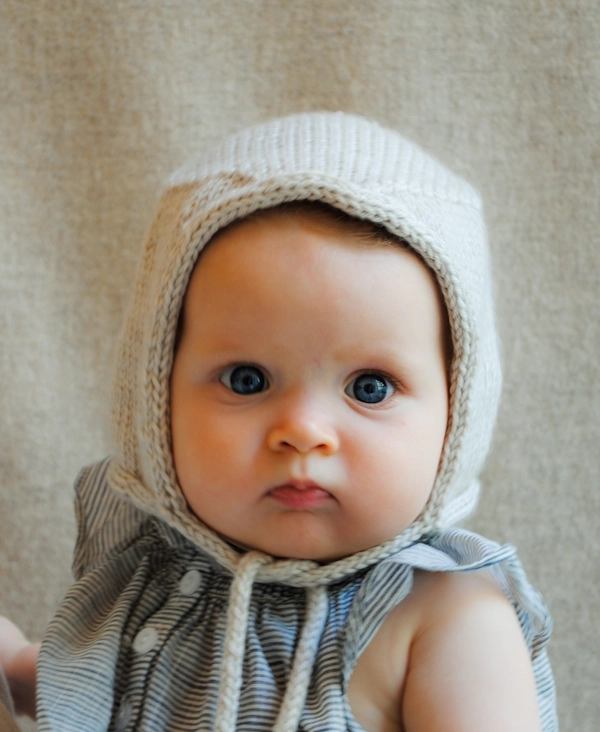
I hope you enjoy knitting this little one-skein project. It’s a bit surprising and a whole lot of fun!
Designed by Purl Soho designer, Whitney Van Nes.
Share your progress and connect with the community by tagging your pics with #PurlSoho, #PurlSohoBusyHands, and #PurlSohoBabyBonnet. We can’t wait to see what you make!
Materials

- 1 skein of Anzula’s For Better or Worsted, 80% Superwash Merino, 10% Cashmere, and 10% Nylon. These colors, from the left, are Au Natural, Clay, and Avocado. Each skein is 200 yards/ 100 grams; approximately 200 yards required. (One skein will make two Baby Bonnets with only about 5 yards to spare, so be sure of your gauge!)
- US 6 (4 mm) 20- or 24-inch circular needles
- Two US 5 (3.75 mm) double pointed needles
Gauge
12 stitches = 4 inches in stockinette stitch
Sizes + Dimensions
To fit a 9 month to 18 month old. (Baby Eleanor, pictured in our photos, is 7 months old and a bit on the small side. The Baby Bonnet is perhaps a little big on her…)
- From cheek to cheek: 14 inches
- From bottom of side to middle of the crown: 6½ inches
- From forehead to back of crown: 5 inches
Pattern
The Crown
Cast 46 stitches onto the circular needle. We used a basic Long Tail Cast On.
Row 1 (right side): K25, slip slip knit (ssk), k1, turn the work so the wrong side is facing you. (27 stitches on the left needle and 18 stitches on the right needle)
Row 2 (wrong side): Slip 1 purlwise, p5, p2tog, p1, turn the work so the right side is facing you. (26 stitches on the left needle and 18 stitches on the right needle)
Row 3: Slip 1 purlwise, knit to 1 stitch before the gap (see below), ssk (with the stitch before the gap and the stitch after the gap), k1, turn.
Here’s the so-called “gap”:
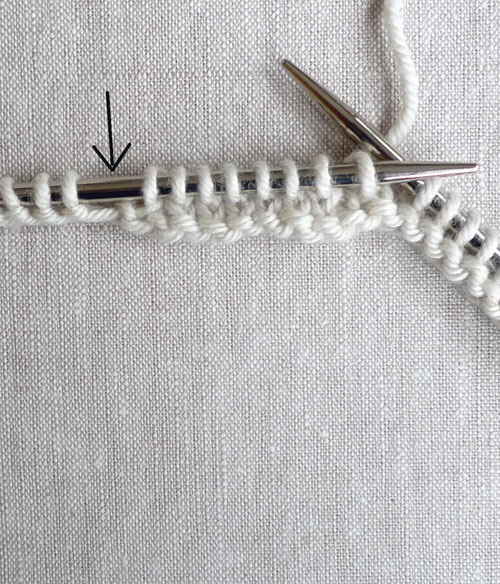
Row 4: Slip 1 purlwise, purl to 1 stitch before the gap, p2tog, p1, turn.
Repeat Rows 3 and 4 until all the stitches have been worked, purling instead of slipping the first stitch of the last row. (26 stitches remain)
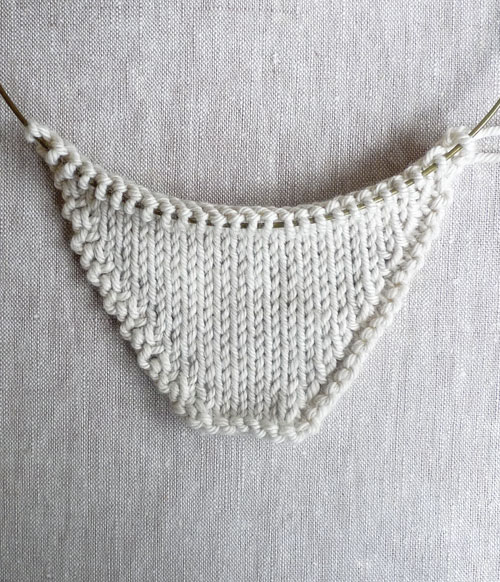
Next Row (right side): Knit.
Next Row (wrong side): Purl.
Repeat the last 2 rows seven more times.
Bind off loosely, leaving the last stitch on the needle.
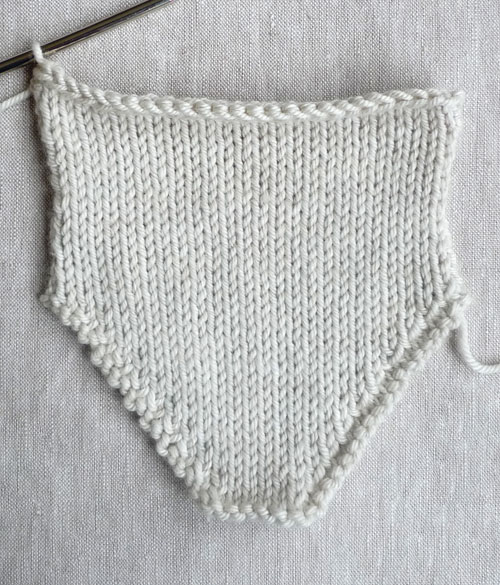
The Right Side

With the right side facing you, pick up 14 stitches along the side of the Crown from Point A to B (15 stitches on needle). Place a marker. Pick up 18 stitches from Point B to C. (33 stitches total)

Row 1 (wrong side): P2tog, purl to end. (1 stitch decreased)
Row 2: Knit to marker, make 1 left, knit to last 2 stitches, k2tog.
Repeat Rows 1 and 2 two more times, removing the marker on the last row. (30 stitches)
Next Row (wrong side): Repeat Row 1. (29 stitches)
Next Row: Knit to last 2 stitches, k2tog. (28 stitches)
Next Row: Purl.
Next Row: Knit to last 2 stitches, k2tog. (1 stitch decreased)
Repeat the last 2 rows three more times. (24 sttiches)
Next Row (wrong side): Purl.
Next Row: Knit.
Repeat the last 2 rows four more times.
Next Row (wrong side): Purl.
Next Row: Ssk, knit to end. (1 stitch decreased)
Repeat the last 2 rows two more times. (21 stitches)
Next Row (wrong side): Purl.
Bind off loosely. Cut the yarn and pull it through the remaining stitch.

The Left Side
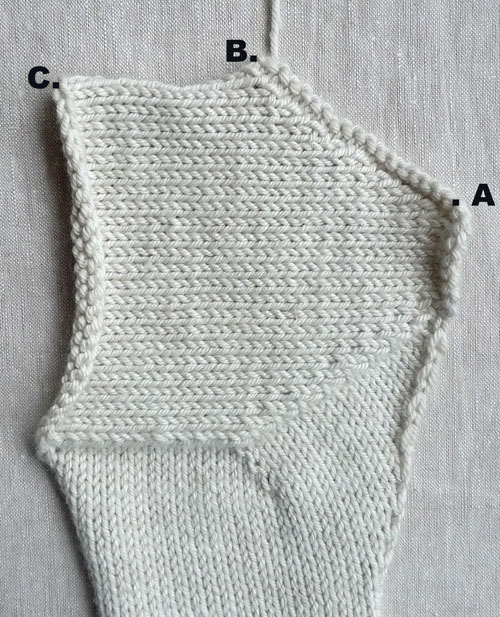
With the right side facing you, join new yarn and pick up 18 stitches along the other side of the Crown from Point A to B. Place a marker. Pick up 15 stitches from Point B to C. (33 stitches total)
Row 1 (wrong side): Purl to last 2 stitches, p2tog through the back loop (p2tog tbl). (1 stitch decreased)
Row 2: Ssk, knit to marker, slip marker, make 1 right, knit to end.
Repeat Rows 1 and 2 two more times, removing the marker on the last row. (30 stitches)
Next Row (wrong side): Repeat Row 1. (29 stitches)
Next Row: Ssk, knit to end. (28 stitches)
Next Row: Purl.
Next Row: Ssk, knit to end. (1 stitch decreased)
Repeat the last 2 rows three more times. (24 sttiches)
Next Row (wrong side): Purl.
Next Row: Knit.
Repeat the last 2 rows four more times.
Next Row (wrong side): Purl.
Next Row: Knit to last 2 stitches, k2tog. (1 stitch decreased)
Repeat the last 2 rows two more times. (21 stitches)
Next Row (wrong side): Purl.
Bind off loosely, leaving the last stitch on the needle.
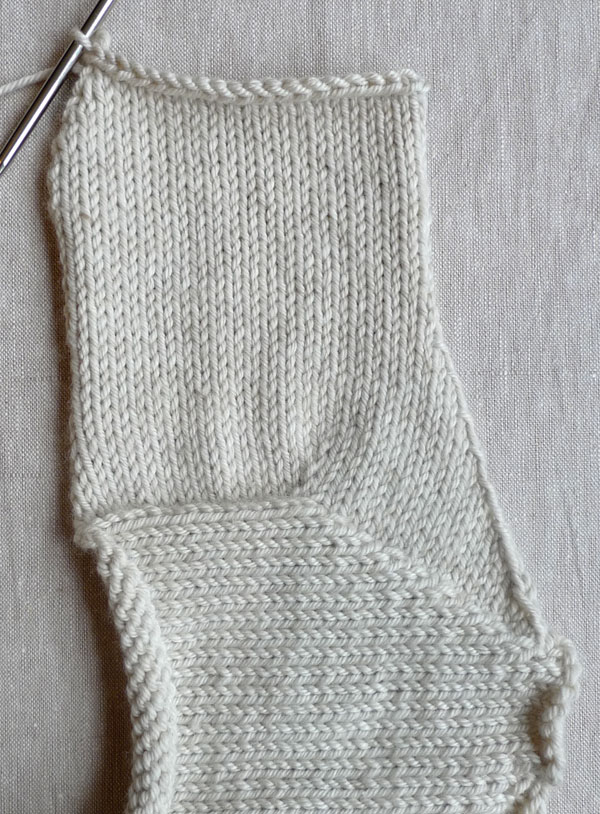
The Back
With the right side facing you, pick up 29 stitches along the back of the Left Side (30 stitches on needle), pick up 24 stitches along the back of the Crown, and pick up 30 stitches along the back of the Right Side. (84 stitches total)

Row 1 (wrong side): P44, p2tog , p1, turn the work so the right side is facing you. (46 stitches on the left needle and 37 stitches on the right needle)
Row 2 (right side): Slip 1 purlwise, k5, ssk, k1, turn the work so the wrong side is facing you. (45 stitches on the left needle and 37 stitches on the right needle)
Row 3: Slip 1 purlwise, purl to 1 stitch before the gap, p2tog (with the stitch before the gap and the stitch after the gap), p1, turn.
Row 4: Slip 1 purlwise, knit to 1 stitch before the gap, ssk, k1, turn.
Repeat Rows 3 and 4 until 7 stitches remain on each end of the needle after the gaps. (52 stitches total)
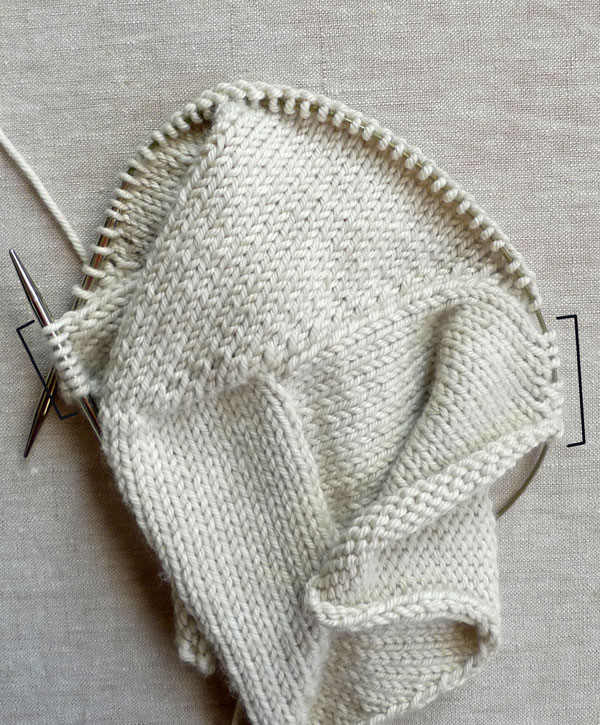
Next Row (wrong side): Slip 1 purlwise, p13, p2tog tbl, p6, p2tog, purl to the 1 stitch before the gap, p2tog, p1, turn.
Next Row: Slip 1 purlwise, knit to 1 stitch before the gap, ssk, k1, turn.
Repeat the last 2 rows two more times. (1 stitch on each end after the gaps, 40 stitches total)
Next Row (wrong side): Slip 1 purlwise, purl to 1 stitch before the gap, p2tog. (39 stitches)
Next Row: Bind off loosely to last 2 stitches, ssk, and bind off the final stitch.
Cut the yarn and pull it through the last stitch.
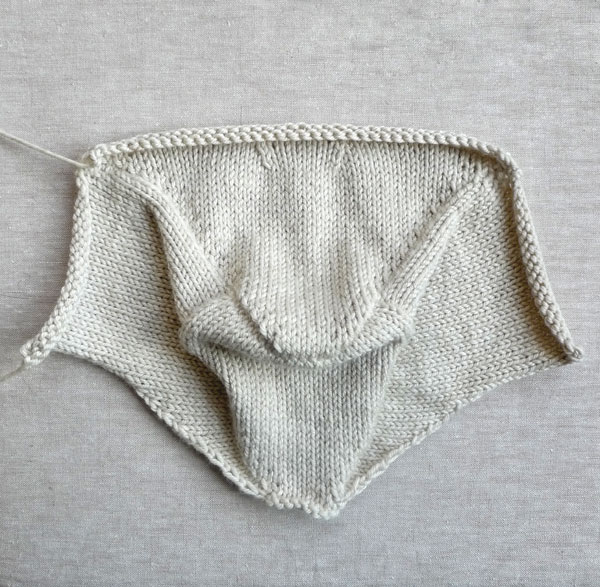
The Attached I-Cord
Cast 3 stitches onto a US #5 double pointed needle.
Knit an I-cord that is 9 1/2 inches unstretched and 12 inches stretched.
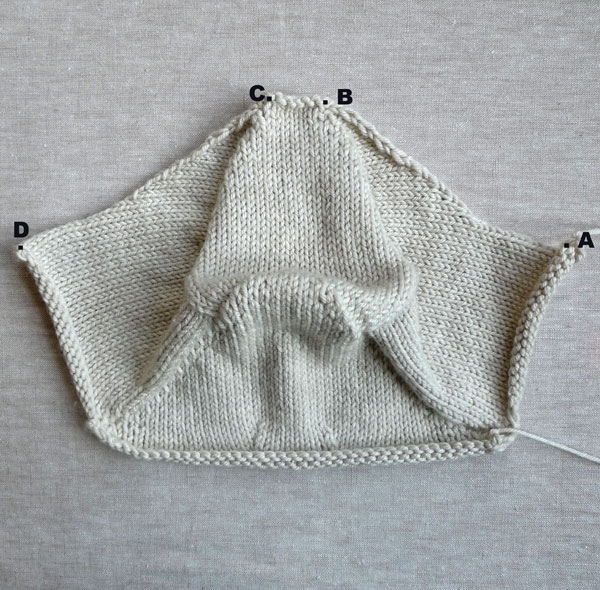
With the right side facing you and beginning at Point A, knit an Attached I-cord. Between Points A and B pick up 32 stitches.

Between Points B and C pick up 7 stitches. And between Points C and D pick up 32 stitches.
Continue to knit an (unattached) I-cord to match the length of the first one (9 1/2 inches unstretched).
Bind off. Cut the yarn and pull it through the last stitch.

Now, with a double pointed needle, pick up 2 stitches from the unattached I-cord at Point D. Then pick up 1 stitch from the bound off edge of the Left Side.

As you now knit the Attached I-cord, pick up 18 stitches along the Left Side. Pick up 35 stitches along the Back, and pick up 18 stitches along the Right Side.
Bind off. Cut the yarn and pull it through the last stitch.
Use the tail to sew the bound off end of this I-cord to the first I-cord you made.
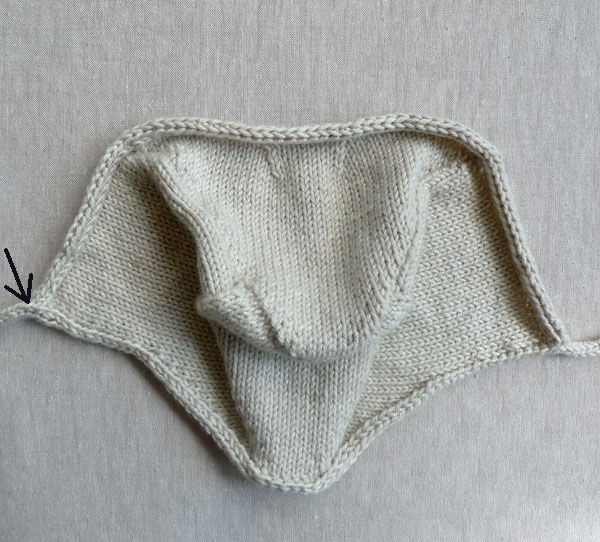
Weave in the ends and gently block your wee Baby Bonnet!




This is a great hat and the design looks so interesting. Also, the baby is just adorable. Thank you.
Clever construction that EZ would have been proud of. (Thus, I'm awfully glad for all the photos, otherwise I'd be lost!) I was thinking that for an Easter bonnet, per se, you could embroider flowers and vines or something on it,
Thank you so much for this cute, genious and pretty pattern.I'd like to introduce this post to my blog with a link and the photo of the bonnet.
The photo will show the link of this original post clearly embedded on it.
If you don't like, I'll revoke the post on my personal blog surely…
Thank you for the lovely hat! I have a question: I've knitted all the way to the first i-cord (the 9 1/2 inch one). but it doesn't say to sew it on to the hat anywhere? i'm confused about the attached i-cord… was i not supposed to knit the first i-cord as a separate piece? thank you for your help!!
Hi Rebekah,
You do knit the first 9 1/2 inches as a separate I-cord, but then you continue to knit it as an Attached I-cord which is a technique that simultaneously knits the I-cord while attaching it to the bonnet. We have an Attached I-cord tutorial right here: https://www.purlsoho.com/create/attached-i-cord-tutorial/2008/1/23/attached-i-cord-tutorial.html .
If you find all this technique a little overwhelming, you could also just knit an appropriate length of I-cord that you sew onto the bonnet at the end.
Thanks for your question and for knitting this little bonnet!
Whitney
I LOVE this bonnet. It's simple but has lovely lines. I've linked to it on Wee Folk Art's Facebook page. Thank you so much for sharing 🙂
I just made this bonnet and it is so cute! The only problem is my 18-month old has a large head and it is too small. Is there any way to figure out how to make the bonnet a bigger size? I can follow instructions but not so great at altering them on my own.
Hi Oneida,
This is a pretty complicated pattern to alter. It would involve extending all of the widths and lengths and adjusting the number of stitches you pick up along the way. Otherwise, my best suggestion would be to knit at a larger gauge (either this yarn looser or a bigger yarn).
Thanks for asking. I hope you know a slightly smaller baby who will appreciate your efforts so far!
Whitney
Thanks for getting back to me, Whitney! I am pregnant so I will save it for my next baby 🙂 Your designs and knits are beautiful.
Just knitting this up now. It's really fun! And so adorable
Thank you for the lovely pattern – as always, I am inspired and enjoying.
Love this bonnet! I'm working on a second one. A question, though: when the pattern says to “pick up” stitches, is it assumed that I am picking up and knitting them? It doesn't say to knit, but I can't figure out how to purl the first row otherwise.
Thanks for the sweet and fun pattern!
Hi Erin,
Yes, I do mean to pick up and knit. I never know how to least confuse people with picking up terminology, since so many different understandings of the process have developed!
Thank you for your question and for making this Bonnet, one of my favorites!
Whitney
Thank you for posting this great pattern! I am at the point where I am starting the back, and I'm a little stuck. I am on row 3 where it says to purl to 1 stitch before the gap. I'm not quite sure where that gap is or should be. Any hints would be appreciated.
Thanks,
Anne
Hi Anne,
The “gap” is the place where you turned the work two rows before. Turning the work should have created a discernible and fairly obvious extra-wide space between two stitches. For Row 3, the gap is after the 8th stitch, so you'll be working the first 7 stitches.
I hope this helps… I'm sorry for the confusion! The “gap” is commonly referred to in sock knitting and it didn't occur to me to clarify!
Thanks so much for asking and please let me know if you're still stuck!
Whitney
Hi Whitney,
And thanks- it became much clearer after you said that. Turned out great!
Anne
Hi whitney
I use uk size needles what size would that be if
Your using us size 6 needles?
Thanks
Hi Umm umar-
It is a UK size 8. Here is a link to a conversion chart in case you have any more questions: http://knitting.about.com/od/toolsandsupplies/a/needlesize.htm
Thanks so much for writing in!
Molly
Thank you so much for this lovely design!
It's the first time I'm making an attached i-cord. When I did it with the right side facing me the "old edge" came out of the i-cord. It looked a bit messy. But when I tried knitting the attached i-cord with the wrong side facing it turned out much better. Do you have a clue why?
Hi meingefangen,
Huh, very interesting. I'm not sure why that is happening… Are you slipping the last stitch of the I-cord and then making a yarn over? This technique effectively hides the "old edge." Otherwise, I can't really imagine why working with the wrong side facing is turning out better for you. I would recommend checking out our Attached I-Cord Tutorial, if you haven't already: https://www.purlsoho.com/create/attached-i-cord-tutorial/2008/1/23/attached-i-cord-tutorial.html
I hope one of these suggestions sorts out this perplexing question for you! Let us know and thanks for asking!
Whitney
Hi there,
I'm working on the section just after picking up the stitches for sections A and B, but I'm supposed to end up with 30 stitches after repeating rows 1 and 2 and I ended up with 31? Am I misunderstanding what you mean by "make 1 left?" I'm understanding this as making a new stitch/adding a stitch – is this incorrect?
Hi Rhonda,
If you click on the words "make 1 left" you'll be taken to a tutorial that shows you what to do for that step.
Also, I just want to make sure that you're understanding that you need to repeat Rows 1 and 2 two more times. So, after working Rows 1 and 2 the first time, you should have 32 stitches, then 31 at the end of the next repeat and finally, 30 at the final repeat.
Please let us know if you're still having trouble, and we'll figure it out! Thanks for your question!
Whitney
Love this bonnet for my granddaughter. Starting the right side, when it says to "make left" do I do that before or after sliding the marker? Or does it matter? Thanks.
Hi PaulaD,
You should make 1 left before the marker, then slip the marker and continue.
Thank you so much for asking and please let us know if you have any other questions!
Whitney
How would you know to make 1 left BEFORE slipping marker? Can you put that in the directions? Maybe advanced knitters know that……. thx. it is a fun pattern.
Hello Sally,
Happy to hear you enjoyed knitting this pattern. This is a great suggestion for extra clarity, I will pass it along.
Thanks for reaching out and happy knitting!
-Marilla
Hello! I am at this part:
Row 1 (wrong side): P2tog, purl to end. (1 stitch decreased)
Row 2: Knit to marker, make 1 left, knit to last 2 stitches, k2tog.
Repeat Rows 1 and 2 two more times, removing the marker on the last row. (30 stitches)
I have repeated rows 1 and 2 once so far and I have 30 stitches. If I repeat them a second time I will only have 29 stitches. Is this correct? I wasn't sure if you were saying 30 stitches should remain after repeating rows 1 and 2, 2 more times or if 30 stitches remain when you start the last row. Does that make sense?
Also, I was just reading the comments and read that when I "make one left," I was supposed to move the marker onto the other needle after making one left. I moved the marker and then made one left so hopefully that doesn't make a big difference! I'm new to knitting, if you can't tell!
I appreciate your help!
Hi Katie,
Your stitch count should decrease by one each time you work Rows 1 and 2, so by the time you have worked those rows three times, your count will have gone from 33 to 30. If you have 30 stitches after having worked those rows only once, then something is awry! Double check that you picked up the correct number of stitches to begin with and that you are decreasing one stitch in Row 1 and adding 1 stitch and decreasing 1 stitch in Row 2.
And I don't think it makes a difference if you make 1 left before or after the marker, but if you have to re-knit this section anyway, you may want to do it correctly the second time, which is before the marker!
I love that you're challenging yourself with this project. Please let us know if you need any more help and good luck!
Whitney
Hi Whitney! Thank you for your help! I ended up figuring out my mistake and correcting it. I finished the bonnet and it's adorable! I learned so much knitting it! I really appreciate the free pattern and all the helpful photos included. I've already started knitting another bonnet in a different color to reinforce what I learned 🙂 thanks again!
Hi there, love this little bonnet, just finished the main section. About to start the icord. Don't have a no 5 US needle though, only have a 4.5 mm UKdouble point. Will this make a great difference or just make the cord appear 'fatter' – could I use it? Otherwise will have to wait until the knitting shop nearby has more stock of 3.75 mm ones
Photos helped loads! Got it right first time
Hi Nicola,
Yes, the I-cord would be thicker with a 4.5mm needle, but it would also be looser, which might present proportion problems with the bonnet itself. Basically, you would probably have to pick up fewer stitches than the pattern details.
If your fingers are twitching to go, give it a try! It'll at least keep you busy until those 3.75mm needles arrive!
Thanks for your question and please let us know if you have more!
Whitney
So cute!
I am so making this!
Love this so much!
I am making one for my moms baby and her friends baby!
Thanks for sharing such a wonderful pattern and great photos 🙂
Thanks for this lovely pattern! I just finished it and I wondered if you had any tips to keep the bottom from rolling a bit. Will that just go down with use? I’m blocking it now and hoping it solves it!
Hi Nelly!
Blocking should definitely help!
-Thomas
Any tips for blocking? I’ve actually never blocked a hat before. I’m curious to know how you blocked this bonnet. Thanks!
Hello Christi,
Thank you for your question. I recommend submerging your bonnet in cold water and then drying it flat on a towel. You could also use a mild cleanser like Soak in the water, which is very gentle and smells great: https://www.purlsoho.com/purl/products/item/5275-Soak-Scentless-12-ounces
With hats and other three dimensional projects you don’t usually need to pin it since curling should not be an issue just try and lay the hat in the shape you want to stop it from stretching out. You may also want to flip the hat after a day or so if it’s still damp at that point.
I hope this answers your question and please feel free to write back with more questions!
Jake
Hello! I can’t find the attached i-cord pattern, there’s an error 404 when i click on the link. Can you help? Thank you!!
Hello Sandra!
Some of our links are still under construction since our big website redesign. Thanks for your patience with us! The tutorial is still available here: https://www.purlsoho.com/create/2008/01/23/attached-i-cord-tutorial/
Thanks for letting us know! -Alyson
This bonnet is so adorable and I am making it for new baby niece! I am just wondering, how do I know what stitches to pick up? I feel like I am just picking them up and hoping for the best. When I look at the pattern it looks like you pick up all the stitches vertically but your video says not to because there isn’t as many row vertically as horizontally. Help would be appreciated! Thanks so much.
Hi Charissa,
Thanks for writing in! Our picking up stitches tutorial is a great resource here. We have videos for both picking up along a cast on as well as a vertical edge. For this pattern, you will pick up the required amount of stitches along each edge. Sometimes this require a bit of decision making and is more of an art than a science. I would suggest watching the videos for each and hopefully that will clear things up a bit for you!
I hope that this helps!
Cassy
I love this pattern so much and love knitting it but somehow I don’t have enough stitches to pick up?? I wish your store was here so I could come get help. As I mentioned before, I am an advanced beginner….. and maybe I lose track but it has happened 2-3 times… but I will keep trying..
Hi Sally,
Sorry to hear you are having problems starting your Bonnet! It sounds like you may be decreasing more than 1 stitch per row on your short rows. Feel free to email or call us during store hours! We are always happy to help!
Good luck!
Carly
Hi! I am consistently not getting 14 sts to pick up. I am pretty positive I am not decreasing more than 1 with my short rows. I am so frustrated but don’t know what I am doing wrong. How many sts should be on my needle after short row section before starting the stockinette rows? I am determined to conquer this pattern!
Hi Susanne,
I’m sorry to hear you are having trouble with this pattern! After completing the short rows, you should have 26 stitches remaining on the needle; however, since you are picking up the 14 stitches along the side of the stockinette portion before getting to the short rows, it is more important to make sure you are working 14 rows of stockinette stitch before binding off. You should then be able to pick up one stitch in each row and come up with the correct amount.
I hope that clears things up! If you are still having difficulties please let us know!
Best,
Julianna
what size for cheek to cheek for 3-6month old is suggested, dont have baby to test on , its a baby shower gift
Hi,
Great question! At present, we only have this pattern in the one size and as such, do not have measurements or instructions for downsizing it to fit a smaller head. We will eertainly keep your request in mind for the future!
Best,
Cassy
Hi! Would you recommend this pattern for knitting beginners? It looks really complicated (coming from someone who only knitted scarves and simple toques yet).
Hi Sara,
Thanks for writing in! I think this is definitely a manageable pattern for a newer knitter, there are a few techniques that are a bit more advanced but we have a great Tutorials page you can check out and you can also write in here or email us a customerservice@purlsoho.com with any questions you may have!
Warmly,
Gianna