Super Simple Felt Easter Basket

It is a tradition in our family that every Easter I make my daughter, Coco, a special holiday gift. From the stuffed bunny of her infancy to the still beloved Bag of Beans from a few years ago, the challenge for me lies not only in coming up with something different year after year, but also in making her something fun and cheerful without stepping over the line into saccharin.

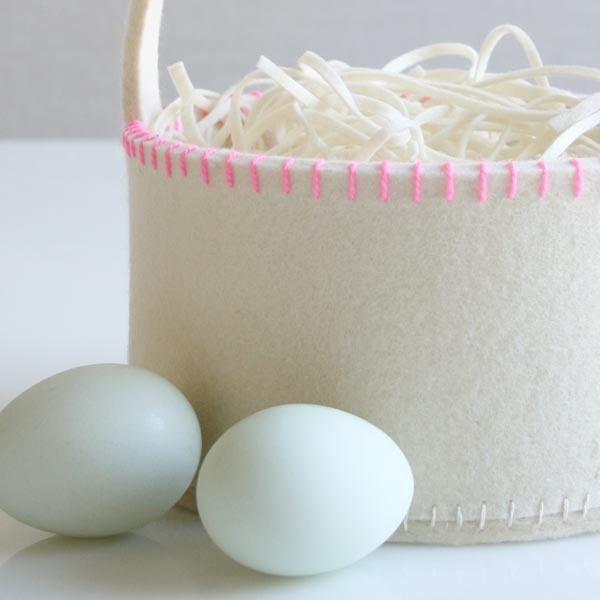
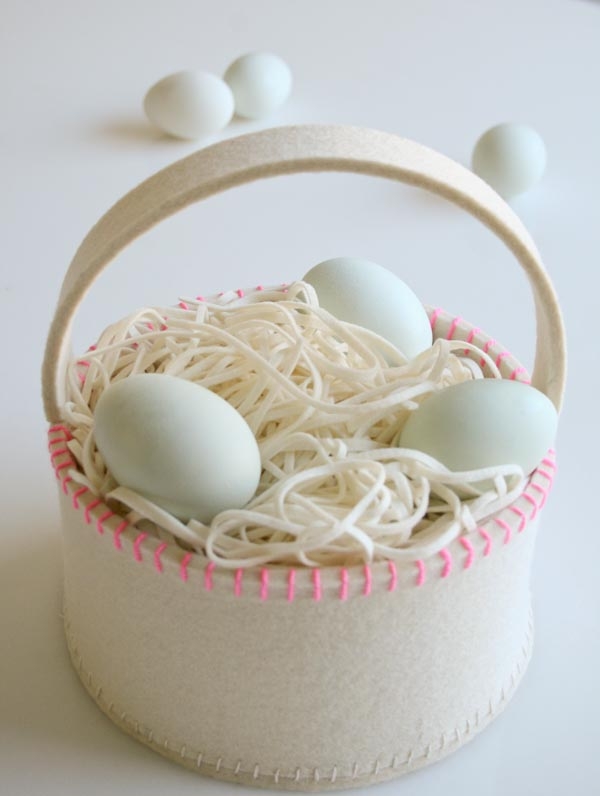
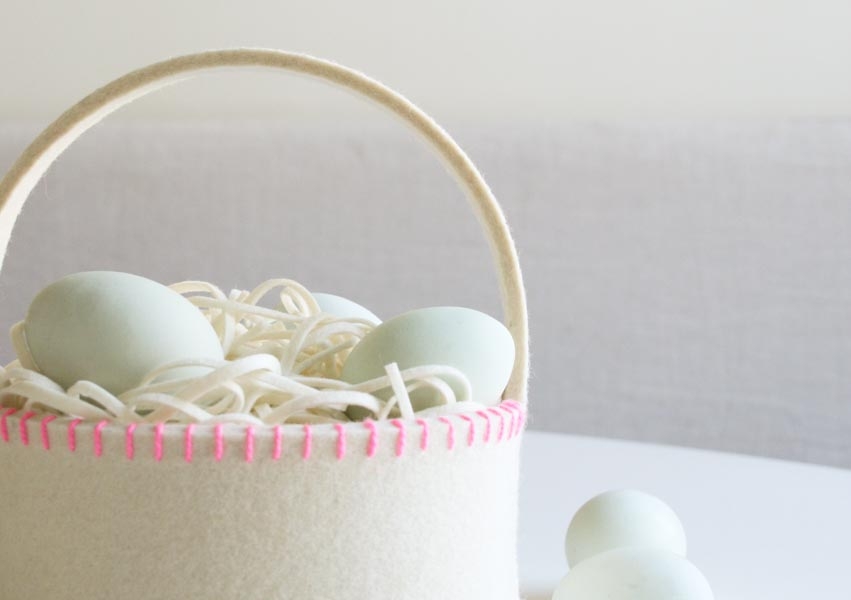
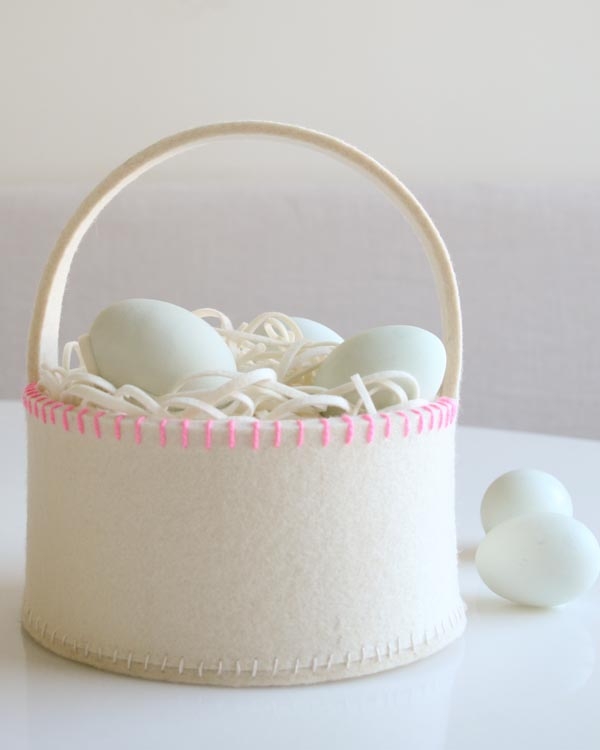
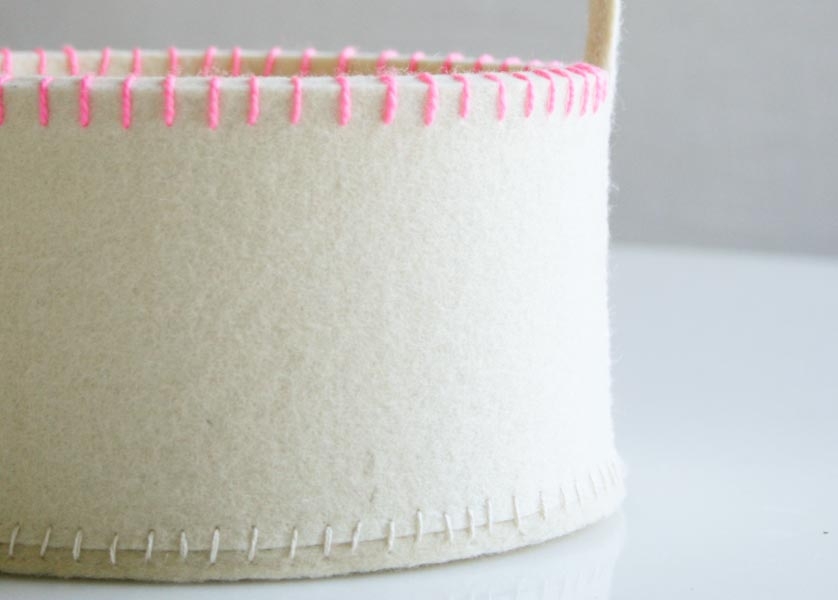
While I admittedly have a reputation for getting more excited than the average person about things made entirely in shades of ecru, I do get equally excited about bright pops of color accenting these neutral fields. And so it’s no surprise, to me at least, that I decided to make this super simple Easter Basket out of creamy white 100% Wool Felt with a burst of lively stitching around its rim.

I was amazed at how beautifully the thick 5mm Felt stitched together. So soft and pliable, I felt like I was shaping a clay vessel. And even the finished basket looks like a ceramic sculpture… until you touch it and feel just how soft it is!

The grass inside is also wool felt and makes the perfect bed for painted eggs. For these photos, I couldn’t resist filling the baskets with subtle Araucana eggs, but I can also happily picture the wee hours of Easter morning when Coco first spots her Felt Easter Basket spilling over with the colorful treats of the day! -Page
Materials

For the Basket
- Two 12 by 12-inch pieces of Wollfilz’s Wool Felt, 5mm. We used the color Ecru. (Please Note: Unfortunately, the 5mm Wool Felt is no longer available.)
- Thread for piecing: Londonderry Linen Thread. We used Ivory 5095 in size 50/3.
- Thread for embellishing: Koigu’s Koigu Premium Merino needlepoint yarn. We used Pink 1155.
- Embroidery needles
- Rotary cutter
- X-acto knife- for cutting out circle (available at your local hardware or grocery store)
- Cutting mat
- Non-slip ruler

Want to try something different? The embellished edge also looks lovely in Trebizond’s Silk Embroidery Thread, shown above (from the top down) in colors 431, 433, 381, 2180, 2178, 214, 202, 741, and 701.
For the Grass
- One 18 by 18-inch piece of Wollfilz’s 1mm precut Wool Felt. We used Ecru.
Pattern
Cut

From one piece of 5mm felt cut two long rectangles each measuring 3.5-inches wide x 11-inches long. These two pieces will form the wall of the basket. From this same piece of felt cut a strip that is 1-inch wide x 12- inches. This will be the handle of the basket. From the second piece of 5mm felt cut a circle that is 7-inches in diameter using an X-acto knife. Hint: We used a bowl, but anything round that is the right dimension will work. Note: If you aren’t using the exact dimensions suggested, make the long rectangles longer so that you have room for adjustments later.
Sew

Place two of the 3.5-inch x 1-inch long pieces together along the short sides.

Double the linen thread and sew the two ends of felt together using a simple whip stitch and making sure the edges of the felt line up on the left and right. Since you will see these stitches on the inside of the basket, be sure to pay attention to your stitches on both sides. Before stitching the other ends together to form the wall of the basket, form a circle with it and place it over the cut felt circle to confirm it matches up. If you’ve left it a bit long, now is the time to trim the ends a bit. Stitch the remaining two short ends of the felt together so that you end up with a round felt cuff.

Place the felt cuff on top of the circle of felt. Don’t worry if the cuff and circle don’t match up exactly. The felt is so pliable and will all come together once stitched. Stitch the wall to the bottom using an invisible whip stitch. Start the needle on the inside of the basket and push the needle through the side wall at an extreme angle so that you are not going out the other side of the felt, rather the needle is traveling parallel to the felt through the middle of it.

Continue to push the needle through to the bottom circle of felt but do not go all the way out the bottom of the felt. Instead bring the needle out when you are only half way through the circle as shown above.

Continue stitching in this way from the outside of the basket until you have gone all the way around the circle.


It should look like this when you are finished.

Attach the handle by whip stitching it to the side wall just as you stitched the two sides of felt together. Since you will see these stitches on the inside of the basket, be sure to pay attention to your stitches on both sides.

Here is what the basket will look like before you embellish it with colorful stitches.
Embellish

Using the pink needlepoint yarn, start the needle on the inside of the basket and stitch a simple whip stitch around the entire top edge of the basket. To start and end the yarn there is no need to tie a knot. Stick the needle through the middle of the felt about an inch and a half away from where you are starting or ending your stitch and just cut yarn. The felt is thick enough to hold the yarn without having to tie a knot.

Voila! It’s beautiful before you’ve even filled it.
Easter Grass

Cut the 18-inch x 18- inch piece of 1mm felt in half so you have two pieces of felt that measure 9-inches x 18- inches. Place one piece on top of the other piece and cut strips of felt from the 9-inch sides of the felt. Each strip can be approximately 1/8-inch wide, but it is fine if they vary in size a bit.


This is so awesome! I'm going to make 2- one with no handle to be a yarn basket, and one to fill with felt bunnies!
These are simply lovely.
so pretty!
These are gorgeous. I wonder how easy would it be to adapt to regular felt?
Wow!
Another perfect tutorial. I love your work! Where do you get your heavy weight felt? I would love to make a few of these.
Thank you for your inspiration!
Blessings,
Shelley
Hi Shellley-
We sell the thick felt here: https://www.purlsoho.com/purl/products/item/4842-Wollfilz-5mm-precut-Natural-Wool-Felt
All of our projects feature products that we sell at our online store, purlsoho.com. Links to the products can be found under the “Materials” heading of any given project.
Thank you very much for your nice comment and question.
Best-
Molly and The Purl Bee
Hi Taysha-
This could probably work in thinner felt but it most likely would be very floppy and not stand up on it's own, if you shrank it down in size you might have more luck getting it to keep its shape. Here is a link to our thinner wool felt:
https://www.purlsoho.com/purl/products/item/6409-Wollfilz-1-mm-precut-Wool-Felt
Please let us know how it goes if you decide to give it a try!
Thank you for writing in!
Molly
I absolutely love this!
This is gorgeous, I love to mix neutral and vibrant colours as well, and this project is yummy. And this thick felt looks like a treat to work with!
I love the basket and would like to make one for my granddaughter but when I clicked on the 5mm felt to order it states that only 1 is available….
Hi Barbara P-
Please email customerservice AT purlsoho DOT com and they can let you know when we will be getting more of this felt in stock.
Thank you!
Molly
Is there a machine or something to cut felt in the same shapes such as same shapes of flowers, same shape of grass..? Thanks
Hi Georgy,
Thanks for writing in! Some people do cut felt with a laser cutter. These are generally large and fairly expensive machines. There are also felt punches (a company called Sizzix makes some) but they are only available in a limited number of shapes and sizes. We cut all of our felt by hand. It certainly takes a while but it does have a certain calming logic to it.
Happy crafting!
Cassy
Is there a specific reason for using the linen thread for piecing as opposed to other embroidery thread? I’m just learning to embroider, and would love to make this basket for my youngest daughter’s Easter basket. It’s a gorgeous basket and I can’t wait to order my first pieces of 5mm felt–it looks amazing to work with!
Hi Kate,
Thanks for writing in! We used the linen thread here to piece this lovely basket together because it is super strong and will allow for heavier items to be placed in the basket. You can certainly use regular embroidery thread in it’s place. I’d be sure to use 3 or 4 plys of DMC if you choose to go this route to ensure good strength!
Best,
Cassy
Thanks so much! I ended up using the full 6 ply of the embroidery floss. It was a bit hard to pull through the felt, but with the aid of a pair of pliers (I think I need a thimble!), I got it done. I bought the Lemon Yellow 5 mm felt and trimmed the top edge in dark purple, then used Grass 44 1mm felt for the felt grass in the basket (I love loud, cheerful colors!). It is simply gorgeous!! Now I want to make a basket for my other daughter and one for my sewing supplies! Thanks for this fabulous tutorial!!
Lovely! Thank you!