Big Cuddly Bunny
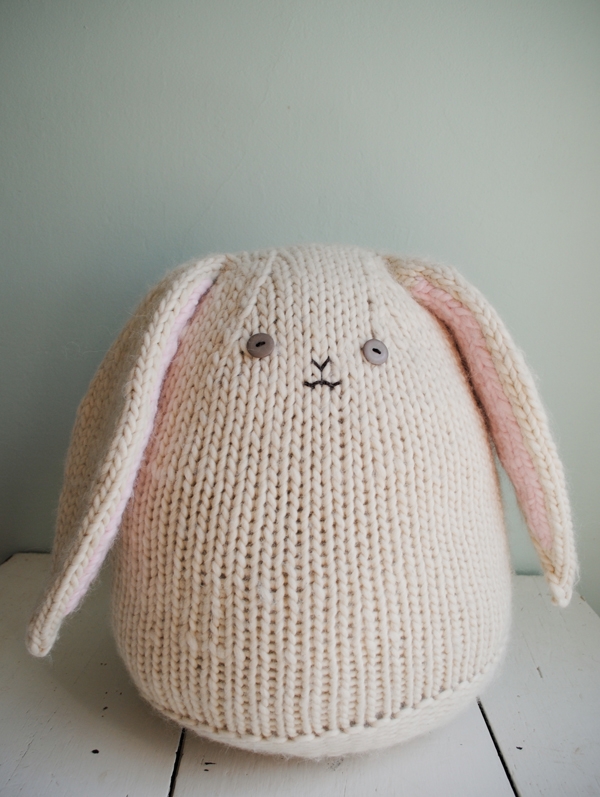
My hometown has an agricultural fair every August that I rarely miss. My brother watches the oxen pulls for hours and my mother lingers over the prize vegetables, but I always head straight for the rabbits! I totally love them: their blinky eyes, their fat bellies and their ridiculous ears. And so when it comes to Easter and its wonderful cast of characters, for me, the bunny wins.

Our Big Cuddly Bunny gets its shape and inspiration from this winter’s Big Snowy Owl. With a couple of key modifications a wide-eyed owl turns into a floppy-eared rabbit, full of sweet, earnest personality. Oversized and overstuffed, the Big Cuddly Bunny is just that, as loveable as the real thing!

Designed by Purl Soho designer, Whitney Van Nes.
Share your progress and connect with the community by tagging your pics with #PurlSoho, #PurlSohoBusyHands, #PurlSohoBigCuddlyBunny, and #PurlSohoGentleGiant. We can’t wait to see what you make!
The Materials

- Main Yarn: 6 skeins of Blue Sky’s Bulky, 50% Alpaca and 50% Wool. I used the color Polar Bear. (Another option: 6 skeins of Purl Soho’s Gentle Giant in Heirloom White.)
- Contrast Yarn (for inside the Bunny’s ears): 1 skein of Blue Sky’s Bulky. This color is Blossom. (Bulky is no longer available so we recommend 1 skein of Gentle Giant in Pink Camellia or Cowrie Pink.)
- Scrap Yarn (for the face). Nothing in your stash? Use a small skein of Needlepoint Yarn. I used Brown Paper Package’s Trio in the color Espresso.
- A US 15 (10 mm), 20 or 24 inch, circular needle.
- A set of US 15 double pointed needles.
- 2 buttons (for the eyes), 3/4 inches in diameter. I used Purl Soho’s Large Round Buttons, color Gray.
- 2 bags of stuffing.
- Optional: a jumbo stitch marker.
- Optional: a Pom Pom Maker (for the tail).
The Pattern
Gauge
2½ stitches = 1 inch in stockinette
Finished Size
15 inches from ground to top of head
38 inches in circumference
The Bottom
With the Main Yarn and the double pointed needles, cast on 8 stitches. We used a basic Long Tail Cast On.
Place a stitch marker and join for working in the round, being careful to not twist your stitches.
Round 1: Knit into the front and back (kfb) 8 times. (16 stitches)
Round 2: Purl.
Round 3: *P1, kfb, repeat from * to end of round. (24 stitches)
Round 4: Purl.
Round 5: *P2, kfb, repeat from * to end of round. (32 stitches)
Round 6: Purl.
Round 7: *P3, kfb, repeat from * to end of round. (40 stitches)
Round 8: Purl.
Round 9: *P4, kfb, repeat from * to end of round. (48 stitches)
Round 10: Purl.
Round 11: *P5, kfb, repeat from * to end of round. (56 stitches)
Switching to the circular needle…
Round 12: Purl.
Round 13: *P13, kfb, repeat from * to end of round. (60 stitches)
Purl 6 rounds.
The Body
Knit 37 rounds.
Next Round: *K8, k2tog, repeat from * to end of round. (54 stitches)
Knit 2 rounds.
Next Round: *K7, k2tog, repeat from * to end of round. (48 stitches)
Knit 2 rounds.
Next Round: *K6, k2tog, repeat from * to end of round. (42 stitches)
Knit 2 rounds.
Next Round: *K5, k2tog, repeat from * to end of round. (36 stitches)
Knit 2 rounds.
Turn the piece inside out and weave in the ends. Then turn it right side out and fill the bunny with a bag of stuffing.
The Bunny’s Left Ear
Remove the stitch marker, and slip the last 5 stitches you knit onto a double pointed needle.

With a second double pointed needle, knit the next 5 stitches.

Rearrange these 10 stitches onto three double pointed needles (3 stitches on two and 4 stitches on the third). Join for working in the round.

Round 1: (K4, kfb) 2 times. (12 stitches)
Round 2: Knit.
Round 3: (K5, kfb) 2 times. (14 stitches)
Round 4: Knit.
Round 5: (K6, kfb) 2 times. (16 stitches)
Rounds 6 and 7: Knit.
Round 8: (K7, kfb) 2 times. (18 stitches)
Rounds 9 and 10: Knit.
Round 11: (K8, kfb) 2 times. (20 stitches)
Rounds 12 and 13: Knit.
Round 14: (K9, kfb) 2 times. (22 stitches)
Rounds 15-20: Knit.
Round 21: (K9, k2tog) 2 times. (20 stitches)
Rounds 22 and 23: Knit.
Round 24: (K8, k2tog) 2 times. (18 stitches)
Rounds 25 and 26: Knit.
Round 27: (K7, k2tog) 2 times. (16 stitches)
Rounds 28 and 29: Knit.
Round 30: (K6, k2tog) 2 times. (14 stitches)
Round 31: Knit.
Round 32: (K5, k2tog) 2 times. (12 stitches)
Round 33: Knit.
Round 34: (K4, k2tog) 2 times. (10 stitches)
Round 35: Knit.
Round 36: (K3, k2tog) 2 times. (8 stitches)
Round 37: Knit.
Round 38: (K2, k2tog) 2 times. (6 stitches)
Round 39: (K1, k2tog) 2 times. (4stitches)
Round 40: (K2tog) 2 times. (2 stitches)
Bind off by passing the first stitch over the second stitch.
Cut the yarn and pull it through the remaining stitch.

The Bunny’s Right Ear

Orient your bunny so that the ear you just made is on the right (as in the above picture). Use the back circular needle to slip 8 stitches from the front needle.
Slip the next 10 stitches onto three double pointed needles (3 stitches on two and 4 stitches on the third).

Join new yarn and (kfb, k4) 2 times. (12 stitches)
Now join for working in the round…
Round 1: Knit.
Round 2: (Kfb, k5) 2 times. (14 stitches)
Round 3: Knit.
Round 4: (Kfb, k6) 2 times. (16 stitches)
Rounds 5 and 6: Knit.
Round 7: (Kfb, k7) 2 times. (18 stitches)
Rounds 8 and 9: Knit.
Round 10: (Kfb, k8) 2 times. (20 stitches)
Rounds 11 and 12: Knit.
Round 13: (Kfb, k9) 2 times. (22 stitches)
Rounds 14-19: Knit.
Round 20: (Ssk, k9) 2 times. (20 stitches)
Round 21 and 22: Knit.
Round 23: (Ssk, k8) 2 times. (18 stitches)
Round 24 and 25: Knit.
Round 26: (Ssk, k7) 2 times. (16 stitches)
Round 27 and 28: Knit.
Round 29: (Ssk, k6) 2 times. (14 stitches)
Round 30: Knit.
Round 31: (Ssk, k5) 2 times. (12 stitches)
Round 32: Knit.
Round 33: (Ssk, k4) 2 times. (10 stitches)
Round 34: Knit.
Round 35: (Ssk, k3) 2 times. (8 stitches)
Round 36: Knit.
Round 37: (Ssk, k2) 2 times. (6 stitches)
Round 38: (Ssk, k1) 2 times. (4 stitches)
Round 39: (Ssk) 2 times. (2 stitches)
Bind off by passing the first stitch over the second stitch.
Cut the yarn and pull it through the remaining stitch.
Closing
Finish stuffing your bunny, making it firm and plump.
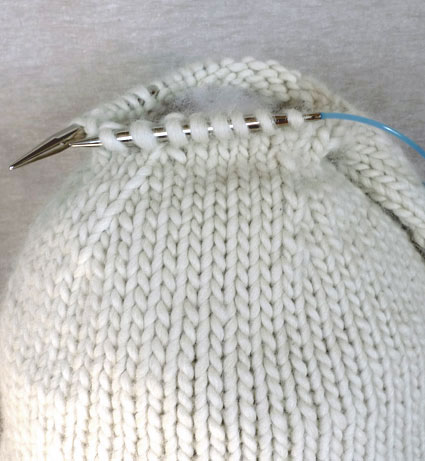
Slide 8 stitches to one end of the circular needle and the other 8 to the other end.
Cut a piece of the Main Yarn about 24 inches long. Thread it onto a tapestry needle and graft the two sides of the bunny’s head together using the Kitchener Stitch.

As you weave in the tails, sew closed the holes.
Inside the Ears
Use the Contrast Yarn and the duplicate stitch to fill in a field of pink on the underside of each ear. Use relatively short pieces of yarn (18 inches or so). Because the yarn is single ply, a longer piece doesn’t hold up very well to the rigors of duplicate stitch!

Do the same for the other ear…

Finishing Touches
THE TAIL
Use the Main Color and the largest size of a Pom Pom Maker to make a fluffy tail. (First time using a Pom Pom Maker? Visit our tutorial here!) Use the tails of the yarn that tied off the pom pom to attach the pom pom to the bunny’s backside. Weave in the ends.
THE FACE
With a piece of dark scrap yarn, attach two buttons for the bunny’s eyes. Then embroider a simple nose and mouth, like we did or however you like!


Thanks!! Another question: do you have another tutorial about duplicate stitch on something closed like these ears since weaving in on the other side isn’t an option? Same with the embroidered face since the bunny is stitched up. I hope this inquiry makes sense. Thank you thank you!!
Hello Katerina!
I understand what you’re asking! I’ve made many stuffed animals and I find that since the wrong side is invisible, you can simply use a crochet hook or a darning needle to pull the tails into the body of the animal and not worry too much about weaving it in super securely. Since the inside of the animal is in tact, it won’t come out. In this case (not for garments), I sometimes do tie a small knot and then just pull the tail into the body of the animal. Hope this answered your question, if not never hesitate to write us at purlbee@purlsoho.com Thanks!
Alyson
Almost done with my big bunny!! How much stuffing was used in this pattern? I have a 32 oz bag – is that enough? Thanks! Love this!
Hi Katerina,
Thank you for your question! Your 32oz bag of stuffing should be plenty. Normally the project only needs a 12 oz bag so you should have more than enough. When you stuff it you just want to make sure that you pull stretch out the Poly-Fil as you stuff it. You don’t want to overstuff your stuffed animal or have clumps of compacted stuffing in the animal or it will get too lumpy and heavy.
I hope this answers your question and please don’t hesitate to write back if any more questions arise!
Happy Crafting!
Jake
Hi,
I made this bunny last year for my son, and he absolutely loves it–it makes a wonderfully soft pillow or sleeping partner. As easy as it was, I really struggled with the color on the ears. I never got the hang of knitting one color over another, and my pink yarn knitted over the white looked crooked and sloppy, and took away from the simple aesthetic.
I’m making another one for a gift, and I want this one to be perfect. Do you have any suggestions as to how I can knit two colors in the round, and change the pattern of the ears so that it looks the same? Or is this not really possible?
Again, it’s a lovely and simple pattern, and was a great learning project to figure out knitting with big needles and knitting in the round.
Hello Charlotte!
Sorry for the delayed response! We don’t have an alternate design for the ears right now, but if you would like to incorporate the pink into the original knitting of the body of the ear I would recommend using the color work technique called Intarsia. Take a look at our tutorial here: https://www.purlsoho.com/create/2008/06/30/intarsia/
Hope this helps! Happy knitting! -Alyson
Hi! Would this pattern work using your new gentle giant yarn? I made one a few years ago and love it, but the new yarn is so soft I’m wondering if I should make another!
Hi Stephanie,
Thanks for writing in! You can certainly knit this fun bunny out of Gentle Giant. You will need 6 skeins of the main color and 1 skein of the contrast color!
Happy knitting!
Cassy
Thanks!!
To size the bunny down a bit, could you follow the same pattern but use the Super Soft Merino and US11 needles? If so, how many skeins of yarn would you need?
Thank you! Really excited about this pattern.
Hi Emily,
Thanks for writing in to us! I think it’s a great idea to do this in Super Soft Merino! The bunny will definitely be smaller but not by too much. I can’t say for sure how many skeins you’ll need, but I suggest getting 5-6 to be safe and exchanging the skeins you don’t use for store credit. Best of luck and let us know how it goes!
-Adam
This pattern never turns out as well as I’d like it too.
Hello Celeste,
Thank you for reaching out. Oh no! Is there something in particular that isn’t working for you in the pattern? I would love to help if I can.
Happy knitting!
-Marilla
Hi,
Instead of using double-pointed needles, can I use circular needles to replace it? As I have no idea how to use the dp needles.
Thanks.
Hi Maureen,
Thanks for writing in! The reason that we use DPNs here is that 16 inch circulars are too large to knit the small circumference of the rabbit ears. We do have a DPN tutorial or you could try magic loop and use a longer needle!
Best,
Cassy
Hi Cassy,
Thanks for your reply. I will try the “magic loop” method.
Cheers,
Maureen
Hi! Oo I hope you are still seeing comments on this!
I am working on bunny’s first ear, and it appears that the wrong side is showing on the front. The knit looking stitches are ending up inside the ear. I am sure it is something I am doing wrong, any idea what that could be? I am an experienced knitter and usually don’t run into this problem. Thanks!
Hi Julia,
Thanks for reaching out! It sounds like you might be knitting on the wrong side of the circle or triangle formed by the double pointed needles. When you first start the ear, you should make sure that you are knitting on the side of the triangle closest to you, not the side farthest away from you, so that the right side of the knit stitches lines up with the right side previously established in the body of the bunny.
I hope that clears things up!
Julianna
You were correct!! Thanks so much! My bunny came out adorably!
HI!!! I’m starting the FIRST ear. I slipped the first 5 stitches onto a DPN, and then it says KNIT THE NEXT 5 with a second DPN. I’m super confused? Do I add yarn? as my tail (yarn) is connected to the first DPN. Does that make ANY sense? I’m not the greatest knitter, and it’s probably something really dumb. LOL.
Hi Jess,
Thank you for writing in! Not to worry, it sounds like you simply slipped the next 5 stitches onto a dpn instead of the last 5 stitches. With your previous 5 completed knit stitches on your first dpn, your working yarn should be in the right position to continue knitting onto a second dpn. I hope this helps!
Happy knitting!
Gaby
I’ve just begun this adorable bunny and am so pleased that it can be used as a small pillow! That hadn’t occurred to me. I’m knitting this and other stuffed toys to send to refugee Ukrainian children through a church knitting group and love the thought of a wee head snuggled up on it.