Silken Straw Summer Sweater
I’ve always been surprised by knitters who put their needles down for the summer. How do they occupy their hands for those three months? Even if I’d ever been able to break my knitting habit, I’ve never really seen a reason to. After all, some of nature’s most beautiful fiber creations are best experienced on a hot day under the shade of a great big tree!
One of my all-time favorite summer yarns is Alchemy’s Silken Straw. While I appreciate the gorgeous hand dyed color, what really makes Silken Straw so special is its one-of-a-kind texture. Rustic and elegant at the same time, Silken Straw is the perfect blend of country and city mouse. Plus its cool, crisp touch is just what I want when the thermometer is rising, never clingy or sticky!
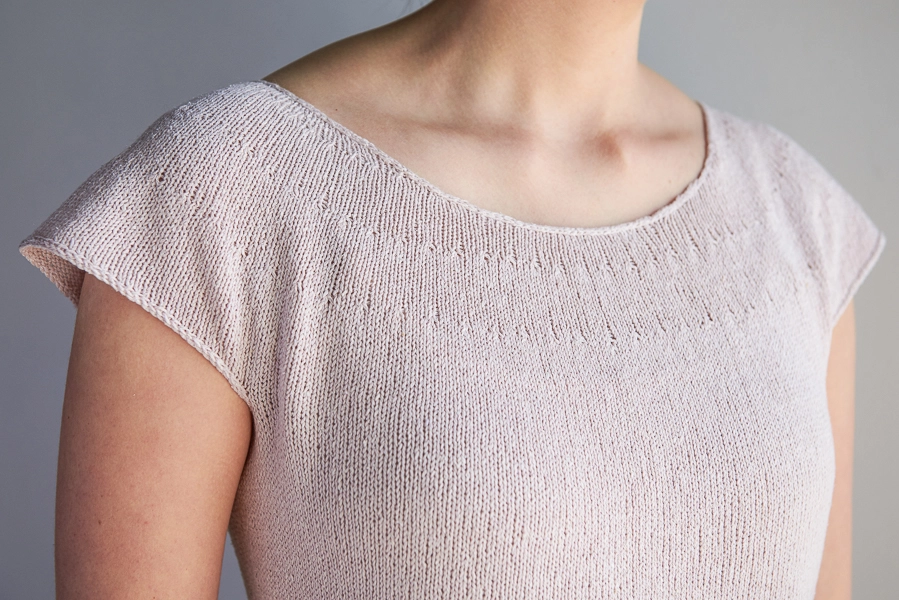
The Silken Straw Summer Sweater is designed to cover you in just a whisper of silk. A slip of a sweater, its beauty is its understated grace and quiet confidence. Team it up with a camisole for dinner and a movie, or throw it over your bathing suit for a sea glass hunt. So simple to knit and so easy to wear, it’s just like summer itself!
Yarn lovers, if you adore the yarn used in this project, you’ll love exploring all of our other yarn collections! Discover over 45 thoughtfully designed yarns in nearly every natural fiber and in every spectacular color you can imagine. Only available here at Purl Soho’s online yarn store, where every skein is created with care and your creativity in mind!
Update: New Yarn
May 2017
We’ve revisited this classic pattern in Purl Soho’s Cattail Silk! Nearly the same as our original Silken Straw Summer Sweater, this version has simpler finishing and lots more sizes. The Cattail Silk also has a lighter drape and, with less shine than the Silken Straw, a more versatile wear-anywhere look. The free knitting pattern for our Circular Yoke Summer Shirt in Cattail Silk is at this link.
Share your progress and connect with the community by tagging your pics with #PurlSoho, #PurlSohoBusyHands, and #PurlSohoSilkenStrawSummerSweater. We can’t wait to see what you make!
Materials
- 4 skeins (for both sizes) of Alchemy’s Silken Straw, 100% Silk. Approximately 944 yards required. This color is Cornflower Blue.
- A US 4 (3.5 mm) 24-inch circular needle
- Two US 4 double pointed needles
- A stitch marker
Shop our wonderful collection of fingering-weight yarn to find a suitable substitute for this project, and remember that it’s always a good idea to check your gauge before you cast on… Our All About Gauge Tutorial shows you how!
Gauge
Unblocked: 26 stitches = 4 inches in stockinette
Blocked: 24 stitches = 4 inches in stockinette
Sizes
Small/Medium (Medium/Large)
- Hip Circumference: 38 (42) inches
- Chest Circumference: 36½ (40½) inches
- Length from Underarm to Bottom Edge: 18 inches
NOTE: To adjust the sizing, the easiest thing to do is to alter the gauge. Silken Straw is very amenable to gauge variations! Just divide the cast on number by your stitch-per-inch number and you’ll know the hip measurement. For example, if you’re knitting at 5½ blocked stitches to the inch and you follow the Medium/Large pattern, you’ll end up with 45¾ inch hips (252 divided by 5.5 = 45.8).
Pattern
Body
With the 24 inch circular needle, cast on 228 (252) stitches. We used a basic Long Tail Cast On.
Place a marker and join for working in the round, being careful to not twist the stitches.
Knit every round until the piece measures 5½ inches from the bottom edge (unroll the edge to measure).
Next round: K 114 (126), place marker, knit to end of round.
*Decrease Round 1: Knit to last 3 stitches, ssk, k1. (1 stitch decreased)
Decrease Round 2: K1, k2tog, knit to 3 stitches before first marker, ssk, k1, slip marker, k1, k2tog, knit to end of round. (3 stitches decreased)
Knit 7 rounds.**
Repeat from * to ** four more times. 208 (232) stitches
Knit 14 rounds.
*Increase Round 1: Knit to last stitch, make 1 right (m1r), k1. (1 stitch increased)
Increase Round 2: K1, make 1 left (m1l), knit to 1 stitch before first marker, m1r, k1, slip marker, k1, m1l, knit to end of round. (3 stitches increased)
Knit 7 rounds. **
Repeat from * to ** two more times, ending last round 6 stitches before the end marker. 220 (244) stitches
Create Underarms
Bind off 12 stitches (removing marker), knit to 7 stitches before next marker, bind off 12 stitches (removing marker), knit 98 (110) stitches to first bind off. 196 (220) stitches
Cast On for Sleeves
Place a new beginning-of-round marker; turn so the wrong side of the work is facing you and use a cable cast on to cast on 60 (65) stitches; turn so the right side of the work is facing you, and, making sure the cast on isn’t twisted, knit the next 98 (110) stitches (to the next set of bound off underarm stitches); with the wrong side facing you, use a cable cast on to cast on 60 (65) stitches; with the right side facing you, and, again making sure the cast on isn’t twisted, for the Medium/Large size knit to the end; OR for the Small/Medium Size, knit to the last 2 stitches, k2tog. 315 (350) stitches
Yoke
Knit until the sleeve measures 2 inches from the cable cast on edge.
Decrease Round: *K3, k2tog, repeat from * to end of round. 252 (280) stitches.
Knit until the sleeve measures 4 inches from the cable cast on edge.
Decrease Round: *K2, k2tog, repeat from * to end of round. 189 (210) stitches.
Knit until the sleeve measures 5 inches from the cable cast on edge.
Shaping Neckline
Round 1: K56 (63), bind off 18 stitches, knit to marker, remove marker, knit to beginning of neck bind off. 171 (192) stitches
Note: From now on you will be working back and forth in rows, with each row ending at the neckline.
Row 1 (wrong side): Bind off 3 stitches, purl to end of row. 168 (189) stitches
Row 2 (right side): Bind off 3 stitches, knit to end of row. 165 (186) stitches
Row 3: Bind off 2 stitches, purl to end of row. 163 (184) stitches
Row 4: Bind off 2 stitches, knit to end of row. 161 (182) stitches
Row 5: P1, p2tog, purl to the last 3 stitches, p2tog through the back loop (p2togtbl), p1. 159 (180) stitches
Row 6: K1, ssk, knit to the last 3 stitches, k2tog, k1. 157 (178) stitches
Row 7: *P1, p2tog, repeat from * to last 4 stitches, p1, p2togtbl, p1. 105 (119) stitches
Row 8: Repeat Row 6. 103 (117) stitches
Row 9: Purl.
Repeat Rows 8 and 9 two more times. 99 (113) stitches.
Bind off loosely.
Finish
Bottom Edge
Cast 3 stitches onto a double pointed needle (for the neatest possible finishing, use a Provisional Cast On).
Knit an Attached I-cord around the bottom hem of the sweater, picking up 1 stitch for each cast on stitch. (When you are finished: If you used a provisional cast on, join the beginning and end of the I-cord with the Kitchener Stitch. If you just cast on normally, bind off the I-cord and sew the beginning and end together.)
Armhole Edges + Neckline
In the same way, knit Attached I-cords to the sleeve edges and around the neckline. Pick up 1 stitch for each cast on or cast off stitch; and, along the neckline, for each edge stitch.
Weave + Block
Weave in the ends, block and enjoy!
Looking for more inspiration? Explore all of our free knitting patterns and knitting tutorials, buy one of our many knitting kits and yarn bundles, and shop for beautiful yarn. We have over 35 gorgeous natural fiber yarns in 100’s of magnificent colors, designed to bring integrity, beauty, and joy to your next knitting project and only available at Purl Soho!
That is GORGEOUS!! The perfect Florida sweater! Thank you!!!
This is perfect for NYC steamy summers… will have to make one right away!
Beautiful! What a wonderful project for the beach. Thanks for the all the fantastic designs; your website is one I continue to look to for great ideas and inpiration.
i.am.in.love…as soon as i get my hands on some of that beautiful silk in exactly that same color i am knitting this gorgeous sweater
Beautiful project! Congratulations for the site, the blog and the fervent creativity. From Italy with admiration
This is so pretty! I'd love to see it on a model, so I could get a sense of the way it drapes and what body type it looks best on.
So simple, beautiful and elegant – want, want, want – now! And doesn't this yarn come in a myriad of so beautiful colours. I will be the envy of toute London! Tks for sharing.
Such a beautiful summer project ! I simply love it ! Just have to find the right yarn in France 😉
Thank you for your ceativity and sharing.
Love this silk sweater and I want to be on your e mail list. Thanks
HI Nancy-
We have added you to our email newsletter list. If anyone else out there would like to get our weekly email newsletter you can do so here:
https://www.purlsoho.com/purl/newsletter?utm_source=purl%2Bbee&utm_medium=blog&utm_term=internal&utm_content=side_nav&utm_campaign=purl%2Bbee%2Bvariety%2Bnav
Thanks!
THE PERFECT SUMMER COMBO…COOL AND SEXY. THANKS WHITNEY!!
A lovely project! I have one question though. I like the way the circular knitting simply gets the garment done so effortlessly, but with it, for me, comes the problem of how to continue the yarn neatly. With seams I always change the yarn at the seam ends and then it is easy to thread the yarn endings to the seams and the garment comes and nice and neat with no knots in the middle. But here, I simply dont know how to do it.
Hi Sari,
Perfect timing! Laura just posted a very thorough tutorial on weaving in your ends! You can find it right here: https://www.purlsoho.com/create/weaving-in-ends/ . In the case of this sweater, I used the diagonal method, which hid the tails very nicely. For extra measure, when I'm knitting in the round I try not to change yarns smack in the front of the sweater, but rather, I keep the tails at the sides or back.
Thank you so much for your question and good luck!
Whitney
It looks like the link to this tutorial is broken. Is this the one? https://www.purlsoho.com/create/weaving-in-your-ends/
Hi Angela,
Thanks for writing in! We did not link to this particular tutorial in this pattern but it does appear that a number of the links in the pattern were broken. I have gone through an fixed all of the broken links and all should work now. Please do not hesitate to let us know if anything else is an issue!
Thank you again for your sharp eyes!
Cassy
Hi,
I love the sweater, but it looks like there are very few colors of silken straw with enough skeins in stock. Can you recommend another yarn, or do you know when you will be getting more in stock?
THanks!
Hi Jessica-
We have re-ordered the Silken Straw but are not sure exactly when it will be back in stock. If you'd like us to email you when it comes back please drop us a line at [email protected]. This sweater would also work with 2 skeins of the 2 ply cashmere by jade sapphire: https://www.purlsoho.com/purl/products/item/614-Jade-Sapphire-2-ply-Cashmere
or 2 skeins of their cashmere silk (which is on sale!)
https://www.purlsoho.com/purl/products/item/7754-Jade-Sapphire-2-ply-Cashmere-Silk
Thanks for your question!
Could you show a picture of someone wearing this sweater? Would love to see shape/drape etc, before i start knitting!
thanks! lisa
Thanks for the great pattern! I made it and added a cap sleeve and cowl neck. Read all about it here:
http://landlocked-art.blogspot.com/2011/10/filed-under-finished.html
and in it's previous form here:
http://landlocked-art.blogspot.com/2011/09/taking-bamboo-from-panda-babies.html
I love the modifications you made to this sweater. Any chance that you’ve got it all written down?
This is so lovely!!! So tempted to knit this, but am new at knitting, and the only thing which i can knit is a simple scarf…
Gorgeous sweater!!! I've been dying to find a light airy summer sweater pattern and this is perfect! One thing/question though- I don't feel comfortable bearing my arms. Is there a way to continue the arm down to make it a long sleeve (or at least a 3/4 sleeve) version?
Thank you so much!
Hi Danette,
Yes, instead of “casting on for the sleeves”, you can knit whatever sleeves you like, and then before the “yoke” section, you would knit the sleeves right onto the body of the sweater. Our Deep V-Neck Sweater is constructed this way and shows photos of how to do it: https://www.purlsoho.com/create/deep-v-neck-sweater/2012/1/22/whits-knits-deep-v-neck-sweater.html
A couple of tips: The length of the sleeve before you attach it is measured to the underarm (not to the top of the shoulder). Also, I would suggest that the finished stitch count of each sleeve be 72 or 77 depending on the size. Then make sure to cast off or put on hold 12 stitches for each underarm.
Please let me know if you encounter any questions along the way; I'd be happy to help!
Whitney
Has anyone made this in euroflax linen? I suspect it would be beautiful and cool for a north carolina summer.
Hi! I'm currently knitting this pattern and have come across a problem. I don't quite understand how to “Cast on for Sleeves.” Is it easier to CCO 60 sts with double pointed needles or the circular needles i'm already working with? Also, how would I attach the new sts to the set of sts after the bind off? Thank you!
Hi Jessica,
You use the circular needle that you're already working with to cable cast on the sleeve stitches. Once you've cast them on you attach them to the body simply by knitting into the first stitch on your left needle, which is the next available body stitch.
I hope this helps. Please let me know if you're still stuck and we'll work at unsticking you!
Thanks!
Whitney
Am currently on working on this – I'm really excited 🙂 It will be perfect for warm spring/summer weather in NC.
I like tops to hit right below my hips (at the widest part) … where would the shirt hit if i followed this instruction: “knit until the piece measures 5 1/2″ from the rolled out bottom)” …? should i knit a little more if i want it a little bit longer?
thanks,
sarah
Hi Sarah-
It totally depends on your size. The finished measurements are given under “Finished Sizes After Blocking” and should be able to tell you where the sweater will hit on your body.
If you do want to make it longer you are correct that you should add the extra length before you begin the shaping.
Please let us know if you have any more questions!
Thank you!
Molly
I'm also curious about Julia's question from February 17. Would this sweater work with the Louet Euroflax linen yarn?
https://www.purlsoho.com/purl/products/item/380-Louet-Euroflax-Originals
Hi Becky-
We think it would be beautiful in the Euroflax, since it is a similar gauge to the Silken Straw. If you give it a try please let us know how it goes.
Thanks for writing in!
Molly
I am also wondering about the Euroflax linen. I have been looking for a linen sweater just like this. I want to make sure the weave will be as open, and the drape will be as nice. Does anyone have any experience with this pattern in the linen?
Thanks
Hi Tonya-
It is a very similar gauge so we think it would work beautifully for this pattern, but no one here at The Purl Bee has made it in the linen.
Thank you!
Molly
Lovely pattern! I'm getting ready to jump in. One question: I am scared of I-cord! Do you think I could do a single crochet trim instead? Thank you!
I'm thinking of doing it in linen, too. I just acquired the yarn and it is beautiful and very different from the soft merinos and silks I'm used to. And the gauge requires really tiny needles. It's a new territory. Also, what is a cable cast on?
Barbara
Hi Barbara-
Here is a link to a cable cast on tutorial: https://www.purlsoho.com/create/cable-cast-on-tutorial/
Thank you!
Molly
Hi,
I am a newbie who is determined to make my teen this lovely sweater.We're wondering whether we could omit the sleeves. Would that be all I had to do or would I have to emend the pattern in some other way?
Lovely website.
Thanks
Hi Ceecee,
Without the sleeves the stitches will no longer be in the round. Instead, you'd have a set of stitches for the front and another set of stitches for the back, which changes the pattern considerably.
Our Cowl Vest is actually constructed exactly like what you're talking about and would be a great reference! It's right here: https://www.purlsoho.com/create/cowl-vest/2010/7/12/whits-knits-cowl-vest-1.html
Please let me know if I can help you figure it all out!
Thanks for your question and good luck!
Whitney
Hi, I just found this pattern and it's so beautiful! I wanted to make this sweater but I'm really petite so I found that I need to knit 7.5 blocked stitches to an inch to fit me. I think this means that I'd be knitting around 8 unblocked stitches to an inch. I really want to make this but I am afraid that if I knit with this yarn and such a small gauge it would loose the “airiness.” Do you have any suggestions on a different yarn or how else to change the pattern?
Thank you so much!
Ann
Hi Ann,
I think that you would lose the airiness if you knit the Silken Straw at the gauge you're suggesting. Instead, you might want to explore some other fingering or lace weight options. Here are some beauties that would be appropriate for 8 stitches to the inch and for warm weather:
Habu's Knitted Linen Tape: https://www.purlsoho.com/purl/products/item/8726-Habu-Textiles-Knitted-Linen-Tape
Habu's Paper Cotton: https://www.purlsoho.com/purl/products/item/8704-Habu-Textiles-Paper-Cotton
Anzula's Sebastian: https://www.purlsoho.com/purl/products/item/8197-Anzula-Sebastian
Anzula's Mermaid: https://www.purlsoho.com/purl/products/item/8321-Anzula-Mermaid
Otherwise, to change the pattern you could multiply your blocked gauge by your desired hip circumference and cast on that number of stitches. Place your marker for the waist shaping half way through the round. And make sure that at the end of casting on for the sleeves you have a total stitch count that is a multiple of seven. You'll have to change some other stitch counts and make other adjustments along the way, but if you're an experienced knitter, none of this should be very difficult because it's really a simple pattern!
Please let me know if you have any other questions and good luck!
Whitney
Hi. I would like to copy the picture along with the pattern and I am having trouble with the photo. Please advise, Thanks!
Which cast on would you recommend for this sweater. I cant WAIT to get started! I was thinking a provisional cast on with waste yarn but not sure.
Thanks!
PS Your store is beautiful! I was visiting from Memphis this summer and bought the silk yarn in hot pink!
Hi Suzanne,
I used a long tail cast on. When I knit the Attached I-cord at the end, I just picked up into the cast on edge. If you have some idea about attaching the I-cord to live stitches, then I say go for it! Otherwise, the long tail cast on is a nice and easy way to start!
Thanks for your question and your enthusiasm! I'd love to see that hot pink sweater when you're done! – it sounds beautiful!
Whitney
Hi Carole. Have you tried dragging the image to your desktop and then accessing it from there? Or you could click on the image save it that way. I think I would put the cursor at the end of what you would like to highlight or select and then hold down the Shift key and then put the cursor at the beginning. This should highlight everything in between. Hope this helps. Sorry for the trouble. -Laura
Maybe I'm just missing it, but do you have the gauge listed for rows to the inch as well as stitches to the inch? I need the info to figure out the gauge I'm knitting…
Hi Rachel,
We don't normally list the row gauge since it's proportionate to the stitch gauge, but we're happy to send the info along when someone asks! The row gauge for this size sweater is 7 rows to the inch, blocked.
I hope this helps sort out your gauge! Thanks for asking!
Whitney
Three months of summer? Lucky Duck, sign me up! LOL! (I'm from Canada and I'm cold but not of heart) Love this Summer Sweater.
Re Silken Straw Summer Sweater
Hi, I am would like to know the degree of difficulty of this project. I can knit but am not an expert. Also what other yarn could you substitute and are you getting anymore of the cornflower blue. Thanks.
Just a quick question – is there a recommended ease? I ask because I can get the 6 stitch blocked gauge with the Silken Straw but I'm trying to figure out whether I need to adjust the stitch numbers. My bust is ~37" and my hips are ~39", so the S/M is obviously too small; but I'm not sure if the best results with this yarn blocked is 3-4" ease, or if it's more like 1-2" – I know it softens up and gets really drapey! If it's closer to 2" I can cast on 234 stitches and go from there. Advice most appreciated!
Hi mfuhrman,
Great question! I would go with the 2-inch easement, because as you say, the yarn is pretty drapey and an extra 3-4 inches might start to look kind of heavy.
Instead of casting on fewer of the M/L size stitches, you could knit that size at a slightly tighter gauge. Just a 1/4 inch tighter (6 1/4 stitches to the inch) would give you a hip measurement of 40 1/3 inches and a bust measurement of 39 inches.
Whatever you decide, I hope you love your finished sweater and please let us know if you have any other questions!
Whitney
Do you think this pattern is doable on straight needles? I'm pretty good at adapting from in the round to–back and forth? Is that what we call it? Anyways, I'm good at adapting, and could probably do so with this, but I don't know if seams would destroy the way the garment hangs. Your opinion?
Could I use a single crochet on the edge rather than the attached I-cord? Would this achieve a comparable edge? Thanks! Loved knitting the sweater.
Hi Emily,
I think side seams would be fine! They'd add a little structure to the sweater, but this yarn is so drapey and soft, that I don't think you'd loose much in the way of fluidity!
Thanks for asking and good luck!
Whitney
Lovely…..I just ordered yarn to make this one and the Cable Back Shell. Cannot wait! Would the Cascade Yarn "Ultra Pima" work for this as well? Thank you!
Hi Sue,
I'm not totally sure that a single crochet edge will keep at bay stockinette's desire to curl as well as the attached I-cord does, but I certainly think it's worth a try!
Let us know the outcome and thanks for your question!
Whitney
Hi Megan,
The Ultra Pima Fine would work, although, because it is a bit thicker, it wouldn't have the same loose, open knit as the Silken Straw.
Let me know if you have any more questions and thanks for this one!
Whitney
Was hoping for some suggestions on slight alterations to the shape. I have 37" hips but a 39" bust, so would really need more like the S/M for the hips but the the L for the bust size. Any suggestions on how to combine?
Hi Rachel N,
You should follow the Small/medium pattern as written through the 14 rounds at the waist Then you should…
*Increase Round 1: Knit to last stitch, make 1 right (m1r), k1. (1 stitch increased)
Increase Round 2: K1, make 1 left (m1l), knit to 1 stitch before first marker, m1r, k1, slip marker, k1, m1l, knit to end of round. (3 stitches increased)
Knit 1 round. **
Repeat from * to ** eight more times, ending last round 6 stitches before the end marker. (244 stitches)
Then you should continue to follow the Medium/Large size.
I hope this helps. Please let us know if you run into any problems or questions and thanks for this one!
Whitney
Hi Sharon,
Our correspondence got accidentally deleted during some recent site construction, but luckily I have on file your latest question! For curious readers, Sharon was asking about neatly picking up stitches around the neckline. Her follow-up question was…
thank you that was helpful. So, when I come to the part where the cast off makes a "corner" I should dip down and eliminate the corner and create a curve?
And my answer is, yes, try that! I think you'll find you get a smoother shape.
Please let us know if you have any other questions and thank you so much for these!
Whitney
I made this beautiful sweater and it turned out great except it is too big! Advice needed, is there a way to shrink it without ruining the sweater, or should I bite the bullet and rip out and re knit making it smaller?
I spent all summer working on it and I can't bare to start over now. I will have to put it away for a few months if my only solution is to redo:-(
Any advice is appreciated! Thanks!
Hi Shelley,
I hate to be the one to tell you this, but one thing Silken Straw is not very good at is shrinking. Growing, yes, but getting smaller, no. I'm so sorry! I hope you eventually have the heart to try it again!
Whitney
I just completed the sweater after several false starts. I started with the larger size and ripped that out after about five inches. I then knitted the smaller size and that turned out too big by the time it was completed. The attached I cord was not keeping the edges from rolling so after trying that I put double crochet around all the edges. I found 1/4 inch opaque chiffon ribbon on a spool from Joannes' and put it through the eyelet formed by the crochet. By pulling up the ribbon and tying it off to pull in the edges the sweater is now really cute. The single crochet edge helps keep the edges from rolling. This yarn is lovely and I love the finished appearance but It is difficult to knit on aluminum needles and I had to switch to bamboo to keep from having the stitches slide off when I wasn't paying close attention.
Hi
I'm really enjoying knitting this for our upcoming Australian summer. Hoping for a clarification around the cablecast on for the sleeves. The linked tutorial directs turn the work so the WS is facing – when working in the round should i turn the work so the needle that has been in my right is now in my left, cast on the stitches (to the now left, but originally right needle) swap the needles back to the other hands then keep knitting. the new stitches won't be knitter into until the next round.
Hopefully my question is clear!
Hi Kristy,
Your question is perfectly clear and you are perfectly correct!
Thanks for asking. Enjoy your sweater and your summer (so jealous right now!).
Whitney
Thank you so much for this pattern. It's EXACTLY what I've been looking for for several months.
I'd like to upsize this to a 44" bust, but don't really know how/where to adjust the numbers.
Hi Deb,
If you're not sure how to adjust a sweater pattern to a new size, you may feel more comfortable adjusting the gauge of this pattern (check out the Note in the Finished Sizes section for more info on this subject). For a 44-inch chest circumference, you would want to knit at 5 1/2 blocked stitches to the inch. This will also give you a 45 3/4-inch hip circumference. The Silken Straw is very amenable to small changes in gauge like this!
Please let us know if you have any more questions; we'd be happy to help!
Whitney
Is it possible to do an i-cord cast on for this sweater? If so, how would it be joined?
Hi Liz,
Thank you for the great suggestion. This is certainly a technique you could use instead of the applied i-cord afterward. We’re also sending you a response via email, so be sure to look out for that!
Happy knitting, and again, great idea!
Anna
At the armhole bind-offs, why begin 6 stitches before the first marker but 7 stitches before the second one? This gives 111 and 109 stitches between the two bind offs instead of 110 x 2, which seems to be what is intended – or am I missing something?
Very attractive pattern, by the way – thank you!
Hi Gitte,
Pattern writing can get pretty wonky when bind offs are concerned! In this case, you'll knit 7 stitches past the first marker to bind off the 12 stitches and six stitches past the second marker. It really does end up so the front and back sides are equal, but I agree that it doesn't look like it's going to work out when you read the pattern. Try doing it!
Thanks so much for your question and please let us know if you run into any problems!
Whitney
Hi, I am having a go at your beautiful silken straw summer sweater. My problem is the creating the underarms. I have now had 3 goes at this but keep ending up with 97 stitches on one side and 99 on the other. I can’t understand what I am doing wrong. I noticed in the comments one other person was also having this problem but I couldn’t quite understand the response.
Hi Stephanie,
Thanks for writing in! It sounds like perhaps you are using the last stitch of the section after the first set of the bind off as part of the bind off for the second underarm. This would explain why you are getting one too many stitches on one side and one too many on the other side. I would suggest making sure to count the stitches in the section after the first bind off section and then count them again after you bind off a few stitches in the second bind off section. This will let you know if you have started binding off too soon and help get the correct number of stitches!
I hope that this helps!
Cassy
Hi Whitney, I am at the step to "Cast On For Sleeves" and have a similar question to 2 others that have posted about this part of the pattern. Should the instructions read that you first need to "turn your work so that the wrong side is facing you" and your yarn is now on the left hand side? I see that the instructions for Cable Cast On on your site say that the first thing you must do is turn your work to the wrong side but it would be helpful if the pattern included this comment as well. Am I on track with how I am to proceed with this now? Or am I totally confused! Thanks so much! LOVE this pattern!
Hi Marilyn,
Yes, you do turn the work so the wrong side is facing you.
Since turning the work is part of how to make a cable cast on, I haven't normally explained that step within the pattern, but since you (and two others) were confused, I've added clarification to the pattern (and will add it to future cable cast on instructions!). Thank you so much for letting me know and for helping other knitters of the Silken Straw Summer Sweater!
I hope you love yours and good luck with finishing it! Please let us know if you have any more questions!
Whitney
I am on the neck shaping, and I noticed that between rows 6 and 7, the number of stitches goes from 178 to 119. Am I missing something? How many total stitches should I have around the neck when all of the decreases have been made? That is, how many stitches should still be on the needle? thanks.
Hi Gretchen,
At the end of Row 6 you should have 178 stitches. Row 7 then says to *P1, p2tog, repeat from * to last 3 stitches, p2togtbl, p1. That means that you’re essentially purling one stitch, then purling two together over and over across the entire row, which is why you end up with 119 stitches. By the end of the Shaping Neckline section you will have 113 stitches.
I hope this clarifies things for you. Please let us know if you still have questions and thank you for these!
Whitney
I love this pattern
I’m a larger woman and even with going up needle sizes to get fewer stitches per inch I’m still not going to get a top that will fit. I’ve decided that I need to cast on 274 or 276 (I’m getting 5 to 5.5 stitches per inch, any less and the stitches don’t look their best) but I’m not sure how to bind off for the underarms. Any help with that would be appreciated. Thank you.
Hi Beverly,
I’m glad you’re figuring out how to make this sweater work for you! I bound off 5 or 6 percent of the stitches for each underarm, so for you, I’d say to bind off 13 or 14 stitches.
Let us know if you need any more help along the way and good luck!
Whitney
Greetings, I working on this now, what is the best means of adding the next ball of yarn?
Thanks!
Ann
Hi Ann!
It’s definitely a little more difficult to hide on this pattern! I would suggest knitting 1 stitch with both the new and the old strand, and then continue knitting with the new yarn only. Later, I would come back and use duplicate stitch to weave in the ends you left on the wrong side.
Happy Knitting!
Thomas
Pinterest has a great tutorial on the Russian way to add another skein. I’ve been knitting over 50 years, just found this link. Now I use it all the time.
I love the look of this sweater and I am looking for something to make out of some Berroco NaturLin (40% linen, 60% rayon) using size 6 needles the knitting gauge is 6 sts=1 in. , 50g weight…….would this sweater work with this type of yarn?
Hi Cintra-
It sounds like it will work but the only way to tell for sure is to make a swatch!
Please let us know if you have any more questions and thanks for getting in touch!
Molly
quick question….
would like to make this longer….more of a tunic. at what point do I add more rows for length?
thanks!
ruth
Hi Ruth,
Thank you for the comment! I recommend adding rows in the beginning for extra length. You could knit every round for however many inches you’d like to add in addition to the 5 1/2 inches the pattern says to do.
I hope this helps and feel free to respond if you need anymore help!
Happy Knitting!
Jake
I’m at the point of binding off the stitches to work the yoke. However, five inches below me, your instructions state the following:
“Cast On for Sleeves
Place a new beginning-of-round marker; turn so the wrong side of the work is facing you and use a cable cast on to cast on 60 (65) stitches; turn so the right side of the work is facing you, and, making…”
My problem is the BOR marker. Is it supposed to lie at the beginning of the armhole, or at the end? If I were to place my marker on the RHN, then turn to do the cable cast on, the marker would become trapped in the stitches at the beginning of the armhole, as seen from the RS. However, if I placed the marker on the LHN, it comes out at the end of the armhole, as seen from the RS.
So… I’m now supposed to knit 56 sts past the BOR marker, then bind off 16, except I really don’t know where my BOR marker should be. My guess is that is lies at the end of the armhole, but I really would like to be sure about this before blundering around & possibly making a hideous mess of my project.
Thanks for your answer, and thank you very much for such a lovely project! I’m knitting it out of Juniper Moon’s Zooey, and it’s turning out beautifully. I also added a slowly disappearing purl crescent from the bottom up to the base of the bust line (photos will be posted on Ravelry under TheYarnBard).
– See more at: https://www.purlsoho.com/create/2011/07/07/whits-knits-silken-straw-summer-sweater/#comments
Hi Bonnie,
Thank you so much for writing us! When you place your beginning of round marker for the armhole cast on, turn the work first and place the marker on the left needle and then do the cable cast on on the left needle as well. Then when you turn the work to have the right side facing you those casted on stitches will on the right needle and you are all ready to knit across the front of the sweater. The marker will be at the beginning of the armhole. If you are concerned about the marker being stuck in the stitches I would try using a removable stitch marker so you can take it out.
I hope this helps and feel free to respond if you have anymore questions!
Happy Knitting!
Jake
So… when I do the K56/63, BO 18 at the neckline, I begin my count before the armhole, and continue counting across the sleeve? Sorry if I seem obtuse.
Hi Bonnie,
Thanks for responding! The K56(63) is starting from the end of round marker placed back in the cast on for sleeves section. It should be located at the edge of the left sleeve on the backside. So the count starts at beginning of the first cable cast on sleeve which should be on the left side of the garment (will look like the right side when it’s facing you like in the photo above). I hope that clarifies things for you! If you are still confused and would like to talk it out feel free to call the shop at 212-420-8796.
Good Luck!
Jake
How can i knit this with 3/4 sleeves? I love this but the sleeves are too short.
Thanks!
Hi Asma,
Thank you for the comment! In order to knit this with 3/4 sleeves you will have to do a little experimenting to figure out what looks best. The simplest way would probably be to pick up the edge of the armhole after you finish knitting the whole sweater and knit the sleeves from the top down. This way you can stop knitting when you achieve the length you desire. The only tricky part will be figuring out how to distribute the decreases to create a sleeve shape you like. We carry a book that assists with designing/altering sweater patterns which may be a good reference; https://www.purlsoho.com/purl/products/item/7407-Sterling-Design-It-Knit-It
I hope this helps and feel free to write us back if you have anymore questions!
Good Luck!
Jake
Hey.
I wonder about the height of the knitted work when “create underarms” starts.
My knitted work arrived at a height of 11 inches.
According to your knitting pattern I should start to create underarms by now.
Comparing with the finished work on your photo the hight seems to be too little. Comparing with my body it might be too little.
What do you measure? Did I perhaps make a mistake?
Thanks for your help.
Hi Marion,
Thank you for the comment! We got a measurement of 18 inches from the underarm to the bottom edge of the piece. Does your piece achieve the same gauge as ours, 6.5 stitches unblocked? Also did you do all the repeats of the decrease and increase rounds? I would double check these things and see if you can identify any errors in the piece. As long as you have 220(224) stitches before you start the underarm you should be able to just knit however many inches you would like to add before beginning the underarms and it shouldn’t alter the shape too drastically!
I hope this helps and feel free to write back if you have anymore questions!
Good Luck!
Jake
HI Marion,
I’m having the same problem you had, how did yours end up? Do you have extra insight as to you would go about differently?
Much appreciated,
Ann
I have a skein of Tosh tussah silk (1000 yds) and I’d like to ask your opinion how you think it would knit it up in silken straw summer sweater pattern. Thank you for your input. Ai
Do you have a rows per inch count? I want to shorten the body to 15″ before the underarms. I was wondering if I should start by knitting only 2.5″ before the waist shaping.
Hello Jamie!
This top has stretched significantly over the years, so unfortunately the sizing is totally off! If you want it to be shorter, keep in mind it will stretch and adjust accordingly. Your calculations seem to work great!
Happy knitting! -Alyson
Hi, I saw a child size version of this pattern knitted up as a sample at a recent fiber festival. Can you advise me how to make this sweater in a size for a 18-24 month old? Is that possible? I’m making one for myself, but would like to make a matching top for my daughter.
Thank you!
Hello Samantha!
We unfortunately don’t have this pattern written up for children! It would take quite a bit of re-sizing and calculations in order to make a baby size. I would recommend finding another basic top or dress for your daughter’s size and make them in the same yarn!
Best of luck and happy knitting! -Alyson
Hello: I bought some yarn on closeout (80% off). It is by Knit One Crochet two, the Gourmet Collection, Meringue. Here is the link: http://www.yarndex.com/yarn.cfm?yarn_id=1082. Do you think this will work? It is a ribbon yarn made in Italy. I have 10 hanks or skeins, 50 grams, 100 yards each. I have 4 different colors to use in the top. I have started a swatch on the 4.5mm needles that are recommend – looks like I will get about 5 to 5.5 per inch. Don’t know if this yarn will block well if at all. I will need to make it about 3″ longer as well.
I am knitting a test one with a cheap cotton yarn (daughter hates wool), but is seems like is will be huge (Premier yarns, Cotton Fair). I get 6 stitches per inch on 4.0mm needles. It is not as airy as the one in your photo.
What do you suggest on the new yarn? Should I decrease the number of stitches to begin with? If I reduce the pattern stitches, I have no idea how to adjust for sleeves. I am a beginning to intermediate knitter who is self taught on the internet. I mostly make newborn baby photo props. Wanted to step it up.
Thanks for your help,
Susan
Hi, Susan!
Thank you for writing in! It looks like the yarn by Knit One Crochet Two is a worsted weight yarn whereas the Silken Straw is a sport weight. So, your yarn is going to give you a different gauge.
We do have tank top pattern that uses a worsted weight yarn, its the Pebble Tank: https://www.purlsoho.com/create/2012/07/22/whits-knits-pebble-tank/. If you have further questions, please let us know!
Happy knitting,
Kumeko
Before buying the yarn suggested what needle gets a gauge for XS/32 chest? Thank you.
Hi For Ash,
Thanks for writing in! To get the suggested gauge for this sweater, we used size US 4 needles. I am afraid that the smallest size written is for a 36 1/2 inch chest. To adjust the sizing, the easiest thing to do is to alter the gauge. Silken Straw is very amenable to gauge variations! Just divide the cast on number by your stitch-per-inch number and you’ll know the hip measurement. For example, if you’re knitting at 5 1/2 blocked stitches to the inch and you follow the Medium/Large pattern, you’ll end up with 45 3/4 inch hips (252 divided by 5.5 = 45.8).
I would suggest perhaps purchasing one skein and knitting a gauge swatch on a needle size or two smaller than the US 4 and see if the above math works for your intended size.
I hope that this helps!
Cassy
Am getting ready to start this project for my daughter. Her chest measure is approximately 32-34″. How much ease is built into the sm/med. size? She wants the top to fit loosely, but I don’t want it falling off of her. My gauge is according to the instructions. I am concerned that the sm/med might run large? Do I need to shrink it down?
Hi Jane,
Thanks for writing us! This is such a beautiful top and a great idea for the weather. I think that you should be fine doing the small/medium size. The finished chest measurement is 36 1/2″, which leaves you with 2″-4″ of ease roughly. Four inches of ease means that you can pinch in 2″ total on each side of the chest, which is pretty much standard and my personally preferred amount of ease in a top. I hope this helps you. Good luck!
Best,
Adam
I love this pattern! I am ordering yarn for myself, and also for my daughter in-law.
I will need to adjust the pattern for her, she is a size 00, petite .
Do I keep the same gauge and multiply by the hip measurement ?
Hi Sally,
Thanks for your kind words about the pattern! To alter the pattern I would use the same gauge, but multiply your stitches per inch to your daughter in-law’s hip measurement (including a couple inches for ease). This will yield your cast on amount. Let us know how it goes!
Best,
Adam
I have done the five and a half inches and the ssk knit one and starting on the second row I’m not sure of the instructions. Sorry for this question it’s probably perfectly obvious but, it appears that all of the decreases are done at 1 marker as it never says to knit to and slip the second marker. At least I couldn’t find it. Is this so? Are they all done at the starting round marker and nothing done at the halfway marker? I don’t see the a slip marker and I am assuming there are two, (1 at the starting round marker and the second at the half way marker-11th stitch) . Does this make sense?
So I guess to summarize my question : I’m not sure where to do the decrease stitches. Are they done at both markers or are they only done at the starting marker? I eagerly await your answer!
Thank you so much, Julie
Hello Julie,
Thanks for writing us! This part is a bit confusing because you technically start your decrease round on the round before in order to decrease on both sides of the end of round marker. In decrease round 1 you’ll knit all the way to the end to the last three stitches and ssk, k1. Slip your end of round marker and k1, k2tog. Next you’ll knit to thee stitches before your side seam marker and ssk, k1, etc. There is one decrease on round one and three on round two. I hope this clears things up!
Best,
Adam
I have been reading through the comments regarding the Spun Silk and you recommend a pattern – Silken Straw Summer Sweater. As we are coming out of the Australian Winter I am keen to try this pattern. Unfortunately I can’t find an image… only the instructions. I have tried on both a desktop computer and my iPad…. still no luck. Do you have a picture available. Thank you
Julie
Hello there,
Thank you for alerting us. We are currently experiencing some technical difficulties with the site, but are working our hardest to resolve all the issues. Hang in there and stay tuned!
-Adam
Hi,
I finished the top and was not happy with the neckline. It wasn’t a smooth curve and was too wide/sloppy looking. There was also a definite point to were I finished the round. Doing an I-cord didn’t help the look at all. I’m in the process to taking it back to just before the decrease rounds starts. I don’t like the how the bind off in the front looks either. I’m using a hand dyed tencel yarn. Any suggestions would be appreciated. Thank you
Dear Sue,
Thank you for writing in. I’m sorry you weren’t happy with the top! This top is made in silk, so the overall silhouette is made for yarns that drape well with an open stitch definition. Maybe the tencel is not the right yarn for this project? Let me know about that.
Best,
Adam
Hi!
I love this pattern, thank you for it! I am not an experienced knitter but I would like to have sleeves on this and I noticed several on Ravelry that had adapted it to include them.
I am just to the point where I need to bind off under the arms. Do you have any suggestions on how to add sleeves? Or, is it too complicated?
Thank you! Julie
Hi Julie,
Great question! While adding sleeves is totally possible, it will require a bit of work on your part to rewrite the pattern. I would recommend looking at the method of attaching sleeves used on out Everyday Linen Raglan. You will then need to figure out how long you want the sleeves, the rate of decrease and use your gauge to determine a cast-on number. This may be a bit beyond what you would like to bite off but it would be a fun challenge.
I hope that this helps and happy knitting!
Cassy
Thank you! I’ll give it a go
Good Morning,
I am a Beginner Knitter and I would like to knit this Tee. Two Questions:
1. Can you suggest substitute yarn for this one ( I am Unemployed Senior).
2. I’d like to upsize this to a 44″ bust, but don’t really know how/where to adjust the numbers and Needle Size. I am a Tight Knitter.
Thank You very much. Hope to hear from you.
Hi Rita,
Thanks for writing in and our apologies for the delayed response! Alchemy Silken Straw comes in at a sport weight so any sport yarn with a gauge of roughly 6 stitches per inch should work. We have seen lovely versions knit in Euroflax as well as Habu’s Linen Roving. With the Euroflax, you will need about the same number of skeins and with the Linen Roving, 2 skeins will do the trick.
As to sizing the pattern up, we do not currently have the resources to do so. You could try knitting with a slightly thicker yarn on a larger needle but we are unable to provide specifications for you at present. We will certainly keep you request for a larger size in mind and thank you for the suggestion!
I hope that this helps!
Cassy
Hi All!
So I’m ready to do the Kitchener Stitch at the end of my neck opening. I did the provisional cast on at the beginning of the I-cord and have transferred those stitches to a needle. In the Kitchener Stitch video tutorial, the ends of the yarn come off the right sideside of the needles and the right side of the fabric is facing up. My question is, how do I position my needles to duplicate this setup? It seems I either have the end of the yarn in the middle of the three stitches or coming off on the left (or last) of the three stitches. So I can either do it by knitting one stitch, which will put the yarn at the right side or I can turn the fabric so that the purl side is up. Please advise ?.
Thank you! Julie
P.S. I sure hope this makes sense……
Hi Julie,
Thanks for writing in and apologies for the delayed response! I would suggest knitting the 1 stitch and following the kitchener instructions as written. This should give you a nice clean graft that should be nearly invisible on your finished sweater.
I hope that this helps!
Cassy
I have some sock yarn I’d love to use for this 920 yard, 37 in bust. Do you think it would work?
Hello Bri,
Thanks for writing in! As long as you are getting gauge you should have enough yarn. I hope this helps let me know if you have any further questions!
-Marilla
I love the look of this sweater and the yarn is beautiful. Is the sweater able to be worn without a camisole, without being too shear?
Hello Shirli,
Thank you for reaching out. This summer sweater is designed as a layering piece, It is sheer, and is best worn of top of something.
Let us know if you have any further questions!
-Marilla
I just finished this sweater to the best of my ability which isn’t much. I’m very new at this and picked this pattern because it looked easy. My problem was that whenever I made a mistake the silk yarn slid on itself and created holes even after I’d fixed my mistake. I haven’t blocked it yet, but the stitches are uneven. Will it look more evenly knit after blocking ? I certainly hope so. Can I block it myself or do I need to send it to the cleaners ? Thank you for your answers.
Marge Zieske
Hi Marge,
Thanks for writing in! Not need to take the item to the cleaners. In general, they will not block things in the way that will most help even out your stitches. I do find that wet blocking helps clean up inconsistencies in my knitting especially when working with silk! You will want to fill a clean basin with warm water and put in a little bit of a leave in wool wash such as Soak. Immerse the whole sweater in the bath, being sure that it is fully submerged. Leave it for at least 15-30 minutes. You will then remove the item, being sure to squeeze and not wring out the water. Place it on a dry towel and lay it out so that it is at the correct dimensions that you want the finished item to be. Allow it to fully dry and then you will be all set. The soak in the warm water lets the fibers relax and move around a touch. This should help!
Best,
Cassy
Love this sweater. I have made it with different types of material, and works great. However, I need to reduce to an extra small size. So if I calculate my cast on as based on a 34 hip measurement x 5.5, my cast on would be 188 stitches. Can I work the pattern as written to achieve the same results only smaller?
Hi Grace,
Thanks for writing in! I am afraid that this pattern is only written to accommodate the two sizes noted above. The instructions above use stitch counts so with a smaller cast on, these will not work. We did make an updated version of this lovely sweater with a more generous sizing range and using a different yarn and gauge. This pattern may work better for your needs especially if you are able to get gauge with the yarn that you are hoping to use.
I hope that this helps!
Cassy
How much yardage needed for the silken straw summer sweater
In sport weight and @6” per in
How much yardage in fingering weight for the whisper wrap
In correct gauge
Thank u
Hello Bridget,
Thank you for reaching out! I would approximate that you would need about 875 yards for this project at that gauge.
The Whisper Wrap takes approximately 1,400 yards.
I hope this helps and let us know if you have any further questions!
Happy knitting!
-Marilla
Hi there,
After weeks of procrastination, I have started working on this sweater. While reading through the pattern I sort of got confused a little (beginner knitter vibes).
After knitting the1 st seven rows, the pattern says knit from * to ** 4 more times. Does this mean I have to knit from ” decrease round 1 till I get to knit 7 rounds? and I do this 4 times? Does this apply to the rest of the pattern?
Thanks!
Hi Presty,
Thanks for reaching out! You will be repeating the entire section between the asterisks four more times, for a total of five times. In other words, you will work the first and second decrease rounds, followed by seven rounds of knitting. You will then repeat this entire 9 row section four more times. Once you have completed these repeats, you will move on to the next section of the pattern.
I hope that clears things up!
Julianna
Is there a mistake in Row 7 under Shaping Neckline? It’s not possible to complete Row 7, which needs a multiple of 3, and end up with either 105 or 119 stitches. Please help. Thank you, Christine
Hi Christine,
I sincerely apologize for the very long delay in responding! You are correct, Row 7 did have an error in it, which we have now corrected and added to our errata page. The corrected row 7 reads:
Row 7: *P1, p2tog, repeat from * to last 4 stitches, p1, p2togtbl, p1. 105 (119) stitches
Thank you so much for catching our error and for your patience!
Best,
Julianna
Thank you so much for the clarification about Row 7, Julianna. Much appreciated.
I can hardly wait to get this sweater off the needles and onto my bod! I’ve been lusting after this pattern for several years!
Cheers, Christine
Hi, me again! I’m at the point of using the cable cast on to create the sleeves. However, when I click the ‘cable cast on’ link in the pattern, it takes me to the tutorial for ‘weaving in ends’.
I absolutely love this sweater, so thank you for providing the free pattern.
Hi Christine,
Thank you so much for the kind words, and I apologize for the incorrect links! These have now been updated to correctly point to the cable cast on tutorial.
Best,
Julianna
can i use silk/ bamboo yarn by patton to knit this sweater?
Hi Dana,
Thanks for reaching out! I’m afraid I’m not familiar with Patons yarns, but you could use any sport weight yarn, as long as you knit a swatch and are able to match our gauge.
Happy knitting!
Julianna
Is there another yarn that would work with this pattern? Cattail Silk?
Hi Saskia,
Thanks for reaching out! I think Cattail Silk would be a perfect alternative, especially since it’s also 100% silk (and machine washable)!
Happy knitting!
Zha Zha
Can you tell me how much yardage needed for the
Silken straw summer sweater.
Hi Bridget,
Thanks for reaching out! Unfortunately we no longer have the exact yardage information for this sweater, but since Silken Straw had 236 yards, I would plan on needing 944 yards.
Happy knitting!
Julianna
What is the required yardage for this sweater? Since the original yarn is not stocked, I couldn’t convert.
Hi Melissa,
Thanks for writing in! Unfortunately we no longer have the exact yardage information for this sweater, but since Silken Straw had 236 yards, I would plan on needing 944 yards.
I hope that helps!
Julianna
I was wondering if there was a schematic drawing of this top?
Hi Dawna,
Thanks for writing in! I’m afraid we don’t have a schematic for this pattern, but I will certainly pass your request along to the design team!
Best,
Julianna
How many skeins of cattail would be required for this pattern?
Hi Beth,
Thanks for reaching out! Cattail Silk would be great with this pattern! 2 skeins would be plenty for either size!
Warmly,
Gianna
I am at that part where I am working on shaping the neckline in back and forth rows. Question: row 1 states “wrong side” in purl stitches. row 2 states “right side” in knit stitches. Are the following rows also wrong side for purl and right side for knit?
Hi Patricia,
Thanks for reaching out. Yes, all of the rows in this section are knit on the right side and purled on the wrong side!
All the best,
Lili