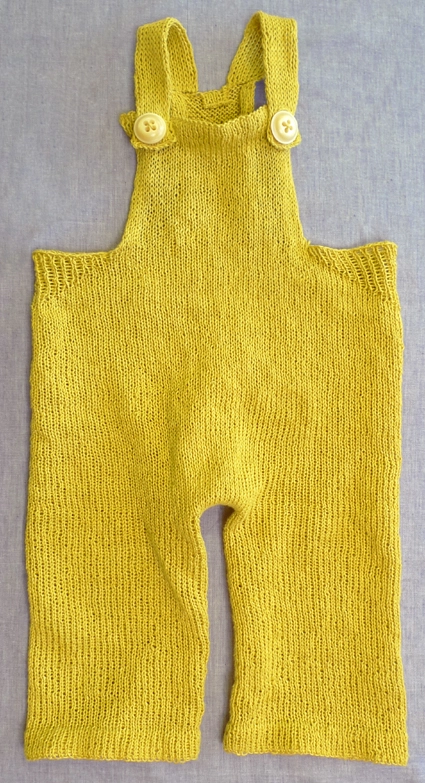
Toddler Overalls
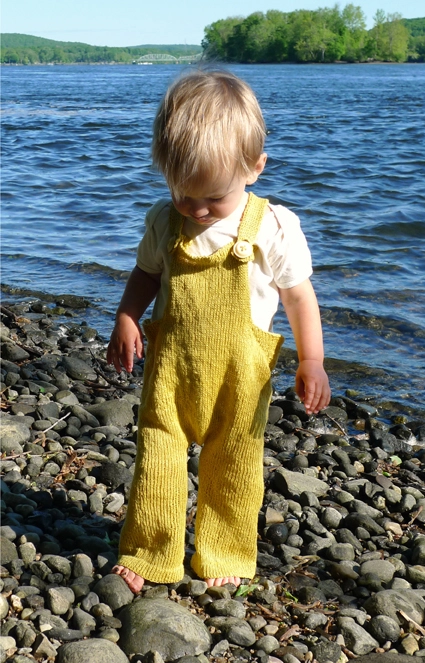
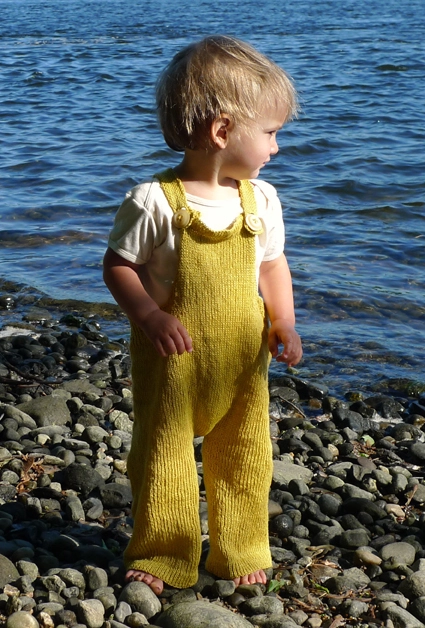
Can you think about overalls without thinking about Huck Finn? I can’t. In order to honor Huck’s supremely kicked back attitude, I used Louet’s Euroflax Linen to make these overalls. The yarn is rustic and unfussy and, most importantly, it’s rugged enough to handle a raft ride down a river. Like an old pair of jeans, this linen gets softer and softer the more you wash and wear it.

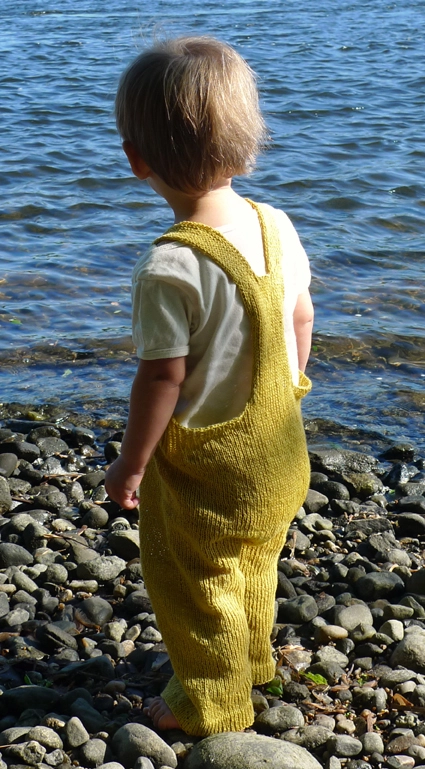
These overalls are designed to last a long time with a loose and easy fit. They don’t bind, scratch, squeeze, rub or do any of the things that toddlers can’t stand. Bear seems to have a new swagger when he’s wearing them – I swear!
Yarn lovers, if you adore the yarn used in this project, you’ll love exploring all of our other yarn collections! Discover over 45 thoughtfully designed yarns in nearly every natural fiber and in every spectacular color you can imagine. Only available here at Purl Soho’s online yarn store, where every skein is created with care and your creativity in mind!
Designed by Purl Soho designer, Whitney Van Nes.
Share your progress and connect with the community by tagging your pics with #PurlSoho, #PurlSohoBusyHands, and #PurlSohoToddlerOveralls. We can’t wait to see what you make!
Materials
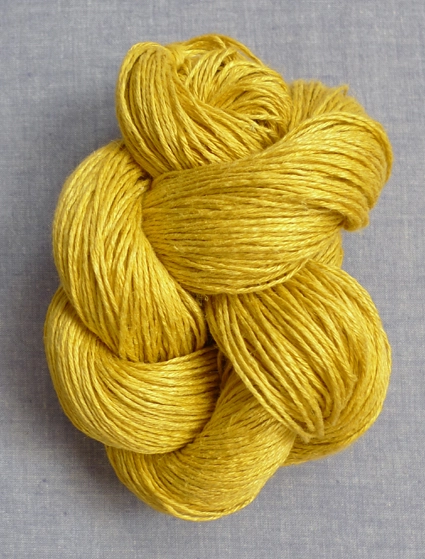
- 2 skeins of Louet’s Euroflax Originals, 100% Linen. This color is “Golden Rod”.
- A US 4 (3.5 mm), 16-inch circular needle.
- 2 buttons, 1 inch in diameter. (I used vintage buttons from my collection.)
- Optional: 2 stitch holders.
Shop our wonderful collection of sport-weight yarn to find a suitable substitute for this project, and remember that it’s always a good idea to check your gauge before you cast on… Our All About Gauge Tutorial shows you how!
Gauge
22½ stitches = 4 inches in stockinette stitch
Finished Size
To fit an 18 – 30 month old.
25 inches from the bottom hem to the top of the shoulder strap and 26 inches around the waist. The legs and straps are easily customized.
Pattern
The Legs
(NOTE: I used a provisional cast on for the legs in order to be able to knit the hem in place rather than having to sew it. We have a thorough Provisional Cast On Tutorial here, but if the provisional cast on seems too complicated for you, ignore my instructions. Instead, just use a regular cast on and sew the hem in place later with a tapestry needle.)
With some scrap cotton yarn, crochet a chain about 70 stitches long. Using the Euroflax linen and the US 4, 16-inch needle, pick up 63 stitches. (Our Provisional Cast On Tutorial is here.)
Place a marker on the right needle and join for working in the round, being careful not to twist the stitches.
Knit 8 rounds.
Purl 1 round.
Knit 8 rounds.
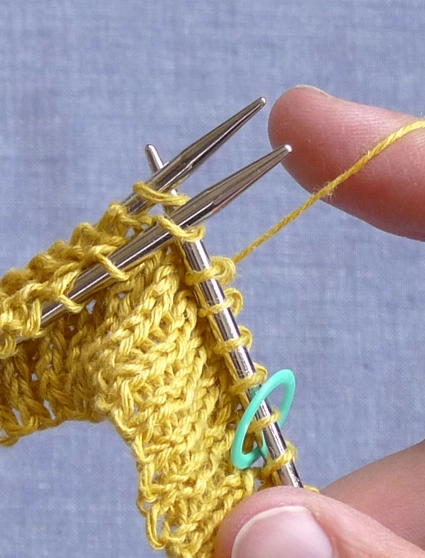
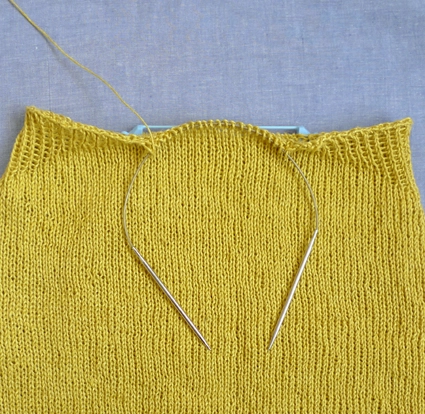
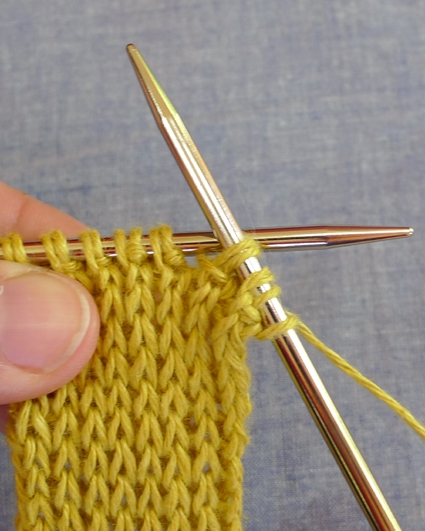
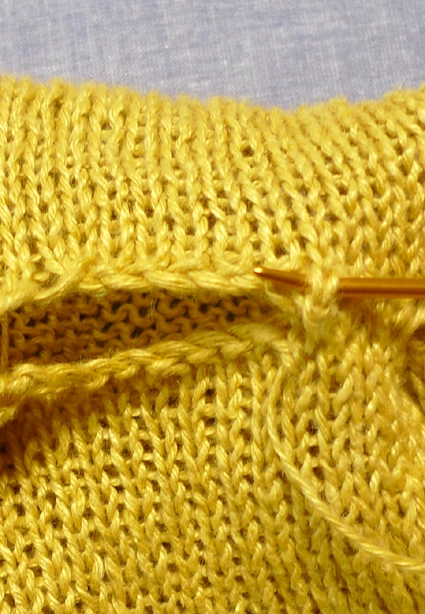
Put the cast on stitches onto a spare circular needle (the length doesn’t matter, but try to use one that’s thinner than your main needle). Again, our Provisional Cast On Tutorial details this step.
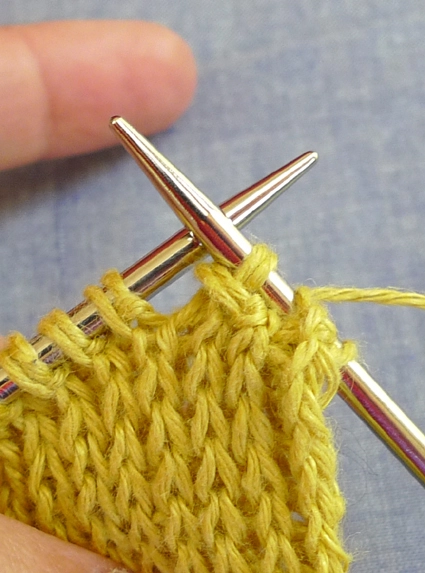
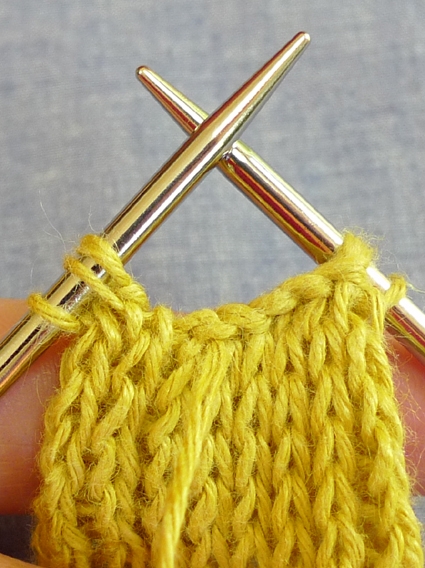
Fold the hem up inside the leg so that the two circular needle are parallel to each other.
Next round: *K 1 stitch from the front needle and 1 stitch from the back needle together, repeat from * to end of round (63 stitches).
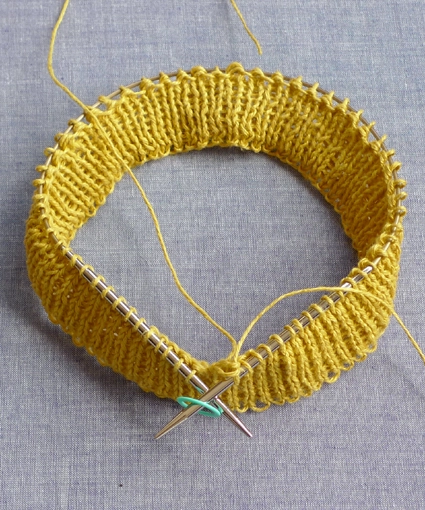
Knit every round until the piece measures 8 3/4 inches from the bottom edge. (Feel free to alter this measurement if your toddler is shorter or taller than mine or if you want to make shorts!)
Cut the tail about 16 inches long and put the stitches on holders, scrap yarn or a spare circular needle.
Make the second leg the same way, except do not cut the yarn at the end. Leave the second leg on the US #4, 16 inch needle.
Joining the Legs
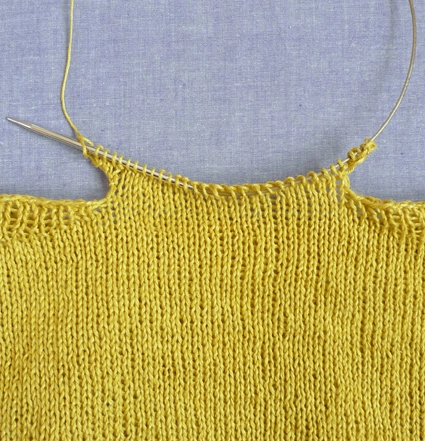
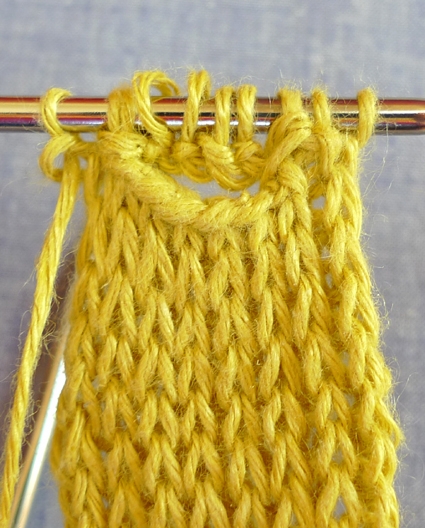
Using a Cable Cast On, cast 10 stitches onto the second leg. (Please check out our new Cable Cast On Tutorial if you need some help.) (This photo doesn’t show the stitch marker, but you should actually keep it in place, right before the cable cast on stitches.)
With the same needle that is holding the 10 cast on stitches, knit into the first stitch of the first leg.
Continue to knit around the 63 stitches of the first leg. (All 136 stitches will now be on the same needle.)
Again, using a Cable Cast On, cast 10 stitches onto the right needle. And with the right side facing you, join the legs by knitting the first stitch of the second leg. Finish knitting the round. (146 stitches)
The Body
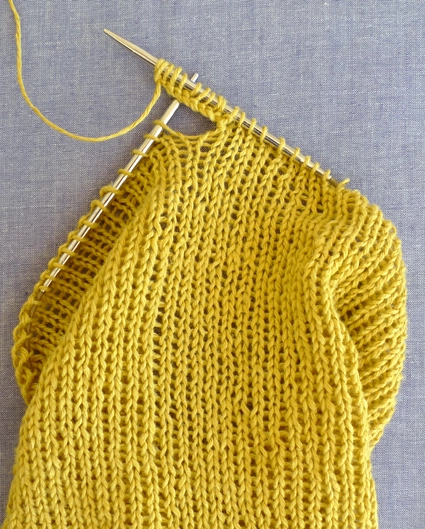
Continue to knit every round until the piece measures 7 inches from the place where you joined the legs.
Next Round: K42, place a marker (use a different color than the end-of-the-round marker), k73, place a marker (same color as the one just placed), k31 to end of round.
Next round: *Knit to 2 stitches before next marker, p1, k1, slip marker, p1, repeat from *, knit to end of round.
Repeat the last round.
Next Round: *Knit to 4 stitches before next marker, [p1,k1] 2 times, slip marker, p1, k1, p1, repeat from *, knit to end of round.
Repeat the last round.
Next Round: *Knit to 6 stitches before next marker, [p1,k1] 3 times, slip marker, [p1, k1] 2 times, p1, repeat from *, knit to end of round.
Repeat the last round.
Next Round: *Knit to 8 stitches before next marker, [p1,k1] 4 times, slip marker, [p1, k1] 3 times, p1, repeat from *, knit to end of round.
Repeat the last round.
Next Round: *Knit to 10 stitches before next marker, [p1,k1] 5 times, slip marker, [p1, k1] 4 times, p1, repeat from *, knit to end of round.
Repeat the last round.
Next Round: *Knit to 12 stitches before next marker, [p1,k1] 6 times, slip marker, [p1, k1] 5 times, p1, repeat from *, knit to end of round.
Next Round: Knit to 14 stitches before next marker, [p1,k1] 7 times, slip marker, [p1, k1] 5 times, p1, knit to 12 stitches before next marker, [p1,k1] 6 times, slip marker, [p1, k1] 6 times, p1, knit to end of round.
Next Round: Knit to 16 stitches before next marker, [p1,k1] 8 times, slip marker, [p1, k1] 6 times, p1, knit to 14 stitches before next marker, [p1,k1] 7 times, slip marker, [p1, k1] 7 times, p1, knit to end of round.
Next Round: Knit to 18 stitches before next marker, [p1,k1] 9 times, slip marker, [p1, k1] 6 times, p1, knit to 14 stitches before next marker, [p1,k1] 7 times, slip marker, [p1, k1] 8 times, p1, knit to end of round.
Next Round: Knit to 20 stitches before next marker, [p1,k1] 10 times, slip marker, [p1, k1] 7 times, p1, knit to 16 stitches before next marker, [p1,k1] 8 times, slip marker, [p1, k1] 9 times, p1, knit to end of round.
Next Round: Knit to 22 stitches before next marker, [p1,k1] 11 times, slip marker, [p1, k1] 7 times, p1, knit to 16 stitches before next marker, [p1,k1] 8 times, slip marker, [p1, k1] 10 times, p1, knit to end of round.
Next Round: Knit to 24 stitches before next marker, [p1,k1] 12 times, slip marker, [p1, k1] 8 times, p1, knit to 18 stitches before next marker, [p1,k1] 9 times, slip marker, [p1, k1] 11 times, p1, knit to end of round.
Next Round: Knit to 26 stitches before next marker, [p1,k1] 13 times, slip marker, [p1, k1] 8 times, p1, knit to 18 stitches before next marker, [p1,k1] 9 times, slip marker, [p1, k1] 12 times, p1, knit to end of round.
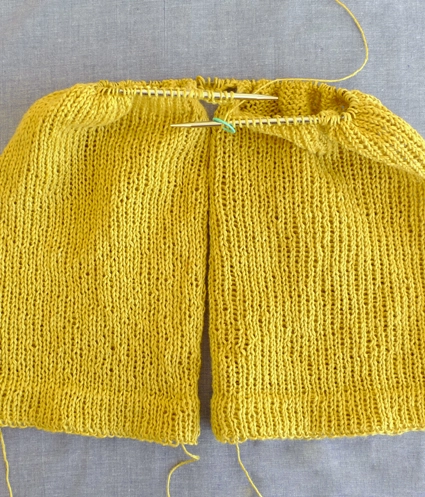
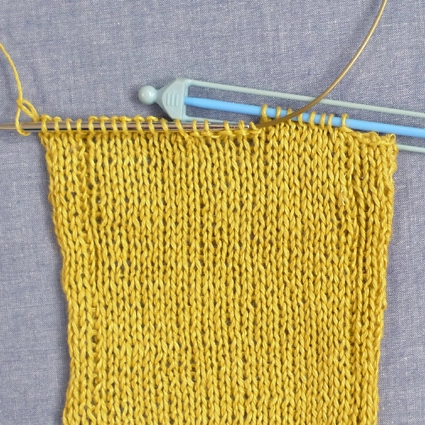
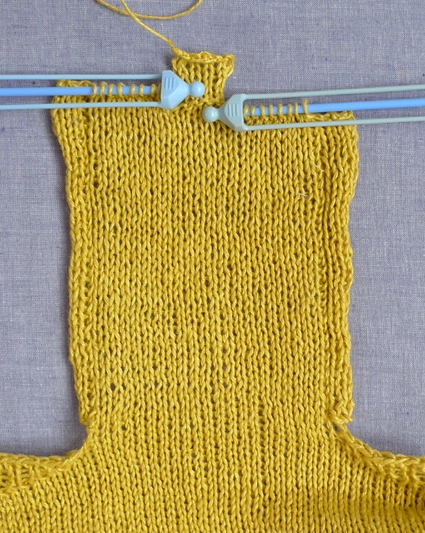
Next Round: Knit to 26 stitches before next marker, bind off stitches in p1, k1 pattern to next marker, remove marker, bind off 17 stitches in pattern, knit to 18 stitches before next marker, put the last 39 stitches on holders, scrap yarn or a spare needle…

…bind off stitches in pattern to next marker, remove marker, bind off 26 stitches in pattern, knit to end of round.
Remove the end-of-the-round marker and knit to the end of the row. These 23 stitches are the back panel of the overalls.
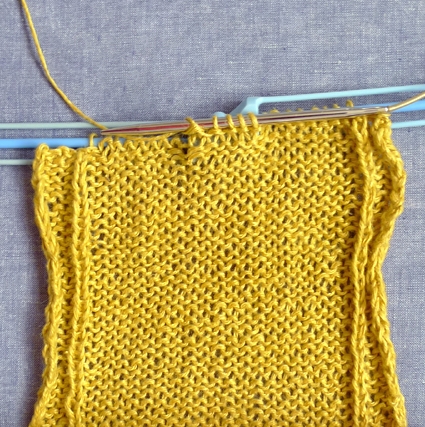
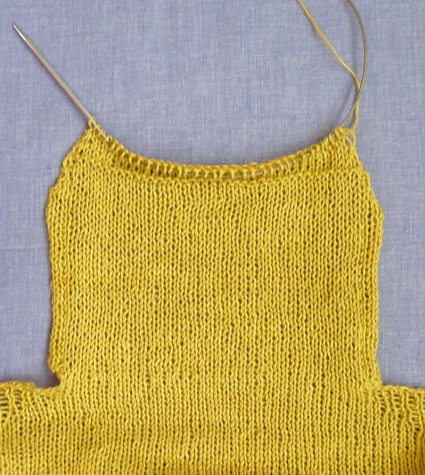
The Back Panel
Work this section back and forth, turning in between rows.
Row 1: With the wrong side facing you, use a Cable Cast On to cast on 4 stitches. P4, k1, purl to end of row. (27 stitches)
Row 2: With the right side facing you, use a Cable Cast On to cast on 4 stitches. K4, p1, knit to last 5 stitches, p1, k4. (31 stitches)
Row 3: P4, k1, purl to last 5 stitches, k1, p4.
Row 4: K4, p1, knit to last 5 stitches, p1, k4.
Repeat Rows 3 and 4 until Back Panel measures 4 1/2 inches, ending with a wrong side row.
Next Row (Right Side): Bind off 5 stitches, k7, put the last 8 stitches on a holder or scrap yarn, p5, k8, p1, k4.
Next Row (Wrong Side): Bind off 5 stitches, p7, put last 8 stitches on holder or scrap yarn, p5.
Working back and forth on the remaining 5 stitches…
Knit 1 row.
Purl 1 row.
Repeat the last 2 rows.
Bind off, cut an 18″ tail and pull it through the remaining stitch.
The Front Panel
Work this section back and forth on the 39 stitches that have been on hold, turning in between rows.
With the right side facing you, join new yarn, leaving an 18″ tail.
Row 1: With the right side facing you, use a Cable Cast On to cast on 4 stitches. K4, p1, knit to end of row. (43 stitches)
Row 2: With the wrong side facing you, use a Cable Cast On to cast on 4 stitches. P4, k1, purl to last 5 stitches, k1, p4. (47 stitches)
Row 3: K4, p1, knit to last 5 stitches, p1, k4.
Row 4: P4, k1, purl to last 5 stitches, k1, p4.
Repeat Rows 3 and 4 until Front Panel measures 4 3/4 inches, ending with a wrong side row.
Next Row (Right Side): Ssk, k2, p1, knit to last 5 stitches, p1, k2, k2tog. (45 stitches)
Next Row: P3, k1, purl to last 4 stitches, k1, p3.
Next Row: Ssk, k1, p1, knit to last 4 stitches, p1, k1, k2tog. (43 stitches)
Next Row: P2, k1, purl to last 3 stitches, k1, p2.
Next Row: Ssk, p1, knit to last 3 stitches, p1, k2tog. (41 stitches)
Next Row: P1, k1, purl to last 2 stitches, k1, p1.
Next Row: Ssk, purl to last 2 stitches, k2tog. (39 stitches)
Purl 1 row.
Next Row: Ssk, knit to last 2 stitches, k2tog. (37 stitches)
Repeat the last 2 rows one time. (35 stitches)
Purl 1 row.
Bind off the remaining stitches. Cut a 24 inch tail and pull it through the last stitch.
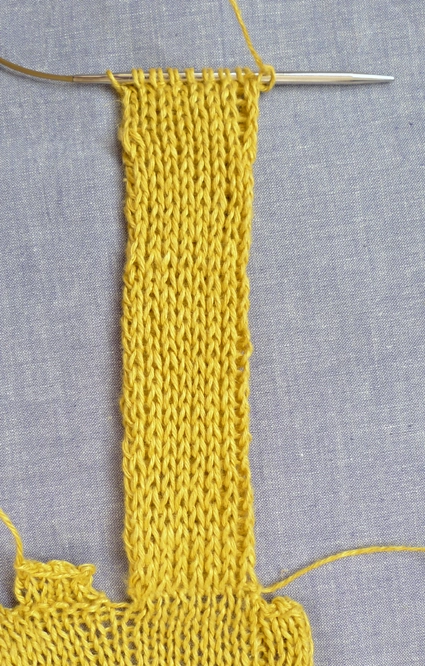
The Straps
Each strap will be worked back and forth on the 8 stitches on hold at the top of the Back Panel.
With the right side facing you, join new yarn to either strap.
Row 1: *K1, make 1, repeat from * to last stitch, knit into the front and back. (16 stitches)
Row 2: Slip 1 knitwise through the back loop, *bring yarn forward, slip 1 purlwise, bring yarn back, k1, repeat from * to last stitch, p1. (Check out our Double Knit Belt pattern for step by step photos.)
Repeat Row 2 until strap measures 6 inches, ending with either side. (If you are able to try the overalls on the recipient, you may want to double check that this is the place you want the buttonhole.)
Buttonhole Row: Slip 1 knitwise through the back loop, bring yarn forward, slip 1 purlwise, bring yarn back, k1, bring yarn forward and slip the next 2 stitches purlwise, bring yarn back…
…*slip the next 2 stitches purlwise, pass the last 2 slipped stitches over (like binding off)…
…repeat from * 4 more times.

Slip the 2 stitches from the right needle back to the left needle and turn the work. (3 stitches on each needle)
Use a Cable Cast On to cast on 6 stitches.
Turn the work and bring yarn back if the right side is facing you or bring the yarn forward if the wrong side is facing you. Slip next 2 stitches purlwise, pass the last 2 cast on stitches over, p1. (10 stitches)
Next Row: Slip 1 knitwise through the back loop, bring yarn forward, slip 1 purlwise, bring yarn back, kfb 6 times, k1, p1. (16 stitches)
Next Row: Row 2: Slip 1 knitwise through the back loop, *bring yarn forward, slip 1 purlwise, bring yarn back, k1, repeat from * to last stitch, p1.
Repeat last row until piece measures 1/2 an inch from the buttonhole.
To bind off: K2tog two times, *pass the first stitch over the second stitch (like a normal bind off), k2tog, repeat from * until one stitch remains.
Cut the yarn and pass the tail through the last stitch.
Finishing
NOTE: For all the finishing, try to sew with an available tail. If there isn’t one, just use a new piece of yarn and sew in the ends.
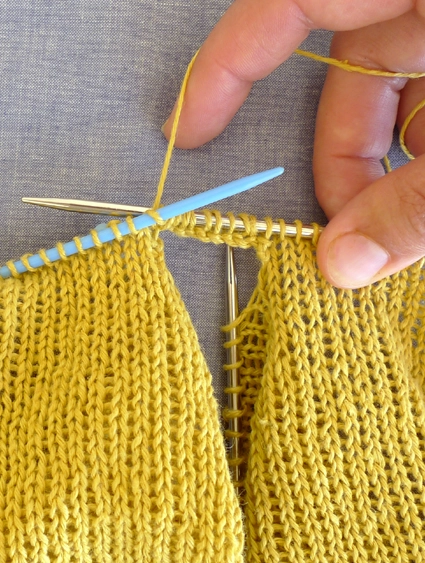
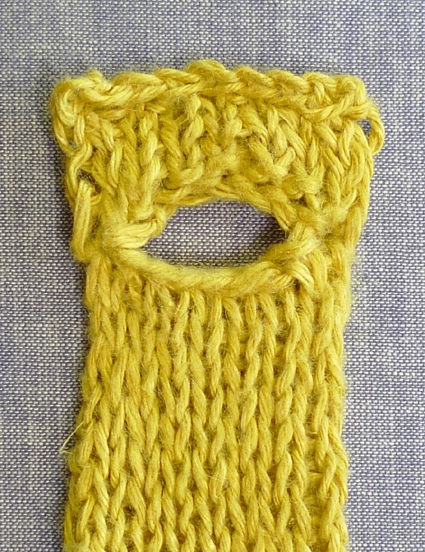
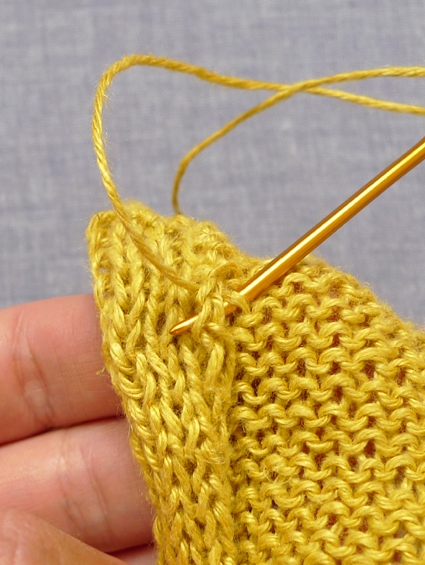
Close the crotch by sewing under the knit stitch that is right below the cast on edge…
…and then sewing under the knit stitch directly across from that one. Continue back and forth across the whole opening.
Finish the Back and Front Panels by sewing down the hems. On the sides, fold the hem at the column of purl stitches, and at the top, fold the hem at the row of purl stitches.
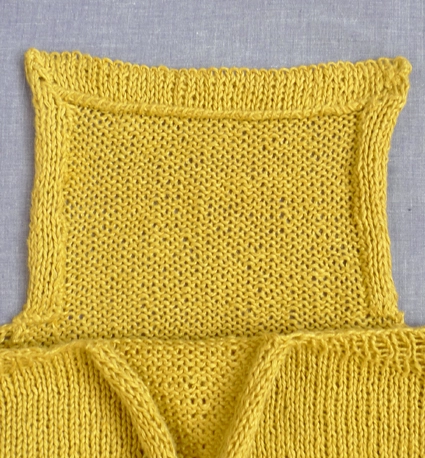
It doesn’t matter exactly how you sew the hems down as long as you are consistent and keep the hem lines straight. I sewed under a purl bump of the panel and then under the very edge of the hem.
Sew the two buttons in place, about 1/2 an inch from the top of the Front Panel.
And, finally, weave in all the stray ends and admire your hard work!
Looking for more inspiration? Explore all of our free knitting patterns and knitting tutorials, buy one of our many knitting kits and yarn bundles, and shop for beautiful yarn. We have over 35 gorgeous natural fiber yarns in 100’s of magnificent colors, designed to bring integrity, beauty, and joy to your next knitting project and only available at Purl Soho!


Thank you! I’ll be on a long flight to Europe this weekend and need something to knit while thinking of my little guy at home. This will be perfect!
these are amazing! what a fashion forward toddler you’ve got on your hands!
You have the BEST pattern instructions online I have ever seen!! Thank you for the detail. I’m so new to knitting but you make me feel like I can tackle great things! 🙂
These are so cute! You always have the best designs. Thank you!
WOW! That is an amazing piece of artistry. As a beginning knitter it looks very daunting but I’ll keep it in my files for later use! I immediately thought of the book Corduroy when I saw the pictures. Too cute.
any chance that you could size these up to adult size? i’d love to make a pair for myself to knock around the house in. they look so cozy! well done!
Redonculously Adorable!
hi whitney, i checked out this awesome blog again after meeting you and bear in the park last week and i’m so glad i did…these are amazing! they remind me of something out of my favorite children’s clothing shop, bu and the duck. thank you for the tutorial!
Wow, what a lovely thing – and wonderfully detailed instructions. Thank you so much! The child in the photos is beautiful, btw.
Hi! These are adorable! I love them. When you said that the legs were 8-3/4″ long, or length needed, should this be the length of the needed inseam? Thanks!
Hi Crystal,
Yes, the 8 3/4 inches is the length of the inseam, from crotch to pant hem.
Thanks for asking and good luck with the pattern!
Whitney
Thank you so much for putting this pattern up. I have almost finished my dungarees now. I did them in Merinowool for the cold cold days that lay ahead. I know my baby will love them as much as I do.
Very fun to make, thanks to your awsome instructions!
H! I am a relative beginner knitter and tried to start this pattern. It is amazing, but I don't have the skill for it yet. Any way I could commission a pair for my little guy? He would rock these. Thanks.
Hi Sarah. I think the Bee knitters are a bit busy at the moment, but we do keep a list of commission knitters at the shop. You can email the shop here: [email protected] . But keep on knitting. You'll be doing projects like this in no time! -Laura
This is sooooo cute!!! But I need a toddler now to make this!!! My kids are too big for that now!!!
Does this adorable pattern come in adult sizes or could you possibly direct me to where I can convert the pattern to an adult size?
Hi Destiny,
Right now this pattern is only available in for 18 – 30 month olds.
Laura
Hi, I just finished knitting this up today…I used slightly different yarn as that specific brand I could not find in Toronto, but the yarn I used is so similar that you can barely notice the difference. My son has ginger (red) hair so I chose a green colour…I love them, they are sweet and so easy to knit up. Thank you for the pattern I love your blog and am now starting Laura's Cap Sleeve Lattice Top 🙂
I wanted to know how much of the second skein you used in this pattern? I have 328 yards of a great Italian cotton I want to use for these. I plan to shorten up the legs and straps a bit. Do you think this will be enough?
Thanks so much
Hi Eliote Lee,
I used about 150 yards of the second skein (determined by weighing what I have leftover). Adding the 270 yards of the first skein, I don't think you have quite enough with your 328 yards, unless you maybe make a cute set of shorts overalls!
Thanks for asking and good luck!
Whitney
I just knit this in red and I LOVE it. My husband will be back from his Naval cruse in a month (I go knitcrazy while my husband is out), and this little overall with a blue polo should be just the thing for our patriotic little guy.
Hi,
It's a really cute knit but I can't seem to join 63 stitches in a round. I am using a 16" cable btw. Does it make a difference if I knit the legs using double pointed needles? Thank you
Hi Kazel,
Sure! If you're more comfortable with double pointed needles, they'll will work just fine.
Thanks for asking and please let us know if you have any more questions along the way!
Whitney
I’m having the same issue joining the 63 stitches on a 16″ circular. What am I doing wrong?
Hi Bridget,
Thanks for writing us. Sometimes it is difficult to get the stitches around the 16″ circular needle, especially with linen. I suggest you use double points instead.
All the best,
Adam
Hi, I have been having a good time working on these cuties. I can't seem to get the double knitting on the straps right! I have checked out the other tutorial and it isn't working out. I have the correct number of stitches. Is there a video that might be helpful. All the ones I am finding online are for two color.
Should I be purling instead of slipping in a purl direction? So close to being done.
Help please.
Jolyn
Hi Jolyn,
No, you should definitely be slipping purlwise (rather than purling), but I'm not sure what you could be doing wrong. Have you followed the photos of our Double Knit Belt tutorial, step-by-step? Are you switching the yarn's position between every single stitch you either knit or slip? I encourage you to go over the tutorial again, and if you're still having problems, to please let us know what your strap looks like and where you think the problem might be. You could even send us a photo!
Thanks for asking. I hope a lightbulb goes off, but if not, please do not hesitate to write us again and we'll try to get you on the right path!
Whitney
Can I add a whale on the front of the bib using the yarn your recommending?
Hello Noreen!
Are you thinking of adding a whale design onto the front using intarsia (colorwork)? That would be so cute! Take a look at our tutorial here: https://www.purlsoho.com/create/2008/06/30/intarsia/
You should definitely use the same yarn as the body so that the gauge and tension don’t differ. Best of luck! -Alyson
Hello! I can’t wait to start knitting these for my little boy! I am a new ish knitter but am ready for the challenge, however it seems that most of the links to the tutorials are broken? Is there any way these can be replaced, I would really appreciate all the help I can get! Thanks!
Hi Naomi,
Thank you for bringing this to our attention! I have gone through the whole post and replaced all of the links with the correct ones. We are so sorry for the inconvenience!
Happy knitting!
Cassy
Hi Cassy,
Thanks for that, I am really enjoying knitting these cuties!
I am having some trouble with the start of the straps though…
I (think I) understand how to do the first part (*K1, make 1, repeat from * to last stitch) resulting in 16 stitches, but then I am confused by the second part (knit into the front and back). From watching the tutorial, would this not increase the number of stitches 2 fold again? Probably a simple answer, I may just be misunderstanding it!
Thank you!
I was misunderstanding it, I have it now!
Hi Naomi,
I think that I see the confusion. For me, it helps to sometimes write the whole line out.
Row 1: K1, make 1, K1, make 1, K1, make 1, K1, make 1, K1, make 1, K1, make 1, K1, make 1, knit into the front and back of the last stitch.
This will result in 16 stitches at the end of this row.
I hope that this helps and happy knitting!
Cassy
Hi! When you are measuring the legs.. Are you measuring from the very bottom of the Hem or the top? Thanks!
Hi Dakota,
Great question! The measurement is from the bottom of the hem (the very bottom of the leg) to the top!
Best,
Cassy
When I start really knitting, I admired this beauty hopping that some time I will be able to face the challenge. Now I finished the first leg and I started the second… I’m wondering what is the right measurement I have to take, as my little nephew is 14 month old and 75cm (30 inch) tall but his legs are 30cm (12 inch) from his ankle to the top from the inside of the leg, at the point of joining the two legs . I saw that you suggest to make the leg 8 3/4 inch. It will be extremely helpful to have the measurement of your little boy to compare, because as I’m really a novice I don’t want to make a mistake that I couldn’t correct.
Please forgive my English and thank you again for your excellent work and your generosity for sharing…
Nancy
Hi Nancy,
Thanks for writing in! I am sorry, but we are unable to provide measurements of the young man in the photos as he is 7 years older now and quite a bit taller. I would suggest measuring a pair of pants that fit the recipient well and using that measurement for the length of the pant from the ankle to the inside leg! this will give you a custom fit that is sure to work well for the little one!
Best,
Cassy
Thank you very much for your answer! I manage some how to find the right measurements, but I’m stuck with an other problem. I attached the two legs together, but in the middle of the knitting there is a hole and I don’t know what to do. Do I have to sew it later? Or I did something terribly wrong?
Thank you in advance for the answer and I wish you a wonderful summer!
Hi Nancy,
So glad to hear that the knit is going well! You have not made a mistake. At the very end you will close the crotch by sewing under the knit stitch that is right below the cast on edge.
Happy knitting!
Cassy
Thank you Cassy!
In the photo is like no human hand had touch it or sew it, but all your project are like this. 🙂
Thanks again!
Can you PLLLLEEEEEAAAAAESSSSSSEEEEEEEE post an adult version? 🙂
Hi Ny,
Thanks for your request! I will certainly pass it along!
Best,
Cassy
I just finished knitting the overalls and I can’t believe it how wonderful they came out. I’m a beginner in knitting and I made some mistakes but that’s because I should’ve read better the instructions . The instructions are very clear and easy to follow if you read them properly. I’m very satisfied with how the overalls came out. I think I will start knitting the second pair ?.
Hi Diana,
Thank you so very much for your kind words! We are so glad that the pattern worked so well for you!
Best,
Cassy
These are adorable but it seems the yarn listed isn’t available anymore – do you have a similarly sturdy substitute that you’d recommend for this project? Thanks!
Hi Sara,
Thanks for writing in! I would suggest using our Field Linen for this pattern – like all 100% linen yarns it is quite durable and easy to machine wash and dry, and it knits up to the same gauge as Euroflax. It also has almost the same yardage, so you will need the same number of skeins as is listed in the pattern.
Happy knitting!
Julianna
I see you suggest using the provisional cast on to allow stitches at the bottom to be left open, but I don’t see where you pick them up and complete them. How do you do that?
Hi Jamie,
Thanks for writing in! You will be using these stitches to finish the hem fairly early on in the section titled “The Legs.” After you knit 8 rounds, purl 1 round, and knit 8 more rounds, you will return the provisional stitches to a spare needle to work a Knit Hem.
I hope that helps, and happy knitting!
Julianna
Any hot tips for using a merino wool for this project? Eg Bellissimo 4ply Merino Extra-fine? I’d love to knit these for a little fella in a cold climate. Thank you!
Hi Tessa,
Thanks for reaching out! You can absolutely knit this pattern in merino wool, but you’ll need to make sure that the yarn you select matches the weight of the yarn we wrote this pattern for. This pattern was designed for a sportweight yarn at a gauge of 22½ stitches = 4 inches in stockinette stitch. Since the yarn you mentioned is a fingering weight, it may be too thin to achieve this gauge! Or even if you can achieve it, the overall knit fabric will likely be loose and airy with lots of space between stitches.
If you’re interested, I’d be happy to recommend some of our own sportweight yarns for this pattern! Or, I’d be happy to take a look at any other yarn ideas you already have and let you know if they’ll work or not.
All the best,
Lili
Thanks so much for getting back to me. There is a Bellissimo 5ply Merino Extra-fine as well, or what yarn would you recommend? I’d love to do it in a dark red. Thanks again!
Hi Tessa,
Yes, the 5-ply option of that yarn is a much better choice! It’s a sportweight yarn so it will be the perfect thickness for this pattern. Of our yarns, Wigeon comes to mind, but I’m not sure we have the dark red color you’re looking for.
All the best,
Lili
I see that you recommend Wigeon for a marino take on these overalls …can you possibly recommend a washable woolen for this pattern?
Thank you.
Hi Ann,
Thanks for reaching out. I’m afraid that we do not carry a machine washable wool yarn that will work for this pattern at the moment. We’re so sorry about that! If you’re open to a different type of fiber, then I’d recommend using Cotton Pure, which is 100% cotton and machine washable. Hope this helps!
All the best,
Lili
Can I use a one step provisional cast on as seen on your video or must I use a 2 step one? I just don’t understand what to do with my yarn as I am picking up the 63 bumps on the back of the chain I crocheted.
Hi Carmen,
Thank you for writing in! You can definitely use our two-step provisional cast on if that works better for you! You can find that tutorial here! I hope this helps!
Happy knitting,
Gavriella