The Twenty Minute Tote
Updated September 2011
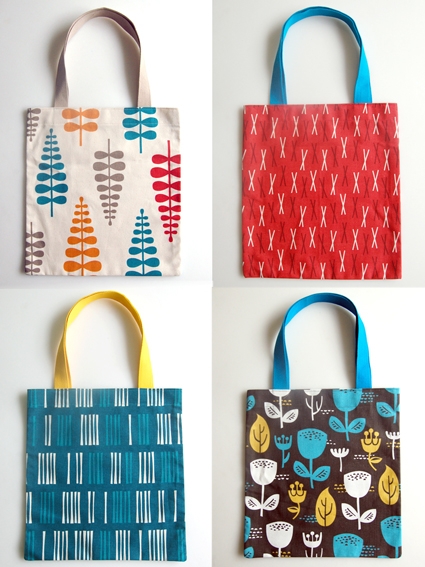
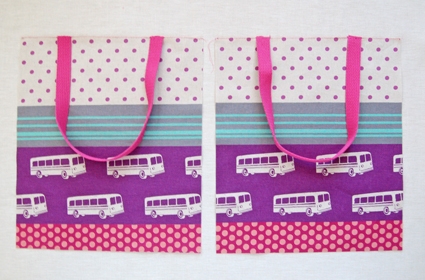
We have remade these awesome, simple bags for fall! This time around, I used a gorgeous new collection of upholstery weight cotton called Outside Oslo. These bold, stylish prints are sophisticated without being serious and come in a rich palette of colors perfect for fall. I added some sturdy contrasting cotton webbing handles for a pop of color, and I love the way they came out! The new materials are as follows:
To make one tote bag:
- 1/2- yard of Outside Oslo Fabric. I used (clockwise from top left): Dawn Frond, Dawn Sticks, Dusk Wildflower, and Dawn Picket
- 2 yards of 1-inch cotton webbing to compliment your fabric. I used (clockwise from top left): Taupe, Turquoise, Turquoise, and Yellow.
- Cotton thread to match your fabric
- Cotton thread to contrast with the inside of the bag
Updated February 2011
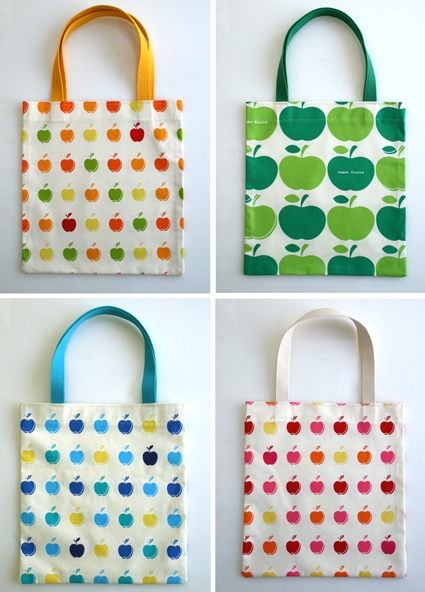
These totes really do come together in 20 minutes a piece which makes them a great, quick, way to add a little Springtime color and excitement into the dull end of Winter months. To make one tote bag:
- 1/2-yard of Kokka Apples. I used Pink Mini Apples, Orange Mini Apples, Blue Mini Apples, and Green Large Apples
- 2 yards of 1-inch cotton webbing to compliment your fabric. I used Natural, Yellow, Turquoise, and Green
- Cotton thread to match your fabric
- Cotton thread to contrast with the inside of the bag
UPDATE: NOW IN GARMENT-DYED TOWELING
AUGUST 2022
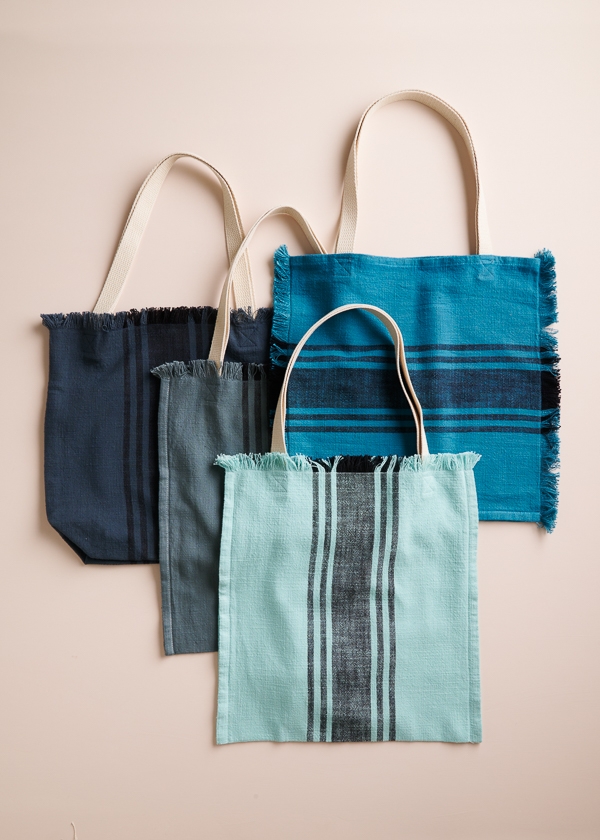
Our Garment-Dyed Toweling Totes put a spin on our classic Twenty Minute Tote pattern! Garment-Dyed Toweling simplifies the tote-making process with its double-fold hems along both selvages, and its distinctive stripes lend some flair. You only need a yard of toweling for each tote, or you can pick up one of our four-color Garment-Dyed Toweling Bundles to make a full set. Happy sewing!
Designed by Purl Soho designer, Molly Schnick. Click here to see even more of Molly’s work!
The Original
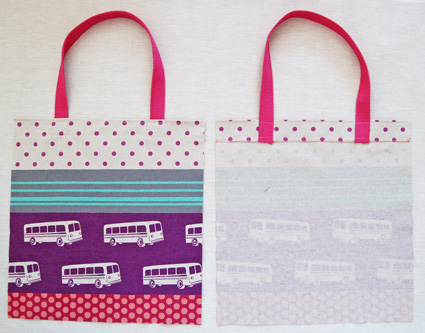
The fabric in these how to shots is from Echino and is now out of print but you can see more from the same designer, Etsuko Furuya here.
Cutting
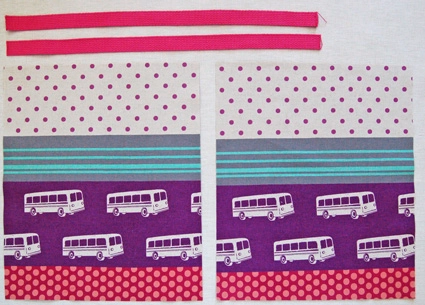
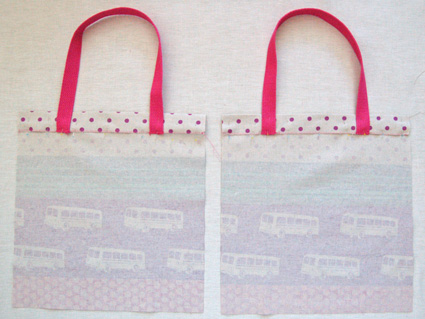
Cut two 16-inch tall by 14-inch wide panels from the fabric. Make sure the pattern is going the correct direction on both panels.
Cut two 22 1/2-inch long pieces from the webbing.
Attaching Handles and Hemming the Top
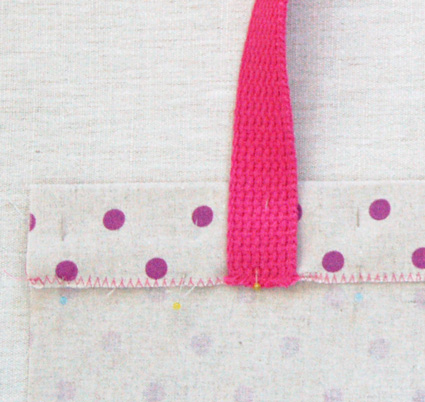
Pin the handle pieces to the top raw edge of the right side of each panel 3-inches from the sides. The raw edges of the handles should match up with the raw edge of the top of the panel so the handles will be facing down as shown in the picture above. Make sure the handles aren’t twisted.
Using the contrasting thread sew a zig zag stitch across the top edge, sewing the handle to the top edge in the process.
This zig zag stitch should be right at the edge of the fabric as shown above.
Turn the panels so their wrong sides are facing up. Press and pin their top edges with the handles down 1 1/2-inches
Make sure to pin the handle so it’s perpendicular to the horizontal sides.
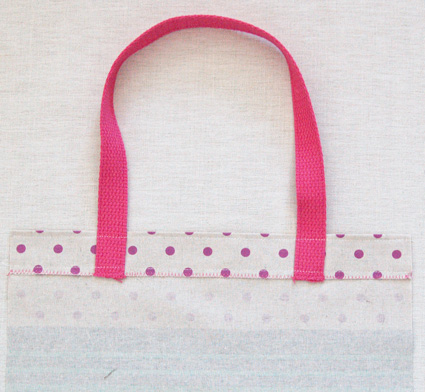
Sew this fold down with the matching thread a 1/4 inch from to top edge and then with a second seam 1/4-inch from the bottom zig zag stitch.
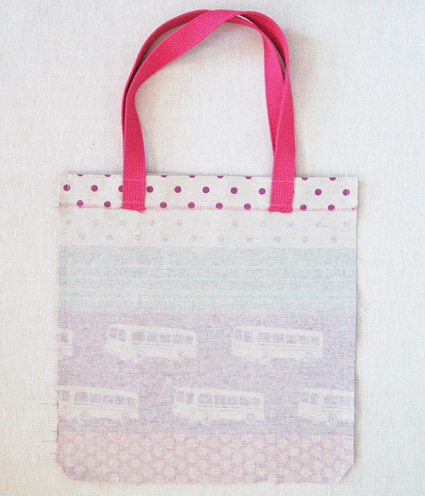
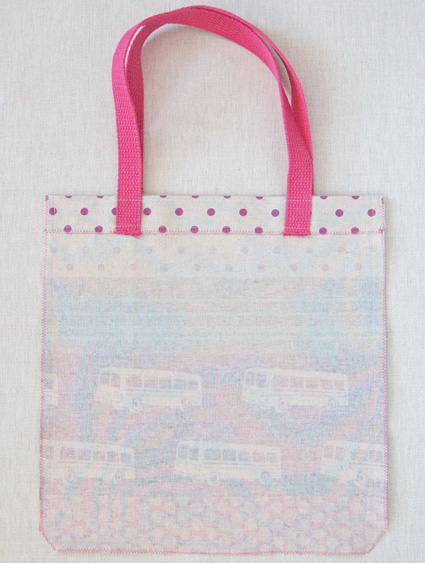
The handle will now be attached and the top hem sewn down on both panels. You’re now ready to sew the bag together.
Sewing the Bag Together
Pin the panels right sides together and sew along the sides and bottom 1/2-inch from the raw edges using the matching thread. Back stitch at the beginning and end of each seam.
Snip off the bottom corners.
Using the contrasting thread zig sag stitch along the raw edges of the sides and bottom of the bag.
Make sure to stitch right along the edge to contain the threads from the raw edges.
Turn the bag right sides out press the corners and you’re all done!
Update 2024: You can explore our current collection of beautiful fabrics and supplies on our page of Sewing Tools + Notions!
151 comments on “The Twenty Minute Tote”
Thank you so much! This is the best tutorial for a simple tote I have found! I'm excited to get started on making gifts for friends & family! ,thanks again!
I am a textiles teacher who teachers sewing at a fabric store in Geelong(Australia ). I plan to teach some young students how to sew a tote very similar to your The twenty Minute Tote that features on your website. I have adapted your version somewhat. The students will use 2 fabrics rather than one, so I have written the pattern in my own words. My question is, am I allowed to include some( not all) of the tote construction photos in my pattern? I am not selling the pattern and I am happy to promote the origin of the tote I.e.www.purlsoho.com/create.
I look forward to hearing from you,
Sonia Walder
Hi Sonia,
Thanks so much for checking in with us about this. We regret to inform you that our photos may not be reproduced in your pattern. We simply have too many similar requests from readers and so any exception to the rule becomes unfair to everyone else.
You are more than welcome to send your students to our blog to look at our photos and pattern and have them print out a copy for themselves.
Best wishes,
Purl Bee
Thank you for allowing the pattern to be printed. I will be using this great pattern to teach my 13 year old Granddaughter to sew. She will be making this for her Moms birthday present. I realized recently when I took her into a fabric store she had no idea about how to sew anything. I grew up with this talent a very much part of my life, thanks to my Mom and Grandmother. I hope this art will continue for future generations.
Thanks
Kathy Nemitz
Thank's the tutorial!I love it the simple. 🙂
Fabulous fabric choices! This a really cute (seems to be simple) design. I'm a new sewer, so I may just try this out 🙂 Thanks for sharing!
Thank you so much for the tutorial. I am a newbie to sewing and your tutorial is so easy to follow. I made two totes for my friend's daughter and changed the measurements to fit little girl. I mentioned your tutorial on my blog today.
http://www.sophiealamode.com/2013/02/princess-tote-and-bento-lunch-bag.html
Lovely, many thanks! Wonder if you would consider including metric system measurements in your tutorials, for your European fans.
Hi pukekome-
We probably won't be able to do this any time soon (although I know the metric system makes a lot more sense that ours!) So until we catch up to the rest of the world, you might want to use an easy conversion calculator site like this one:
http://www.globalrph.com/conversions.htm
Thanks for writing in!
Molly
Hello! I just wanted to let you know I used this as my very first project on my new sewing machine. Thanks! What a great project!
I just made one of these today on my new-to-me vintage sewing machine. Having no webbing on hand, I made handles out of some twill I sewed into tubes and turned. I boxed the corners, as I like that in a bag.
I really liked the way the handles were attached–very elegant and finishes nicely.
-
Would you mind sharing how to “Box the corners”?
Thank you for sharing this lovely bag. I made one for each of my young granddaughters (slightly larger) to take their books to and from the library. I embroidered their names on the front; no picking up the wrong bag!
To be so clever and share with others is a gift. Thanks again!
Lynne
Las Vegas
Love it! I'm a brand new sewer, but I think I could do this. Thanks for sharing. Do you have any posts on how to do a lined bag?
HI Lindsey-
Yes we do! The Forty Minute Tote! https://www.purlsoho.com/create/the-purl-bee/2012/6/3/mollys-sketchbook-the-forty-minute-tote.html
Thanks for writing in!
Molly
Great tutorial! Thanks so much for sharing, made my first one today and I plan on making one for all my pals for Christmas this year. I messed up and bought my cotton webbing in yard cuts so my handles pieces are only 18" but it still leaves enough room to easily carry the bag.
Amanda 🙂
As usual, another wonderful tutorial! I have used this tutorial over and over again. I've made a few as gifts and have used it to teach my students basic sewing skills, it took them a little longer than twenty minutes though 🙂 Here is one I made for my niece, http://www.domestic360life.com/blog/projects/savannah-bag/
Thanks Molly!
Cheers,
Corey
I'm just going to change the dimensions a little, make the straps for a shoulder bag and. it'll be an iPad carrier. Thank you so much. They'll make great gifts.
Hi Shiela-
That sounds like a good plan. If you want to make a more substantial laptop cover you might want to check out this project: https://www.purlsoho.com/create/the-purl-bee/2013/8/1/mollys-sketchbook-quilted-computer-sleeve.html
Molly
Thanks for posting this awesome project! Perfect for a beginner like me. I just made one for my mom for mother's day…now onto a second for my mother-in-law!
One quick technique question for you….when you say to snip off the bottom corners, how close to the stitched corner should that cut be? Thanks!
Hi Amy-
It should be roughly 1/8-inch from the stitched corners. Thanks so much for your question!
Molly
oh i have to try this, too…. great for a gift….
kreacaro.blogspot.de
LOVE LOVE LOVE the stylish fabric you've chosen for these tot bags! 20 minutes from start to finish, seems UNREAL! How EASY! THANKS for sharing the tutorial! Sarah in Minneapolis
I love these Molly! Have made my own slightly smaller version for teacher gifts (my fat quarters were obviously a bit smaller than yours!) x
http://shabbyshe.wordpress.com/2014/06/25/teacher-totes-a-thank-you-gift/
This is really cute..have made bags in the past but this was a good refresher to do such an easy tote. I have two young ladies that I will be teaching a beginning sewing class to and this will be the first thing I will have them make. I may even have them applique their inital on the front. Such a good project..thank you for sharing.
I wonder if you could put a lining o these bags. I might try.
-
Hi Molly,
I’m on my way to my sewing machine now, I think I will add a outside patch pocket.
I have you in my bookmarks so I’ll be back.
Thanks so much
Hi Gail-
You certainly can! I actually made another bag based on this one called the "Forty Minute Tote" that has a lining and an inside pocket. You can find that pattern here:
https://www.purlsoho.com/create/the-purl-bee/2012/6/3/mollys-sketchbook-the-forty-minute-tote.html
Thanks for writing in!
Molly
I was searching for a simple tote project and feel so lucky to have found yours. I appreciate your clear instructions and photography of each step. Sewing is not my strength, but you made me look like a superstar in my 7 yr old’s eyes today. Thanks for a great memory between mom and daughter.
I use empty dog food bags to make totes like these! I Cut plain unbleached muslin the same size as the sides and just sew it all together with the muslin inside the bag. I tack the corners so the liner doesn’t shift. People (read dog lovers, lol) love them and I sell dozens of them at the farmer’s markets.
love this bag…can’t wait to make it ! thanks.
These are wonderful! Seem very sturdy-made out of good material. I’m in charge of the Food Pantry at church, & the cheap dollar bags only hold up for a few months. Think I’ll try to make about 60 of them. Thanks
This is perfect for the sewing class I teach to a group of teens on Friday afternoons. Thank you!
Such a simple bag. I made 15 of these tonight, for the kids (PreK -5th) in our church to carry their bibles that they will be getting as a gifts next week.
where does the webbing go-I don’t see it sewed on the instructions.
it is really superb.they are very easy for beginners also. what do u call the handle cloth.
Dear Molly,
I tried making this tote today and I must say it turned out neat. Thank you for putting together the tutorial.
Aparna.
Great totes! Now I know what I will make this summer, and put away for Christmas!
Hi, I don’t have a sewing machine, and I am terrible at sewing, so could I sew this by hand? I’ve sewn small pillows for dolls, but that’s it.
brilliant will definitely try this
Hi,
This is amazing project , not time taking, i can sew it in one sitting , and can use it for long…….
Thank you for sharing it.
Hi – I would like to use your pattern for our church. We make totebags for Operation Christmas Child. I have been looking for an easy pattern and ran across yours. Thanks!
Thanks for your ideas. I am an art teacher and I am making a similar bag with my students, Putting on the handles is for easier with your than mine. Thanks for the ideas.
Love you site, thanks
Molly,
thank you! You made my day with this tutorial! Going shopping for cute fabrics!
WOW!
so easy and so smart
Great pattern,just love it!
On your 20 min. tote, is there a liner that goes in it? I know there is one for the 40 mins tote, but I did not understand there being a liner for the 20 min? Thank u
Another easy way to use up left over material. So quick and easy! Love this thank you!
I made this bag, but larger to keep in my suitcase just in case I make purchases while traveling and need to carry on those items on the plane. (my suitcase is always full when I leave home!) I have never been stopped at the gate for having the extra piece. It is so lightweight and easy to pack too!
Another idea would be to make a few to use as gift bags instead of wrapping paper, this way the recipient gets two gifts!
That was so easy. I can run one up in no time. No complications at all. Thanks.
I was looking for some simple bingo gifts, these are really great!
I have been making these for years. I add a pocket to the middle outside bottom on one side… fold the finished bag in thirds, so that the pocket is still showing, fold this in half, and again in thirds, always have the pocket sewing. Slip this into the pocket and you have a travelling bag to put into your purse, or jacket pocket, next time you go shopping. No need for plastic.
Looking for an easy tote to make for 5 sweet girls going to Disney world this summer. This looks perfect. Thanks so much!
Hello there, I am so excited to make these bags. My sewing machine is a relic from the 1960’s and does not have a zig zag stitch attachment. Only straight stitch. Can I still follow your pattern or should I really use my serger for added support with the seams?
Love Love LOVE your fabric selections. I’ll be buying them today!!
Thanks again!!
-
I would think the inside seams could be * pinked * and finished with pinking shears although the zig zag stitch might add support in other places?
How study is this bag & what are the finishing dimensions? Thanks a bunch!
I love quick and fast!! And I was interested in making the 20 minute tote for gifts instead of gift wrap. Please tell me how I can modify the size up or down for the various gifts (at least 3 different sizes, one smaller and one larger than the pattern). Is there a formula to use for the length/width of the bag in relation to the straps?
Your instructions are so nicely explained (love the helpful pictures) and I can’t wait to make a few tote bags. My plan is to head to the dollar store and buy things to fill them with that a homeless person might find helpful. I have been wanting to make “Blessing Bags” to keep in the car to give out to anyone I see in need, and this has inspired me. Thanks so much!
This is an amazing simple pattern and the instructions with pictures are easy to follow. Just made one and 6 more to go for my grand children. I embroidered a women face on the front of the bag and came out beautiful. Thanks so much.
This will be a perfect gift bag for the grandchildren. I was stumped as to what I was going to use for 2017 Christmas and this is perfect. I always embrodier their names on the pillowcase or towel or whatever I decide to use. With 13, I hate to have all that paper and I really hate to wrap gifts. This way they each get an item with their name on it plus whatever I buy them.
love your bags , have you got a pattern for over the shoulder peg bag , I’m a newbie at sewing
thank you
Diane
-
For my tote bags (as I make many the same size) I cut out the pattern size in either card stock or cardboard that way u don’t have to measure it cuts down on time and I know they’ll be the same size x
Can you do the straps from the same fabric as the tote?
-
I like to buy belts from thrift stores, cut them up, and use those. I always look for the longest ones I can find as it allows for more length for the straps.
-
What a great idea!!!
-
Loved making those .little bags. I make all my bags for Christmas gifts
And make my own handles. I recently made twenty small bags for a
Church group sending them to foreign countries and made the handles of matching m arterial . Simple as you don’t have to find
Coodinating ribbon to compliment your fabric. Keep sewing—I am 94 and sew. Every day at the home where I live in N.H.
Your fabric.
Beautiful and easy bag . I made a few for presents.
Thank you Harriet for the inspiration. Love to see!
Please add notes when patterns arent available.
-
Hi Ann,
Thanks for writing in! Although the fabrics we used when we originally made these totes are not available, our pattern is still here! You may be looking for a template or pattern piece to print which we do not have for this pattern because it is as easy as can be – if you scroll to the “CUTTING” section of the pattern, you will see instructions and dimensions for cutting two rectangles from your chosen fabric, as well as the length of cotton webbing to cut for the handles.
I hope that helps!
Julianna
I’ve made about 120 of these tote bags for a local women’s day shelter. When the ladies ask for undies, socks, or bras, the staff tuck them into my fabric tote bags. So much nicer than a used plastic grocery bag. I’ve been using my fabric stash – HURRAY! But I also found drapery panels for $2 ea at my local thrift store and they worked really well! Thank you so much for the great idea. I’ve made a couple of small changes, but your pattern rocks!
Great pattern! What is the finished size.
Thank you.
Can I use linen? I have some linen fabric and I have no idea what to make with it.
-
Hi Wendy,
Thanks for writing in! Although there are many different weights of linen fabric, we used a heavy or upholstery weight cotton for these totes, so as long as your linen is on the heavier side, it should work great!
Best,
Julianna-
Maybe double the linen as a liner possibly?
-
If using the same fabric as the bag to make the strap and you want a stronger strap, use interfacing inside the strap. (Iron-on preferred)
-
Interfacing, or flat line it to some heavier fabric, so it will act heavier. Both works… just in case you don’t have interfacing!
How important is it to use cotton thread. I like dual duty because it has poly in it and is stronger than plain cotton thread.
Love the bags! I plan on making some for friends and family.
-
Hi Fran,
Thanks for writing in and for the kind words! You can certainly use a polyester or polyester blend thread for these bags. Although some sewing instructors or writers recommend matching your thread content to your fabric (in other words, use cotton thread with cotton fabric), you can also choose to use a stronger thread for items that will see heavier use, such as tote bags, or when sewing heavier weight fabrics.
Best of luck and happy sewing!
Julianna
These are good, but I was Wondering how hard would it be to add a gusset on the sides?
I think this would expand their use immensely.
My first bag turned out amazing! Thanks for the easy to follow instructions …onto my next bag!
Thanks
!
???Thks so much for sharing! I’m motivated to make quite a few of these for my shopping, instead of plastic bags! I love the material you used to make these! Also that was great giving the option of printing the pattern/or saving the pdf file!
Très jolis sacs.
Je viens de sortir la machine à coudre car je dois en réaliser vingt-trois pour les élèves de ma classe.
Je vais utiliser les anciens rideaux de la maison dont le tissu est passé d’un côté ainsi que des chutes de coton légers pour les différencier.
Merci pour les explications claires et faciles à suivre.
Bonjour
Je cherche les dimensions des petits sacs mais en cms car les mailles je comprends pas
Merci de votre aide
C’est pour offrir à la médiathèque de ma commune je souhaiterai faire qq petits sacs
Cordialement et bravo pour ce que vous réalisez
Nadou
WOW! So easy. I have just started using a sewing machine, in our family, generation after generation sewed by hand (beginning in the day when there was no such thing as a sewing machine), and I have mastered that quite well. But some of the newer projects and ideas, just can’t be done by hand. Although this could be, my arthritis will not allow much more hand sewing. This is the BEST tutorial with the words ACTUALLY matching the pictures that I have found so far. So many of them still lose me when they explain each step, and then show the photos. They are not real clear. Thanks so much for TRULY making it easy to follow your instructions. Have a blessed day!
I’ve taken so much from this post, thank you! Your bag turned out beautiful and I love its antique charm. The colors are subtle, yet done with so much precision and attention to details. And I’m definitely going to apply your great tips when painting my tote bag.
I’m moderating it slightly by dropping in a lining with a small interior pocket. Wish me luck!!
-
Hi Nicci,
Thanks for your comment! Adding a lining with an interior pocket sounds awesome, and super handy! I’m sure it’ll turn out wonderfully.
Have a great rest of your day!
All the best,
Cat
Thank you for sharing, you inspire me to get going on making my own market/grocery bags!
I’ve used this to make some Halloween trick or treat bags.
My first time using the zigzag stitch and happy with how they’ve turned out.
Thank you for making it easy to follow also I’m autistic and visual images are easier for me to understand.
I have used French seams to make the inside of the tote bag neater.
What a great idea! I got married in January and really wanted to make a ton of hand-made stuff for the guests! Honestly, had I more time, I would have wanted to make all of the wedding favors… anyway, I ended up just making cookies for the out-of-town guests, putting them in pretty paper bags from a craft store, along with other goodies from my hometown (Bethlehem, PA)… I wish i had thought to do this, though! What an awesome last-minute gift! (ps – best wishes on your upcoming wedding!!)
Love this idea! As a new sewer, this looks like something I could easily do! How fun!
i can’t wait to try this! i really like quick sewing projects, that aren’t overwhelming!
This is such a fabulous idea! Just wondering how much can the tote bag hold .. hrm.. Definitely must try this out one day!
You did good, girl. I did/do the same thing…bite off more that I can chew and then I’m a rag when the final stuff needs to get done. NO MORE OVEREXTENDING! only you will know, right? BUT ..those of us who make stuff…it wouldn’t be special if we didn’t have something handmade that was made by us!! I hear ya on that one. …so….you did great with this one, very nice gifty…..I would certainly love one of those…and the timing thing you did…bravo!…so you knew how much time you needed to sew them all (so you can say “Forgettaboutit!”)
I love your tutotial!
Brilliant! I love the simplicity in using the zig-zag stitch. Thanks for sharing! And have fun making lots of bags! 🙂
Very sweet! I love the fabric…is it like canvas or ????
These will make awesome gift bags. Thanks for sharing.
I made one of these today using the Kokka Tiny Prints Black Cat print. It did take me longer than 20 minutes but I am a beginner. Now it’s a hepcat bag! Thanks for the tutorial.
What a great bag! I would like to use this instead of paper gift bags.
Love your tutorials!
Congratulations the wedding!
I love these bags and I think I could actually make them. Thanks for the tutorial.
I just finished my bag and I had my doubts along the way. I am a beginner sewer and this was my second project. It came out really cute! I’m so pleased. I’m using it instead of a gift bag for my niece’s birthday gift. I’m so inspired by this website! Keep the tutorials coming!!
Have been thinking about bags for my knitting projects (instead of lumping them all together). I think in Decor-weight fabric (to protect a little from needle poke-through) these will be perfect!
those prints are so cool! i’m definitely going to try a version of this.
What a great tutorial ! thanks for sharing
I made one today – so easy! It took me around 40 minutes, if you include cutting and pinning time. You can click the link in my name if you want to see how my bag turned out.
Thanks so much for sharing this.
This looks like a fun and quick project to try!
This a great idea! I'm including it in the handmade gift roundup at somedaycrafts.blogspot.com on Friday
this was on my to-do-list since months, last week i tried one. And now I´m addicted, i have done 8 totes!
a new idea for me, thanks a lot 🙂
I just finished making this bag a few minutes ago, and I love love love love it! It looks like the ones they sell in stores! Thank you so much 🙂
A really neat and easy idea. I do believe I will make several for friends . However using the serger should simplify several steps for me.
I just found this “the twenty minute tote” and eager
to try it. Could someone let me know how this can
be done on a serger. Am interested in the best
type of material not overly expensive.
Hi Shorty Annie-
Thanks so much for your comment. None of us at the Bee have experience with a serger but it might be something we explore in the future so stay tuned! In the meantime maybe one of our knowledgeable readers can help you out?
Thanks again!– Molly
thanks so much for this pattern!! i hand sewed this lovely bag with some cheap scrap giraffe patterned fabric and it turned out awesome!
that fabric is amazing.
i used your tutorial to make my first bag ever!
super fun.
cheers.
http://flytothewall.blogspot.com/2011/02/day-8-and-i-totalllly-want-to-make-this.html
I”m totally trying this. Thanks for the tutorial!
Shorty Annie
Anywhere that zig zag stitch was used you could use a serger. I still recommend using the straight stitch. The serger will “trim” any excess fabric off and make the ends look neat and trim and help keep the fabric from fraying. Zig Zag stitches here look GREAT and neat trim though so if you are that amazing with a zig zag it might just be easier to use one singular sewing machine instead of alternating between serger and normal (for your straight stitch)
Jana, Thanks for the info. on the Twenty Minute Tote
sewing the tote with a zigzag verses a serger.
Shortie Annie
thank you i am blogging this tomorrow
When I think of the money I spent buying different bags that didn't always please me and that now I see I could make them myself and create a huge collection of different bag designs… It seems so easy to make them!
I love this tutuorial!
I have never really done any sewing before so i am a total newbie. I really want to make party bags for my nieces 4th birthday party. She is having a pyjama pizza party so hopefully i can find some material to suit the theme.
I just wanted to ask which material should i look for to use? is there a specific type of material? (I am in cape town, south africa).
Also has anyone else tried this and can give me some useful tips to make it easier. I need to make around 30 smallish bags for the 18th September.
Love the whole blog and especially this pattern!
Hi Tami-
Thanks for the kind words about the blog and pattern!
This will work best with a heavier weight fabric like any of these upholstery weight fabrics here: https://www.purlsoho.com/purl/products/12-sewing-patchwork-fabric?filters%5B%5D=532
Good luck with your project!
– Molly
Hi Molly,
Thanks for replying so quickly.
I really love those fabrics but i need to buy them here in cape town. What kind of fabric should i ask for in the store? An upholstery fabric? As it is for a kids party pack I want it to be durable but not the best or most expensive. Is there any other type of fabric i should ask for?
There really is nothing like this in cape town so i am exicited to do something unique for my niece.
Thanks and hopefully it works out – i will let you know.
Hi Tami-
Upholstery Weight is a good thing to ask for, or canvas.
Thanks for your questions!
Gogeous bags, sorry I am too lazy to make this – Where can I buy one or two of these. I want one asap.
Hi Donna-
We don't sell these already sewn but we if you call Purl Soho in NYC they can recommend someone who could sew it for you. Their number is 212-420-8796.
Thank you!- Molly
Wow, these are GREAT!! I have featured this tutorial at:
http://happyinred.blogspot.com/2011/10/tribute-to-tote.html
I hope that's okay? If not: please contact me and I'll take care of things asap!
Esther.
This is the cutest DIY ever!!!!!
This is such a a great simple tutorial! Thanks for sharing!
I included this post in a tutorial link list on my blog today. Enjoy. 🙂