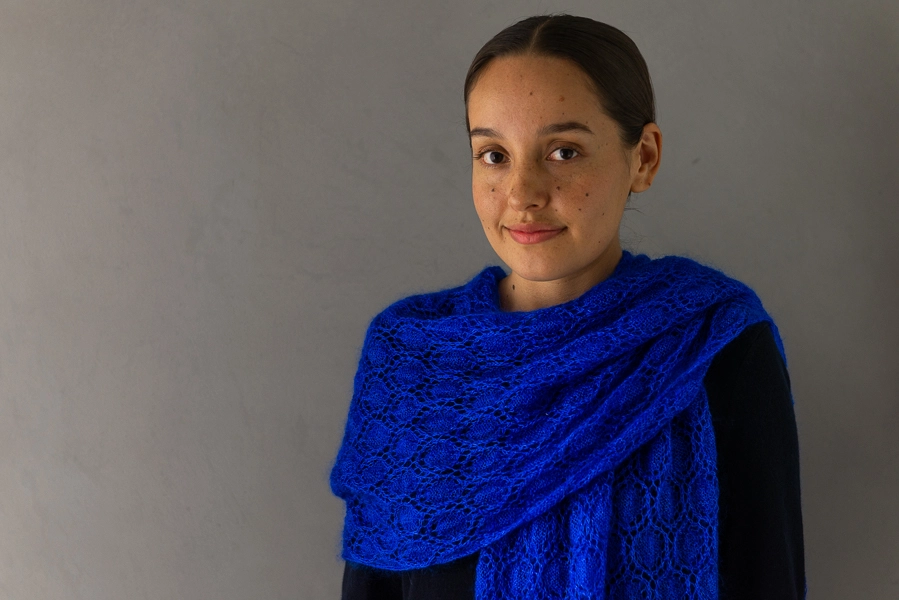
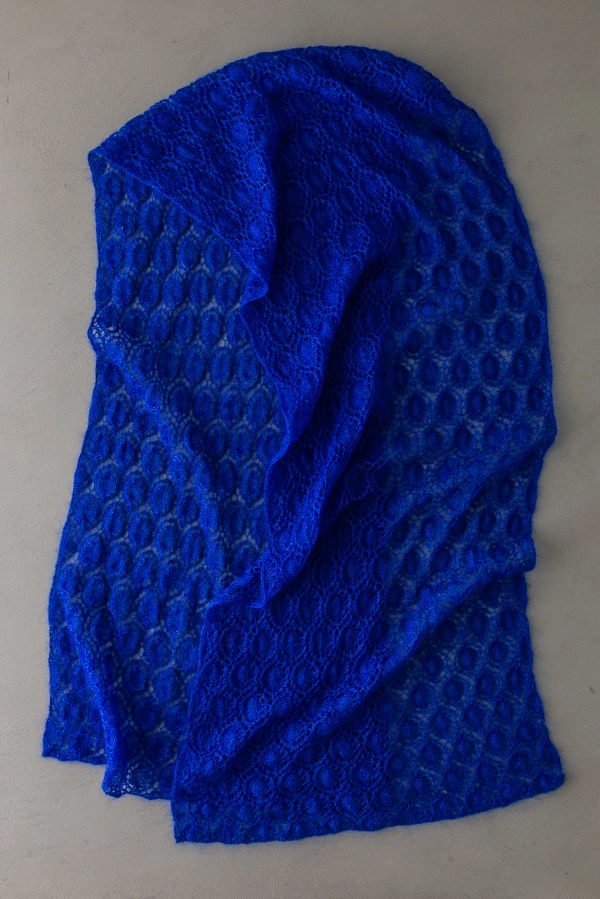
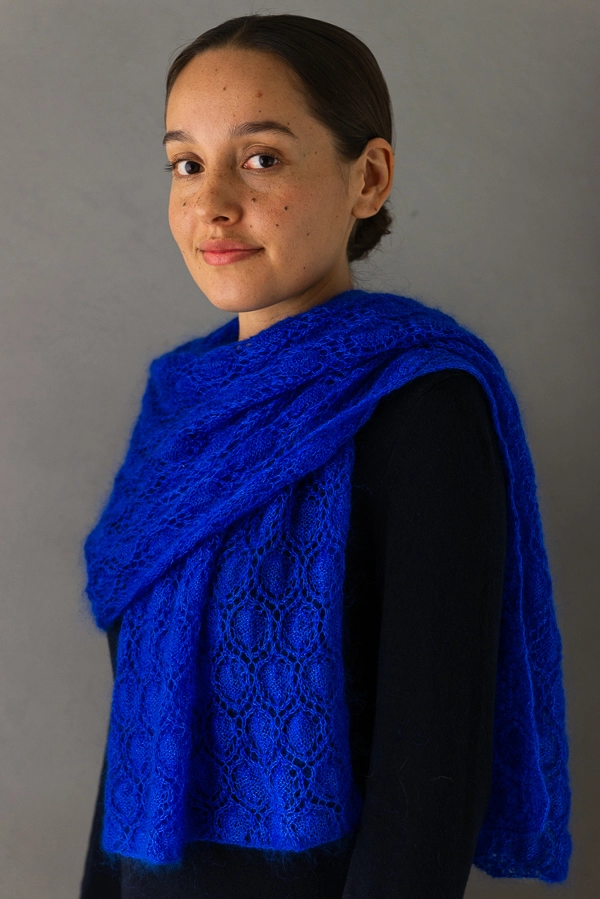
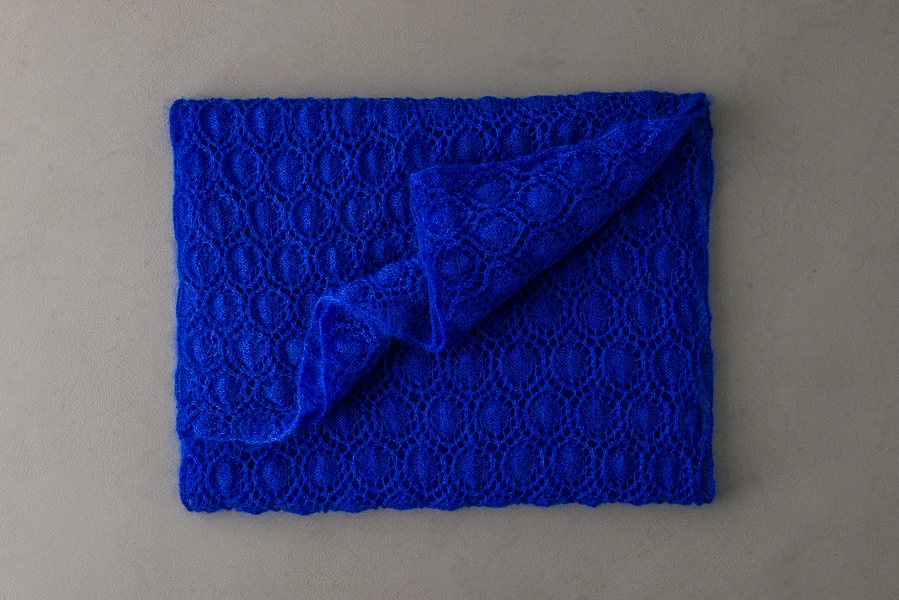
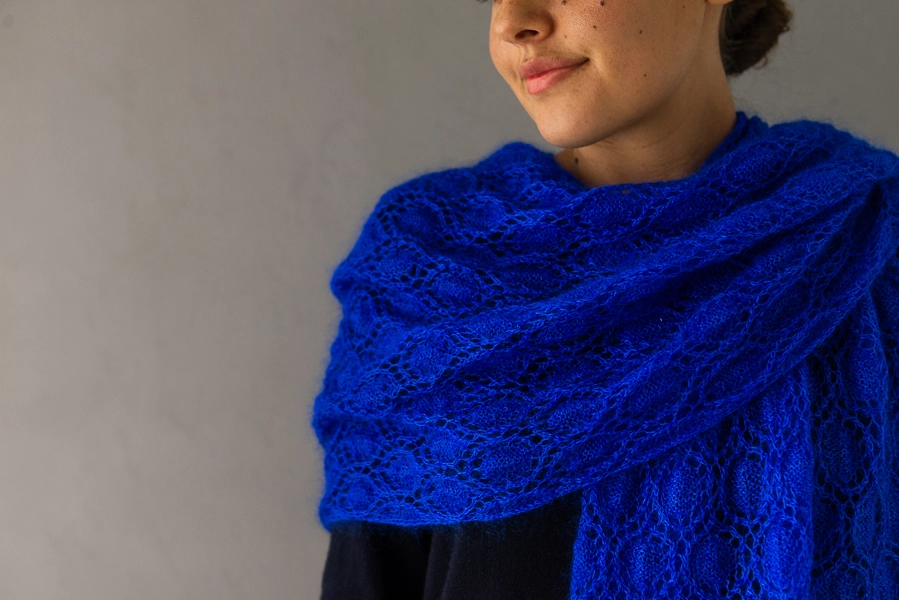

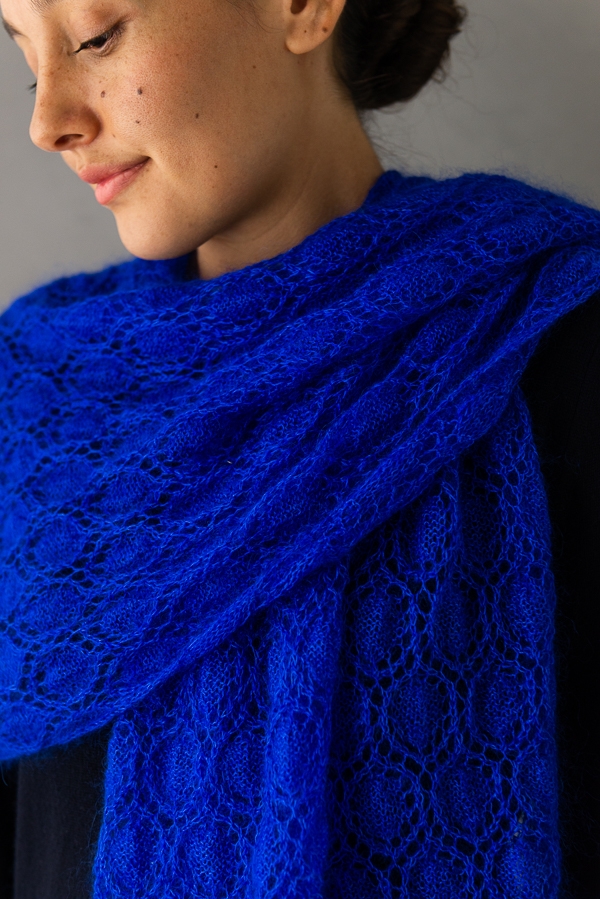
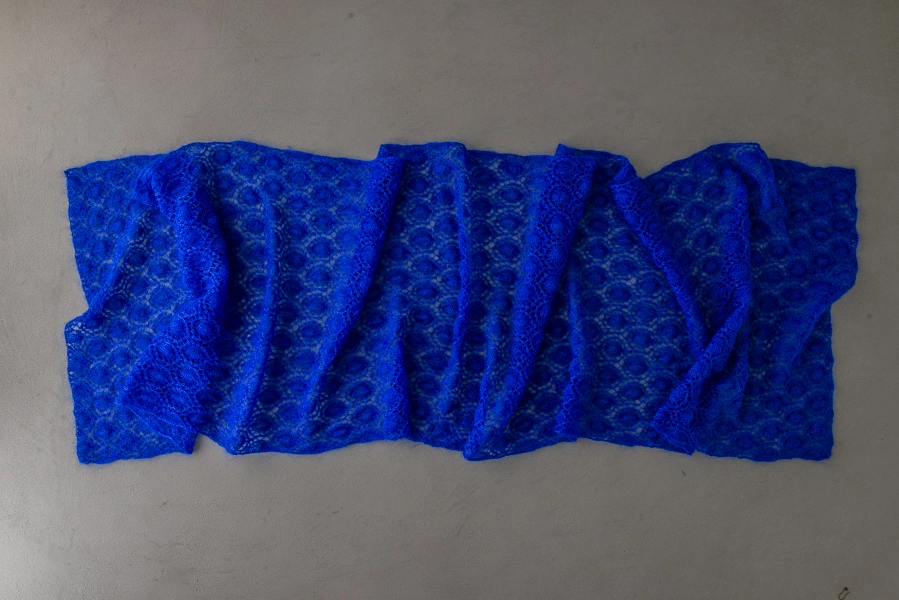
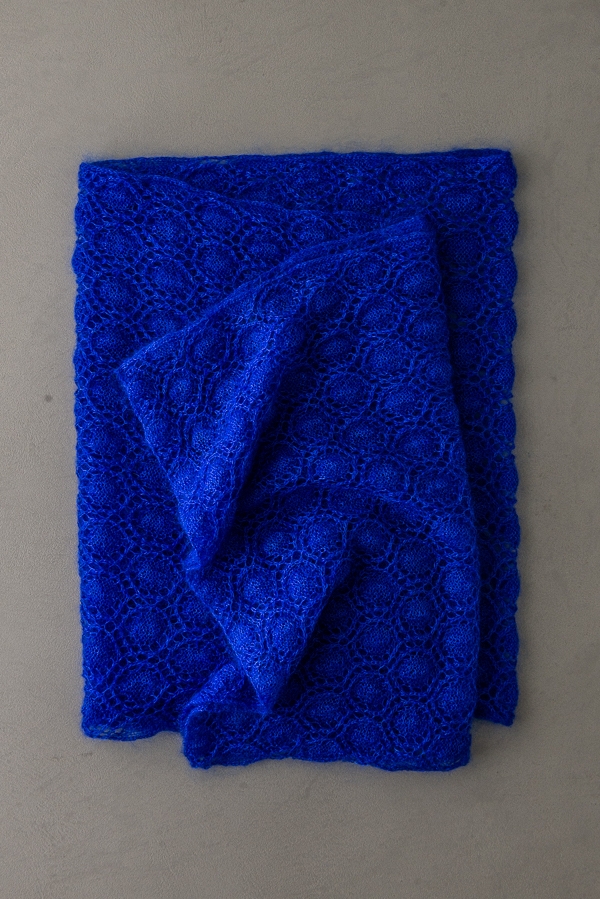
Dewdrops Wrap
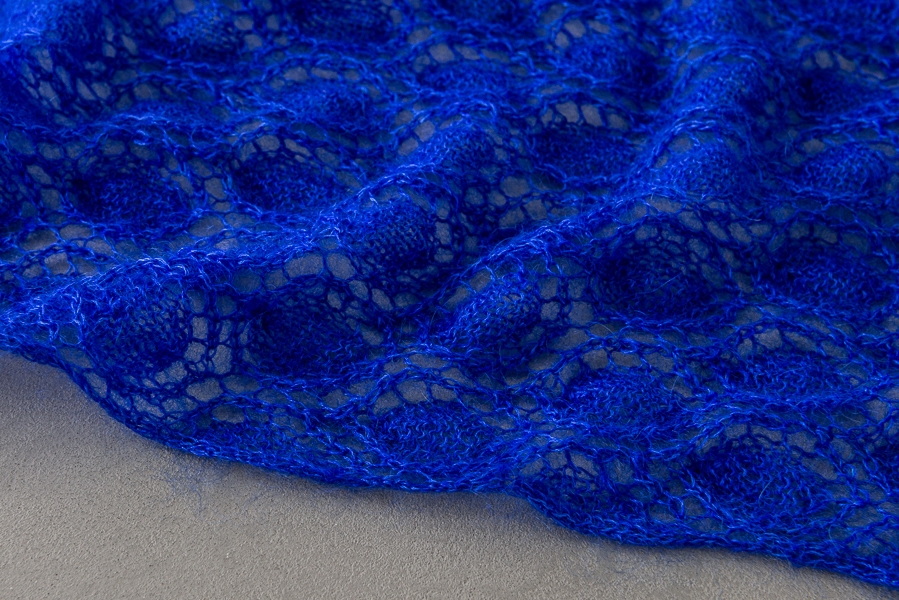
The sun climbing over the horizon, birds alighting from their nests, and drops of dew clinging to the milkweed, it’s all in a morning! Our Dewdrops Wrap is a bright eyed and bushy tailed knit, carpeted in a field of pretty droplets.

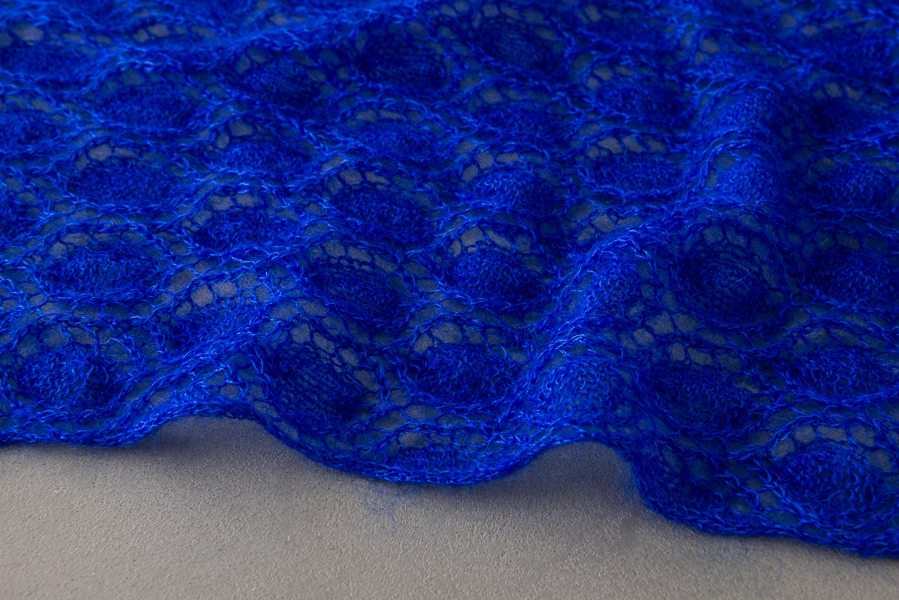
This classic lace pattern does the unusual by busting knitting out of its grid into a land of orbs. Probably not your first lace project, but a fun challenge for everyone else, we offer the 24-row repeat as written or charted instructions.

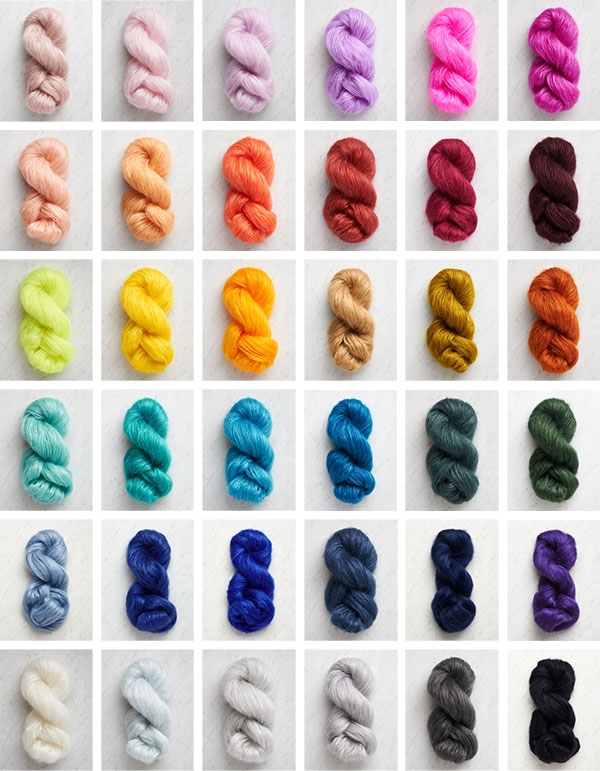
And, burying the lead, how about this color?! One of our new additions to the Tussock palette, bluer-than-blue Lapis Lazuli is like a siren beckoning. It’s one of our five new blues, plus a purple, that brings the Tussock family to thirty-six glorious colors!
Yarn lovers, if you adore the yarn used in this project, you’ll love exploring all of our other yarn collections! Discover over 45 thoughtfully designed yarns in nearly every natural fiber and in every spectacular color you can imagine. Only available here at Purl Soho’s online yarn store, where every skein is created with care and your creativity in mind!
Designed by Purl Soho designer, Jake Canton. Click here to see even more of Jake’s designs!
Share your progress + connect with the community by tagging your pics with #PurlSoho, #PurlSohoBusyHands, #PurlSohoDewdropsWrap, and #PurlSohoTussock. We can’t wait to see what you make!
Materials
- 2 (4) skeins of Purl Soho’s Tussock, 60% super fine kid mohair and 40% silk. Each skein of this fingering-weight yarn is 328 yards / 25 grams; approximately 650 (1,299) total yards required. We used the color Lapis Lazuli.
- US 4 (3.5 mm) straight or 24-inch circular needles
Gauge
29 stitches and 42 rows = 4 inches in stitch pattern
Size
Finished Dimensions: 9 (19) inches wide x 76 inches long
Notes
Stitch Multiple
This pattern works over a multiple of 12 + 5 stitches.
Decreases
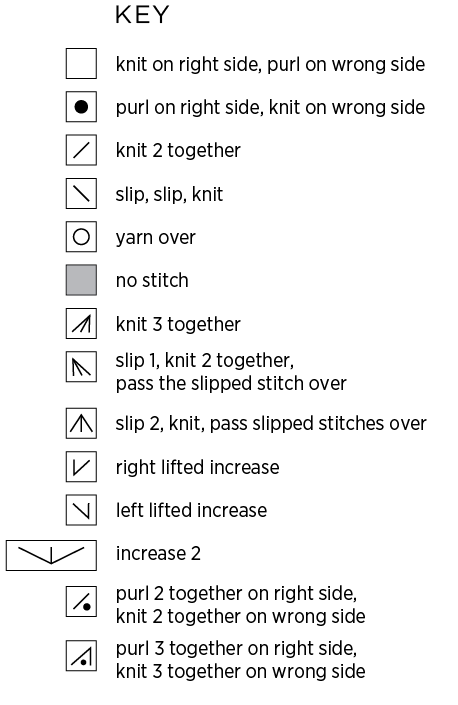
Slip 1, k2tog, psso (slip 1, knit 2 together, pass slip stitch over)
Slip 1 stitch purlwise with yarn in back, knit 2 stitches together, pass slipped stitch over k2tog and off right needle. [2 stitches decreased]
S2kp (slip 2, knit 1, pass slip stitch over)
Slip 2 stitches together knitwise with yarn in back, knit 1, pass slipped stitches over knit stitch and off right needle. [2 stitches decreased]
For more information on this technique, please visit our S2kp Tutorial.
Increases
RLI (Right Lifted Increase)
Lift right leg of stitch below next stitch on left needle onto left needle and knit it. [1 stitch increased]
LLI (Left Lifted Increase)
Lift left leg of stitch 2 rows below stitch on right needle onto left needle and knit it through the back loop. [1 stitch increased]
For more information on these techniques, please visit our Lifted Increase Tutorial.
INC2 (increase 2)
K1 into back loop leaving stitch on left needle, k1 into front of same stitch leaving it on left needle, k1 into back loop of same stitch and let it fall off left needle. [2 stitches increased]
Pattern
Cast on 65 (137) stitches. We used a basic Long Tail Cast On.
Set-Up Row (wrong side): Purl to end of row.
Now follow either the Written or Chart Instructions, both below.
Written Instructions
Row 1 (right side): K2, knit 2 together (k2tog), *yarn over (yo), k2tog, yo, p5, yo, slip slip knit (ssk), yo, slip 1, k2tog, psso (see Notes), repeat from * to last 13 stitches, yo, k2tog, yo, p5, yo, ssk, yo, ssk, k2.
Row 2 (wrong side): P6, *k5, p7, repeat from * to last 11 stiches, k5, p6.
Row 3: K2, *yo, knit 3 together (k3tog), yo, p7, yo, ssk, repeat from * to last 3 stitches, yo, k2tog, k1.
Row 4: *P5, k7, repeat from * to last 5 stitches, p5.
Row 5: K1, ssk, yo, *ssk, yo, p7, yo, s2kp (see Notes), yo, repeat from * to last 2 stitches, k2.
Row 6: Repeat Row 4.
Row 7: K2, *yo, s2kp, yo, p7, yo, k2tog, repeat from * to last 3 stitches, yo, k2tog, k1.
Row 8: Repeat Row 4.
Row 9: K2, RLI (see Notes), k1, *yo, ssk, yo, purl 2 together (p2tog), purl 3 together (p3tog), p2tog, yo, k2tog, yo, INC2 (see Notes), repeat from * to last 14 stitches, yo, ssk, yo, p2tog, p3tog, p2tog, yo, k2tog, yo, k1, LLI (see Notes), k2.
Row 10: P7, *k3tog, p9, repeat from * to last 10 stitches, k3tog, p7.
Row 11: K2, RLI, k1, *[yo, ssk] twice, p1, [k2tog, yo] twice, INC2, repeat from * to last 12 stitches, [yo, ssk] twice, p1, [k2tog, yo] twice, k1, LLI, k2.
Row 12: P8, *k1, p11, repeat from * to last 9 stitches, k1, p8.
Row 13: K2, p3, *yo, ssk, yo, slip 1, k2tog, psso, yo, k2tog, yo, p5, repeat from * to last 12 stitches, yo, ssk, yo, slip 1, k2tog, psso, yo, k2tog, yo, p3, k2.
Row 14: P2, k3, *p7, k5, repeat from * to last 12 stitches, p7, k3, p2.
Row 15: K2, p4, *yo, ssk, yo, k3tog, yo, p7, repeat from * to last 11 stitches, yo, ssk, yo, k3tog, yo, p4, k2.
Row 16: P2, k4, *p5, k7, repeat from * to last 11 stitches, p5, k4, p2.
Row 17: K2, p4, *yo, s2kp, yo, ssk, yo, p7, repeat from * to last 11 stitches, yo, s2kp, yo, ssk, yo, p4, k2.
Row 18: Repeat Row 16.
Row 19: K2, p4, *yo, k2tog, yo, s2kp, yo, p7, repeat from * to last 11 stitches, yo, k2tog, yo, s2kp, yo, p4, k2.
Row 20: Repeat Row 16.
Row 21: K2, p2tog, *p2tog, yo, k2tog, yo, INC2, yo, ssk, yo, p2tog, p3tog, repeat from * to last 13 stitches, p2tog, yo, k2tog, yo, INC2, yo, ssk, yo, p2tog twice, k2.
Row 22: P2, k2tog, *p9, k3tog, repeat from * to last 13 stitches, p9, k2tog, p2.
Row 23: K2, p1, *[k2tog, yo] twice, INC2, [yo, ssk] twice, p1, repeat from * to last 2 stitches, k2.
Row 24: P2, k1, *p11, k1, repeat from * to last 2 stitches, p2.
Repeat Rows 1-24 until piece measures 70 inches from cast-on edge, ending with Row 24.
With the right side facing you, bind off knitwise.
Weave in the ends and wet block to finish!
Chart Instructions
NOTE: Begin this chart in the bottom right corner. Right-side rows are odd numbered and read right to left. Wrong-side rows are even numbered and read left to right. Work your way up the chart to the top line.
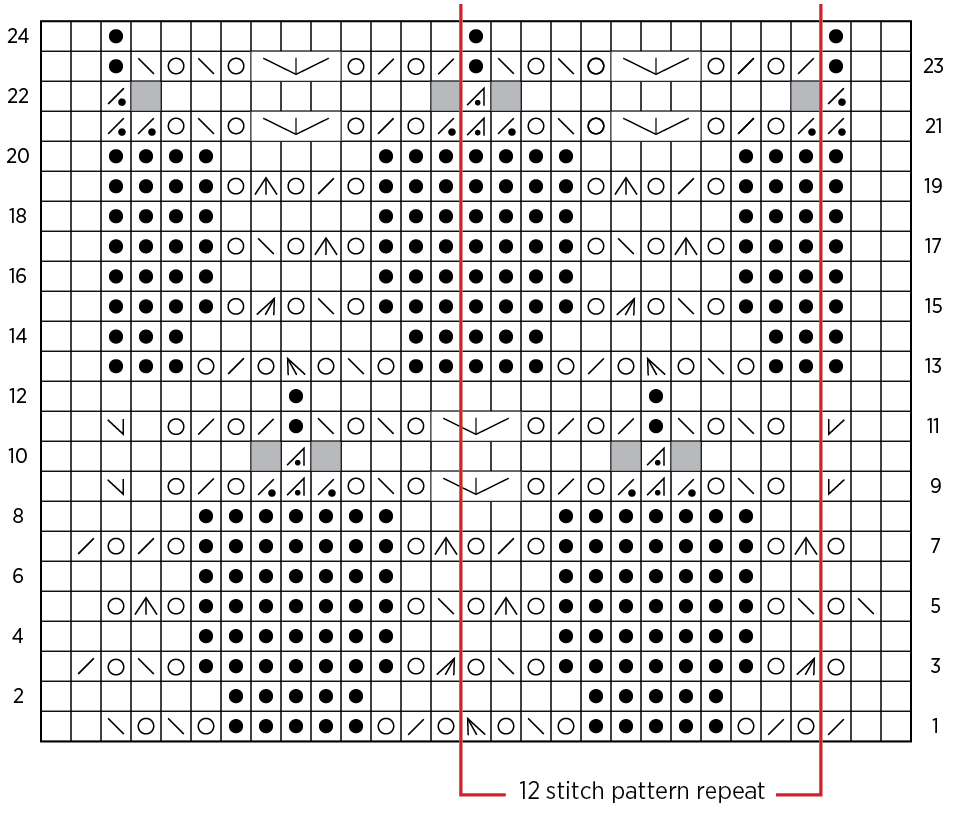
(Want to see it bigger? Click here and view the chart as a PDF!)
Update: Key Modified on September 1, 2020
Key: The symbol for k3tog and slip, k2tog, pass the slipped stitch over, switched with each other.
Repeat Rows 1-24 until piece measures 70 inches from cast-on edge, ending with Row 24.
With the right side facing you, bind off knitwise.
Weave in the ends and wet block to finish!
LEARN ABOUT TUSSOCK + ALL OUR BEAUTIFUL YARNS
Tussock is impossible to replace! Spun and dyed in Japan, it is 60% super fine kid mohair, the softest quality there is, plus 40% silk, which is much more than most mohair-silk blends and makes for a super lustrous yarn. Technically a fine lace-weight, Tussock’s mohair blooms so beautifully that we prefer to use it as a fingering-weight yarn, either alone on US 3-6 needles or alongside other yarns for plumping up a companion or deepening its complexity. Choose from 26 gorgeous colors, inspired by juicy, ripe berries and mimosas in bloom, lapping waters and zippy wildflowers… Pure joy!
More Free Knitting Patterns
- Be sure to explore our collection of free Tussock knitting patterns and cast on!
More Fingering-Weight Yarns
- Shop our entire collection of fingering-weight yarn
- If you want to use a different yarn, be sure to take the time to get the correct gauge. Need help? Check our All About Gauge Tutorial!
More Yarns With Similar Fibers
- Shop mohair yarn
- Shop silk yarn
Looking for more inspiration? Explore all of our free knitting patterns and knitting tutorials, buy one of our many knitting kits and yarn bundles, and shop for beautiful yarn. We have over 35 gorgeous natural fiber yarns in 100’s of magnificent colors, designed to bring integrity, beauty, and joy to your next knitting project and only available at Purl Soho!


That blue is incredible!
Do you use 2 strand of yarn?
Hi Pandora,
Thanks for writing in! This wrap is made using a single strand of Tussock.
Happy knitting!
Julianna
What can be substituted for the Tussock yarn
The daughter I would like to make this for can not tolerate mohair
Hi Cathy,
Thanks for reaching out! The fluffy halo of mohair is pretty unique to the fiber, but I have a few suggestions that are mohair free! I would try either our Linen Quill or Sweetgrass yarns. Both will show the stitch definition of the lace beautifully and add a subtle halo of alpaca. It won’t be as extreme as Tussock but will still be wonderfully soft around the edges!
I hope that helps, and happy knitting!
Julianna
I am trying to do this right now and on Row 1 I think there is an error. I have ripped this out three times now and am getting kind of frustrated. It says at the last 13 stitches to do yo, k2tog, yo, p5, yo, ssk, yo, ssk, k2. but if you add all that up it’s actually 19 stitches. Could you let me know what is correct. I don’t want to rip this out again.
Thanks for your help!
Elizabeth
Hi Elizabeth,
Thanks for writing in! I took a look at Row 1 and it should work out, even the last 13 stitches, so I think you might be working an extra stitch whenever you work a yarn over. The yarn over only refers to the yarn wrapping around the needle and does not include knitting or purling the following stitch, so when you’re counting the written stitches to see if the math will work out, you shouldn’t count the yarn overs, as they will add a stitch but will not use up one of the stitches on the needle. For this last section of Row 1, the k2tog and ssk each take up two stitches, so you will add together 2+5+2+2+2 for a total of 13 stitches. You may find it helpful to review our Yarn Over (YO) tutorial!
I hope that clears things up!
Julianna
Hi
Could someone help ne with row 9?
At the end I have less stitches.
Maybe I made “increase 2 wrong?
Thank you
Hi Mirzai,
Thanks for reaching out! If you are missing stitches at the end of row 9 it may be because you are missing an increase or yarn over at some point across the row. To help keep track of all of the steps in this row I would recommend writing the instructions out on paper and then checking off each step as you go or even placing stitch markers across the row to mark where the decreases and increases are!
I hope this helps and feel free to reach out with any more questions going forward!
Gianna
hello, sorry to say I have the same problem as Mirzai about the number of stitches of the row 9, I tried to write it down as you say but 13 stitches don’t fit in 12…? as it seems to be very complicated for many people to do this chart, wouldn’t it be possible to make a video ?
Hi Estelle,
Thanks for writing in. Let me see if I can help organize Row 9 so that it’s more clearly represented! To better conceptualize of the row, I divided it into 3 sections, so here’s how I think of it:
First section: k2, RLI, k1: increases from 3 stitches to 4 stitches
Second (repeated) section: *yo, ssk, yo, p2tog, p3tog, p2tog, yo, k2tog, yo, INC2*: increases/decreases balance out at 12 stitches
Third section: yo, ssk, yo, p2tog, p3tog, p2tog, yo, k2tog, yo, k1, LLI, k2: decreases from 14 stitches to 13 stitches
Since it looks like you may be most confused about the 12-stitch pattern repeat section, I’ll break that section down a bit more:
yo: no stitch on Row 8, 1 stitch on Row 9
ssk: 2 stitches on Row 8, 1 stitch on Row 9
yo: no stitch on Row 8, 1 stitch on Row 9
p2tog: 2 stitches on Row 8, 1 stitch on Row 9
p3tog: 3 stitches on Row 8, 1 stitch on Row 9
p2tog: 2 stitches on Row 8, 1 stitch on Row 9
yo: no stitch on Row 8, 1 stitch on Row 9
k2tog: 2 stitches on Row 8, 1 stitch on Row 9
yo: no stitch on Row 8, 1 stitch on Row 9
INC2: 1 stitch on Row 8, 3 stitches on Row 9
So now, if you add up all the stitches that were on Row 8, it’s 0 + 2 + 0 + 2 + 3 + 2 + 0 + 2 + 0 + 1 = 12, and if you add up all the stitches that you should have after Row 9, it’s 1 + 1 + 1 + 1 + 1 + 1 + 1 + 1 + 1 + 3 = 12.
I’m sorry to say that we do not currently have the time and resources to create a video tutorial for this pattern, but thank you for the suggestion, and we will keep that in mind for the future. In the meantime, I hope this helps you visualize the pattern a bit better!
All the best,
Lili
thank you Lili for your help. I tried it this way and it works well !!! It’s great !
Hi
I’ve attempted this 3 times, and can’t get past row 1. The pattern says to do the repeats up to last 13 stitches, but all three times I only have 12 left on the left needle. I ripped, thinking I’d miss counted but not 3 times. I was careful about the yarn overs and ask and k2tog places and I always come up with just 12 at the end. What am I doing wrong? Also before the purl 5 the yarn overs- didn’t work unless I reversed the way I did it. Is that correct?
thanks Vicki
Hi Vicki,
Thanks for reaching out! I double checked the pattern and it is correct so you should be coming up to 13 stitches at the end. I would guess that you are missing a yarn over somewhere along the way… I would recommend placing stitch markers to mark each of the repeats between the * to help you keep track of all of the steps within that sections or write out the pattern on a scrap paper and check off the steps as you go! I am also not sure why the yarn overs wouldn’t work before the purl 5 and would cause you to reverse them! I haven’t heard of that being an issue so that may be where the problem is happening.
See if marking the repeats helps at all, but if you are still having problems with Row 1 after this please take a picture of your work and send it to us at our email [email protected] and we can troubleshoot further from there!
All the best,
Gianna
Hi,
Thanks, those suggestions helped and I rewatched the tutorials on the ssk and fixed my issues.
Vicki
I have been obsessed with this wrap in the bright blue color since you first sent out the pattern. Though I’m an intermediate knitter, I’m a bit concerned that there are ZERO finished projects on Ravelry. Is this pattern just too difficult? What’s going on? This is very unusual for a Purl Soho free pattern. I want to make sure before investing in expensive yarn.
Hi Manisha,
Thanks for reaching out! I don’t think it is because this pattern is too difficult- I would say it is an intermediate pattern just like most of our other lace wraps! I believe it may be because pattern hasn’t been as popular as some of our other lace patterns. We had a few lace patterns come out around the same time, and the others got a bit more attention than this one, which could be why you haven’t seen any finished projects on revelry.
I hope this helps, please feel free to reach out with any more questions! Also, if you do end up making this we would love to see your finished work!
Warmly,
Gianna
Hi there. So I listened to you and ordered 4 skeins of the Tussock to knit this shawl, and I’ve knit a few rows over the course of hours. I can see why there are no finished projects. While the actual techniques are not in themselves difficult, doing them in the Tussock is impossible even for skilled knitters. What makes this pattern even more challenging is that the pattern repeats are not easy memorizable from one row to the next, and so I have to keep looking back and forth. Knitting is supposed to be enjoyable. I’m dreading continuing further with this beast of a pattern in the Tussock. It would definitely be easier in a non-mohair fingering weight yarn. Now if only I hadn’t spent $80+ on Tussock I will never use.
Hi Manisha,
I am sorry to hear that you are not satisfied with this project, please email us at [email protected] and we can assist you further from there.
Warmly,
Gianna
This is a fairly complex pattern, but then I am kind of a newby at knitting. I am learning the pattern as I go and I have to say that it helps to keep things fairly loose. Each row I start I think of as a new beginning. A few times I have come to realize that I missed a yo, or the like, and I have to improvise. It is just me though. The main thing is that we should do it cause we enjoy it. I love pattern and am doing it in a teal color.
Hi,
I’m just starting this wrap and I never know how you want the slips done on the SSK. In the tutorial you’ve said you like to do slip one purlwise and then slip one knit wise but on the no cable cable scarf I found it was actually important to slip both slips on the SSK purlwise. Do far I’ve been doing purlwise followed by knitwise for this scarf but am not sure which will make the pattern look right. It would be great if you said how you wanted your SSKs to be done in your patterns more generally in the notes. I knit your patterns all the time and as many say, they are the best.
I still can’t read charts well even thought I’ve been an avid knitter for about 5 years now, but know many people who use your patters have often asked so, form them, it is really nice you are now including them.
Hi Jane,
Thanks for reaching out! We’re so glad you’ve been enjoying our patterns, and I’d be glad to clarify the ssk for you! There are different ways to work the ssk (some knitters prefer to slip both stitches in the same direction, while others like to slip the first stitch knitwise and the second stitch purlwise), but unless otherwise noted our preferred method is to slip the first stitch knitwise and the second stitch purlwise. You can take a look at our SSK Tutorial to see it in action, and we also list it in our Knitting Abbreviations and Terms page! I hope this helps clear things up!
Warmly,
Kelsey
Hola folks! I just wanted to make a note here, I’ve noticed quite a few folks making comments that the pattern is wrong and it appears to in fact be the chart that is the issue, not the written pattern.
Anyone following the chart will notice that the red lines for the repeat are incorrect beginning on 11. It’s strange that this has still not been fixed with the numerous messages but a good example is how row 13 in the written instructions is correct and tells you to k2, p3 THEN begin your pattern repeat rounds, the chart is clearly telling folks to start the repeat at the red line which is right in the middle of that p3 and would affect anyone’s numbers by the end.
Just wanted to make sure someone was aware as I, too, had to frog my project once but after 18 years of the craft, you notice things. 🙂
Happy crafting, all!
Hi Gabi,
Thanks for writing in, and that’s a great observation! I can confirm that the written instructions and the chart actually do match each other, but I’d be happy to explain the differences you’ve noticed between the bracketed repeat section in the written pattern and the red outlined repeat section in the chart.
While we always try to keep the stitch repeat the same between the written instructions and the chart, there are some instances where that wouldn’t create an intuitive repeat. That happens to be the case for this pattern in particular, which is why the pattern repeat in the chart doesn’t match the bracketed instructions from Row 11 onwards. Here, we felt the pattern read better when we tried not to force it into chart formatting!
As an example, let’s take Row 13. If we had written this line to match the pattern repeat in the chart, then the beginning would read: K2, p1, *p2, yo, ssk, etc…. This is not the most succinct way to write this out, since the three purled stitches are divided into p1 and p2. This same reasoning of not dividing the stretches of purl stitches (or knit stitches, on the wrong side) holds for the subsequent rows as well!
Another way to look at this is considering that because all of the stitches are repeated over and over throughout the course of each row, there technically is not one correct “start” to a repeat! You’ll always be cycling through the same pattern repeat, even though we choose to notate the duration differently in the chart than we do in the written instructions for the sake of clarity.
I hope this helps shed some light on how we chose to write up this pattern! And please don’t hesitate to reach out to us if you have any other questions.
All the best,
Lili
P.S. This pattern IS truly stunning and I find the repeats very easy to to memorize as I go once I figured out the chart, thank you so much for having a written AND chart version available, especially when it’s a free pattern. I’ve been using your patterns for YEAAARRRSSSSS and recognize the work that goes into this! Y’all rock. 😉
Hi,
Would it be possible to make this a square wrap that can be folded into a triangle? How many stitches would I need to cast on?
Thanks for your help
Ulrike
Hi Ulrike,
Thank you for writing in! That project sounds like a wonderful idea! To modify this pattern you will want to start with a gauge swatch. You will then measure your stitches per inch and multiply that number by the desired width of your project and that will give you your cast on number. One thing to keep in mind is that this pattern works over a multiple of 12 + 5 stitches. Then you can just knit to the desired height of your piece! I hope this helps!
Happy knitting,
Gavriella