Your basket is empty.
Continue Shopping
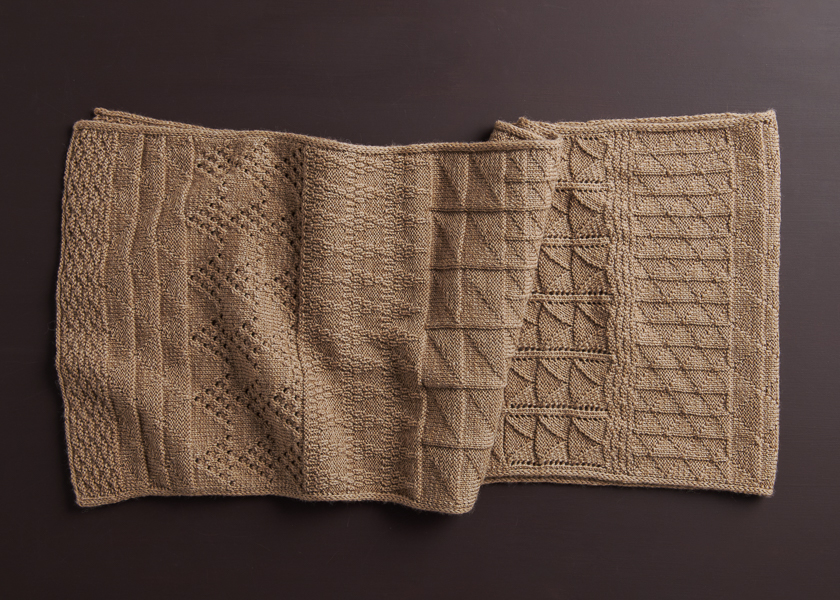
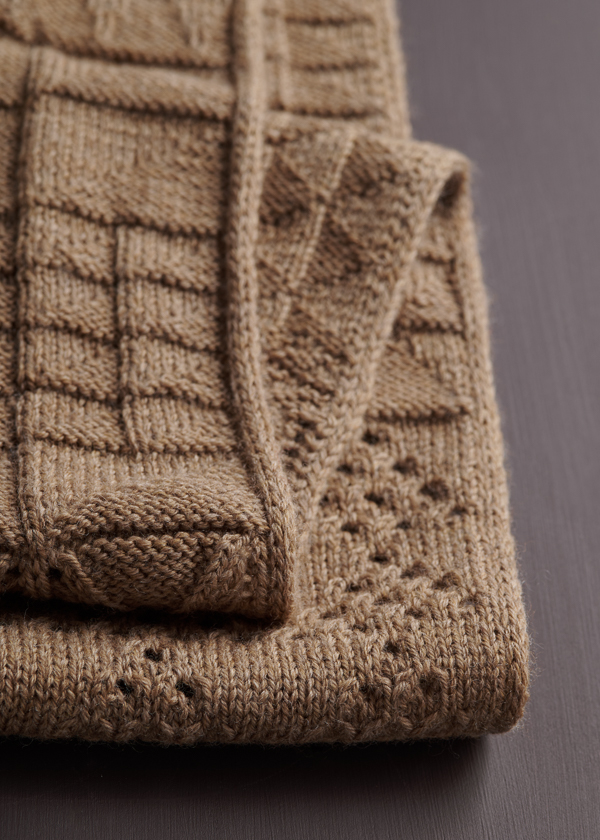
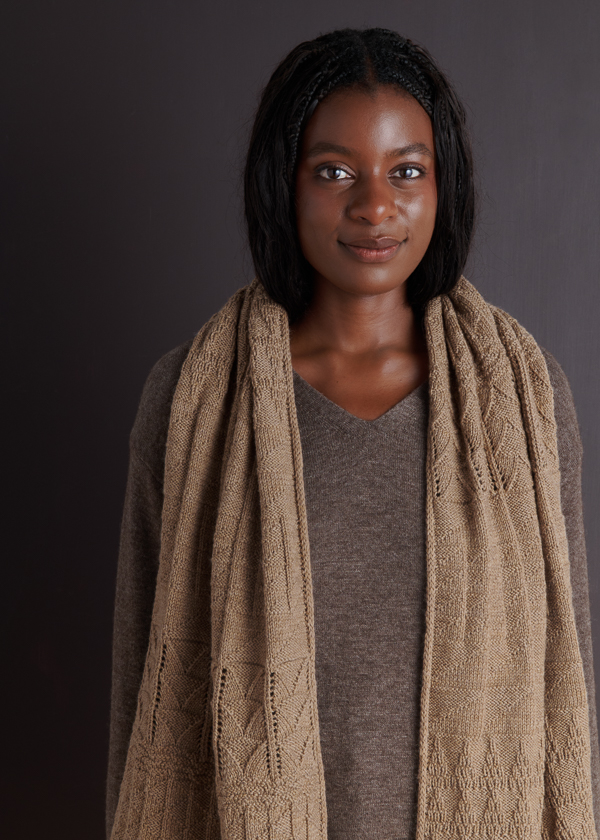
Porto Wrap
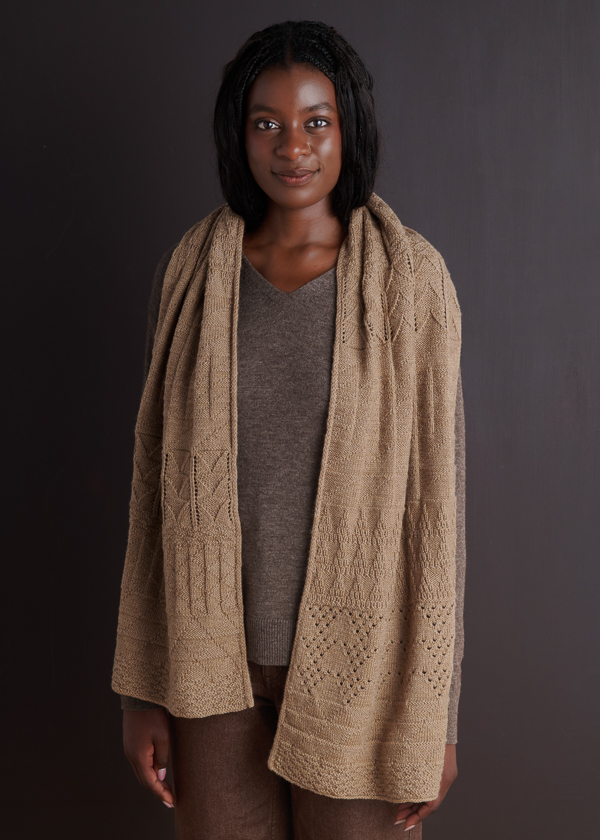
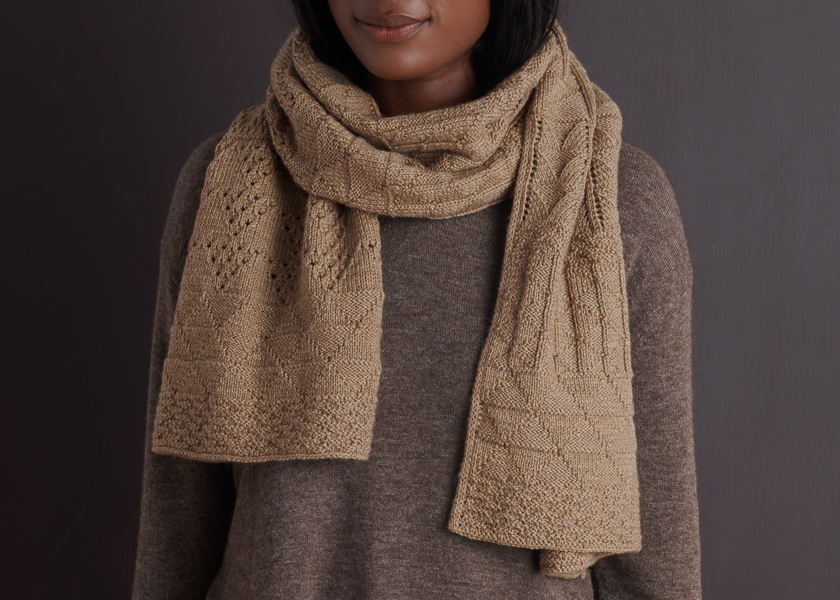
A masterpiece of simple stitches and the most knitting fun you can imagine, our Porto Wrap is a fresh take on our incredibly popular Porto Blanket, scaled down to a wearable work of art. While the original blanket featured our Knitting Yarn DK, this wrap version introduces our new Knitting Yarn Fine, itself a scaled-down version of a beloved classic!
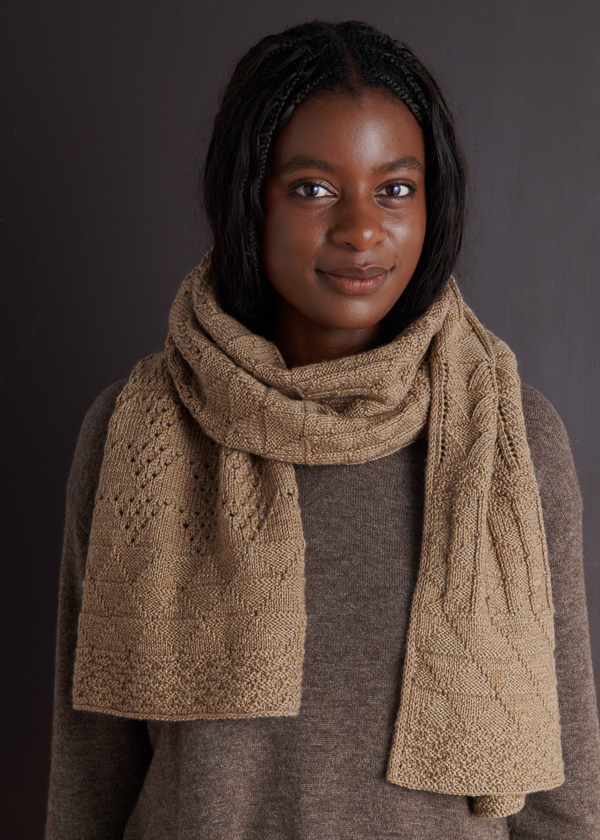
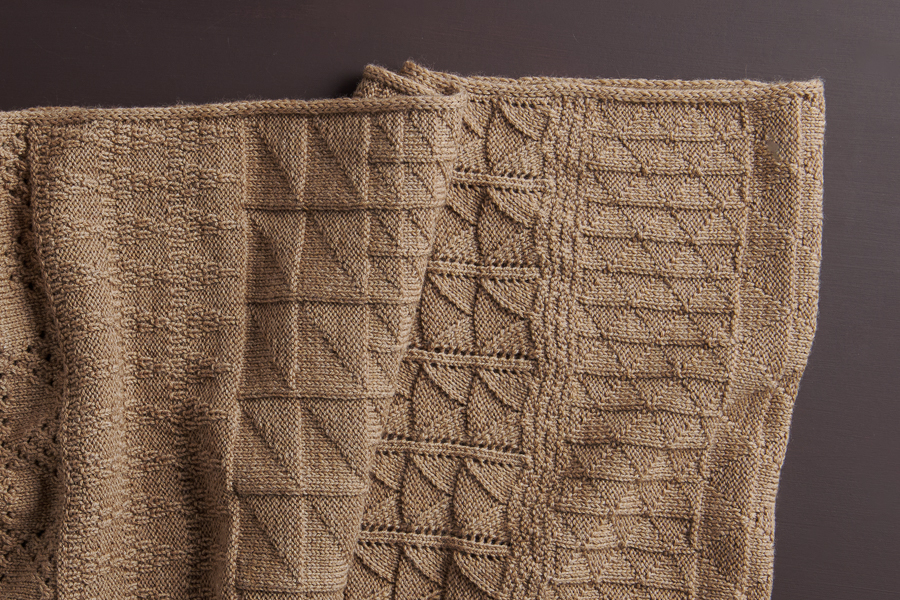
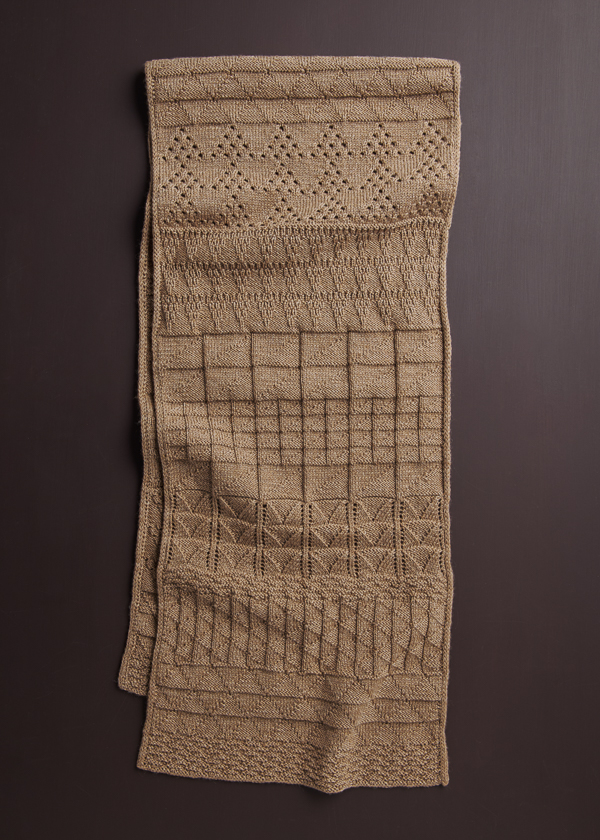
Explore nine different stitch patterns as you work your way through the Porto Wrap, all inspired by Portugal’s iconic tilework. Each section may look intricate, but you only need a handful of beginner techniques for the whole project! It’s a testament to the creative power of knitting’s simplest stitches: basic knits and purls, simple decreases, yarn overs, and knit-through-the-back-loops.
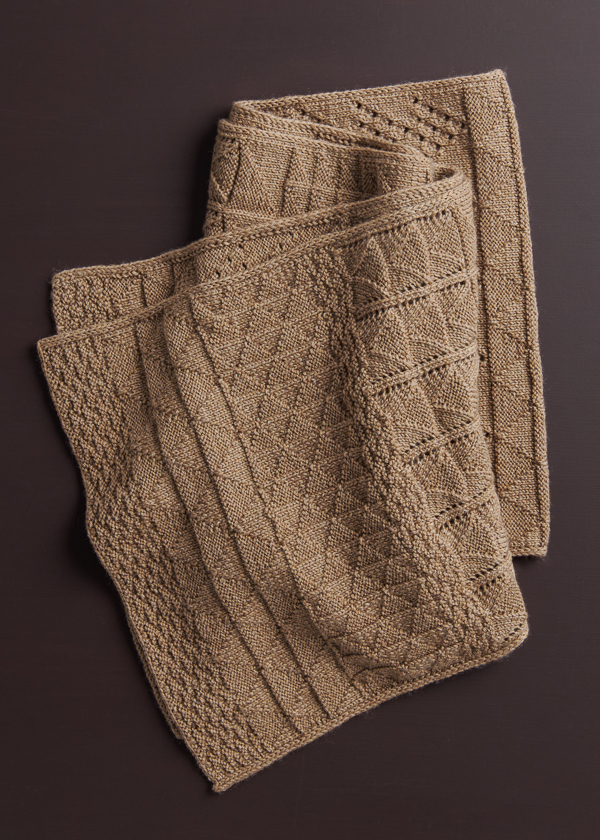
Knitting Yarn Fine is a brand-new sibling to Knitting Yarn DK, allowing you to knit with this perfect-for-everything 100% merino wool at those lovely finer gauges from fingering to sport weight. With its cushiony 4-ply spin and smooth surface, Knitting Yarn Fine gives you clear, crisp stitch definition and architectural textures across every stitch pattern, while pure merino wool makes the fabric super soft and elegant.
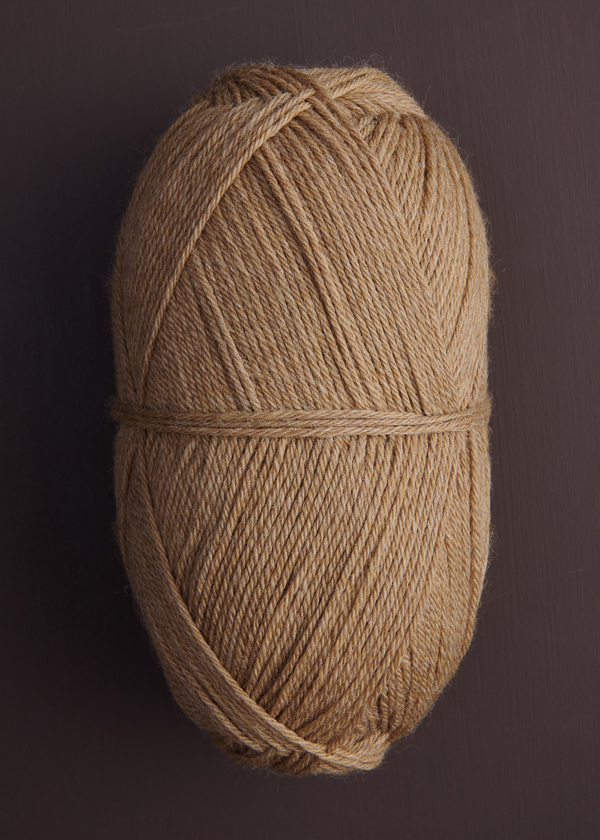
We chose to knit our Porto Wrap in warm Sandpiper Brown, but you can choose from an array of blues reminiscent of traditional Portuguese azulejo tilework or any of Knitting Yarn Fine’s 16 richly heathered colors. This yarn comes in plump, ready-to-knit balls, and you only need four to knit the Porto Wrap, like we did, or just two to make a narrower scarf!
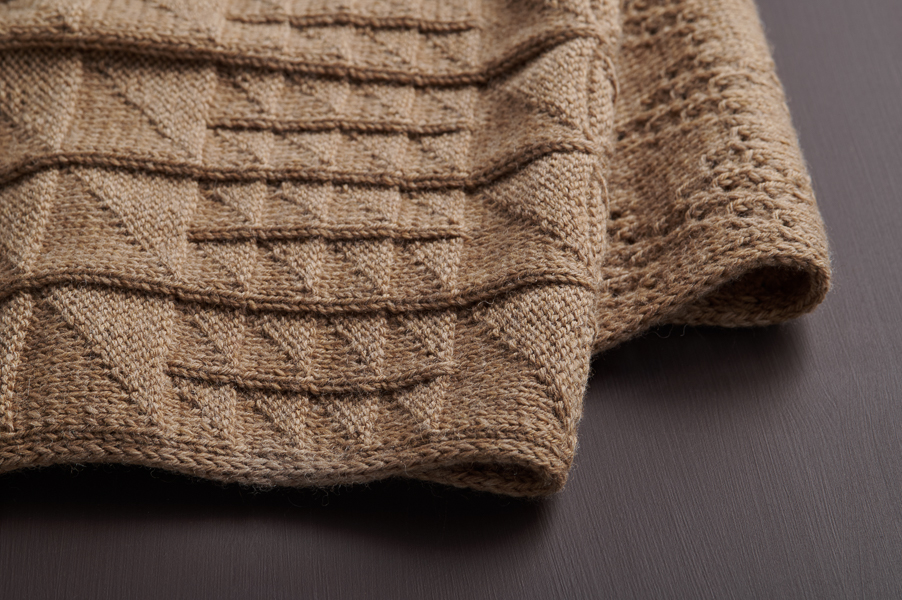
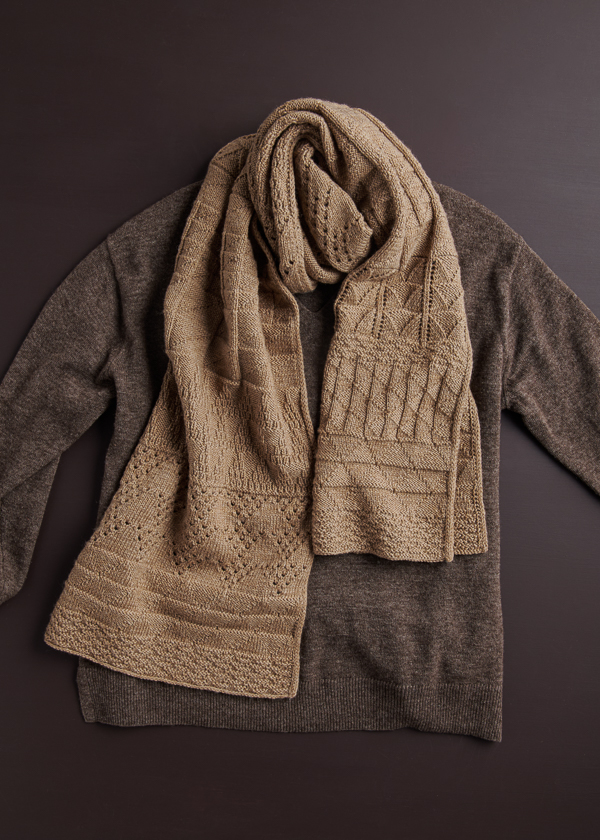
Beginners and seasoned knitters alike will savor the bouncy feel and understated beauty of Knitting Yarn Fine as one captivating texture gives way to the next. And at the end of this engaging knitting journey, you’ll have a shifting mosaic of geometric patterns, ready to wrap around your shoulders and transport you!
Yarn lovers, if you adore the yarn used in this project, you’ll love exploring all of our other yarn collections! Discover over 55 thoughtfully designed yarns in nearly every natural fiber and in every spectacular color you can imagine. Only available here at Purl Soho’s online yarn store, where every skein is created with care and your creativity in mind!
Pattern designed and written by Purl Soho designer, Hiromi Glover. See even more of Hiromi’s work on her Instagram!
Story written by Andrea Lotz for Purl Soho.
Want to print this pattern? On desktop, find the “print” icon in the right margin, and on mobile, scroll to the end of the pattern for it. Use the on-screen instructions to remove anything you don’t want to print!
Materials
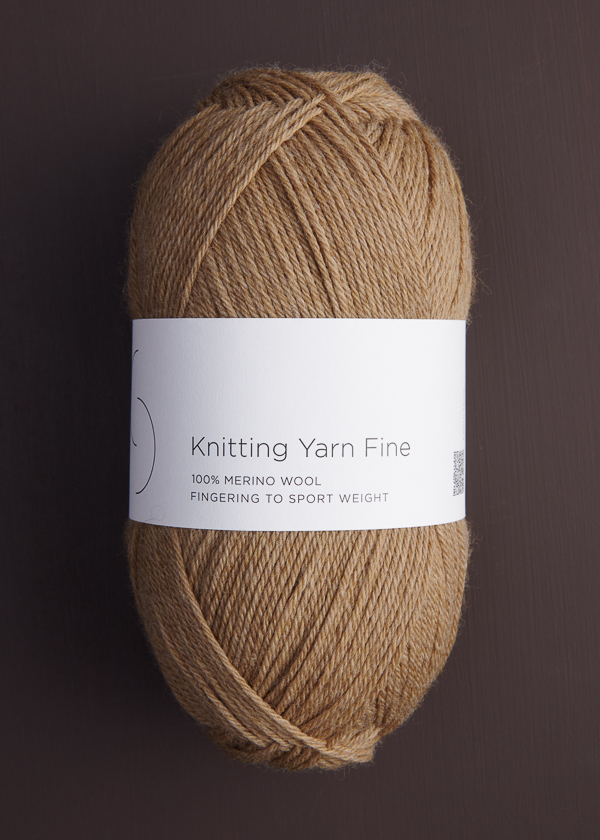
- 2 (4) balls of Purl Soho’s Knitting Yarn Fine, 100% merino wool yarn. Each ball of this fingering-weight yarn is 328 yards/ 100 grams; approximately 645 (1200) total yards required. We used Sandpiper Brown.
- US 4 (3.5 mm), 24-inch circular knitting needles
GAUGE
27 stitches and 40 rows = 4 inches in Large Flag Stitch (see Notes)
All the patterns used in this wrap have slightly different gauges, but if you can achieve the gauge listed above, your wrap will turn out the correct size!
SIZES
Scarf (Wrap)
Finished Dimensions: 7¾ (15) inches wide x 69¾ inches long
SAMPLE: We knit the Wrap size.
NOTES
LARGE FLAG STITCH PATTERN (FOR GAUGE SWATCH)
Cast on a multiple of 16 stitches.
Set-Up Row: (wrong side): Purl to end of row.
Row 1 (right side): Knit to end of row.
Row 2: *K1, p15, repeat from * to end of row.
Row 3: *K14, p2, repeat from * to end of row.
Row 4: *K3, p13, repeat from * to end of row.
Row 5: *K12, p4, repeat from * to end of row.
Row 6: *K5, p11, repeat from * to end of row.
Row 7: *K10, p6, repeat from * to end of row.
Row 8: *K7, p9, repeat from * to end of row.
Row 9: *K8, p8, repeat from * to end of row.
Row 10: *K9, p7, repeat from * to end of row.
Row 11: *K6, p10, repeat from * to end of row.
Row 12: *K11, p5, repeat from * to end of row.
Row 13: *K4, p12, repeat from * to end of row.
Row 14: *K13, p3, repeat from * to end of row.
Row 15: *K2, p14, repeat from * to end of row.
Row 16: *K15, p1, repeat from * to end of row.
Repeat Rows 1–16 for pattern.
STITCH MULTIPLE
This pattern is worked over a multiple of 48 plus 8 stitches. (Note that the stitch patterns in each section may work over different stitch multiples, but the wrap as a whole works over this multiple.)
SLIP STITCHES
On right-side rows: Slip stitches purlwise with yarn in back (wyib).
On wrong-side rows: Slip stitches purlwise with yarn in front (wyif).
PATTERN
BEGIN
Cast on 56 (104) stitches. We used a basic Long Tail Cast On.
Set-Up Row (wrong side): Slip 3 (see Notes), k1, purl to last 4 stitches, k1, p3.
Work Porto Pattern either from Written Instructions or Chart, both below.
PORTO PATTERN: WRITTEN INSTRUCTIONS
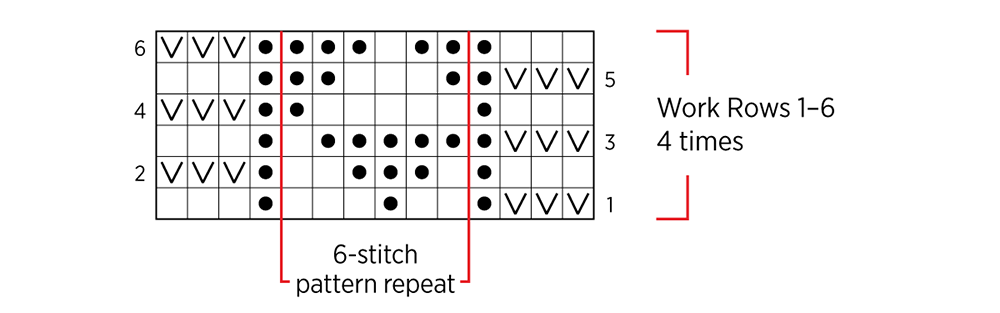
SECTION A: Knit Little Pyramid
Row 1 (right side): Slip 3 (see Notes), p1, *k2, p1, k3, repeat from * to last 4 stitches, p1, k3.
Row 2 (wrong side): Slip 3, k1, *p2, k3, p1, repeat from * to last 4 stitches, k1, p3.
Row 3: Slip 3, p1, *p5, k1, repeat from * to last 4 stitches, p1, k3.
Row 4: Slip 3, k1, *k1, p5, repeat from * to last 4 stitches, k1, p3.
Row 5: Slip 3, p1, *p1, k3, p2, repeat from * to last 4 stitches, p1, k3.
Row 6: Slip 3, k1, *k3, p1, k2, repeat from * to last 4 stitches, k1, p3.
Repeat Rows 1–6 three more times.
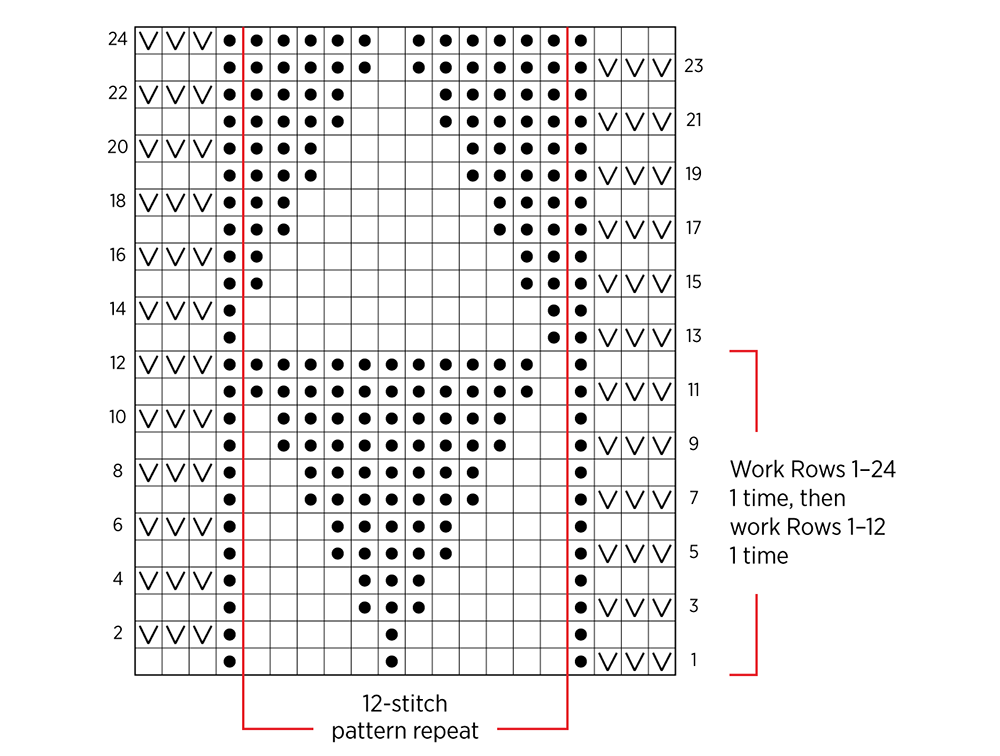
SECTION B: Halved Diamond
Row 1 (right side): Slip 3, p1, *k6, p1, k5, repeat from * to last 4 stitches, p1, k3.
Row 2 (wrong side): Slip 3, k1, *p5, k1, p6, repeat from * to last 4 stitches, k1, p3.
Row 3: Slip 3, p1, *k5, p3, k4, repeat from * to last 4 stitches, p1, k3.
Row 4: Slip 3, k1, *p4, k3, p5, repeat from * to last 4 stitches, k1, p3.
Row 5: Slip 3, p1, *k4, p5, k3, repeat from * to last 4 stitches, p1, k3.
Row 6: Slip 3, k1, *p3, k5, p4, repeat from * to last 4 stitches, k1, p3.
Row 7: Slip 3, p1, *k3, p7, k2, repeat from * to last 4 stitches, p1, k3.
Row 8: Slip 3, k1, *p2, k7, p3, repeat from * to last 4 stitches, k1, p3.
Row 9: Slip 3, p1, *k2, p9, k1, repeat from * to last 4 stitches, p1, k3.
Row 10: Slip 3, k1, *p1, k9, p2, repeat from * to last 4 stitches, k1, p3.
Row 11: Slip 3, p1, *k1, p11, repeat from * to last 4 stitches, p1, k3.
Row 12: Slip 3, k1, *k11, p1, repeat from * to last 4 stitches, k1, p3.
Row 13: Slip 3, p1, *p1, k11, repeat from * to last 4 stitches, p1, k3.
Row 14: Slip 3, k1, *p11, k1, repeat from * to last 4 stitches, k1, p3.
Row 15: Slip 3, p1, *p2, k9, p1, repeat from * to last 4 stitches, p1, k3.
Row 16: Slip 3, k1, *k1, p9, k2, repeat from * to last 4 stitches, k1, p3.
Row 17: Slip 3, p1, *p3, k7, p2, repeat from * to last 4 stitches, p1, k3.
Row 18: Slip 3, k1, *k2, p7, k3, repeat from * to last 4 stitches, k1, p3.
Row 19: Slip 3, p1, *p4, k5, p3, repeat from * to last 4 stitches, p1, k3.
Row 20: Slip 3, k1, *k3, p5, k4, repeat from * to last 4 stitches, k1, p3.
Row 21: Slip 3, p1, *p5, k3, p4, repeat from * to last 4 stitches, p1, k3.
Row 22: Slip 3, k1, *k4, p3, k5, repeat from * to last 4 stitches, k1, p3.
Row 23: Slip 3, p1, *p6, k1, p5, repeat from * to last 4 stitches, p1, k3.
Row 24: Slip 3, k1, *k5, p1, k6, repeat from * to last 4 stitches, k1, p3.
Repeat Rows 1–12 one more time.
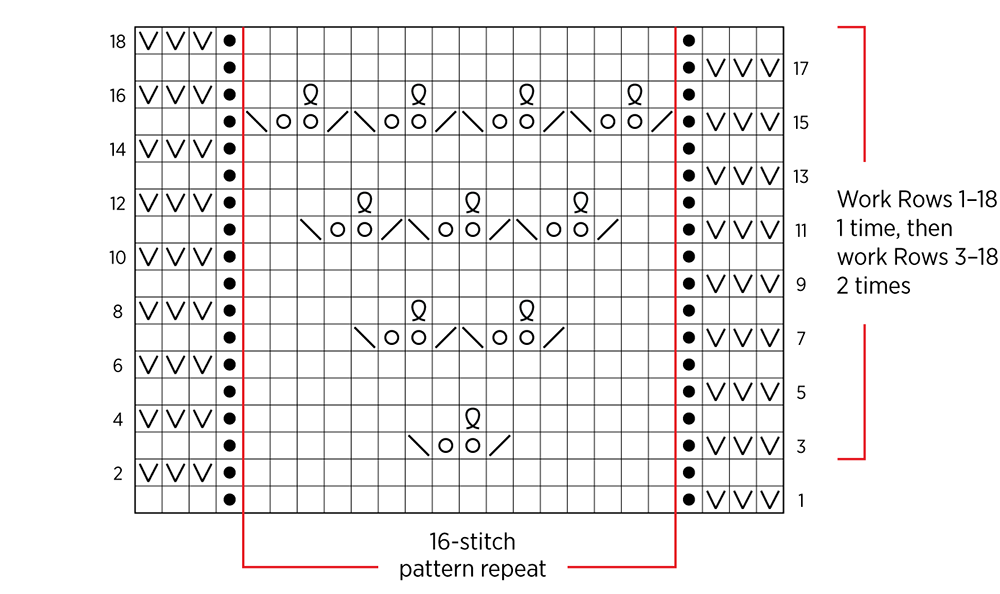
SECTION C: Eyelet Triangle
Row 1 (right side): Slip 3, p1, knit to last 4 stitches, p1, k3.
Row 2 (wrong side): Slip 3, k1, purl to last 4 stitches, k1, p3.
Row 3: Slip 3, p1, *k6, knit 2 together (k2tog), [yarn over (yo)] 2 times, slip slip knit (ssk), k6, repeat from * to last 4 stitches, p1, k3.
Row 4: Slip 3, k1, *p8, p1 through back loop (p1 tbl), p7, repeat from * to last 4 stitches, k1, p3.
Rows 5 and 6: Repeat Rows 1 and 2.
Row 7: Slip 3, p1, *k4, [k2tog, (yo) 2 times, ssk] 2 times, k4, repeat from * to last 4 stitches, p1, k3.
Row 8: Slip 3, k1, *p6, p1 tbl, p3, p1 tbl, p5, repeat from * to last 4 stitches, k1, p3.
Rows 9 and 10: Repeat Rows 1 and 2.
Row 11: Slip 3, p1, *k2, [k2tog, (yo) 2 times, ssk] 3 times, k2, repeat from * to last 4 stitches, p1, k3.
Row 12: Slip 3, k1, *p4, [p1 tbl, p3] 3 times, repeat from * to last 4 stitches, k1, p3.
Rows 13 and 14: Repeat Rows 1 and 2.
Row 15: Slip 3, p1, *k2tog, (yo) 2 times, ssk, repeat from * to last 4 stitches, p1, k3.
Row 16: Slip 3, k1, *p2, p1 tbl, p1, repeat from * to last 4 stitches, k1, p3.
Rows 17 and 18: Repeat Rows 1 and 2.
Repeat Rows 3–18 two more times.
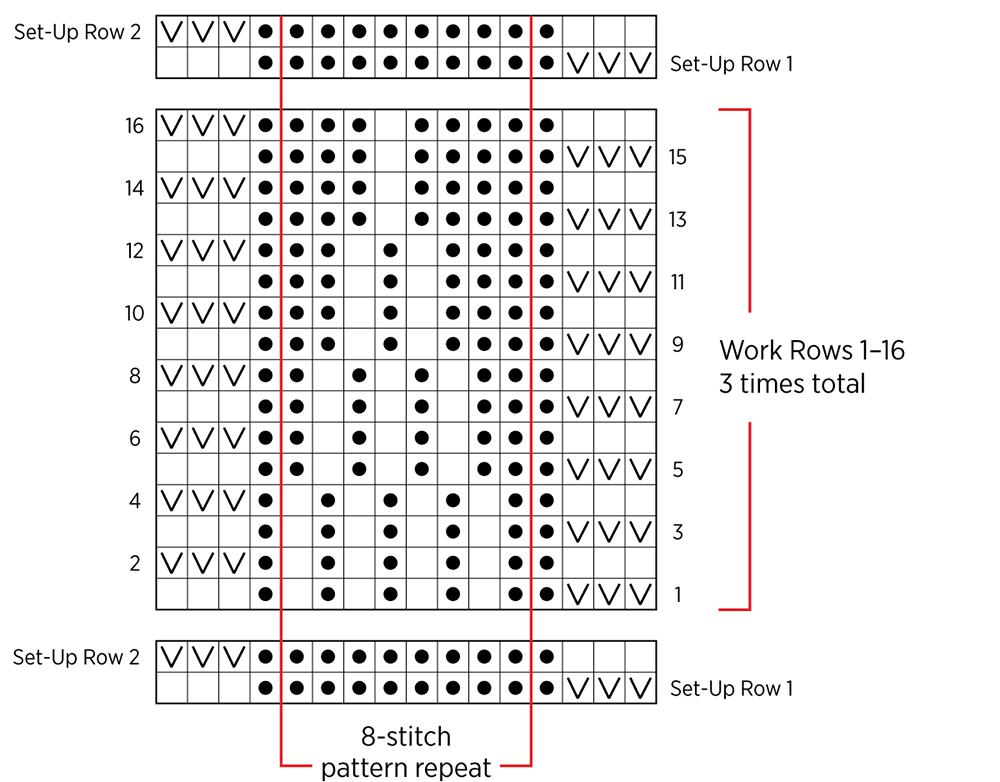
SECTION D: Ribbed Pyramid
Set-Up Row 1 (right side): Slip 3, purl to last 3 stitches, k3.
Set-Up Row 2 (wrong side): Slip 3, knit to last 3 stitches, p3.
Row 1: Slip 3, p1, *p1, k1, repeat from * to last 4 stitches, p1, k3.
Row 2: Slip 3, k1, *p1, k1, repeat from * to last 4 stitches, k1, p3.
Rows 3 and 4: Repeat Rows 1 and 2.
Row 5: Slip 3, p1, *p2, [k1, p1] 3 times, repeat from * to last 4 stitches, p1, k3.
Row 6: Slip 3, k1, *[k1, p1] 3 times, k2, repeat from * to last 4 stitches, k1, p3.
Rows 7 and 8: Repeat Rows 5 and 6.
Row 9: Slip 3, p1, *p3, k1, p1, k1, p2, repeat from * to last 4 stitches, p1, k3.
Row 10: Slip 3, k1, *k2, p1, k1, p1, k3, repeat from * to last 4 stitches, k1, p3.
Rows 11 and 12: Repeat Rows 9 and 10.
Row 13: Slip 3, p1, *p4, k1, p3, repeat from * to last 4 stitches, p1, k3.
Row 14: Slip 3, k1, *k3, p1, k4, repeat from * to last 4 stitches, k1, p3.
Rows 15 and 16: Repeat Rows 13 and 14.
Repeat Rows 1–16 two more times.
Repeat Set-Up Rows 1 and 2 one time.
SECTION E: Large Flag
Row 1 (right side): Slip 3, p1, knit to last 4 stitches, p1, k3.
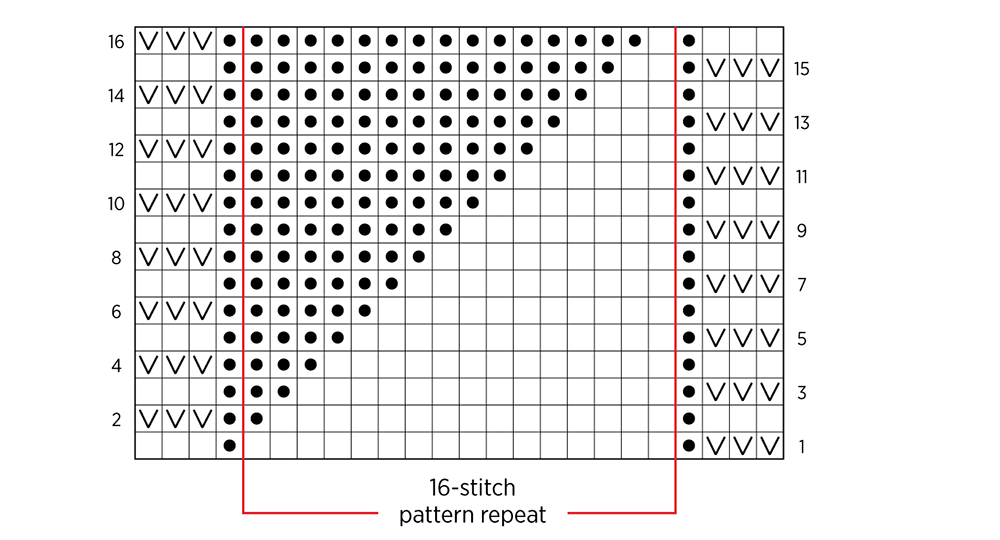
Row 2 (wrong side): Slip 3, k1, *k1, p15, repeat from * to last 4 stitches, k1, p3.
Row 3: Slip 3, p1, *k14, p2, repeat from * to last 4 stitches, p1, k3.
Row 4: Slip 3, k1, *k3, p13, repeat from * to last 4 stitches, k1, p3.
Row 5: Slip 3, p1, *k12, p4, repeat from * to last 4 stitches, p1, k3.
Row 6: Slip 3, k1, *k5, p11, repeat from * to last 4 stitches, k1, p3.
Row 7: Slip 3, p1, *k10, p6, repeat from * to last 4 stitches, p1, k3.
Row 8: Slip 3, k1, *k7, p9, repeat from * to last 4 stitches, k1, p3.
Row 9: Slip 3, p1, *k8, p8, repeat from * to last 4 stitches, p1, k3.
Row 10: Slip 3, k1, *k9, p7, repeat from * to last 4 stitches, k1, p3.
Row 11: Slip 3, p1, *k6, p10, repeat from * to last 4 stitches, p1, k3.
Row 12: Slip 3, k1, *k11, p5, repeat from * to last 4 stitches, k1, p3.
Row 13: Slip 3, p1, *k4, p12, repeat from * to last 4 stitches, p1, k3.
Row 14: Slip 3, k1, *k13, p3, repeat from * to last 4 stitches, k1, p3.
Row 15: Slip 3, p1, *k2, p14, repeat from * to last 4 stitches, p1, k3.
Row 16: Slip 3, k1, *k15, p1, repeat from * to last 4 stitches, k1, p3.
Repeat Rows 1–16 one more time.
SECTION F: Small Flag
Row 1 (right side): Slip 3, p1, knit to last 4 stitches, p1, k3.
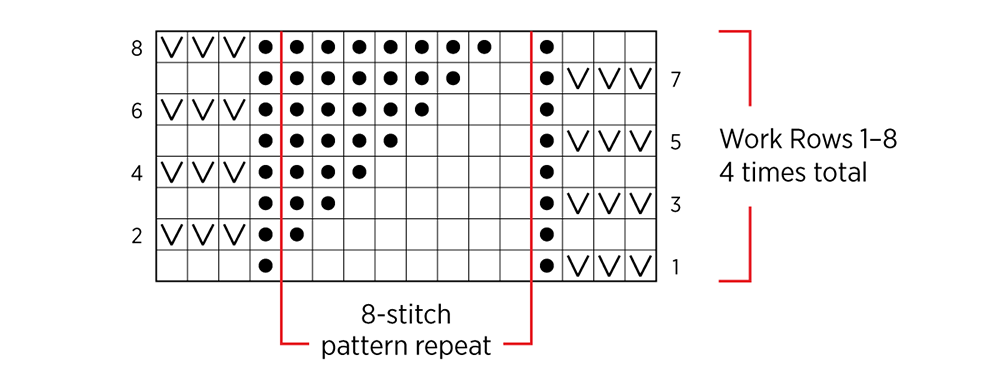
Row 2 (wrong side): Slip 3, k1, *k1, p7, repeat from * to last 4 stitches, k1, p3.
Row 3: Slip 3, p1, *k6, p2, repeat from * to last 4 stitches, p1, k3.
Row 4: Slip 3, k1, *k3, p5, repeat from * to last 4 stitches, k1, p3.
Row 5: Slip 3, p1, *k4, p4, repeat from * to last 4 stitches, p1, k3.
Row 6: Slip 3, k1, *k5, p3, repeat from * to last 4 stitches, k1, p3.
Row 7: Slip 3, p1, *k2, p6, repeat from * to last 4 stitches, p1, k3.
Row 8: Slip 3, k1, *k7, p1, repeat from * to last 4 stitches, k1, p3.
Repeat Rows 1–8 three more times.
SECTION G: Large Flag
Repeat Rows 1–16 of Section E one time.
SECTION H: Stacked Triangles
Set-Up Row 1 (right side): Slip 3, p1, knit to last 4 stitches, p1, k3.
Set-Up Row 2 (wrong side): Slip 3, k1, purl to last 4 stitches, k1, p3.
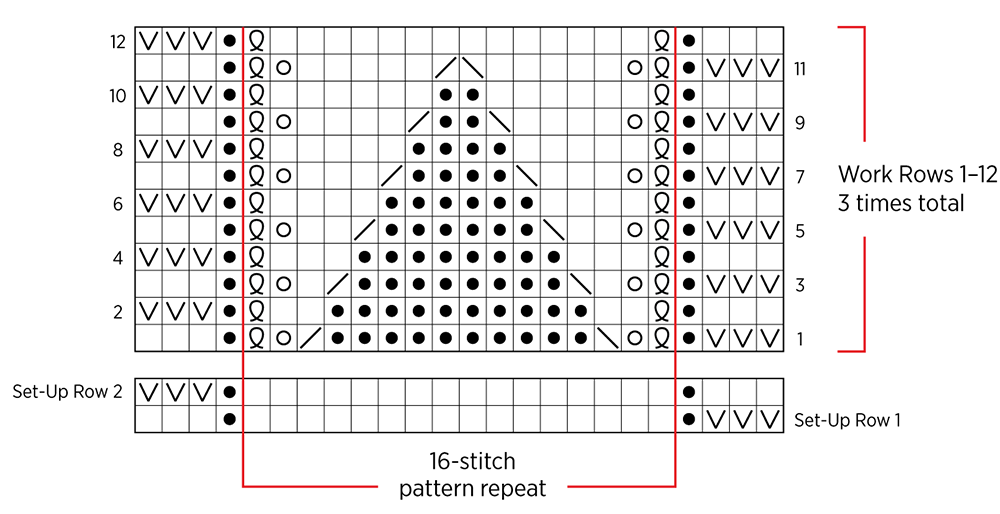
Row 1 (right side): Slip 3, p1, *knit 1 through the back loop (k1 tbl), yo, ssk, p10, k2tog, yo, k1 tbl, repeat from * to last 4 stitches, p1, k3.
Row 2 (wrong side): Slip 3, k1, *p1 tbl, p2, k10, p2, p1 tbl, repeat from * to last 4 stitches, k1, p3.
Row 3: Slip 3, p1, *k1 tbl, yo, k1, ssk, p8, k2tog, k1, yo, k1 tbl, repeat from * to last 4 stitches, p1, k3.
Row 4: Slip 3, k1, *p1 tbl, p3, k8, p3, p1 tbl, repeat from * to last 4 stitches, k1, p3.
Row 5: Slip 3, p1, *k1 tbl, yo, k2, ssk, p6, k2tog, k2, yo, k1 tbl, repeat from * to last 4 stitches, p1, k3.
Row 6: Slip 3, k1, *p1 tbl, p4, k6, p4, p1 tbl, repeat from * to last 4 stitches, k1, p3.
Row 7: Slip 3, p1, *k1 tbl, yo, k3, ssk, p4, k2tog, k3, yo, k1 tbl, repeat from * to last 4 stitches, p1, k3.
Row 8: Slip 3, k1, *p1 tbl, p5, k4, p5, p1 tbl, repeat from * to last 4 stitches, k1, p3.
Row 9: Slip 3, p1, *k1 tbl, yo, k4, ssk, p2, k2tog, k4, yo, k1 tbl, repeat from * to last 4 stitches, p1, k3.
Row 10: Slip 3, k1, *p1 tbl, p6, k2, p6, p1 tbl, repeat from * to last 4 stitches, k1, p3.
Row 11: Slip 3, p1, *k1 tbl, yo, k5, ssk, k2tog, k5, yo, k1 tbl, repeat from * to last 4 stitches, p1, k3.
Row 12: Slip 3, k1, *p1 tbl, p14, p1 tbl, repeat from * to last 4 stitches, k1, p3.
Repeat Rows 1–12 two more times.
SECTION I: Purl Little Pyramid
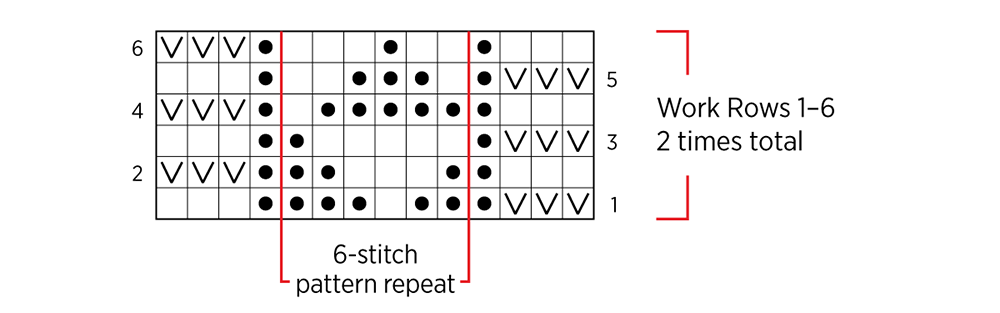
Row 1 (right side): Slip 3, p1, *p2, k1, p3, repeat from * to last 4 stitches, p1, k3.
Row 2 (wrong side): Slip 3, k1, *k2, p3, k1, repeat from * to last 4 stitches, k1, p3.
Row 3: Slip 3, p1, *k5, p1, repeat from * to last 4 stitches, p1, k3.
Row 4: Slip 3, k1, *p1, k5, repeat from * to last 4 stitches, k1, p3.
Row 5: Slip 3, p1, *k1, p3, k2, repeat from * to last 4 stitches, p1, k3.
Row 6: Slip 3, k1, *p3, k1, p2, repeat from * to last 4 stitches, k1, p3.
Repeat Rows 1–6 one more time.
SECTION J: Flying Geese
Row 1: Slip 3, p1, *k1, p5, k5, p1, repeat from * to last 4 stitches, p1, k3.
Row 2: Slip 3, k1, *k2, p4, k4, p2, repeat from * to last 4 stitches, k1, p3.
Row 3: Slip 3, p1, *k3, p3, repeat from * to last 4 stitches, p1, k3.
Row 4: Slip 3, k1, *k4, p2, k2, p4, repeat from * to last 4 stitches, k1, p3.
Row 5: Slip 3, p1, *k5, p1, k1, p5, repeat from * to last 4 stitches, p1, k3.
Row 6: Slip 3, k1, *k6, p6, repeat from * to last 4 stitches, k1, p3.
Row 7: Repeat Row 5.
Row 8: Repeat Row 4.
Row 9: Repeat Row 3.
Row 10: Repeat Row 2.
Row 11: Repeat Row 1.
Row 12: Slip 3, k1, *p6, k6, repeat from * to last 4 stitches, k1, p3.
Repeat Rows 1–12 one more time.
Repeat Rows 1–11 one time.
Last Row (wrong side): Slip 3, k6, p1, *k11, p1, repeat from * to last 10 stitches, k7, p3.
SECTIONS K–S:
Repeat Sections B–J one time.
SECTION T: Halved Diamond
Repeat Section B one time.
SECTION U: Knit Little Pyramid
Repeat Section A one time.
Go on to Finishing, below.
PORTO PATTERN: CHARTS
NOTE: New to reading charts? Learn how with our Reading a Chart Tutorial.
Starting in the bottom right corner of the Charts below, work right-side (odd number) rows from right to left and wrong-side (even number) rows from left to right.
Work Sections A-J, following along with the corresponding chart for each section.
Work Sections B-J one time.
Work Section B one time.
Work Section A one time.
Go on to Finishing, below.
KEY
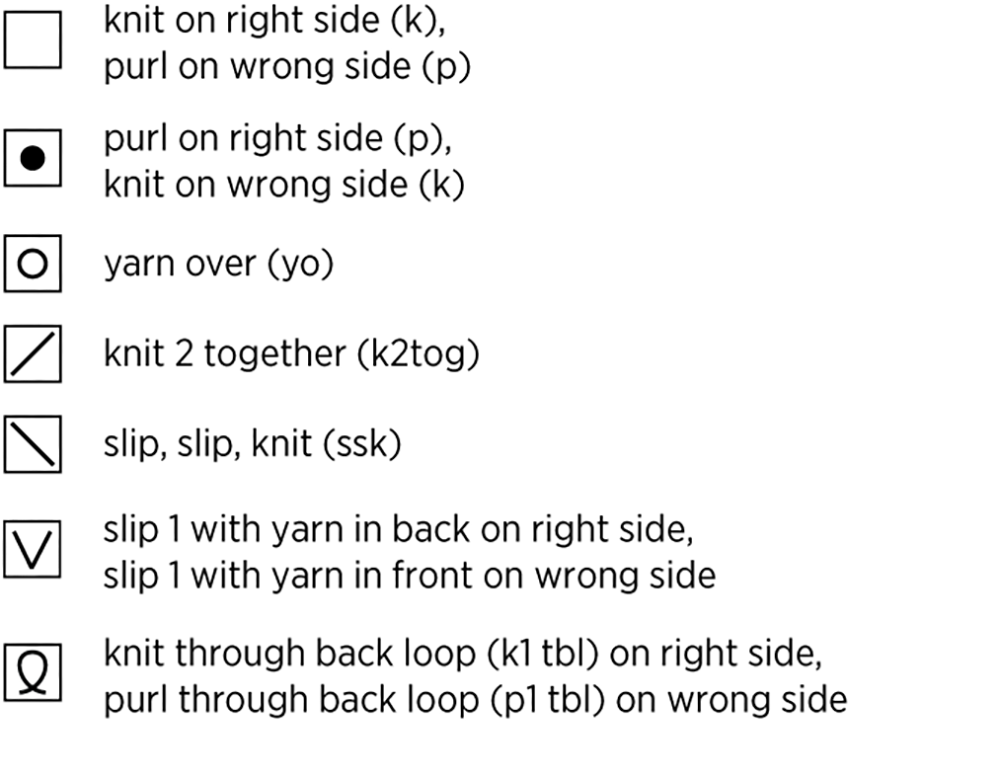
SECTION A: Knit Little Pyramid
SECTION B: Halved Diamond
SECTION C: Eyelet Triangle
SECTION D: Ribbed Pyramid
SECTIONS E + G: Large Flag
For Section E, work Rows 1–16 two times.
For Section G, work Rows 1–16 one time.
SECTION F: Small Flag
SECTION H: Stacked Triangles
SECTION I: Purl Little Pyramid
SECTION J: Flying Geese
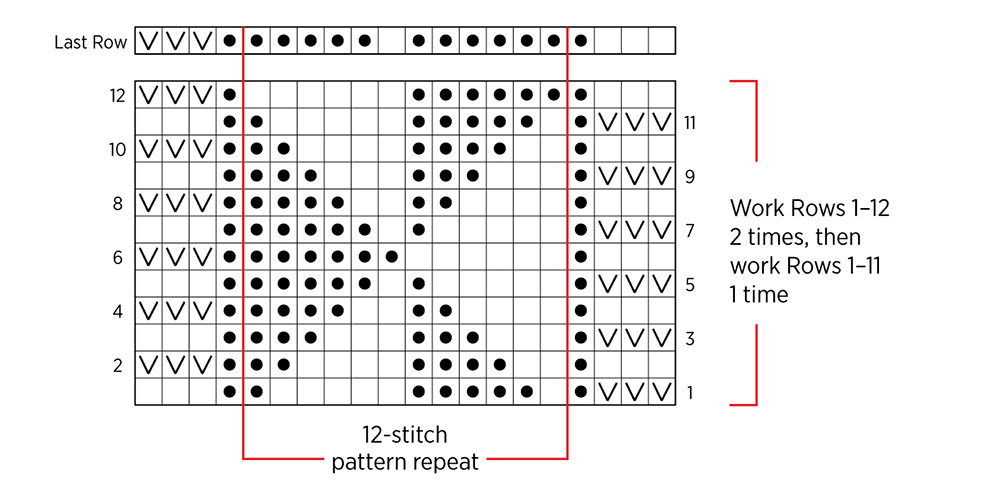
NOTE: Want to see it bigger? Download this chart (and key) as a PDF!
FINISHING
With right-side facing you, bind off knitwise.
Weave in the ends and gently wet block to finished dimensions (using T-pins, blocking pins, or blocking wires as needed).
Share your progress and connect with the community by tagging your pics with #PurlSoho. We can’t wait to see what you make!
Learn About Knitting Yarn Fine + All Our Beautiful Yarns
A true classic and a go-to for knitters and crocheters alike, Knitting Yarn Fine brings its clear stitch definition, soft strength, and cushiony feel to this project! Made with 100% merino wool, this fingering-weight yarn to sport-weight yarn comes in a ready-to-knit ball, avialable in over a dozen gorgeous heathered colors. Simple stitches, dimensional textures, beautifully articulated cables, and glorious colorwork… Everything looks amazing in Knitting Yarn Fine!
More Knitting Patterns
- Be sure to explore our growing collection of Knitting Yarn Fine patterns and cast on!
More Fingering-Weight Yarns + Sport-Weight Yarns
- Shop our entire collection of fingering-weight yarns (What does fingering-weight yarn mean, really? Our guide to fingering-weight yarn will answer your questions and more!)
- Shop our entire collection of sport-weight yarns (Learn all about sport-weight yarn with our guide to this sweet spot of a yarn weight!)
- If you want to use a different yarn, be sure to take the time to get the correct gauge. Need help? Check our All About Gauge Tutorial, our Yarn Substitution article, and our Complete Guide To Yarn for lots of helpful information.
More Yarns With Similar Fiber
- Shop Knitting Yarn DK, this yarn’s light worsted/DK-weight sibling
- Shop merino wool yarn
Looking for more inspiration? Explore all of our knitting patterns (including tons of free knitting patterns) and knitting tutorials, buy one of our many knitting kits and yarn bundles, and shop for beautiful yarn. We have over 55 gorgeous natural fiber yarns in 1,000s of magnificent colors, designed to bring integrity, beauty, and joy to your next knitting project and only available at Purl Soho!


Absolutely beautiful pattern and yarn! Thank you. Next on my list to do!
Hello Karen,
We’re thrilled to see the Porto Wrap caught your eye! As always, we’re here if you have any questions while you work.
All the best,
Hills
I♥️
Want to knit this !
Hi Susan,
We’re so glad to see you’re loving the Porto Wrap as much as we are! Please feel free to reach out with any questions you might have along the way! We’re always happy to help.
Happy knitting,
Hills
how many stitches did you cast on for the wrap? please.
Hi Mary Lou,
Thank you so much for reaching out with your question! We’re so glad to see you’re considering the Porto Wrap for your next project, and we’re happy to help!
For the wrap size, we cast on 104 stitches. It can sometimes be a little tricky to find, but if you scroll to the bottom, you can find the pattern below the information for gauge swatching. I hope this is helpful, and please feel free to reach back out with any other questions you might have!
Happy knitting,
Hills
Hi! I am thinking about knitting the scarf. In looking at the directions, I assume they are the same as for the wrap but with fewer repeats of the pattern, is this correct? I really like the Sandpiper color. Thanks Marilyn
Hi Marilyn,
Thank you so much for reaching out. This is a great question!
The size difference between the scarf and the wrap is solely in the width for this project. The scarf is 7.75″ wide, whereas the wrap is 15″ wide. You’ll cast on a different number of stitches (that work over a multiple of 48 + 8 stitches), then they both work the same number of repeats for the same length (69.75″).
We’re really glad to see you loved the Sandpiper Brown choice as much as we have! We can’t wait to see what you make!
Kindly,
Hills
I was also looking at the Distant River , not sure which would look better. Is the Sandpiper heathered also, the Distant River is, so any suggestions would be welcomed. How much longer is the sale on?
Hi Marilyn,
Thank you so much for your reply!
The heather effect on Distant River is really nice; you’re right! It looks like the other shades with some heathering would be: New Leaf Green, Pine Needle, Sour Citron, Spring Sky, Wild Mulberry, Acorn Brown, Blue Topaz, Blue Willow. They are a bit more subtle, for the most part, when compared with Distant River. New Leaf Green has the strongest heather effect, second to Distant River.
This sale should continue for a few more days, but if you ever miss a sale, please feel free to email us at [email protected]. We’d be happy to help!
Happy knitting, Marilyn!
Hills
I’d like to make the wrap a little wider. Am I correct in thinking the additional stitches would be a multiple of 16? I would need more yarn, of course.
Hi Mary Ann,
Thanks so much for reaching out with your question! I’m really happy to see that the Porto Wrap caught your interest, and I’d love to help you explore this modification.
This pattern is worked over a multiple of 48 stitches plus 8. Keep in mind, though, that while different sections might work over different stitch multiples, overall, the entire wrap follows this multiple constraint. For a scarf that’s about 7.75 inches wide, you’d cast on 56 stitches (one multiple of 48 plus 8). For the larger wrap, you’d cast on 104 stitches (that’s two repeats of the multiple plus 8), which makes it about 15 inches wide. To go even bigger, you could cast on 152 stitches, which is three repeats of 48 plus 8.
If you cast on 152 stitches, you’ll get a width of around 22.6 inches. The original wrap measured 15″ by 69.75″ and used about 1,200 yards of 1,312 yards, leaving you with 112 yards leftover. For your new wrap, which would be around 22.6″ by 69.75″, you’ll need approximately 1,802 yards of yarn. Since each skein has 328 yards, you’ll want to pick up 6 skeins to complete a project this size at the same gauge.
I hope this helps you figure out your next steps for the perfect project! Feel free to reach out again anytime.
Happy knitting,
Hills
I loved making the blanket and can’t wait to start the wrap!
Hi Regina,
This is fantastic news! We’re so glad you loved the blanket and are turning to the wrap now. Please feel free to reach out if you run into any questions as you work. We can’t wait to see what you make!
Happy crafting,
Hills
A beautiful patter! Thank you for downsizing that beautiful blanket pattern for these!
Do i need to swatch each different design to find my gauge?
Hi Mari,
Thank you so much for reaching out! We’re thrilled to see you’re looking forward to this project, and so grateful for your kindness.
To swatch for this project, we recommend using the LARGE FLAG STITCH PATTERN; if you’re able to reach the gauge listed in this section, then your tension ought to work for the rest of the stitch patterns listed. Just a small note: our gauges are listed for finished swatches, so don’t forget to block your swatch!
Please feel free to reach back out anytime, and happy knitting, Mari!
All the best,
Hills
I’d LOVE to make this wrap but I’d like it a little bit wider than the 15″ wrap. It looks to me like, because of the pattern multiples, I would need to expand that to 22″ — is that right or can I do some sort of “lesser” expansion. (For instance, doing one or two of the panels an additional time?)
Also, I’m not sure I’d want it as long as 70″ — is there any room to shorten it slightly without ruining the beautiful pattern and drape?
Also — how much additional yarn should I buy for a scheme like this??
Thank you for always answering us out here — it means a lot.
Hi Linda,
Thanks so much for reaching out with your question! I’m really glad to see the Porto Wrap spoke to you, and I’m happy to help you consider modifications.
This pattern is worked over a multiple of 48 plus 8 stitches. (Note that the stitch patterns in each section may work over different stitch multiples, but the wrap as a whole works over this multiple.) The scarf size casts on one multiple of 48 + 8 stitches for a 7.75″ wide scarf at 56 stitches. The wrap size casts on 104, which is 2 repeats of the multiple plus 8 stitches and reaches 15″. The only way to make the pattern larger would be by casting on 3 multiples of 48 + 8 stitches, for a total of 152 stitches.
The best way to make the pattern shorter would be to find the sections that work multiple repeats of the same pattern, and work fewer repeats. You could do this over a few different sections to better maintain the original stitch pattern. Each textured section will work over a different row gauge, so it would be difficult to advise on that choice and would be a little bit up to your personal preference whether you wanted to skip a section entirely or shorten one or many sections.
Some other textured scarves you might consider would be the Fern Frost Wrap or the Speckled Wrap, which both come in a scarf size.
I hope this helps point you in the right direction! Please feel free to reach back out anytime.
All the best,
Hills
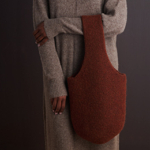
The way this piece was styled and photographed is beautiful! Can you also tell me the name of the sweater that it was styled with?
Happy knitting,
Brandy
Hi Brandy,
Thank you so much for reaching out with your kind words!
It looks like this sweater is from home, and it’s a V-neck from Uniqlo in Taupe. I hope this helps you find what you’re looking for, and please feel free to reach out anytime!
Happy knitting!
Hills
Can you confirm my math? If I want to make the wrap wider, I cast on 3 multiples of 48 (144 stitches) plus 8 for a total of 152? And how much wiggle room is there in the 4 skeins required for the original width? Can I make it with 4, or is that cutting it too close?
Hi Liz,
Thank you so much for reaching out! I am so excited to read that you’re considering the Porto Wrap as your next project!
Great work on your math so far! You could cast on 152 stitches to reach a width of about 22.6 inches. The original wrap was 15″ by 69.75″ and used 1,200 yards of 1,312 yards, leaving 112 yards remaining. Your new wrap will be 22.6″ by 69.75″ and would require 1,802 yards. There are 328 yards per skein, so you would need 6 skeins for a project this size worked at the same gauge.
I hope this helps get you started! Don’t hesitate to reach back out!
Happy knitting,
Hills
I knit the Porto blanket last year and I just love it. Now if I don’t want a wrap just a scarf what would be the cast on number please? Would 32 work? Thank you
Hi Janice,
Thanks so much for reaching out with your question! I’m really excited to hear you’re interested in the Porto Wrap, and I’d be happy to help you explore this modification.
This pattern is worked over a multiple of 48 stitches plus 8. While some sections might work over different stitch multiples, the overall wrap follows this rule. If you were to cast on 32 stitches, you wouldn’t be able to complete all of the stitch pattern multiples.
For the scarf size, you’d actually want to start with 56 stitches (that’s just one set of 48 stitches plus 8). For the larger wrap, you’d cast on 104 stitches (which is two repeats of the multiple plus 8), giving you about 15 inches in width.
I so hope this is helpful for you. Please reach back out with any other questions you might have!
Warmly,
Hills
Thank you so much.
The selected yarn is fingering to sport weight. Which of your other yarns could be substituted?
Hello Chantal,
Thanks so much for writing in about the Porto Wrap. We’re so glad you’re thinking about it for your next project!
For another yarn that straddles the fingering-weight to sport-weight line, you could consider Echo Cashmere, made from beautiful recycled cashmere. On the sport-weight side, you could take a look at organically grown Japanese Denim Cotton or Season Alpaca; on the fingering-weight side, you might explore plant-based Santolina!
I would always suggest knitting and blocking a gauge swatch when substituting yarns. It’s the perfect chance to change your needle size to meet the pattern’s gauge (which is listed for blocked swatches), as well as an opportunity to ensure you love the look and feel of the finished fabric.
I hope you find the perfect yarn for your Porto Wrap!
Kindly,
Hills
For the yo in section 3, do we follow the directions for yo between 2 knit stitches? This is closest to what’s in the pattern compared to the video instruction page but I’m pretty new to knitting so I’m not positive. Thank you in advance. 🙂
Hi Susan,
We’re so happy you’ve chosen to make the Porto Wrap! You’re right, you will be following the instructions for “YO Between Two Knit Stitches” and “Two Yarn Overs In A Row, Between Two Knit Stitches.”
Happy knitting!
Mia
Do you think the Wild Mulberry will show the stitch patterns clearly? I love that color but would it be too dark?
Hello Linda,
Thank you so much for reaching out! This is a great question.
I actually just started this wrap in Peat Bog, and I could see that being a bit tricky to read the stitches clearly. Wild Mulberry is lighter, though, and has some beautiful heathering throughout. I think it shouldn’t be too hard to see the stitches, and that it would make a lovely Porto Wrap!
If you do run into any trouble, though, please feel free to email us at [email protected], and we would be glad to help!
Happy knitting,
Hills
Thank you for help!
I would like to convert this Porto pattern for worstered wight yarn .
Can it be done ? How many more stitches will I need and what needle
size ? Thank you for your help and love all your patterns
Hi Donna,
Thank you so much for reaching out! This sounds like a fun idea, and I’m happy to help think this through with you.
I think this would look really nice in a worsted-weight yarn. I would suggest knitting a gauge swatch to find the needle size that creates a fabric you adore!
Unfortunately, this pattern can’t be modified easily because the stitch patterns need to line up correctly. This pattern is worked over a multiple of 48 plus 8 stitches. While the stitch patterns in each section may work over different stitch multiples, the wrap as a whole works over this multiple alone. We designed the scarf to work over one repeat of 48 + 8 stitches, and the wrap to work over 2 repeats. Since we can’t modify the pattern, you might consider working the scarf size to ensure it will still wrap nicely around your neck.
I hope this helps point you in the right direction! Please feel free to reach back out anytime!
Happy knitting,
Hills
Is the LARGE FLAG STITCH PATTERN (FOR GAUGE SWATCH) part of the pattern?
Hi Nicole,
Thanks so much for reaching out. This is a great question!
These instructions are guiding you on how to work your gauge swatch specifically. If you can reach the gauge listed for this section, then you should be good to go for any of the other stitch patterns within the project. The pattern for the project itself will begin after the notes on the STITCH MULTIPLE and how to work your SLIP STITCHES.
I hope this helps, and that you love the Porto Wrap as much as we do. Please feel free to reach back out with any other questions you might have as you work.
All the best,
Hills
Having difficulty downloading the pattern into Knit Companion App. Please advise on steps. Thanks!
Hi Linda,
I’m sorry to read that you’ve run into a bit of trouble using the pattern in Knit Companion. I just sent you an email with a PDF, which you should be able to use in Knit Companion. I hope this helps!
Please feel free to reach back out anytime.
All the best
Hills
Love the challenge. On the pattern it calls for 2 (4) balls on the yarn. Are there two different sizes? One for 2 balls and one for 4 balls? Thanks!
Hi Nancy,
We’re so glad to see you’re excited to get started on the Porto Wrap, and I’m happy to help!
The Porto Wrap comes in a scarf size and a wrap size. The first size calls for 2 balls, and the second size calls for 4 balls, respectively. Below, I’ve copied the materials list; the first size is outside the parentheses, and the larger size is inside the parentheses:
And here are the dimensions of the finished garment:
SIZES
Scarf (Wrap)
Finished Dimensions: 7¾ (15) inches wide x 69¾ inches long
SAMPLE: We knit the Wrap size.
I hope this helps you choose the right size for your project. Please feel free to reach back out anytime!
All the best,
Hills
I’m on the second section, using the yarn you used. For some reason it does not look like yours. Can I send you a picture of what I’ve done, so you can explain where I went wrong.
Hi Lynn,
I’m sorry to read that you’ve run into some trouble with your Porto Wrap! Please feel free to email us a photo to [email protected]. We’d be glad to take a look and get you back on track!
All the best,
Hills
Hi,
I bought a whole cone of your Light Worsted/DK weight in sandpiper brown in hopes to make this for my daughter. As I was getting ready to start casting on, I realize the blanket, not the wrap calls for this yarn. Can I substitute the DK for the wrap without any issues or would you suggest I pivot?
Thank you!
Hi Beth,
I’m so sorry to read that there was a hiccup in placing your order for the Porto Wrap.
We would be happy to help you get what you need! Please feel free to email us at [email protected], and we would be glad to get this sorted.
All the best,
Hills
I cannot read this pattern,any other way than what I am doing, and every time I do row 3 it causes me to decrease by many stitches. When I analyze the pattern, it appears the slip slip knit decreases the row as there is not a Yarn over to compensate for it. The two together Yarn over balances out but the slip slip Knit does not.Can you please help?🙏
SECTION C: EYELET TRIANGLE
Row 3: Slip 3, p1, *k6, knit 2 together (k2tog), [yarn over (yo)] 2 times, slip slip knit (ssk), k6, repeat from * to last 4 stitches, p1, k3.
Hi Jasbir,
I’m sorry that you’ve run into trouble with your eyelet triangles, and I’m happy to help clarify.
Here is Section C, expanded:
Row 3: Slip 3, p1, *k6, k2tog, yo, yo, ssk, k6, repeat from * to last 4 stitches, p1, k3.
Since k2tog will decrease by 1 stitch and ssk will decrease by 1 stitch, you should be decreasing by 2 stitches on this row. This should be balanced by the 2 yarn overs in the row, leaving you with an even row.
I hope this helps! If you’re still running into trouble, please feel free to email us at [email protected]. We’re eager to get you back on track.
All the best,
Hills
I’m having what I assume is a very newbie problem with the edges. I am slipping my 3 stitches but that leaves the working thread still at the first slipped stitch so that when I go to move the yarn to either k1 or p1 (the stitch right after the 3 slipped stitches), I’m ending up with a bar across my edge from repositioning the yarn to the front or back. I hope I am making sense. If you’re understanding my issue, can you tell me what I’m doing wrong so I can fix it? Oddly, it’s not happening every row but it’s also happening (seemingly) randomly on both odd and even or right and wrong side rows. The rest of the row is fine. Thank you in advance. 🙂
Hi Susan,
I’m so sorry you’ve run into some trouble with the edges of your Porto Wrap, and I’m happy to help!
We’ve included some information on the slip stitches in case you’d like to reference it:
It sounds like you’re describing the correct placement for the I-cord edge. There will be a small bar that wraps in front of the 3-stitch selvage edge as you slip your stitches at the beginning of each row. These stitches are worked on the next row, and as you continue to work, the edge curls up into itself progressively. This will hide that bar, and likely explains why you aren’t seeing it on every row. This bar is actually the force that twists the cord into itself, making the beautiful tube-like shape!
It sounds like you’re on the right track…great work! If you’re still running into trouble, though, please feel free to send us a photo of your work with your question! We can be reached at [email protected] and are eager to get you on track for some fun knitting.
All the best,
Hills