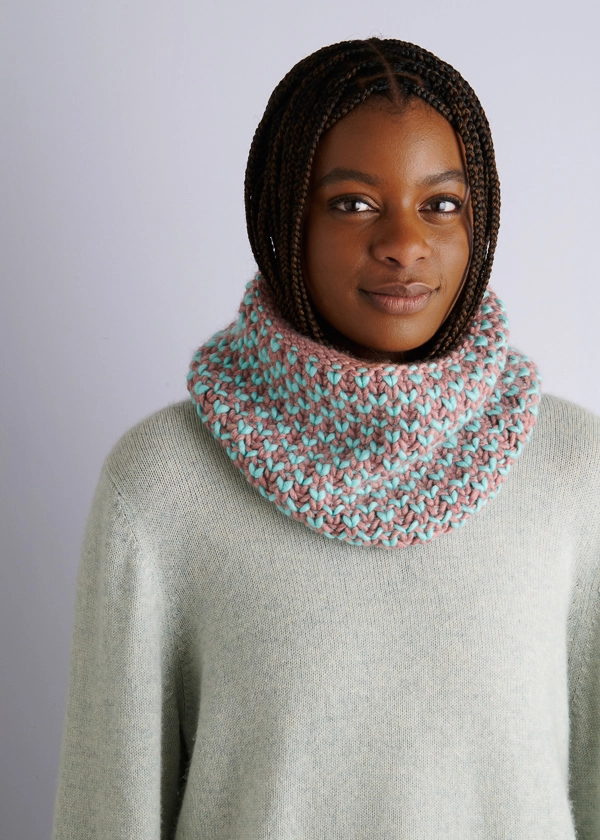
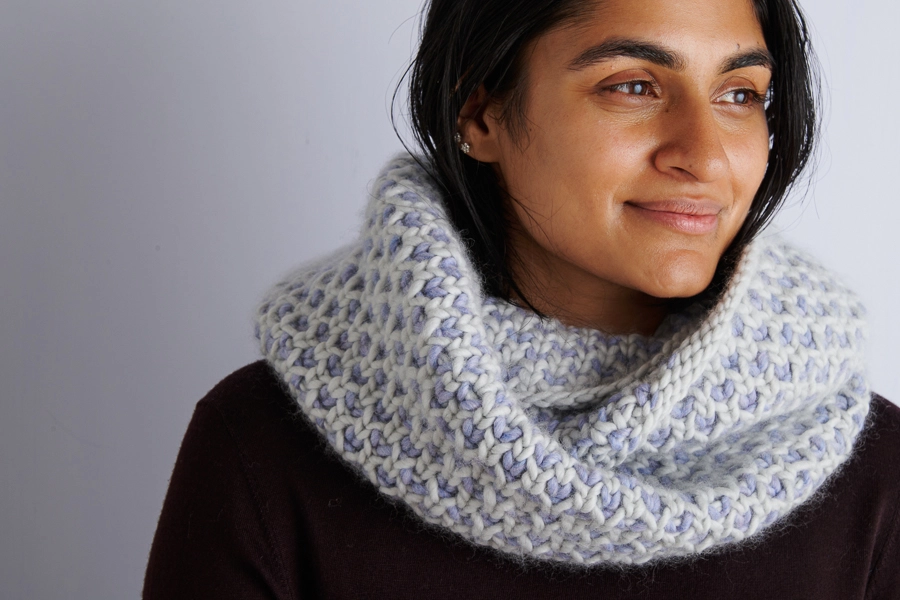
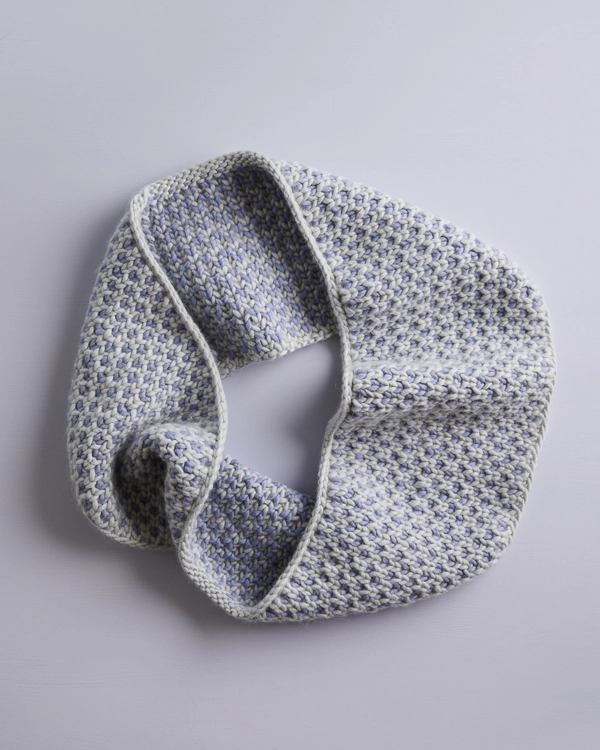
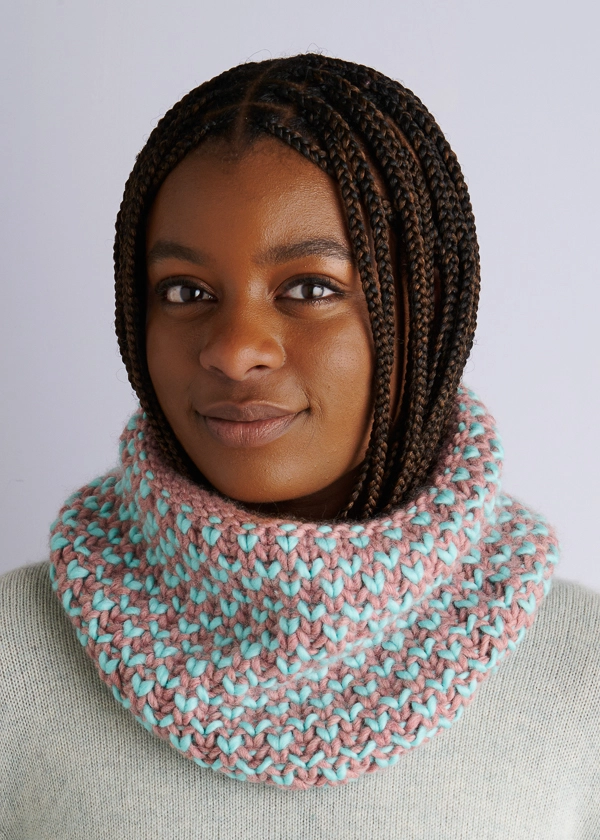
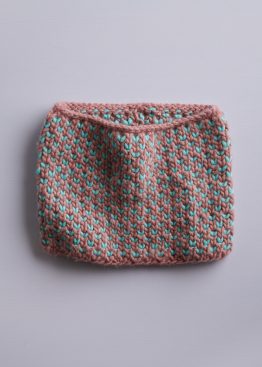
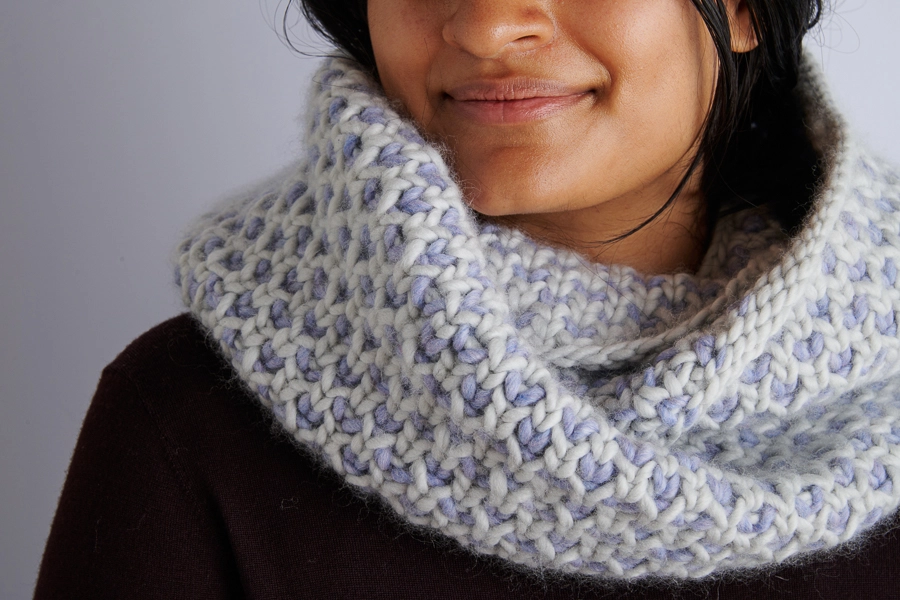
Beautyberry Cowl
Our Beautyberry Cowl is just the lift you may need as color fades from the landscape and Old Man Winter rolls around!
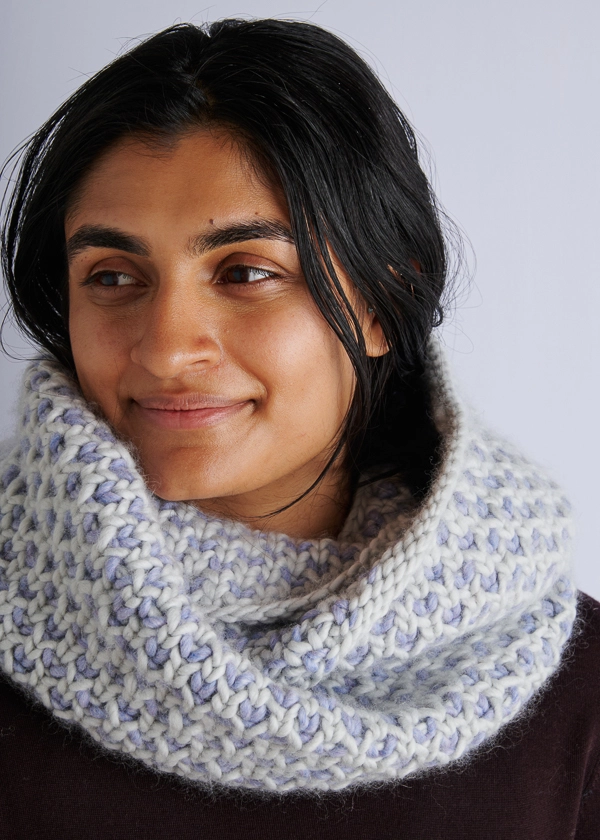
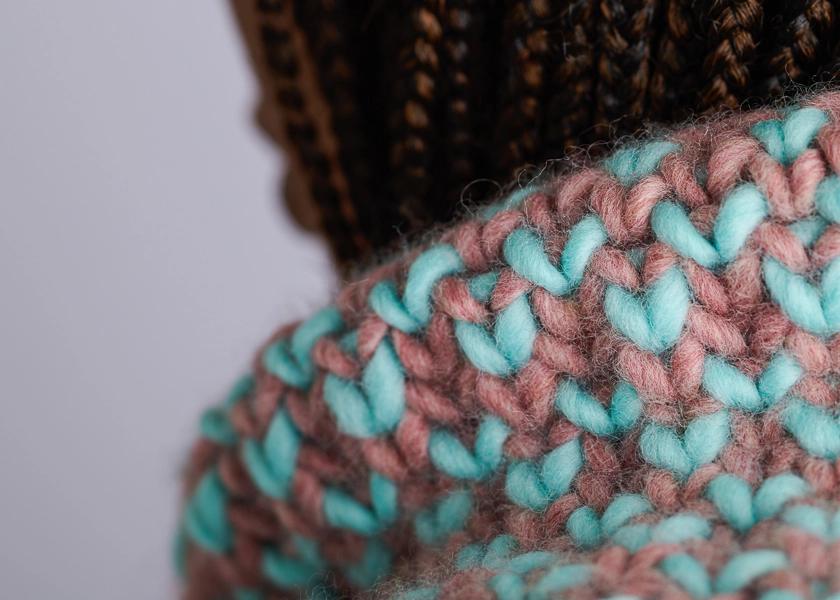
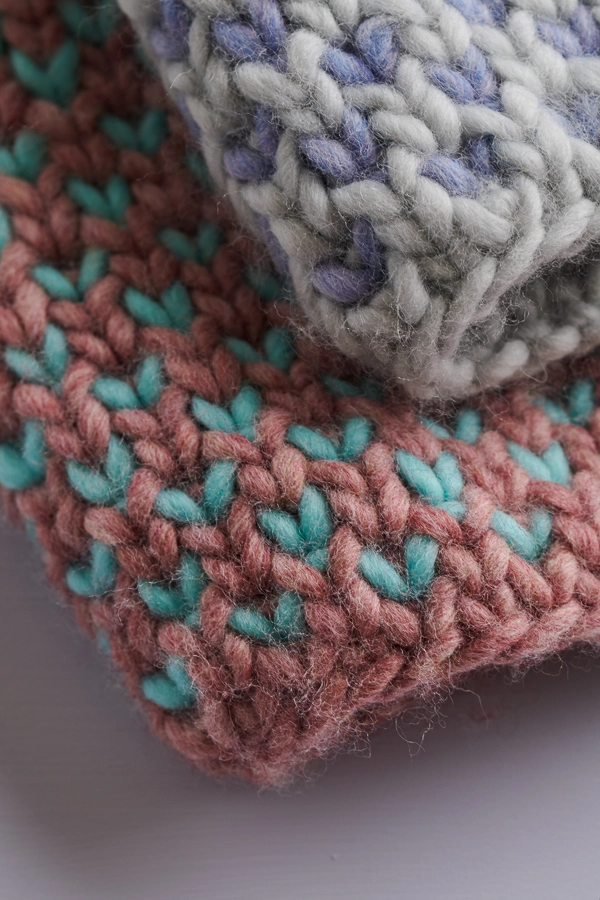
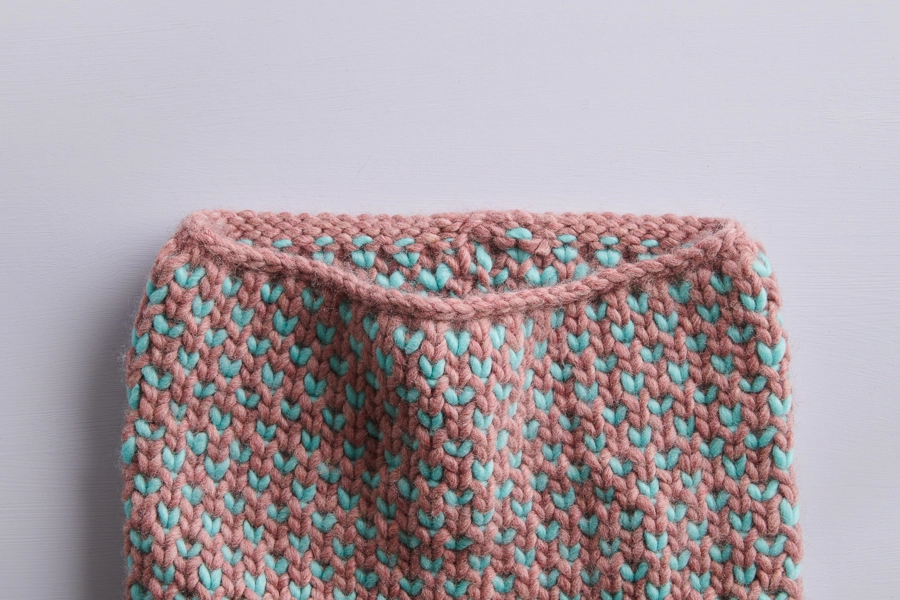
This pattern is a pleasure and a surprise to knit. A lovely reversible fabric, its alternating colors may look like stranded colorwork, but really, you only use one color per round and work every other stitch into the row below. No fear, our Working Into The Stitch Below tutorial shows you how!
Made in our Super Soft Merino, the Beautyberry Cowl is toasty warm without weighing you down. Its bulky weight also means quick knitting and the right touch of drama!
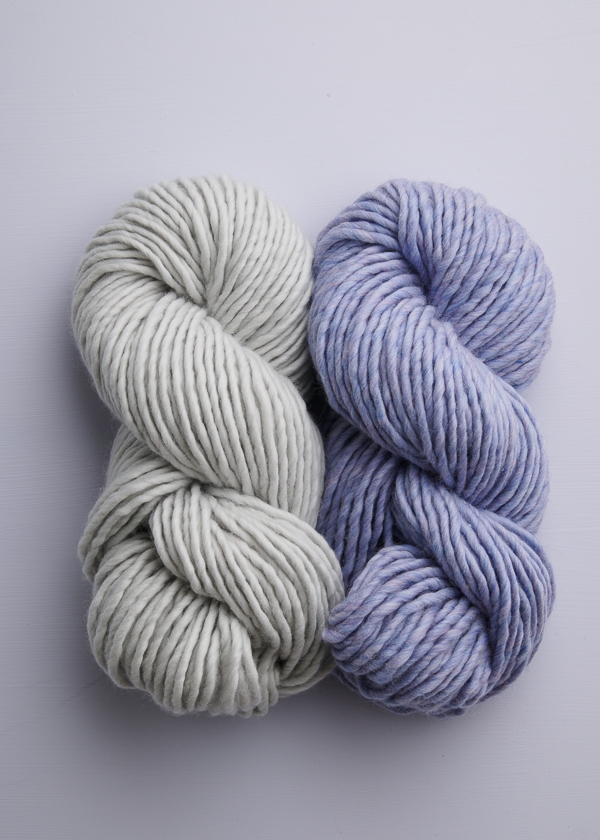
This single ply of 100% Peruvian merino is loosely spun, which increases its soft touch and also helps trap air to insulate you from the winter cold.
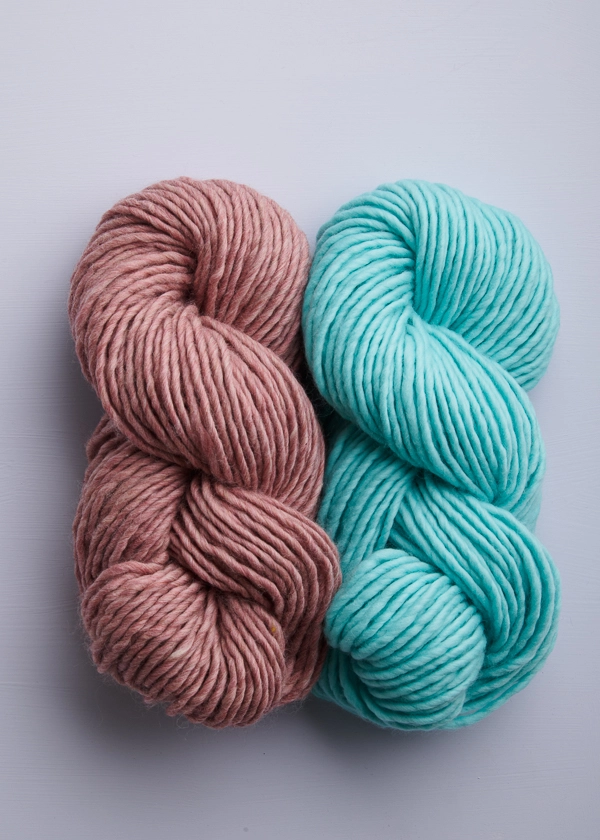
Super Soft Merino comes in over thirty colors, and it only takes three skeins for a once-around cowl or five for the double-wrap version. Pick the shades that will enliven your winter days and cast on!

Designed for Purl Soho by Gianna Mueller, based on our Beautyberry Blanket, originally designed by Laura Ferguson. Click here to see even more of Gianna’s designs!
Share your progress and connect with the community by tagging your pics with #PurlSoho, #PurlSohoBusyHands, #PurlSohoBeautyberryCowl, and #PurlSohoSuperSoftMerino. We can’t wait to see what you make!
Materials
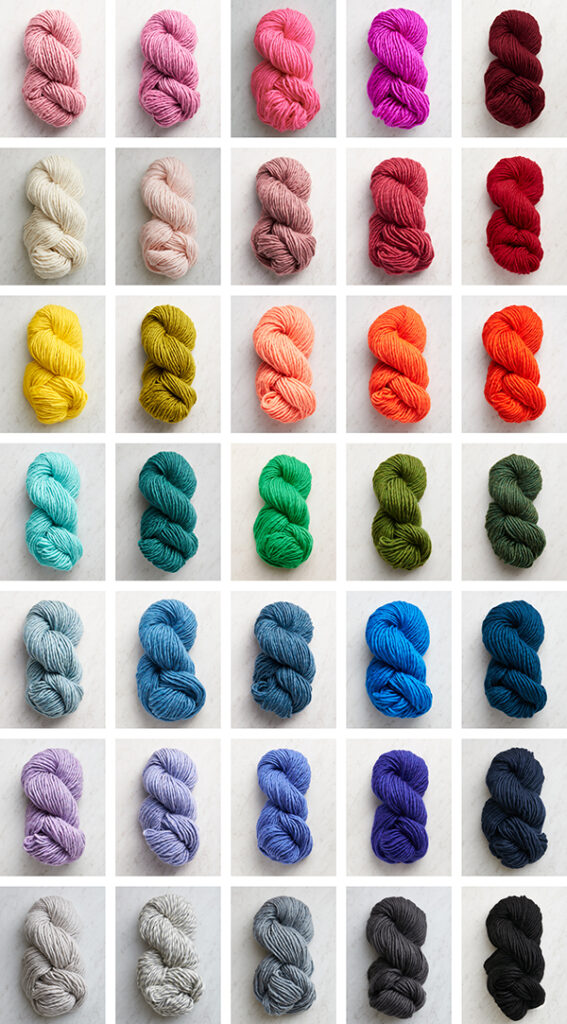
- Purl Soho’s Super Soft Merino, 100% merino wool. Each skein is 87 yards/ 100 grams.
- Color A: 2 (3) skeins; approximately 100 (220) yards required.
- Color B: 1 (2) skein(s); approximately 45 (95) yards required.
- US 11 (8 mm), 16- or 32-inch circular needles, depending on size you are making
- A stitch marker
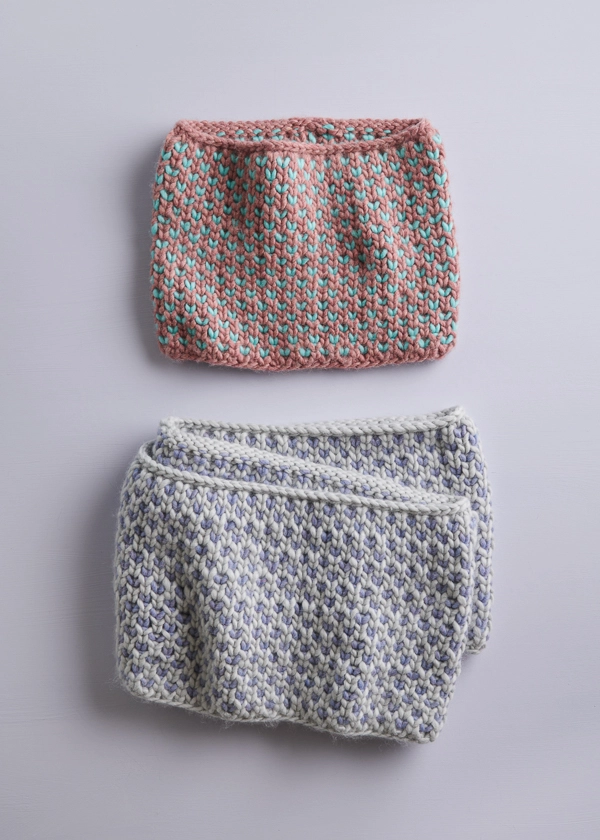
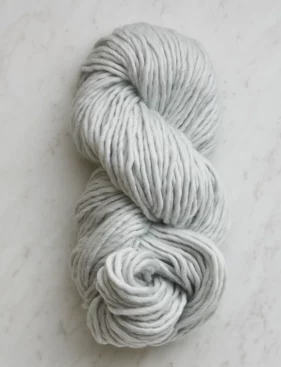
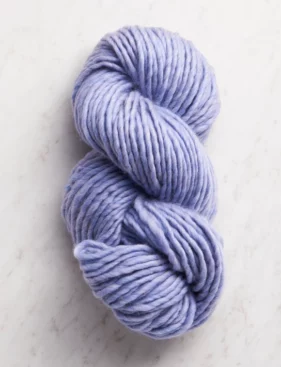
We used the following colors for our samples…
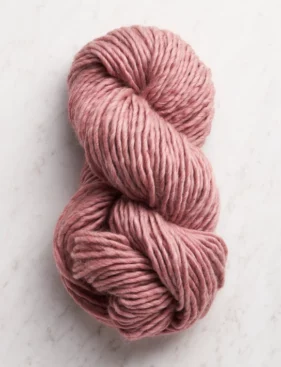
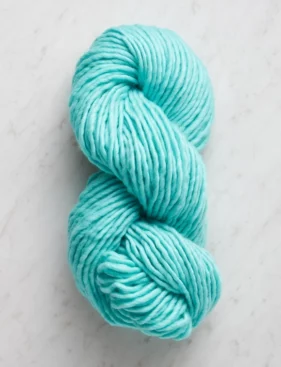
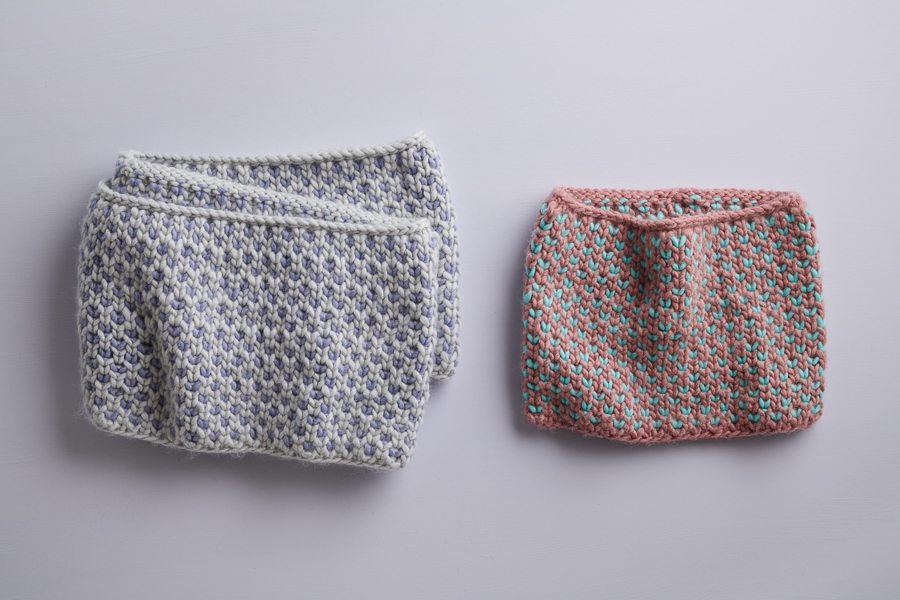
Once-Around
Color A: Pink Starfish + Color B: Eggshell Blue
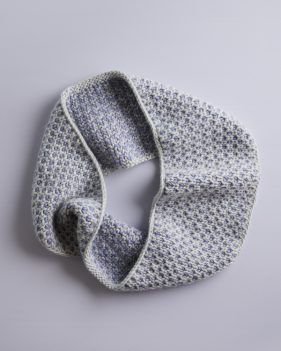
Twice-Around
Color A: Artemisia Green + Color B: Berry Blue
GAUGE
10 stitches and 23 rounds = 4 inches in stitch pattern
SIZES
Once-Around (Twice-Around)
- Finished Height: Approximately 9½ inches
- Finished Circumference: Approximately 24½ (53¾) inches
NOTES
STITCH MULTIPLE
This pattern works over an odd number of stitches.
KNITTING INTO THE STITCH BELOW
NOTE: For more information about this technique, be sure to visit our Working into the Stitch Below Tutorial!
p1b [purl one below]: Insert the tip of the right needle into the stitch below the next stitch from back to front, purl normally (wrapping the yarn around the needle and pulling it back through the stitch below) and let the stitch above fall from the left needle.
k1b [knit one below]: Insert the tip of the right needle into the stitch below the next stitch from front to back, knit normally (wrapping the yarn around the needle and pulling it back through the stitch below) and let the stitch above fall from the left needle.
CARRYING UP THE YARN
Rather than cutting the yarn every couple of rows, you’ll want to carry the non-working yarn up the inside of the cowl. For a few tips on carrying the yarn, visit our Stripes in the Round Tutorial!
PATTERN
With Color A, cast on 61 (135) stitches. We used a basic Long Tail Cast On.
Place marker and join for working in the round, being careful not to twist the stitches.
Round 1: Knit to end of round.
Round 2: With Color A, *p1, p1b (see Notes), repeat from * to last stitch, k1.
Round 3: With Color A, *k1b (see Notes), k1, repeat from * to last stitch, k1.
Round 4: With Color B, *p1, p1b, repeat from * to last stitch, slip 1 purlwise.
Round 5: With Color A, *p1b, p1, repeat from * to last stitch, k1.
Round 6: With Color A, *k1, k1b, repeat from * to last stitch, k1.
Round 7: With Color B, *k1b, k1, repeat from * to last stitch, slip 1 purlwise.
Repeat Rounds 2-7 seven more times, then repeat Rounds 2-6 once.
Cut Yarn B.
Next Round: With Color A, knit to end of round.
Bind off loosely, going up one or two needle sizes if necessary.
FINISHING
Weave in remaining ends and gently steam block.


Can you provide an estimate of the yardage needed if this was done in a lighter, worsted weight yarn? Thank you!
Hi Kerry,
Thanks for writing in! I’m afraid we don’t have estimated yardage requirements for this pattern if it were made in a worsted weight since we’ve only designed it using Super Soft Merino, a chunky/bulky weight yarn. I think the skein requirements would be about the same, though! It would be 2 (3) skeins of Color A and 1 (2) skein(s) of color B for the Once-Around size and Twice-Around sizes respectively. And if you’re in doubt, it’s always a good idea to grab an extra skein! Lastly, we recommend always doing a gauge swatch so you can get an accurate sense of how many stitches per inch you’re knitting. We have a guide on swatching here if you’d like more information (https://www.purlsoho.com/create/2020/08/20/all-about-gauge/)!
I hope this helps! Have a great day!
All the best,
Cat
Thank you for the above pattern, very much appreciated!!!!
Hi Jean,
You’re very welcome! Thank you so much for the kind message!
All the best,
Cat
Thank you for the lovely cowl.
Hi, I’m having difficulty with this pattern- my cowl isn’t looking like the pattern photos. I’m knitting the cowl in the round and the pattern calls for alternating between knit and purl rows, but looking at the pattern photos, the outside (right side) of the cowl looks like only knit rows- I’m not seeing any of the purl rows on the outside of the cowl in the photos, it looks like all knit ?
Hi Raquel,
Thanks for reaching out, although I’m sorry to hear that your cowl isn’t coming out exactly as expected! There are indeed some purl bumps on the right side of the cowl, but they actually get hidden once you knit a few repeats of the pattern. Because of the nature of this stitch pattern, the purl bumps kind of recede into the texture. I’d recommend sending a photo of your work so far to customerservice@purlsoho.com. That way, we’ll be able to visualize exactly what’s going on and provide more specific advice!
All the best,
Lili
It is lovely pattern and interesting stitch. However any suggestion on how to undo this kind of stitch to correct a mistake? I don’t know how to go back with this k1b or p1b stitch and now have to consider undoing everything. I am an experienced by easily distracted knitter, so used to fix mistakes. With this stitch, I don’t seem to figure out how to. Thank you!
Hi Madeleine,
Thanks for reaching out! I’m afraid that I don’t know of a way to easily fix mistakes that are a few rounds down in a pattern that uses k1b and p1b stitches. But I’d recommend putting a lifeline in so that you don’t have to undo everything! You can do this by using a tapestry needle to thread a piece of scrap yarn through one leg of each stitch on one row. Then, you can rip back without fear of losing any stitches! Once you’ve unraveled to the point of the lifeline, you can slip those stitches back onto your needles and remove the scrap yarn. Hope this helps!
All the best,
Lili
Hi Lily – thanks for the quick answer. The lifeline is a great idea and that’s what I will do! thanks and happy holidays!
This is such a beautiful cowl! My daughter saw it and asked me to knit her one. Do you have any recommendations for knitting this cowl for a 6 year old?
Hi Tomoko,
Thanks so much for writing in! You could certainly make this cowl in a smaller size for your daughter! To do so, I would recommend first deciding on what new dimensions you’d like to knit the cowl in. Feel free to take a look at this pattern that we previously released for a child-sized cowl (https://www.purlsoho.com/create/2012/08/26/amy-gropp-forbes-of-eclectic-mom-braided-cowl-for-kids/) to get a sense for what dimensions would work! This cowl is 18″ in circumference and 11″ in height, so that could be a good benchmark for you.
Once you’ve decided on the new circumference, all you need to do is multiply the stitches per inch for the Beautyberry Cowl (the gauge is 10 stitches and 23 rounds = 4 inches in stitch pattern so that would be 2.5 stitches per inch) and multiply that by your new preferred circumference. Keep in mind, though, that this pattern is worked over any odd number of stitches, so you would need to make sure you cast on an odd number. If you’d like the cowl to be 18″ in circumference, you could cast on 45 stitches. Hope this helps!
All the best,
Cat
Hi,
I was looking forward to knitting this cowl. I ordered yarn in black (color A) and white (color B). I have ripped it out 3 times and am having a heck of a time with purling or knitting below. The yarn is fuzzy and not well defined, so it’s hard to see if I am working the P1b correctly (especially using the black), resulting in a lot of frustration. I’ve practiced with lighter colored yarn and watched a couple of videos, but my color choices and the yarn are not working well for me. Any suggestions that might help? Perhaps switching to color A= white?) Maybe I’ll just knit the cowl in a rib!
Best,
Carol
Hi Carol,
Thanks for reaching out, although I’m sorry to hear that you’ve having a hard time working with the yarn! It’s definitely a struggle working stitches like p1b or k1b in dark colored yarns, so I think switching to using the white color for Color A is a great idea. That way you’ll have fewer rounds on which you’ll need to p1b or k1b with the black yarn. Alternatively, you might find that knitting underneath bright and direct lighting will make things a whole lot easier to see!
All the best,
Lili
Hi there – I was planning to use lovebird for color B. Do you think that would work well?
Thanks!
Claire
Hi Claire,
That’s such a great idea, and I think it would looks amazing! If you give this a try, please let us know how it turns out!
All the best,
Lili
Thanks! And for the quick reply 🙂
Hi, what is the best way to carry up the yarn? I did watch the tutorial on carrying up the yarn linked here, but the example in the tutorial is for a much simpler all knit pattern. I’m finding carrying up the yarn to be more complicated with this pattern because in some rows the color switch happens at a P1b and k1b stitch or the color switch happens after the slip 1 purlwise. I’m finding that if I cross the yarn over before a P1b or kb1, or after the slip purlwise, I end up with a large gap. Any suggestions on how to carry up the yarn in those situations? Also, when we slip 1 purlwise, are we slipping with yarn in back? Thanks in advance for your help
Hi Raquel,
Thanks for writing in, although I’m sorry to hear that you’re having difficulty navigating the color switch! I would recommend keeping as close to the instructions in the linked tutorial–they should still work for the most part. At the rounds where you’ve just slipped a stitch though, you will notice that Color B will need to be pulled to the left further in order to cross it over Color A, as shown in the tutorial. This will still trap Color B in the correct spot! If you’re still running into problems though, I’d recommend sending a photo of your work to customerservice@purlsoho.com so we can visualize what’s going on.
In answer to your other question, all stitches are slipped with yarn in back!
All the best,
Lili
Hi, when I joined yarn B for the first time in Round 4, I joined yarn B by simply purling with it, which leaves the tail of yarn B hanging loose. Then in round 5, the pattern calls for a P1b, which means purling into that very first purl used to join yarn B. However, since the tail of yarn B is hanging loose, doing the P1b into it is somewhat awkward and I ending up with an incomplete V shape for that stitch. Am I doing that incorrectly? Do you suggest a different way for joining yarn B? Thanks
Hi Raquel,
That is the correct way to begin working with Color B! The first p1b will always be awkward, since the end of Color B isn’t under tension, and it will look a bit wonky because of this. You should be able to even out the tension after knitting a few more rounds by tugging on the end of Color B to tighten the first stitch up!
All the best,
Lili
There are so many beautiful patterns on here and I found some free ones and thought I would try this as a gift with some yarn I already had. Something is not adding up for me for what it’s worth I did not purchase yarn yet from Purl Soho and live the selections. That being said 61 is not divisible by 3 and 135 is. Not sure if I should add a stitch to connect in the round. I have knit a lot of simple things but find this pattern challenging thus I keep trying. By the time I start the 2nd cycle it’s clear that it is incorrect. Clearly I need to practice some easier stuff but thought I would mention it in case there is a misprint. I wish and keep hoping my I will get it.
Hi Madeline,
I’m sorry to hear that you’re having trouble with this pattern! The pattern works over any odd number of stitches, so both 61 and 135 will work as cast-on numbers. Would you be able to send a photo of your project so far to customerservice@purlsoho.com? That way, we can visualize exactly what’s going on and help you move forward in the pattern from there!
All the best,
Lili
The first round is knit and then row two you do a p1 and p1b into a knit row.
Round 1: Knit to end of round.
Round 2: With Color A, *p1, p1b (see Notes), repeat from * to last stitch, k1.
Could you provide a video on how to do the p1b when the row above it is a knit stitch? All the videos I see do a p1b when the row above is a purl row.
Hi Carla,
Thanks for reaching out. I’m afraid that we do not have a video showing exactly how to purl into a knit stitch below, but I’d be happy to help you figure this out! It may be more helpful to watch our video on knitting a stitch into the stitch below, since this shows how to do it when the round below is a knit round, just like in this pattern. The only difference is that you’ll need to purl instead of knit!
All the best,
Lili
I’m getting very frustrated with this pattern. I’m not an expert knitter, but far from a beginner. I typically take one week to knit a cowl, even when working with 2 colors in a row & some lace work, too.
However, this pattern has me stumped. If I had read all these comments ahead of time, I would not have tried this, as so many people have trouble with it, for multiple reasons!
In the description, it says, ” No fear, our Working Into The Stitch Below tutorial shows you how!” So, I first watched the videos on how to K1b and P1b. That did not seem difficult at all.
However, I did not realize the pattern has us doing K1b into a purl row, and P1b into a knit row. I can’t figure that out; and after reading someone’s comment on the same issue, realized I am not alone. Sadly, the answer to her was that there is NO video on how to do that.
On Ravelry, it implies that this pattern is an easy one, but it’s not. I see a variety of issues people are having.
I’ve ripped it out & tried again, but not knowing how to K1b when the video shows knit work, but the pattern is purl, is too confusing.
I’m thinking of giving up, but I spent a lot of money on 3 skeins of yarn.
Very disappointed!
Hi Jeanine,
I’m so sorry to hear that this project has been so disappointing, and I’m eager to help! While our tutorial does not demonstrate the k1b into a purl stitch or the p1b, the technique is actually the same. You insert the tip of your right needle into the center of the stitch in the row below the first stitch on the left needle (for a purl stitch, this would be underneath the purl bump), and then complete the knit or purl stitch as normal.
I hope that this explanation helps you move forward in your project, but if you’d like to see a visual demonstration of this, then I’d recommend signing up for a free 1-On-1 Project Help session. We’re happy to chat more about this technique over Zoom and show you how it’s done!
All the best,
Lili
My question is not about the Beautyberry Cowl; rather, it concerns the Super Soft Merino yarn. I want to knit a blanket or throw with subtle colour changes, like the pattern for the Joy of Colour Scarf in which the knitter holds two strands of Linen Quill throughout. I wondered if I could get something like this blend of colours by doing a two-colour linen stitch and changing only one of the two colours at a time, and if this stitch would work in a very soft bulky yarn like Super Soft Merino. Does that yarn have good stitch definition, or is there too much bloom (or halo—I’m not sure of the technical term for the fuzzy cloud that surrounds some yarns) ? (I am drawn to this yarn because of the vibrant colours! The linen quill has great colours too, but is it soft enough for a cozy throw?) Thank you for any advice you can give me.
Hi Susan,
Thank you for writing in! What a great idea! That would work great in our Super Soft Merino as it does have a great stitch definition! I hope this helps but please let me know if you have any other questions and we would be happy to help!
Happy Knitting,
Gavriella