
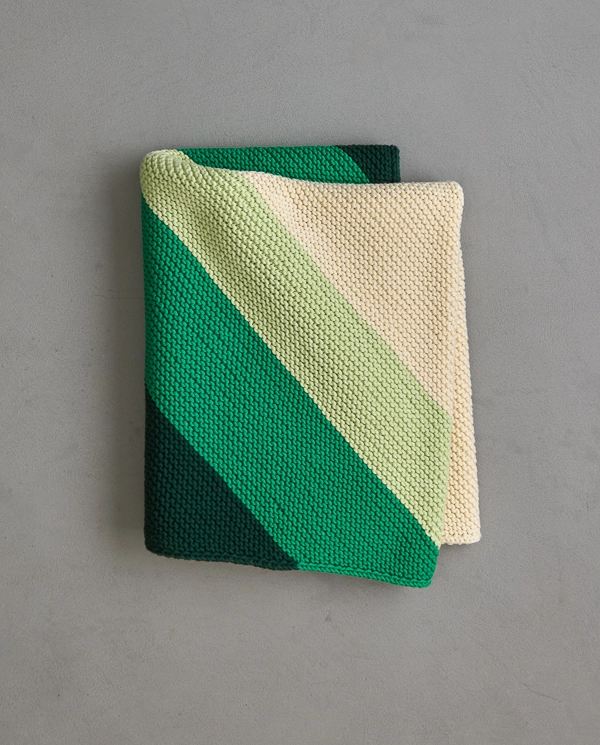
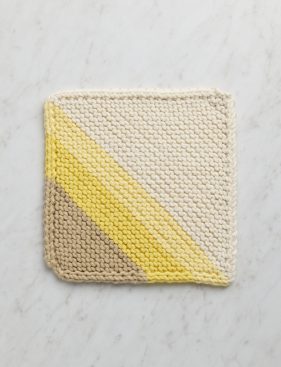
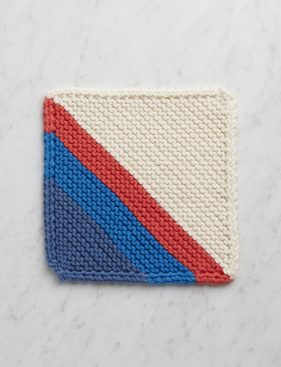
Colorful Corner Blanket In Tulip Cotton
Whether a bird’s wing or a changing leaf, nature is always showing us the power of a splash of color. Our Colorful Corner Blanket follows that lead and demonstrates just how much a little (color) goes a long way!

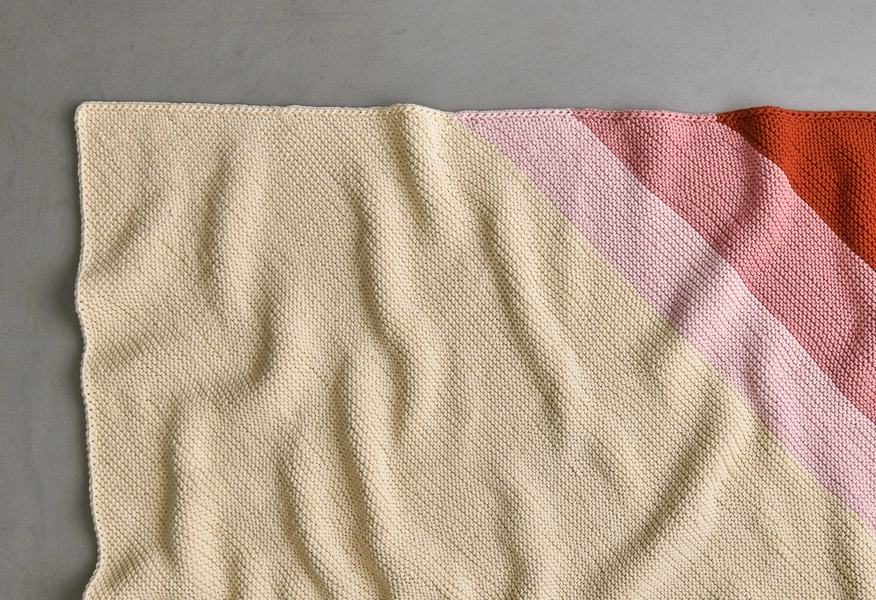
This garter stitch blanket lets you knit until your heart’s content, pausing only for simple increases or decreases at the edge. In the end you have a beautiful, satisfyingly squishy fabric that will ward off the effects of any cold, drafty corners.

All this simple charm is the perfect package for our beautiful new Tulip Cotton, which is a 100% organically grown, worsted-weight cotton yarn. It has a petal-soft feel, refined texture, and wonderful matte finish that gives a sturdy depth to all thirty (yes, thirty!) of its colors. If that seems like a lot of choices, don’t worry… We’re in your corner with seven wonderful Colorful Corner Blanket Bundles (no longer available)!
Designed by Purl Soho designer, Gaby Bush, based on the Colorful Corner Blanket, originally designed by Laura Ferguson.
Share your progress and connect with the community by tagging your pics with #PurlSoho, #PurlSohoBusyHands, #PurlSohoColorfulCornerBlanket, and #PurlSohoTulipCotton. We can’t wait to see what you make!
Materials
- 9 skeins of Purl Soho’s Tulip Cotton, 100% organically grown cotton. Each skein is 131 yards/ 100 grams. (NOTE: We no longer offer Tulip Cotton, but choose from one of our other worsted weight yarns.)
- Color A: 1 skein; approximately 131 yards required
- Color B: 1 skein; approximately 131 yards required
- Color C: 1 skein; approximately 131 yards required
- Color D: 6 skeins; approximately 738 yards required
- US 6 (4 mm), 40-inch circular needles
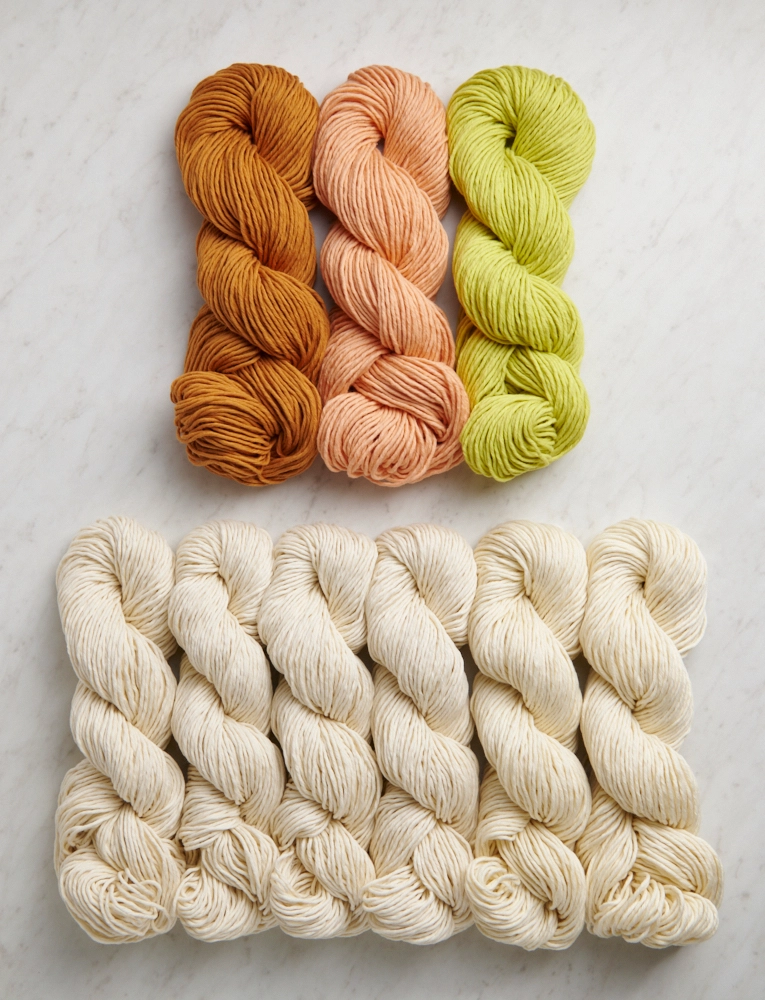
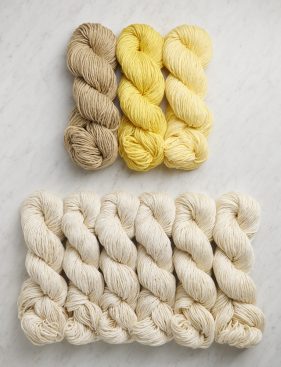
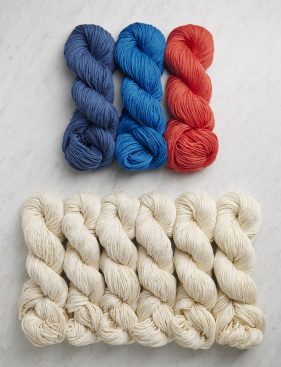
We came up with 7 inspiring palettes (all use Heirloom White for Color D). For our samples we used (NOTE: the Colorful Corner Blanket Bundles are no longer available.)
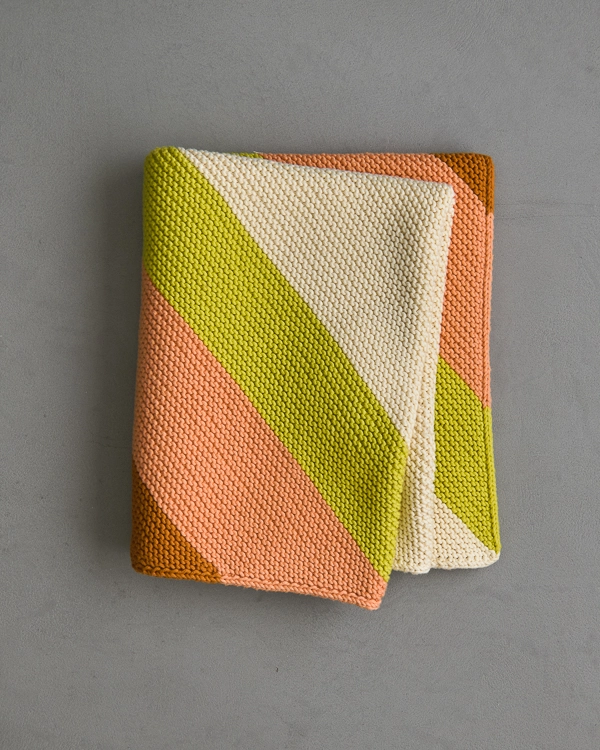
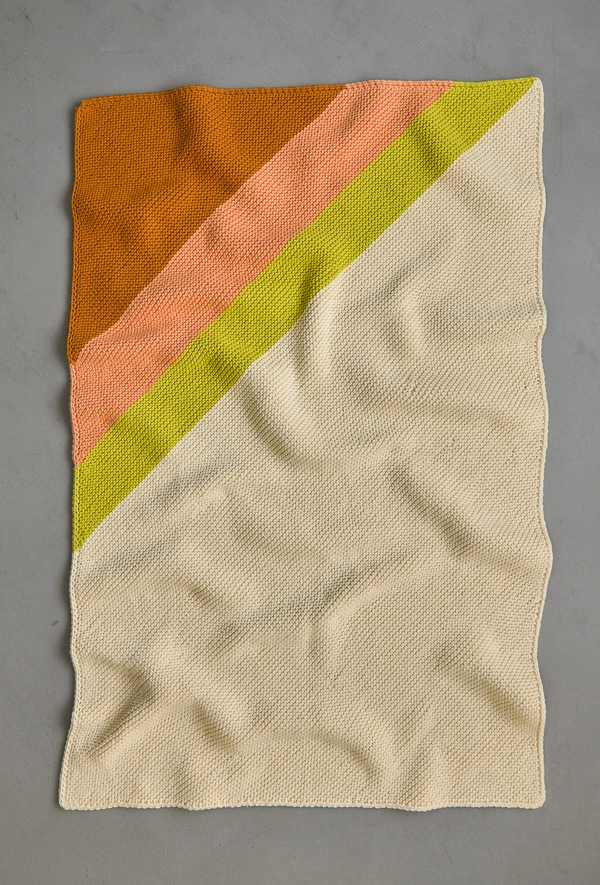
QUINCE (top row, above): Color A, Amber Honey; Color B, Fresh Peach; Color C, Yuzu Yellow
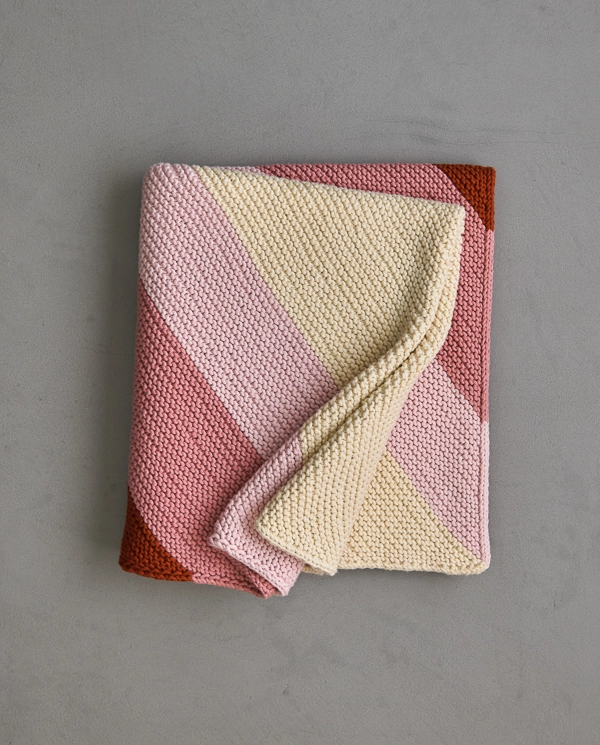
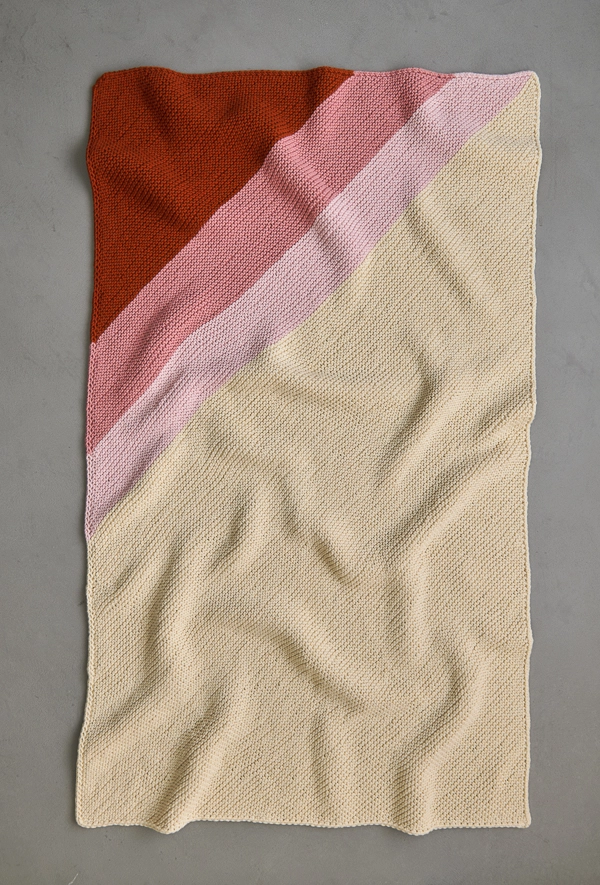
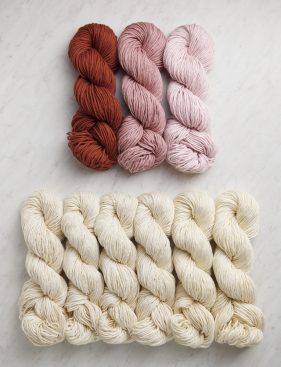
VALENTINE (bottom left, above): Color A, Red Sequoia; Color B, Pink Cliff; Color C, Icy Pink
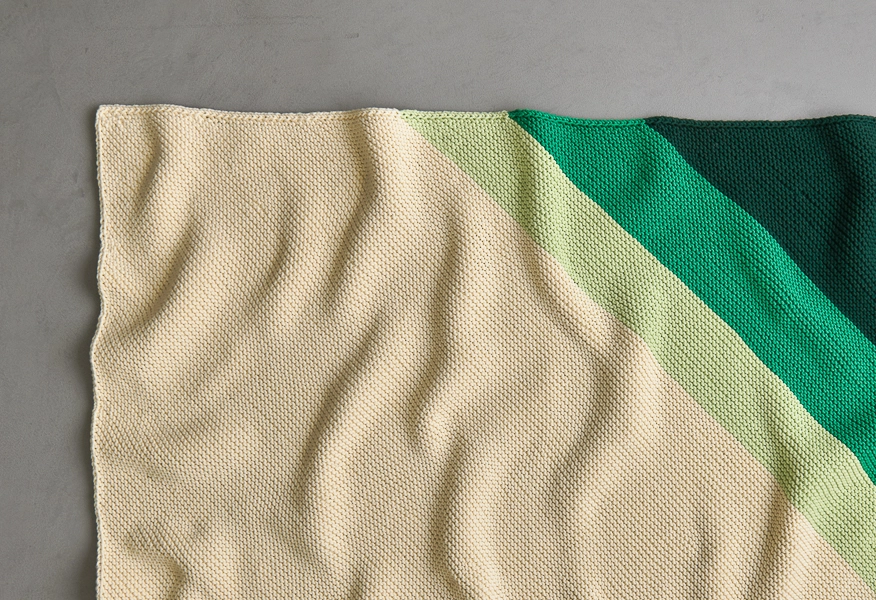
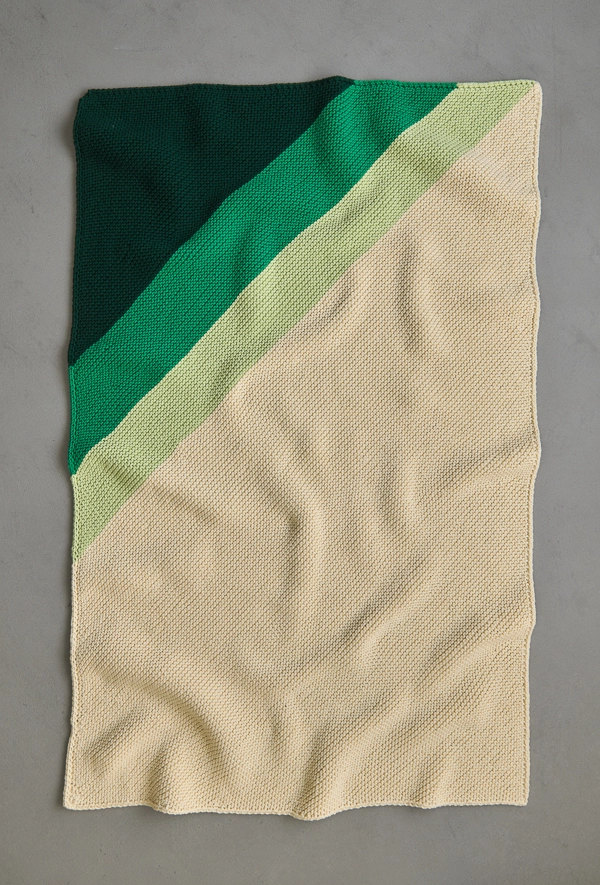
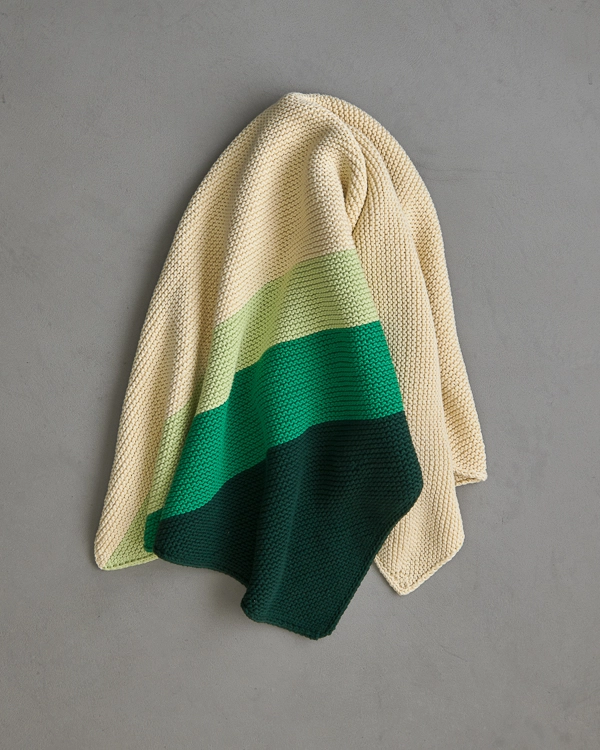
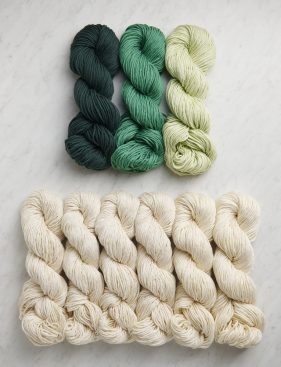
CLOVER (bottom right, above): Color A, Pine Bough; Color B, Spring Leaf; Color C, Fresh Honeydew
And the remaining four more bundles to choose from are…
CORNFIELD: Color A: Sesame Seed, Color B, Yellow Marigold, Color C: Mimosa Yellow
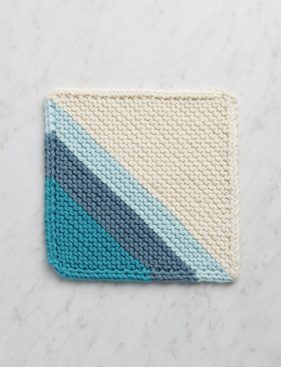

GLACIER: Color A, Aqua Sea; Color B, Blue Spruce; Color C, Ice Cap Blue
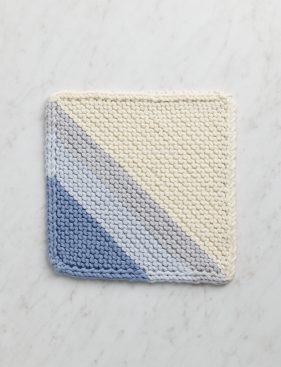
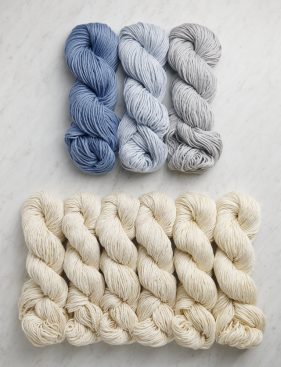
OCEAN WAVE: Color A, Faded Blue; Color B, Blue Talc; Color C, Gray Frost
SURFBOARD: Color A, Ocean Blue; Color B, Deep Sky; Color C, Wild Watermelon
GAUGE
17 stitches and 34 rows = 4 inches in garter stitch
Note: We used the entirety of the skeins for this blanket. To avoid running out of yarn, check your gauge, be sparing with your tails, and reuse your swatch yarn, if necessary.
SIZE
Finished Dimensions: 27¼ inches wide x 38 inches long
PATTERN
BEGIN + INCREASE
Using a basic Long Tail Cast On and Color A, cast on 5 stitches.
Row 1 (right side): K2, make 1 left (m1L), knit to last two stitches, make 1 right (m1R), k2. [2 stitches increased]
Row 2 (wrong side): P2, knit to last two stitches, p2.
Repeat Rows 1 and 2 forty-five more times, ending with Row 2. [97 stitches; piece measures approximately 11 inches from cast-on point]
Cut Color A.
Join Color B.
Repeat Rows 1 and 2 nineteen more times, ending with Row 2. [135 stitches; piece measures approximately 15½ inches from cast-on point]
Cut Color B.
Join Color C.
Repeat Rows 1 and 2 fifteen more times, ending with Row 2. [165 stitches; piece measures approximately 19 inches from cast-on point]
Cut Color C.
Join Color D.
Repeat Rows 1 and 2 one more time. [167 stitches]
CONTINUE
Still using Color D…
Row 1 (right side): K2, m1L, knit to last three stitches, knit 2 together (k2tog), k1.
Row 2 (wrong side): P2, knit to last two stitches, p2.
Repeat Rows 1 and 2 until piece measures approximately 38 inches along selvage edge from cast-on point, ending with Row 2.
CONTINUE + DECREASE
Row 1 (right side): K1, slip slip knit, knit to last three stitches, k2tog, k1. [2 stitches decreased]
Row 2 (wrong side): P2, knit to last two stitches, p2.
Repeat Rows 1 and 2 until 5 stitches remain, ending with Row 1.
Bind Off (wrong side): P2, bind off one, k1, bind off one, [p1, bind off one] 2 times.
FINISH
Weave in the remaining ends and gently wet block.


Could this be made a throw size? If so, how many skeins would it take?
Hi Teresa,
Thanks for reaching out. You can absolutely make this blanket in a throw size! All you’ll need to do is first, continue the BEGIN + INCREASE section until your blanket reaches your desired width, and then continue the CONTINUE section until it reaches your desired length. Our throw blankets are usually around 42 inches by 56 inches, and to make this blanket at those dimensions, you would need 20 skeins of Tulip Cotton. I hope this helps you plan your project!
All the best,
Lili
Thank you, I’d like to make the throw size as well. I see you are advising to knit to desired width but Carly says below “The Colorful Corner Blanket is knit on the bias, so you can expect your finished blanket to get wider after it’s been blocked out” so in the pattern you knit to 19” but the finished size is 27.
I know it is asking a lot but your staff is so knowledgeable, could you give us an approximate pattern for the throw for us newbies. According to the comments, quite a few of us want to make the throw size. I purchased 20 skeins and am so excited to get started.
Your help is so much appreciated!!!!!!
Hi Julie,
Thanks for reaching out! It looks like Carly gave some inaccurate advice in that comment, and we’ll go an edit that so it’s correct. We’re so sorry for the confusion!
In order to make this blanket larger, the pattern is essentially the same, so it would be a bit redundant to write it all out again! All you’ll need to do is keep knitting the BEGIN + INCREASE section until your edges reach the width you’re aiming for. (42 inches is what might work well with 20 skeins, so that’s a good goal.)
Hope this helps! I’m always happy to give more specific advice as you knit along.
All the best,
Lili
ooops I didn’t see the reply above, you can ignore my latest post. Then CONTINUE with color D for 52″ , then do the CONTINUE + DECREASE until bind off?
thanks and so sorry for the duplication!!
No worries at all! Yes, you’re absolutely correct! Once you’ve reached your desired width during BEGIN + INCREASE, you can move onto CONTINUE until the long edge reaches your desired length, and then finish up with CONTINUE + DECREASE.
All the best,
Lili
So I’m getting close YAY. The blanket is 42 inches wide. . To verify, where do I measure the 56 inches long? I am assuming along the left edge, but since this is knit on a diagonal, I’m confused. Please help!!!
Thanks!
Hi Julie,
Since 56 inches is the final length of your blanket, then you would measure that along whatever is the longest side of the blanket so far. If the right side is facing you, then this should be the right edge. Hope this helps!
All the best,
Lili
This is a beautiful summer throw! I will be making it for my daughter’s birthday gift. THANKYOU
What is the purpose of the middle Continue section pattern? Why wouldn’t you just go from Increase to Decrease ?
Thanks!
Hi Kathleen,
Thanks for reaching out. The CONTINUE section creates the rectangular shape of the blanket! In this section, you’re increasing at one edge and decreasing at the other, which keeps the stitch count even so that the blanket increases in length on the bias. If you skipped straight from the INCREASE section to the DECREASE section, then your blanket would be a square. Hope this helps clarify things!
All the best,
Lili
I want to make a baby blanket for my first grandchild born in May. What size do you recommend!
Hi Moya,
Thanks for reaching out! This blanket was designed in one size only, and the dimensions of that size are 27¼ inches wide x 38 inches long. I think that’s a good size for a baby, but if you want to make it smaller, then you can repeat Rows 1 and 2 of both the BEGIN + INCREASE section and the CONTINUE section fewer times. Hope this helps!
All the best,
Lili
Hi. I have a question. How can this pattern be made with all garter stitch if the 2nd row is to be repeated throughout as a Purl row? Maybe I’m missing something?
Hi Darlene,
Thanks for reaching out. On Row 2, you’re only purling the first and last two stitches! All the other stitches are knit, creating garter stitch throughout the main body of the blanket. Hope this clarifies things!
All the best,
Lili
Beautiful! This looks to be a baby size- Can you publish a throw version?
Hi Kathryn,
I’m glad to hear that you’re enjoying this pattern! While we have only written up the pattern in a smaller size, you can easily modify it to make a larger blanket. All you’ll need to do is continue the INCREASE section until your blanket is as wide as you’d like, and then continue the CONTINUE section until you’ve reached your desired length. I hope this helps!
All the best,
Lili
Lili – what would your yarn recomendation be for making this a throw. I know you said 20 skeins but what colors would you get more of? Would you double the colored skeins and then fill out the 20 with the heirloom white? Does that make sense??
Hi Joanie,
Thanks for reaching out. I think your idea is a good one! You can use 2 skeins each of Colors A, B, and C, and then use 14 skeins of Heirloom White. Hope this helps!
All the best,
Lili
I’d like to knit this for a teenager and don’t want to have the large expanse of white. Is there a fourth blue that could be used with the Glacial Bundle that would look good in place of the white? Also, how many skeins would I need to make a larger size – 50 x 75? Thanks, Margene
Hi Margene,
Thanks for reaching out. I think that Sailor Blue would look really nice with the rest of the colors in the Glacier Bundle! Alternatively, you could also rearrange the original colors in the Glacier Bundle, so that you’re using one of the blues for the large expanse, and then using Heirloom White for one of the stripes. (For this option, you would also need to buy the skeins individually, since you’ll need different quantities of each.)
In answer to your question about making a larger size, you would need a total of 32 skeins of Tulip Cotton to make a 50 x 75 inch blanket. I hope this helps you to plan your project!
All the best,
Lili
Could this be made into a placemat? What dimensions would I use?
Thank you! I’m looking forward to this lovely project.
Hi Deb,
Thanks for reaching out! I think this pattern would be stunning as a placemat! Typically our placemats are around 18 inches wide x 13 inches high.
I hope this helps, and please let us know how they turn out! Happy knitting!
Gianna
How do I pick up stitches on the fourth triangle so they all look consistent. Thanks
Hi Dee,
Thanks for reaching out! You actually will be continuously knitting and simply changing colors through out the blanket, you will not need to pick up stitches at any point!
I hope this clears things up!
Gianna
Thank you for this free pattern. I especially love how nice the edges look. Is this created by the increases and decreases? Also, do you have any suggestions for a worsted weight super wash wool? Or any other yarns?
Thank you.
Hi Lulu,
Thanks for reaching out and for your kind words! This blanket is knit on the bias, so you will actually be increasing and decreasing at different points in the pattern! As for other yarns, we don’t offer a superwash wool in a worsted weight, but for a wool option I would suggest using Plenty, Partridge, or Worsted Twist!
I hope this helps and please let me know if you have any more questions!
Gianna
Hi, I tend to be a tight knitter – can I size up to the US 7 (4.5mm) needle or will I end up running out of yarn?
Thanks!
Hi Zinola,
Thanks for reaching out! For this pattern in order to not run out of yarn, it is important to match the gauge provided, and if you need to go up to a US 7 to achieve the gauge that is totally fine! I would suggest working a gauge swatch prior to beginning, if you think you will need to go to a 7 you can start there or start with a 6 and then adjust, whatever works for you to get gauge, that way you won’t run out of yarn! For more information on gauge I would suggest checking out our wonderful tutorial, All About Gauge.
I hope this helps, happy knitting!
Gianna
Beautiful pattern! Two questions – are you joining new colors at the beginning of row 1, or knitting several stitches (inc or dec) and then joining a new color? Also when weaving in the ends, do you have a recommended method so the colors don’t blend together and remain distinct? Thank you so much! Julie
Hi Julie,
Thanks for writing in! When joining the new yarn, you will start the beginning of the right side row. For weaving in your ends, I would suggest checking out our Weaving in Your Ends tutorial! We used the GARTER WEAVING IN ENDS WITH DUPLICATE STITCH method.
I hope this helps, happy knitting!
Gianna
I am a fairly new knitter. What is a make one left(or right)!
Hi Ruth,
Thanks for writing in! Make 1 left or right is a technique to increase with either a left-leaning stitch or a right-leaning stitch. The pink highlights in the pattern will take you to the corresponding tutorials, but for your convenience I have also attached our wonderful step by step tutorial here: Make 1 Right (m1R) + Make 1 Left (m1L)
Happy knitting!
Gianna
If I were to make the overall blanket larger, throw sized, for example, would I make the same number of stitches in the colored section and there would just be more heirloom white or would I add to the amount of stitches I used for each color to make it look proportional?
Hi Joanie,
Thanks for reaching out. In order to make this blanket larger but still proportional, all you’ll need to do is continue the INCREASE section until your blanket is as wide as you’d like, and then continue the CONTINUE section until you’ve reached your desired length. In terms of color, if you want the stripes in the corner to extend all the way across the bottom edge, like they do in our version, you would still need to extend the stripes to the end of the INCREASE section, however far you continue it for. I hope this helps!
All the best,
Lili
I bought 2 kits plus 2 more skeins of white in hopes of making a bigger blanket.
Would it work out to just simply double the pattern? Using 2 skeins of each color and then continuing to the white? How long would that make the blanket? I’m just not sure how to proceed.
Thanks!
Hi Anna,
Thanks for reaching out. With 20 skeins of Tulip Cotton, you’ll be able to make approximately a 42- by 56-inch blanket! Doubling the pattern won’t quite work here, since that would actually cause the length to be really short. So I would recommend working the BEGIN + INCREASE section until you reach 42 inches in width, and then work the CONTINUE section until the blanket is 56 inches long. I hope this helps!
All the best,
Lili
Thanks, Lili,
Do you have any idea how wide each color stripe should be? I’m not particularly understanding how to calculate that. Thank you!
Hi Anna,
That’s a tricky question, and the short answer is it’s really up to you how to place the stripes! But I can give you some estimates if you’d like to match how we’ve done them in the sample blankets. Basically, the first stripe will take up approximately 47% of the width, the second stripe will take up 30%, and the final stripe, 23%. Since you’re making a blanket with a width of 42 inches, then your first stripe should be about 19.7 inches, your middle stripe should come to 12.6 inches, and your final stripe should measure approximately 9.7 inches (all measured along the edge, not up the center).
All the best,
Lili
Amazing! This is perfect. Thank you!
Hi! I just received the Quince bundle and I’m wondering about other options to substitute for the Heirloom White. This is going to be a baby blanket and I’m thinking about using a different color that doesn’t show dirt so easily. Thanks!
Hi Mary,
Thanks for writing in! I totally understand what you mean! in place of Heirloom White, I would recommend using Sesame Seed or even Gray Frost.
I hope this helps, happy knitting!
Gianna
Hi! I ordered the valentine bundle and would love to make another blanket as well. Do you have any recommendations for a 3rd color that would pair well with the garden pansy and pale iris? Thank you!
Hi Pam!
Thank you for your question! Icy Pink, Heirloom White, and Gray Frost would all be good candidates to pair with Garden Pansy and Pale Iris. Another idea for a purple-leaning blanket would be Mulled Wine, Pink Cliff, and either Icy Pink or Heirloom White.
I hope these suggestions help!
All the best,
Margaret
Hi Purl Soho!
I’m in the beginning of color D, is on row 1, at the end you k2tog and k1, should it create a “sharp” angle?
Hello,
Thanks for reaching out to us, and you are correct that each row of this blanket will make a sharp angle! The Colorful Corner Blanket is knit on a bias, which means that the grain of the fabric is running on an angle instead of straight with the blanket.
I hope this helps!
All the best,
Carly
Hello!!! Just got through color C, with my piece measuring approximately 19 inches from cast-on point, but if the overall dimensions of the blanket are 27in wide, and what follows is the CONTINUE portion, where do the extra 8 inches for the width come from??? THANKS!
Hi Nicole,
Thanks for reaching out to us. It sounds like you might be measuring from the tip of the triangle up to your live stitches. You’ll actually want to take this measurement along one of the edges! But I did the math to double check, and if you’re measuring 19″ from tip to live stitches, your edges should be just about 27 inches, so you’re right on track!
I hope this helps!
All the best,
Carly
Is there any reason why you only do 15 rows of color C instead of the 19 rows of color B. I read the earlier post about 23% for color C and 30% for color B. Is it just the design or because it is knit on the bias?
Hi Donna!
Thank you for your question! Since this blanket is knit on the bias like you mentioned, each row contains more and more stitches though the colorful corner. As stitches are added to each row, the same amount of yarn that was used in the previous stripe covers less distance in this stripe, so that is why the instructions for Color C suggest knitting fewer rows than Color B. You are welcome to knit more rows with Color C, however! You really can’t go wrong with this colorful corner motif, and I encourage you to knit what looks best to you!
All the best,
Margaret
Thank you for the response. Silly me, your answer makes total sense. Thank you for the math lesson!
You are very welcome, Donna! We are happy to help, and we hope you enjoy knitting your blanket!
All the best,
Margaret
Hello! I am looking at making this pattern into a laphgan, so 36x48in. How many skeins of each color do you think I would need?
Thanks!
Hi Elena,
Thanks for reaching out. To make this pattern with dimensions of 36in by 48in, you would need 10 skeins of the main color (Heirloom White), and 2 skeins each for each of the contrast colors. I hope this helps you plan your project!
All the best,
Lili
I bought 2 skeins of each color for the 42×56 size throw. I don’t want to run out of a color in the middle of a row. How many rows would each color(A,B, C) be to get to the 42 inches wide. I understand to knit with color D until it is 56 inches long.
Thank you so much
Hi Julie,
Thanks for reaching out. While the recommendation I gave earlier for a throw with a size of 42 inches by 56 inches is not an official size we’ve designed this blanket for, I’d be happy to help calculate the modifications to the pattern! Here’s the approximate distances (and number of rows/garter ridges) for Colors A, B, and C if you’re aiming for a width of 42 inches:
Color A: 16.95 inches, 144 rows, 72 garter ridges
Color B: 6.94 inches, 58 rows, 29 garter ridges
Color C: 5.39 inches, 44 rows, 22 garter ridges
Hope this helps!
All the best,
Lili
That helps so much! Thanks !!
I’ve started this blanket several times and each time the corner I’m starting from looks weird. It’s like the garter stitch body makes a corner but the edging stops short of the corner. It looks like someone took a tiny bite out of the very tip of the corner haha. Any ideas of what I’m doing wrong?
Hi Angela,
Thanks for reaching out! That’s actually totally correct and you aren’t doing anything wrong at all! Since you’re starting with casting on 5 stitches from that corner, that corner will be ever so slightly less pointed than the others because of the cast-on edge. I hope this helps! Please let us know if you have any other questions!
All the best,
Cat
Thank you!!
Hi Angela,
You’re very welcome! Have a wonderful rest of your day!
All the best,
Cat
I did a gauge swatch on this blanket and was right on target. But I was short of each of the colors but kept going. I am now starting the white section and have only 163 rows not 165 as pattern states. Just 2 rows short – but will that be a problem as I decrease to finish the blanket?
Hi Michelle,
Thanks for reaching out! That won’t be a problem at all. You can work the decrease section as normal, and it will bring you right down to 5 stitches for the Bind-Off Row. Hope this helps!
All the best,
Lili
First of all I love your site – have moved from NYC and cannot come into the store but here is all the joy to be found there.
Question: I would like to knit this in a bulky yarn. How many yards would be needed and which of your yarns would you recommend.
Looking for something appropriate for a baby blanket so def machine washable.
Thanks very much
Hi Lisa,
Thank you so much for your kind words! Lovebird is the yarn that comes to mind, since it’s our only machine washable bulky yarn. It’s made out of 100% super wash merino wool, and it’s hand-dyed, resulting in beautiful unique color combinations! It’s a bit difficult to predict yardage accurately when changing the weight of the yarn, but based on some other projects that use Lovebird, I’d say that you would need about 9 skeins to make this pattern. Hope this helps!
All the best,
Lili
Beautiful pattern! How many ridges (garter rows) for the CONTINUE section? I am having a hard time measuring so it is easier for me to count rows like you indicated in the color section. Thanks in advance!!
Hi Jules,
Thanks for reaching out! It looks like there are about 54 garter ridges in the CONTINUE section. Hope this helps!
All the best,
Lili
Thank you! You all at Purl Soho are the best!!
I am almost finished with making this blanket as a baby gift and am wondering how best to block it. Would it be okay to wash on gentle in a washing machine since the yarn says that it is machine washable and dryable or should I block it by hand, possible just with steam?
Hi Karen,
Thanks for reaching out! Machine washing and drying would be perfectly fine for this blanket. If it comes out of the dryer a bit misshapen, then steam blocking it will definitely help make it more uniform!
All the best,
Lili
Good morning, First of all I love your site and your store and want to thank you for all the free patterns and amazing yarns and suggestions. I just finished the 4 points blanket in Campo and love the yarn. How many yards of Campo would I need for this. I would like to make with a bit more color and less solid but if I knew how much Campo needed could figure that out. Thanks so much.
Lisa
Hi Lisa,
Since Campo is also a worsted weight yarn, like Tulip Cotton, you’ll be able to knit it to the same gauge and therefore will need just about the same yardage! Hope this helps!
All the best,
Lili
My daughter-in-law would like this blanket mainly in the Glacier color palette, but with a peach or pink substituted for one of the colors. Do you have any suggestions for a good combination? I also might knit the bottom corner to mirror the stripe, so please indicate the revised number of skeins. Thank you!
Hi Denise,
Thanks for writing in! I think that Fresh Peach would be the perfect color to substitute into the palette. I would recommend using it instead of Aqua Sea, since it matches the tone of the other two colors a bit better. If you mirror the stripes on the bottom corner, you would need 2 skeins of each contrast color, and just 3 skeins of the main color!
All the best,
Lili
Thanks, Lili. We love that color combination and I am putting in the order now!
If I were to make this as a twin blanket, how many skeins of yarn would I need? How would the increases and decreases work?
Hi Pushpa,
Thanks for reaching out! I did a quick search and am seeing that twin-sized blankets are typically around 65 inches by 90 inches. Are these measurements what you had in mind? Let me know, and then I can help calculate how much yarn you would need! I do want to give you a heads up though that the yarn we used for this project, Tulip Cotton, has been discontinued. I’d be happy to recommend alternate yarns to use for the project if you’d like!
All the best,
Lili