Basic Mending Tutorial
Whether snagged by a branch, singed by an errant campfire ember, or munched by moths, let’s face it, holes find their way into our knits! But rips and tears don’t have to be a reason to say goodbye to a favorite sweater, hat, or blanket. Here we’ll show you how to use the weaving method to mend and extend the life of your knits. Follow along with our video or step-by-step below!
MATERIALS + TOOLS
Before getting started, there are a few tools and materials you’ll want to have on hand. You will need…
- A tapestry needle
- Scissors
- Repair yarn(s)
- A Mending Mushroom
When picking a repair yarn, choose a yarn that’s a similar weight or thinner to the one used in your knit. Leftover yarn from the original project will allow your mending to blend nicely into the fabric, or for a fun and colorful visible mend, get creative with 1 or 2 different colors of repair yarn. For demonstration purposes we used two different colors, red for the warp and purple for the weft.
Another thing to keep in mind is the placement and size of the hole. Mending mushrooms (or eggs) are handy tools for controlling the tension of your repair. Purl Soho’s Mending Mushrooms come in three sizes, Morel, Porcini, and Toadstool, depending on where the repair is located and its size. In this case, because the hole is in an expanse of fabric and is fairly large, we chose our big, flat Toadstool.
SETTING UP

Prep your hole for weaving by trimming away any loose or frayed threads that might get in the way of the weaving.
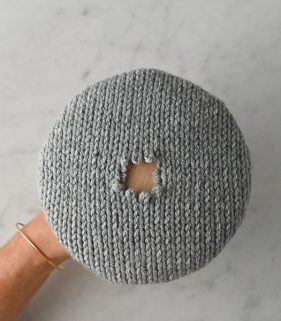
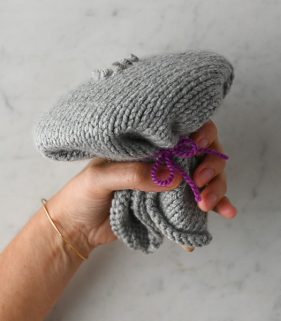
Next, center the hole on top of the mending mushroom and secure the rest of the fabric. Either hold the work around the stem of the mushroom with your hand, or tie it with an extra length of yarn. The fabric should be relaxed, not too tight, not too loose, so that the mending doesn’t warp the fabric.
Last, map out the placement of your mending. It should overlap the hole by ½ inch on every side, so visualize where your patch will go (or place removable stitch markers or pins if you’d like to be more precise).
CREATE THE WARP
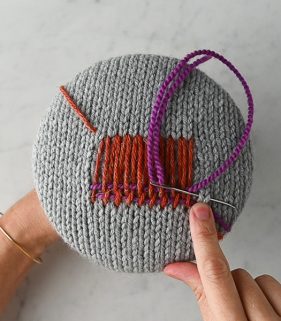
The first part of making a woven patch is creating a warp, a series of strands that pass over the hole from top to bottom, parallel to the knit columns of the fabric. Thread your tapestry needle with a length of your chosen warp yarn and get started!

Find the stitch that’s about ½ inch below and ½ inch to the right of your hole, and pass the threaded needle underneath that stitch from right to left, leaving about a 5-inch tail.

Following the column of knit stitches up, locate the stitch that is ½-inch away from the top of the hole. Slip the needle under this stitch from right to left and pull the yarn snug: not too tight, not too loose.

Continue the warp by repeating the above steps, each time moving one stitch to the left of the previously worked stitch. Sew back and forth until the hole is completely covered, and cut the yarn, leaving a 5-inch tail. The warp is complete!
CREATE THE WEFT
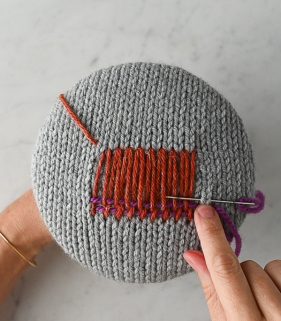
Now to create the weft, or the strands that will run parallel to the rows of the knit fabric and perpendicular to the warp, thread the tapestry needle with a length of weft yarn.

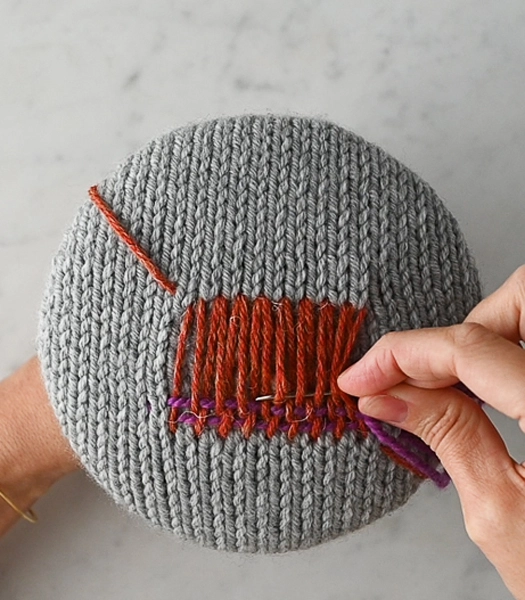
When working the weft, you’ll be working into stitches along the column of stitches one stitch to the side of the warp’s edges. Also, you will start one row up from the bottom row of the warp, as shown above, and you will finish one row below the top warp row. So to begin, draw the threaded needle under the stitch one column to the right and one row above where you began the warp, again, leaving a 5-inch tail.

Weave the needle over and under the warp threads. At the end of the row, pass the needle under the stitch from the same row as where you started and one column to the left of the edge of the warp, as shown above.

Now working from left to right, anchor the weft by passing the needle under the stitch directly above the one just worked. Weave across the hole, this time bringing the needle under the strands you previously went over and over the threads you previously went under.
When you reach the right side of the hole, bring the needle from left to right underneath the stitch just above the one where you began the weft. Switching directions, draw the needle from right to left under the stitch directly above, and weave across the hole, again by passing the needle under the strands you’d previously gone over and over the strands you’d previously gone under.
Continue weaving the weft by repeating the above steps, ending with the row just below the top of the warp. Cut the weft yarn, leaving a 5-inch tail.
FINISHING

Once you’re done, remove the fabric from the mushroom, and use the tapestry needle to weave the ends into the back of the fabric. And that’s it… A basic weaving mend and a very neatly repaired hole!


Wow that’s awesome 👏 I love Purl Soho I learn so much especially the Intarsia colour changing I am using at the moment for my 3 colour patchwork blanket it’s the first time I have knitted a patchwork blanket all in one piece and I had no idea how to add another colour without having holes where I tried to add another I have found it invaluable well done Have a lovely weekend
Warm Wishes
Elizabeth Rose 🌹
What a fabulous and detailed instruction video! Thank you so much for taking the time and effort to teach us.
Appreciate greatly the video on woven darning. I was a bit surprised that the loops left behind by where the yarn had severed were left untouched. I’ve always imagined (based on naivite) that those loops would be caught to avoid them continuing to “run.” Are they stabilized simply by the woven structure? Thank you.
Leslie
Hi Leslie,
Thanks for writing in! The woven structure does indeed stabilize the leftover ends, so they shouldn’t continue to run after the fabric is mended.
All the best,
Lili
I think it’s best to run a thin yarn through those loose loops. It helps to stabilize the fabric and you’re less likely to catch your fingers, or other stuff (like rings, hair clips, etc.) in them. Then do the weaving over it.