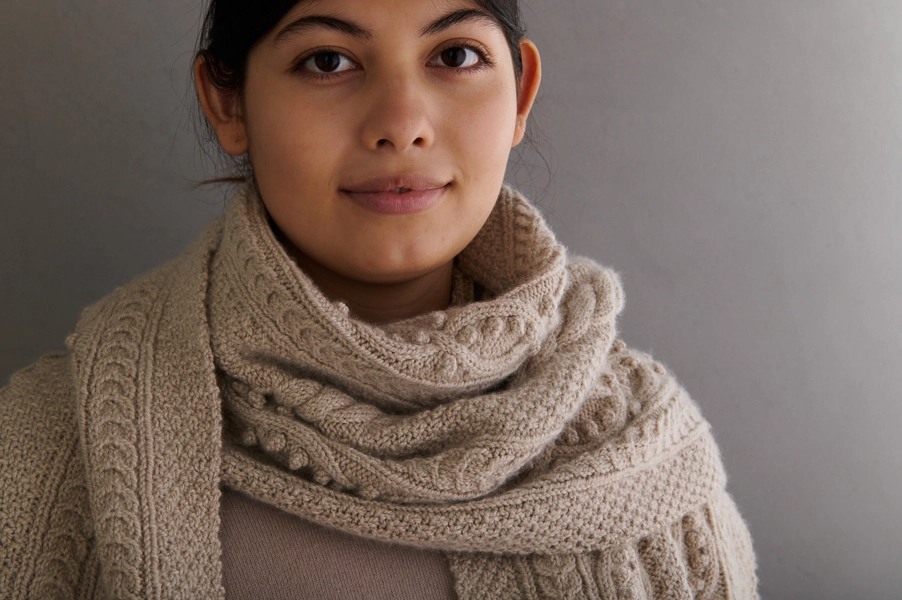
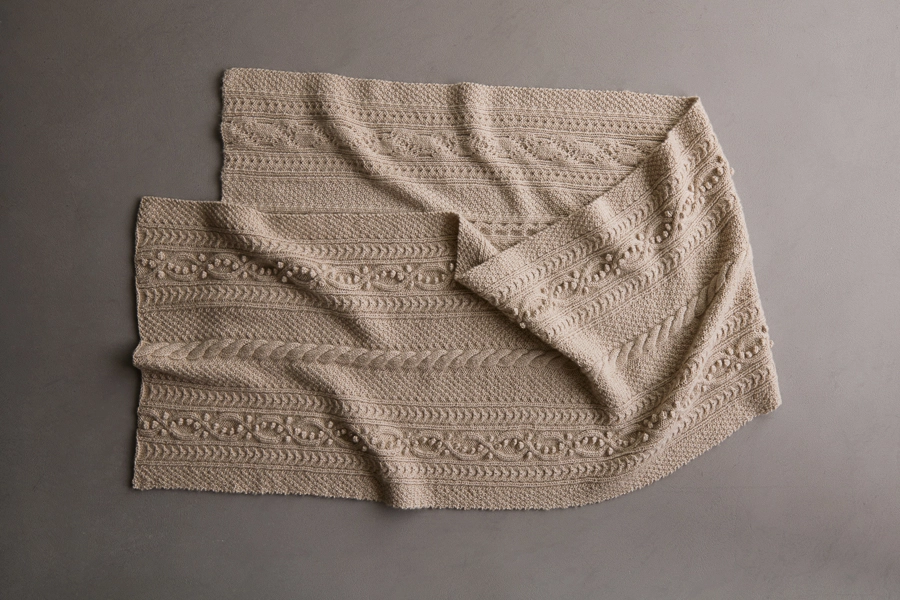
Bas-Relief Wrap
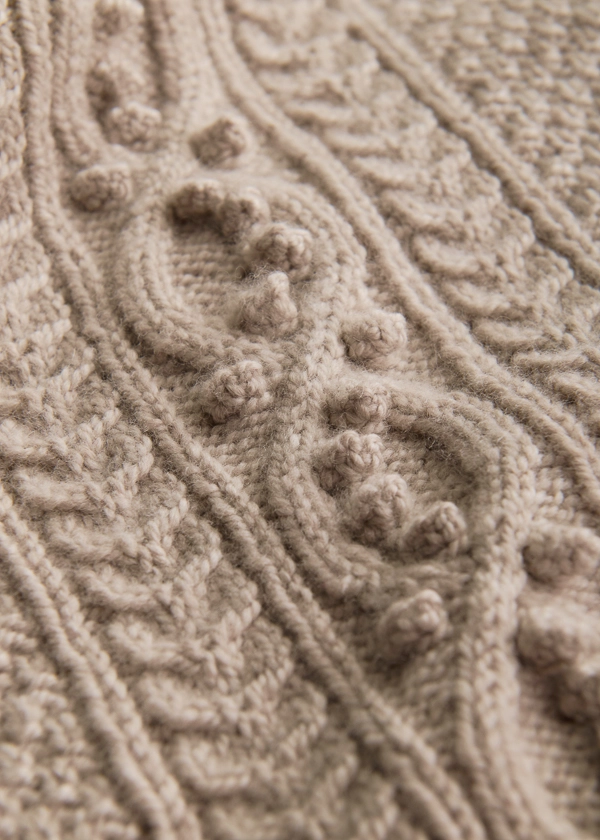
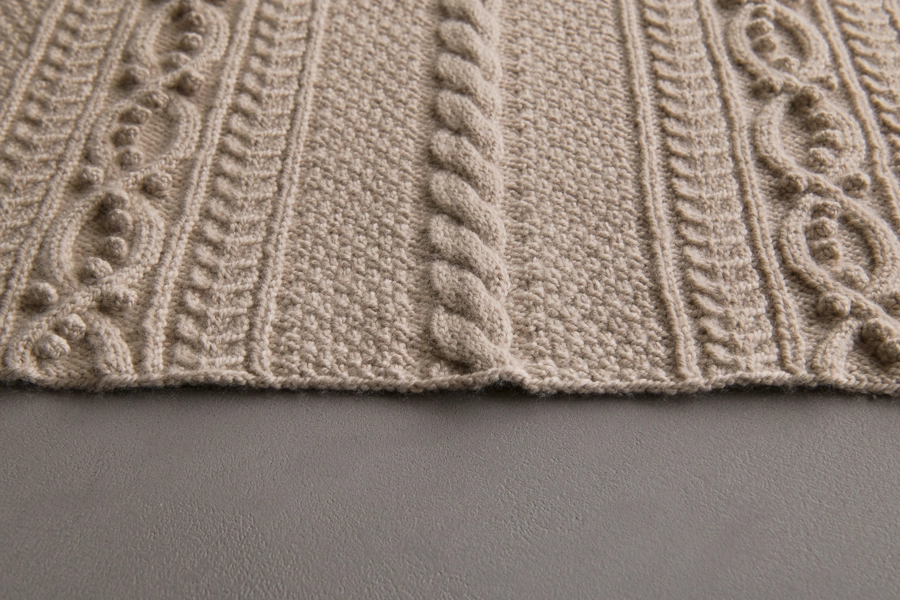
Bringing to mind a marble mantel, a chiseled frieze, or an ornate column, our Bas-Relief Wrap has sculpture in its bones!

Its hewn intricacy is stunning, but so is the soft interpretation of things that are so hard. Chalk it up to another amazing feat of knitting!
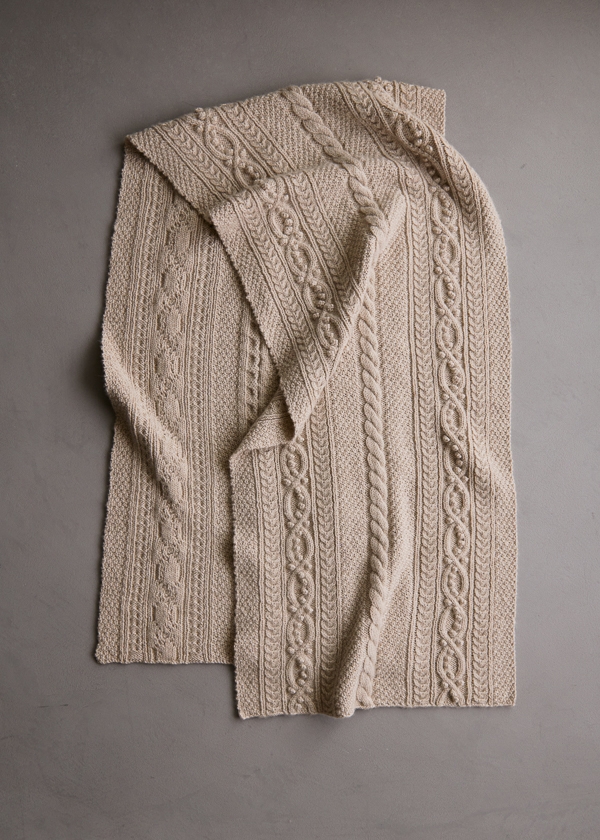
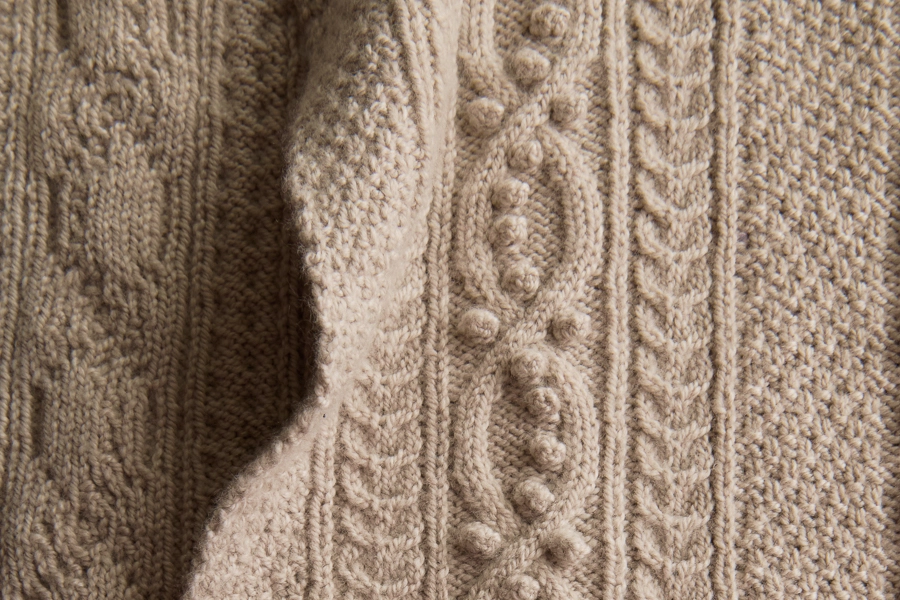
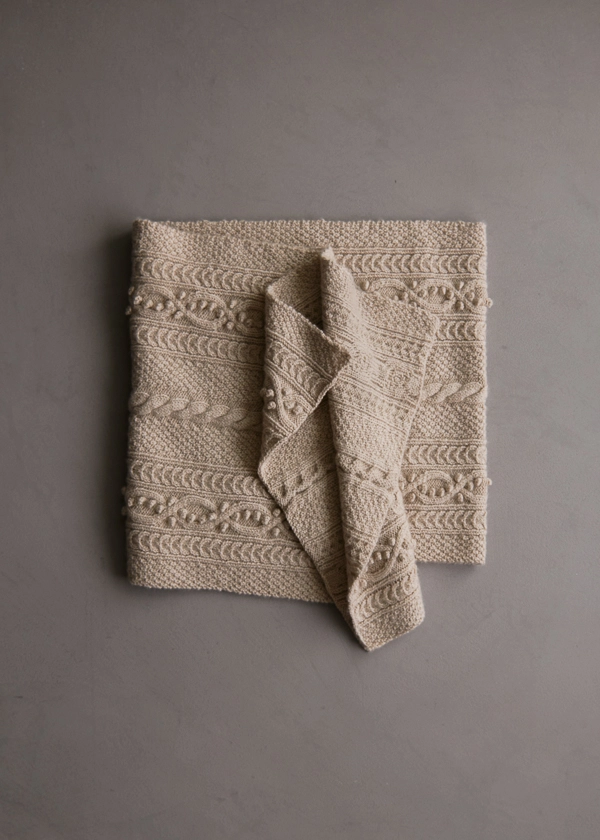
Panels of simple moss (i.e. double seed) stitch intersperse three kinds of cable panels, including one speckled with beautiful little bobbles. It makes for a very engaging knit and also a project that ends with a real feeling of accomplishment.
This gorgeous wrap is doubly gorgeous in our very special Cashmere Merino Bloom. One of our favorite choices for heirloom-level knits, its gentle cashmere and cushion-y extra fine merino put the emphasis on soft.
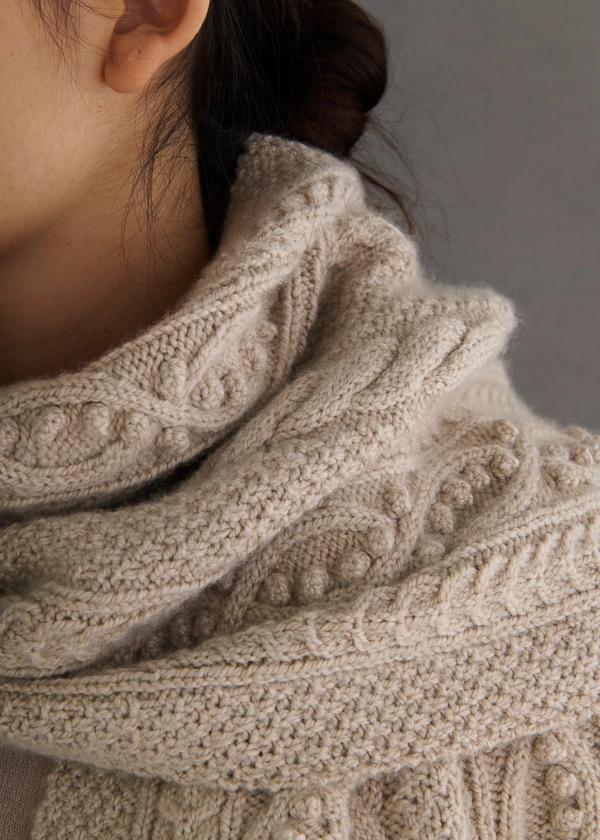
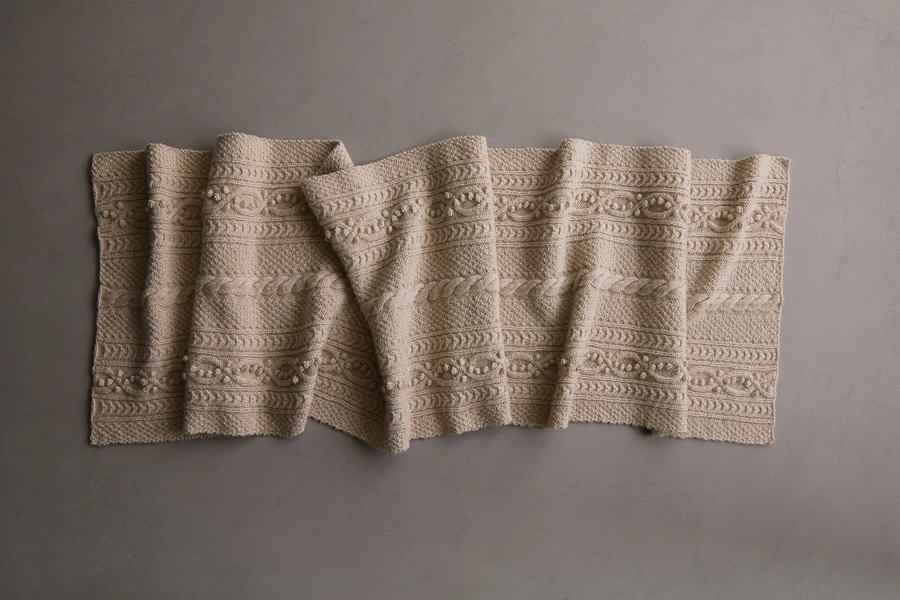
Follow along with the wrap pattern to make the version shown here, or choose the narrower scarf option. Either way, we offer written or charted instructions, depending on your brain!
Designed by Purl Soho designer, Jake Canton. Click here to see even more of Jake’s designs!
Share your progress + connect with the community by tagging your pics with #PurlSoho, #PurlSohoBusyHands, #PurlSohoBasRelifeWrap, and #PurlSohoCashmereMerinoBloom. We can’t wait to see what you make!
Materials

- 3 (7) skeins of Purl Soho’s Cashmere Merino Bloom, 75% extra fine merino and 25% cashmere. Each skein is 218 yards; approximately 654 (1340) yards required. We used Wheat Flour.
- US 6 (4mm), straight or 24-inch circular needles
- A cable stitch holder
- Stitch markers
NOTE: Trying to decide Scarf or Wrap? You might like to know a couple of ways in which the patterns differ. First, the Scarf version includes just the stitches to the right of the Wrap’s center cable (not including the center cable). In addition, there are the same number of moss stitches before and after the cable panels (unlike in the Wrap version).
Gauge
22 stitches and 34 rows = 4 inches in moss (or double seed) stitch
20 stitches and 30 rows = 4 inches in stockinette stitch
NOTE: For the Scarf version you’ll use just about all 3 skeins of yarn. To avoid running out of yarn, make sure to achieve this gauge.
Size
Scarf (Wrap)
Finished Dimensions: 8¼ (18¼) inches wide x 71¾ inches long
Notes
Cables
NOTE For more information about making cables, visit our Cable Tutorial. Although it shows a 6-stitch cable and this pattern uses 3-, 4-, or 8-stitch ones, the technique is the same!
1/2 RC + 1/2 LC (1/2 Right + Left Cross)
NOTE: For the Right and Left Cross, the tutorial above shows crossing knit stitches over purl stitches, but for these cables, you will knit all the stitches.
1/2 RC (1/2 RIGHT CROSS): Slip 2 stitches onto cable stitch holder and hold in back of work, k1, then k2 from cable stitch holder.
1/2 LC (1/2 LEFT CROSS): Slip 1 stitch onto cable stitch holder and hold in front of work, k2, then k1 from cable stitch holder.
2/1 RPC + 2/1 LPC (2/1 Right + Left Purl Cross)
2/1 RPC (2/1 RIGHT PURL CROSS): Slip 1 stitch onto cable stitch holder and hold in back of work, k2, then p1 from cable stitch holder.
2/1 LPC (2/1 LEFT PURL CROSS): Slip 2 stitches onto cable stitch holder and hold in front of work, p1, then k2 from cable stitch holder.
C4F + C4B (Cable 4 Front + Back)
C4F (CABLE 4 FRONT): Slip 2 stitches onto cable stitch holder and hold in front of work, k2, then k2 from cable stitch holder.
C4B (CABLE 4 BACK): Slip 2 stitches onto cable stitch holder and hold in back of work, k2, then k2 from cable stitch holder.
C8F (Cable 8 Front, Wrap Version Only)
C8F (CABLE 8 FRONT): Slip 4 stitches onto cable stitch holder and hold in front of work, k4, then k4 from cable stitch holder.
Bobble
For more help, please visit our 5 Stitch Garter Bobble Tutorial.
MB (Make Bobble)
Knit into the next stitch, leaving it on the left needle, [(yarn over, knit 1) into same stitch] two times. Turn work so wrong side is facing you, k5; turn work so right side is facing you, k2tog; return stitch to left needle, slip remaining three stitches of bobble over the k2tog stitch, knit that stitch, returning it to the right needle.
Pattern
Cast on 50 (112) stitches. We used a basic Long Tail Cast On.
Work Cable Pattern either from Written Instructions or Chart, both below. Be sure to follow the instructions for the width you are making, either Scarf or Wrap.
Cable Pattern: Written Instructions, Scarf
NOTE: Markers are for separating repeats and are optional. If you are using them, slip markers as you come to them.
Scarf
Set-Up Row (wrong side): [P1, k1] 3 times, p1, k2, p1, k1, place marker (pm), p6, pm, k1, p1, k1, p2, k6, p2, k1, p1, k1, pm, p6, pm, k1, [p1, k1] 5 times.
Row 1 (right side): [K1, p1] 3 times, k1, p2, k1, p1, k6, p1, k1, p1, k2, p6, k2, p1, k1, p1, k6, p1, [k1, p1] 5 times.
Row 2 (wrong side) and every even numbered row: Knit the knit stitches and purl the purl stitches, except knit the stitch above a bobble when one was made in the previous row.
Row 3: [P1, k1] 5 times, p1, 1/2 RC (see Notes), 1/2 LC (see Notes), p1, k1, p1, k2, p1, MB (see Notes), p4, k2, p1, k1, p1, 1/2 RC, 1/2 LC, p1, k1, p1, [p1, k1] 4 times.
Row 5: [K1, p1] 3 times, k1, p2, k1, p1, k6, p1, k1, p1, 2/1 LPC (see Notes), p4, 2/1 RPC (see Notes), p1, k1, p1, k6, p1, [k1, p1] 5 times.
Row 7: [P1, k1] 5 times, p1, 1/2 RC, 1/2 LC, p1, k1, p2, 2/1 LPC, MB, p1, 2/1 RPC, p2, k1, p1, 1/2 RC, 1/2 LC, p1, k1, p1, [p1, k1] 4 times.
Row 9: [K1, p1] 3 times, k1, p2, k1, p1, k6, p1, k1, p3, 2/1 LPC, 2/1 RPC, p3, k1, p1, k6, p1, [k1, p1] 5 times.
Row 11: [P1, k1] 5 times, p1, 1/2 RC, 1/2 LC, p1, k1, p2, MB, p1, C4F (see Notes), p1, MB, p2, k1, p1, 1/2 RC, 1/2 LC, p1, k1, p1, [p1, k1] 4 times.
Row 13: [K1, p1] 3 times, k1, p2, k1, p1, k6, p1, k1, p3, 2/1 RPC, 2/1 LPC, p3, k1, p1, k6, p1, [k1, p1] 5 times.
Row 15: [P1, k1] 5 times, p1, 1/2 RC, 1/2 LC, p1, k1, p2, 2/1 RPC, p1, MB, 2/1 LPC, p2, k1, p1, 1/2 RC, 1/2 LC, p1, k1, p1, [p1, k1] 4 times.
Row 17: [K1, p1] 3 times, k1, p2, k1, p1, k6, p1, k1, p1, 2/1 RPC, p4, 2/1 LPC, p1, k1, p1, k6, p1, [k1, p1] 5 times.
Row 19: [P1, k1] 5 times, p1, 1/2 RC, 1/2 LC, p1, k1, p1, k2, p4, MB, p1, k2, p1, k1, p1, 1/2 RC, 1/2 LC, p1, k1, p1, [p1, k1] 4 times.
Row 21: [K1, p1] 3 times, k1, p2, k1, p1, k6, p1, k1, p1, k2, p6, k2, p1, k1, p1, k6, p1, [k1, p1] 5 times.
Row 23: [P1, k1] 5 times, p1, 1/2 RC, 1/2 LC, p1, k1, p1, k2, p4, MB, p1, k2, p1, k1, p1, 1/2 RC, 1/2 LC, p1, k1, p1, [p1, k1] 4 times.
Row 25: [K1, p1] 3 times, k1, p2, k1, p1, k6, p1, k1, p1, 2/1 LPC, p4, 2/1 RPC, p1, k1, p1, k6, p1, [k1, p1] 5 times.
Row 27: [P1, k1] 5 times, p1, 1/2 RC, 1/2 LC, p1, k1, p2, 2/1 LPC, p1, MB, 2/1 RPC, p2, k1, p1, 1/2 RC, 1/2 LC, p1, k1, p1, [p1, k1] 4 times.
Row 29: [K1, p1] 3 times, k1, p2, k1, p1, k6, p1, k1, p3, 2/1 LPC, 2/1 RPC, p3, k1, p1, k6, p1, [k1, p1] 5 times.
Row 31: [P1, k1] 5 times, p1, 1/2 RC, 1/2 LC, p1, k1, p2, MB, p1, C4F, p1, MB, p2, k1, p1, 1/2 RC, 1/2 LC, p1, k1, p1, [p1, k1] 4 times.
Row 33: [K1, p1] 3 times, k1, p2, k1, p1, k6, p1, k1, p3, 2/1 RPC, 2/1 LPC, p3, k1, p1, k6, p1, [k1, p1] 5 times.
Row 35: [P1, k1] 5 times, p1, 1/2 RC, 1/2 LC, p1, k1, p2, 2/1 RPC, MB, p1, 2/1 LPC, p2, k1, p1, 1/2 RC, 1/2 LC, p1, k1, p1, [p1, k1] 4 times.
Row 37: [K1, p1] 3 times, k1, p2, k1, p1, k6, p1, k1, p1, 2/1 RPC, p4, 2/1 LPC, p1, k1, p1, k6, p1, [k1, p1] 5 times.
Row 39: [P1, k1] 5 times, p1, 1/2 RC, 1/2 LC, p1, k1, p1, k2, p1, MB, p4, k2, p1, k1, p1, 1/2 RC, 1/2 LC, p1, k1, p1, [p1, k1] 4 times.
Row 40: Knit the knit stitches and purl the purl stitches, except knit the stitch above a bobble when one was made in the previous row.
Repeat Rows 1-40 fourteen more times. Piece measures approximately 71½ inches from cast-on edge.
Repeat Rows 1 and 2 one more time.
With the right side facing you, bind off in pattern.
Weave in ends and wet block.
Wrap
Set-Up Row (wrong side): [P1, k1] 3 times, p1, k2, p1, k1, *place marker (pm), p6, pm, k1, p1, k1, p2, k6, p2, k1, p1, k1, pm, p6, pm**, [k1, p1] 5 times, k3, pm, p8, pm, k2, p1, [k1, p1] 3 times, k2, p1, k1, repeat from * to ** one more time, k1, [p1, k1] 5 times.
Row 1 (right side): [K1, p1] 3 times, k1, p2, k1, p1, k6, p1, k1, p1, k2, p6, k2, p1, k1, p1, k6, p1, [k1, p1] 5 times, p2, k8, p2, [k1, p1] 3 times, k1, p2, k1, p1, k6, p1, k1, p1, k2, p6, k2, p1, k1, p1, k6, p1, [k1, p1] 5 times.
Row 2 (wrong side) and every even numbered row: Knit the knit stitches and purl the purl stitches, except knit the stitch above a bobble when one was made in the previous row.
Row 3: [P1, k1] 5 times, p1, 1/2 RC (see Notes), 1/2 LC (see Notes), p1, k1, p1, k2, p1, MB (see Notes), p4, k2, p1, k1, p1, 1/2 RC, 1/2 LC, p1, k1, p1, [p1, k1] 4 times, p2, k8, p3, [k1, p1] 5 times, 1/2 RC, 1/2 LC, p1, k1, p1, k2, p4, MB, p1, k2, p1, k1, p1, 1/2 RC, 1/2 LC, p1, k1, p1, [p1, k1] 4 times.
Row 5: [K1, p1] 3 times, k1, p2, k1, p1, k6, p1, k1, p1, 2/1 LPC (see Notes), p4, 2/1 RPC (see Notes), p1, k1, p1, k6, [p1, k1] 5 times, p3, C8F (see Notes), p2, [k1, p1] 3 times, k1, p2, k1, p1, k6, p1, k1, p1, 2/1 LPC, p4, 2/1 RPC, p1, k1, p1, k6, p1, [k1, p1] 5 times.
Row 7: [P1, k1] 5 times, p1, 1/2 RC, 1/2 LC, p1, k1, p2, 2/1 LPC, MB, p1, 2/1 RPC, p2, k1, p1, 1/2 RC, 1/2 LC, p1, k1, p1, [p1, k1] 4 times, p2, k8, p3, [k1, p1] 5 times, 1/2 RC, 1/2 LC, p1, k1, p2, 2/1 LPC, p1, MB, 2/1 RPC, p2, k1, p1, 1/2 RC, 1/2 LC, p1, k1, p1, [p1, k1] 4 times.
Row 9: [K1, p1] 3 times, k1, p2, k1, p1, k6, p1, k1, p3, 2/1 LPC, 2/1 RPC, p3, k1, p1, k6, [p1, k1] 5 times, p3, k8, p2, [k1, p1] 3 times, k1, p2, k1, p1, k6, p1, k1, p3, 2/1 LPC, 2/1 RPC, p3, k1, p1, k6, p1, [k1, p1] 5 times.
Row 11: [P1, k1] 5 times, p1, 1/2 RC, 1/2 LC, p1, k1, p2, MB, p1, C4F (see Notes), p1, MB, p2, k1, p1, 1/2 RC, 1/2 LC, p1, k1, p1, [p1, k1] 4 times, p2, k8, p3, [k1, p1] 5 times, 1/2 RC, 1/2 LC, p1, k1, p2, MB, p1, C4B (see Notes), p1, MB, p2, k1, p1, 1/2 RC, 1/2 LC, p1, k1, p1, [p1, k1] 4 times.
Row 13: [K1, p1] 3 times, k1, p2, k1, p1, k6, p1, k1, p3, 2/1 RPC, 2/1 LPC, p3, k1, p1, k6, [p1, k1] 5 times, p3, C8F, p2, [k1, p1] 3 times, k1, p2, k1, p1, k6, p1, k1, p3, 2/1 RPC, 2/1 LPC, p3, k1, p1, k6, p1, [k1, p1] 5 times.
Row 15: [P1, k1] 5 times, p1, 1/2 RC, 1/2 LC, p1, k1, p2, 2/1 RPC, p1, MB, 2/1 LPC, p2, k1, p1, 1/2 RC, 1/2 LC, p1, k1, p1, [p1, k1] 4 times, p2, k8, p3, [k1, p1] 5 times, 1/2 RC, 1/2 LC, p1, k1, p2, 2/1 RPC, MB, p1, 2/1 LPC, p2, k1, p1, 1/2 RC, 1/2 LC, p1, k1, p1, [p1, k1] 4 times.
Row 17: [K1, p1] 3 times, k1, p2, k1, p1, k6, p1, k1, p1, 2/1 RPC, p4, 2/1 LPC, p1, k1, p1, k6, [p1, k1] 5 times, p3, k8, p2, [k1, p1] 3 times, k1, p2, k1, p1, k6, p1, k1, p1, 2/1 RPC, p4, 2/1 LPC, p1, k1, p1, k6, p1, [k1, p1] 5 times.
Row 19: [P1, k1] 5 times, p1, 1/2 RC, 1/2 LC, p1, k1, p1, k2, p4, MB, p1, k2, p1, k1, p1, 1/2 RC, 1/2 LC, p1, k1, p1, [p1, k1] 4 times, p2, k8, p3, [k1, p1] 5 times, 1/2 RC, 1/2 LC, p1, k1, p1, k2, p1, MB, p4, k2, p1, k1, p1, 1/2 RC, 1/2 LC, p1, k1, p1, [p1, k1] 4 times.
Row 21: [K1, p1] 3 times, k1, p2, k1, p1, k6, p1, k1, p1, k2, p6, k2, p1, k1, p1, k6, [p1, k1] 5 times, p3, C8F, p2, [k1, p1] 3 times, k1, p2, k1, p1, k6, p1, k1, p1, k2, p6, k2, p1, k1, p1, k6, p1, [k1, p1] 5 times.
Row 23: [P1, k1] 5 times, p1, 1/2 RC, 1/2 LC, p1, k1, p1, k2, p4, MB, p1, k2, p1, k1, p1, 1/2 RC, 1/2 LC, p1, k1, p1, [p1, k1] 4 times, p2, k8, p3, [k1, p1] 5 times, 1/2 RC, 1/2 LC, p1, k1, p1, k2, p1, MB, p4, k2, p1, k1, p1, 1/2 RC, 1/2 LC, p1, k1, p1, [p1, k1] 4 times.
Row 25: [K1, p1] 3 times, k1, p2, k1, p1, k6, p1, k1, p1, 2/1 LPC, p4, 2/1 RPC, p1, k1, p1, k6, [p1, k1] 5 times, p3, k8, p2, [k1, p1] 3 times, k1, p2, k1, p1, k6, p1, k1, p1, 2/1 LPC, p4, 2/1 RPC, p1, k1, p1, k6, p1, [k1, p1] 5 times.
Row 27: [P1, k1] 5 times, p1, 1/2 RC, 1/2 LC, p1, k1, p2, 2/1 LPC, p1, MB, 2/1 RPC, p2, k1, p1, 1/2 RC, 1/2 LC, p1, k1, p1, [p1, k1] 4 times, p2, k8, p3, [k1, p1] 5 times, 1/2 RC, 1/2 LC, p1, k1, p2, 2/1 LPC, MB, p1, 2/1 RPC, p2, k1, p1, 1/2 RC, 1/2 LC, p1, k1, p1, [p1, k1] 4 times.
Row 29: [K1, p1] 3 times, k1, p2, k1, p1, k6, p1, k1, p3, 2/1 LPC, 2/1 RPC, p3, k1, p1, k6, [p1, k1] 5 times, p3, C8F, p2, [k1, p1] 3 times, k1, p2, k1, p1, k6, p1, k1, p3, 2/1 LPC, 2/1 RPC, p3, k1, p1, k6, p1, [k1, p1] 5 times.
Row 31: [P1, k1] 5 times, p1, 1/2 RC, 1/2 LC, p1, k1, p2, MB, p1, C4F, p1, MB, p2, k1, p1, 1/2 RC, 1/2 LC, p1, k1, p1, [p1, k1] 4 times, p2, k8, p3, [k1, p1] 5 times, 1/2 RC, 1/2 LC, p1, k1, p2, MB, p1, C4B, p1, MB, p2, k1, p1, 1/2 RC, 1/2 LC, p1, k1, p1, [p1, k1] 4 times.
Row 33: [K1, p1] 3 times, k1, p2, k1, p1, k6, p1, k1, p3, 2/1 RPC, 2/1 LPC, p3, k1, p1, k6, [p1, k1] 5 times, p3, k8, p2, [k1, p1] 3 times, k1, p2, k1, p1, k6, p1, k1, p3, 2/1 RPC, 2/1 LPC, p3, k1, p1, k6, p1, [k1, p1] 5 times.
Row 35: [P1, k1] 5 times, p1, 1/2 RC, 1/2 LC, p1, k1, p2, 2/1 RPC, MB, p1, 2/1 LPC, p2, k1, p1, 1/2 RC, 1/2 LC, p1, k1, p1, [p1, k1] 4 times, p2, k8, p3, [k1, p1] 5 times, 1/2 RC, 1/2 LC, p1, k1, p2, 2/1 RPC, p1, MB, 2/1 LPC, p2, k1, p1, 1/2 RC, 1/2 LC, p1, k1, p1, [p1, k1] 4 times.
Row 37: [K1, p1] 3 times, k1, p2, k1, p1, k6, p1, k1, p1, 2/1 RC, p4, 2/1 LC, p1, k1, p1, k6, [p1, k1] 5 times, p3, C8F, p2, [k1, p1] 3 times, k1, p2, k1, p1, k6, p1, k1, p1, 2/1 RC, p4, 2/1 LC, p1, k1, p1, k6, p1, [k1, p1] 5 times.
Row 39: [P1, k1] 5 times, p1, 1/2 RC, 1/2 LC, p1, k1, p1, k2, p1, MB, p4, k2, p1, k1, p1, 1/2 RC, 1/2 LC, p1, k1, p1, [p1, k1] 4 times, p2, k8, p3, [k1, p1] 5 times, 1/2 RC, 1/2 LC, p1, k1, p1, k2, p4, MB, p1, k2, p1, k1, p1, 1/2 RC, 1/2 LC, p1, k1, p1, [p1, k1] 4 times.
Row 40: Knit the knit stitches and purl the purl stitches, except knit the stitch above a bobble when one was made in the previous row.
Repeat Rows 1-40 fourteen times. Piece measures approximately 71½ inches from cast-on edge.
Repeat Rows 1 and 2 one more time.
With the right side facing you, bind off in pattern.
Weave in ends and wet block.
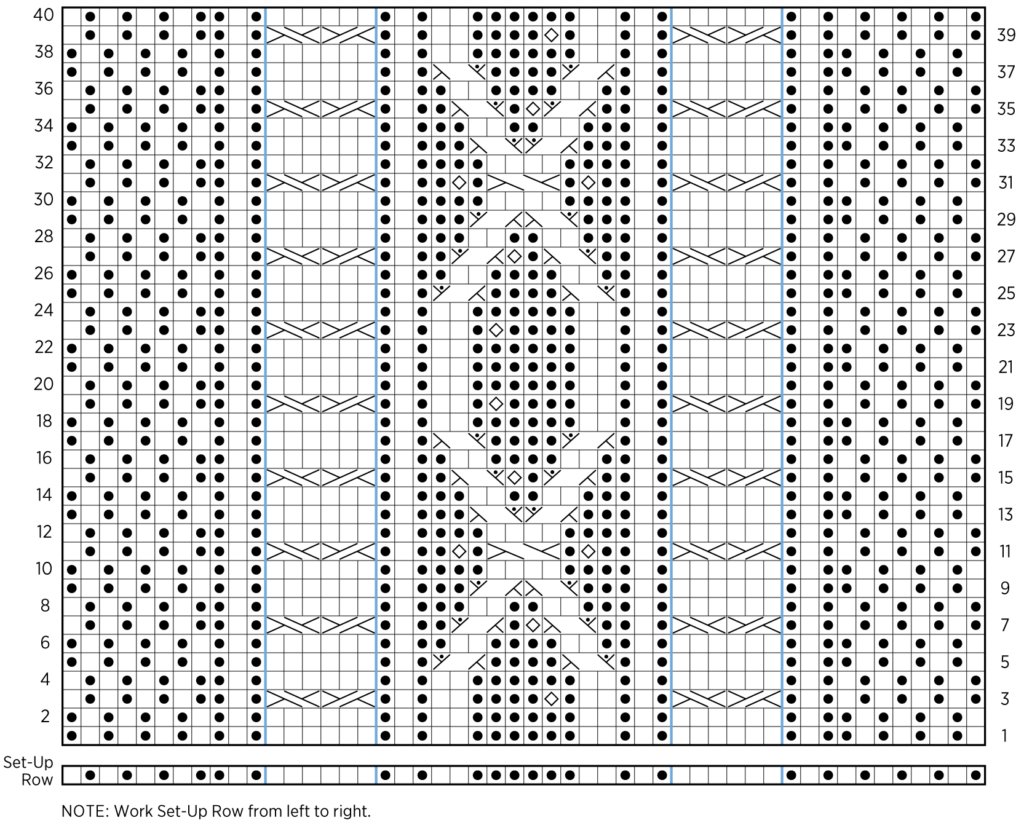
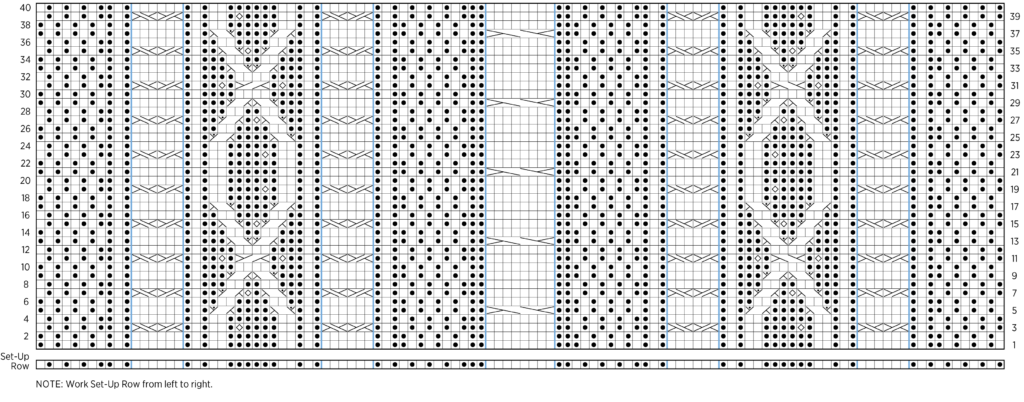
Cable Pattern: Charts
NOTE: Markers are for separating repeats and are optional. If you are using them, slip markers as you come to them. And if you’re new to knitting charts, unravel the mysteries with our Reading A Chart tutorial!
Start in the bottom left corner of the Chart (see below). Work the wrong-side Set-Up Row from left to right, then work right-side (odd number) rows from right to left, and wrong-side (even number) rows from left to right.
Work your way up the chart to Row 40, then repeat Rows 1-40 fourteen more times.
Repeat Rows 1 and 2 one more time. Go on to Finishing section, below.
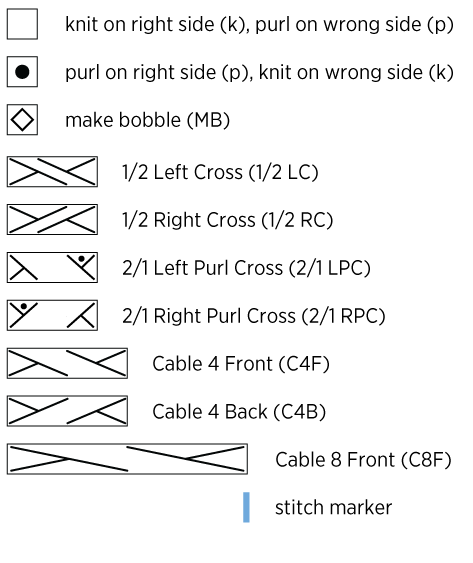
Key For Both Scarf + Wrap
Scarf
NOTE: Want to see it bigger? Download this chart (and key) as a PDF!
Wrap
NOTE: Want to see it bigger? Download this chart (and key) as a PDF!
Finishing, Scarf + Wrap
With the right side facing you, bind off in pattern.
Weave in ends and wet block.


Thank you very much!
It’s wonderful!
Which color yarn was used in the example? I’m assuming it was Wheat Flour. Beautiful! I’m looking for a new project. This would be perfect!!!
Hi Beverly,
Thanks for reaching out and for your kind words! Yes that is correct, we used Wheat Flour for the sample!
Warmly,
Gianna
Can you suggest an alternate yarn, or can you estimate when you might get more stock of Crocus Bud Heather? My heart is set on this colorway!
Hi Jane,
Thanks for reaching out! Crocus Bud is also my favorite color that we carry in Cashmere Merino Bloom, and luckily we should have it back in stock within the next few weeks! The best way to stay up to date is to add your email in on the Cashmere Merino Bloom product page under Crocus Bud and we will send an email as soon as it is available!
Happy knitting!
Gianna
If the open square is knit on the right side and purl on the wrong side, shouldn’t the dotted square be purl on the right side and knit on the wrong side? Your explanation is wrong in this email.
Hi Penny,
Egads, you’re right! We have corrected that error and are very grateful to your eagle eyes and sharp brain. Thank you so much for saving us too much embarrassment and, more importantly, your fellows knitters from frustration!
Best,
Whitney
I’m thinking of making the Bas Relief scarf pattern, but I’m not fond of bobbles. It looks like leaving out the bobble would just mean purling the one stitch marked for the bobble in each instance–Is there any more to it than that? Feel free to tell me that I would be taking too much charm out of this lovely pattern were I to make such an adjustment! Perhaps there’s another simple way to liven up that area inside the cable. Thank you.
Hi Judith,
Thanks for reaching out! You can certainly work the wrap without the bobbles! And you are correct, those stitches will become purl stitches when looking at it on the right side (so in the chart they would just be dots). I think it will look beautiful with or without the bobbles!
Thanks for you question, and Happy Knitting!
All the best,
Kelsey
I’m glad someone asked this question. I don’t want to do bobbles, either! Thank you!
The same! I think it would be just as pretty without.
Beautiful pattern; love the option of doing a scarf or wrap. Thanks so much! 🙂
This is lovely!
I am not a fan of bobbles. Would skipping the MB instruction create any fundamental issues?
Thanks very much!
Hi Chermia,
Thanks for reaching out! No, leaving the bobbles out wouldn’t create any issues! If you didn’t want to work the bobbles, then those stitches will be purl stitches when looking at it on the right side (so in the chart they would just be dots).
Hope this helps, and please let me know if you have any other questions!
Happy Knitting,
Kelsey
If I wanted to use this beautiful patter for a baby blanket how would I modify it?
Hi Brenda,
Thanks for reaching out! There isn’t really a formula to adjust the width for this pattern since there isn’t an exact stitch multiple that the pattern works over. However, I think that this pattern would be absolutely beautiful as a baby blanket! I would recommend simply doubling the wrap size cast on, this would give you a width of approximately 36″ which is about the same standard size of a baby blanket. For this you would cast on 224 and follow the pattern or chart as written until you reach your desired length!
I hope this helps, happy knitting!
Gianna
I’m not wild about bobbles. What adjustment would I have to make to just leave them out? It looks like I would just purl that one stitch and keep on going, correct?
Thank you.
Hi Carol!
Thanks for reaching out! Yes, you are correct; if you want to omit the bobbles, then all those stitches will be purl stitches when looking at it on the right side (so in the chart they would just be dots).
Thanks for reaching out and Happy Knitting!
Kelsey
Beautiful but … can the bobble be left out? if so what do you do?
Hi Marion,
Thanks for reaching out! If you wanted to leave the bobble out, then all those stitches will be purl stitches when looking at it on the right side of the fabric (so in the chart they would just be dots).
I hope this helps, and please let us know if you have any other questions!
Happy Knitting!
Kelsey
This is a beauty! However I would prefer using an alternative yarn so what would you recommend. I don’t know which of your other yarns would showcase the lovely sculptural motifs as well as the Cashmere Merino does. I would prefer making the wrap or maybe the scarf but a bit wider. Thank you for the great pattern!
Hi Melinda,
Thanks for reaching out! Cashmere Merino Bloom does showcase the detail of the pattern beautifully, but I also think that Understory would be a great option. It has excellent stitch definition, so would look lovely with the cables and bobbles! Good Wool or Mulberry Merino would also look great with this pattern, they are a bit more fine so I would recommend working a gauge swatch prior to beginning, you may need to adjust the needle size a bit!
I hope this helps, happy knitting!
Gianna
Would make a stunning throw too
Hi this is beautiful! Do you think your Good Wool would work for this ?
Hi Maryellen,
Thanks for reaching out! I think Good Wool would be a great option for this pattern! It is a bit more fine than Cashmere Merino Bloom, so I definitely recommend working a gauge swatch prior to starting! You may need to adjust the needle size to obtain gauge!
Warmly,
Gianna
Can you recommend a substitute yarn for people allergic to animal fiber?
Hi Nancy,
Thanks for reaching out! We don’t have a 100% plant fiber that is the same weight, but we do have our lovely Cotton Pure! It is a sport weight yarn so it is a bit thinner than a dk/light worsted like we used for this pattern. I think it would look lovely but I do recommend working a gauge swatch prior to beginning as you will likely need to adjust the needle size!
We also have one of our newer yarns Morning, it is a beautiful dk/light worsted weight (same as the pattern) and it is a blend of 75% organically grown cotton and 25% yak! I haven’t heard of any allergy related issues with this yarn since the yak quantity is relatively small, so this could also be a great option and would work with the pattern as written!
I hope this helps, happy knitting!
Gianna
Newbie Question -does cable-work who better in lighter color yarns – in general?
Thank you,
Hi Cat,
Thanks for reaching out! In general you will be able to see a cable pattern better in a lighter color but you could certainly use a darker color and still be able to see the beautiful pattern! It more comes down to the type of yarn you use, a yarn that is very fuzzy will be more difficult to see the stitch pattern. While a yarn that has a great stitch definition like Cashmere Merino Bloom will help to highlight the cables!
I hope this helps, happy knitting!
Gianna
This pattern is amazing! First time making bobbles and I LIKE the way they look – especially after blocking. Lisa
Hello! thank you for this gorgeous pattern, would this pattern work for a fingering weight yarn?
Hi Teresa,
Thanks for reaching out! I think you could certainly make this wrap using a fingering weight yarn! I would recommend starting by working a gauge swatch to calculate your cast on amount!
Please let us know how this turns out, happy knitting!
Gianna
Almost finished with this in the scarf pattern……what a joy to work up and I love love love the cashmere bloom yarn…..a total favorite now….I want to make everything out of it!!!!!!!!
Thank you Purl Soho for fabulous yarns and such fast shipping!!!
P.S……I crocheted the bobbles…looks great…and so much easier!
Crocheted bobbles?!!! What a marvelous idea!!!
Hi,
Can i knit this wrap using Cygnet? What size needles should i use? Absolutely love Cygnet and want to do this with the new colour!
Hi Woon,
Thanks for writing in! I think that this wrap would look beautiful in Cygnet, and I’m happy to hear that you’re excited to try out the new color. However, Cygnet is a fingering weight yarn, and this pattern was designed for Cashmere Merino Bloom, which is DK weight and is quite a bit thicker. I still think you can use Cygnet, though, you will just need to modify the pattern slightly!
Because there isn’t really a formula to adjust the width for this pattern (there isn’t an exact stitch multiple that the pattern works over), I would recommend simply doubling the wrap size cast-on. That would mean casting on 224 stitches and working through each line of the pattern twice per row, as you knit! This way, you should be able to get roughly the same dimensions, even with a lighter yarn. I hope this helps, but please let me know if you have any other questions!
All the best,
Lili
Do you recommend blocking? I am using your Cashmere Merino Bloom.
Hi Joan,
Thanks for reaching out. We definitely recommend blocking this wrap! That will help the intricate design become more even.
All the best,
Lili
Hello! Would you recommend making this wrap in the Salt & Pepper Helix color? I really love that colorway, but wonder if it would be too distracting with all the cables and details…? Thanks so much!
Hi Lisa,
Thanks for writing in. Personally, I do think that Salt + Pepper would detract from the intricate stitch patterning in this design. I think that this wrap is best done in a solid color! (But I also love the Salt + Pepper color too!)
All the best,
Lili
This pattern is so beautiful. I want to make the wrap. I know you’ve answered several
times that there isn’t a good way to make it wider other than doubling the cast-on. I just want to make it a *little* wider :). Would there be a way to just double the outer border section on each end? I know that’s not the exact beautiful pattern you have made, but if I did it want to try it, what would I do? (Moderately skilled knitter here but really bad at charts and math)
Hi Patricia,
Thanks for reaching out. It’s definitely possible to make the wrap just a little bit wider! I think you already have the right idea to extend the outer border sections on each side of the wrap. Each border section is made up of 8 stitches of moss/double seed stitch, so I would just cast on 16 extra stitches, and then work the moss stitch for 16 stitches on each side instead of 8! Hope this helps.
All the best,
Lili
Just saw this pattern and right away thought “baby blanket”. Thanks for a beautiful design . Can’t wait to see smiles of delight on the new moms face!
Hi,
What a beautiful pattern! I’m itching to try this one out, I love cable patterns and this one would really be a challenge for me. As I am based in the UK and unable to wait for the delivery of your gorgeous yarn (far to impatient) would you be able to let me know how many balls or yardage I would need to make the wrap, is it 3 balls for the scarf and 7 for the wrap? Look forward to your next email for my dose of inspiration. Kind regards!
Hi Charlotte,
Thanks for writing in! I totally know what you mean! For this project, you will need a dk/light worsted weight yarn, if you would like to make the scarf size you will need 654 yards (3 skeins), or if you would like to make the wrap size you will need 1340 yards (7 skeins)!
I hope this helps and please let us know if you have any more questions!
Gianna
This is the most amazing pattern. This designer is incredible. Can’t wait to start knitting this wrap. Thanks for creating this wonderful project!!
Hi,
I would love to make the bas wrap pattern as an afghan. Is this possible and what do you recommend for yarn to make it a bit of a faster project ? Thank you.
Hi Mary Ellen,
Thanks for writing in. I think it’s definitely possible to turn this pattern into an afghan! All you would need to do is double, triple, or even quadruple the existing width of the pattern, depending on how wide you’d like the blanket to be. As for yarn, I’d recommend using Plenty, which will work up a lot faster. I hope this helps!
All the best,
Lili
Thank you for the response. Will I loose the beauty of the cable etc using navy bed? If I triple the width how many skeins would I need?
Hi Mary Ellen,
I think this design will look lovely in navy! I don’t think you’ll lose the beauty of the cables. I remember in a previous comment, I suggested that you use our yarn Plenty for you project, so that it would knit up faster. Are you still planning on doing that? Let me know, and I can give you an estimate of how many skeins it will take!
All the best,
Lili
Hi, thank you for your response. I don’t know whether triple or quadruple the pattern. What do you think and how many Keon’s do you suggest? ME
Hi Mary Ellen,
The decision to triple or quadruple the pattern, as well as the number of skeins you need, would depend on the yarn you’re using! In a previous comment, you mentioned wanting to use a different yarn to make the project faster, and I suggested Plenty. Are you still interested in using Plenty to make this pattern? Or do you want to go with Cashmere Merino Bloom, the yarn we designed it in? Let me know, and then I can calculate how many skeins you’ll need!
All the best,
Lili
This is one of the most satisfying knits I have been engaged in in a very long time and I knit every single day. This pattern is great and I even forced myself to learn to bobble using your written tutorial (I hope you put it on your list for video tutorials some day although I did finally figure it out:)). I love the bobbles and was sad to see half the comments are asking about leaving out the bobbles. This is just a stellar pattern. All your stuff is just so fantastic: wool, patterns, tutorials. I hope always that you guys keep doing what your doing forever!!!
Hi Lilli,
Yes, I’d like to make it in the plenty yarn. Sorry for not being more clear. Mary Ellen
Hi Mary Ellen,
Thanks for confirming! Because Plenty is quite thicker than Cashmere Merino Bloom, I would recommend just doubling the Wrap size pattern. Based on my estimates, this will give you an approximately 50-inch-wide fabric, which I think is definitely wide enough for an afghan! You may also want to modify how many times you repeat Rows 1-40. Using Plenty will add a lot of additional length as well, so you may find you need to repeat this section fewer than 14 times to reach a length that works for you! And I would recommend buying 18 skeins of Plenty. I hope this helps you plan your project!
All the best,
Lili
Hi Again,
I’m not sophisticated enough to transpose straight to round knitting but I do it with patterns where every other round is a purl round and just do a knit round when working in the round — this often works with basic cable patterns). Since every other round we knit the knits and purl the purls when knitting flat, I wondered if you could make this in the round by just purling the knits and knitting the purls on the “wrong side” and work it in the round. — instead of matching the stitches on the wrong side like we are doing for the flat version. I guess I can also just try it, but wondered what you thought. I wasn’t sure it could work because I know when you transpose a pattern, you don’t just reverse the stitch but also have to reverse the entire row.
Hi Jane,
Thanks for writing in. I think you have just the right idea on how to modify this pattern to be worked in the round! Fortunately, Row 2 is written in a way where you do not need to reverse it. You’ll essentially just need to “invert” Row 2 by purling the knits and knitting the purls. And when you come to a bobble, you’ll work a purl stitch above it. Let us know how it goes if you try it!
All the best,
Lili
I apologize!!! There are 112 stitches in the set up row. I’m not sure what I did wrong, but after putting it aside a bit, it ended up being just fine! I’m sorry to bother you. If possible, please do not post my previous comment! And just so you know, I’m doing this pattern BECAUSE of the bobbles! That’s what makes this pattern stand out from many other pretty cabled wraps! Thank you for sharing it!
Hi Kat,
No worries at all–I’m so glad to hear that you’ve figured out the Set-Up Row already! And thank you so much for your kind words!
Happy knitting!
Lili
Once the 14 patterns have been completed and Rows 1 & 2 repeated, you state: “With the right side facing you, bind off in pattern.”
Can you explain how I do this as Row 3 includes making bobbles and making cables.
Thank you.
Hi Anne,
Thank you for reaching out! On the final row of your wrap, when you’re ready to bind-off, you will not be working row 3 of the repeat, but will instead be alternating between binding off purl stitches and knit stitches. When binding off you will be knitting the knit stitches and purling the purl stitches before passing the previous stitch over to bind it off.
I hope this explanation helps! Please let us know if you have any questions.
All the best,
Carly
Thank you – this makes sense.
Thank you! This is the most SATISFYING knitting I have ever done! It really is very easy with just enough “hardness” to make me learn something new, keep me interested and test my determination! I LOVE it! It is BEAUTIFUL! Thank you for sharing this pattern!
A few years ago I purchased 6 skeins of cashmere Marino bloom in tide pool, which is still in my stash. I’d love to make the wrap, but I’m short a skein. Would I be able to make the wrap a bit shorter, or should I buy an additional skein? I’m worried about variation in color.
Hi Renee,
Thanks for reaching out! You can absolutely make the wrap a bit shorter, but if you decide to order another skein, then I’d recommend alternating skeins as you work to minimize any color discrepancy between them. If you’re unfamiliar with that technique, you can check out the following tutorial for good advice on how to work with slightly irregular yarns. Hope this helps!
All the best,
Lili
I made a blanket based on this pattern. It turned out so beautifully! (I did find a couple of mistakes after I finished but decided not to fix them 🙂 ) I would post a photo if I could! Thank you for this pattern!
I’m among those who would like to make the wrap, but would like it to be wider. I’m thinking that one option would be to use a heavier yarn (worsted weight?), and perhaps go up a size in needles. Any reason you can think of that this isn’t a reasonable plan? One question would be whether/how much to increase the quantity of yarn needed?
Hi Carole,
Thank you for writing in! You could definitely knit this at a larger gauge! To estimate yardage, you will want to make a gauge swatch in pattern and then weigh the swatch. You will then break down how the weight in grams compares to the square footage in inches. Once you have the weight of grams per square inch, you can then multiply that number by the new dimensions you want for your wrap while sticking to the same instructions of the pattern.
In this case you will probably be safe ordering an additional 2 skeins but we would recommend not winding them until you need them so that you can return whatever you don’t use.
Another option is to widen the seed stitch panels of the wrap to give you a wider scarf while working in the same gauge of the pattern. This way you can easily follow the same instructions on the chart while working the cable rows. I hope this helps!
Happy knitting,
Gavriella
Hello, this is a beautiful pattern. I noticed a small error in row 9 of the scarf. It says 21LC and 21 RC but it should be 21LPC and 21RPC.
Sharon
Hi Sharon,
Thank you for writing in! Our design team has just updated the written instructions for the scarf. Thank you for bringing it to our attention!
Happy knitting,
Gavriella