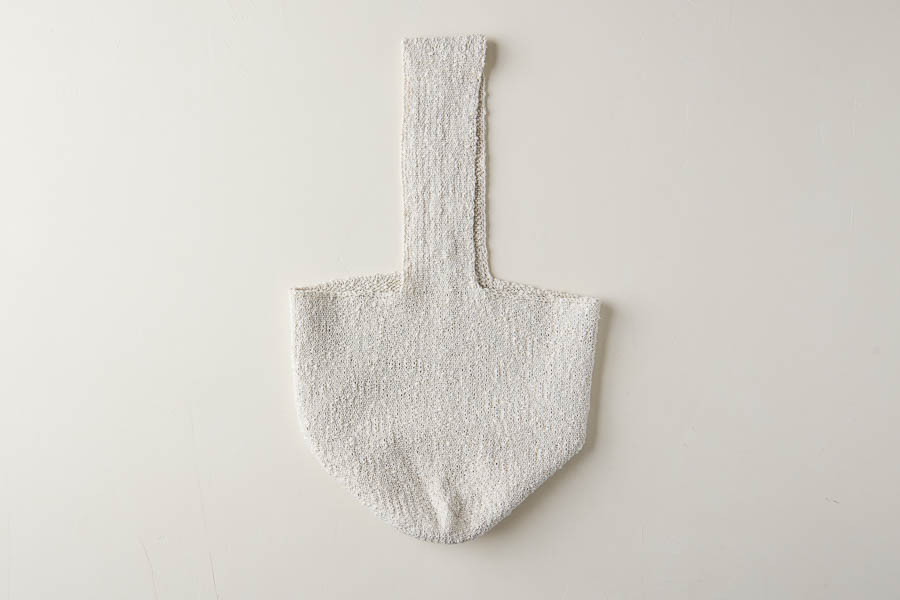
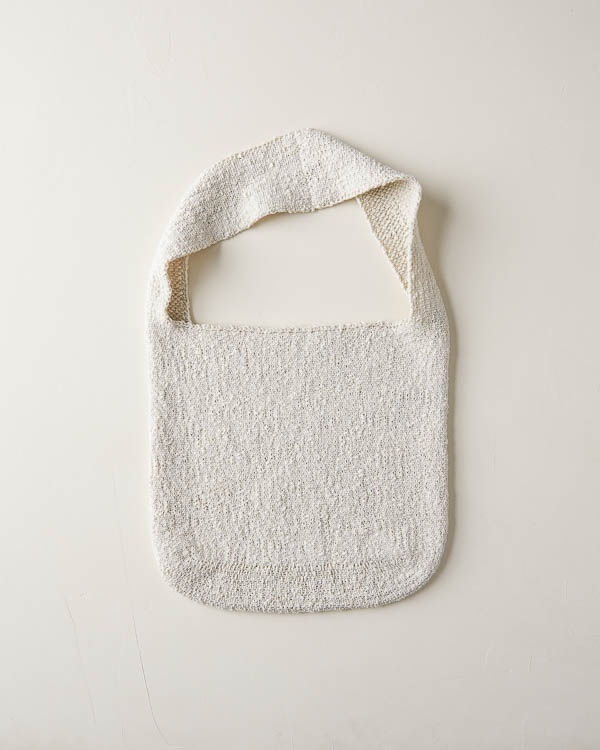
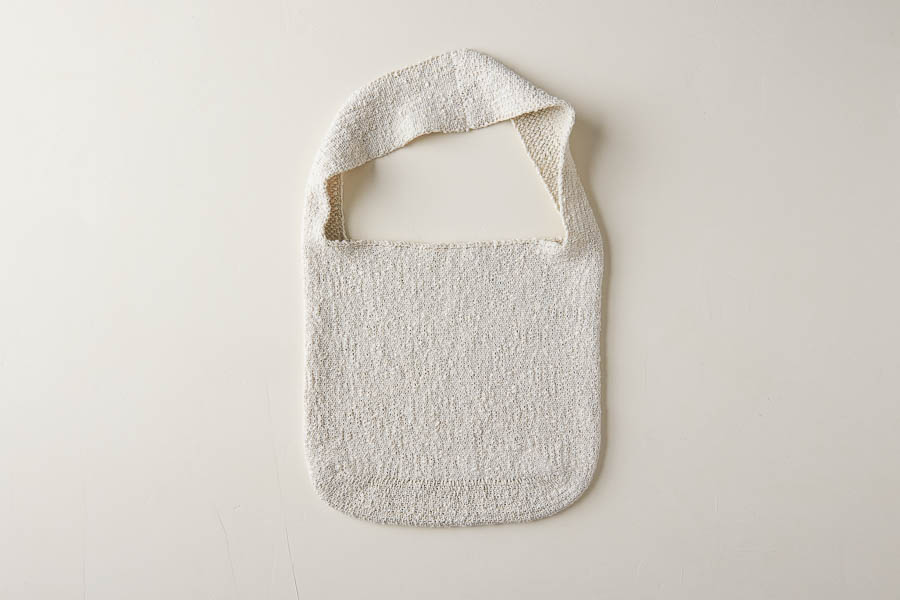
Simple Knit Tote
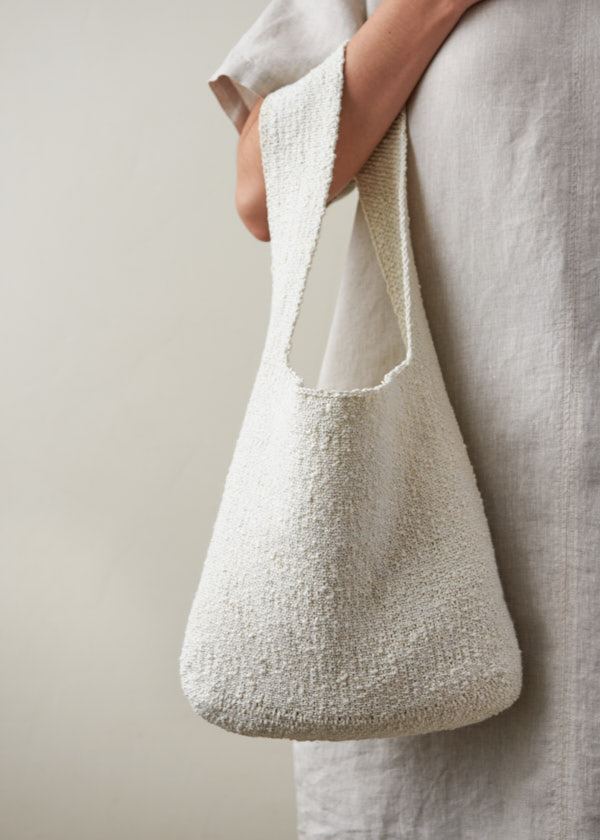
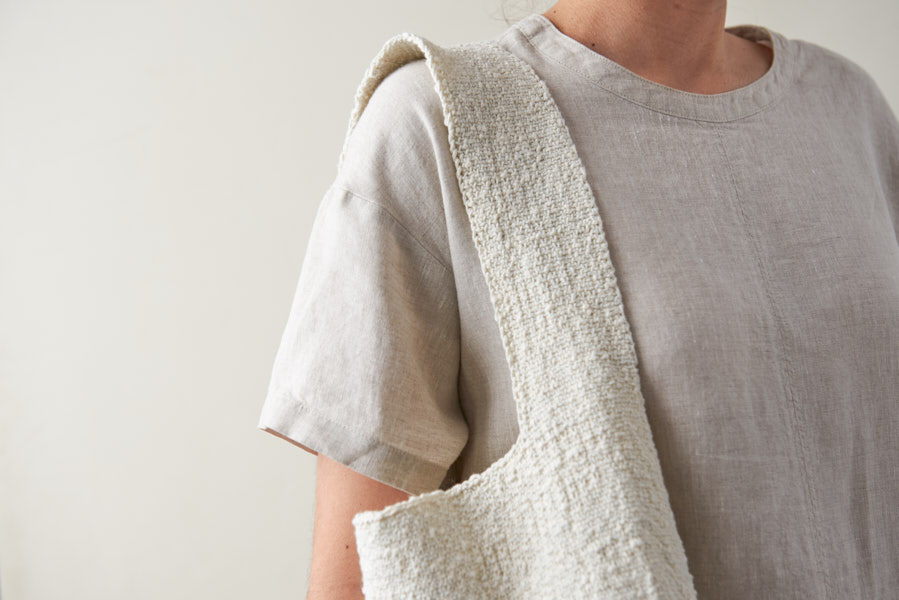
A hand-knit handbag, made with love not logos, can really carry the day, and our beautifully shaped, minimally wrought Simple Knit Tote does just that!
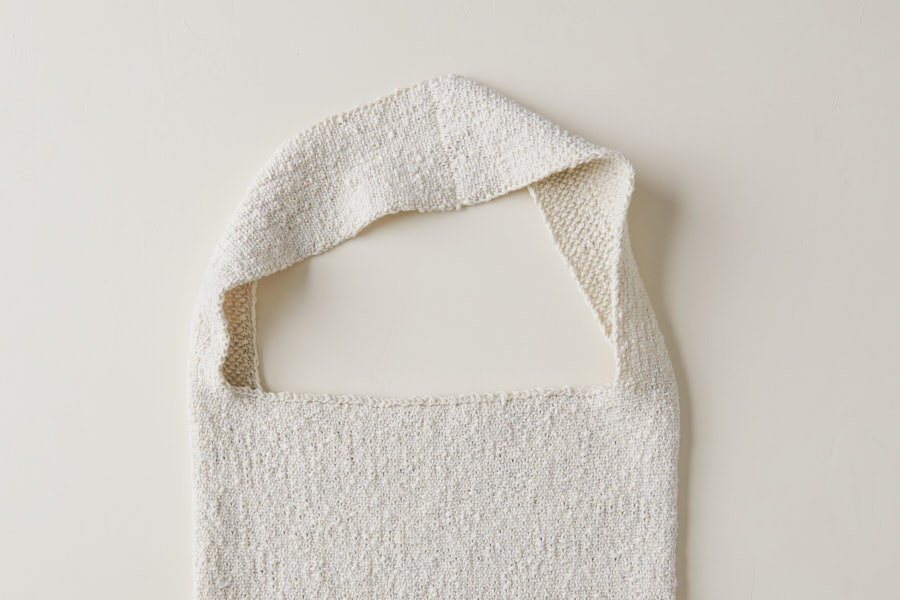
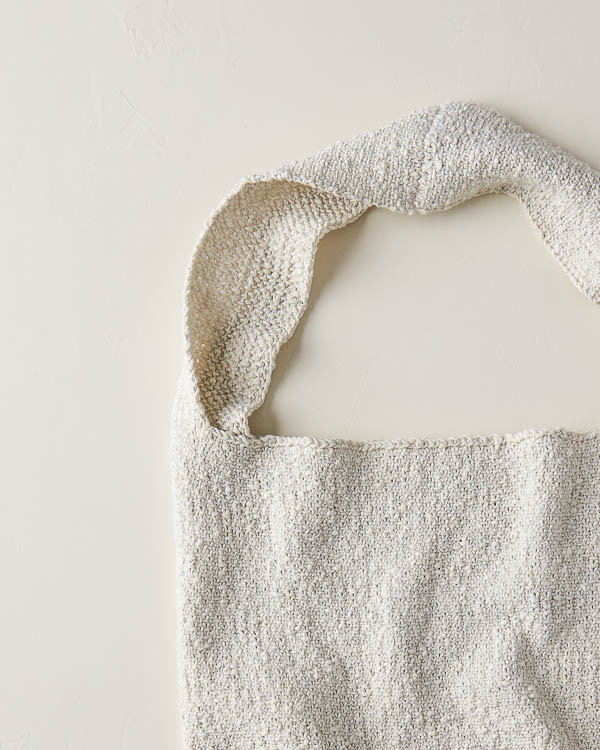
The nubbly texture of our cotton-linen Lantern (here in White Smoke, for a glorious modern-cloud effect) lends a natural raw beauty, and in simple linen stitch, the bag has a lovely woven look and a dense, sturdy feel.
Construction is in keeping with the easy aesthetic: You knit the bottom flat, pick up around the edges and knit the body of the bag in the round, then knit each side of the strap and join in the middle with a 3-needle bind off.
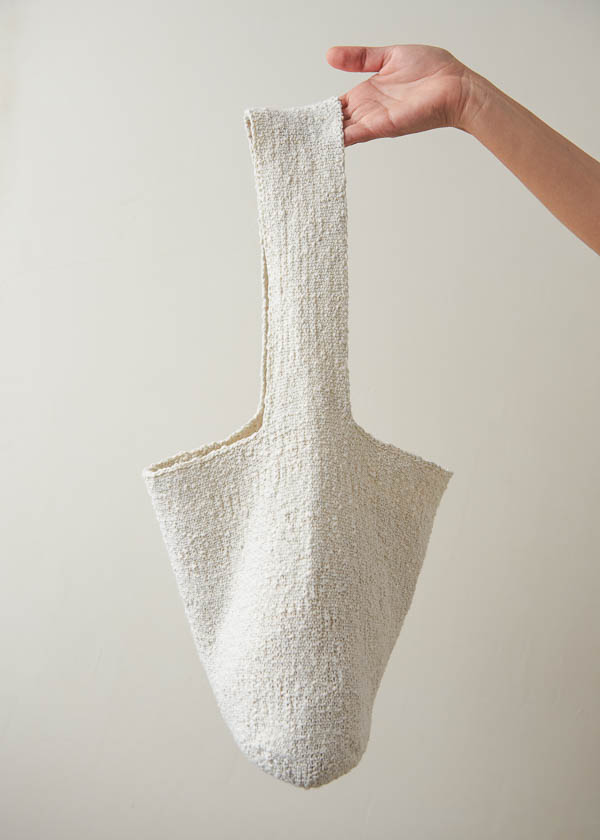
Knit it for you or your favorite bag-user… This Simple Knit Tote, with its perfect form, detail without fuss, and slouchy-cool structure, is our kind of everyday hero!
Yarn lovers, if you adore the yarn used in this project, you’ll love exploring all of our other yarn collections! Discover over 45 thoughtfully designed yarns in nearly every natural fiber and in every spectacular color you can imagine. Only available here at Purl Soho’s online yarn store, where every skein is created with care and your creativity in mind!
Designed by Purl Soho designer, Jake Canton. Click here to see even more of Jake’s designs!
Share your progress + connect with the community by tagging your pics with #PurlSoho, #PurlSohoBusyHands, #PurlSohoSimpleKnitTote, and #PurlSohoLantern. We can’t wait to see what you make!
Materials
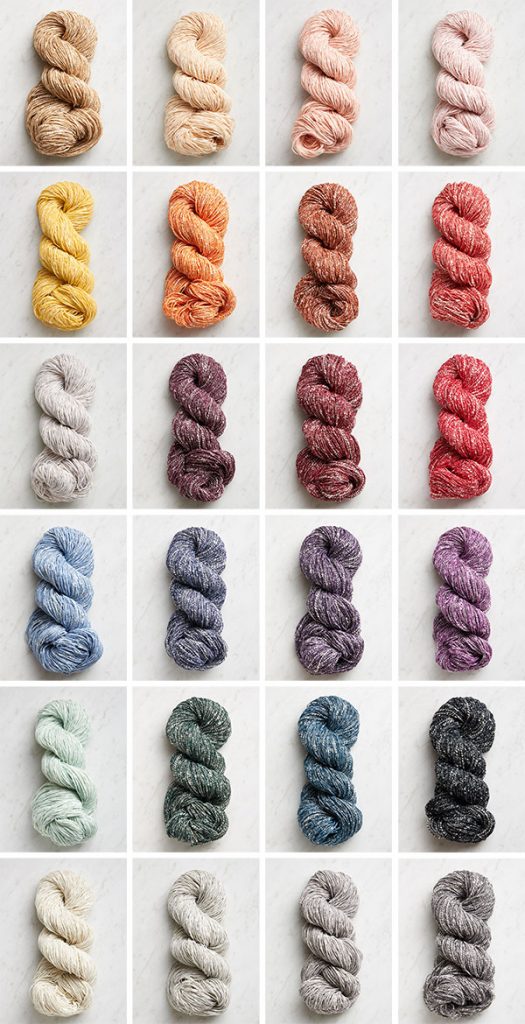
- 3 skeins of Purl Soho’s Lantern, 61% cotton and 39% linen. Each skein is 164 yards/ 100 grams; approximately 386 yards required. We used White Smoke.
- US 8 (5 mm), 24- or 32- inch circular needles
- A spare US 8 circular or double pointed needle
- A few yards of sport or light worsted scrap yarn
- A stitch marker
- A stitch holder (optional)
Gauge
27 stitches and 50 rows = 4 inches in stitch pattern
Size
- Finished Circumference: 25 inches
- Finished Height: 11 inches
- Base of Bag: 3½ inches wide x 9 inches long
- Strap Width: 3½ inches
- Strap Length: 22 inches
Notes
Construction
You will make this bag by first knitting the Base flat, then picking up around the Base and knitting the Body of the bag in the round.
Slip Stitches
Slip all slip stitches purlwise unless indicated otherwise in pattern.
Provisional Cast On
For assistance, including how to put live stitches back onto needles, please visit our Provisional Cast-On: A Two-Step Method Tutorial.
Pattern
Base
Using a Provisional Cast-on (see Notes), cast on 24 stitches.
Row 1 (wrong side): Slip 1 knitwise with yarn in front (wyif), *p1, slip 1 (see Notes) with yarn in back (wyib), repeat from * to last stitch, k1.
Row 2 (right side): Slip 1 knitwise wyif, *k1, slip 1 wyif, repeat from * to last stitch, k1.
Repeat Rows 1 and 2 fifty nine more times, ending with Row 2. [120 total rows, measuring approximately 9 inches from cast-on edge]
Body
Pick Up + Knit
With right side facing you, turn piece 90 degrees clockwise and with working yarn, pick up and knit 61 stitches evenly along left selvage. [85 stitches]
With right side facing you and cast-on edge at top, slip 24 cast-on stitches onto left needle (see Notes), starting with top left corner stitch. With working yarn and right needle, knit 24 cast-on stitches. [109 stitches]
With right side still facing you, turn work 90 degrees clockwise and pick up and knit 60 stitches along remaining selvage. [169 total stitches]
Continue Even
With right side facing you, place marker and join for working in the round.
Round 1: *K1, slip 1 wyif, repeat from * to last stitch, k1.
Round 2: *Slip 1 wyif, k1, repeat from * to last stitch, slip 1 wyif.
Repeat Rounds 1 and 2 until piece measures 11 inches from picked-up edge, ending with Round 2.
Bind-Off Round: [K1, slip 1 wyif] 12 times, bind off 61 stitches knitwise, [slip 1 wyif, k1] 11 times, slip 1 wyif, place previous 24 stitches on stitch holder or scrap yarn, bind off to end of round. [25 stitches]
Strap
Work First Side
NOTE: As you work Row 1, pass final bind off stitch over first slip stitch. [24 stitches]
**Row 1 (right side): Slip 1 knitwise wyif, *k1, slip 1 wyif, repeat from * to last stitch, k1.
Row 2 (wrong side): Slip 1 knitwise wyif, *p1, slip 1 wyib, repeat from * to last stitch, k1.
Repeat Rows 1 and 2 until Strap measures 11 inches from Bind-Off Round, ending with Row 2.***
Slip stitches onto spare needle and cut yarn.
Work Second Side
With right side facing you, place 24 on-hold stitches onto left needle. Repeat from ** to *** to work second side of Strap.
Keep stitches on needle and do not cut yarn,
Connect Ends
With right sides of Strap pieces untwisted and facing each other and holding needles parallel, use working yarn to work a 3-Needle Bind Off over Strap stitches.
Cut yarn and pull through last stitch.
Finishing
Weave in ends and block as desired.
Looking for more inspiration? Explore all of our free knitting patterns and knitting tutorials, buy one of our many knitting kits and yarn bundles, and shop for beautiful yarn. We have over 35 gorgeous natural fiber yarns in 100’s of magnificent colors, designed to bring integrity, beauty, and joy to your next knitting project and only available at Purl Soho!
Please change my e-mail address to the one listed above. Thank you.
Hello Karen,
Thank you for reaching out! To change your e-mail address you can send a quick e-mail to [email protected] and they will be able to take care of it for you.
Happy knitting!
-Marilla
I’m wondering about stretching. This is an issue for all of the crochet bags I’ve made.
Hello Martha,
Thank you for reaching out! With any cotton yarn you will get a bit of stretching, but the linen will help it to keep its structure. The slipped stitches within the stitch pattern create a dense fabric that will also help to keep its structure.
I hope this helps and happy knitting!
-Marilla
Thank you
Hi! How would you adapt this stitch for an elementary wrap? I love the texture and look of it!
Hello Lily,
Thanks for reaching out! This bag is knit up using the Linen Stitch. We actually have a wrap that is knit up in Linen Stitch called Peppered Stripes Wrap.
I hope this helps and happy knitting!
-Marilla
What level of difficulty would you call this pattern? I’m new at knitting. Thanks.
Hello,
Thanks for reaching out! I would say this is an intermediate project. If you are curious about this stitch you can always knit up a little swatch and see if its for you! And of course, we are always here to help if you need help along the way!
Happy knitting!
-Marilla
A true beauty! What a great looking addition to our bag wardrobe! Can0t wait to knit these bags for gifts and me! Thank you again purlsoho!
Julie
Love love love it!
Simple but elegant.
Can’t wait to make it but am only halfway through a baby blanket and the baby’s already arrived….
Is there a video explaining this pattern
Hello Lesllaney,
Thank you for reaching out! We do not have a tutorial for this stitch. Is there a specific question that we can help answer?
Happy knitting!
-Marilla
I would love to see a video on how to make a base for a knit tote bag or any other bag. Is this possible? Or perhaps you could link me to one that you feel addresses the base issue?
thanks.
Hi Priscilla,
Thank you for your questions! While we do not currently have a video demonstrating how to work the base of this tote bag, we would be happy to demonstrate it for you in a 1-on-1 Zoom call! Alternatively, you are welcome to email us a photo of your work at [email protected] so we can help you with your bag. Please feel free to let us know what works for you!
All the best,
Margaret
I have 3 skeins of your Linen Quill can i use that instead of
Lantern suggested here
Hello Laura,
Thanks for reaching out! Unfortunately Linen Quill is much thinner than Lantern so it would not work for this project.
I hope this helps and happy knitting!
-Marilla
This is so lovely! I really want to make it in either the shibori blue or bluegrass blue. Do you plan to get those back in stock or should I pick something you still have stocked? I’d you do plan to stick the blues again, do you have photos of searches of those of those colors I can see? Thank you! Can’t wait!!
Hi Glory,
Thanks for reaching out! We will certainly be getting more Lantern in all colors back in stock! In fact, our mill is currently making it. While we do not have a firm ETA, we are hoping that it will arrive soon. You can sign up to be notified when we get it back in stock. To do so, go to the product page, select the color that you are interested in and enter your email address. When that yarn and color arrives, we will email you right away! Although we don’t have any projects out of Shibori Blue, our Cap Sleeve Pullover sample is made out of Bluegrass Blue if you would lke to see a bigger project in that color.
I hope that helps!
Julianna
Very helpful! Thank you!!
Hi – I started this project using Lantern in Platinum Gray (beautiful yarn!), but I can’t see any way that someone could get to the gauge of 27 stitches = 4″ with size US 8 knitting needles, even if they knit EXTREMELY tightly. I had to go to size 2 needles to get to 27″ stitches = 4″ – and I don’t knit tightly – I usually have pretty normal tension and am close to gauge for other patterns from Purl Soho and others. This pattern gauge seems so far off that I am sending a comment for the first time because I feel like I misread or missed something. Appreciate your help.
Hi Marsha,
Thanks for writing in! I am sorry to hear this! This stitch pattern is quite dense and we were able to get gauge on a US 8 in stitch pattern as the slipped stitches tend to pull in. That said, I like to think of needle size as a recommendation. If you are a tighter knitter you might need to up needle sizes and if you are a looser knitter you may need to go down. With cotton and other plant based fibers, gauge can be a bit more of a challenge. I myself tend to need to go down a needle size or so when working with cotton as it does not have the same give as wool. All of that said, all that really matters is that you do get gauge in the stitch pattern. The needle size will depend more on you than the pattern and whatever needle size gives you gauge is what you should use!
I do hope that this helps!
Cassy
Thank you Cassy – I’ll work with the size 2 needles – was just surprised at how much smaller I had to go to get to gauge vs. the pattern’s recommended needle size. In my time knitting, this is the first time I’ve had to go down so many sizes in needles – usually I only have to adjust up or down a bit, if I even need to adjust. 🙂
I, too, am having the same issue with gauge. I am using the yarn in the photo and am down to a size 4 needle and still finding it too large. I’ll try a 2 now that i’ve read your comment. I usually knit right on gauge so this is a surprise.
Hello Kathy,
Thank you for reaching out! Because of its unique texture, Lantern often results in a different gauge.
Good luck and let us know how it goes!
-Marilla
I’m also having a gauge issue. But only in the row count. I’m just a touch over 3 1/2 inches in base width but will be closer to 12 inches in base length using size 8 needles. Any issue with just letting it stitch out to this size. The fabric appears dense enough. Thanks for your guidance.
Hi Carol,
Thanks for reaching out! I would suggest blocking what you have done to see how it affects the size and gauge – it sounds to me like you are very close to the correct stitch to row ratio since it will block out a bit wider and shorter, but you will then have to move down a needle size for the gauge to be correct. If you are happy with the fabric as is, you can continue and your bag will turn out wider than ours; however, you may want to have an extra skein of yarn on hand as it will take more yardage to knit the bag at a looser gauge. If you don’t end up needing it, any unwound yarn can be returned for store credit.
I hope that helps!
Julianna
Thanks Juliana! I think I will start again with another skein of yarn and a smaller needle to be sure. Is the gauge stated in the instructions measured as knitted or after blocking? This always confused me!
Hi Carol,
In general, you should assume that the gauge given in a pattern is the post-blocking gauge unless otherwise specified. This is especially true for garments – since all of the stitch counts are based on the gauge, if you are ever going to block or wash the finished sweater, you should block or wash your gauge in the same way to avoid any surprise size changes after the first wash. Some patterns will give both a blocked and unblocked gauge which is helpful, but otherwise, it’s a good practice to block your gauge swatch before measuring!
Best,
Julianna
I was playing with a swatch to see how I would like to knit the tote (its so beautiful). I think the problem is that when you look under heading of Pattern you see directions for the base of purse. Only two rows make up pattern. But then the pattern directions are a tad different for the body of the tote. Knitting the body on circular needles doesn’t require a purl stitch, like the base of purse does. So if you are knitting a swatch with instructions for the body of purse using straight needles, not circular needles knitting in the round, you’re getting a huge gauge compared to the pattern for knitting swatch for base of purse. If you were to knit a swatch in the round with circular needles you’ll get the correct gauge. Or if you knit the directions of the base of purse with straight needles you’ll get correct gauge. I was shocked when I knitted the instructions for body of purse with straight needles; it was very different than the base of purse swatch.
Pam
On that note, I’m wondering if the gauge should be same for knitting a swatch in the round as knitting a gauge of the strap pattern (casting on 24 stitches to see how wide it is)?
Hi Pamela,
Great question! For some people , knitting flat and knitting in the round do result in different gauges, so if you think that might be the case for you, it would be a good idea to work a swatch in both methods; however, in the case of this bag, I would probably recommend just continuing on until you get to the strap and use the strap itself as your gauge swatch. Since the strap is only 25 stitches, if you find after the first inch or two it is turning out the wrong width, it will be easy enough to unravel and work the strap on a different size needle.
I hope that helps, and happy knitting!
Julianna
Thank you, Julianna.
I have a feeling knitting in the round will make a smaller swatch than knitting flat. It seems purling adds bulk. I’m just guessing though as this is all pretty new to me, still. After Christmas projects, I want to make this. Just the coolest pattern!
Pamela
Hello Marsha-
I too had a terrible time with this gauge. I am down to a size 2 needle, which I’m finding difficult to use with this yarn. Just wondering if you finished the bag using size 2 needles or if you made any adjustments to the pattern. Any tips would be greatly appreciated! Hope your bag is complete and as lovely as the photos. Happy knitting.
I made this last summer and had issues with the gauge but decided I liked the tension with a size 6 so I adjusted the number of stitches. Came out perfect!!
I was wondering if you had any other tote patterns that do not require picking up stitches around the base. I have tried many times and watched videos but can’t seem to master that technique. However I have the lovely Lantern yarn and don’t want to give up. I appreciate any suggestions you might have.
Hello,
Thanks for reaching out! I would recommend checking out our Heel Stitch Tote project! This bag was originally knit using Lantern and is designed to be knit in the round and seamed up later using Kitchener Stitch.
I hope this helps!
All the best,
Carly
I am just starting this. I’m not sure what I’m doing wrong in my slip stitch knitwise. To get untwisted stitches on the front, every time I go the next direction I have to knit or purl through the back of the stitch because it’s twisted. Is the pattern meant to have twisted stitches? I feel really dumb.
Hi Sheri,
Thanks for writing in! I am sorry to hear that you are having difficulties! Apart from the first stitch on each row, you will be slipping these stitches as if to purl which will put the stitches in the correct orientation and not twist them. If you were slipping them knitwise, this would twist the stitches.
I do hope that this helps!
Cassy
Thank you for the reply. I read “slip one knitwise”, and thought it meant knit.
Hello! Super excited about starting this project. My question is about the provisional cast on. I’ve done that cast on with success before on other projects. I’m assuming that we start with a scrap piece of yarn. If so, because of the slipped stitches that don’t get knit in the first row, won’t it be impossible to remove the provisional cast on when needed? I hope my question makes sense. Thanks for being there to answer it!
Best, Rhonda
Me again. Figured it out, I was using the crochet hook method for starting the provisional cast on instead of crocheting a simple chain and picking up stitches from that. Loving the look of the stitch so far! Rhonda
Hi Rhonda,
Thanks for writing back! We are so glad to hear that it all worked out!
Best,
Cassy
How do you think this bag would look in Black Feather? I love the White Smoke but think a darker color would be better for me.
Hello Barbra,
Thanks for reaching out! I think this bag would look classic and sleek in Black Feather- I say go for it.
Happy knitting!
-Marilla
I am having trouble with the gauge for the tote. I am using Lantern. I cast on the 24 sts. on a # 8 needle. After 25 rows, I have 3″ of length and width of 3 1/2 inches. The width is what it supposed to be according to the size notes, but in 75 rows I will have the 9″……….not anywhere close to the 120 rows called for. If I go down enough needle sizes to get in 120 rows, the width may be considerable less than 3 1/2 inches. I read the reply to Marsha Malin, but it doesn’t fully answer my issue.
Hi Judy,
Thanks for reaching out! Is it possible that you are knitting your gauge swatch in stockinette stitch instead of linen stitch? Because of the alternating slipped stitches in linen stitch, the row height is much shorter than in stockinette. If your row gauge is still off but your stitch gauge is correct, I would stick with whatever needle gives you the correct stitch gauge as the row gauge is less important for this pattern, and as it is a tote bag and not a garment, it isn’t crucial to have perfect gauge.
I hope that helps!
Julianna
So excited to start this project, but I have had some issues! Using your suggested size 8 needles, I knitted the base, but only had about 80 rows in 9 inches. So I added more rows to bring it up to 100 which is about 10″ — obviously need to rethink the needle size and start again! My fault not to knit a swatch for gauge — but since it isn’t something that needs to fit, I didn’t bother!
But my next problem is the lack of instruction about needle choice when picking up the stitches to knit in the round. I think I will have to use a full set of dp needles for several inches before I can use a circular needle. Is that what you suggest?
Anyway, despite my rocky start, I prepared to start over and get it right.
Hello Laurie,
Thank you for reaching out and sharing your experience with the pattern! When you are picking up your stitches around the base you only need your circular needle. You have your 24 live stitches on your needles, you then pick up your left selvedge stitches, you then slip your 24 provisionally cast on stitches onto your left needle and then knitting across those 24 stitches and picking up your right selvedge.
I hope this makes sense and happy knitting!
-Marilla
Hi, I love this tote but am having difficulty understanding the body portion of the instructions. I am new to knitting and am able to understand how to pick up stitches but the whole rotating and adding and casting on part im totally lost. Is there a video I can reference or see how to do this part of the pattern
THanks
Uma
Hello Uma,
Thank you for reaching out! For this section you are picking up stitches on each side of your base, and putting your provisionally cast on back on your needles.
I hope this makes sense and let me know if you have any further questions!
-Marilla
I am also having a hard time with the gauge in pattern. What do you recommend if you have too few rows (36 rows = 4 inches instead of 50), and too many stitches (40 stitches instead of 27 = 4 inches). I am on size 8 needles.
Hi Beth,
Thanks for writing in! This is a bit of a mystery – it is unusual for stitches and rows in a gauge swatch to be off in different directions. I would double check that you are knitting your swatch in the linen stitch pattern as given for the base of the bag, as the this stitch does knit up very differently from stockinette stitch. If you are still running into this issue in linen stitch, pulling too tightly on your yarn when slipping stitches would tighten up your stitch gauge too much, so make sure you are not tugging on the yarn when moving it from the front to the back of the work and vice versa. It also can be tricky to count rows in linen stitch, especially when worked in Lantern, so I would also recommend double checking that you are counting every row. When you are looking at the swatch from the right side, in each column of knit stitches, you will count each “v” and each bar across the column as a row, or can count two rows per “v.”
I hope that helps!
Julianna
I too am having a difficult time with gauge…done over three times! Am now down to a size US 5. I phoned today and your representative was very helpful. I think I can work this out now…fewer rows perhaps. Love the pattern otherwise.
I am binding off, and the stitches don’t add up. It says to [k, sl1wyif] 12 times (24 stitches), then bind off 61 stitches (85 done), then [sl1wyif, k1] 11 times plus sl1wyif (23 stitches; 108 done), then bind off to end (25 stitches; 133 done). But there are 169 on the needle. Is this a typo or am I missing something? Just want to make sure. Thanks.
Hello Kathy,
Thank you for reaching out! This part can be a bit tricky to visualize. When you have completed this section you should have 24 stitches on a holder and 25 live stitches. The pattern states “[K1, slip 1 wyif] 12 times (24 stitches), bind off 61 stitches knitwise, [slip 1 wyif, k1] 11 times, slip 1 wyif, place previous 24 stitches on stitch holder or scrap yarn, bind off to END of round.” You will have a total of 25 stitches left on your needles (and 24 on a holder).
I hope this clears things up for you, but let us know if you have any further questions!
Happy knitting,
Marilla
I had the same question as Kathy, and Marilla cleared it up for me as well. Thank you!! I am making two modifications to customize this tote: knitting the bucket to 13 inches in length and producing a cross body bag by knitting the strap to 37 inches in length. This really is a gorgeous bag, and Jake Canton is a gem of a designer.
I love this bag and think it will look great in the Lantern yarn. With the yarn being nubby, I’m having some trouble picking up stitches. Would it be okay to rotate the base so there would be fewer side stitches to pick up? How would that convert in terms of the number of stitches to cast on and the number of rows to knit?
Thank you!
Hi Allison,
Thanks for reaching out! Although the dimensions of the base may turn out slightly different because of the gauge ratio of linen stitch, you could cast on 60 stitches and work 24 repeats of rows 1 and 2 if you wish. You will then be able to pick up 25 stitches for each short side of the rectangle, and end up with the same number of stitches for the body of the bag.
I hope that helps, and please do let us know how it turns out!
Julianna
Hi there! I absolutely love this pattern but I’m really struggling to understand how I will go about picking up the provisional cast on stitches when it comes time to start the body. My provisional cast on scrap yarn seems heavily intertwined with my working yarn. Would you be able to advice on how this works? Thanks so much!
Marissa
Hi Marissa,
Thanks for reaching out! It sounds like you might have used a One-Step Provisional Cast On instead of our Two-Step Provisional Cast On for this tote. Because you start right away with the stitch pattern, the One-Step Provisional Cast On does become quite entangled with the working yarn, so you will probably have to manually unpick it from each stitch. In the future, if you prefer a One-Step Provisional, you can avoid this by knitting one row with your main yarn before starting the stitch pattern.
I hope that helps!
Julianna
I was having the same issue. Started with one-step method. Thanks Marissa for asking the question.
Thanks Julianna for the answer!
Debra
Hello,
I don’t quite understand knitting 24 more cast on stitches after picking up the provisional cast- ones. How are they integrated into the rest of the piece?
GJ
Hi Gray Jane,
I think I can clear this up for you! You will not be adding 24 more stitches in this step. Instead, after picking up 61 stitches from the long side of the rectangle, you will return the 24 stitches from the provisional cast on to your left hand needle, and then knit across these 24 stitches using the yarn attached to the picked up stitches.
Happy knitting!
Julianna
Hi! I have a question about where the “A few yards of sport or light worsted scrap yarn” comes into play for this pattern! Do i use it during the provisional cast on and does it have to be in a different color? or can I just use the same cotton-linen purl soho yarn that I bought for this pattern? Thanks so much 🙂
Hi Julie,
Thanks for reaching out! Yes, you will be using the scrap yarn for the provisional cast on. While you could theoretically use the same yarn for the provisional cast on, I wouldn’t recommend it as this will make it very difficult to find the stitches to remove and pick up. It’s much easier to see how to remove a provisional cast on when it is worked in a contrasting color yarn!
Best,
Julianna
Hello – I’m having some trouble picking up the stitches – do we only pick up 3 out of every 4 stitches, or every stitch going down the long side of the rectangle for 61 stitches? What do the bigger numbers in brackets mean?
Thanks!
Rachel
Hi Rachel
Thanks for the great question! As you knit the body on Row 1 (wrong side): Slip 1 knitwise with yarn in front (wyif), *p1, slip 1 (see Notes) with yarn in back (wyib), repeat from * to last stitch, k1. And on Row 2 (right side): Slip 1 knitwise wyif, *k1, slip 1 wyif, repeat from * to last stitch, k1. You will be picking up every slipped stitch created at the beginning of these rows on the long side of the rectangle. The bigger numbers in the brackets indicate the total number of stitches or rows you have at the end of that direction. After you turn piece 90 degrees clockwise and with working yarn, pick up and knit 61 stitches evenly along left selvage. [85 stitches] this is the 61 stitches you picked up + the 24 stitches you already had on your needle. I hope this explains it!
Happy knitting
Jessica
Hi, The white smoke color is really beautiful but I’m wondering if this washes well?
thanks!
Hi Bellen
Thanks for writing in! Although our official recommended care instructions for Lantern are to hand wash and lay flat to dry, our insider practical knowledge is that Lantern holds up great in a cold or warm machine wash and even in a low or warm dry cycle. There may be a very small amount of shrinkage (like 2%), so stick with handwashing for garments. Also, washing with like colors is always a good idea! I hope this helps you pick the perfect color!
Best
Jessica
Hi,
Is it possible to knit this flst, with a seam?
Thank you
Laura
Hi Laura
Thanks for reaching out! With a few modifications, you could knit this flat. After you knit the base, you could turn your work 90 degrees and pick up the 61 stitches for one side. Adjusting the linen stitch pattern to working flat back and forth and starting with row 2:
Round 2: *Slip 1 wyib, p1, repeat from * to last stitch, slip 1 wyib.
Round 1: *K1, slip 1 wyif, repeat from * to last stitch, k1.
Then repeat until 11″ have been knit. Repeat on other side of the base. For the straps, you can pick up the 24 stitches, at the base and knit Strap Work First Side, for the length of your bag plus 11″. Repeat this process on the other side. Then you will seam up the straps to both sides of the bag, and at the middle of where the handles meet. I hope this helps!
Happy knitting
Jessica
Thank you for taking the time for such a detailed, useful answer.
I love your patterns and your yarn but unfortunately most of them require knitting on the round,. I wish you had more items knitted flat, or flat/round versions.
Laura
Hi Laura
You are so welcome! I will pass your request on to our design team for future patterns.
Happy knitting
Jessica
Thank you? I hope they will.
I am starting to knit the circular section of the pattern. The instructions say to use 24″ to 32″ circular needles. The whole circumference of the bag is only 25″, so I am not sure how that could work. I thought my 14″ cord and 5″ tips would work, but it is still too long. I have ordered 4″ tips for my interchangeable needles to see whether that will be short enough. Do I not understand the measurements correctly?
Hi Janet,
Thanks for reaching out! You are correct that the finished circumference of the bag is 25 inches, but some people find that they can stretch this many stitches around a 32 inch needle or use a modified version of Magic Loop to accommodate the smaller circumference, but I am surprised that your 24″ needle is still too large! For the first few rows, it can be a little awkward and tight to knit around the corners, so if that is where you are having an issue, I would recommend carrying on for a few rows to see if it gets easier. If not, I’m sure the shorter tips will work much better!
Best,
Julianna
I am also struggling with the 24 inch circulars. The 24 inches includes two tips, each 5 1/2 inches long and straight which reduces the ability of the stitches on the needles to shape easily without extreme pulling. So is is not as if there is 24 inches of flexible needle to accommodate the shape of the bag.I think it needs a 2 circular needle or magic loop
Hi Cathy,
Thanks for writing in! We were able to knit our bag comfortably on a 24″ needle, but everyone is different, so if you find that magic loop, or possibly even going down to a 16″ circular, makes knitting this bag easier for you, then I think you should use whatever method makes your knitting project more enjoyable!
Best,
Julianna
Slip one knit wise wyif !
One side, the knit last St side is lovely. The side with wyif is awful ! I must be doing it wrong somehow. Can you advise?
Hi Kathleen,
Thanks for reaching out! I would guess that the issue is probably occuring on Row 2, where the slipped stitch is followed by a knit stitch. It’s not uncommon to move the yarn incorrectly on this type of edging! After slipping the stitch with the yarn in front, you will need to move the yarn between the needles from the front of the work to the back, just as you would when switching between a knit and purl. This should result in an edge that looks just as tidy as the other one!
I hope that helps!
Julianna
LOVE this bag! I made two last year and the beautiful Dew Blue arrived in the mail this morning for my third bag. Yarn is wound and ready to go. It’s a great project to sandwich between sweaters and baby blankets — and a perfect gift for someone special!
Just printed this and wanted to say 1) thank you for offering such beautiful free patterns and then you spend so much time supporting them in the comments, and 2) LOVE the printing feature where you can remove pictures and notes you don’t need. Fantastic!
Hello
I can’t get my stitches for the handle to add up to those in the pattern.
[K1, slip 1wyif] 12 times = 24 stitches. Bind of 61. Slip 1 wyif 11 times, slip 1 wyif = 23 stitches. The pattern states 24 stitches – but my maths comes up with 23!! And I have 24 left on the needle, not the stated 25.
Have checked my number of stitches and I’ve got 169.
Not sure what I’m doing wrong! Thanks
Hi Odette,
Thanks for reaching out! My best guess is that you are missing one of the knit stitches or slip stitches or binding off an extra stitch causing you to come up missing one stitch. I would recommend writing out the steps and checking them off as you go to keep track and make sure that you are binding off/ slipping and knitting the correct amount of stitches!
I hope this helps!
Warmly,
Gianna
Please explain the first step in Pick Up and Knit: Since the work is on circular needles, I can’t figure out which needle to use for the 61 stitches on the left selvage- the needle closest to the working yarn, or the needle furthest away from the working yarn? And is this considered the ‘left’ or ‘right’ needle at this point in the pattern? Thank you ~
Hi Tracie,
Thanks for reaching out! You will picking up and knitting the stitches using the working yarn and picking the stitches up using the “right” needle of your circular needles!
I hope this helps, happy knitting!
Gianna
Hello
I’m having trouble understanding the bind off instructions – do I not need to bind of 61 after placing “previous 24 stitches on stitch marker? I do not understand “bind off to end of round [25 stitches].” Thank you
Hi Mary,
Thanks for reaching out! For the Bind-Off Round you will [K1, slip 1 wyif] 12 times, you will then bind off 61 stitches knitwise! After you bind off 61 stitches you will continue to [slip 1 wyif, k1] 11 times, slip 1 wyif, then place previous 24 stitches on stitch holder or scrap yarn, you will then continue to bind off the rest of the stitches till you reach the end of the round.
I hope this clears things up!
Warmly,
Gianna
I’m waiting for Moth Wing to be back in stock. I’m hoping that this tote, made in Moth Wing, will look rather like a straw bag — without the drawbacks of straw. Am I way off base?
P.S. I really like your patterns, and tho’ I haven’t been knitting long, I’ve even made a couple (!), but it’s your pattern-contained clear step-by-step, and your wonderful support that have made me a fan. Thank you.
Hi Ada,
I agree with you! I think the Moth Wing will make a lovely tote and absolutely give the feel of a straw bag (minus the pricks and pokes from the straw)! I’ve knit this bag myself and found it to be a really wonderful pattern to work, and very easily adjustable if you wanted to make it a larger size.
Let me know if you have any other questions and happy knitting!
Warmly,
Kelsey
Hi
Maybe a stupid question but is there any chance I could buy this simple knit tote bag in white?
Or do you have to knit it on your own?
Thankyou
Sincerely
Hi Arzum,
Thanks for writing in! Unfortunately, we do not sell any finished products, but we do sell everything you would need to make them yourself!
Warmly,
Gianna
I am not able to download the pattern in order to print it. Any suggestions? Any other way to get the pattern?
Hi Ellen,
Thanks for reaching out! Please email our team at [email protected] and we can assist you further from there!
Warmly,
Gianna
I’m curious what you think about doing this in Field Linen (from a textural/wear perspective)? Thank you
Hi Sarah,
Thanks for writing in! I think Feild Linen would be a great option for this blanket, we love using our linen yarns for tote bags like this! The only issue is that Field Linen is significantly thinner than Lantern so you would need to make adjustments to the gauge and cast on which could be a bit complicated for this pattern. Alternatively, if you would like, you could use Field Linen doubled and it should work up to a similar gauge and wouldn’t be much easier than altering the pattern! Just be sure to check your gauge prior to beginning!
I hope this helps, happy knitting!
Gianna
For: “Bind-Off Round: [K1, slip 1 wyif] 12 times**, bind off 61 stitches knitwise, [slip 1 wyif, k1] 11 times, slip 1 wyif***, place previous 24 stitches on stitch holder or scrap yarn, bind off to end of round. [25 stitches]” Do you place the FIRST** 24 stitches on a holder, or the newly knited ones*** on a holder? Thank you!
Hi Christine,
Thanks for reaching out! In this section of the pattern, you just need to place the 24 stitches you just knit onto a holder (not the very first ones). Hope this helps!
All the best,
Lili
I’ve been very excited to make this tote. However… after knitting about 4” of the body, I realize my base looks different. I’m trying to redo it and I just can’t make the base look like the body. The base separates. One side it’s knitted, the other side is purled, but I can pull them apart. They’re not solid like the body. Does this make sense? I cannot figure out what I’m doing wrong.
Hi,
Thanks for reaching out about this, and I’m sorry to hear that you’re running into issues with the base of the tote. I’m having a little trouble understanding what you’re describing, though. How is the base separating?
The base is knit flat, so it should just be one solid piece of fabric. Once you complete 120 rows, you’ll then pick up the stitches all around the edges of the base and join your work in the round to begin the body section.
I hope this explanation helps a bit, but if you’re still having trouble, feel free to send photos of your work to [email protected]. That will help us visualize your work better so we can give more exact advice!
All the best,
Lili
Hello! Many thanks for the pattern and instructions. I love your projects! 🙂 However, could you please advise how to work on circular needles? Do you work using a magic loop? I have problems as the bottom it is not a circle but a rectangle. Thank you in advance for your advice.
Hi Klaudia,
Thank you so much! Circular needles can be used to work in the round or to knit large flat sections, like blankets or cardigans. This pattern is constructed by knitting the base of the bag in a flat rectangle first, then picking up stitches around the perimeter of the rectangle with circular needles to form a circle that is knit in the round – no magic loop necessary!
Hope this helps you, but please let us know if you have any other questions!
All the best,
Margaret
Hola acabo de descubrir vuestro bolso y ya me corre prisa empezar a tejer.
El punto que utilizáis tiene otro nombre?, Porque no lo entiendo muy bien, quizás como utilizo el traductor no logro entenderlo. Gracias
Hi Encarna,
Thank you for your question! The stitch pattern we use for the bottom of this bag is slip 1 with yarn in front, knit 1. On the wrong side, the pattern is slip 1 with yarn in back, purl 1. The slipped stitches on knit rows are slipped as if to knit, and the slipped stitches on purl rows are slipped as if to purl. I hope this helps! We ran this response through Google Translate to provide as clear an answer as possible!
Happy knitting!
Margaret
Hi,
I, like many others, am having issues with the binding off section. In this round I have done the [K1, slip 1 wyif] 12 times, and got the 24 stitches, but once I bind off the 61 stitches when I begin the [slip 1 wyif, k1] 11 times, I am running against the pattern. My first stitch that I have to slip, according to the pattern, I should be knitting it. At this point I do have one stitch that is left on my right needle from the bind off, should I be placing that stitch back on my left needle and then beginning the [slip 1 wyif, k1] 11 times? If I do that I will be in the pattern again but I will not have 24 stitches to put on a holder, only 23. Help!
Hi Emily,
Thanks for reaching out. I believe you might be knitting one too few stitch at the beginning of the “bind off 61 stitches” section of this round! After you [k1, slip 1 wyif] 12 times, you’ll need to knit 2 stitches before binding any of them off. If you only knit 1 stitch before bringing the previous one over that stitch and off the needle, then you will be 1 stitch off in the pattern. I hope this helps clarify things!
All the best,
Lili
Hello,
I started this project with some left over Lantern yarn, but just noticed you no longer sell it. I love the texture of this tote! Do you have any suggestions for other yarn that could be used to produce a similar texture?
Thanks in advance,
Cherie
Hi Cherie,
Thanks for reaching out. I’m so sorry to say that we’ve discontinued Lantern! While we loved yarn, not everybody else felt the same way, so we’ve had to make the sad decision to stop producing it. We hope you can understand!
If you’d like to substitute Lantern with a different yarn, I’d recommend checking out Tulip Cotton and Sunshower Cotton. These options are similar in weight and fiber content, and they’re machine washable!
I hope these recommendations help! Please let us know if you have any questions.
All the best,
Carly
Hi Purl Soho! I’d love to make this bag. I had a terrible experience trying (and burning and crashing) to knit a one color brioche vest. It was impossible! When I see slipped stitches in this pattern, my heart seizes in fear. Can you give me an idea of the difficulty of this pattern’s stitch relative to brioche stitch?
Thank you!
Hi Alexandra,
Thanks for writing in, although I’m sorry to hear that brioche stitch was so difficult! The slipped stitches in this pattern are very different from brioche slipped stitches. Instead of being paired with a yarn over, you’ll just transfer the stitch from the left needle to the right needle, and it’ll still function like a normal live stitch!
If this is daunting, I’d recommend trying out the stitch pattern in a small swatch using some scrap yarn. That way, you can get comfortable with the stitch pattern beforehand and feel nothing but confidence when you begin the actual project! I also wanted to pass along some tutorials on the other techniques used in this pattern so you can review them before beginning:
Provisional Cast On: a Two-Step Method
Picking Up Stitches
3-Needle Bind Off
I hope this helps you get a better sense of this project, and as always, we’re happy to answer any questions that may come up along the way!
All the best,
Lili
Hello! I’m wondering if the Blackbird Linen would work for this bag? And would it take two skeins? Thank you!
Hi Christy,
Blackbird Linen would be a great choice for this pattern! I’d just recommend knitting a gauge swatch before casting on your project, to make sure you get the correct gauge. You may need to size up or down your needles!
Since the yardage for this pattern is 386, you’ll need 3 skeins of Blackbird Linen (175 yards each) to complete it. Hope this helps!
All the best,
Lili
Hi there, thanks for this pattern! I’ve finished the base of the bag but am now confused about knitting 61 stitches (as opposed to 60) along the left selvage when beginning the body of the bag. Where does that extra stitch go? I’m still relatively new to knitting so bear with me!
Thanks,
Julian
Hi Julian,
Thanks for reaching out! Factoring in the provisional cast-on from the very beginning, there will be a little additional space at the end of this edge. You’ll be able to fit the 61st stitch in right there, before knitting the 24 cast-on stitches.
I hope this helps clarify things, but please let me know if you have any other questions!
All the best,
Lili
Excellent! Thanks!
After doing the provisional cast-on with scrap yarn, row 1 starts with “slip stitch.” Does that mean I’m slipping the first PROVISIONAL stitch? Or should I knit a row first (into my provisional stitches), so when I slip a stitch, I’m actually slipping a stitch that will ultimately be part of the bag?
Hi Amy,
That is a great question! When you are creating your provisional cast on, you will use the scrap yarn as a ‘tool’ to hold your live stitches but the actual stitches that should end up on your needle should be with the working yarn you are using for your pattern. Therefore, once you start at row 1, you should already have 24 stitches in your working yarn ready to knit. So in this case you will indeed slip the first stitch knitwise with yarn in front.
I hope this helps but please let me know if you have any other questions!
Happy knitting,
Gavriella
I’ve been knitting for years until about 2 yrs ago when I suddenly quit. However, I am now beginning to get interested again, and I’m really glad you’re still around. I’m still interested in knitting your Simple Knit Tote. Since you no longer carry Latern, Soho’s Hedgerow yarn might be a good replacement. My problem is how I change the pattern for the different gauge. Thank you for any advice you may have.
Hi Dianne,
Thank you for writing in! We are thrilled to hear you are jumping back into knitting. Instead of altering the gauge of the pattern, I would first begin with a gauge swatch to see how you like the fabric and if you can meet the gauge written into the pattern. That way you won’t have to alter the pattern too much. I also think you might enjoy the result of a more sturdy fabric that Hedgerow could provide with this pattern. I hope this helps!
Happy knitting,
Gavriella
Hi! I am travelling and without a crochet hook for the provisional cast-on. Is there a way to knit this bag using a different cast-on method? Seems the straps would have to be attached separately instead of seamlessly emerging from the body of the bag.
Love the pattern and also love linen stitch!
Hi Julie,
Thank you for writing in! You could definitely use a regular cast on for this section. Just instead of picking up stitches from the provisional cast on, you can work in between stitches.
All the best,
Gavriella