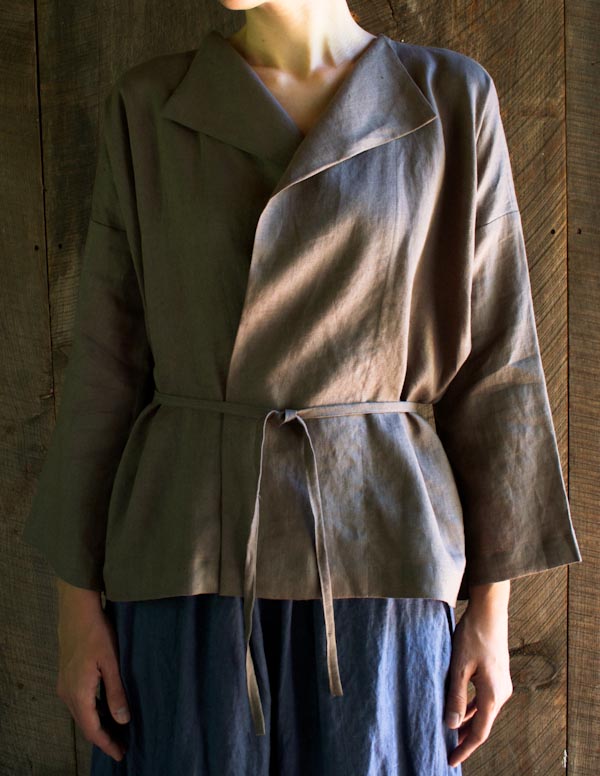
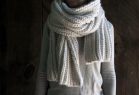
Sewn Linen Jacket
With years of wardrobe mistakes behind me, I realize that no matter how much I admire the look of a sleek, fitted suit or coat on someone else, I’m really a softly tailored kind of girl.

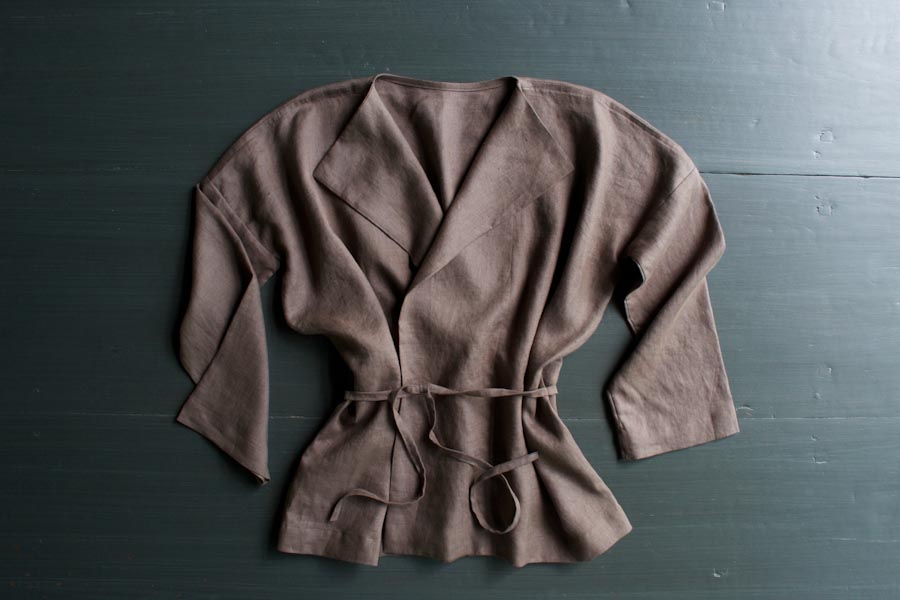
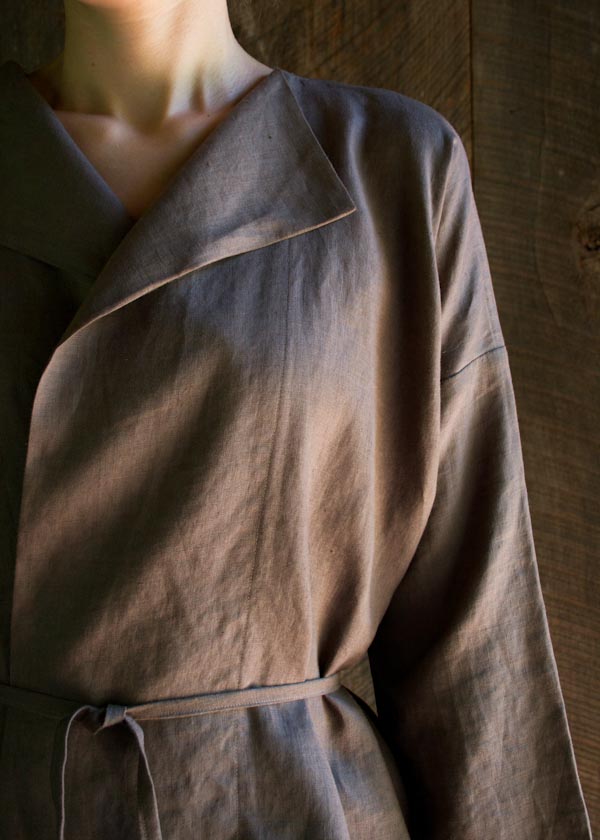
Our Sewn Linen Jacket is just the type of garment I love: understated, sophisticated and easy to wear… and sew! And thanks to all those years spent studying the minutiae of more tailored garments, French seams and well placed topstitching add just the right amount of detail to this piece.

Purl Soho’s handsome Handkerchief Linen accentuates our Sewn Linen Jacket’s loose silhouette. This lovely fabric also adds a simple elegance and gentle drape that rivals any suit, any day! -Corinne
Materials

- 1 ¾ (1 ¾. 1 ¾, 2, 2) yards of Purl Soho’s Handkerchief Linen. We used the color Hippo. (Please Note: Handkerchief Linen is no longer available. To view our full line of fabrics, click here!)
- 1 (1, 2, 2, 2) spool(s) of Gutermann’s Cotton Sewing Thread in a color to match the fabric. We used color 3630.
- A free Sewn Linen Jacket Neckline Template, printed and cut out.
Recommended tools (optional) …
- Purl Soho’s Rotary Cutting Tool Kit, which includes …
- An 18mm bias tape maker
Sizes

Finished Garment Measurements

Notes
Prewash and press all fabric before starting.
Backstitch at the beginning and end of all seams.
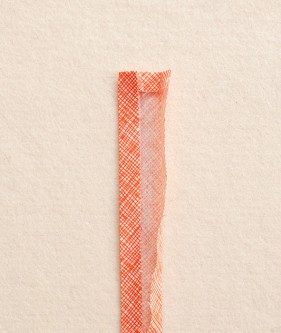
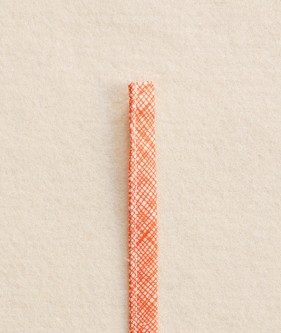
For the sake of clarity our instructional photos use Robert Kaufman’s Botanics + Architextures in Tangerine Hatches, a fabric with a clear right and wrong side. When you are working with a fabric without a clear right or wrong side, choose either side as the right side for the first seam and follow this precedent for all subsequent steps.
Pattern
Cut
Use the chart below to cut 1 Back, 2 Front, and 2 Sleeve pieces from the fabric. (All measurements shown in inches.)

Also cut …
One 2 1/4 x 10-inch rectangle on the bias (at a 45-degree angle to the selvage). This is the Neck Binding.
One 1 5/8-inch strip from selvage to selvage. This is the Tie.
Use the chart below for help with the layout of the pieces on the fabric.

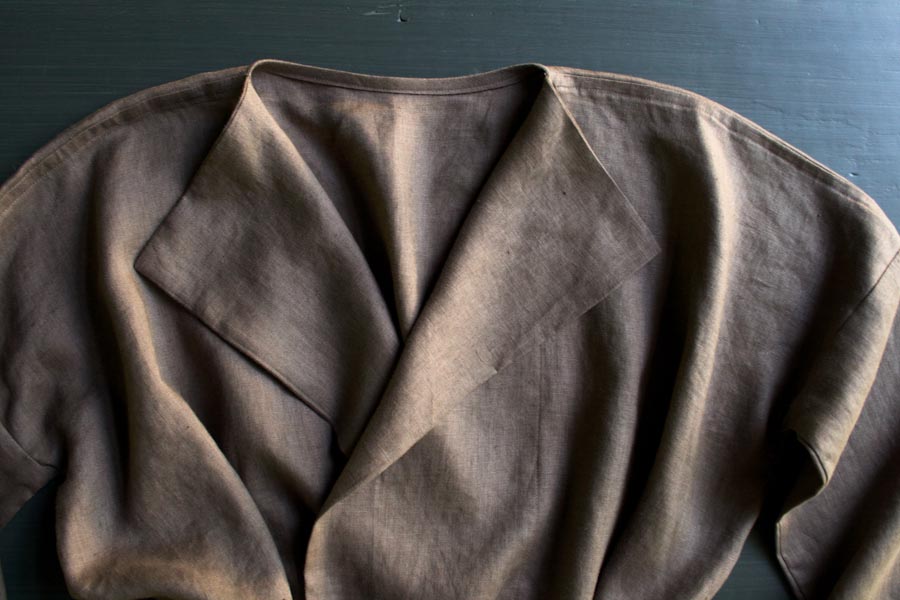
Prepare the Back Neck

Fold the Back piece in half so that its two short sides meet.
Place the prepared Neckline Template on the fold, lining up the top edge of the Template with the short raw edge of the fabric. Cut out around the Template.

Fold the Neck Binding in half so that its two long sides meet. Press flat.

Pin the Neck Binding to the right side of the Neckline edge, lining up the two raw edges of the Binding with the raw neck edge and leaving a 1 inch overhang on both ends of the Binding.
Sew the Binding to the neck edge with a ¼-inch seam allowance.
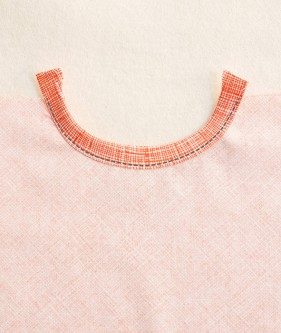
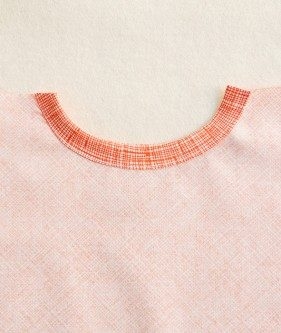
Fold the Neck Binding along the seam line to the wrong side of the Back. Press and pin. Sew the Binding down with an edgestitch.
Trim the remaining overhang at both ends of the Binding so they are flush with the edges of the Back.
Sew the Shoulder Seams

Lay one Front piece out flat with its wrong side facing up and its short sides running along the top and bottom.
With the right side facing up and the Neck opening at the top, place the Back on top of the Front. Line up the top straight edges and one side edge.
Pin the two pieces together along the top straight edge. Stop when you reach the neckline curve.
Sew along the pinned edge with a ¼-inch seam allowance.

Make a small ¼-inch clip into the seam allowance of the Front piece, right at the neckline edge. Make sure not to cut past the seam line.

Fold the garment along the seam line so that the right sides of the Front and Back are facing. Press flat and pin along the fold. Sew across the pinned edge with a ½-inch seam allowance.
This is the Shoulder Seam.

Press the seam allowance towards the Front.
The Front fabric that overhangs past the edge of the Shoulder Seam is called the Front Flap. Press the top edge of the Front Flap ¾ inch toward the wrong side (following the Shoulder Seam line). Make a ½-inch clip into the fold of the Front Flap, following the curve of the neckline edge. Do not clip past the fold’s crease.

Use the second Front piece to repeat these steps at the other side of the Back.
This is the now the Body.
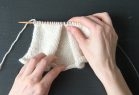
Attach the Sleeves
Note: The 13 ½ (14, 14 ¾, 15 ½, 16 ¼)–inch side of the Sleeve is the Shoulder Edge.
Fold each Sleeve in half at the Shoulder Edge. Press to create a crease and then unfold.

With wrong sides together, pin the Shoulder Edge of one Sleeve to a raw shoulder edge of the Body, lining up the center crease of the Sleeve with the Shoulder Seam.
Starting ¼ inch before the Sleeve and ending ¼ inch after, sew along the pinned edge with a ¼-inch seam allowance.

Make a ¼-inch cut into the Front and Back pieces at the edges of the Sleeve. Do not cut past the seam line.

Now, fold the garment at this seam so that the right side of the Sleeve is facing the right side of the Body. Press this fold flat and pin.
Sew with a ½-inch seam allowance. This is the Sleeve Seam.
Unfold the garment and press the seam toward the Sleeve.
Repeat with the second Sleeve on the other side of the Body.
This is now the Jacket.
Sew the Side Seams

With the wrong side facing out, fold the Jacket at the Shoulder Seams so that the raw edges of the Sleeves, as well as the long sides and bottom edges of the Front and Back, meet.
Pin all the sleeve and side seams.

Starting from the end of one Sleeve and working toward the underarm, sew along the pinned edge with a ¼-inch seam allowance.
When you reach the Sleeve Seam, backstitch ½ inch, and then sew forward again, stopping at the Sleeve Seam line. Insert the needle and pivot the Jacket. Sew forward ½ inch, backstitch, and then continue to sew down the side of the Body with a ¾-inch seam allowance.
Repeat on the other side.

Trim the seam allowance of the side seams to ¼ inch.

Cut a small notch into both underarms, making sure not to cut past the seam line.
Sew along the raw edges of the seam allowances with a zigzag stitch. Press the seam allowance to one side.
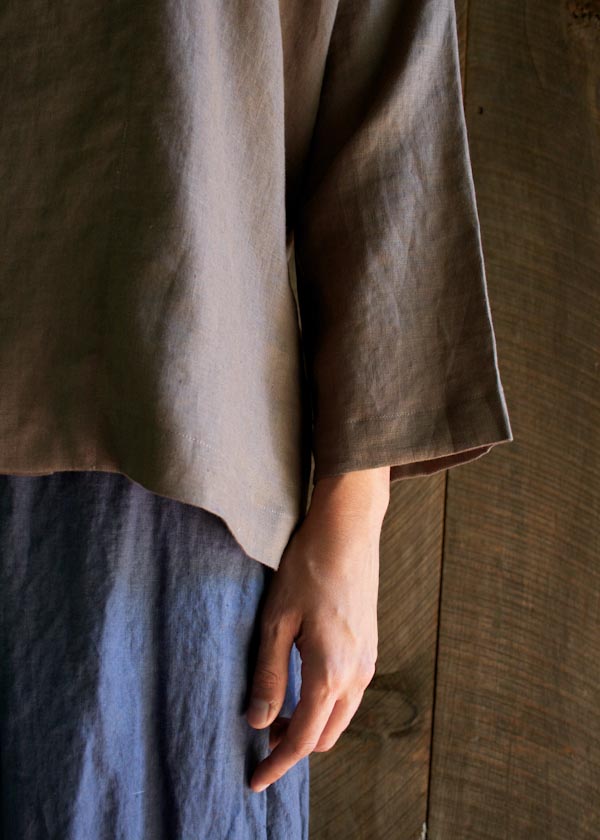
Hem the Sleeves

Fold the raw edge of one of the Sleeves ¼ inch towards the wrong side and press. Now, fold the edge 1 inch towards the wrong side. Press and pin. Sew the hem down with an edgestitch.
Repeat with the other Sleeve.
Sew the Front Flaps

Fold the bottom raw edge of the Jacket Body ¼ inch towards the wrong side and press. Now, fold the edge 1 inch towards the wrong side and press again. Don’t sew the hem down yet; just be sure to make a nice, sharp crease with the iron.

Open the folds at the top and bottom edges of one Front Flap. Now, fold the long raw edge of the Flap ¼ inch towards the wrong side and press.
Repeat on the other side.

Turn the Jacket so that its right side is facing out. Fold one Front Flap towards the right side so that its outer folded edge meets the Back neck edge. Pin the Front Flap together along the top crease, making sure the creases on the front and back of the Flap are aligned.

Continue the fold all the way down the Front Flap. Pin the bottom edges of the Flap together along the upper crease mark of the bottom hem.

Sew the two layers of the Front Flap fold together along the pinned creases.

At the bottom edge, trim the seam allowance of the top layer of the fold to ½ inch.

Turn the Front Flap’s entire fold so that the right side of the fabric is facing out. Poke the corners out neatly.

There will be a small flap of fabric that sticks out close to the neckline edge. Fold this piece so that it is hidden within the Front Flap fold.

Press the Flap flat along all folds and pin the unsewn edge in place. Sew down with an edgestitch.

Repeat on the other side.
Finish the Hem

Refold all of the bottom hem creases. Sew the hem down with an edgestitch. Start and stop the seam at the Front Flap seam lines.
Prepare and Attach the Tie

Fold the Tie piece in half lengthwise and press to create a crease. Open up the fold. Now, fold in the two long raw edges to meet the center crease and press. Refold the center crease so that the raw edges are encased in the fold.
Alternatively, you can create these folds using an 18mm bias tape maker.
To prevent fraying, finish the two short ends of the Tie with a fold-over finish. Here’s how …
Open the folds of the Tie at one end and fold over the short edge ¼ inch. Press flat. Refold the Tie and press. Repeat on the other side.
Sew the folded edges of the Tie together with an edgestitch.

Lay the Jacket out flat with the right side of one side seam facing up.
Measure 16 ½ (16 ½, 16 ¾, 17, 17 ¼) inches down from one Shoulder Seam and place a pin at this point, perpendicular to the seam line.
Now, fold the Tie in half to mark its center. Measure 7 (7 ¼, 7 ¾, 8 ¼, 8 ½) inches to one side of this center point and place a pin to mark.
Pin the Tie to the Jacket, matching up the marked spot on the Tie with the side seam of the Jacket and the marked spot on the Jacket with the top of the Tie.
Starting 1/8 inch before the Tie and ending 1/8 inch after, sew the Tie to the Jacket along the seam line three times: First sew the seam forward, then backstitch over the length of the seam, and then sew the seam forward again.
Repeat with the other side seam and the other end of the Tie.
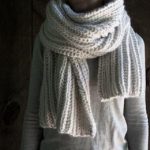
Your Sewn Linen Jacket is ready to wear!


i would love to make this in a wool – perhaps felted – could this pattern be adapted for different seasons?
Hi Susan –
I love the idea of adapting this pattern for all seasons! I have not tried this Jacket in wool, so I cannot say for sure how it would affect the over all fit and drape, though I imagine that it could be stunning! I do think you would want to make some adjustments to the pattern, particularly I would eliminate the french seams and adjust the hems to accommodate the extra thickness of the fabric.
I hope this helps! If you do decide to make a colder-weather version, please let us know, and check in if you have any questions along the way!
-Corinne
I really like your use of linen, but do you have any suggestions on armhole hacks? I’ve really enjoyed your other pattern-less garments along these lines, but after making several boxy Ts, I find the armhole consistently weak. Any ideas for strengthening it? I’ve added some reinforcement strips, but would love to adjust the cut instead — whether that’s widening the sleeve to lower the armhole, or widening the side piece to allow for a more curved cut at the arm. Do you think either of those approaches would work? Any thoughts on which would be better?
Hi Christi –
Thanks for writing in! I completely understand your concern with the underarm seam. However, I don’t think you will encounter the same issues with this Jacket. Compared with the Boxy Tee, the body of this garment has an additional 10 inches of ease, which brings the shoulder seam further down on the arm and reduces the tension in the underarm seam. No hacks required!
I hope this helps!
-Corinne
Most under arm seams that requires ease or strength can benefit by a smallish bias sqaure added in along the lines of an old style men’s work short ( like a fisherman’s shirt or typical 1800′ s smock) french seams always reduce wear and tear during use and cleaning, or a lighter fabric can bind these seams as well.
These are great tips, Marie. Thank you for writing in!
Hi,
I would really try to make this top, but the instructions are so confusing to me. Is there a paper pattern for the top?
Thanks for your help.
Linda
Hi Linda –
I’m sorry you’re finding this pattern hard to follow! Because this Jacket is made using simple rectangle shapes, we did not make a paper pattern for the main pattern pieces. We did however make a Neckline Template for cutting out the neck from the Jacket Back. You can find this free PDF download in the “Materials” section of the pattern.
All of the dimensions you need for the rest of the pattern pieces are included in the Cutting Chart in the “Cut” section of the pattern. If you have any questions about this chart, or with any thing else in the pattern, please let me know. I am happy to help!
Thanks!
-Corinne
This is just the approach to jackets etc. that I have been looking for.
Simply beautiful. Thank you for the pattern. 🙂
Love your style!
this is lovely! i love seeing it on a human also! 🙂 thank you so much for all your inspiration!
You have done such a great job showing all the steps in making the jacket. Linda I really think if you follow each step as you sew you will not have any problems. I have sewed for many years, these instructions and pictures a very good.
I am wondering what you think about lengthening the jack maybe 2″ would this work? As some else suggest maybe a soft wool since the weather is changing.
Good job hope you keep it up.
Hi Pat –
Thank you for your kind words. I am so glad that you like the pattern!
I think this Jacket could be lovely with a little bit of added length, and you should be able to do this quite easily.
Also, I think this Jacket could be beautiful in a light wool, but as I mentioned in a previous comment, depending on the thickness of your fabric, you may want to adjust some of the seaming and hems to accommodate the extra bulk.
Thanks!
-Corinne
Hello – I’ve started making a muslin of the jacket and am wondering why the neckline has a scoop + the straight part – it’s a bit difficult to sew the bias strip along the area where it transitions between the scoop and the straight part… Can you explain why this is important? I’m happy to keep it as is – but if I can switch it to a straight scoop, that would make it easier…
Lisa
Hi Lisa –
This is a great question! The straight edge at the neckline is designed to get mostly used up in the seam allowance of the shoulder. When attaching the bias tape for the neckline, you should have no problems if you add a bit of curve here in place of the hard angle.
I hope this helps!
-Corinne
A million “Thank you’s” for this fantastic pattern. I just completed my jacket in a charcoal linen…it is simply beautiful. It has immediately become one of my favorites.
I’ve just made this in a printed cotton, adding several inches in length, and now I’ve got a really nice, comfy summer dressing gown! Thanks for the pattern and straightforward instructions.
Hi! A question about petite sizing… where should the body hem lay? It is quite long on me, being hardly 5’2″. Just past the hip bones, what is a good reference point? Thx!
Hello Robin –
This is a great question. I think wherever you find the hemline most flattering is the best reference I can offer! The jacket is designed to fall just as you’ve described, just below the hip line (as you can see in the model shots above), but you may find this cut unappealing for your smaller frame. Perhaps you could try right at the hip line or slightly above?
I hope this helps! Sorry I can’t offer more!
-Corinne
Hi! I have a question about the direction that the sleeves are situated on the fabric. Are they sleeves cut so the shoulder is parallel to the selvage, or the other way? Thanks! I’m planning to make this jacket with medium weigh denim.
Alanna
Hi Alanna,
Thanks for writing in! The 13 ½ (14, 14 ¾, 15 ½, 16 ¼)–inch side of the Sleeve is the Shoulder Edge and that edge is perpendicular to the selvedge in the cutting set-up.
I hope that this helps and let us know how the jacket turns out!
Cassy
I really liked this pattern, and even though I made many mistakes and had to rip many seams, I had a great time making this jacket. However, after finishing it, I realised it was too large for me. I’m very petite, even by Asian standards. So the jacket kind of bunches around me too much, and it makes me look like a dumpling. Is there any way I could make the jacket fit me better at this point? Thanks!
Hi Lihong,
Thanks for writing in and for your kind words! I am afraid that given the construction of this garment, altering it to fit better could be quite a challenge, due in large to the boxy look and construction. If you were to make another version, you could cut the front and back pieces to be about 1-2 inches smaller and then increase the length of the sleeves accordingly. You could try to put some darts into the back panel to take out some of the bulk but I am afraid that we do not have a tutorial on how to best do this.
Best,
Cassy
I’m making this in mineral linen and found the 5/8″ strip for the tie impossible to work with. I cut 1″ instead and sewn it looks like your model version.
Is there any reason not to attach an interior pocket to the jacket facing?
Hi Val,
Thanks for writing in! I could see the 5/8″ strips being a bit challenging using the Mineral Linen as it is a touch heavier than the Handkerchief Linen that we used here. That said, 1″ strips should work well without changing the look too dramatically!
You can certainly add pockets via the side seams. You may want to be careful about how you tack them down on the inside so as not to see the stitching on the front side. It may take a bit of trial and error but it would work well!
Best,
Cassy
I’m stuck and terrified at the last step of the shoulder seam: “Make a ½-inch clip into the fold of the Front Flap, following the curve of the neckline edge. Do not clip past the fold’s crease.”
The previous clipping was marked with a heavy black line.
How can I clip into the fold a half inch and not cut past the crease? Isn’t the crease the fold and vice versa?
I’m just can’t picture it. Can you help?
Hi Val,
Thanks for writing in and fear not! The picture directly above this direction shows a black line where you will make the clip. I know that this is a bit confusing but that line will be where you clip!
I hope that this helps!
Cassy
Hi Cassy,
What a great pattern and easy sewing project! I made this in a stone coloured linen as a birthday gift for my sister and now I’m tempted to make another for myself!
Thanks!
Claire
Hi there,
I have a question about this pattern. I used the mineral linen and made it a bit shorter, it is a swing jacket, which I love. However, the some of the instructions left me stumped. After the shoulder seam is complete and we make the clip in the neck, when you finish you have a raw edge on the jacket. I’m not seeing where this is tidied up. Also the sleeves are awkward, I’ve tried making kimono sleeves before and especially with a heavier linen they are just stiff. Is there any solution to that? Thank you for you response. I really want to improve my skills!
Hi Kimberly,
Thanks for reaching out and our apologies for the delayed response! I am happy to help! The clips that you make after completely the shoulder seam will be dealt with in the “Sew the Front Flaps” section. The third picture in the section indicates the clip and the fifth image shows where it is secured to the inside of the front flap!
The sleeves on this lovely little jacket can be a little challenging when using a heavier weight linen than what we did here. You could try making them a bit larger in circumference as this should add a bit more drape to them. You can also try adding a small gusset under the arm, as illustrated in our Women’s Robe project (https://www.purlsoho.com/create/2014/04/24/womens-robe/). This may help create a little extra space to drape the arms and can be done after the fact. The other option would be to use a lighter weight linen that would be not quite as stiff.
I hope that this helps!
Cassy
Hey !
This is such a wonderful pattern /jacket I love it!
I have 2 questions: This pattern already INCLUDES the seam allowance, right? I could find any specific information about it.
And the first size is supposed to be like an XS, then S etc?
Thank you!
Ida
Hi Ida,
Yes, you’re correct on both counts! They pattern pieces include seam allowances (check the specific section of the pattern for the correct seam allowance for that seam) and the first size is an extra small.
Happy Crafting!
Cassandra
Cassandra – Thank you so much for this wonderful pattern and tutorial! It seems that I love rectangles as well! It makes it so easy to adjust for length, width and style features.
In August I found your Boxy Tee while looking for a pattern for a Susan Eastman-inspired top. I made a lot of mistakes putting the Boxy Tee together, but your instructions were really good and I ended up with a top I love made from repurposed linen fabric.
I just had to try your kimono-style jacket. I made this in one afternoon from a beautiful black linen and I am very happy with the results. I even made the belt and intend to wear it that way; which is amazing as I am not normally a belt-wearing person; but it looks really nice! I have a feeling this will become a staple garment for me.
Thank you, again
Donna