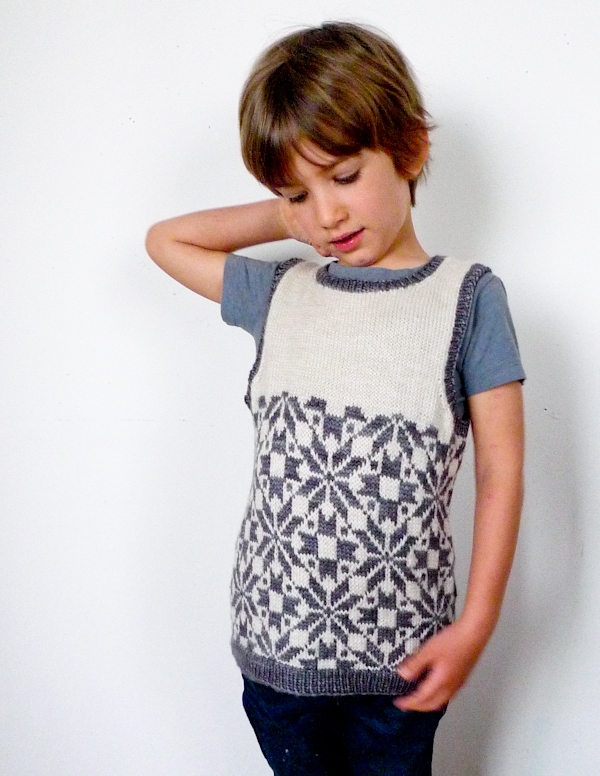
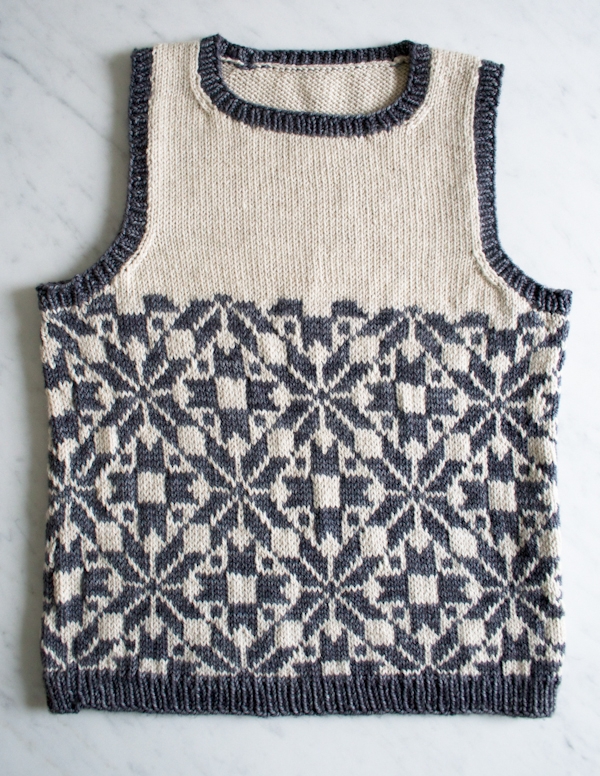
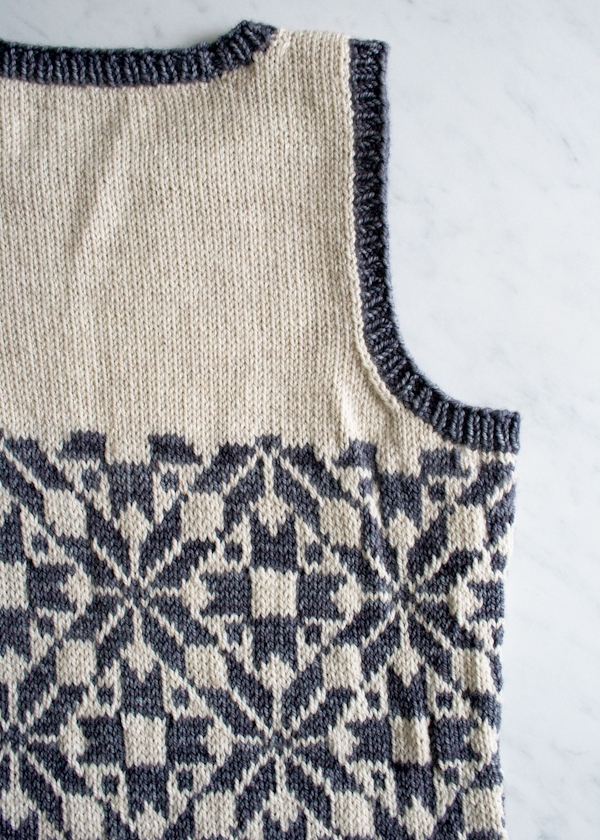
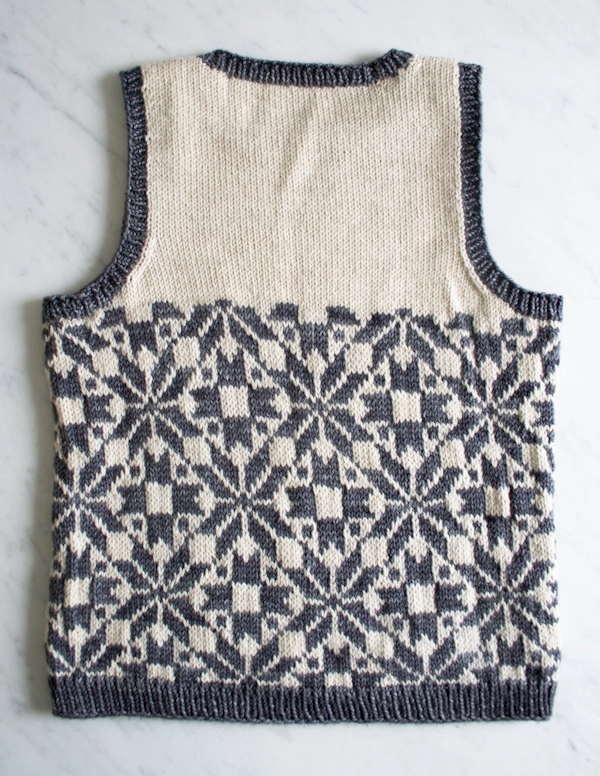
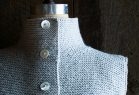
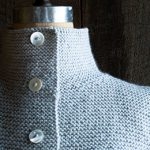
Kid’s Fair Isle Vest
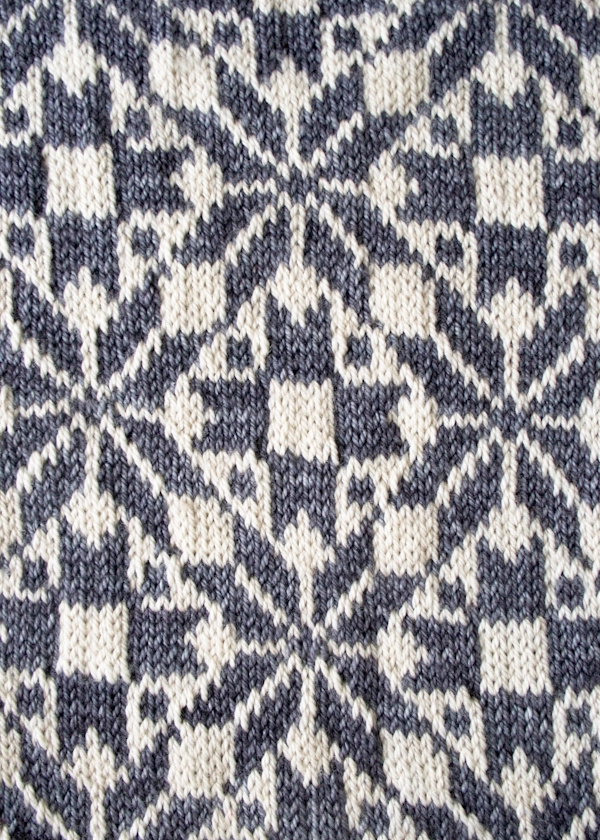
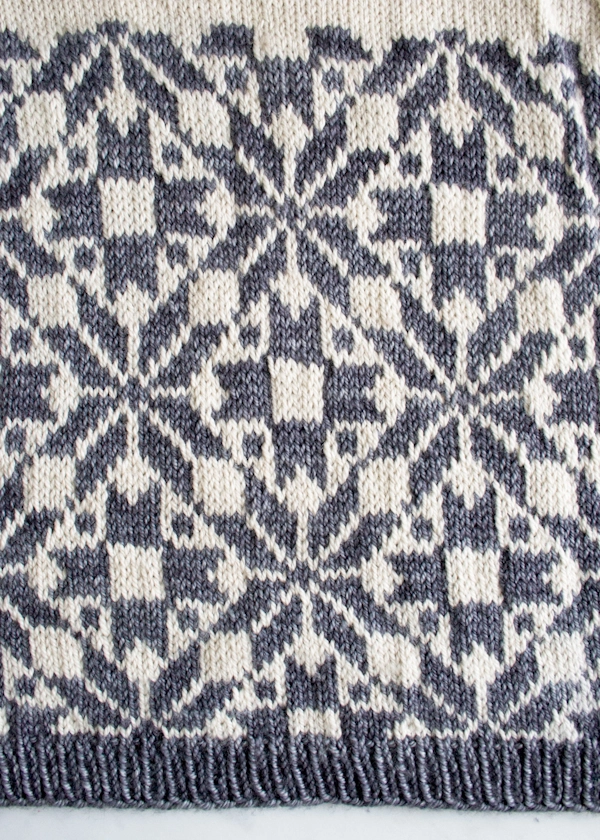
For this Kid’s Fair Isle Vest I used a technique credited to a tiny island north of Scotland (aka Fair Isle) and a stitch pattern from another tiny island, this one west of Estonia (Muhu). In times and places where, by logic, function should have ruled sweater design, instead, knitters seemed to have taken sheer joy in form. It seems to me that, when they cast on for a new sweater, the women from these cold, isolated island places threw all of life’s hardships and frustrations right out the window.

Such knitting ingenuity from anywhere, anytime is awe-inspiring, and the creation of this vest was a wonderful opportunity to get inside the minds of the incredible knitting women who came before us. Armed with the beautiful book, Designs and Patterns from Muhu Island, I used a pared-down palette and design to bring a modern sensibility to this extraordinary traditional stitch pattern.

And since my son, the intended recipient of this vest, doesn’t plan on spending the next few months aboard a fishing vessel, instead of thick, scratchy wool, I chose Anzula’s soft and supple Cricket. A combination of merino, cashmere and a touch of nylon, this subtly hand dyed yarn isn’t necessarily seaworthy, but it is what we modern city-dwellers have come to appreciate!

The Kid’s Fair Isle Vest is a fun challenge and also a truly satisfying trip into knitting history. Thank you to all those inspiring women who innovated such beauty by lantern light! -Whitney
Designed by Purl Soho designer, Whitney Van Nes.
Share your progress and connect with the community by tagging your pics with #PurlSoho, #PurlSohoBusyHands, and #PurlSohoKidsFairIsleVest. We can’t wait to see what you make!
Materials
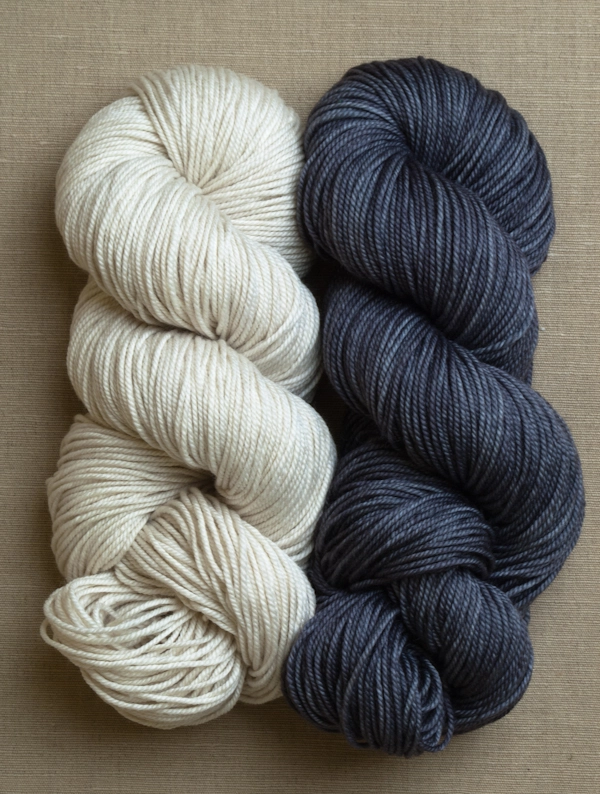
- Main Color (MC): 1 (2) skein(s) of Anzula’s Cricket, 80% Superwash Merino, 10% Cashmere and 10% Nylon. Each skein is 250 yards/ 100 grams; approximately 250 (500) yards required. We used the color Au Natural.
- Contrast Color (CC): 1 skein of Anzula’s Cricket; approximately 250 yards required. We used the color Elephant.
- US 5 (3.75 mm), 20- or 24-inch circular needles
- US 4 (3.5 mm), 16-inch circular needles
- Optional: US 4, 20- or 24-inch circular needles, for the Front and Back sections
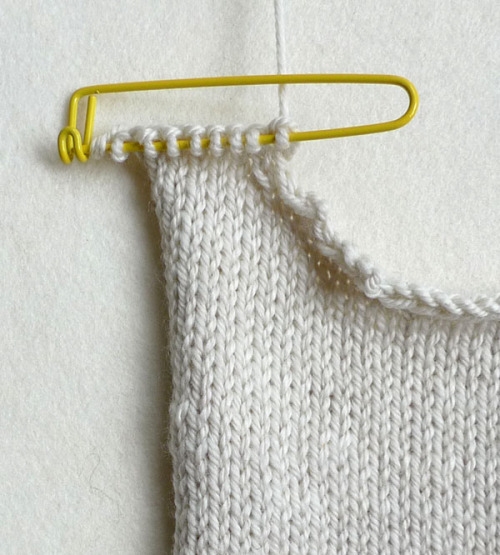
- 5 small and 2 large stitch holders (or scrap yarn)
- Stitch markers, including one unique
Gauge
Fair Isle Pattern
- Unblocked: 28½ stitches and 27½ rounds = 4 inches, using larger needles
- Blocked: 27½ stitches and 25 rounds = 4 inches
Stockinette Stitch
- Unblocked: 25 stitches and 33 rows = 4 inches, using smaller needles
- Blocked: 24 stitches and 32 rows = 4 inches
Sizes
Kids 2-4 (5-7)
- Finished circumference around chest 23¼ (28) inches
- Finished length from bottom edge to underarm 10¾ (12) inches
- Finished armhole length 5¾ (6½) inches
- Finished width across back 9½ (10) inches
Notes
- The chart in the pattern shows a 32-stitch, 32-round repeat. For size 2-4 start the first round at the asterisk (*), and for size 5-7 start the first round at the bottom right corner. For both sizes, reading from right to left, repeat the 32 stitches 5 (6) times to the end of the round, then move up to the right end of the next line of the chart and read left. When you have worked to the top line of the chart, start again at the bottom right (for both sizes). For size 2-4 work the chart through the line marked with a cross (+); and for size 5-7, work the chart to the top line again.
- Some people work Fair Isle holding one strand of yarn in each hand, knitting English style with their right hands and Continental with their left. If this is too advanced for you, just drop the yarn you’re not using and pick up the one you need. Regardless of your method, keeping the same color consistently above the other will ensure a neat wrong side.
- Before you knit the first stitch of a new color, slide the stitches you most recently worked down the right needle. This will force the working yarn to stretch its way to the next stitch, ensuring some necessary slack.
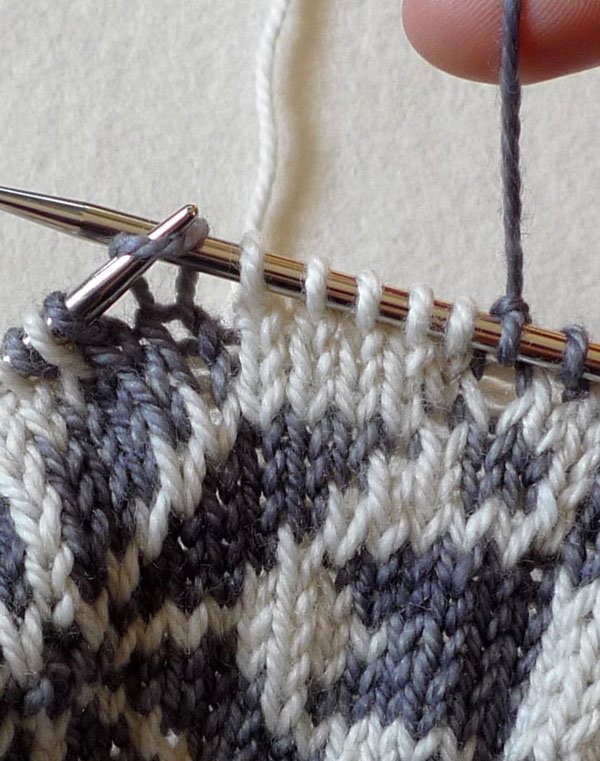
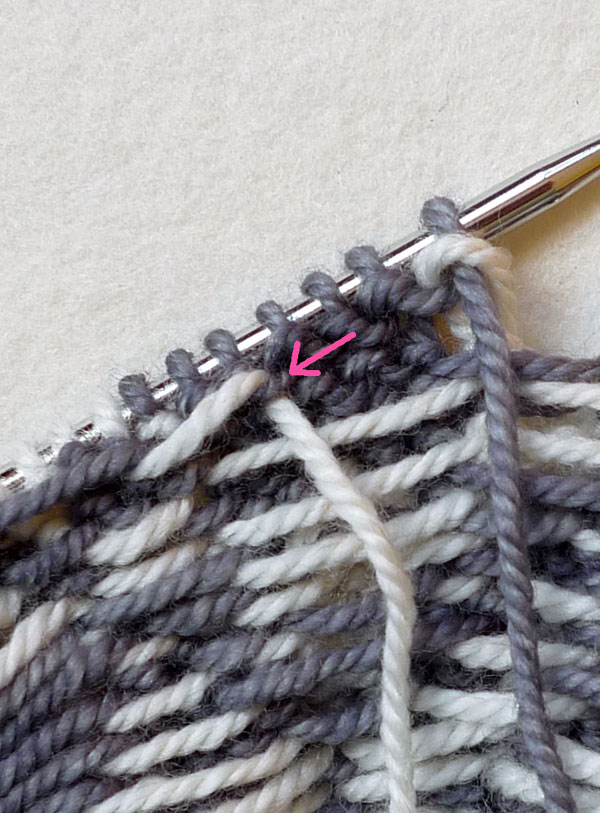
- When you are required to work either 7 or 8 stitches of one color, you should “tack down” the non-working yarn so that its back strand isn’t too long. Here’s how…
Work 3 or 4 stitches with the working yarn, then bring the non-working yarn between the working yarn and the right needle, essentially laying it on top of the working yarn.
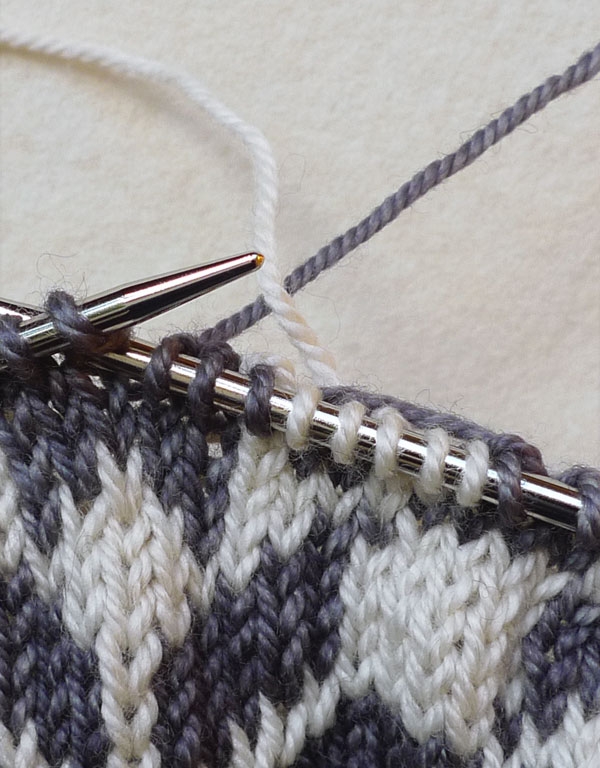
Work the remaining stitches as normal. You’ll see that the non-working yarn got neatly tacked down by the working yarn, avoiding a long and messy strand across the wide expanse of stitches.
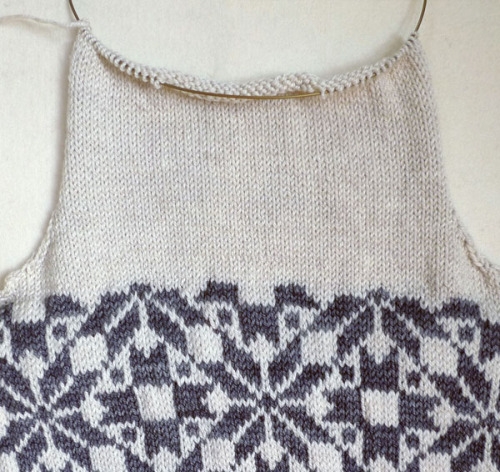
- Finally, please note that the photos in this pattern show the size 5-7. The Fair Isle pattern of the size 2-4 is centered differently, both horizontally and vertically.
Pattern
Body
Using the Contrast Color (CC) and larger needles, cast on 160 (192) stitches. We used a basic Long Tail Cast On.
Place a marker and join for working in the round, being careful to not twist the stitches.
Round 1: *K1, p1, repeat from * to end of round.
Repeat Round 1 until piece measures (3/4) 1 inch from cast on edge.
Work the Fair Isle Chart (below) according to the instructions given in the Notes (above). To reiterate, size 2-4 starts at the asterisk (*) and size 5-7 starts at the bottom right corner.
As you work the first round, place a marker (that is a different color than the end-of-the-round marker) at the end of each repeat.
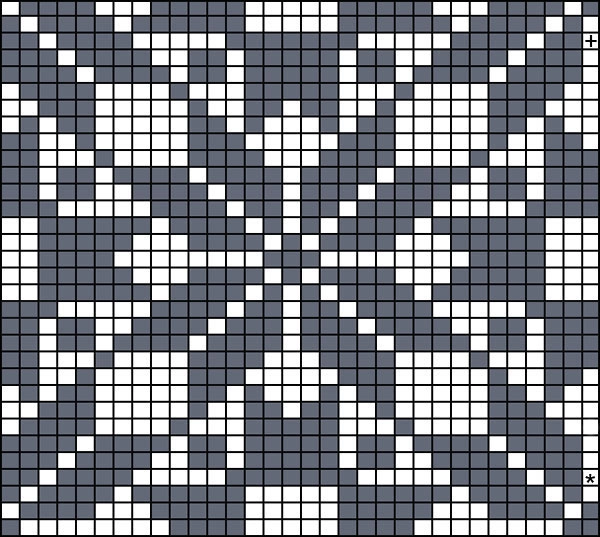
For size 5-7, work the first row of the chart one more time, knitting the very last stitch with the MC.
For both sizes, cut the CC yarn.
Put Underarms on Hold
NOTE: As you work this section, remove each stitch marker as you get to it.
Working now with just the MC and switching to the (longer) smaller needles, knit 14 (8) stitches, put last 11 (15) stitches on a small stitch holder (for the Right Underarm).
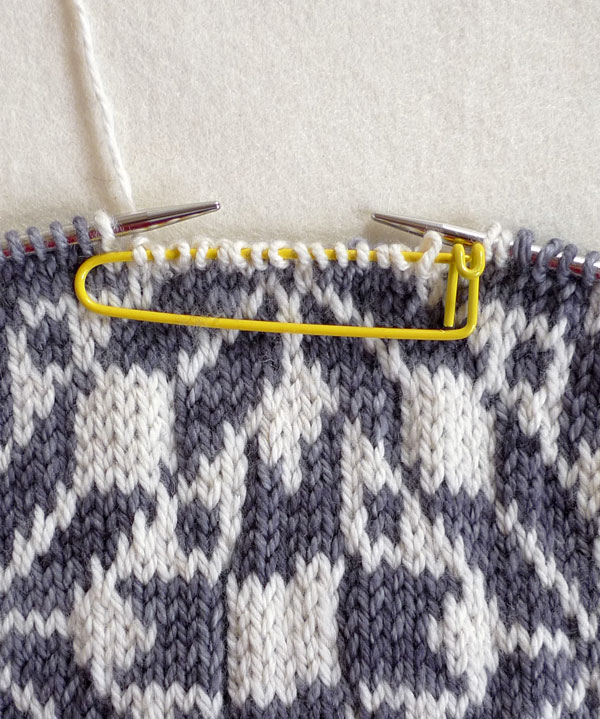
Continuing with the first stitch to the left of the stitch holder, knit to 2 stitches before (8 stitches after) the third stitch marker (not including the end-of-the-round marker), k30 (8), put last 11 (15) stitches on a small stitch holder (for the Left Underarm).
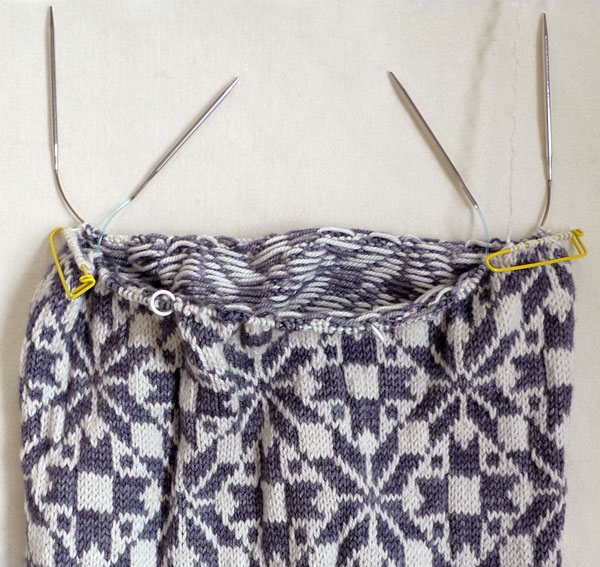
Now, again, continuing with the first stitch to the left of the stitch holder, knit to next stitch holder.
You now have 11 (15) stitches on hold for each Underarm and 69 (81) stitches for each the Front and Back.
Front
Notes: For the Front section you will work just the last 69 (81) stitches you knit. Put the other 69 (81) stitches on hold on two large stitch holders (or scrap yarn or a spare circular needle). Also for this section, you will be working back and forth in rows, rather than in the round. This means that you will turn the work at the end of each row.
Row 1 (wrong side): Bind off 3 stitches in purl, purl to end. [66 (78) stitches]
Row 2 (right side): Bind off 3 stitches in knit, knit to end. [63 (75) stitches]
Row 3: Bind off 2 stitches in purl, purl to end. [2 stitches decreased]
Row 4: Bind off 2 stitches in knit, knit to end. [2 stitches decreased]
Repeat Rows 3 and 4 zero (one) more time(s). [59 (67) stitches]
Next Row (wrong side): P1, p2tog, purl to last 3 stitches, p2tog through the back loop (p2tog tbl), p1. [2 stitches decreased]
Next Row (right side): K1, ssk, knit to last 3 stitches, k2tog, k1. [2 stitches decreased]
Repeat last 2 rows zero (one) more time(s). [55 (59) stitches]
Next Row (wrong side): Purl.
Next Row (right side): K1, ssk, knit to last 3 stitches, k2tog, k1. [2 stitches decreased]
Repeat last two rows 1 (1) more time. [51 (55) stitches]**
Work evenly in stockinette stitch until the MC section measures 4 (4 1/2) inches, ending with a purl row.
Next Row (right side): K17 (18), k2 and bind off 17 (19) stitches in knit, k16 (17). [34 (36) total Front stitches; 17 (18) stitches for each Shoulder]
Right Front Shoulder
Note: For this section you will work just the previous 17 (18) stitches on the needle. Leave the other stitches (for the Left Front Shoulder) on hold on the needle.
Row 1 (wrong side): Purl.
Row 2 (right side): Bind off 3 stitches in knit, knit to end. [14 (15) stitches]
Row 3: Purl.
Row 4: Bind off 2 stitches in knit, knit to end. [12 (13) stitches]
Row 5: Purl to last 3 stitches, p2tog tbl, p1. [11 (12) stitches]
Row 6: K1, ssk, knit to end. [10 (11) stitches]
Row 7: Purl.
Row 8: Repeat Row 6. [1 stitch decreased]
Rows 9 and 10: Repeat Rows 7 and 8. [8 (9) stitches]
Work evenly in stockinette stitch until piece measures 6 1/4 (7) inches from top of Right Front Shoulder to beginning of MC section, ending with a knit row.
Cut the yarn, leaving an 18-inch tail, and put the remaining 8 (9) stitches on a small stitch holder.

Left Front Shoulder
NOTE: For this section you will work just 17 (18) stitches you have on hold on the needle.
With the right side facing you, join MC.
Row 1 (right side): Knit.
Row 2 (wrong side): Bind off 3 stitches in purl, purl to end. [14 (15) stitches]
Row 3: Knit.
Row 4: Bind off 2 stitches in purl, purl to end. [12 (13) stitches]
Row 5: Knit to last 3 stitches, k2tog, k1. [11 (12) stitches]
Row 6: P1, p2tog, purl to end. [10 (11) stitches]
Row 7: Knit.
Row 8: Repeat Row 6. [1 stitch decreased]
Rows 9 and 10: Repeat Rows 7 and 8. [8 (9) stitches]
Work evenly in stockinette stitch until piece measures 6 1/4 (7) inches from top of Left Front Shoulder to beginning of MC section, ending with a knit row.
Cut the yarn, leaving an 18-inch tail, and put the remaining 8 (9) stitches on a small stitch holder.
Back
Note: For the Back section you will work the 69 (81) stitches that have been on hold, turning the work at the end of each row.
Return the 69 (81) Back stitches to the smaller needle and with the wrong side facing you, join MC.
Work from Row 1 of the Front section to the **. [51 (55) stitches]
Work evenly in stockinette stitch until the MC section measures 5 1/2 (6) inches, ending with a purl row.
Next Row (right side): K 14 (15), k2 and bind off 23 (25) stitches in knit, k 13 (14). [28 (30) total Back stitches; 14 (15) stitches for each Shoulder]
Left Back Shoulder
Note: For this section you will work just the previous 14 (15) stitches on the needle. Leave the other stitches (for the Right Back Shoulder) on hold on the needle.
Row 1 (wrong side): Purl.
Row 2 (right side): Bind off 3 stitches in knit, knit to end. [11 (12) stitches]
Row 3: Purl.
Row 4: Bind off 2 stitches in knit, knit to end. [9 (10) stitches]
Row 5: Purl to last 3 stitches, p2tog tbl, p1. [8 (9) stitches]
Work evenly in stockinette stitch until piece measures 6 1/4 (7) inches from top of Left Back Shoulder to beginning of MC section, ending with either row.
Cut the yarn and put the remaining 8 (9) stitches on a small stitch holder.
Right Back Shoulder
NOTE: For this section you will work just 14 (15) stitches you have on hold on the needle.
With the right side facing you, join MC.
Row 1 (right side): Knit.
Row 2 (wrong side): Bind off 3 stitches in purl, purl to end. [11 (12) stitches]
Row 3: Knit.
Row 4: Bind off 2 stitches in purl, purl to end. [9 (10) stitches]
Row 5: Knit to last 3 stitches, k2tog, k1. [8 (9) stitches]
Work evenly in stockinette stitch until piece measures 6 1/4 (7) inches from top of Right Back Shoulder to beginning of MC section, ending with either row.
Cut the yarn and leave the remaining 8 (9) stitches on the needle.
Finish
Shoulders
Slip the Right Front Shoulder stitches onto the other end of the circular needle so that you have the 9 stitches of each Right Shoulder at each end of the needle and the tips of the needle are pointing toward the right armhole. Thread the Front Shoulder tail onto a tapestry needle, and with the wrong sides of the vest facing each other and the Back side of the vest facing you, hold the two ends of the needle parallel to each other.

Use the Kitchener Stitch to graft together the two Right Shoulders.
Now do nearly the same for the two sets of Left Shoulder stitches: slip each set of stitches onto the ends of the circular needle (so that the points are facing toward the neckhole); thread the tapestry needle onto the Front Shoulder tail; hold the wrong sides facing each other and the Back side facing you; and use the Kitchener Stitch to graft together the Left Shoulder Stitches.
Armhole Bands
With the right side facing you, slip the 14 stitches of either Underarm onto the 16-inch needle.
With CC, knit the 14 stitches.
Now pick up around the armhole for the Armhole Band, ending at the 14 Underarm stitches. Pick up 1 stitch for each bind off stitch and 2 stitches for every three rows of knitting. Make sure the number of stitches from the middle of the Underarm up the Front to the top of the Shoulder equals the number of stitches from the middle of the Underarm up the Back to the top of the Shoulder, give or take a stitch or two. Also, make sure that the total number of Armhole Band stitches is an even number.

Place a marker and join for working in the round.
Round 1: *K1, p1, repeat from * to end of round.
Repeat last round 3 more times.
Bind off loosely in k1, p1 pattern.
Neckband
With the right side facing you, starting anywhere along the Back neckline, use the 16-inch needle and the CC to pick up evenly around the entire circumference of the neck. Pick up 1 stitch for each bind off stitch and 2 stitches for every three rows of knitting. Make sure you have picked up an even number of stitches.
Place a marker and join for working in the round.
Round 1: *K1, p1, repeat from * to end of round.
Repeat last round 3 more times.
Bind off loosely in k1, p1 pattern.
Last Things
Weave in all the ends, block the vest and put it on!


Beautiful vest! I can imagine it as a lovely dress for a little girl, as well. Thank you for sharing this wonderful knitting tradition.
Love it! Now, could you do a pattern for a women's size 10/12?
… I am hoping for an adult version soon – or I have to sit down and work it out. The color combo is lovely!
Would love an adult male version to make from my son. Thank you. I will visit Soho in the spring. See you then.
Very lovely indeed. I do love this kind of nostalgia.
Very beautiful! Molto bello! 🙂 Paola – Italy
Oh, my goodness. This is gorgeous AND free. Thank you so much!
Kid 3 now has his Easter knit in the queue… 🙂
I was about to put this vest at the top of my queue, until I saw it was sized for children. Adult version, please!?
Oh, it would be wonderful to have an adult version of this beauty! I would buy your yarn and make it today!
Gorgeous pattern!!
I second (or fifth) the request for an adult version 🙂
Such a retro look for hipster kids 😉
Useful photos and clear description. I appreciated the length: the sweater doesn’t ride up on an active kid
Hi. I really love this pattern and would like to knit it in a size 9-10. Can you help with the technical side, how many stitches do I cast on etc? And where do I start knitting the graph from?
Thanks!
Tia
Hi Tia,
Thanks for writing in! Unfortunately, for patterns that require gauge to fit, we are unable to alter the pattern in the comments section. However, I will be sure to pass your request along to the design team! I’m so sorry about that!
Best,
Julianna
COULDN’T YOU POSSIBLY MAKE A PATTERN FOR ADULTS? I DO SO WANT TO MAKE ONE FOR MY SON, WHOLL LOVE T, I KNOW.
Hi Anita,
Thanks for writing in! I’m afraid that we don’t have any plans to make an adult version of this pattern yet, but I think it’s a lovely idea. I will absolutely pass along your suggestion for the future! Thank you again for sharing your idea with us.
All the best,
Lili