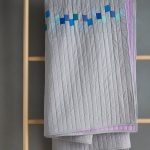
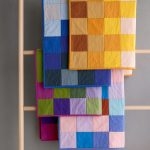
Mary Flanagan Felted Wool Patchwork Quillow

From the moment we saw these gorgeous bundles of ten uniquely textured and hand dyed felted wools from Mary Flanagan, we knew we wanted to make a patchwork blanket with them. They seemed to be made just for this purpose since felted wool doesn’t require hemming, plus it’s very soft, warm and inviting. When we got our bundle home and began to design the quilt, we realized that we would only need nine of the ten pieces to make it, but we were determined to use all 10. It occurred to us that we could use the 10th piece to make a simple pocket on the back of the quilt into which the entire piece could be folded to make a pillow, and our quilt became a quillow! It was meant to be.
Materials
- One Mary Flanagan textured Felted Wool Bundle (we used Spring Rain)
- One spool 100% cotton machine sewing thread (we used color # 7970)
- Rotary cutter
- 12.5-inch x 12.5-inch grid ruler
- 6.5-inch x 24.5-inch grid ruler
- Cutting mat
For best results, use a walking foot on your sewing machine.
Squaring up

When your bundle arrives the pieces will not be perfectly cut. You will need to cut each piece to 12.5-inches x 15-inches (or smaller if your smallest piece isn’t big enough) and you will also need to square each piece up while cutting it to this size.
Place the square grid ruler along the bottom edge of the short side of the wool piece with its left edge about 5-inches from the left edge of the piece of felt as shown above. Make sure the ruler is exactly straight against bottom edge of the felt. It doesn’t matter what line you use on the ruler since you are just getting a straight line, not a measurement. (If none of the sides of the felt are straight you will need to cut all four sides).
Note: You will not be using the grid on your cutting mat to measure so it doesn’t matter where you place the fabric in relation to that grid.

Place your 6.5-inch x 24.5-inch grid ruler vertically against the left edge of the square ruler being careful not to move the square ruler. Place your hand on the long ruler to anchor it and remove the square ruler.

Using your rotary cutter cut along the right side of the ruler. Your piece of wool is now squared up with the bottom edge of the wool (meaning it has been cut at a perfect 90 degree angle).
Repeat these steps on the other sides of wool in order to cut it to 12.5-inches x 15-inches. Repeat for the remaining 9 pieces.
Placing and Pinning
 Once you have all ten pieces of wool cut to the exact same size, lay 9 of them out in a 3-piece wide x 3 piece tall rectangle to decide which pieces you want where in your quilt. It’s nice to disperse the darker colors around the quilt. The tenth piece will form the pocket that holds the quillow, so set this piece aside.
 Separate your layout into three 12.5-inch wide strips of three pieces each (so that you’ll be pinning along the short sides for each strip).
Pin together each strip as follows:
- Pin along the short sides
- Overlap the pieces by a half inch
- Use ample pins since the fabric stretches as you are sewing
To create less bulk when sewing, overlap pieces in the three strips as shown in the photo above:
- On left and right hand strips, overlap the pieces so that the top piece is under the piece below.
- On the center strip, overlap the pieces so that the top piece covers the piece below it.
Sewing

Using a walking foot on your machine, sew along the pinned edges using a 1/16-inch seam allowance.

Flip the strip over and you will see that you have a half-inch flap where the two pieces of wool overlap as shown above. Using a 1/16-inch seam allowance, sew this flap down just as you did on the reverse side.

You will have two parallel seams running along the overlapped felt which creates a finished seam on both sides. Repeat this step for all pinned seams. You will now have three strips of three pieces of wool sewn together.
Quillow pocket


Using the piece that you set aside for the quillow, pin it to the back side of the lower right hand patch on your quilt. Only pin it on the three outside edges of the wool leaving the short side open where you’ve sewn your strips together as shown above.

Using a 1/16-inch seam allowance, sew around all three pinned sides leaving the short side open for the pocket as shown above.
Sewing 2

Line up the three strips that you’ve sewn together so that everything creates a grid. Overlap the three strips with each other by a half inch. Overlap the left and right strips over the middle strip as shown above.

Make sure all the intersections and edges line up and use enough pins to keep everything in place so that the quilt will be nice and neat after it’s all sewn together.

Sew the three strips together in the same manner as you sewed the individual wool pieces together using a 1/16-inch seam allowance on both sides.

This is how the quillow pocket will look once everything is sewn together.
Folding

To fold the quillow, lay the quilt flat with the pocket underneath the bottom right hand corner of the quilt.

Fold from the left the entire first column over the second column.

Then second column over the third column.

Then fold down from the top once…

And then twice.

Flip inside out.

And voila!


This looks like a great pattern and I hope to try it. What lovely colors. Thanks for another great project!
I may be wrong, but check to see if there is an error in the instructions under “Placing and Pinning.” In the second to last bullet point, should it read, “On left and right hand strips, overlap the pieces so that the top piece * is under * the piece below.”?
instead of:
“On left and right hand strips, overlap the pieces so that the top piece covers the piece below.”
HI Carolyn,
Thanks for your note! You are right and it is now corrected!
I love quillows! My grandmother made quillows for all the grandkids one year for Christmas. Mine had to be retired years ago, it had gotten pretty ratty, so this project is definitely getting added to my sewing queue.
I love this project. Could the finished blanket be hand or machine washed?
A great tutorial, thank you. For those who like sewing to help others, this is a great project to make for shelters, hospices, etc. — portability and warmth combined.
it really is pretty . I was thinking it might be nice to finish off the edges even though the wool wont fray- how about an easy blanket stitch in a nice bright colour?
love this project, thanks for sharing it!
so tell us about the felt is it soft or itchy cause I need to make one of these so beautiful!
Hi Lisa-
The felt is very soft but it is wool so if you're sensitive to wool it might feel a bit itchy.
Thank you for your comment!
– Molly
Gorgeous! My grandmother made us all “reading quillows” when we were younger and I'm glad to see a more modern take on them. That wool is absolutely gorgeous.
If you sew the pocket to bottom piece of the middle row, you have a conveniently placed pocket in which to stick your feet while laying under the quilt. Not sure if that makes the seams too bulky in this case, I can think of only one way to find out!
If I were to try this quillow in a larger size (add another row of squares for a total of 12), would the folded blanket still fit inside of the pocket?
Hi Hannah-
We haven't tried this, but I believe it would work.
Thanks for your question!
Molly
My new favorite! I coupled the blackberry with the wagon wheel (for contrast) and made a larger version of this that I love! I think this is going to be my go-to home-made gift for nieces and nephews in 2012. It's a nice practical gift that they will use and hopefully take with them as they grow (camping, college, etc.)
Hi,
Thank you for another beautiful project!
I'm getting started, and I'm a little confused in the “Squaring Up” section. It says, “Place the square grid ruler along the bottom edge of the short side of the wool piece with its left edge about 5-inches from the left edge of the piece of felt as shown above.” It doesn't look like 5 inches from the left edge in the photo– is this supposed to be .5 inches?
Is there a difference between felted wool and wool fabric? I would like to make this and have some wool fabric; if so, what modifications or sewing techniques should I apply?
Hi Rebecca-
Felted wool is wool that has been woven and then felted. It is matted together so that it won't fray when cut. If you'd like to use regular wool I would recommend felting it first by washing and drying it in the washing machine.
And just to be clear, neither of these is to be confused with wool felt which is produced by pressing the fibers together results in a stiffer fabric.
Thanks for getting in touch!
Molly
Hello. This is a beautiful project. I too love the colours! I have a bag of old cashmere jumpers which I hane cut into pieces. Would I be able to use the same sewing technique to join the pieces even though it is not felted?
I am trying to make a blanket which looks the same both sides. Thank you emma
Hi Emma,
Thanks for reaching out. I think that this technique will probably work for un-felted fabric, but you may see some frayed edges on both sides! Another idea to make a blanket that’s the same on both sides would be to piece two identical quilt tops, and then use one as the backing fabric, instead of a contrasting fabric!
All the best,
Lili