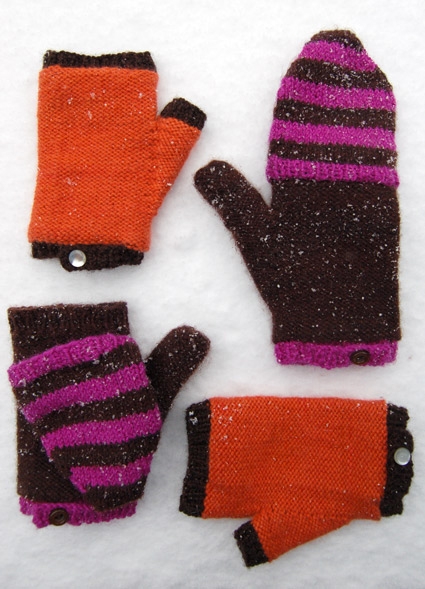
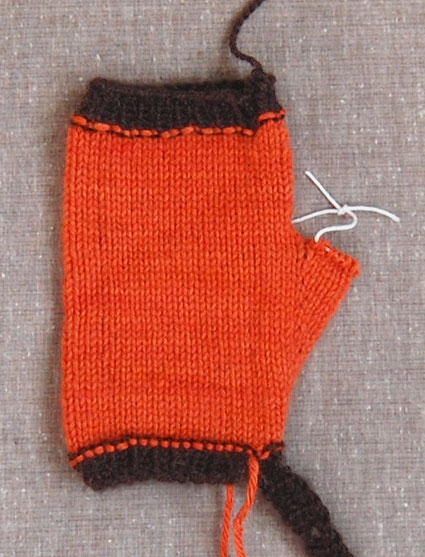
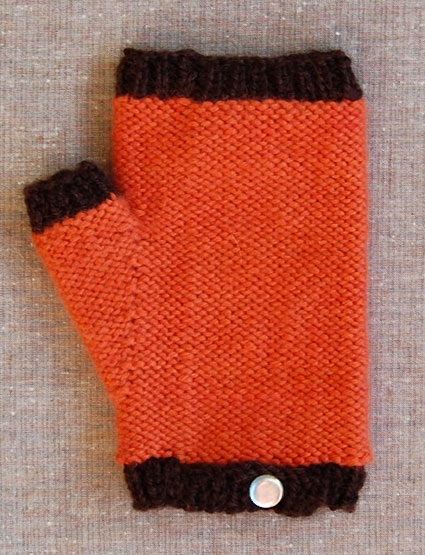
Hand Warmers and Flip Top Mittens
Since making the Cashmere Fingerless Gloves, we’ve had lots of requests for slight pattern alternatives. I agree that no one pattern can answer all of our hand-warming needs, so I came up with a couple of variations on the original theme: Hand Warmers and Flip Top Mittens.
The Hand Warmers eliminate the challenge of knitting the fingers without sacrificing the elegance of the original pattern. And the Flip Top Mittens do the double duty of warming cold fingers on some days and liberating busy fingers on others. Both patterns still use only one skein of Jade Sapphire’s amazing 6 ply cashmere and one skein of Blue Sky Alpaca’s Sportweight Alpaca.
Now we can all be equipped for whatever circumstances come our way: unseasonably warm weather in New York or snowstorms in Seattle!
To make the original version please revisit our Cashmere Fingerless Gloves Project Journal. Or to explore new options just keep on reading. Thanks! –Whitney
Designed by Purl Soho designer, Whitney Van Nes.
Share your progress and connect with the community by tagging your pics with #PurlSoho, #PurlSohoBusyHands, and #PurlSohoHandWarmersAndFlipTopMittens. We can’t wait to see what you make!
Materials
Hand Warmers
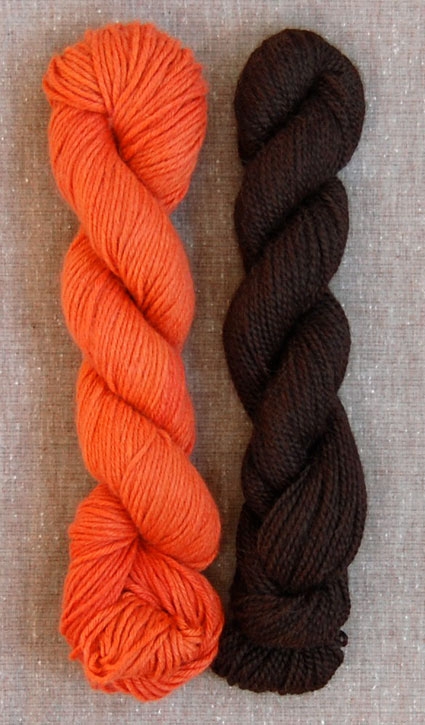
- 1 skein of Jade Sapphire’s 6 ply Cashmere, 100% mongolian cashmere. This color is called “Blood Orange”. (NOTE: We no longer offer Jade Sapphire’s Zageo 6-Ply Cashmere, but choose from one of our other light worsted/dk weight yarns.)
- 1 skein of Blue Sky Alpaca’s Sportweight Alpaca, 100% baby alpaca. This is “Molasses” #541.
- A set of US size 4 double pointed needles
- A set of US size 5 double pointed needles
- 2 buttons about ½-inch in diameter
FLIP TOP MITTENS
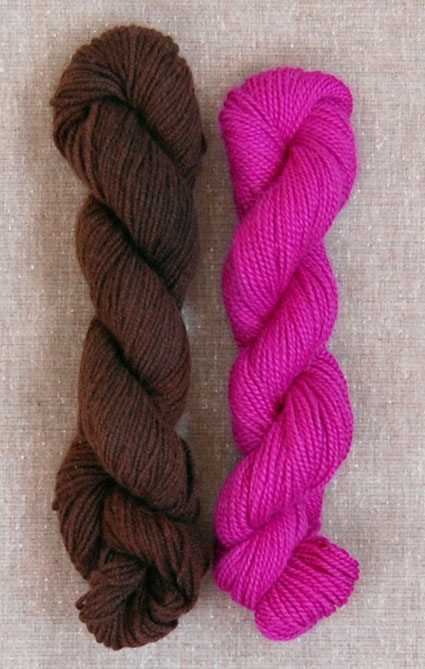
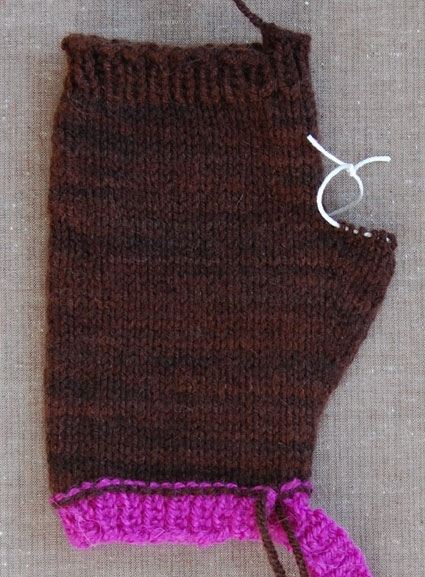
- 1 skein of Jade Sapphire’s 6 ply Cashmere, 100% mongolian cashmere. This color is “Black Walnut”. (NOTE: We no longer offer Jade Sapphire’s Zageo 6-Ply Cashmere, but choose from one of our other light worsted/dk weight yarns.)
- 1 skein of Blue Sky Alpaca’s Sportweight Alpaca, 1005 baby alpaca. This is “Fuchsia” #530.
- A set of US size 4 double pointed needles
- A set of US size 5 double pointed needles
- 2 buttons about ½-inch in diameter
Gauge
24 stitches = 4 inches in reverse stockinette
SIZE
Finished Palm Circumference: 7 inches, to fit average woman’s hand
Note
The first half of this pattern is identical to our Cashmere Fingerless Gloves pattern. The written instructions are reprinted here, but if you would like to view the photos of each step, please click on this link.
Pattern: Hand Warmers
RIGHT HAND WARMER
Cuff
With the Contrast Color (CC), cast 53 stitches onto a US 4 needle (For this step you can use 2 double pointed needles, straight needles or circular needles.)
Row 1: K1, *p1, k1, repeat from * to end of row.
Row 2 (buttonhole row): K2, p1, *k1, p1, repeat from * to last 6 stitches, k2tog, yo, k1, p1, k2.
Row 3: Repeat Row 1.
Row 4: K2, p1, *k1, p1, repeat from * until there are 41 stitches on the right needle and 12 stitches on the left needle, bind off the last 12 stitches.
Cut the yarn and pull the tail through the last stitch. (41 stitches remain)
Hold the needle so the buttonhole tab is to the left. With a US 5 double pointed needle and the Main Color (MC), purl 1 row.
Distribute the 41 stitches onto three US 5 double pointed needles.
Join into the round with a knit stitch.
Knit 10 rounds.
Gusset
Next Round: Knit to 5 stitches before the end of the round, place a marker, m1R, k1, M1L, place a marker, knit to the end of the round. (43 stitches)
Knit 2 rounds.
Next Round: Knit to the first marker, slip the marker, M1R, knit to the next marker, M1L, slip the marker, knit to the end of the round. (2 stitches increased)
Repeat the last 3 rounds until there are 15 stitches between the markers (55 stitches total).
Knit 1 round.
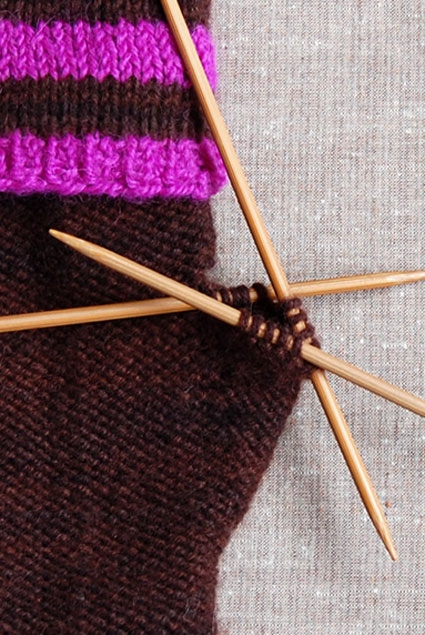
Separating The Thumb
Next Round: Knit to the first marker, put the 15 gusset stitches onto scrap yarn (removing the markers), use the Cable Cast On to cast on 2 stitches, knit into the next stitch to join the round,and knit to the end of the round. (42 stitches)
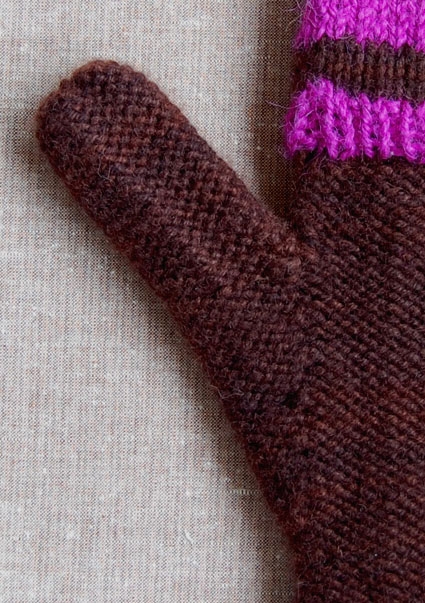
Knit every round until the glove reaches the base of your pinky, or for about 1½ more inches.
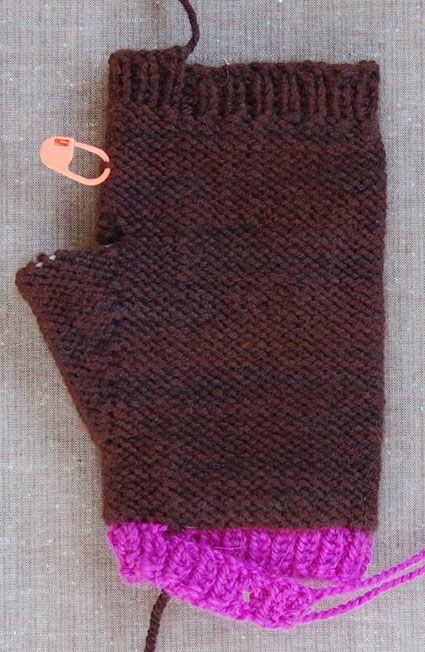
Top Cuff
NOTE: This is where the pattern is no longer exactly the same as the Fingerless Gloves…
Changing to US 4 double pointed needles and the CC, purl 1 round.
Next round: *K1, p1, repeat from * to end of round.
Repeat last round 3 more times.
Bind off in rib pattern.
Thumb
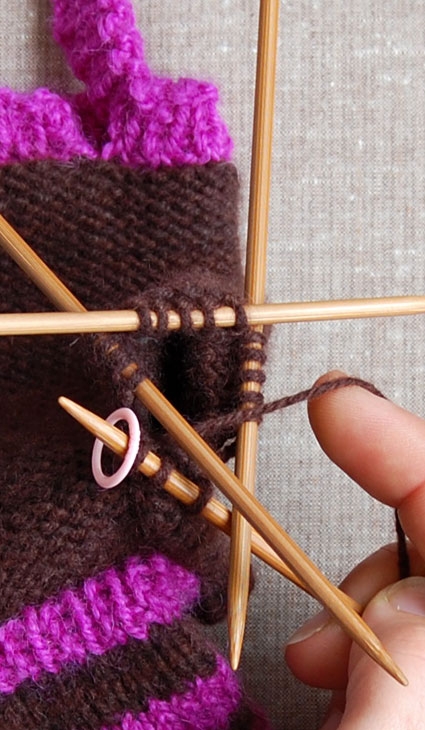
Turn the hand warmer right side out (so the purl side is showing), and put the 15 thumb stitches onto three US 5 double pointed needles.
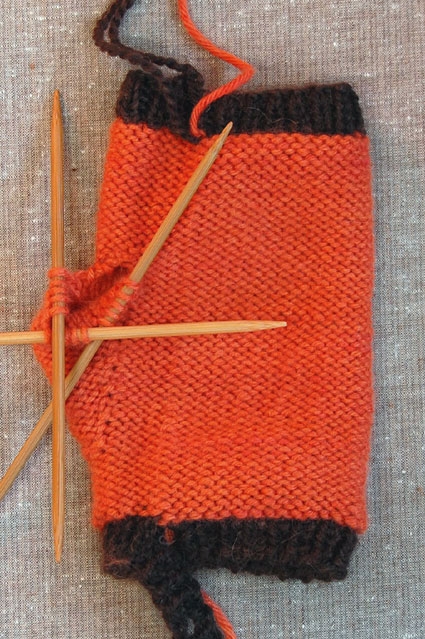
Pick up 3 stitches from the base of the thumb and place a marker. (18 stitches)
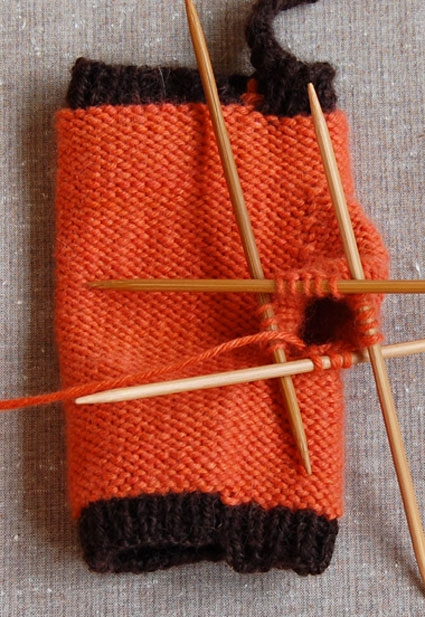
Purl 3 rounds.
Change to US 4 double pointed needles and the CC.
Knit 1 round.
Next round: *K1, p1, repeat from * to end of round.
Repeat the last round 3 more times.
Bind off in rib pattern.
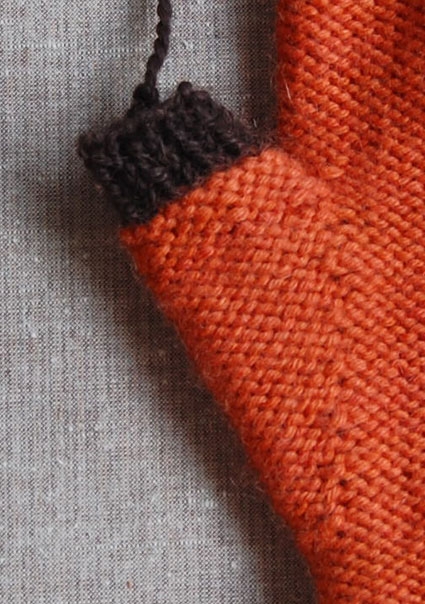
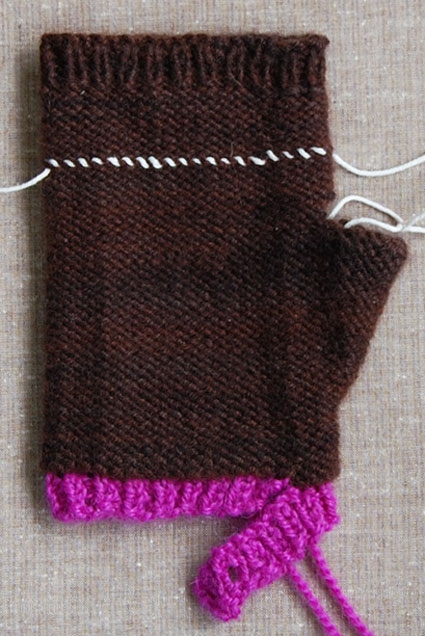
Sew the inside edge of the cuff to the buttonhole tab, and attach a button under the button hole.
Finally, weave in the all ends…
LEFT HAND WARMER
NOTE: Again, most of the left Hand Warmer is the same as the left Fingerless Glove. Those written instructions are reprinted here, but if you’d also like to see the pattern’s photos, please visit the Cashmere Fingerless Gloves Project Journal.
Cuff
With the CC, cast 53 stitches onto a US 4 needle.
Row 1: K1, *p1, k1, repeat from * to end of row.
Row 2 (buttonhole row): K2, p1, k1, yo, k2tog, *p1, k1, repeat from * to last stitch, k1.
Row 3: Repeat Row 1.
Row 4: Bind off 12 stitches, slip the stitch left on the right needle back to the left needle. Change to a US 5 double pointed needle and the MC, purl to the end of the row. (41 stitches)
Distribute the stitches on three US 5 double pointed needles.
Join into the round.
Knit 10 rounds.
Gusset
Round 1: K4, place a marker, m1R, k1, m1L, place a marker, knit to the end of the round. (43 stitches)
Knit 2 rounds.
Next round: Knit to marker, slip the marker, m1R, knit to next marker, m1L, slip the marker, knit to the end of the round. (2 stitches increased)
Repeat the last 3 rounds until there are 15 stitches between the markers (55 stitches total).
Knit 1 row.
Finish
Continue to knit the left Hand Warmer exactly how you made the right, starting with the “Separating the Thumb” section.
Pattern: Flip Top Mittens
RIGHT MITTEN
Begin by following the pattern for the right Hand Warmer (above). End with knitting 1½ inches to the base of the pinky (to the “Top Cuff” section of the pattern).
Top Cuff
Change to US 4 double pointed needles.
Next round: *K1, p1, repeat from * to end of round.
Repeat last round 3 more times.
Bind off in rib pattern.
Flip Top
Turn the knitting right side out (so the purl side is facing you).
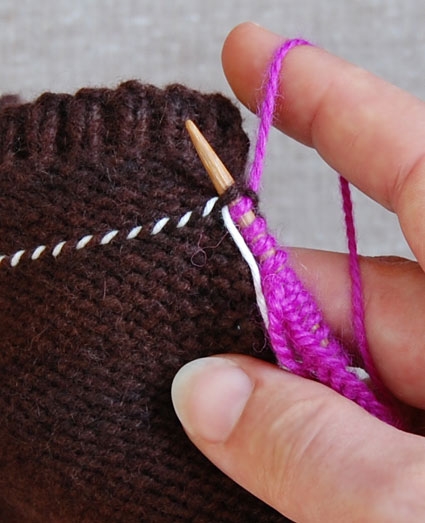
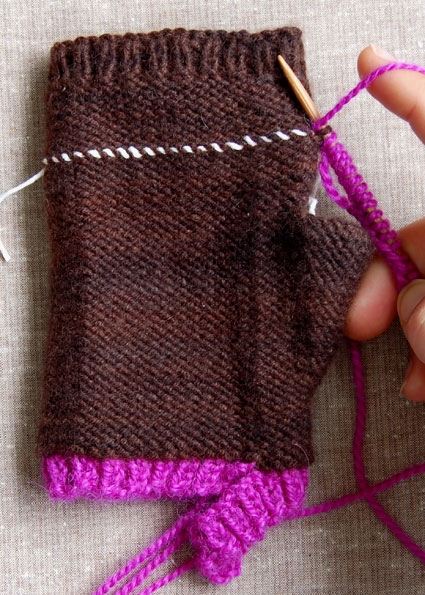
Mark a purl stitch along the left side of the palm, half way between the base of the thumb and the top of the cuff.
With a piece of scrap yarn, sew under 21 purl stitches in a straight line from the marked stitch across the back of the hand warmer.
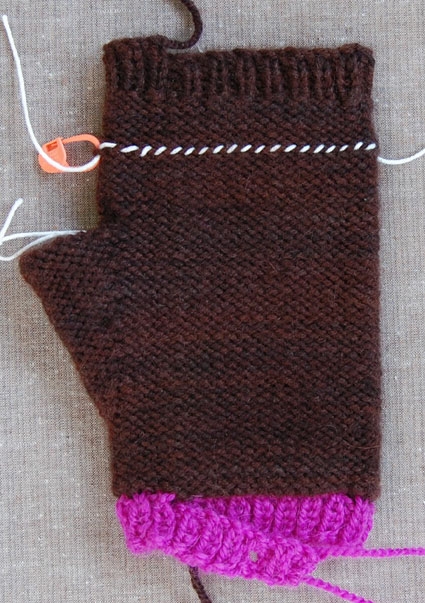
With a US 4 double pointed needle and the CC, cast on 21 stitches.
Then, starting at the pinky side of the scrap yarn, pick up and knit each purl stitch marked by the scrap yarn (removing the scrap yarn and the stitch marker as you go). (42 stitches)
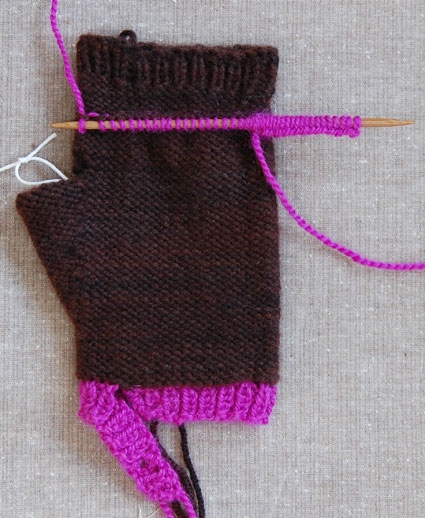
**Distribute the stitches onto three US 4 double pointed needles, and placing a marker, join for working in the round.

Next Round: *K1, p1, repeat from * to end of round.
Repeat the last round 3 more times.
Changing to US 5 double pointed needles,
Knit 5 rounds with the MC.
Knit 5 rounds with the CC.
Repeat the last 10 rounds.
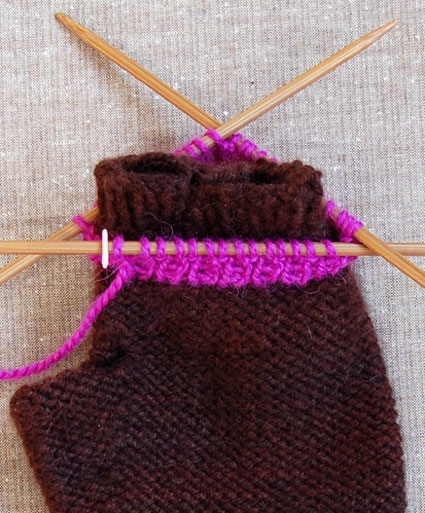
Next Round: With the MC, k21, place a marker, k21.
Decrease Round: K2tog, knit to 2 stitches before the marker, ssk, slip the marker, k2tog, knit to 2 stitches before the end of the round, ssk. (4 stitches decreased)
Knit 1 round.
Repeat the last 2 rounds while continuing to knit 5 rounds of the MC, followed by 5 rounds of the CC.
When there are 14 stitches left, knit 1 round.
Arrange the first 7 stitches onto one needle and the last 7 stitches onto another needle.
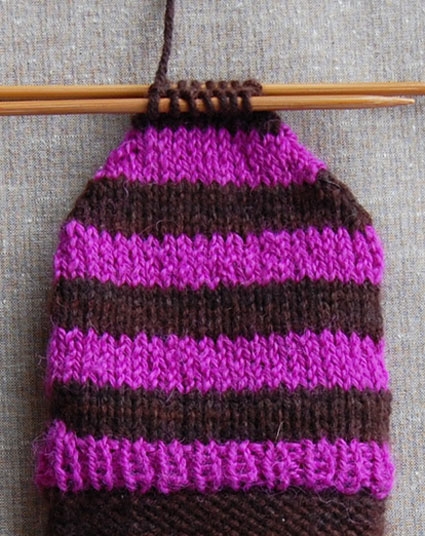
Use the Kitchener Stitch to graft the ends of the mitten together.
Thumb
Put the 15 thumb stitches onto three US 5 double pointed needles.
Pick up 3 stitches from the base of the thumb and place a marker. (18 stitches)
Purl every round for about 2¼ inches (or until the thumb reaches the top of your thumb when you try the mitten on).
Cut the yarn and thread it through the 18 stitches. Thread the yarn through the top of the thumb to the inside of the mitten.
Now sew the inside edge of the cuff to the buttonhole tab, and attach a button under the button hole.
And, weave in the all ends…
LEFT MITTEN
Begin by following the pattern for the left Hand Warmer (above). End with knitting 1½ inches to the base of the pinky (to the “Top Cuff” section of the pattern).
Then follow the Top Cuff instructions for the Right Mitten.
Flip Top
Turn the knitting right side out (so the purl side is facing you).
Mark a purl stitch along the right side of the palm, half way between the base of the thumb and the top of the cuff.
With a piece of scrap yarn, sew under 21 purl stitches in a straight line from the marked stitch across the back of the hand warmer.
With a US 4 double pointed needle and the CC, cast on 21 stitches.
Then, starting at the thumb side of the scrap yarn…
…pick up and knit each purl stitch marked by the scrap yarn (removing the scrap yarn and the stitch marker as you go). (42 stitches)
Continue to work the left mitten the same way you knit the right mitten, starting from the point in the right mitten pattern marked by ** (ie “Distribute the stitches onto three US 4 double pointed needles…”). Just follow the right mitten pattern until, voila! two mittens!


I know this might be a stretch to ask this question and expect a response, but what changes would i need to make to make the flip top mittens for men? I wanted to make some for my brother to bear the biting winters in Boston. Either way, I’ll be making a pair for myself, though I’m not sure if I’ll have a real opportunity to wear them. I live in Alabama! 🙂 Thank you for the pattern!
Awesome! I’m not sure I have enough experience to make these, but I’m sure going to give it a try. Your great photos will help a lot. LOVE them!!!!!
Hi,
This is awesome, Thank you very much for the details of doing this item. Your explanations and photos are very clear and easy to understand. I’m new in this area, but will give it a try and make as a gift to my fren.
This hand warmer pattern is one that I had been looking for. Thank you and I am anxious to get started making one.
I have been looking for a pattern like this in a toddler size. Do you happen to have one? I haven't been able to find one to buy or for free in the size that I want.
Hi Alicia,
I found this cute pattern online for Playground Mittens: http://crossroadknits.blogspot.com/2007/01/playground-mittens.html . I'm not familiar with the blog and haven't tried the pattern, but I think this is, at least, a good starting point!
Thanks for your question!
Whitney
Thank you so much for this awesome pattern. I had a go at it and the instructions were so easy to follow – http://melodytan.blogspot.com/2010/08/flip-top-mittens.html
I love my gloves 🙂
Trying to simply instructions for a young knitter. Can handwarmers be made on straight needles?
Trying to simply instructions for a young knitter. Can handwarmers be made on straight needles?
Hi Shirley-
Yes, hand warmers can be made on straight needles but we wouldn't recommend it with this pattern. Our Purl Soho Hat and Handwarmers kit for beginners contains a great pattern for handwarmers knit on 2 needles: https://www.purlsoho.com/purl/products/item/9273-Purl-Soho-Hat-and-Hand-Warmers-for-Beginners
Thank you for your question!
Molly
Can you please tell me what the abbrv. of ssk is please.
Hi Diane-
Please check out our Terms and Tutorials page for a full explanation of SSK:
https://www.purlsoho.com/create/knitting-terms-tutorials/
Thank you!
Molly
Did you use the larger needles to get the gauge? I assume is the larger needle.
Hi Lily-
Yes that’s correct! But keep in mind that the listed needle sizes are always just a suggestion. Everyone knits differently so the most important thing is that you get the correct gauge.
Thanks for getting in touch!
Molly
Hello, I just bought a skein of Purl Soho’s Flax Down because I was interested in making the Arched Gusset Mittens, but am now considering making these instead. Do you think it would be do-able to use the flax down instead of cashmere? Would I need to do anything to the pattern to make it work? Thank you!
Hi Natalia,
Thank you for the comment! I think the flax down would be a great yarn substitute for this pattern. It is slightly heavier but I think it will knit up nice and tight on a US 5 needle like the pattern calls for. I do always recommend doing a small gauge swatch whenever substituting yarn just to try and get the proper stitches per inch and decide the best needle size to use!
I hope this helps and feel free to respond if you have anymore questions!
Happy Knitting!
Jake