Elisa’s Nest Tote

This pretty tote bag was designed by Elisa, an Italian knitter and blogger who saw the Climbing Trellis Lace Pattern here on the Purl Bee. She calls it her “No More Plastic Bag, Thank You!” It is a fast knit that takes only a few hours to complete.
Elisa’s Nest Tote can be made from just about any cotton yarn (linen or hemp yarn work nicely, too). The stretchy lace stitch makes this bag practical and quite durable.
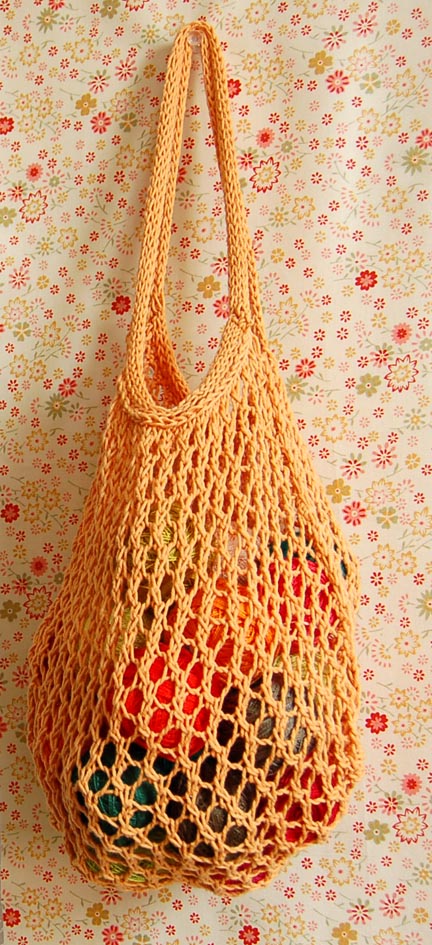
We would choose this dainty and durable tote over a plastic bag any day!
Share your progress and connect with the community by tagging your pics with #PurlSoho, #PurlSohoBusyHands, and #PurlSohoElisasNestTote. We can’t wait to see what you make!
MATERIALS

- 1 skein or approximately 175-200 yards cotton yarn. We used Rowan 4-ply Cotton in Tutti Frutti
- A pair of needles a few sizes larger than recommended for your yarn. We used US 9 (5.5 mm) needles.
- A set of double pointed needles in the size recommended for your yarn. We used US 3 (3.25 mm) needles.
- A crochet hook in the size recommended for your yarn. We used a 3.5 mm hook.
SIZE
Finished Dimensions: 8 inches wide x 12 inches long when
NOTE: Depending on the size of the yarn you use, the bag may be bigger or smaller, and it will stretch when filled.
NOTES
k2tog decrease; knit two stitches together
psso pass slipped stitch over
ssk decrease; slip, slip, knit
yo increase; yarn over
Check out our Decrease Tutorials for help with the techniques used in this pattern.
You can learn more about I-Cords in our I-Cord Tutorial.
Pattern
DOWNLOAD THIS FREE PATTERN!
Here’s a copy of Elisa’s Nest Tote for you to keep. Enjoy!
With larger needles, cast on 41 stitches. We used a basic Long Tail Cast On.
Rows 1 and 3: Purl.
Row 2: K1, *yo, k2tog, repeat from * to end of row.
Row 4: *Ssk, yo, repeat from * to last stitch, k1.
Repeat Rows 1 – 4 until fabric measures approximately 24 inches, or twice desired length of the finished bag.
Bind off loosely.
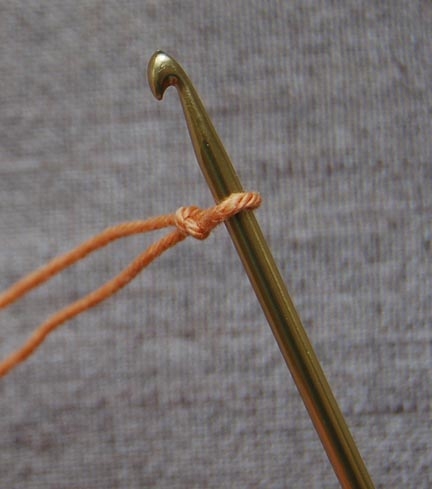
1. Fold the bag in half, right sides together so that the cast on and bind off edges form the top of the bag. You will join together the parallel long edges of the bag using a crochet hook.
2. Using a 1 yard length of the same yarn that you used to knit the bag, make a slip knot on the hook. Leave a 6 inch tail of yarn.
3. Insert your crochet hook under the loops of the first edge stitch on the front side, at the corner with the top edge of the bag. Then insert the hook through the first edge stitch on the back side.
4. Wrap the yarn around the hook, then draw the hook back through the two edge stitches. You now have two stitches on the hook.
5. Wrap the yarn around the hook and draw it through both stitches on the hook. You have just one stitch on the hook now.
Continue joining the front and back edges of the bag, repeat steps 3 – 5 along the length of the bag. When you reach the bottom of the bag, where the knitted fabric is folded in half, draw the remaining yarn all the way through the final stitch to secure it.
Weave in your ends using a tapestry needle or your crochet hook.
Repeat for the second side of the bag.

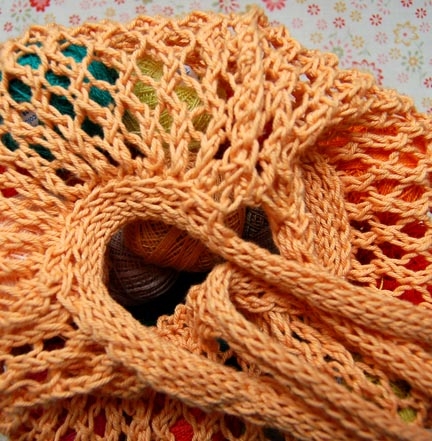
This Applied I-Cord makes a nice finished edge for the top of the bag and a strong handle, too! You’ll need only two of your double-pointed needles, plus a tapestry needle for joining the circular handle together.
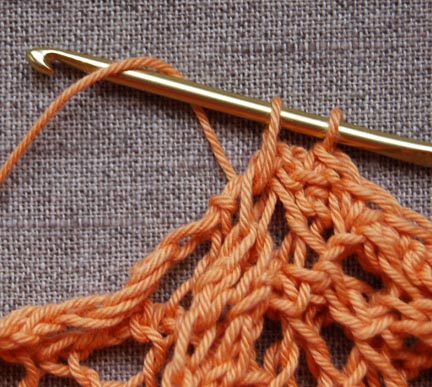
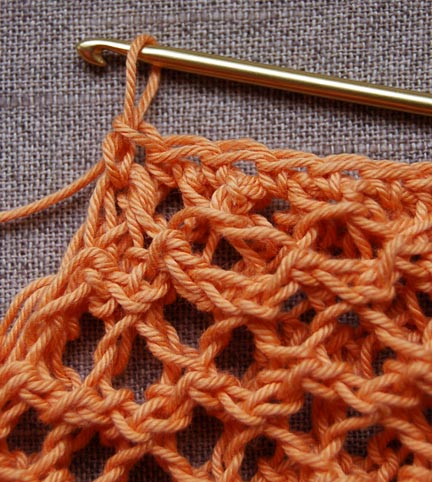
APPLIED I-CORD BORDER
With smaller needles, cast on 6 stitches.
Round 1: K5, sl 1. Beginning at the right front edge of the top of the bag, pick up one stitch and place it on the left needle. Knit it onto the right needle, then pass the slipped stitch over it and off the right needle. You have six stitches on the right needle, and the yarn is coming from the last stitch on the left, closest to the point of the needle.

Round 2 Preparation: Without turning the needle, slide the stitches down the needle to the opposite end and move the needle to your left hand. The yarn is coming from the last stitch on the left, now furthest from the point of the needle.
Round 2: K5, sl 1. Pick up the next edge stitch and place it on the left needle. K1, psso.
Repeat Round 2 until all of the edge stitches along the front of the bag have been incorporated into the I-Cord.

I-CORD HANDLE
Once you have completed the Applied I-cord Border, continue knitting the I-cord handle until you reach the desired length. Remember that the handle will stretch a lot when the bag is full. For a hand bag, we recommend knitting an 8 inch long I-cord handle; for a shoulder bag, knit until the I-cord is approximately 16 inches long.
JOIN BEGINNING AND END OF I-CORD USING KITCHENER STITCH
Kitchener stitch is a seamless way to join “live” stitches, or stitches that are still on the needle. For this project, one end of the I-cord is live, but the other end is the cast on edge. To set up for Kitchener stitch, pick up six stitches from the cast on edge on one needle. Now you have six stitches on each needle.

1. Break the yarn, leaving a 20 inch length. Thread it onto a tapestry needle.
2. Hold the needles parallel, so that the stitches on the front needle come from the I-cord border, and the stitches on the back needle come from the I-cord handle. The yarn is coming from the first stitch on the back needle.
3. Draw the tapestry needle through the first stitch on the front needle, as if to purl. Leave the stitch on the knitting needle.
4. Draw the tapestry needle through the first stitch on the back needle, as if to knit. Leave the stitch on the knitting needle.
5. Front Needle
a. Draw the tapestry needle through the first stitch on the front needle as if to knit. Slip the stitch off the knitting needle.
b. Draw the tapestry needle through the following stitch on the front needle as if to purl and leave it on the knitting needle.
6. Back Needle
a. Draw the tapestry needle through the first stitch on the back needle as if to purl. Slip the stitch off the knitting needle.
b. Draw the tapestry needle through the following stitch on the back needle as if to knit and leave it on the knitting needle.
Repeat Steps 5 and 6 for remaining stitches.
Draw the yarn through the last stitch to secure it, then weave in the tails.
MAKE SECOND HANDLE
Knit the Applied I-cord Border and I-cord Handle for the back of the bag. Make sure the handles are the same length!
We hope you use your Nest Bag for groceries, books, yarn, and all the bits and pieces that make up your life. Enjoy!


love it! thank you.
Thank you for this pattern. I am on my second bag!
That is pretty, will have a go at this sometime.
I’m 16″ into the 24″ that I have to knit! I’m getting near the end! It’s a fun pattern, as long as you don’t forget any yarnovers! LOL!
Thank you for the pattern! I found the reference to your site in my newspaper (The Daily Breeze) here in the Los Angeles area. california is currently moving to ban plastic shopping bags that we have gotten into the habit of using — but which are now clogging our landfills. So this is a great pattern to use for me to make my own shopping bags. By the way — your site is beautiful.
Happy Knitting!
I must be a moron but I really don’t see the pattern, can someone send me the link. This is adorable
Hi Jodi,
You can find the full pattern by clicking on this link:
https://www.purlsoho.com/create/elisa-nest-tote/
I just finished my first bag and I made it out of some old scrap yarn and it is wonderful, so you are definitely not limited to a cotton. This was also my first I-cord and I love it…gonna go I-cord crazy now. Thanks for such a great pattern.
I love the idea of ridding the world of plastic bags, but I just finished my one and only nest tote. I’m satisfied with the result, but this took me a VERY long time, and I’m not a beginner. I just thought knitters should know that it will probably take more than “a few hours.” Now I need to find something to do with the other 6 skeins of Rowan 4 ply cotton that I bought. Any ideas?
Thank you for the link. This was my first time on the site, what a great page for info!!
Kim
Thank you so much for this pattern! It only took me three days to knit and I’ve only been knitting for three months. I got to work on my crocheting, i-cord, and other skills, and it wasn’t tough to make at all. I am in love with the bag. It’s so beautiful!!!!! I prance around my house wearing it becasue I love it so much. Thanks again!!!!!
Thanks for the great pattern! Made 2 for a bridal shower and was sad to see them go. Now it’s time to make some for myself – any tips on making a bigger opening to fit a big ol box of cheerios into it? Thanks again!
mine came out with lost of stiches, question, with the ssk i looked on line do you slip , slip and then knit thoses two together for a decrease, that would make sence but the pattern didnt say to knit the two slip stiches together, i am so confused,, help me quick..
I started this bag the other day and somehow I keep adding more and more stitches! I start with 41 stitches….does anyone know how stitches there are supposed to be in the following rows? Thank you for any answers in advance!
Hi Rin,
You should have 41 stitches the whole time you knit the bag. It sounds like you might be doing something funny with your yarn overs. Make sure that you're just bringing the yarn forward into the purl position and then doing the k2tog's or ssk's. Remember that you don't really “knit” a yarn over; it's created by what you do after it!
Please let us know if you're still having problems and thanks for your question!
Whitney
I made this and I love it. I lined the inside and changed the handle a bit. You can read about here if you want: http://landlocked-art.blogspot.com/2011/10/nest-tote.html
Candace, your lined bag is GORGEOUS!!
Thanks so much for this pattern! I made a smaller tote as a handbag, but I found the opening really small after knitting the I-cord handles (I do love the I-cord!!). Could this be because the needles I used were too small? Thanks for any advice!
Hi Bear,
It's possible your needles were too small, but more likely that you didn't pick up enough stitches as you knit the handle. Picking up too few stitches will result in a pretty tight opening which is no good for grapefruits and cabbages!
Thanks for asking!
Whitney
I don't see how this makes a cord at all. What I've got following these instructions is a flat border piece with a big chunk of yarn running across the back between rows.
Hi Angela,
I'd love to help, but I'm not sure where you're encountering problems. Is it with the Attached I-cord? Have you checked out our tutorial? It's right here: https://www.purlsoho.com/create/attached-i-cord-tutorial/2008/1/23/attached-i-cord-tutorial.html
Otherwise, if you can be more specific with your situation, I'm sure we'll work it out!
Thanks!
Whitney
Hello, when I found your site and then this pattern I thought great- must give this a go. Have tried to get started ( even purchased the exact same wool as described – rowan 4 ply cotton 'tutti frutti'), but I am struggling much like a previous post to maintain 41 stitches. Even so the bag still looks quite small – am really not sure what I am doing wrong here, any input gratefully received thanks vicki
Hello Vicki.
Can you explain to me what you mean about maintaining 41 stitches.
Laura
Hi Laura, I cast on 41 as indicated and then having read an earlier comment, got the impression that I should always have 41 stitches ( in other words maintain my cast on number of stitches throughout the piece) … Is this correct? I seem to have 41 then get an increase to over 50 + stitches which sort of felt wrong but I am at a loss to know why this is so. Thanks
superbe superbe quelle chouette ide (very good idea !!!)
Love this pattern! Bag turned out beautiful! Going to be making these for Xmas gifts. Thanks!
Some how, even though I think I’m following the pattern (but obviously I’m doing something wrong, lol), I keep ending up with only 39 stitches at the end after Row 4. Any ideas what I am doing wrong?
Hello Anna!
Lace can definitely be tricky! You should never be increasing or decreasing any stitches in this pattern, since for every decrease stitch (k2tog or ssk) there is a yarn over. These should cancel each other out so that at the end of each row you are still left with 41 stitches. I would imagine you might have forgotten two yarn overs or accidentally dropped one and forgot to knit it.
Hope this helps!
Alyson
Hi, love this bag! I am wondering if I can make this with circular needles by casting on 82 stitches? That way I would only have to seam the bottom?
Hey Bonnie,
Thank you for the comment! Knitting this pattern in the round is a great idea! A cast on of 82 would be good. I would recommend doing 3 rows of knitting before going into the stitch pattern to allow for seam allowance. Since you will be knitting this in the round and not turning the work the stitch pattern will change slightly. Simply change rows 1 and 3 to rows of knitting rather than purling.
I hope it all works out and don’t hesitate to write back with more questions!
Happy Knitting!
Jake
Hello, after the 2nd row I end up with 42 stitches, is this right?
Hi Karen,
Thank you for your question! You should end each row with the same number of stitches (41 stitches). Row 2 reads: K1, *yo, k2tog, repeat from * to end of row. Each yo creates 1 stitch and each k2tog removes one stitch. They effectively cancel each other out while creating the netted texture of this tote.
I hope that this helps and happy knitting!
Cassy
Hi, for the seaming in single crochet, is each stitch supposed to be every other row or every row. It seems like every row you end up with a wavy, flaring edge, which makes sense so that the bag can stretch long, but based on the photos, it looks like it may be every other row? I have 39 repeats of the 4 row pattern, so folded in half, that’s 19 repeats per side. 19 multiplied by 4 is 76, which is exactly how many stitches I made in single crochet down one side. Waiting to do other side until I hear back from you. Thanks in advance!
Hi Susan,
For the seaming, you are doing the single crochet in each stitch.
I hope this helps,
Melissa
It is not clear to me if I need to knit one stitch before yo,or do yo directly after decrease.thanks.
Hello Hana,
Thank you for reaching out! You will be doing your YO directly after your decrease stitch.
Happy knitting!
-Marilla
thank you Marilla for quick answer. Here is my another problem,): if I follow the instructions for row 2, there still lefts one stitch, should I knit it, or make YO? the same in row 4, in the end of the row ther left two stitches, should I make ssk, or just knit it? I really want to knit this bag and already cast on maybe five times (once in round and the pattern still does not look as on picture). thanks.
Hello Hana,
Great question, I hope I can help! When you are knitting row 2 you must knit your first stitch and then begin your “Yarn Over, Knit two Together” pattern. This means that on row two you will end with a k2tog. On Row 4 you start your “Slip Slip Knit, Yarn Over” repeat right from the start, which means you will have one stitch at the end which you will knit. This means on row two you knit the first stitch and on row 4 you knit the last stitch.
I hope this clears thins up for you and let me know if this doesn’t make sense!
Happy knitting,
Marilla
Ok,my tote bag is finished, I didn’t make yo at the end of the row, but I finally found out my mistake. The result is bit smal, I think now I will try bigger in the circle (I dislike sewing parts together). At the end I must say the pattern is clear. Thanks for answers.
SSK…was very confusing and not clear as the link to the tutorial did not work. However after googling for help I discovered all it means is knit 2 tog through the back loops of the stitch therefore decreasing, then yarn over creates another stitch to even it out.
This results in the decrease stitch angle is opposite to k2tog…
This creates the alternating rows creating a zig zag effect. Hope this helps anyone who is giving it a go many years after it was written.
Thanks for the pattern….
Hi Jo,
Thanks for reaching out! We are sorry about the broken link! We have now fixed it but please do not hesitate to let us know! We are always happy to help!
SSK stands for slip slip knit. You will slip 1 stitch knitwise from front to back then slip one purlwise from back to front. You will then take the tip of your left needle and slide it into the front of those 2 slipped stitches and then knit them together as normal! This creates a left leaning decrease whereas the k2tog decrease is a right leaning decrease!
I hope that this helps!
Cassy
Hello, I want to thank you for this beautiful pattern and also ask you a couple questions if you don’t mind. I learned a couple new things from doing this pattern (the I-cord and the kitchener stitch.
But, please, how do you know where the first stitch is to start your I-Cord border on. (Is it the big holes that are created or is it one of the little stitches across the top)? I use the little stitches across the top, so needless to say I must have had like 50 stitches at least across the top of one side making the I-cord border with. I ended up with a very gathered fabric edge under the border. Also, when picking up stitches when making the i-cord, do I pick up the top of the yarn across the top of the large holes or like I said, (the stitches across the top rim which I had a hard time distinguishing between). Still looks fine, but thinking I did something wrong though. Also, when making the I-cord how taught must I keep my yarn. In the tutorial on youtube it says keep tugging on the threads, which I did (but my hands hurt after pulling them tight constantly). One time, I was pulling my threads so tight that one of my needles went flying across the room out of my project and had a hard time picking up the dropped stitches. Your bag is beautiful, that is why i’m making the effort to get it right for the next one I would love to make. many thanks, paula ps. also, all the comments under your pattern helped me, so I thought maybe the answer to my questions might help others. regards, paula
Hi Paula,
Thanks for reaching out, and I’m so glad to hear how much you enjoyed knitting the Nest Tote! It does sound like you picked up the stitches for the applied i-cord correctly – if you look at the first picture in the “Applied I-Cord Border” section of the pattern, it will show you where the stitches should be picked up, which is under each cast off or cast on stitch on the very edge of the bag. A gathered look at the top is normal! You should only have to give your yarn a little tug when working the first stitch of each I-Cord row. This ensures that the back of the i-cord pulls shut neatly, but you don’t have to keep up a constant tighter than normal tension. It is possible that if you were striving to knit your I-Cord as tightly as possible the edging turned out extra gathered because of that extra tension! However, I’m sure it looks beautiful and hopefully these tips will help for next time!
Happy knitting!
Julianna
Hello,
Do you have crochet pattern? I am not good in knitting ?
Thank you in advance.
Hi Siti,
Thanks for reaching out! I would recommend either our Crocheted Linen Grocery Tote or Linen Market Bag – both are quite similar to this knitted tote!
Best,
Julianna
Is it possible to knit this tote in the round and if so, what changes would be needed? I’m a new knitter so I need a little more guidance than most!
Hi Kim,
Thanks for writing in, and I hope you’re enjoying venturing into the world of knitting! Unfortunately, we don’t have instructions for knitting this tote in the round, but you may be interested in our Knit Linen Market Bag instead! The lace pattern is quite similar and the pattern is already designed for knitting in the round.
I hope that helps, and happy knitting!
Julianna
If you go on Ravelry (knit & crochet website) and look up this pattern (just search for “Elisa’s Nest Tote”), you’ll find help under the “Projects” tab. People who have made this pretty tote often comment on how they adapted the pattern for working in the round, especially a user called “selyn84.”