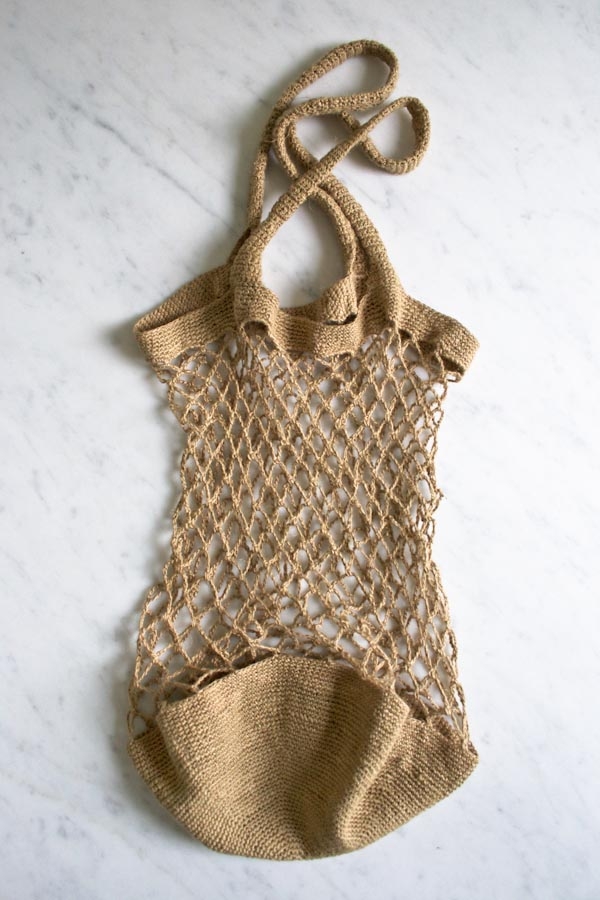


Linen Market Bag
It’s no fun carrying around a plastic shopping bag. Well, forget fun… It’s also no good. Our Linen Market Bag doesn’t have either problem. It’s a hand-crafted thing of beauty that works harder and longer than even the nicest plastic bag.

For its natural purity and strength, I hooked up our Linen Market Bag with Bockens Tow Linen 6/1. Made in Sweden, this 100% linen undulates between very fine and slightly less fine and sprouts little fibers here and there, just to remind you that nature knows best.

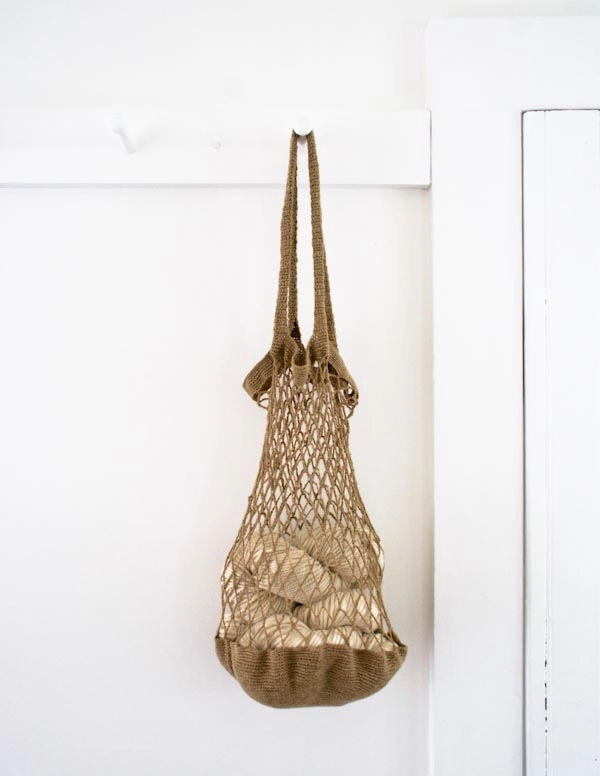
This gentle rusticity seems kindred to the kinds of things I plan to pack into my Bag: raw almonds from the food co-op, fresh greens from the farmer’s market, and my crochet project du jour!

I love when practicality and a certain rawness swing around into elegance, all while doing the right thing. Forget plastic; this Bag feels good! -Whitney
Update: New Yarn
June 21, 2017


We also made this bag in our Field Linen. Sturdy and durable, it also stunningly beautiful. Be sure to also check out our Market Bag in Field Linen!
Materials

- 1 spool of Bockens Tow Linen 6/1, 100% linen. This color is Oatmeal.
- A size B (2.25 mm) crochet hook
- A removable stitch marker
One spool of Tow Linen is enough to make two Linen Market Bags.
Gauge
30 single crochets = 4 inches
Size
Finished height from bottom center to top edge: 15 inches
Finished height from bottom edge to top edge: 10 inches
Finished diameter of bottom: 11 inches
Finished handle drop: 9 inches
Note: Finished dimensions are after blocking.
Pattern
Bottom

Note: I blocked the Bottom before I took this photo. If yours looks a little wavy, don’t worry, so did mine; that’s why I blocked it!
Chain 4 and slip stitch into the first chain to form a ring.
Round 1: Make 8 single crochets (sc) into the ring.
Note: Mark the first stitch of the next round with a removable marker. Reposition the marker at the beginning of each round to mark the new first stitch.
Round 2: Make 2 sc into each stitch. [16 stitches]
Round 3: *1 sc into next stitch, 2 sc into next stitch, repeat from * to end of round. [24 stitches]
Round 4: *2 sc into next stitch, 1 sc into next 2 stitches, repeat from * to end of round. [32 stitches]
Round 5: Make 1 sc into each stitch.
Round 6: *1 sc into next 3 stitches, 2 sc into next stitch, repeat from * to end of round. [40 stitches]
Round 7: *2 sc into next stitch, 1 sc into next 4 stitches, repeat from * to end of round. [48 stitches]
Round 8: *1 sc into next 5 stitches, 2 sc into next stitch, repeat from * to end of round. [56 stitches]
Round 9: Make 1 sc into each stitch.
Round 10: *2 sc into next stitch, 1 sc into next 6 stitches, repeat from * to end of round. [64 stitches]
Round 11: *1 sc into next 7 stitches, 2 sc into next stitch, repeat from * to end of round. [72 stitches]
Round 12: *2 sc into next stitch, 1 sc into next 8 stitches, repeat from * to end of round. [80 stitches]
Round 13: Make 1 sc into each stitch.
Round 14: *1 sc into next 9 stitches, 2 sc into next stitch, repeat from * to end of round. [88 stitches]
Round 15: *2 sc into next stitch, 1 sc into next 10 stitches, repeat from * to end of round. [96 stitches]
Round 16: *1 sc into next 11 stitches, 2 sc into next stitch, repeat from * to end of round. [104 stitches]
Round 17: Make 1 sc into each stitch.
Round 18: *2 sc into next stitch, 1 sc into next 12 stitches, repeat from * to end of round. [112 stitches]
Round 19: *1 sc into next 13 stitches, 2 sc into next stitch, repeat from * to end of round. [120 stitches]
Round 20: *2 sc into next stitch, 1 sc into next 14 stitches, repeat from * to end of round. [128 stitches]
Round 21: Make 1 sc into each stitch.
Round 22: *1 sc into next 15 stitches, 2 sc into next stitch, repeat from * to end of round. [136 stitches]
Round 23: *2 sc into next stitch, 1 sc into next 16 stitches, repeat from * to end of round. [144 stitches]
Round 24: Make 1 sc into each stitch.
Round 25: *1 sc into next 17 stitches, 2 sc into next stitch, repeat from * to end of round. [152 stitches]
Round 26: *2 sc into next stitch, 1 sc into next 18 stitches, repeat from * to end of round. [160 stitches]
Round 27: Make 1 sc into each stitch.
Round 28: *1 sc into next 19 stitches, 2 sc into next stitch, repeat from * to end of round. [168 stitches]
Round 29: *2 sc into next stitch, 1 sc into next 20 stitches, repeat from * to end of round. [176 stitches]
Round 30: Make 1 sc into each stitch.
Round 31: *1 sc into next 21 stitches, 2 sc into next stitch, repeat from * to end of round. [184 stitches]
Round 32: *2 sc into next stitch, 1 sc into next 22 stitches, repeat from * to end of round. [192 stitches]
Round 33: Make 1 sc into each stitch.
Round 34: *1 sc into next 23 stitches, 2 sc into next stitch, repeat from * to end of round. [200 stitches]
Round 35: *2 sc into next stitch, 1 sc into next 24 stitches, repeat from * to end of round. [208 stitches]
Rounds 36-45: Make 1 sc into each stitch.
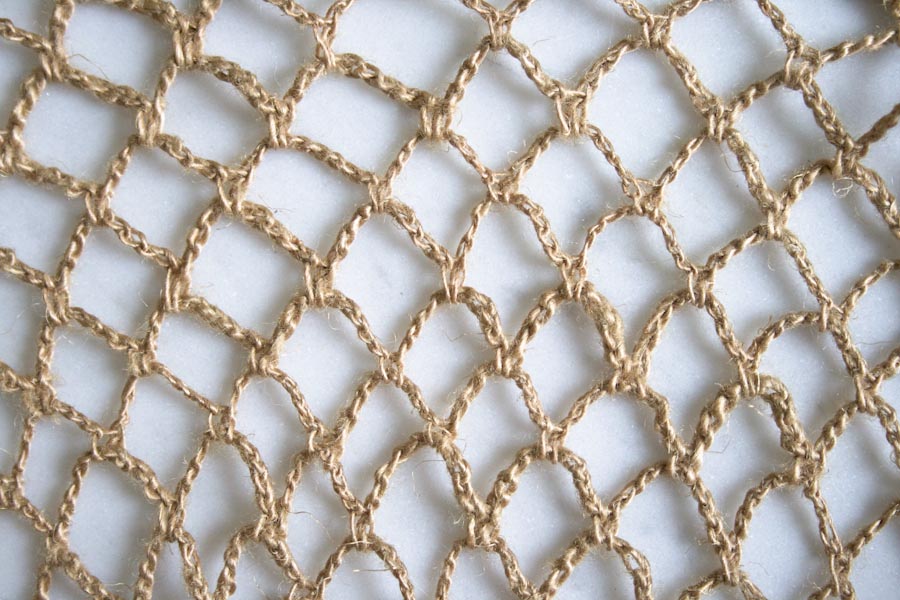
Netting
Round 1: *1 sc into next stitch, ch 10, skip 7 stitches, repeat from * to end of round.
Note: Now is a good time to turn the bag right side out. When you made the Bottom, the right side of the fabric ended up inside the bag. By flipping it right side out, not only do you have the right side on the outside, but working the Netting will also be much easier with the right side of the fabric facing you.
Another Note: Now is also a good time to remove the stitch marker. You will work the netting in a spiral without worrying about the beginning or end of the round.

Next Three Inches: *1 sc into next ch-10 space, ch 10, repeat from * until piece measures 3 inches from Round 1.
Next Three Inches: *1 sc into next ch-10 space, ch 9, repeat from * until piece measures 6 inches from Round 1.
Next Three Inches: *1 sc into next ch-9 space, ch 8, repeat from * until piece measures 9 inches from Round 1.
Top Edge

Note: You will work the Top Edge with a removable stitch marker, repositioning it to mark the first stitch of each round.
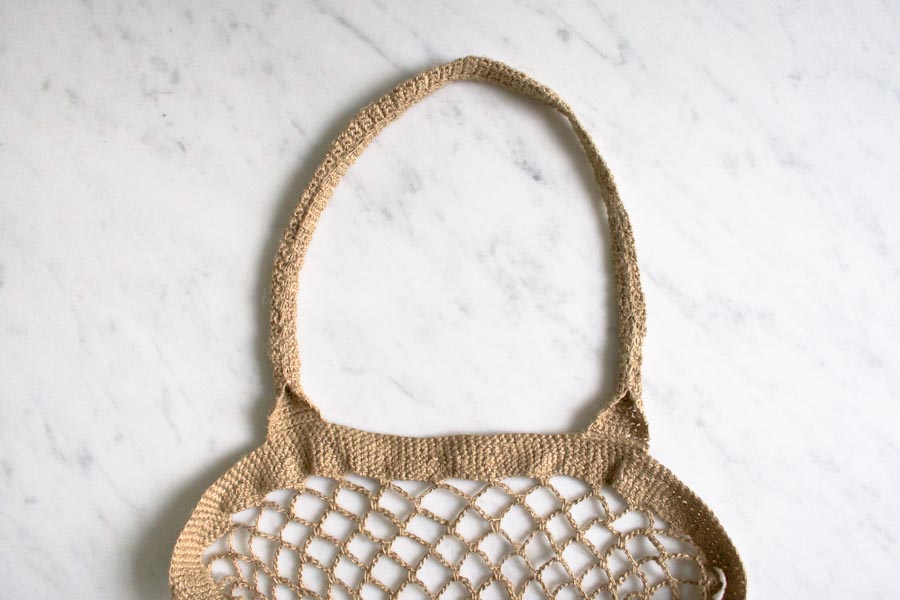
Round 1: 1 sc into next ch-8 space, mark this stitch with a removable stitch marker, 7 sc into same space (see photo, above), *8 sc into next ch-8 space, repeat from * to end of round. [208 stitches]

Rounds 2-5: Make 1 sc into each stitch.
Round 6: *1 sc into next 7 stitches, skip a stitch, repeat from * to end of round. [182 stitches]
Rounds 7-10: Make 1 sc into each stitch.
Remove the stitch marker.
First Handle
Row 1 (right side): 1 sc into next 10 stitches, turn the work.
Row 2 (wrong side): 1 sc into next 10 stitches, turn the work.
Repeat Rows 1 and 2 until the Handle measures 17 inches from the Top Edge, ending with a wrong side row.
With the right side facing you, count 41 stitches past the left-hand edge of where the Handle connects to the Top Edge and mark that stitch.

Making sure the Handle isn’t twisted, align the end of the Handle with the Top Edge of the bag, right sides together. The live stitch on the Handle should line up with the stitch marker.

With the wrong side of the Top Edge facing you, make 10 sc into both the next 10 stitches of the Top Edge and the 10 stitches of the Handle, connecting the two pieces.
Cut the yarn and pull it through the remaining stitch.
Second Handle
With the right side facing you, count 41 stitches from the left-most edge of the First Handle.
Join yarn, and starting with that 41st stitch, work Row 1 of the First Handle section. Continue to work as for the First Handle all the way to the end of the First Handle section.
Finish
Thread a 36-inch length of yarn onto a tapestry needle.

Fold one Handle lengthwise, wrong sides together, then, starting 1 1/2 inches from where the Handle connects to the Top Edge, whipstitch the two edges of the Handle together. Finish when you are 1 1/2 inches from the other end of the Handle.
Repeat for the other Handle.
Weave in the ends, and block your Bag, being sure to fold each Handle so the whipstitch seam runs centered along the inside of the Handle.


I was so excited to see this beautiful yarn and tote– then I saw it was a crochet pattern , and rats! I can’t crochet. Do you have it in a knit?
Hi Jeanne,
We have two knit bags, neither exactly like this one but both beautiful and market-ready! Here are the links:
https://www.purlsoho.com/create/2007/06/28/elisas-nest-tote/
https://www.purlsoho.com/create/2013/04/28/lauras-loop-knit-tote/
I hope one of these designs inspires you! Please let us know if you have any more questions and thank you so much for this one!
Whitney
I love this bag but I don’t know how to crochet
Could you possibly convert this pattern into one that works for knitting ? I would think that many other knitters besides myself would be very happy to have this project in a knitting pattern
Thanks!
Hi Eleanor,
I will definitely put your request on my list of possible future projects! In the meantime, you may like one of the knit-bag patterns I just shared with Jeanne, another reader with a similar question. Here are those links again…
https://www.purlsoho.com/create/2007/06/28/elisas-nest-tote/
https://www.purlsoho.com/create/2013/04/28/lauras-loop-knit-tote/
Thank you so much for asking!
Whitney
Wonderful pattern! Will one skein of the linen make more than one bag?
Oops! Forget my question–just read the post more closely and saw one skein will make two bags. Sorry!
Hi Andria,
Yes, one spool is enough for two bags, almost three! Each spool is 1148 yards, and I used about 415 yards to make one bag, about 100 yards short of a third bag.
Thanks for asking (and then for letting us know that you figured out the answer) and let us know if you have any other questions!
Whitney
Do you know approx how much of the linen spool one bag takes? I have an idea to make several in different colors. Oooh, maybe I could make one with 2 colors — one for the top and bottom and another for the netting!
Hi Ramona,
I used about 415 yards to make my bag, and each linen spool has 1148 yards.
I love your idea of using two colors. Please let us know how it goes and if you have any more questions. Thanks for this one!
Whitney
Would you be able to knit this bag in Firefly Trellis Yarn? Do you think it would be strong enough?
Hi Ann,
I’ve never seen Firefly Trellis in person, and it’s difficult online to tell how strong it is (although it’s easy to see what a cool bag it will make!).
I recommend firmly tugging on the yarn to see how easily it breaks. If it takes a lot of strength to break the yarn (or if it doesn’t break at all), you should be good to go!
Thank you so much for your question and good luck!
Whitney
Awesome! I was thrilled to see a crochet pattern! Lovely bag too!
What does the number 6/1 mean? I see most 16/2 when I search the web for Swedish linen, but have no idea what either number means. Thanks!
Hi Marilyn,
Great question! The “6/1” is a classification system used for weaving yarns.
The “1” indicates that it is single ply, and the “6” refers to its weight (in meters-per-kilo). Each fiber has its own weight classification system , so note that a 6/1 linen is not the same weight as a 6/1 wool or silk (for example).
I hope this clears things up for you, and thanks so much for asking!
Whitney
How important is it to use linen on this pattern? Can you use cotton? Would that change anything?
Hi Sarah,
You could absolutely use cotton for this pattern! Plant fibers, in general, are very strong and durable, so even bamboo would be a good choice. Plant fibers also tend to “grow,” so linen, cotton or bamboo, your finished bag may stretch out a little bit.
Please let us know if you have any more questions and thank you very much for this one!
Whitney
Im working on this now and I’m almost done with the base, but the netting portion is confusing. Do you repeat the “next three inches” steps around the base. I’d love some more explanation!
Thank you!
Hi Bethany,
Thanks for reaching out! Yes, after working Round 1 of the netting, you will repeat the step inside of the asterisks (1 sc into next ch-10 space, ch 10) until the netting measures 3 inches from the last row of the base of the bag, as shown in the picture with the measuring tape.
I hope that clears things up!
Julianna
Hello there, I’m trying to find the oatmeal color this pattern was using but I can’t see to see it on the link you had posted. I tried looking online via google and I haven’t quite pinned down the spool you had used. Any tips for this or similar thread/yarn ?
Hi kneil,
Unfortunately, the Oatmeal color of the Bockens Tow Linen 6/1 have sold out. Please feel free to get in touch with our customer service (by email at customerservice AT purlsoho DOT com, or by phone [800] 597-7875), and they can let you know when the yarn will be back in stock.
Or if you’d rather get started right away, we have a couple of excellent alternatives! The first would be Bockens Tow Linen 4/1, which is just slightly thicker than the 6/1 and comes in a natural Unbleached color. Find it right here:
https://www.purlsoho.com/purl/products/item/9758-Bockens-Bockens-Tow-Linen-41
Louet’s Euroflax is another beautiful linen. It is a bit thicker than either Bockens, but is still an elegant sportweight. It’s here:
https://www.purlsoho.com/purl/products/item/380-Louet-Euroflax-Originals
Thank you so much for asking and please let us know if you have any other questions!
Whitney
Oh please create a knitted version of this bag. The ones you gave links too just don’t measure up to the beautiful design of this one.
This bag is just lovely. I am an experienced knitter but have never crocheted. I am, however up to the challenge! How would this be as a beginner’s first project? Approximately how long does this bag take to crochet? Thanks!
Hi Pastille,
The Bockens Tow Linen 6/1 is very fine and takes some time and perhaps patience. And so, I wouldn’t necessarily recommend the yarn for a first-time crocheter, although the pattern itself would be appropriate for someone “up to the challenge.”
You may want to try out the pattern with a slightly thicker yarn, like Louet’s Euroflax (https://www.purlsoho.com/purl/products/item/380-Louet-Euroflax-Originals). It will go faster and be a bit less finicky. (You’d probably want to stop crocheting the bag’s bottom when it measures about 11 inches across, rather than when there are 208 stitches. You’ll also need to make some adjustments to the number of stitches you skip in the first round of the netting, but as an experienced knitter, that shouldn’t be too hard.)
Or, if you’re the kind of person who loves little details and meticulous work, just go for it with the Bockens!
Please let us know if you run into any questions along the way and good luck!
Whitney
I was so excited to see this item! We are full time farmers selling our wares at a wonderful farmers market. I know everyone will see my finished bag and I will direct them to Purlbee and Pearl Soho! I am ordering a different colour but will ba anxious to make one in the oatmeal as pictured. Any idea when that will be available again?
Thank you very much – I’m adore for all your things, best for the Folded Squares Cardigan and the Linen Market Bag. Perhaps try make them.
Love
Marianne
This is my first crochet project. I have finished the bottom (phew!) and the first round of chains. I could use some clarification on why you recommend turning the project at this point. So far I’ve been working right to left. If I turn, do I now work left to right? This seems awkward to me. Or do I continue right to left, essentially going back back the way i came?
Also, wouldn’t I then be working the top edge backwards too?
Any tips on knowing right from wrong side are appreciated-they both look good to me!
Thanks for your patience with this first timer.
By the way, I’m using the peach color and it looks great for this bag!
Hello Christina!
Welcome to the crochet world! I can tell you’re a knitter! When the instructions recommend “turning” the back inside out, they’re not using the word as one would in a knitting pattern. They’re simply asking you to un-curl the base of the bag so that the side you’ve been facing all along becomes the bottom.
I agree that its very hard to distinguish the difference between the right and the wrong side of single crochets, but the benefit of keeping the right side as the bottom of the bag is to keep all the stitches oriented towards you so your hook has easy access to them as you’re creating the netting.
Happy stitching and thanks for writing in! -Alyson
I have been learning to crochet over the summer and decided to do this market bag as my first ever project. The bottom of the bag is finally done (not perfectly, but I want to leave the mistakes to look back on– I AM going to master this craft..lol ) The pattern is very nice to follow, but I need a little push to understand the second row of the netting instructions *1 sc into next ch-10 space”. I know it will be very easy but I am not exactly sure I understand how to do this correctly. Any suggestions would be greatly appreciated, and thank you for lhelping me through the beginner pangs!
Hello Rho!
Welcome to crocheting! When the instructions tell you to create a stitch into a “space”, you’re not actually putting your hook into the “V” of a stitch from the previous round, you’re just putting your hook into the hole created by the chain 10 of the previous row. The new single crochet stitch that you’re creating will sort of wrap around the bar that those previous 10 chain stitches created.
I hope this helps! Happy stitching! -Alyson
Hi, I would like to make this bag using your pattern and sell it in my shop. Can you advise what your policy is on this? Thanks.
Hello, Chole!
Thank you so much for your interest in our Linen Market Bag pattern. Unfortunately, all items made from our patterns cannot be sold. All of our patterns are copyrighted and are intended for personal home use only. We hope you understand.
Thank you for getting in touch!
Best,
Kumeko
I’m glad to see this bag is back! Please note my comments from last year, as well as so many other similar comments from fellow knitters! We would love to knit this bag. Unfortunately, the links you provided for a similar market tote are not quite the same as this crocheted one….do you think you could convert this same market tote to a knit pattern?
Many thanks!
Hi Eleanor,
Thanks for the nice comment! We will definitely keep your request in mind for future projects. Stay tuned!
-Adam
Hello. I love this bag and am quite excited to start it. However I am relatively new to crochet (started a couple months back) and do have a few questions. The Bockens Tow Linen is not available where I live. So is it okay if I use 100% cotton to make this bag?
Secondly, when we make the bottom of this bag do we crochet it in a circle, that is do we slip stitch at the end of every round? Or do we crochet it in a spiral without slip stitching?
Hi Anum,
Thanks for writing us! You could certainly use cotton for this project instead of the Bockens Tow Linen. You can also purchase the Bockens Tow on our website too by clicking here. If you choose to work in cotton, make sure it’s fingering weight or close to it because the bag will come out larger in a heavier weight. For this pattern you will be crocheting the bottom in a spiral, increasing by doing a SC into one stitch multiple times. Good luck on the pattern! Once it’s done I’m sure you’ll get good use out of it!
Best,
Adam
Thank you so much for replying. One last question: how did you block the bottom? I have never done it before so I am a little confused.
Hello Anum,
Blocking is fun — well, for me. For linen I suggest soaking in warm water with some soap (you can use a wool wash or even dish soap) for about 20 minutes. After you take it out of the bath I’d roll in a towel to get rid of the excess water and then lay out to dry. You’ll have a different feeling project!
Happy crafting!
Adam
Thank you. I will be using cotton but will try this method as well.
I just finished it! I haven’t crocheted in 40 years but now have a lovely market bag. Today I block. I’ve just ordered 2 more colors of the linen to make as gifts. Thank you so much for this beautiful pattern.
Hi Carol,
That is so great to hear! We are so glad that this pattern got you back into crocheting! Thank you for your kind words!
Happy crocheting!
Cassy
Is there anyway to get this pattern without having to print 22 pages?
Hi Mary,
Thanks for writing in! We do have a printer friendly version of all of our patterns available! If you’re on a desktop version of the site, you will find a “print” icon in the right column just below the date and tags. If you’re on a mobile version of the site, you will find a “print” icon below the pattern and above the comments.
Follow the easy on-screen instructions to delete whichever parts of the pattern you don’t want to print or save. For example, you may decide to shorten the pattern by omitting certain images or the list of materials.
I hope that this helps!
Cassy
love these patterns
Just a quick question. I have some beautiful fabrics that I’d like to use as the bottom,so I’m going to start with an 11 finished circle of fabric and do the buttonhole stitch around it and then join with the netting to the stitches. So my question is about how many times does the first row of netting touch the base/what’s the distance between the chain 10 spaces? Hopefully that’s understandable.
Never mind! just read the 208 sc in the last round of base ! So 208 divided by 8 stitches(7 stitches plus one sc) is 26 times. I can figure it out Thank’s I just love the bag, can’t wait to get started.
Love the market bag, but don’t know how o crochet do you have a pattern for knitted market bag
Thank you. Arlene
Hello Arlene,
Thank you for reaching out! We have a great pattern for a Knit Tote that I think you will enjoy.
Hope this helps!
-Marilla
Love this bag. I’m making it in field linen (but with a 2.25 mm hook because of my gauge), but was wondering how you assess the relative strengths of field linen v. the original spooled linen called for. I’d like to try that because it could be a $15 bag instead of a $50 bag — but I love the strength of the field linen. Thoughts?
Hello Theresa,
Thank you for reaching out! I’m so happy to hear you are enjoying this pattern. Linen is a sturdy fiber, so in terms of strength these two yarns are comparable. I hope this helps!
Warmly,
Marilla
That is good news. I finished mine in field linen and just “christened” it at the farmers market. Gorgeous and strong. Thank you for answering. (I didn’t realize you had until it occurred to me to look just now!)
I am planning on making this linen market bag with your Bockens Tow Linen 6/1. I have a set of crochet hooks that list size B as 2.0mm and C as 2.5 mm (I have just discovered that these are not standard sizes). I understand that I can crochet awhile and see how the gauge with each comes out, but if neither is quite right, what do you recommend. Should I go smaller than 2.25 or bigger? I hope I don’t have to buy another hook.
Thank you!!
Hi Janet,
Thanks for writing in! Fortunately, since this is a market bag and not a garment that relies on gauge to fit properly, if your gauge is slightly tighter or looser than ours, your bag will just be a tiny bit larger or smaller than ours, which isn’t too much of a problem! There is plenty of extra yardage in one spool of the Bockens Tow Linen, so even if your gauge turns out a little looser, you won’t have to worry about running out of yarn. I would suggest trying a swatch on each hook to see which results in a fabric that is close to our gauge and that you are happy with!
Best of luck and happy crocheting!
Julianna
Im loving this bag. So easy and looks fabulous!
I’m assuming that once the netting is finished I should revert to working on the wrong side again to ensure the piece looks the same on the bottom and the top.
Is this right?
Hi Leigh,
Thanks for reaching out! You will not need to work on the wrong side fro the top portion of the bag after you complete the netting. You can keep working on the right side of the bag and it should come out just as ours did!
Best,
Cassy
Hi there, I am loving this pattern and am excited to be nearly finished. However I am struggling with the instructions for the handle spacing – I assume they should be evenly spaced across the top of the bag but following your instructions gives me uneven spacing. This is hard to explain – but if you count 41 from the left of the first handle and then join the live stitch at the marker, and then turn to the wrong side and crochet back towards the left, this leaves 30 stitches between the joins – is this correct? I’m confused.
Hi Julie,
Thanks for reaching out! You are correct that the handles are not evenly spaced around the bag, but they should turn out symmetrically placed on each side of the bag! After completing the second handle, you will have 31 stitches between the two attachments of each handle, and 41 stitches between the opposite handles on each side.
I hope that helps! Please let us know if you have any other questions!
Julianna
Hello, I purchased the pomegranate colored Brockens Tow 6/1 and am thoroughly enjoying creating the bag. I will be giving this as a gift to a friend. What are care instructions that I should pass along? And, what care instructions do you recommend I do before gifting it? I am concerned there will be some initial bleeding of the color.
Thank you…
Hi Cynthia,
Thanks for reaching out! Bockens Tow Linen is completely machine washable and can even go in the dryer, so it’s quite easy care. We haven’t had any reports of the color bleeding, but if you are concerned, I would suggest washing it with a few towels or dark clothes such as jeans that won’t show any displaced dye before giving it as a gift.
I hope that helps!
Julianna
Hi. Love you guys and your wonderful yarns and patterns. I used to crochet in high school many decades ago but all I made was one giant Granny Square blanket! So I don’t really know what I am doing.
That said, I love this and would love to make several for gifts. Too ambitious for a beginner? Thanks as always!
Hi Charlene,
Thanks so much for the kind words! I actually think this bag is a great beginner or refresher project! It only uses a few stitches and becomes quite mindless after a while, so I encourage you to give it a try!
Best,
Julianna
Greetings! I have just finished round 1 of the netting for this be and wondering how best to move into the next three inches of spiral netting. Chaining 10 seems like a lot for the first loop since it won’t be offset yet, or does it settle out once you finish the next round? Thanks for clarifying!
Hi Lori,
Thanks for writing in! It does seem odd at first when transitioning to working the rounds in a spiral, but I assure you that the beginning loop won’t be noticeable in the finished bag, especially once you have loaded the finished bag up with your farmer’s market goodies!
Happy stitching!
Julianna
Thank you for your input! Sorry I didn’t see this sooner.
After the netting, on row 6, why skipping one stitch? (Single crochet 7 stitches, skip one)
Why not decrease, instead of skip?
By skipping a stitch it created a little hole.
Thanks
Hi Louise,
Thanks for reaching out! Skipping a stitch is just one of several ways to decrease, and at a tight gauge like what is used in this pattern shouldn’t leave a noticeable hole, especially after blocking. However, if the hole bothers you, you could work 6 sc followed by a sc2tog instead! We have a tutorial on the Single Crochet Decrease in case you need a refresher!
I hope this helps, and please let us know if you have any other questions!
Warmly,
Kelsey
Hi! This bag has been so fun to make! I am making it in the field linen, and it is beautiful. I just got to the handle step, and had a question. Are you supposed to chain 1 when turning the work over for a new row? It’s been awhile since I have crocheted, but i thought this was typically done when not working in the round.
Thanks!
Hilary
Hi Hilary,
That’s a great question! It’s certainly unconventional, but this pattern does indeed call for no chain stitches before each row. It actually creates a really nice and neat edge! I hope this clarifies things.
All the best,
Lili