Knit Hedgehogs

The first hedgehog I ever met was Mrs. Tiggy-Winkle, Beatrix Potter’s kindly washerwoman of the Lake District. From her tiny country cottage to her “little black nose [that] went sniffle, sniffle, snuffle, and her eyes [that] went twinkle, twinkle”, she was everything I thought charming and good as a child.

Since then I have always felt a love and affinity for hedgehogs. But not until I sat down to write this story did I actually realize that Mrs. Tiggy-Winkle was not only the first hedgehog I ever met, she is the only hedgehog I’ve ever met.
You see, I’ve always vaguely imagined that hedgehogs were all around me, hiding in burrows and hollow logs and hedgehog-sized cottages, but a quick look into the matter has thoroughly disavowed me of my silly assumptions. Hedgehogs don’t even live in the United States, let alone outside my window! They live most everywhere else, but not here. I’m sure this doesn’t surprise our worldly readers, but to me this information was a little bit shattering.
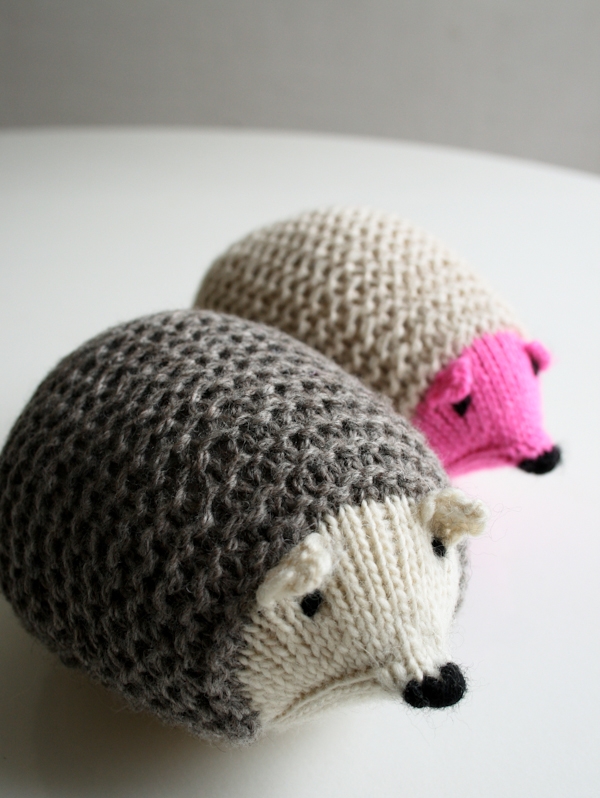
This newfound knowledge only makes my trio of Knit Hedgehogs more germane, because now they’re not just cute and adorable, but they also offer a very practical way to hang out with hedgehogs if you happen to live in the Americas!
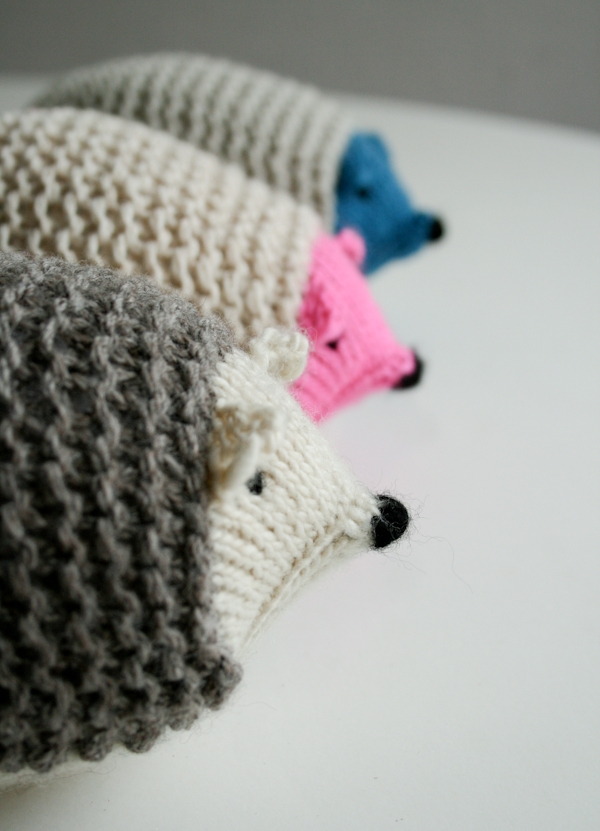
England is one place hedgehogs do live (just ask Beatrix Potter!), and so for a truly native hedgehog, we turn to British crafter Julie Williams of Little Cotton Rabbits. Just before posting this story, Little Cotton Rabbit’s equally adorable Little Oddment Hedgie was pinned to our Pinterest page. We love it!
For our hedgie I used Manos del Uruguay’s pretty Silk Blend for its head and belly. With a gentle handspun shine, Silk Blend makes a lovely contrast to the Cascade yarns I used for the hedgehog’s garter stitch back. Both Eco Cloud and Superwash 128 are great heavy worsted weight choices for cuddling!
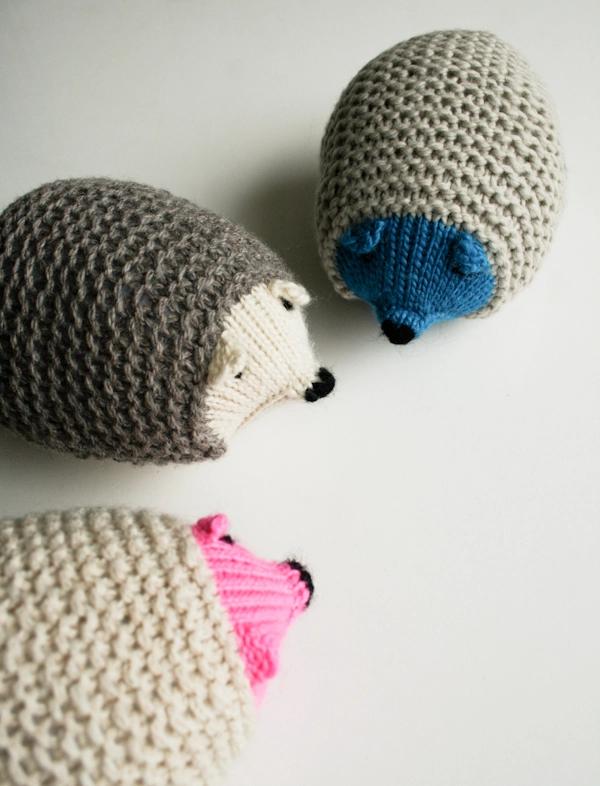
These guys are seriously fun to knit with not one lick of sewing or even grafting! So, if you’d like to populate your world with adorable little Knit Hedgehogs, get knitting! -Whitney
Designed by Purl Soho designer, Whitney Van Nes.
Share your progress and connect with the community by tagging your pics with #PurlSoho, #PurlSohoBusyHands, and #PurlSohoKnitHedgehogs. We can’t wait to see what you make!
Materials
- Main Yarn: 1 skein (or approximately 128 yards) of a worsted weight yarn.
- Contrast Yarn: 1 skein (or less than 150 yards) of a DK weight yarn.
- A set of US 4 (3.5 mm) double pointed needles
- A set of US 8 (5 mm) double pointed needles
- Stuffing
- Scrap yarn in a heavy worsted or chunky weight for the eyes and nose. I used Purl Soho’s Super Soft Merino in Soft Black.
Here’s what we used for our samples…
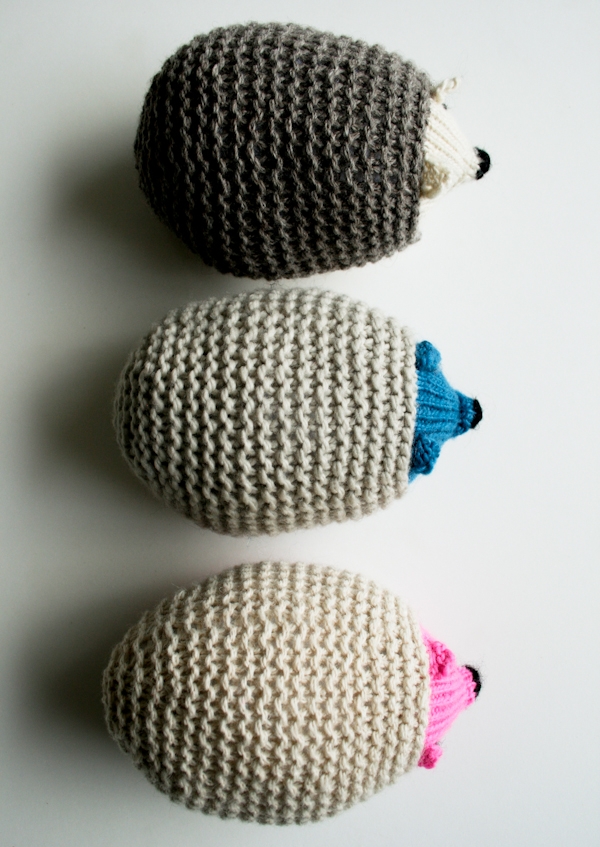
For the Pink Hedgehog
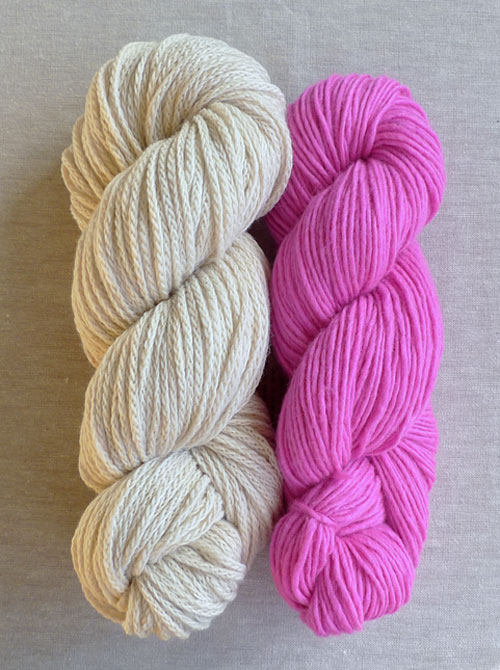
- 1 skein of Main Yarn, shown on left: Cascade’s Eco Cloud, 70% Undyed Merino Wool and 30% Undyed Baby Alpaca. This color is Ecru.
- 1 skein of Contrast Yarn, shown on right: Manos del Uruguay’s Silk Blend, 70% Merino Extrafine Wool and 30% Silk. This color is Shocking.
For the Natural Hedgehog

- 1 skein of Main Yarn, shown on left: Cascade’s Eco Cloud, 70% Undyed Merino Wool and 30% Undyed Baby Alpaca. This color is Wild Dove.
- 1 skein of Contrast Yarn, shown on right: Manos del Uruguay’s Silk Blend, 70% Merino Extrafine Wool and 30% Silk. This color is Natural.
For the Blue Hedgehog

- 1 skein of Main Yarn, shown on left: Cascade’s 128 Superwash, 100% Superwash Merino. This color is Feather Grey.
- 1 skein of Contrast Yarn, shown on right: Manos del Uruguay’s Silk Blend, 70% Merino Extrafine Wool and 30% Silk. This color is Juniper.
Gauge
7 stitches = 1 inch in stockinette stitch using Contrast Yarn and smaller needles
5½ stitches = 1 inch in garter stitch using Main Yarn and larger needles
Size
About 6 inches long and 11½ inches around
Pattern
Head
With the Contrast Yarn and the smaller double pointed needles, cast 6 stitches onto three needles. We used a basic Long Tail Cast On.
Join for working in the round, being careful to not twist the stitches.
Round 1: Knit.
Round 2: K1, make 1 left (m1l), k1, make 1 right (m1r), k4. (8 stitches)
Round 3: K2, m1l, k1, m1r, k5. (10 stitches)
Round 4: Knit.
Round 5: K7, m1l, knit to end of round, m1r. (2 stitches increased)
Repeat Round 5 until there are a total of 36 stitches.
Arrange the stitches so that the first 7 stitches of the round are on one needle and the remaining 29 stitches are distributed between the second and third needles.

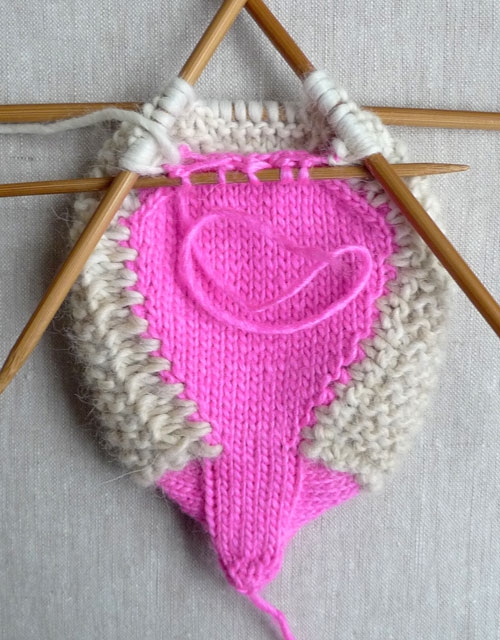
Belly
NOTE: For this section you will just be working back and forth on the first 7 stitches.
Row 1 (right side): K1, m1r, knit to last stitch on the needle, m1l, k1. (9 stitches)
Row 2 (wrong side): Purl.
Repeat Rows 1 and 2 five more times. (19 stitches)
Next Row (right side): Knit.
Next Row: Purl.
**Next Row: Repeat Row 1. (2 stitches increased)
Next Row: Purl.
Next Row: Knit.
Next Row: Purl.
Repeat from ** one more time. (23 stitches)
Next Row (right side): K1, ssk, knit to last 3 stitches on the needle, k2tog, k1. (21 stitches)
Next Row: Purl.
Next Row: K1, ssk, knit to last 3 stitches on the needle, k2tog, k1. (2 stitches decreased)
Next Row: P1, p2tog, purl to last 3 stitches on the needles, p2tog tbl, p1. (2 stitches decreased)
Repeat last 2 rows two more times. (9 stitches)
Next Row (right side): K1, slip 1, ssk, pass the slipped stitch over the ssk, k1, k2tog, place the k2tog-stitch onto the left needle, pass the next stitch over the k2tog-stitch, put it back on the right needle, k1. (5 stitches)
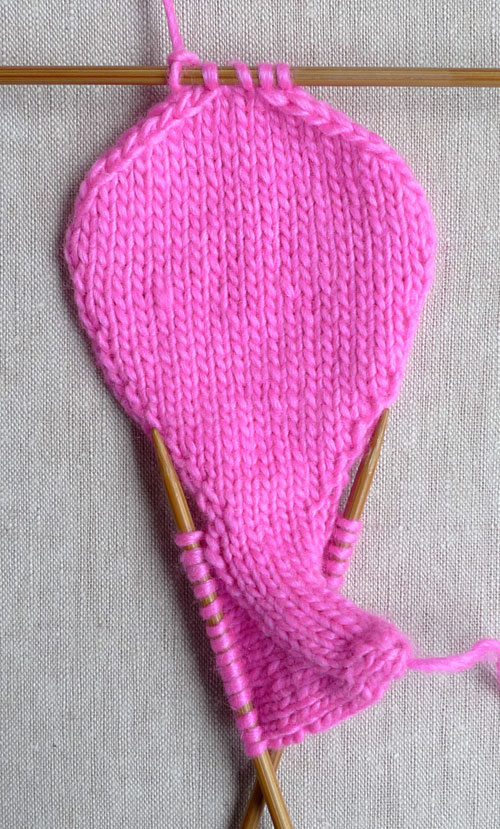
Cut the yarn. The 5 Belly stitches remaining on the double pointed needle will be on hold until the end of the next section.
Body
(FYI, the Main Yarn shown in the following photographs isn’t the Eco Cloud that I ended up using for my finished hedgehog. It’s another yarn that proved to be too thin. Live and learn!)
NOTE: For this section you will be working back and forth on the 29 Head stitches that have been on hold.
With the right side facing you and using the Main Yarn and the larger double pointed needles, knit 29 stitches onto three needles.

NOTE: The following instructions have you picking up stitches from the Belly selvages. Be sure to pick up every other row. You’ll know you have it right if between each picked up stitch, you see two vertical strands of the Contrast Yarn, like this:

Row 1 (wrong side): Knit to last 3 stitches, ssk, k1, pick up 1 stitch purlwise from the Belly. (29 stitches)
Here’s how to pick up purlwise: start with the yarn in front like you’re going to purl, bring the right needle from the right side of the fabric to the wrong side, wrap the yarn as if to purl, then bring the stitch out to the right side.
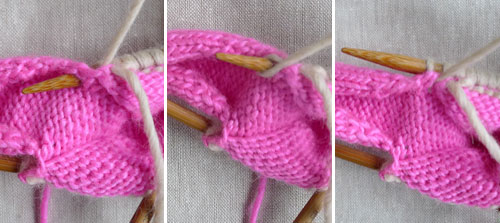
Row 2 (right side): Knit to last 3 stitches, ssk, k1, pick up 1 stitch knitwise from the Belly. (29 stitches)
Repeat Rows 1 and 2 until all the Belly’s edge stitches have been picked up and you have reached the 5 stitches on hold. End with a wrong side row.
Next Row (right side): *K5, k2tog, repeat from * to last stitch, k1, with the same double pointed needle, k the 5 stitches that have been on hold. (30 stitches)
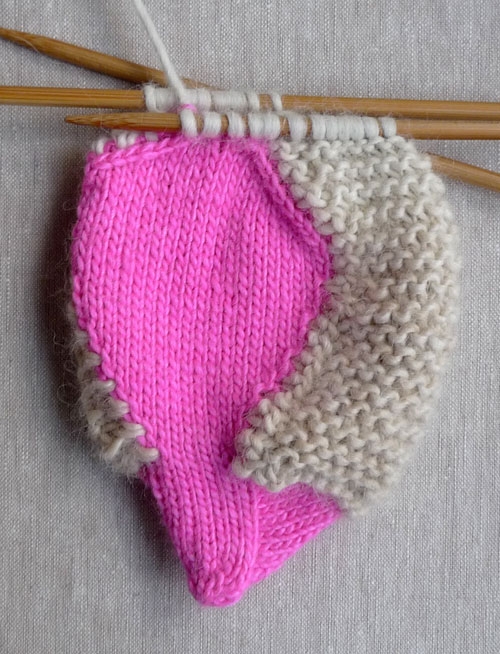
Place a marker and continue to work with the right side facing you so that you’re now working in the round…
Round 1: Purl.
Round 2: *K4, k2tog, repeat from * to end of round. (25 stitches)
Round 3: Purl.
Round 4: *K3, k2tog, repeat from * to end of round. (20 stitches)
Round 5: Purl.
Now is a good time to turn your hedgehog inside out so you can weave in the ends. Then turn it right side out and fill it with stuffing, making it nice and chubby.
Round 6: *K2, k2tog, repeat from * to end of round. (15 stitches)
Round 7: Purl.
Round 8: *K1, k2tog, repeat from * to end of round. (10 stitches)
Round 9: Purl.
Round 10: *K2tog, repeat from * to end of round. (5 stitches)
Cut the yarn and thread it through the remaining stitches. Then thread the tail through the hedgehog so it comes out somewhere else and cut the tail.
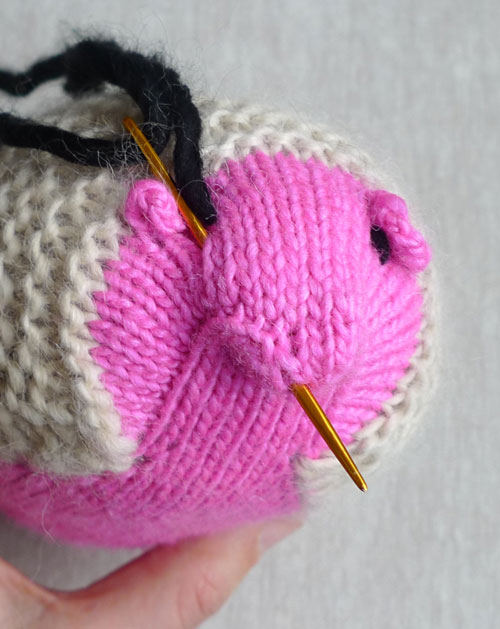
Ears
With the smaller double pointed needles, the Contrast Yarn and the nose facing you, pick up 4 stitches from the top of the head where it meets the body. Pick up off to the right side, where an ear might be.
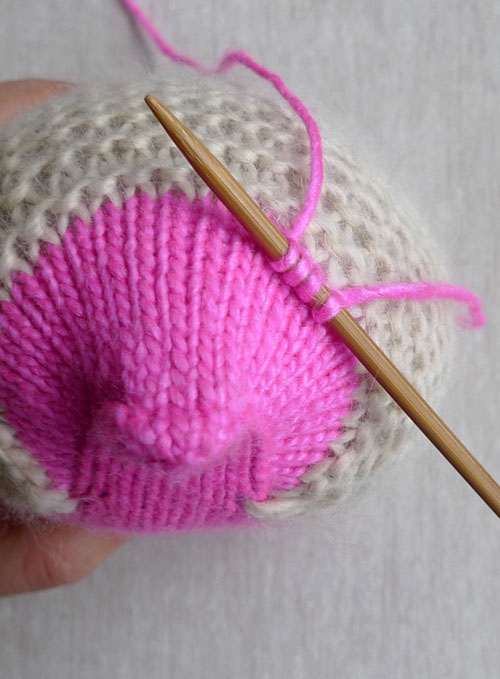
Row 1 (wrong side): Purl.
Row 2 (right side): Knit.
Row 3: P2tog, p2tog through the back loop. (2 stitches)
Row 4: Pass the left stitch over the right stitch. (1 stitch)

Cut yarn and pull it through the remaining stitch.
Now make a left ear just the way you made the right one!
Weave in the ends.
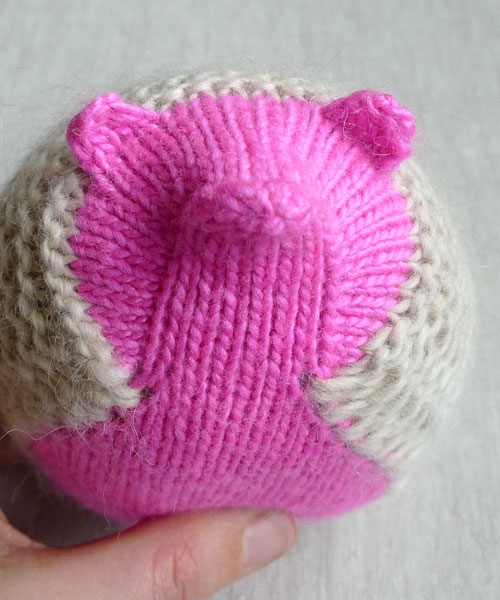
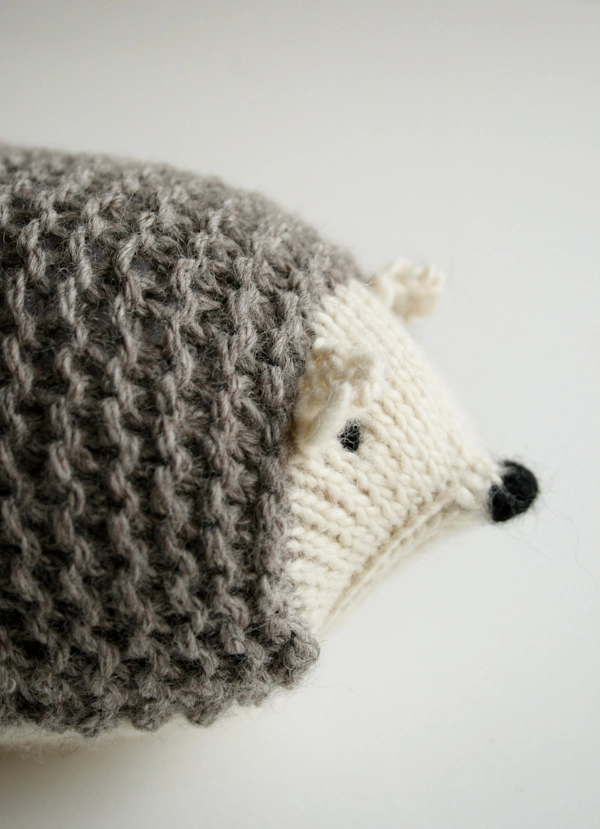
Eyes and Nose
Thread some scrap yarn onto a tapestry needle.
Poke the needle into the body of the hedgehog and bring the needle out under an ear, right where you’d like an eye.
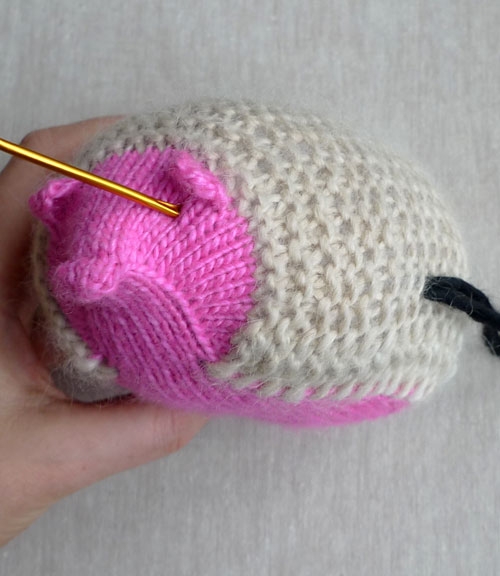
Now insert the needle one stitch away from where it came out, and bring the needle out under the other ear.

Again, insert the needle one stitch away from where it came out, and now bring the needle out at the top of the nose.
Make four vertical stitches over the tip of the nose, then poke the needle out of the body somewhere.
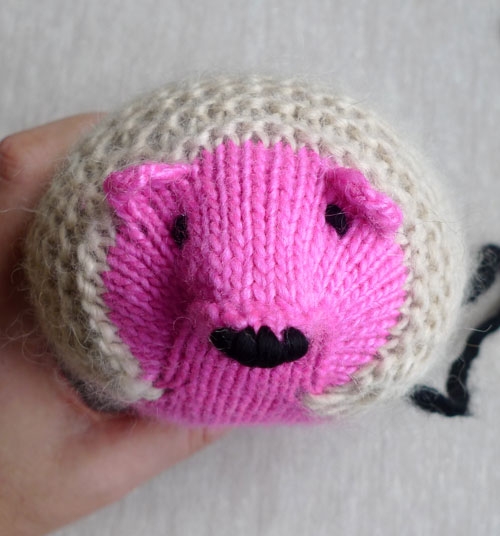
Cut the tails, plump up your new friend and you’re done!


Hi: I’d like some advice for stuffing this. I am using natural wool.
Is it good to err on the side of overstuffed, as over time the stuffing will get compressed? Or should I stuff it just enough so that it still is a bit squishy?
(By the way, do you sell stuffing?)
Hi Natalie,
Thanks for reaching out! I think this mostly comes down to preference! If you prefer a bit of squish I would recommend not over stuffing it, but if you prefer it to be more dense and not as squishy than I would say to add some extra stuffing. Since these are smaller items you wont need to worry about the stuffing getting compressed over time like what may happen in a bigger project, like a pillow, since the stuffing wont be getting moved around as much inside!
And yes! We do sell stuffing, we carry a Poly-Fil Stuffing and a 100% Cotton Stuffing!
I hope this helps!
Warmly,
Gianna
Thanks Gianna!
What are the differences between the stuffings? Poly-fill , cotton, or wool? I am trying to decide what the best option is. Why might I choose one over another? 🙂
Is the Poly-fill less likely to compress?
Hi Natalie,
Thats a great questions! I would say cotton stuffing is the best choice for quilting or stuffing a blanket for instance. For a smaller item like this I would narrow it down to Wool or Poly-fill for the stuffing! Wool stuffing is very common in toys and might have a better overall feeling. Poly-fill is a bit more cost effective and machine washable! Wool will also be a bit more dense while Poly-fill is a bit lighter! Either way I don’t think you’ll have to worry too much about compressing!
I hope this helps!
Gianna
Hi,
I am working on the face- my tapestry needle seems too blunt to pierce through the stuffing for making the face. Can you recommend another tool that make work better?
Hi Natalie,
Thanks for reaching out! I’d suggest you take a look at the Clover’s Chibi with Darning Needles set as an option. It comes with three different needle sizes, and it sounds like a finer needle might be just what you need!
I hope this helps, and please let me know if you have any other questions!
All the best,
Kelsey
Thanks for the suggestion!
They may indeed be better than the Clover Jumbo Bent Tip Tapestry Needles…. but also hope it is possible to thread the bulky yarn through it!
Can someone make a video on how to make this? im a beginner and everything looks so hard!
Hi Ashley,
Thanks for reaching out! We don’t currently have the resources available to film a tutorial for this pattern, but thank you for expressing your interest! I will be sure to pass this along to the rest of the team. I know this pattern may seem complicated but it is actually pretty easy and straightforward! If you decide to knit this and run into any issues I am happy to help at any point here in the comment section or you can reach out to us directly for assistance by emailing our team at customerservice@purlsoho.com
I hope this helps, happy knitting!
Gianna
Hallo ich habe Gesicht und Bauch fertig, jetzt komme ich nicht weiter 3Maschen stricken, 2 zusammen stricken, 1 Masche stricken und dann eine Masche vom Bauch dazu, ich bin doch vielzuweit weg vom Bauch dafür.
Danke für die Hilfe
Hi Brunni,
Thanks for reaching out! Please email a photo of your work to our customer service team at customerservice@purlsoho.com and they can help you further from there!
Warmly,
Gianna
It looks like the recommended yarn is no longer available on the Purl Soho website. Can you offer other yarn suggestions that you sell? Many thanks!
Hi Alissa,
Thanks for reaching out! Yes, we no longer sell the yarns listed but luckily I have some great alternatives available! For the body, I would suggest using our Worsted Twist, Linen Quill Worsted, or WOOLFOLK YARN Tov. For the contrasting color, I would suggest using our Flax Down, or Kersti Merino Crepe, Solid and Multi!
I hope this helps and please let me know if you have any more questions!
Gianna
When you are starting the head, is it 6 stitches on each needle or 6 stitches spread across the three needles? I’m trying to increase the stitches with 2 stitches on each needle to start out with can’t m1r due to there not being any stitches to do it.
Hi Sydney,
Thanks for reaching out. You’ll be starting with 6 stitches spread out between all three needles, so 2 stitches per needle. It’s a little tricky to maneuver for the first few rows, but I’d recommend shifting your stitches on the needles to make it easier to work the increases at the beginning! So you can move one of the stitches over to the current needle so that you can do the m1r next to it, even though that would mean only 1 stitch on the next needle. Then you can keep shifting the stitches around like this whenever it becomes difficult to work any of the increases. Hope this helps!
All the best,
Lili
Hi,
This is my first time using double point needles and the tutorials for joining the round that I’m seeing say to cast on an extra stitch. So to start should I be casting on 6 stitches or should I cast on 7 and decrease to 6 to join the round?
Thanks,
Katie
Hi Katie,
Thanks for reaching out. When I made the hedgehog, I did not add an extra stitch and it came out great! While I know that that is a technique that is often used when knitting in the round, I think that in this case–even if you decrease it out on the next round–it would make the hedgehog’s nose too bulky. The cast on becomes the tip of the nose, so you’ll want to make sure that’s still small and pointy! Hope this helps!
All the best,
Lili
I am new t at using DPN and I on on Round 5. I don’t understand the pattern when it says K7, m1l, knit to end of round, m1r. (2 stitches increased)
I knitted 7, did the m1l and I don’t understand when I do m1r. I am on the first needle. Do I knit till the end and the last one I do m1r?
Hi Sharri!
Thank you so much for your question. Yes, you are correct! After you knit 7 and M1L, knit the remaining stitches in the row on your needles, and then at the very end of the round on the last needle, M1R. We also have a tutorial for Knitting in the Round on Double Pointed Needles if you are interested!
I hope this helps!
All the best,
Margaret
Thank you for donating this pattern to all us knitters.
hello! this is my first time using DPN. how do I switch to the main yarn while still having the contrast yarn on my needles?
Hi Em,
Thanks for reaching out! When beginning with a new ball of yarn, all you need to do is start knitting with it! We have a great tutorial that demonstrates this, if you want a good visual: Adding a Ball of Yarn. The only difference is that you’re beginning with the new ball of yarn at the edge of a row, rather than in the middle!
All the best,
Lili
Pages 10 and 11 for the start of the body are not clear as it has printed over itself and the directions cannot be read. Please correct so I can continue with my hedgehog. Thank you.
Hi Christine,
I’m sorry to hear that the pattern didn’t format correctly when you printed it! I’d recommend using the print function on this page to create a printer-friendly version. If you’re on your computer, you’ll find a “print” icon in the right column just below the “Save To Favorites” button. If you’re on a mobile version of the site, you will find the “print” icon below the pattern and above the comments.
Click on this button, and a window will pop up where you can delete whichever parts of the pattern you don’t want to print. When you hover over any image or a text block, it will be highlighted in yellow and a “trash” icon will appear. Just click on this icon to delete anything that’s not necessary to the pattern! For example, you may decide to shorten the pattern by omitting certain images or the list of materials. Then, just click on the “Print” button in the upper left-hand corner of the pop-up window!
All the best,
Lili