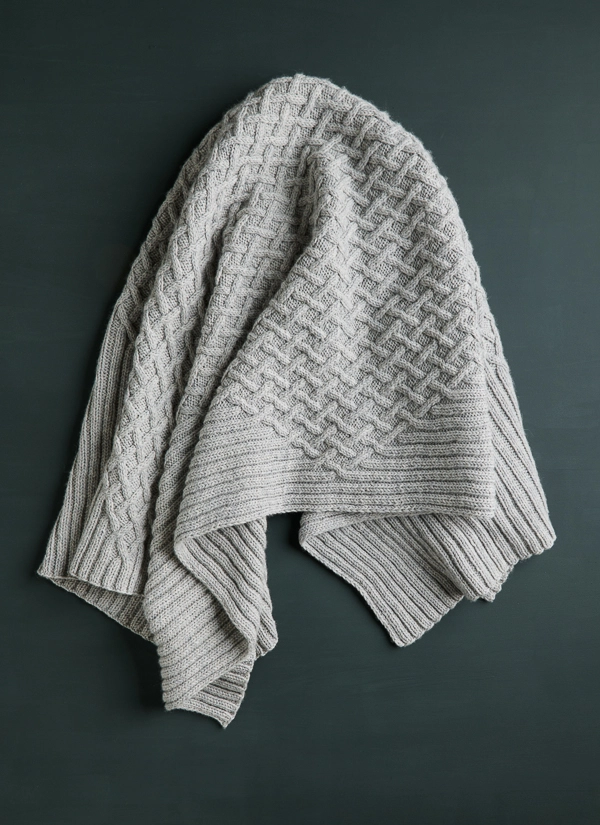
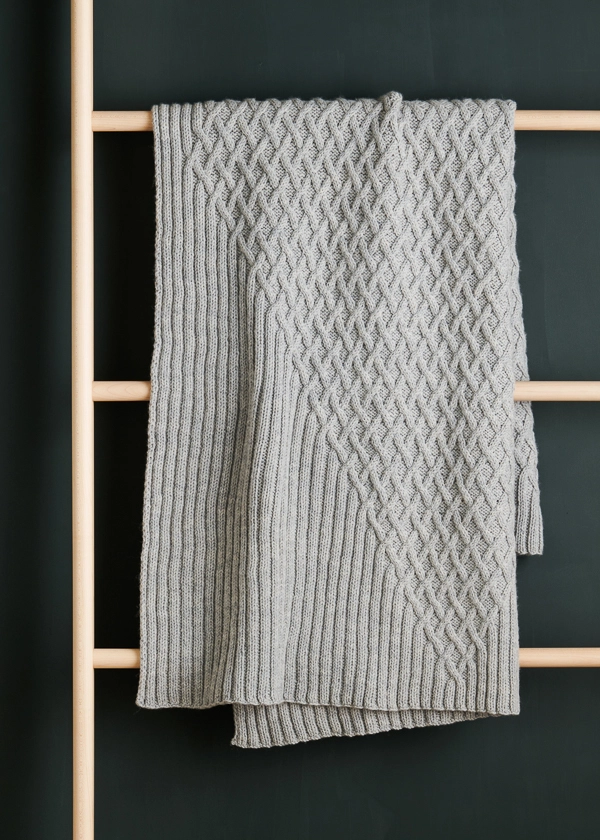
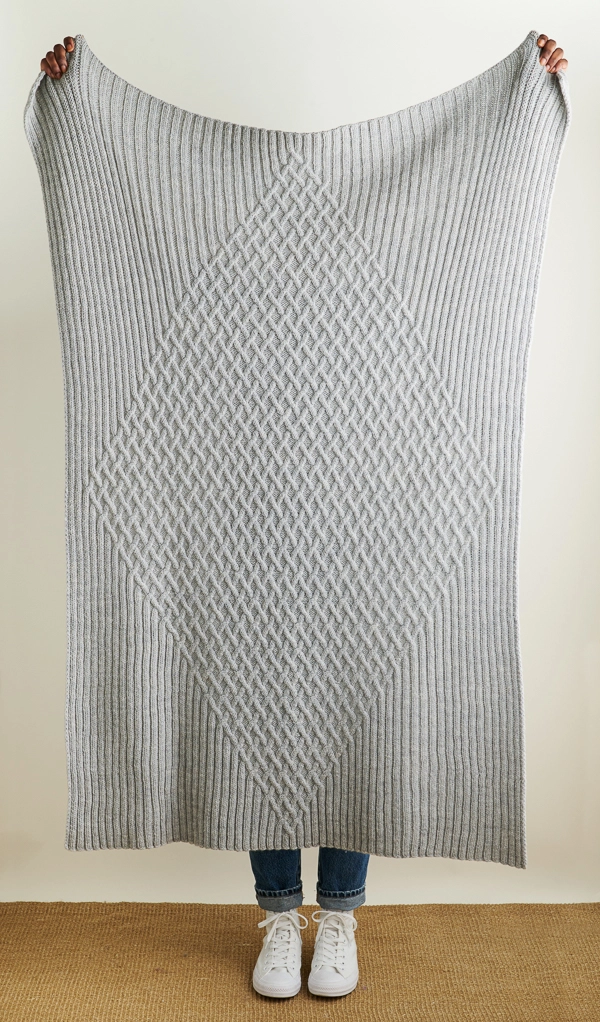
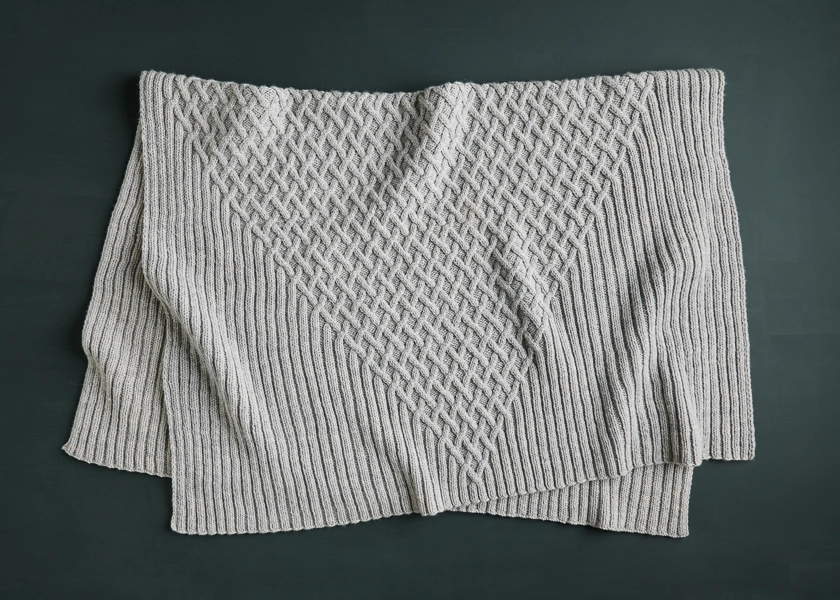
Emblem Blanket
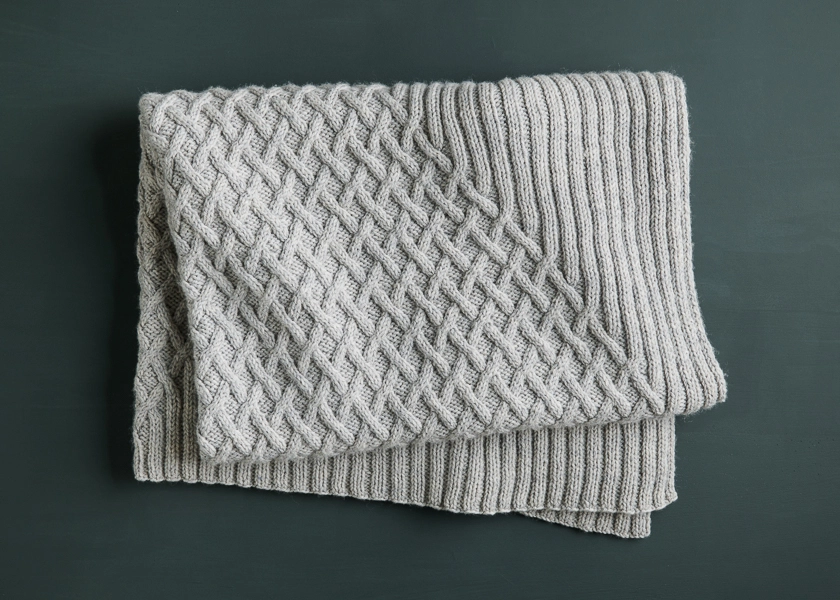
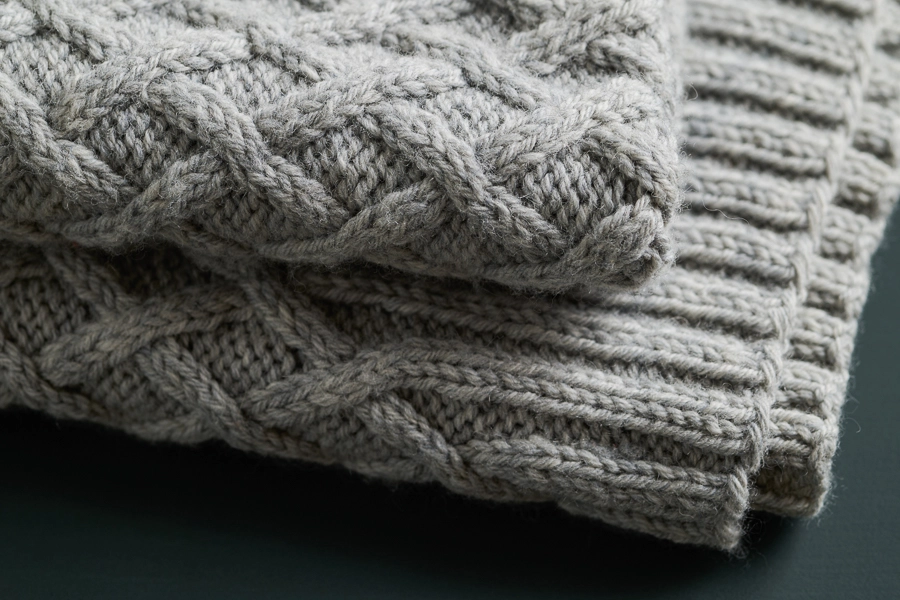
Our Emblem Blanket pattern has all the beauty and style of a classic cabled knit, but with a dramatic scale that gives the project a geometric, modern feel!
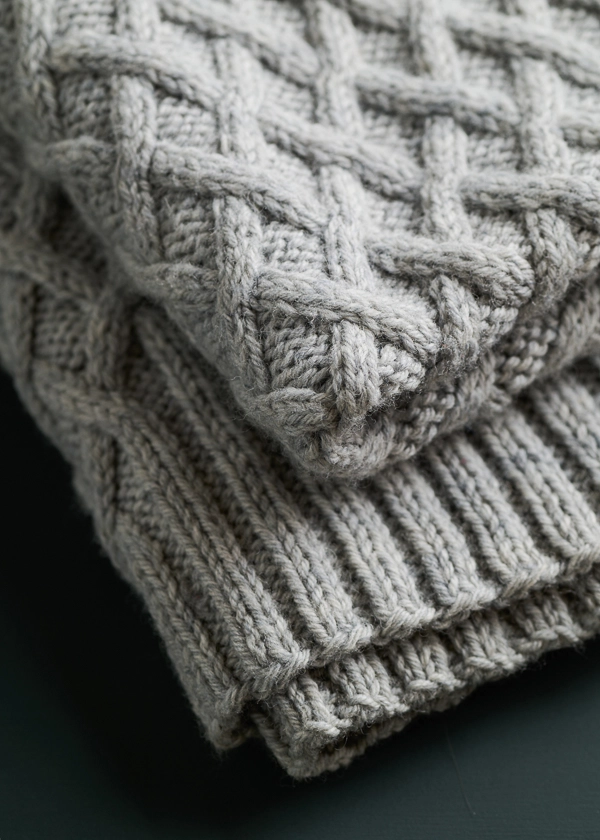
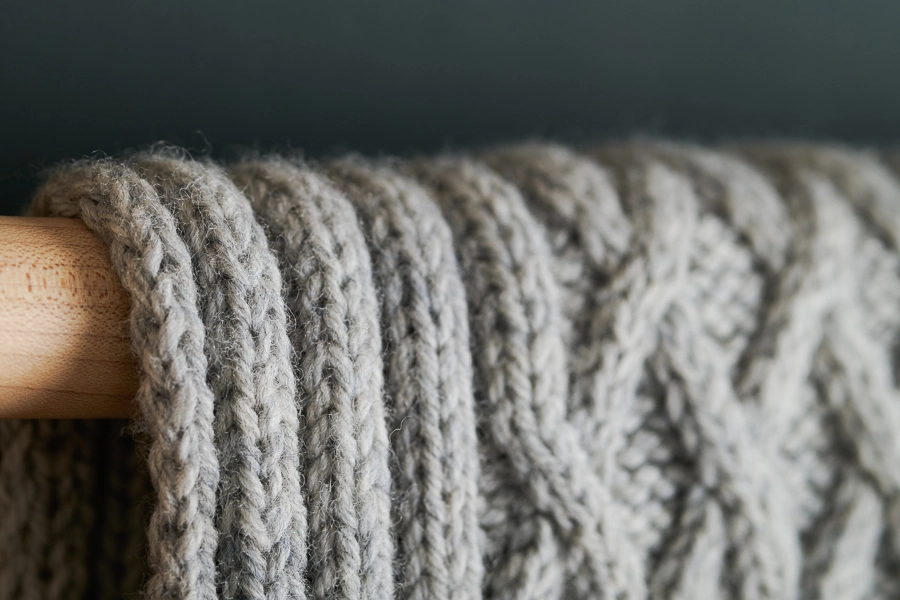
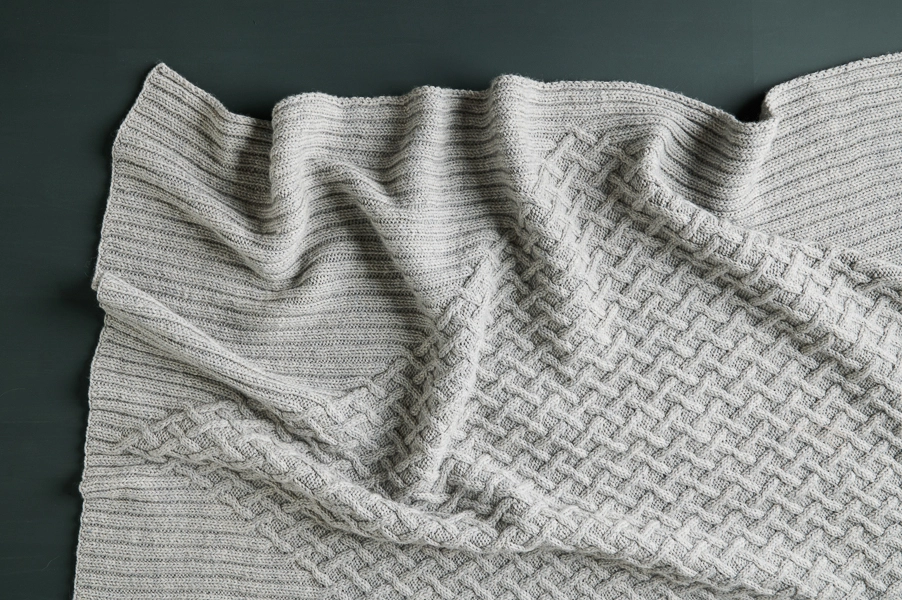
Simple ribbing travels up the blanket and melts seamlessly into the cabled diamonds within diamonds (within diamonds!) that make this blanket such a stunner. If the thought of all those cables intimidates you, take a breath and check out our cable tutorial… Because if you can knit, you can cable!
We offer both written and charted instructions for this pattern, but the cable charts are short and easy to read, making this a great project if you’re also new to reading charts!
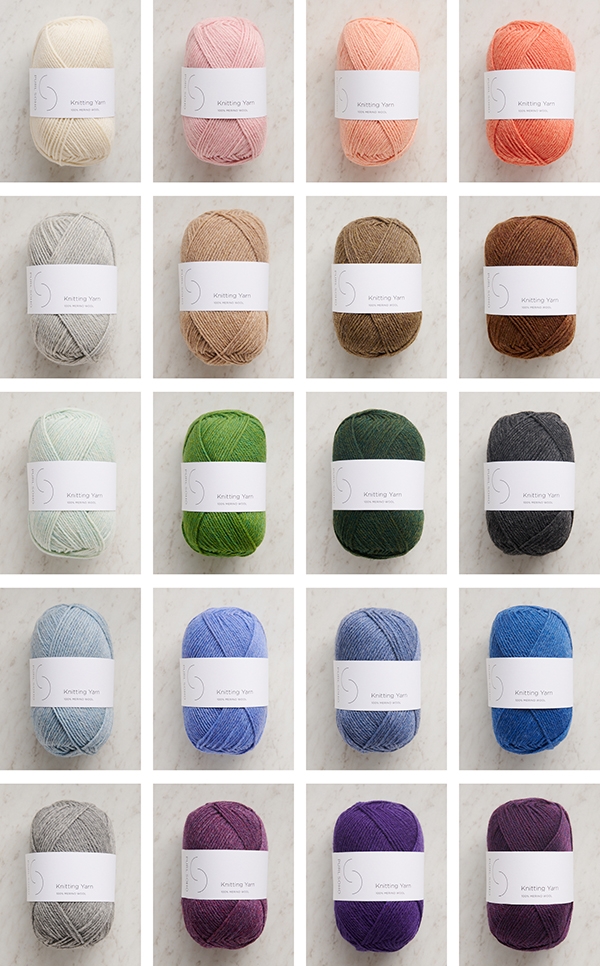
The perfect choice for all these captivating cables? Our 100% merino from New Zealand, Knitting Yarn! It has four even plies, which lead to spectacular stitch definition and beautifully articulated textures across the surface of the fabric.
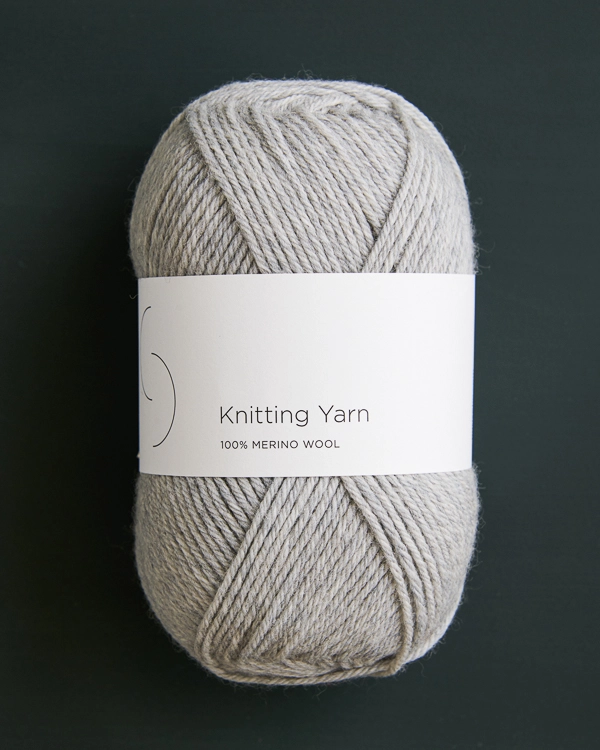
Knitting Yarn’s pleasant toothiness and springy feel make for a wonderful blanket, with enough structure to hold its shape and enough weight to make you cozy. Pick your favorite color, and cast on!
Yarn lovers, if you adore the yarn used in this project, you’ll love exploring all of our other yarn collections! Discover over 45 thoughtfully designed yarns in nearly every natural fiber and in every spectacular color you can imagine. Only available here at Purl Soho’s online yarn store, where every skein is created with care and your creativity in mind!
Blanket version designed by Purl Soho designer Hiromi Glover, based on the original Emblem Scarf by Jake Canton. Click here to see even more of Hiromi’s work!
Share your progress and connect with the community by tagging your pics with #PurlSoho, #PurlSohoBusyHands, #PurlSohoEmblemBlanket, and #PurlSohoKnittingYarn. We can’t wait to see what you make!
Materials
- 10 (13) balls of Purl Soho’s Knitting Yarn, 100% merino wool yarn. Each ball of this light worsted/DK yarnis 219 yards/ 100 grams; approximately 2110 (2725) yards required. We used the color Birch Bark.
- US 7 (4.5 mm) 40- or 47-inch circular needles
- A cable stitch holder
GAUGE
26 stitches and 25.5 rows = 4 inches in 2×2 rib, blocked and relaxed
SIZES
Crib (Throw)
Finished Dimensions: 37¾ inches wide x 54 inches long (42¾ inches wide x 61½ inches long)
Sample: We knit the Crib size.
NOTES
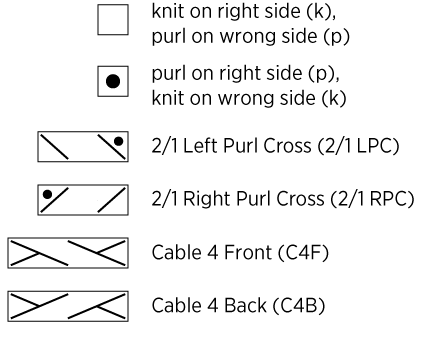
CABLES
Left + Right Purl Crosses
2/1 LPC (2/1 Left Purl Cross)
Slip 2 stitches onto cable stitch holder and hold in front of work, p1 from left needle, then k2 from cable stitch holder.
2/1 RPC (2/1 Right Purl Cross)
Slip 1 stitch onto cable stitch holder and hold in back of work, k2 from left needle, then p1 from cable stitch holder.
Cable 4 Front + Back
C4F (Cable 4 Front)
Slip 2 stitches onto cable stitch holder and hold in front of work, k2 from left needle, then k2 from cable stitch holder.
C4B (Cable 4 Back)
Slip 2 stitches onto cable stitch holder and hold in back of work, k2 from left needle, then k2 from cable stitch holder.
For more information about making cables, visit our Cable Tutorial. While it shows a 6-stitch cable and this pattern uses 3- or 4-stitch ones, the technique is the same!
CABLE PATTERNS: WRITTEN INSTRUCTIONS
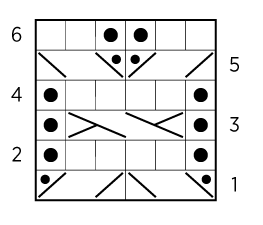
CABLE PATTERN 1
Worked over 6 stitches.
Row 1 (right side): 2/1 LPC (see Cables, above), 2/1 RPC (see Cables).
Row 2 (wrong side): K1, p4, k1.
Row 3: P1, C4F (see Cables), p1.
Row 4: K1, p4, k1.
Row 5: 2/1 RPC, 2/1 LPC.
Row 6: P2, k2, p2.
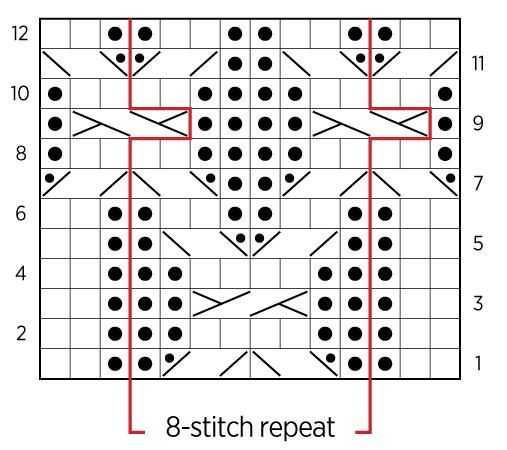
CABLE PATTERN 2
Worked over a multiple of 8 plus 6 stitches.
Row 1 (right side): K2, p1, *p1, 2/1 LPC, 2/1 RPC, p1, repeat from * to 3 stitches before marker, p1, k2.
Row 2 (wrong side): P2, k1, *k2, p4, k2, repeat from * to 3 stitches before marker, k1, p2.
Row 3: K2, p1, *p2, C4B (see Cables, above), p2, repeat from * to 3 stitches before marker, p1, k2.
Row 4: Repeat Row 2.
Row 5: K2, p1, *p1, 2/1 RPC, 2/1 LPC, p1, repeat from * to 3 stitches before marker, p1, k2.
Row 6: P2, k1, *k1, p2, k2, p2, k1, repeat from * to 3 stitches before marker, k1, p2.
Row 7: 2/1 LPC, *2/1 RPC, p2, 2/1 LPC, repeat from * to 3 stitches before marker, 2/1 RPC.
Row 8: K1, p2, *p2, k4, p2, repeat from * to 3 stitches before marker, p2, k1.
Row 9: P1, *C4F, p4, repeat from * to 5 stitches before marker, C4F, p1.
Row 10: Repeat Row 8.
Row 11: 2/1 RPC, *2/1 LPC, p2, 2/1 RPC, repeat from * to 3 stitches before marker, 2/1 LPC.
Row 12: Repeat Row 6.
Repeat Rows 1-12 for pattern.
CABLE PATTERN 3
Worked over a multiple of 8 plus 6 stitches.
Row 1 (right side): 2/1 LPC, *2/1 RPC, p2, 2/1 LPC, repeat from * to 3 stitches before next marker, 2/1 RPC.
Row 2 (wrong side): K1, p2, *p2, k4, p2, repeat from * to 3 stitches before marker, p2, k1.
Row 3: P1, *C4F, p4, repeat from * to 5 stitches before marker, C4F, p1.
Row 4: Repeat Row 2.
Row 5: 2/1 RPC, *2/1 LPC, p2, 2/1 RPC, repeat from * to 3 stitches before marker, 2/1 LPC.
Row 6: P2, k1, *k1, p2, k2, p2, k1, repeat from * to 3 stitches before marker, k1, p2.
Row 7: K2, p1, *p1, 2/1 LPC, 2/1 RPC, p1, repeat from * to 3 stitches before marker, p1, k2.
Row 8: P2, k1, *k2, p4, k2, repeat from * to 3 stitches before marker, k1, p2.
Row 9: K2, p1, *p2, C4B, p2, repeat from * to 3 stitches before marker, p1, k2.
Row 10: Repeat Row 8.
Row 11: K2, p1, *p1, 2/1 RPC, 2/1 LPC, p1, repeat from * to 3 stitches before marker, p1, k2.
Row 12: Repeat Row 6.
Repeat Rows 1-12 for pattern.
CABLE PATTERNS: CHARTS
Start in the bottom right corner of each Chart and work right-side (odd number) rows from right to left, and wrong-side (even number) rows from left to right. For more help with reading knitting charts, please visit our Reading A Chart tutorial.
KEY
CABLE PATTERN 1
CABLE PATTERN 2
CABLE PATTERN 3
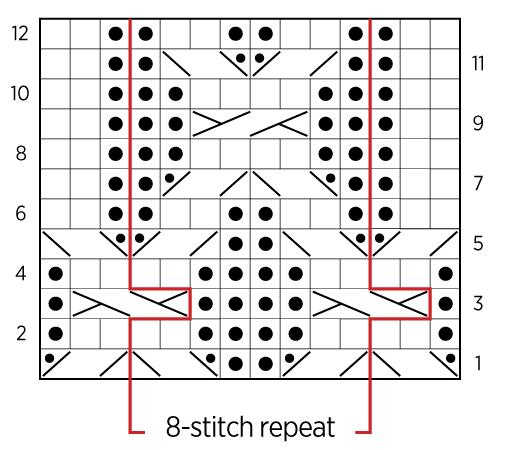
NOTE: Want to see it bigger? Here’s a PDF…
PATTERN
BEGIN
Cast on 246 (278) stitches. We used a basic Long Tail Cast On.
Set-Up Row (wrong side): Slip 1 with yarn in front , p1, *k2, p2, repeat from * to last 4 stitches, k2, p1, slip 1 wyif.
Row 1 (right side): *K2, p2, repeat from * to last 2 stitches, k2.
Row 2 (wrong side): Slip 1 wyif, p1, *k2, p2, repeat from * to last 4 stitches, k2, p1, slip 1 wyif.
Repeat Rows 1 and 2 two more times.
SECTION A
Row 1 (right side): [K2, p2] 30 (34) times, place marker (pm), work Row 1 of Cable Pattern 1 (either from Written Instructions or Chart, both above), pm, [p2, k2] 30 (34) times.
Row 2 (wrong side): Slip 1 wyif, p1, k2, [p2, k2] to first marker, slip marker (sm), work Row 2 of Cable Pattern 1 to next marker, sm, [k2, p2] to last 4 stitches, k2, p1, slip 1 wyif.
Rows 3–5: Work in established pattern, working Rows 3–5 of Cable Pattern 1.
Row 6 (wrong side) Slip 1 wyif, p1, k2, [p2, k2] to 8 stitches before first marker, pm, [p2, k2] 2 times, remove marker, work Row 6 of Cable Pattern 1 to next marker, remove marker, [k2, p2] 2 times, pm, [k2, p2] to last 4 stitches, k2, p1, slip 1 wyif. [22 stitches between markers]
SECTION B
Row 1 (right side): [K2, p2] to first marker, sm, work Row 1 of Cable Pattern 2 (either from Written Instructions or Chart, both above), sm, [p2, k2] to end of row.
Row 2 (wrong side): Slip 1 wyif, p1, k2, [p2, k2] to first marker, sm, work Row 2 of Cable Pattern 2, sm, [k2, p2] to last 4 stitches, k2, p1, slip 1 wyif.
Rows 3–11: Work in established pattern, working Rows 3–11 of Cable Pattern 2.
Row 12 (wrong side) Slip 1 wyif, p1, k2, [p2, k2] to 8 stitches before first marker, pm, [p2, k2] 2 times, remove marker, work Row 12 of Cable Pattern 2, remove marker, [k2, p2] 2 times, pm, [k2, p2] to last 4 stitches, k2, p1, slip 1 wyif. [16 more stitches between markers]
Repeat Rows 1-12 twelve (14) more times. [230 (262) stitches between markers]
SECTION C
Row 1 (right side): [K2, p2] 2 times, sm, work Row 1 of Cable Pattern 2, sm, [p2, k2] 2 times.
Row 2 (wrong side): Slip 1 wyif, p1, k2, p2, k2, sm, work Row 2 of Cable Pattern 2, sm, k2, p2, k2, p1, slip 1 wyif.
Rows 3–5: Work in established pattern, working Rows 3–5 of Cable Pattern 2.
Row 6 (wrong side): Slip 1 wyif, p1, k2, p2, k2, remove marker, [p2, k2] 2 times, pm, p2, *k2, p2, repeat from * to 8 stitches before next marker, pm, [k2, p2] 2 times, remove marker, k2, p2, p1, slip 1 wyif. [214 (246) stitches between markers]
SECTION D
Row 1 (right side): [K2, p2] to first marker, sm, work Row 1 of Cable Pattern 3 (either from Written Instructions or Chart, both above), sm, [p2, k2] to end of row.
Row 2 (wrong side): Slip 1 wyif, p1, k2, [p2, k2] to first marker, sm, work Row 2 of Cable Pattern 3, sm, [k2, p2] to last 4 stitches, k2, p1, slip 1 wyif.
Rows 3–11: Work in established pattern, working Rows 3–11 of Cable Pattern 3.
Row 12 (wrong side): Slip 1 wyif, p1, k2, [p2, k2] to first marker, remove marker, [p2, k2] 2 times, pm, p2, *k2, p2, repeat from * to 8 stitches before next marker, pm, [k2, p2] 2 times, remove marker, [k2, p2] to last 4 stitches, k2, p1, slip 1 wyif. [16 fewer stitches between markers]
Repeat Rows 1-12 twelve (14) more times. [6 stitches remain between markers]
SECTION E
Row 1 (right side): [K2, p2] to first marker, sm, work Row 1 of Cable Pattern 1, sm, [p2, k2] to end of row.
Row 2 (wrong side): Slip 1 wyif, p1, k2, [p2, k2] to first marker, sm, work Row 2 of Cable Pattern 1, sm, [k2, p2] to last 4 stitches, k2, p1, slip 1 wyif.
Rows 3–5: Work in established pattern, working Rows 3–5 of Cable Pattern 1.
Row 6 (wrong side): Slip 1 wyif, p1, k2, [p2, k2] to first marker, remove marker, work Row 6 of Cable Pattern 1, remove marker, [k2, p2] to last 4 stitches, k2, p1, slip 1 wyif.
END
Row 1 (right side): *K2, p2, repeat from * to last 2 stitches, k2.
Row 2 (wrong side): Slip 1 wyif, p1, *k2, p2, repeat from * to last 4 stitches, k2, p1, slip 1 wyif.
Repeat Rows 1 and 2 two more times.
With right side facing you, bind off all stitches in 2×2 rib pattern.
Weave in ends and gently wet block.
Learn About Knitting Yarn + All Our Beautiful Yarns
A true classic loved by knitters and crocheters alike, Knitting Yarn brings its crisp stitch definition, soft strength, and cushiony feel to this project! Made with 100% New Zealand merino wool, Knitting Yarn is a light worsted/DK-weight yarn in a ready-to-knit ball you’ll love to knit from. Simple stitches, dimensional textures, beautifully articulated cables, and glorious colorwork… Everything looks amazing in Knitting Yarn! Making something big, like a blanket or sweater? Shop our 1000-gram Knitting Yarn On A Cone collection, too!
More Free Knitting Patterns
- Be sure to explore our collection of (mostly free!) Knitting Yarn knitting patterns and cast on!
More Light Worsted/DK-Weight Yarns
- Shop our entire collection of light worsted/DK-weight yarns (What does DK-weight yarn mean, really? Our guide to DK yarn will answer your questions and demystify.)
- If you want to use a different yarn, be sure to take the time to get the correct gauge. Need help? Check our All About Gauge Tutorial!
More Yarns With Similar Fiber
- Shop merino wool yarn
Looking for more inspiration? Explore all of our free knitting patterns and knitting tutorials, buy one of our many knitting kits and yarn bundles, and shop for beautiful yarn. We have over 35 gorgeous natural fiber yarns in 100’s of magnificent colors, designed to bring integrity, beauty, and joy to your next knitting project and only available at Purl Soho!


What a beautiful design! Would love to knit this a long scarf/stole. Do you plan on releasing a scarf version? Thanks!
Hi Odaiba,
Thanks for writing in! This pattern is actually inspired by our previous Emblem Scarf pattern. I’d recommend checking that one out, since it sounds like exactly what you’re looking for!
All the best,
Lili
Hi. The link to the Emblem Scarf does not link to the pattern and I cannot find the pattern on the website. Would you please send a link to the pattern? Thank you
Hi Jo,
Thanks for reaching out! You can find the Emblem Scarf pattern right here. Hope this helps!
All the best,
Lili
Lilli, I think you have the dream job. I would love to just think knitting. Thank you for all your help with the Bobble Sheep pattern. Now I’m on to the emblem blanket.
Good morning…
I want to make the Emblem Blanket in the throw size. I was thinking New Leaf Green and Pine Needle for the cabled diamonds. How much of each color would I need?
Thank you!
Meredith
Hi Meredith,
Thanks for reaching out. That sounds like a fun idea, but we’re not quite sure how you’re planning on dividing the colors considering how difficult it would be to work this pattern with intarsia (or any other colorwork method). Could you let us know more about the layout you’d like? I may be able to calculate it once I know more about your plans, but in general, we recommend keeping to one color for this blanket!
All the best,
Lili
Okay, thank you. I wanted to do the inside diamond/cable part in one color and the outside/’straight’ lines, in another color.
Hi Meredith,
Thanks for letting me know! The diamond in the center takes up about half of the area of the blanket, so I’d recommend purchasing 7 skeins of each color, for 14 skeins total (and an equal amount for each color).
All the best,
Lili
I knit my grandson the Sandrift blanket busing the Santolina bundle in blues for college a year ago. His brother goes to college this fall. How durable, soft to the touch is this Emblem Blanket.
Hi Carole,
Thanks for reaching out. We designed this blanket with Knitting Yarn, which is an incredibly soft, yet durable, yarn! It’s made from merino wool, so it won’t itch, and it has a relatively tight spin with many plies, which increases the strength. Hope this helps!
All the best,
Lili
Thanks for the information.
Curious to know how to adjust to make a smaller, baby blanket, size. Any advice or would this be too complicated to resize?
Hi Claire,
Thanks for reaching out. It is a little tricky to modify the size of this blanket, but it’s totally possible! First, to determine how many stitches you’ll need to cast on, multiply your desired width by the number of stitches per inch, which, according to the gauge, is 6.5. Then, round the resulting number to the nearest multiple of 8 + 6, and cast on!
The next small thing you’ll need to change is on Row 1 of SECTION A. The number you need to increase is the number of times you repeat [k2, p2] at the beginning of the row and at the end as well. To find this number, just subtract 6 from your cast-on number and divide the result by 8.
From there on, you can pretty much just follow the pattern as written! However, you will need to repeat Rows 1-12 of both SECTION B and SECTION D fewer times, since your cabled diamonds will reach the edge of your blanket sooner. But this is super easy–just keep repeating Rows 1-12 until you have only 8 stitches between your stitch markers and the edges of the blanket!
I hope this helps, and please let me know if you’d like help with any of the calculations!
All the best,
Lili
First time here. I like the looks. I have been knitting and crocheting all my life. But now I’m back to beginner.
Hi Barbara,
Glad to hear that you’re a fan of this pattern! If you have any questions about it, please don’t hesitate to reach out to us here, or by sending an email to [email protected].
All the best,
Lili
This is a lovely pattern. I’m interested in knowing what the pattern looks like on the other side. Is it considered reversible? That’s something that is important to me in a blanket pattern. Thanks.
Hi Rita,
Thanks for writing in! This pattern is not reversible. The cables are stockinette, so they’ll show up as purl bumps on the wrong side, while the purl bumps in between the cables will show up as stockinette. I think it would still be an interesting and beautiful texture though!
All the best,
Lili
Thank you for another lovely pattern When you slip the stitches onto the cable stitch holder, I am presuming you slip them purlwise?
Hi DM,
Yes, you’re correct! In this pattern, all slipped stitches are slipped purlwise!
All the best,
Lili
Is there a worsted/aran weight yarn you would recommend to do this blanket? That would have similar stitch definition?
Hi Kim,
Plenty would be a great choice if you want to make this blanket in a worsted weight yarn instead. Plenty has amazing stitch definition, and we love using it for anything cabled!
Since you would need to knit at a larger gauge though, I’d recommend casting on fewer stitches so that your blanket ends up with the correct dimensions. First, to determine how many stitches you’ll need to cast on, multiply your desired width by the number of stitches per inch, which, according to the gauge, is 6.5. Then, round the resulting number to the nearest multiple of 8 + 6, and cast on!
The next small thing you’ll need to change is on Row 1 of SECTION A. The number you need to increase is the number of times you repeat [k2, p2] at the beginning of the row and at the end as well. To find this number, just subtract 6 from your cast-on number and divide the result by 8.
From there on, you can pretty much just follow the pattern as written! However, you will need to repeat Rows 1-12 of both SECTION B and SECTION D fewer times, since your cabled diamonds will reach the edge of your blanket sooner. But this is super easy–just keep repeating Rows 1-12 until you have only 8 stitches between your stitch markers and the edges of the blanket!
I hope this helps, and please let me know if you’d like help with any of the calculations!
All the best,
Lili
What is the finished throw size? And is the throw size the same as the crib size? Thanks
Hi Deborah,
Thanks for reaching out! You can find the dimensions of the two different sizes under the SIZES heading on the project page, but for reference, this is what it says there:
Crib (Throw)
Finished Dimensions: 37¾ inches wide x 54 inches long (42¾ inches wide x 61½ inches long)
I hope this helps!
All the best,
Lili
In knitting the emblem blanket the directions for the gauge say to measure after “block and relax”. Just what does that mean? I’ve been knitting for 74 years and never blocked ribbing because one usually needs the stretch. The gauge knit for the pattern appears to be shorter than 4″ but wider than 4 ” depending on the stretch. Is the amount of yarn called for enough to allow for differences in the gauge?
Hi Ruth,
That’s a great question! The reason that the ribbing needs to relax in this pattern is because of the cabled design. Cables do not naturally pull in like ribbing does, so without blocking, the sides of the blanket will slope inwards since the areas with more ribbing will have more stretch than the areas with more cables. In order to even out these two different gauges, you’ll need to let the ribbing relax during blocking.
The amount of yarn we recommend will work as long as you achieve the correct gauge of 26 stitches and 25.5 rows = 4 inches in 2×2 rib, blocked and relaxed (or something relatively close to it). I’d recommend knitting up an approximately 6 x 6 inch swatch and then measuring the central 4 inches after blocking it. Hope this helps clarify things!
All the best,
Lili
I’ve done the gauge for this blanket. I have the correct number of rows with the size 7 needle but the width is five inches even before blocking. What do I do now? I’ve never seen such a discrepancy .
Hi Ruth,
Blocking ribbing can definitely be tricky in regards to the stitch gauge! Would you be able to send a photo of your swatch to [email protected]? That’ll help us visualize what’s going on better and give more specific advice!
All the best,
Lili
I’ll knit another swatch so I can take a photo. I pulled the first one out.
Ruth
Hi Lili: I sent the photo as you requested. Thank you for trying to help me with this problem. I sent it to the email you mentioned.
Ruth
Thanks so much! I replied to your email this morning, so hopefully you received my message!
All the best,
Lili
Hi Lili: I’m back. I’m sorry to keep asking questions. I’ve sent another email with another photo to the above email address. Thanks for your help.
Ruth
Hi, Beautiful pattern. I’m wondering if you think Wigeon yarn would work with this pattern. I have some and don’t have a pattern in mind for it.
Thank you
Hi Regina,
Thanks for reaching out. While Wigeon won’t be a perfect substitute (since it’s a sportweight yarn, and this pattern was written for a DK weight yarn), there are a few different ways you can make it work! First, you can try using larger needles to achieve the gauge of the pattern (26 stitches and 25.5 rows = 4 inches in 2×2 rib, blocked and relaxed). This will create a slightly looser fabric with more drape, but if you can achieve gauge with Wigeon, then you can follow the pattern as written!
Alternatively, you could still knit it with Wigeon at a smaller gauge, but you would need to increase the stitch count and make some subsequent modifications in order for the blanket to turn out the correct size. Let me know if this option is the one you’d like to go with, and I’ll pass along the information on how you would need to modify the pattern to make this work!
All the best,
Lili
I’m trying to start section B and I can’t seem to get the correct stitch count. When I do the math, there is a shortage of .25 stitches. I’m making the crib blanket size which has 246 total stitches. When you take the 44 stitches for the beginning and ending rib, it leaves 202 stitches. 202 divided by 8 for the repeat plus 6 for the beginning and end of chart does not divide evenly. I have 4 stitches left before the marker. Is there an error in the pattern or am I missing something. Please advise.
Hello!
Thanks for writing in! At the beginning of Section B for the Crib size, you should have 112 stitches of ribbing before the first marker, 22 stitches in between markers, and 112 stitches after the second marker. The repeat of 6 stitches is actually positioned in the center cable pattern, not at the edges! That means that only the central section (that currently has 22 stitches) must be a multiple of 8 + 6. The remaining 112 stitches on each side are in a multiple of 4, since you’re just working 2 x 2 ribbing across them. Hope this helps clarify things!
All the best,
Lili
I’ve enjoyed working the cables for this blanket but am. confused by the written instructions. There are instructions for Sections A-E but no mention of when these are supposed to be used. There are no mentions of sections. Do they come one after the other? Where am I to place each section? Thanks for any help you can give me.
Hi Shareen,
Thanks for reaching out! You will work SECTIONS A through E in alphabetic order, one after the other. For example, SECTION A comes right after the BEGIN section, and it’s followed by SECTION B. I hope this helps clarify things!
All the best,
Lili
Thanks.
I have an allergy to wool. Could you make a recommendation for an alternative yarn?
Hi Debra,
Thanks for reaching out! I’d recommend trying either Morning or Simply Yak. Both these yarns are also DK weight, so they’ll work for the pattern/gauge, but they contain yak fiber instead of wool. Yak is considered hypoallergenic because it doesn’t contain lanolin, like wool does. Hope this helps!
All the best,
Lili
In Cable Pattern 2, Row 5 seems to be missing. Is it a repeat of another row?
Re: Row 5
I have tried to work it out from the diagram.
Is it k2, p1 *(p1, 2/1 RPC, 2/1 LPC, p1), p1, k2 ?
Thanks.
Hi Susan,
Thank you for writing in! The instructions for cable pattern 2, row 5 are as follows: Row 5: K2, p1, *p1, 2/1 RPC, 2/1 LPC, p1, repeat from * to 3 stitches before marker, p1, k2. The charted instructions are the same as the written instructions so you may find it helpful to cross-reference that if you need to check any of the rows as you work. I hope this helps but please let me know if I am misunderstanding your question and I would be happy to take another look!
Happy knitting,
Gavriella
Hi – I am just starting section C. The section has 6 rows, but cable pattern 2 has 12 rows. Am I repeating rows 1-6 of section C twice?
Love the pattern. It is a fun knit.
Hi Roberta,
You will only work 6 total rows in this section being sure to follow the cable instruction listed on each row. So for example, for row 1, you will only work Row 1 of Cable Pattern 2. I hope this helps!
Happy knitting,
Gavriella
Can this blanket be knitted using morning yarn?
Hi Jane!
You can definitely use Morning for this blanket! We just recommend knitting a quick gauge swatch to make sure you are able to achieve the same tension as the pattern.
All the best,
Gavriella
What a lovely pattern! I bought Knitting Yarn on a Cone and a few hanks of Tussock to make the Ember Blanket for a wedding gift and then I found this pattern. Has anyone used that combo for this pattern? I’ll play around with needle size to get gauge but just wondering how the halo from the Tussock might make the cables look.
Hi Ellie,
Adding a strand of Tussock would be absolutely lovely! While we haven’t tried this ourselves yet, I think that the cables are spaced far enough away from each other that the fuzzy halo won’t obstruct their definition. Since you have the yarn already, I’d recommend knitting up a small swatch to see (and feel!) what it’s like in person. And we’d love to know how it turns out!
All the best,
Lili
Thank you so much! Sorry, one more question and its silly but my brain is fried and I’m bad at knitting math despite being a knitter for more than two decades lol. If I ordered Knitting Yarn on a Cone (2,190 yards) and I am making the crib size of this Emblem Blanket (2,110 yards needed) but I am using size 8 needles, will that be enough? It’s only just hit me that going up a needle size, along with adding in the Tussock, might mean I won’t have enough yarn to finish the charts.
You’re welcome! That will depend on if you’re hitting the gauge of the pattern or not. If you go up a needle size and also end up with a larger gauge than the pattern calls for, then you will be at risk of running out of yarn. I’d recommend swatching and seeing what you end up with first, and then we can go from there!
All the best,
Lili
Question.
In the area where there is the straight rib I’d like to put an initial.
If I do an area of straight stockinette (with a purl frame) with a drop out stitch letter pattern. (like “alphabet blanket”) will it pull the blanket out of shape?
Hi Trina,
Thanks for writing in! I’m afraid that adding a section of stockinette and/or garter stitch within the ribbing will stretch the blanket out of shape in that spot. Another idea could be to work duplicate stitch over both the stockinette V stitches and the purl bumps in the ribbing. We show how to do duplicate stitch for both in our Weaving In Your Ends tutorial!
All the best,
Lili
That’s what I was afraid of. Thanks for getting back to me.