
Ainur Berkimbayeva For Purl Soho: Pinwheel Baby Romper In Picnic Cotton
We thought that a sleeping baby was the cutest thing out there, but then we saw a sleeping baby in Ainur Berkimbayeva’s Pinwheel Baby Romper… Well, that just takes the cake!
Being a master of original construction and clever design, Ainur has us cast on at the center of this adorable pinwheel bib, then knit in a circle, increasing at the five points.

Once you’ve made two of these little wheels, you join them across the underarms and knit the billowing bottom of the piece in the round.

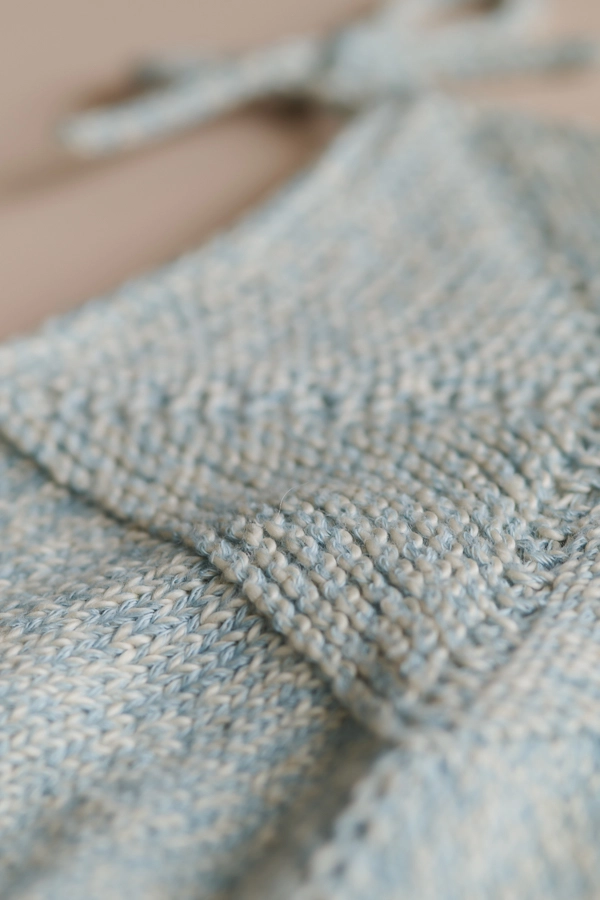
Like the blur on a twirling pinwheel, the two colors of our Picnic Cotton blend together as you knit, creating a playful marled fabric that is as light and soft as the skin of its tiny recipient. And it drapes beautifully, ensuring that any baby wearing the Pinwheel Baby Romper will be as comfortable as they are cute!

One hundred percent Peruvian Pima cotton, Picnic Cotton is sourced, spun, and dyed in Peru. Pima cotton comes from fibers with an extra-long staple length that make for a uniquely smooth and strong yarn… It’s the very best for your little bugaboo!

Picnic Cotton is very affordable, machine wash- and dryable, and comes in a super sweet palette, making it wonderfully suited for this winsome piece and the baby in your life!
Yarn lovers, if you adore the yarn used in this project, you’ll love exploring all of our other yarn collections! Discover over 45 thoughtfully designed yarns in nearly every natural fiber and in every spectacular color you can imagine. Only available here at Purl Soho’s online yarn store, where every skein is created with care and your creativity in mind!

Designed for Purl Soho by Ainur Berkimbayeva. Ainur sees the unique constraints of knitting as opportunities rather than limitations. Using her remarkable ingenuity and love of geometry, she designs beautiful pieces for knitters who share her enthusiasm for shape, texture, and adventure!
Share your progress and connect with the community by tagging your pics with #PurlSoho, #PurlSohoBusyHands, #PurlSohoPinwheelBabyRomper and #PurlSohoPicnicCotton. We can’t wait to see what you make!
Materials

- 3 (3, 4) skeins of Purl Soho’s Picnic Cotton, 100% Peruvian Pima cotton yarn. Each skein of this fingering weight yarn is 164 yards; approximately 365 (455, 550) yards required. We used the color Sky + Clouds.
- US 3 (3.25 mm), 24-inch circular needles
- Six US 3 double pointed needles
- Spare double pointed or circular needles, US 3 or smaller
- Stitch markers, including one unique
- Stitch holders or scrap yarn
- A Pinwheel Baby Romper pattern
GAUGE
29 stitches and 52 rounds = 4 inches in garter stitch
29 stitches and 38 rounds = 4 inches in stockinette stitch
SIZES
3–6 months (6–12 months, 12–18 months)
To fit actual chest circumference of approximately 16 (18, 20) inches with approximately 2–3 inches of ease
- Finished Waist Circumference: 16¼ (18½, 20¾) inches
- Finished Bib Width and Height: 4¼ (4¾, 5¼) inches
- Front Length from Waist to Crotch: 6 (6¾, 7½) inches
- Leg Circumference: 8¼ (9½, 10½) inches
Sample: The romper shown here is size 3–6 months. The blanket is our Arbor Blanket. You can find the free pattern here!
PATTERN

The Pinwheel Baby Romper is available for purchase as a PDF download only.


LEARN ABOUT PICNIC COTTON + ALL OUR BEAUTIFUL YARNS
Picnic Cotton brings the spirit of a soft summer breeze to this project! 100% Peruvian Pima cotton, this fingering-weight yarn starts with a warm-white roving core, which gets intermittently wrapped in delicate, colored threads. Knit up, it makes a beautifully marled fabric with a lovely drape. Machine wash- and dryable, Picnic Cotton’s cheery palette is inspired by the joy of summer!
More Free Knitting Patterns
- Be sure to explore our collection of Picnic Cotton knitting patterns and cast on!
More Fingering-Weight Yarns
- Shop our entire collection of fingering-weight yarns
- If you want to use a different yarn, be sure to take the time to get the correct gauge. Need help? Check our All About Gauge Tutorial!
More Yarns With Similar Fibers
- Shop cotton yarn (What helps cotton keep its cool? Learn all about this soft, natural fiber in our guide to cotton yarn!)
- Shop plant-based yarn
- Shop machine-washable yarn
Looking for more inspiration? Explore all of our free knitting patterns and knitting tutorials, buy one of our many knitting kits and yarn bundles, and shop for beautiful yarn. We have over 35 gorgeous natural fiber yarns in 100’s of magnificent colors, designed to bring integrity, beauty, and joy to your next knitting project and only available at Purl Soho!


Thank you for including a photo of those yummy little tootsies!
I’m having a hard time casting on with the double. points. I keep dropping the stitches and twisting them because there are only five cast on stitches. Is there a video tutorial on how to do this? Or, is there another way to cast on and get a similar look?
Thanks!
Hello!
Thank you for your question, though I’m so sorry to hear you are having a frustrating time with this cast on! One trick I can recommend that might help is casting all five stitches onto one double pointed needle, and then distributing them between the three needles before knitting the first round. We also have a tutorial for using Double Pointed Needles in general that may be of interest to you!
I hope this helps in the meantime, but please feel free to reach out to us at [email protected] if you are still having trouble!
All the best,
Margaret
Thank you, Margaret!
I’ll check out the tutorial for insights. I did try to cast onto one needle and then distributing. I’ll try again.
You are very welcome! I hope our tutorial can be helpful, and please feel free to get in touch with us if you are in need of some extra help!
All the best,
Margaret
I tried the DPN’s too as mentioned above, first onto one needle. I’m somewhat used to using DPN’s but this was tough! I tried magic loop too. I’ll try the DPN’s again, it was probably too late last night for the first time.
I finally got this going after many re-starts! I ended up using two circulars to start with the first five stitches. I’ve now transferred the 30 stitches evenly onto five DPN’s (6 stitches each).
However, I’m not sure my stitch markers are in the correct spots. It’s a long story, (since I was struggling), but I’m not at all confident they are in proper spots.
Can you help with this? I want to keep going correctly.
TIA! Margaret
Hi Margaret,
Thanks for reaching out! I’d be happy to help you with the marker placement for this section.
After redistributing your stitches onto 5 DPNs, your working yarn would be ready to work with at the beginning of your round where you can place your first marker. From there you will purl 1 and place a second marker. Then you can *purl 5 stitches, pm, purl 1 pm*, and repeat from * to * until you have 10 stitch markers total. You can see where each marker should go on either side of the knit stitches that are located between the increased stitches made on previous rows.
I hope this helps, and please let us know if you have any other questions!
All the best,
Carly
Yes!! This will help so much! I’m determined to get this right…this romper is so adorable and makes a great gift for a new grand-nephew. Thank you so much!
Hi Carly, I’m aware that you don’t state the levels, i.e. beginner, easy, intermediate, etc but based on reading the comments I’m wondering–would you say that this is not for a knitter that is not very experienced?
If so, is there another easier baby one piece romper that might be easier?
Thank you!
Leanne B.
Hi Leanne,
This pattern might prove to be a challenge for a beginner knitter! If you’re curious about what techniques are required, I’d be happy to list those out and provide links to our tutorials on them, in case you want to see what they entail. But I’m also happy to recommend some easier patterns!
While we do not have any other baby romper patterns, I’d recommend the Easy Pullover for Babies, Toddlers + Kids as a great pattern for less experienced knitters. If you’ve never knit a sweater before, this is a great one to begin with!
All the best,
Lili
I have to agree – I have cast on and distributed the stiches on to 3 needles (several times!!!!) but have not been able to get past that! I will try again today but if I give up on this project, can I use the yarn for the clean and simple baby dress? I know this yarn is fingering versus the cotton pure yarn. Thank you!
Hi Bonnie,
Thank you for reaching out, though I’m sorry to hear that you’ve had to restart your project!
We would be happy to answer any questions you have about the pattern, so please feel free to reach out to us at [email protected] or in the comments below so we can help get your project back on track. We also offer free 1-on-1 sessions over zoom if you’d prefer! You can sign up for a session here.
If you do decide to use your Buttercup Cotton for a different project, I’m afraid it would be too fine to knit the Clean + Simple Baby Dress. Instead, I’d recommend checking out the Seashell Baby Shirt + Dress and the Baby Jumper patterns! Both projects were made using a fingering weight yarn, but it’s always best to knit a gauge swatch before casting on for your project to ensure you’re getting the correct gauge. Our tutorial, All About Gauge, might be helpful for this project!
Please let us know if you have any other questions!
All the best,
Carly
Can this be done on magic loop?
Hi Alexis,
Thanks for your reaching out with your question. We knit our sample using DPNs since this project starts out with so few stitches, but you can absolutely use the Magic Loop to knit the Pinwheel Baby Romper!
I hope this helps, and happy knitting!
All the best,
Carly
Hi, I am really enjoying knitting this project. I have divided for the legs, and I have the right leg stitches distributed over 3 DPNs. Next step is “join yarn at inner Leg and pm for end of round.” I am not sure how to join the right leg stitches to work in the round, since there is no working yarn (the working yarn was cut previously, and the tail is in the middle of one of the DPNs and not near the inner Leg). Do you have any advice?
I also wanted to share with others that I also struggled with casting on and getting the pinwheels started. I ended up having success working the pinwheels in magic loop.
Hi Emma,
Thanks for reaching out. I’m sorry to hear that you had difficulty casting on and getting started with this project, but glad that magic loop did the trick!
When you begin using a new working yarn, all you’ll need to do is start knitting with it! Once you have a few stitches done, it will be completely secure. If this is daunting, we have a great tutorial, Adding a Ball of Yarn, that shows all the steps!
All the best,
Lili
Thanks Lili! I think I was misunderstanding the instructions–it sounds like I should just start knitting with the new yarn, and then I can join for working in the round after the first row is complete. Thanks again.
You’re very welcome, Emma! Yes, once you’ve started knitting with your new working yarn, you’ll be all set up for working in the round!
All the best,
Lili
Just confirming the romper does not open at the bottom for easier diaper changes?
Hi Nancy,
This romper was indeed designed without an opening at the bottom!
All the best,
Lili
For those struggling with the caston, could it be done with a “magic circle” (a search will find you many tutorials), whereby you cast on the stitches and draw them together later?
Hi Judy,
I’ve only heard of using the magic circle to begin crochet projects, but if you know of a version for knitting, then I’m sure it would be great to experiment with for this project!
All the best,
Lili
Hi, I am also having trouble getting started. I left a comment on the ravelry comments, but here it is:
Hello, I’m feeling stupid asking this, but I’m confused about the initial set up.
I cast on the 5 stitches, then I purled, then I did the K1 M1L to get to 10 stitches. This next part has me confused though.
It says to purl 1 then place a marker to the end of the round which would make 10 markers! I that what you meant?
The next round has you make 1 right and left only 5 times, which leaves all those extra markers.
The pinwheel clearly has 5 sections, so are the markers to divide the stitches into 5 sections? I don’t understand why we need 10 markers.
It’s not making sense to me – please help!
I’m also doing it with magic loop, but that shouldn’t make a difference right?
Thanks for any help you can give, and I’d love a zoom session to help me.
Hi Leslie,
Thanks for reaching out, although I’m sorry to hear that you’re having trouble getting started on this pattern! Yes, there should be 10 total stitch markers at this point. There is one stitch marker on either side of each of the five “seams” of the front and back bib! This adds up to 10 markers, since there are 2 per “seam.”
In answer to your other question, magic loop will not make a difference! I hope this helps clear up any confusion, but if you’re interested in chatting more over Zoom, I’d recommend signing up for a 1-On-1 Project Help session.
All the best,
Lili
I’m fairly new to knitting and boy has this pattern made me grow in my knitting journey. This one takes a lot of persistence and patience. I am almost done! Love it!!
I wanted to ask a question about the Straps + Armhole edging part. The pattern says to pickup and knit a total of 68 stitches for each area starting at the front bib, underarm and back bib. So do I pickup all 68 stitches first then cut yarn then join in new yarn to knit these stitches before heading to the next step for the i-cord edging? Or, am I just picking up those stitches and then proceeding to the i-cord edging step?
Hi Judith,
Thank you for writing in! You will pick up and knit the 68 stitches, then cut your yarn with a tail length of 8 inches before proceeding to the steps to make your i-cord. I hope this helps!
Happy knitting,
Gavriella
Hello,
Are the gauge swatches meant to be as if in the round? That is how I’ve been doing mine, but I can already tell that the garter gauge is much much larger than the stockinette, even though the pattern gives 52 rounds for garter gauge and 38 rounds for stockinette gauge. Any suggestions?
thank you!
Michelle
Hi Michelle,
That is exactly correct, the gauge swatches will be knit in the same fashion as the pattern. I would suggest going down a needle size for the garter stitch swatch and sections of the pattern. Just to make sure you are able to meet the same gauge as the pattern. I hope this helps but please let me know if you have any other questions!
All the best,
Gavriella
I love this pattern, but as with others, I struggled with the CO. Ultimately, I found it helpful to use wood DPNs. The short DPNs work best.
I am at the end of SHAPE BACK WITH SHORT ROWS. I am confused by the instruction ‘Knit to end of round”. It would help to know how many stitches are knit by the end of SR 5.
Thank you!
Hi Pearl,
We’re sorry to hear you are having trouble with this pattern. On short row 5 you should knit back to your BOR which has been marked with the unique stitch marker. When working the short rows, you will have the same amount of stitches on your needles the entire time as there are no increase or decreases made. I hope this helps but please feel free to email in a photo of your project and the issue you are running into to [email protected] so we can have a deeper look. We’ll be able to better visualize what’s going on that way!
All the best,
Gavriella
Front bib….THE bind off paragraph..unable to get the markers to the front center..is the knit 1 part of the bind off process…or is it to remain separate on the right needle..Than begin binding off the 113 stitches..I will be back later thank – you deb
Hi Deborah,
Thanks for writing in! The k1 is not part of the bind-off. You will k1, then remove the stitch marker that’s there, then k2 and begin the bind-off with those two stitches. Hope this helps clarify things!
All the best,
Lili