

Wheelwright Shawl
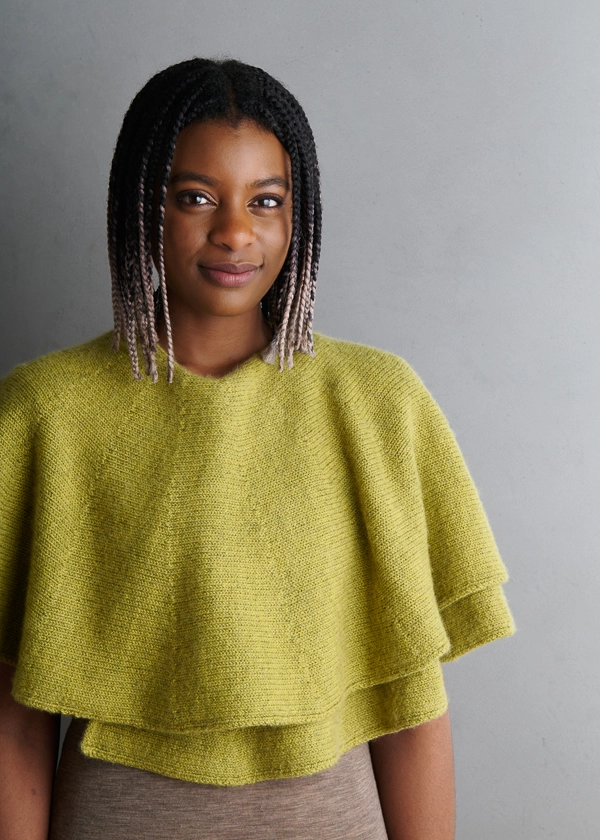
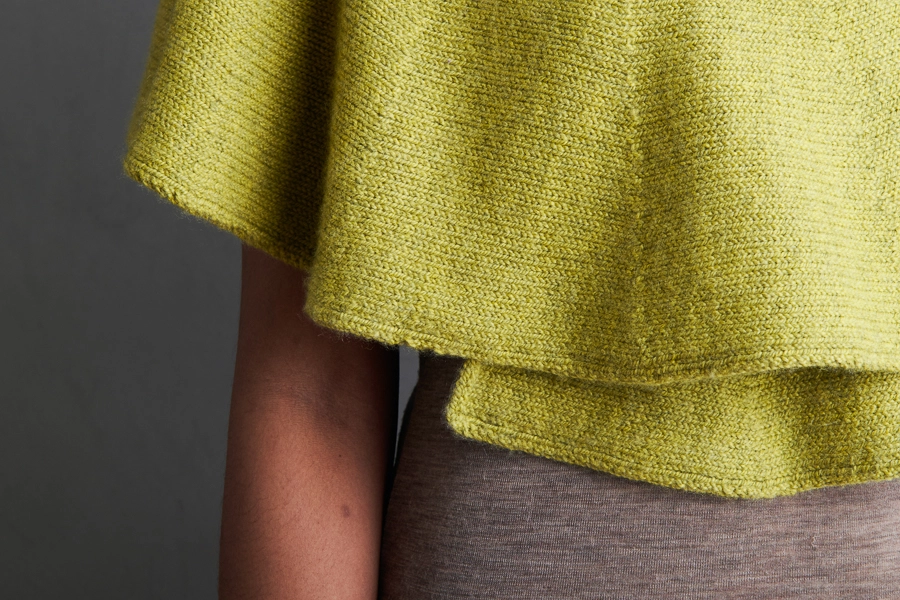
Our Wheelwright Shawl borrows its engineering from the hand-makers across the town square to create a circular sweep of soft-as-can-be fabric!
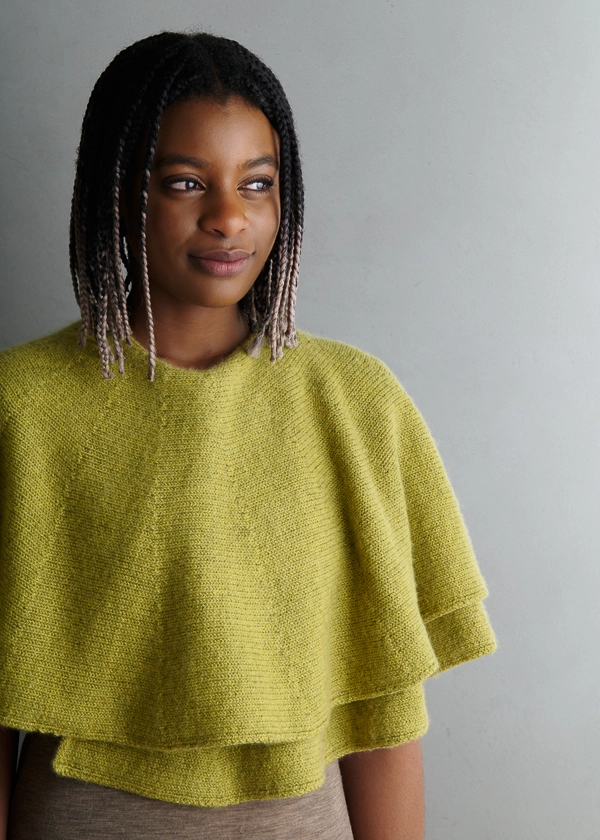
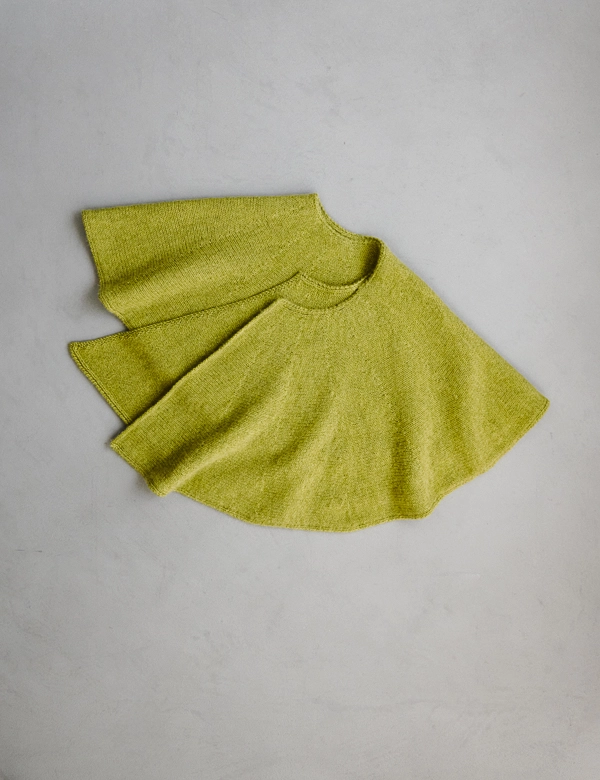
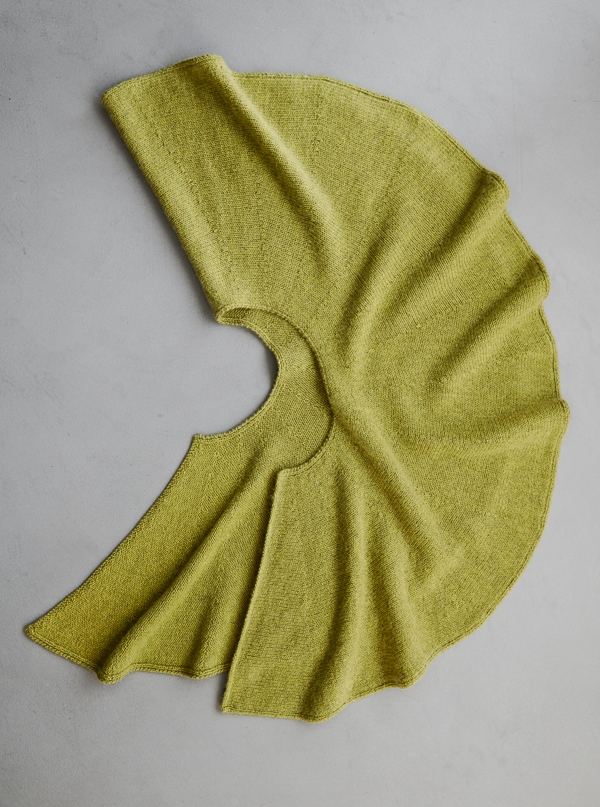
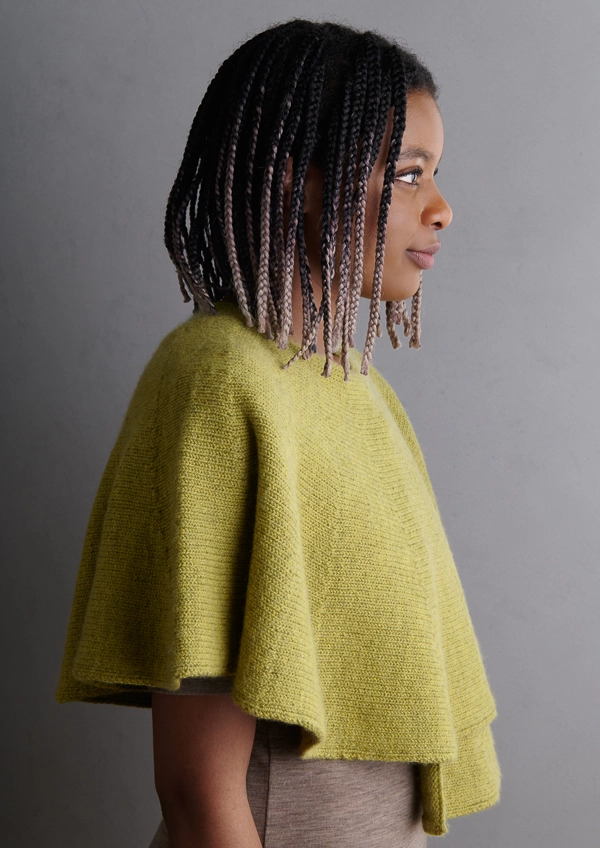
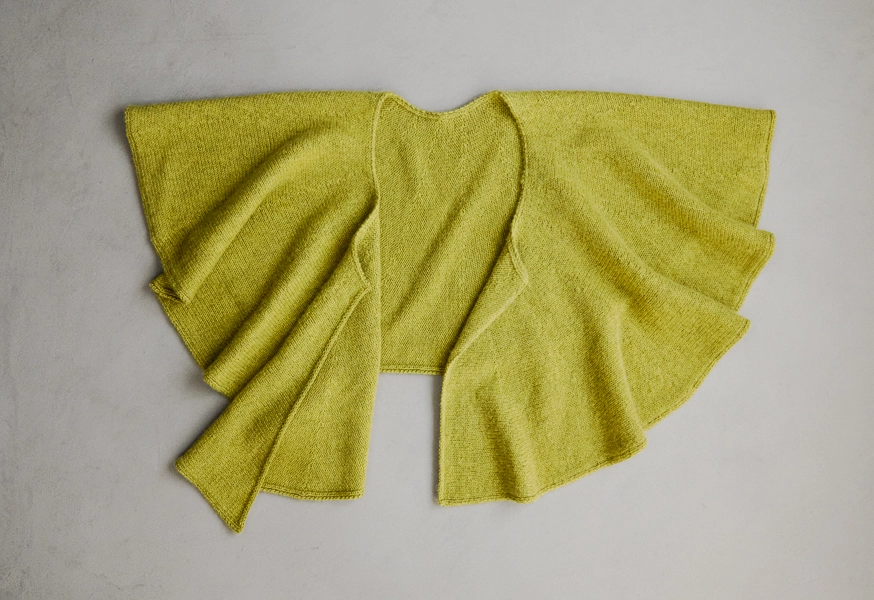
An engaging construction, you form each spoke of the Wheelwright Shawl with short rows that, twenty-four spokes later, create a circle and a half with a rounded opening in the middle, all designed to swing around your body with beauty, grace, and a bit of drama, too.
If short rows are new to you, now is the time to get over that hurdle! Simple stockinette stitch clears the plate for focusing on a new technique, while 24 wedges offer enough practice that, by the end, short rows will be just one more arrow in your quiver.
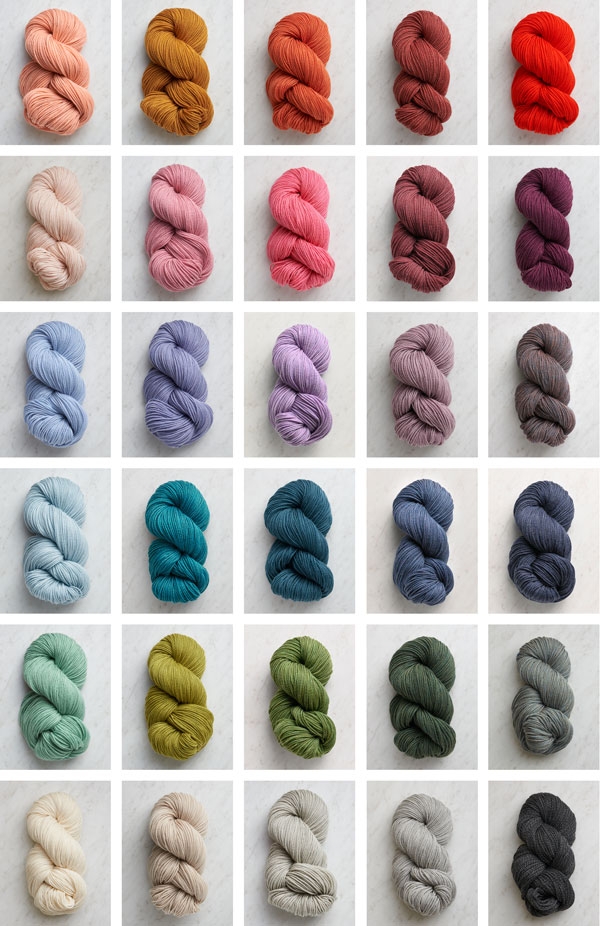
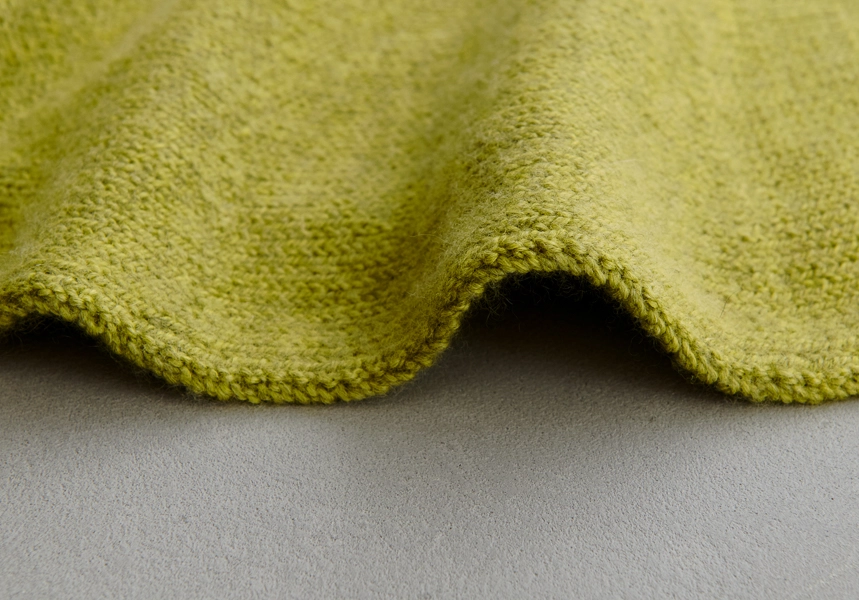
When a gorgeous swath of fabric is the goal, our Cashmere Merino Bloom is a wonderful choice. Seventy-five percent extra fine merino and 25% cashmere, it is incredibly soft with a lovely glow that comes from the halo of cashmere fiber hovering over its surface. It comes in over two dozen inspiring colors, including this Golden Green, like a rare gem grown deep in a field of lichen!
Designed by Purl Soho designer, Jake Canton. Click here to see even more of Jake’s designs!
Share your progress and connect with the community by tagging your pics with #PurlSoho, #PurlSohoBusyHands, #PurlSohoWheelwrightShawl and #PurlSohoCashmereMerinoBloom. We can’t wait to see what you make!
Materials
- 5 skeins of Purl Soho’s Cashmere Merino Bloom, 75% extra fine merino and 25% cashmere. Each skein is 218 yards/ 100 grams; approximately 1090 yards required. We used the color Golden Green.
- US 6 (4mm), straight or 24-inch circular needles
Gauge
20 stitches and 32 rows = 4 inches in stockinette stitch
NOTE: We used nearly 5 full skeins to make this wrap. To avoid running short, please double check your gauge and be conservative with tails!
Size
- Finished Outer Circumference: 168 inches
- Finished Inner (Neckhole) Circumference: 24¼ inches
- Finished Width from Inner to Outer Edge: 15¼ inches
Notes
CONSTRUCTION
You will cast on at a short end of this shawl and use short rows to create 24 pie-shaped wedges, which form a circle and a half with a rounded inner edge.
SHORT ROW SHAPING: WRP-T (WRAP AND TURN)
Keeping yarn in back, slip next stitch purlwise from left needle to right needle. Bring yarn to front. Return slipped stitch to left needle. Turn work so wrong side is facing you.
For a step-by-step video and photo tutorial of how to work this technique, please visit our Short Rows: Wrap + Turn Tutorial tutorial, but do not move yarn to back before turning work.
Pattern
Cast on 76 stitches. We used a basic Long Tail Cast On.
Set-Up Row (wrong side): K1, p1, knit to last 2 stitches, p1, k1.
SHORT-ROW WEDGE
Row 1 (right side): K2, p1, knit to last 3 stitches, p1, k2.
Row 2 (wrong side): K1, p1, k1, purl to last 3 stitches, k1, p1, k1.
Rows 3–6: Repeat Rows 1 and 2 two more times.
Row 7: K2, p1, knit to last 4 stitches, wrp-t (see Note).
Row 8: Purl to last 3 stitches, k1, p1, k1.
Row 9: K2, p1, knit to 3 stitches before wrap, wrp-t.
Rows 10–53: Repeat Rows 8 and 9 twenty-two more times. [3 stitches remain to the left of the final wrap]
Row 54: K1, p1, k1.
Row 55: K2, p1, knit to last 3 stitches, knitting wrapped stitches with their wraps, p1, k2.
Row 56: K1, p1, k1, purl to last 3 stitches, k1, p1, k1.
CONTINUE
Repeat Short-Row Wedge 23 more times, ending with Row 55 on the last repeat.
Next Row (wrong side): K1, p1, knit to last 2 stitches, p1, k1.
With right side facing you, bind off in knit stitch.
FINISHING
Weave in the ends and gently wet block.


Well, now I’ve gone and done it.
My daughter wants a Wheelwright shall that has a 126 st cast on.
I have to do more row 8 and 9 repeats, but I have no idea how many more need to be made.
PULLING MY HAIR OUT!!!
Thank you for your help. YOU ARE A LIFE SAVER!!!
Hi MJ,
Unfortunately, 126 stitches will not work for this pattern, as it is not a multiple of 3 + 1. You will need to use either 124 stitches or 127 stitches instead!
The easiest way to keep track of your repeats of Rows 8 and 9 actually is to not count them! Instead, you can simply keep repeating them until you have only 3 stitches to the left of the final wrap. Once you have cast on a multiple of 3 + 1 stitches (either 124 or 127 stitches), this will work out perfectly! So instead of repeating Rows 8 and 9 just 22 more times, you will need to continue repeating them until there are only 3 stitches left.
All the best,
Lili
NOT A GOOD WAY TO START MY DAY.
I chose to make this shawl longer. I already knit everything up to this point.
The last row I knit was a right-side row, followed up by the wrong side row: “WS Row 8: P to last 3, K1, P1, K1.”
What am I missing?
Hi MJ,
If you still have more short rows to work in the wedge, then it sounds like you’re in the correct spot! After working a repeat of Row 9 (right side), then you will repeat Row 8 (wrong side) again.
All the best,
Lili
Lili, I AM LOST. Would you please make more sense of the instructions you gave me?
Thank you in advance for your help, and my apologies for being such a pain in the neck.
Hi MJ,
Thanks so much for writing in! It sounds like from your last comment that you’ve just finished a Row 9 (Right Side) repeat and followed that up with Row 8 (wrong side). You just need to keep repeating these 2 rows until you have 3 stitches remaining to the left of the final wrap. You should be on Row 54 (a wrong side row) at this point. Proceed with the instructions for Rows 54 to 56, and you’ll have a completed wedge! This shawl is made up of multiple wedges, so you will continue making wedges until you’ve completed 23 of them in total, ending with Row 55 on the last repeat. Then, you’ll just have one more wrong side row to do before binding off!
I hope this helps! Feel free to reach out to us at customerservice@purlsoho.com if you’d like to send any photos of your work and we’d be more than happy to keep looking into this over there!
All the best,
Cat
I am dyslexic, and now suffer from dementia, so my recall is a problem.
I do remember when I first started knitting this pattern there was something about wrap and turns, where the first one was supposed to be worked… but not all of the others.
I hope I have explained this well enough that you will understand what I am talking about.
It seems like there were three situations that were not explained in the pattern itself, but like after thoughts. I have started knitting this pattern more times than I can remember.
I am desperate to be successful knitting this pattern. It is to be a gift for my second daughter, as she liked the shawl as much as I do.
I hope and pray you have the answers to my questions.
Thank you in advance.
Happy Thanksgiving, Merry Christmas and Happy New Year to you and yours.
Hi MJ,
I’m always happy to answer any questions you have on this project! However, I’m afraid that I’m not quite understanding what you’re asking about this time. But here’s something that might help! If you scroll back through the comments, you’ll be able to find all the previous questions you asked, as well as all of my previous answers. (You can get to the previous comments by clicking the “Older Comments” button and then scrolling down until you see your name.) Hopefully this helps you access all the advice I’ve given in the past!
All the best,
Lili
I am tall and the modeled pic looks shorter than I’d like for myself so I just placed my order for 7 skeins. Would you be willing to make a recommendation for how many (maximum) CO stiches I can make and still have enough to finish a longer version of the project?
Hi Terry,
Thanks for writing in, and apologies for not answering your question sooner! It’s a really great question, but it required a lot of complex calculations, so I didn’t want to provide a rushed solution. In any case, I have an answer for you now! I would recommend casting on 91 stitches, which will extend the shawl by 3 inches in length and use up your 7th skein.
One thing you can do to double check this number on your end is knit up one wedge of the shawl with a cast-on of 91! Then, weigh the wedge in grams and multiply this number by 24. If the resulting number is less than 700g (the weight of 7 skeins of Cashmere Merino Bloom), then 91 stitches will definitely work as a cast-on number!
I hope this helps, and please let me know if you have any other questions!
All the best,
Lili
Thank you! Your timing is just perfect. I am just finishing up the Striped Triangle Garter Wrap so I’ll get started on this project this weekend and your calculations and detailed answer is much appreciated! I will take the approach you suggest and please know that the time and effort you take to help with Q&A’s…..really does add value to my purchase!
Thanks again!
Terry
You’re very welcome, Terry! Happy knitting!
All the best,
Lili
FINALLY!!! (Even though you answered my question February 8, 2022) GAH!
Your answer was “Yes, this row means to K every wrapped st along with its wrap! And, only the first one. ”
I KNEW I was missing something, but couldn’t give it a name.
I CANNOT THANK YOU ENOUGH for all your help, even though I BLEW IT MYSELF.
Merry Christmas and Happy New Year!
Your friend, MJ
I’m so glad to hear that you found the answer you needed!
All the best,
Lili
I am finished with row 118 of what I have knit, and received your latest message. I am at a total loss with how to pick up where I left off, and am WORRIED TO DEATH that I may have to pull all my work (118 rows) and begin again.
An example is: Row 54, where there is only knit 1, purl 1, knit one.
Rows 55 and 56 look good to go… but time and your response will make all the difference.
I am SOOO SORRY to do this to you again, but I would like to post what I have completed already. HERE IT IS:
1. WS SET-UP ROW: K1, P1, K to last 2, P1, K1.
2. RS Row 1: K2, P1, K to last 3, P1, K2.
3. WS Row 2: K1, P1, K1, P to last 3, K1, P1, K1.
4. RS Row 3: K2, P1, K to last 3, P1, K2.
5. WS Row 4: K1, P1, K1, P to last 3, K1, P1, K1.
6. RS Row 5: K2, P1, K to last 3, P1, K2.
7. WS Row 6: K1, P1, K1, P to last 3, K1, P1, K1.
8. RS Row 3: K2, P1, K to last 3, P1, K2.
9. WS Row 4: K1, P1, K1, P to last 3, K1, P1, K1.
10. RS Row 5: K2, P1, K to last 3, P1, K2.
11. WS Row 6: K1, P1, K1, P to last 3, K1, P1, K1.
Rows 3–6: REP Rows 1 and 2 two more Xs.
12. RS Row 3: K2, P1, K to last 3, P1, K2.
13. WS Row 4: K1, P1, K1, P to last 3, K1, P1, K1.
14. RS Row 5: K2, P1, K to last 3, P1, K2.
15. WS Row 6: K1, P1, K1, P to last 3, K1, P1, K1.
16. RS Row 3: K2, P1, K to last 3, P1, K2.
17. WS Row 4: K1, P1, K1, P to last 3, K1, P1, K1.
18. RS Row 5: K2, P1, K to last 3, P1, K2.
19. WS Row 6: K1, P1, K1, P to last 3, K1, P1, K1
20. RS Row 7: K2, P1, K to last 4, wrp-t K ONLY the first wrapped st along with its wrap!
21. Yarn FRONT, SL next st P-wise from left to right needle.
22. YARN BACK. TURN P-SIDE FACING, READY TO PURL
23. RS Row 53: K2, P1, K to last 3 before wrap, wrp-t.)
24. YARN BACK, SL next st Pwise from left to right needle.
25. YARN FRONT. Return SL’d st to left needle. YARN BACK
26. WS row: continue to Row 54 is a WS row, so everything works out!
REP Rows 10–53: REP Rows 8 and 9 22 more X. [3 REM left of final wrap]
27. 8. WS Row 8: P to last 3, K1, P1, K1.
28. 9. RS Row 9: K2, P1, K to last 3 before wrap, wrp-t. 1
29. YARN BACK, SL next st Pwise from left to right needle.
30. YARN FRONT. Return SL’d st to left needle. YARN BACK.
31. 10. WS Row 8: P to last 3, K1, P1, K1.
32. 11. RS Row 9: K2, P1, K to last 3 before wrap, wrp-t. 2
33. YARN BACK, SL next st Pwise from left to right needle.
34. YARN FRONT. Return SL’d st to left needle. YARN BACK.
35. 12. WS Row 8: P to last 3, K1, P1, K1.
36. 13. RS Row 9: K2, P1, K to last 3 before wrap, wrp-t. 3
37. YARN BACK, SL next st Pwise from left to right needle.
38. YARN FRONT. Return SL’d st to left needle. YARN BACK.
39. 14. WS Row 8: P to last 3, K1, P1, K1.
40. 15. RS Row 9: K2, P1, K to last 3 before wrap, wrp-t. 4
41. YARN BACK, SL next st Pwise from left to right needle.
42. YARN FRONT. Return SL’d st to left needle. YARN BACK.
43. 16. WS Row 8: P to last 3, K1, P1, K1.
44. 17. RS Row 9: K2, P1, K to last 3 before wrap, wrp-t. 5
45. YARN BACK, SL next st Pwise from left to right needle.
46. YARN FRONT. Return SL’d st to left needle. YARN BACK.
47. 18. WS Row 8: P to last 3, K1, P1, K1.
48. 19. RS Row 9: K2, P1, K to last 3 before wrap, wrp-t. 6
49. YARN BACK, SL next st Pwise from left to right needle.
50. YARN FRONT. Return SL’d st to left needle. YARN BACK.
51. 20. WS Row 8: P to last 3, K1, P1, K1.
52. 21. RS Row 9: K2, P1, K to last 3 before wrap, wrp-t. 7
53. YARN BACK, SL next st Pwise from left to right needle.
54. YARN FRONT. Return SL’d st to left needle. YARN BACK.
55. 22. WS Row 8: P to last 3, K1, P1, K1.
56. 23. RS Row 9: K2, P1, K to last 3 before wrap, wrp-t. 8
57. YARN BACK, SL next st Pwise from left to right needle.
58. YARN FRONT. Return SL’d st to left needle. YARN BACK.
59. 24. WS Row 8: P to last 3, K1, P1, K1.
60. 25. RS Row 9: K2, P1, K to last 3 before wrap, wrp-t. 9
61. YARN BACK, SL next st Pwise from left to right needle.
62. YARN FRONT. Return SL’d st to left needle. YARN BACK.
63. 26. WS Row 8: P to last 3, K1, P1, K1.
64. 27. RS Row 9: K2, P1, K to last 3 before wrap, wrp-t. 10
65. YARN BACK, SL next st Pwise from left to right needle.
66. YARN FRONT. Return SL’d st to left needle. YARN BACK.
67. 28. WS Row 8: P to last 3, K1, P1, K1.
68. 29. RS Row 9: K2, P1, K to last 3 before wrap, wrp-t. 11
69. YARN BACK, SL next st Pwise from left to right needle.
70. YARN FRONT. Return SL’d st to left needle. YARN BACK.
71. 30. WS Row 8: P to last 3, K1, P1, K1.
72. 31. RS Row 9: K2, P1, K to last 3 before wrap, wrp-t. 12
73. YARN BACK, SL next st Pwise from left to right needle.
74. YARN FRONT. Return SL’d st to left needle. YARN BACK.
75. 32. WS Row 8: P to last 3, K1, P1, K1.
76. 33. RS Row 9: K2, P1, K to last 3 before wrap, wrp-t. 13
77. YARN BACK, SL next st Pwise from left to right needle.
78. YARN FRONT. Return SL’d st to left needle. YARN BACK.
79. 34. WS Row 8: P to last 3, K1, P1, K1.
80. 35. RS Row 9: K2, P1, K to last 3 before wrap, wrp-t. 14
81. YARN BACK, SL next st Pwise from left to right needle.
82. YARN FRONT. Return SL’d st to left needle. YARN BACK.
83. 36. WS Row 8: P to last 3, K1, P1, K1.
84. 37. RS Row 9: K2, P1, K to last 3 before wrap, wrp-t. 15
85. YARN BACK, SL next st Pwise from left to right needle.
86. YARN FRONT. Return SL’d st to left needle. YARN BACK.
87. 38. WS Row 8: P to last 3, K1, P1, K1.
88. 39. RS Row 9: K2, P1, K to last 3 before wrap, wrp-t. 16
89. YARN BACK, SL next st Pwise from left to right needle.
90. YARN FRONT. Return SL’d st to left needle. YARN BACK.
91. 40. WS Row 8: P to last 3, K1, P1, K1.
92. 41. RS Row 9: K2, P1, K to last 3 before wrap, wrp-t. 17
93. YARN BACK, SL next st Pwise from left to right needle.
94. YARN FRONT. Return SL’d st to left needle. YARN BACK.
95. 42. WS Row 8: P to last 3, K1, P1, K1.
96. 43. RS Row 9: K2, P1, K to last 3 before wrap, wrp-t. 18
97. YARN BACK, SL next st Pwise from left to right needle.
98. YARN FRONT. Return SL’d st to left needle. YARN BACK.
99. 44. WS Row 8: P to last 3, K1, P1, K1.
100. 45. RS Row 9: K2, P1, K to last 3 before wrap, wrp-t. 19
101. YARN BACK, SL next st Pwise from left to right needle.
102. YARN FRONT. Return SL’d st to left needle. YARN BACK.
103. 46. WS Row 8: P to last 3, K1, P1, K1.
104. 47. RS Row 9: K2, P1, K to last 3 before wrap, wrp-t. 20
105. YARN BACK, SL next st Pwise from left to right needle.
106. YARN FRONT. Return SL’d st to left needle. YARN BACK.
107. 48. WS Row 8: P to last 3, K1, P1, K1.
108. 49. RS Row 9: K2, P1, K to last 3 before wrap, wrp-t. 21
109. YARN BACK, SL next st Pwise from left to right needle.
110. YARN FRONT. Return SL’d st to left needle. YARN BACK.
111. 50. WS Row 8: P to last 3, K1, P1, K1.
112. 51. RS Row 9: K2, P1, K to last 3 before wrap, wrp-t 22
113. YARN BACK, SL next st Pwise from left to right needle.
114. 52. YARN FRONT. Return SL’d st to left needle. YARN BACK.
115. WS Row 8: P to last 3, K1, P1, K1.
116. RS ROW 53. Row 9: K2, P1, K to last 3 before wrap, wrp-t).
117. YARN BACK, SL next st P-wise from left to right needle.
118. YARN FRONT. Return SL’d st to left needle. YARN BACK. Praying this is right so you don’t have to go crazy!!!
As always, I sincerely appreciate all your assistance. You truly ROCK!!!
Hi MJ,
I’m a bit confused about how you’re numbering the rows, but I think that you’re doing everything correctly! Have you completed Rows 55 and 56 yet? You mention in your comment that “Rows 55 and 56 look good to go,” so it sounds like you may have just finished knitting these! If so, then you can move onto the instructions under the heading CONTINUE, in which all you’ll be doing is repeating what you just knit 23 more times, to create the rest of the wedges!
All the best,
Lili
I’m having a terrible time with this pattern!!!
Regarding: Row 7: K2, p1, knit to last 4 stitches, wrp-t (see Note).
It would be really nice if you included the information for the (see Note) in the pattern itself.
My yarn is tattered from being pulled sooo many times… and I have broken down and cried sooo many times over it.
Please set me straing again.
In the meantime, I am praying again for this to finally make sense to me.
My apologies for the rant.
P.S. it’s snowing. Must mean Christmas is CLOSE.
Have a blessed day.
Hi MJ,
Goodness, I’m so sorry to hear that this pattern has become so frustrating! The reason that we do not include the instructions for how to work a wrp-t in the pattern itself is because that would become very repetitive and take up a lot of space in the pattern itself. The wrp-t is done on Row 9 as well, and all the subsequent repeats of Row 9, so we opted to put those instructions in the NOTES section for reference, instead of writing them out each time a wrp-t is used.
If you’d like a refresher on how to work wrap + turn short rows, I’d recommend checking out our tutorial!
All the best,
Lili
Lord, my mind is gone!!!
How many rows is one short-row wedge?
Hi MJ,
Each wedge has a total of 56 rows!
All the best,
Lili
I have pulled out yet another attempt at knitting the Wheelwright shawl. Looking at the written pattern, I am gravely concerned about the number of rows it will take to complete this project. What I am looking at is alarming, to say the least.
Thank you in advance for your help, yet again.
Your weary friend, MJ.
Oh no, I’m so sorry to hear that you’ve hit another stopping point in your project! Can you let me know what your concern is regarding the number of rows? I’ll keep an eye out for your reply, and then I’ll do my very best to answer your question!
All the best,
Lili
It’s Lili to the rescue… but I figured out that NOT EVERY LINE is a “ROW TO COUNT”
My row count now is only 1,288. MUCH LOWER than what the count was with everything that wasn’t a real row to knit. WHEW!!!
It has rained most of the day and windy and rainy tonight, so I didn’t get to do my “double time” walk. My poor brain is droning in useless thoughts…
God bless you, as always.
Oh, and I am on a great roll knitting tonight.
Hi MJ,
I’m not quite sure where you’re getting the number 1288 from! Since you’re knitting this shawl with a cast-on of 91 stitches, there will be 66 rows per wedge (instead of 56). Since you knit 24 wedges total, you multiply that number (24) by the number of rows in 1 wedge (66) to find the total number of rows. 24 * 66 = 1584, so there will be 1584 total rows in this shawl if you cast on 91 stitches!
All the best,
Lili
The good LORD has heard my prayers. After several days knitting, my brain is where it should be, and I finally understand my stumbling point on working short rows, and am on a roll.
God bless you for your patience with me. You will never understand how much I appreciate your standing by me through my “bad brain” days!!!!
Have a blessed Christmas and a happy, healthy New Year.
Hi MJ,
Oh I’m so glad to hear that you’re on a roll now! I hope you have fun continuing your project, and please don’t hesitate to reach out if anything else comes up along the way!
All the best,
Lili
Good morning! I am wondering if I can use Linen Quill for this pattern. I have 6 skeins that I ordered with no particular pattern in mind. Do you think this one would work without too much adjustment? Thanks!
Hi Christina,
Thanks so much for your comment! I’m afraid Linen Quill is much thinner than the yarn featured in this pattern, Cashmere Merino Bloom, since it’s a fingering weight yarn and Cashmere Merino Bloom is a DK weight yarn, so it would not work by itself for this particular pattern. You could potentially knit this shawl using your Linen Quill, though, if you hold two strands of this yarn together and knit with them in that way! This pattern calls for 1090 yards of yarn and 6 skeins of Linen Quill held double would provide 1317 yards, so you would have plenty of yardage. I would really recommend doing a gauge swatch though, if you decide to use Linen Quill held double, in case you need to adjust your needle size at all! Here’s our guide on swatching in case you’d like more information (https://www.purlsoho.com/create/2020/08/20/all-about-gauge/)!
Lastly, if you’d like to use your Linen Quill held single, here are all our patterns that feature this yarn if you’d like to take a look (https://www.purlsoho.com/shop?q=linen+quill#results:projects)!
Hope this helps!
All the best,
Cat
I am giving in to this pattern, yet once again.
Is it unreasonable for this pattern to have 2537 rows?
This is how desperate I am to have this lovely shawl for my daughter.
Thank you in advance once again.
HAPPY NEW YEAR!!!
Your biggest pest,
MJ
Hi MJ,
I’m sorry that you’ve run into more trouble with this pattern! However, I’m not sure if I’m understanding your question. Since you’re casting on 91 stitches, in order to create a shawl that’s 18 inches long (instead of 15 inches long), the total number of rows in the entire pattern will only be 1584. Hope this helps clarify things, but please let me know if I misinterpreted your question!
All the best,
Lili
Si può avere anche il video grazie
Hi Francesca,
Thanks for reaching out. If you’d like to visualize how to do the wrap + turn short rows used in this pattern, I’d recommend taking a look at our Short Rows: Wrap + Turn tutorial!
All the best,
Lili
Hi Lili,
Thank you for sharing this beautiful pattern. Unfortunately I have some trouble with this pattern. I hope that you can help me.
Row 1 (right side): K2, p1, knit to last 3 stitches, p1, k2.
Row 2 (wrong side): K1, p1, k1, purl to last 3 stitches, k1, p1, k1.
Rows 3–6: Repeat Rows 1 and 2 two more times.
Row 7: K2, p1, knit to last 4 stitches, wrp-t (see Note).
Row 8: Purl to last 3 stitches, k1, p1, k1.
Row 9: K2, p1, knit to 3 stitches before wrap, wrp-t.
10 – repeat row 8
11 – repeat row 9
12 repeat row 8
13repeat row 9
14repeat row 8
15repeat row 9
16repeat row 8
17repeat row 9
18repeat row 8
19repeat row 9
20repeat row 8
21repeat row 9
22repeat row 8
23repeat row 9
24repeat row 8
25repeat row 9
26repeat row 8
27repeat row 9
28repeat row 8
29repeat row 9
30repeat row 8
31repeat row 9
32repeat row 8
33repeat row 9
34repeat row 8
35repeat row 9
36repeat row 8
37repeat row 9
38repeat row 8
39repeat row 9
40repeat row 8
41repeat row 9
42repeat row 8
43repeat row 9
44repeat row 8
45repeat row 9
46repeat row 8
47repeat row 9
48repeat row 8
49repeat row 9
50repeat row 8
51repeat row 9
52repeat row 8
53repeat row 9
54 k1, p1,k1 ( 3 last stitches from row 53)
55 k2, p1, knit to last 3 stitches, knitting wrapped stitches with theorie wrap, p1 ,k2 [ what do you mean with ” knitting wrapped stitches with teir wraps ?)
56 k1, p1,k1 purl to last 3 stitches, k1,p1,k1) ( do you mean that the third stich should be a k1?)
After finishing 56 row , should I start with row 10 and repeat row 8 and 9 until I get to row number 56 again?
Thank you in advance.
With kind regard,
Hi Apru,
Thanks for reaching out. What you have written looks correct to me, but I’d be happy to answer your remaining questions!
1. “Knitting wrapped stitches with their wraps” is what you do with wrap + turn short rows to secure the row. We demonstrate this part of the short row technique in our Short Rows: Wrap + Turn tutorial, so I’d recommend checking that video out if this is daunting!
2. On Row 56, you will knit until there are only 3 stitches left on your left-hand needle. Then, you will knit the first one, purl the second, and knit the final one! After that, the row will be completed.
3. After finishing Row 56, you will begin the entire SHORT-ROW WEDGE again, beginning all the way at Row 1! Then, you’ll work all the way until Row 56 before going back to Row 1 for the third wedge.
I hope this helps clarify things!
All the best,
Lili
Greetings!
My attempts to make this beautiful wrap have been challenging, but I’m not giving up. After various setbacks, I am so close to finishing the first wedge. I’m using the German Short Row method for the project. I am 4 stiches from the end of row 53, 23 wraps down, one to go. I turned with 4 stiches left on row 53, slipped the 4th stich from left to right needle, wrapped the yarn, pulled up to create the wrapped stich, and brought the yarn to front. Now I am ready to work row 54 – the wrong side – using the last 3 stiches that create the edge. Until I hit the edge this has worked perfectly, because with the yarn in front, I could proceed to purl the row. My problem is the first stich of the worked edge is a knit stich. If I move the yarn to the back, the wrapped stich isn’t right. Can you please help me out of this dilemma?
Hi Susan,
That’s a great question! Because the first stitch on Row 54 is a knit, rather than a purl, you can omit the final step of the typical wrap + turn. So instead of bringing the yarn to the back before turning your work, just leave it on the front. That way, when you turn your work, it will be in the back, right where you need it to work that first knit stitch of Row 54!
All the best,
Lili
Hi Lili, I’ve been away, and I’m just getting back to my project. I’m afraid I’m not understanding your suggestion to leave the yarn in front because the yarn is in back.
Row 53 is a knit row so the working yarn is in the back. Doing the German Short Rows I’ve been turning the work before moving the stitch that will be used to create the “v” shaped stitch, which means the working yarn that was in back for knitting is now in front. After turning I have 4 stitches on the left needle. Next I slip the first stitch from the left needle to the right, leaving the 3 border stitches of Row 54. With the stitch now on the right needle, I pull up and over the needle with the working yarn, and I have to bring the working yarn to the front to create the the “v” shaped stitch. I tried leaving the yarn in back, but the “v” shaped stitch doesn’t hold. I wish I could send you a picture.
Oh I’m sorry, I misread your earlier comment and didn’t realize you were using German short rows! My answer was for wrap + turn short rows. But I can tell you’re on the right track. You can work a right-side German short row as normal here, but just omit the step of bringing the yarn to the front. It may seem to not hold the v shape at first, but I promise that it’s correct! after you’ve finished knitting Row 54, you should be able to see the double stitch more clearly.
All the best,
Lili
I am not skilled in doing short rows. A friend advised to substitute the wrp-t and do the German short row method instead for this pattern. I have seen your tutorial. I’m still waiting for the yarn I purchased from you so I have time to decide. Do you recommend wrp-t over German short row for someone like myself with less experience? Will the German short row method look different on the wedges?
Thank you!
Hi Zulma,
Thanks for reaching out. Either short row method will end up looking exactly the same for this pattern! I would recommend sticking to wrap + turn short rows for now, since you won’t need to modify the pattern at all. That will just make everything easier!
In general though, I’d say that the choice mainly depends on which method of short rows you learn first. Both methods are easy to do once you get the hang of them, but I learned wrap + turn short rows first, so I always feel more confident in those. But many of my knitting friends learned German short rows first and they prefer those!
All the best,
Lili
Hi Lili,
Thank you so much for the advice! I’ll do the wrp-t as you recommended.
In reviewing the pattern, I am a bit concerned about row 9, but I think it will make sense once I’ve knitted to that point with needles in hand. If I’m stuck, I will reach out to you for help. My order is due tomorrow. Can’t wait to start.
Thanks again.
Zulma
Hi Lili,
I didn’t think I’d have so many issues, and yet, here I am. Not so sure if I’m following instructions correctly. I am now repeating rows 8 &9. When I finish row 9, I knit to 3 sts before wrap, do wrp-t, turn work to wrong side. At this point, I do nothing with sts on the right side of the needle (to the right of the just wrapped stitch on the right side) and start repeat of row 8 (Purl, etc). Is this correct? The sts on the right side remain unworked? As I continue to do this with the repeats, those sts on the right side needle remain unworked when I start row 8. Because of that, I don’t know how I’ll end up with 3 sts to the left on final wrap. Hard for me to visualize it until I’m there. Also, as I look at the project on the right side, the sts on the left are not really increasing; project is only increasing on the right side. Is this correct? Another issue: since I now have enough repeats, I can see the pattern evolving and the body of the project has texture, unlike your picture with a smooth looking body. My work has definite formation of columns, not smooth looking surface like yours.
I was most careful with all the previous rows, repeats of rows 1 & 2, and did the wrp-t on row 7. Don’t know where I went wrong.
So sorry that I have so many issues. I will continue with repeats of rows 8 & 9. Based on my issues, if you feel I did something wrong, I will start over again. I am on repeat #5 of rows 8/9.
Thank you for your help Lili.
Zulma
Hi again Lili,
I decided to unravel and start again. There’s no way that I was on the right track. The shawl has a beautiful stockinette which I did not have. If possible and you can think how I could have made such a mistake, please let me know. Hopefully, it won’t happen again.
I’d also like a clarification of row 9: when I finish row 9, wrp-t, turn work. I start row 8 and don’t do anything with the sts on the right side of needle.
Thank you again,
Zulma
Hi once again Lili,
I started over and I’m on the right track. I have the stockinette as it should be. I did 2 life lines, one on row 7 and another one on the first row 9. I am now on repeats of rows 8 & 9. I am turning the work after the wrp-t and starting to Purl row 8 again, ignoring all stitches to the right. Please confirm that I’m doing that correctly. I now see what I did wrong previously. After so many years of knitting, I can’t believe I made such a mistake. I don’t even think I made such mistakes when I first started knitting. Started to knit again recently while grieving my mother’s passing and perhaps I just wasn’t concentrating. But, I’m concentrating more now and trying to stay “in the present” with the next stitch and the next wrp-t. I still want your clarification on row 9. I still can’t visualize having 3 stitches remaining to the left of the final wrap. But hopefully when I get there it will make sense. I understand that after row 56 I start a new wedge by starting on row 1, repeating 23 times (last repeat is row 55). Thank you once again. Sorry for the multiple messages. Hopefully, this is my last message but who knows what will happen. 🤞
Be well, Zulma
I have the Cashmere Ombre set and am thinking about using this pattern instead of the one(s) in the box. Would take a bit of algebra as the gauge is different, but what do you think?
Hi Betty,
I think that’s a great idea! If you need any assistance along the way, please don’t hesitate to reach out. We can help guide you through any calculations!
All the best,
Lili
Hi Lili,
After being so elated that I finally had everything right, I have a new issue. I must first apologize again for so many messages. I completed the 22 repeats of rows 8 & 9. On the very last repeat, I have one stitch by itself which would be a wrap. However once I wrap that stitch and I turn the work, normally I’d be ready to Purl. However, I’m on the last repeat on the wrong side and I only have 3 stitches left, the end of row 8, k1, p1, k1. But since I’m on the purl side I can’t bec that first stitch is a knit. I have recounted and I have 76 stitches on the needles. I unraveled all 22 repeats and started on row 7. So glad I had a life line. As I continue to do wrp-t’s I noticed that there are 2 stitches separating the wraps. The grouping eventually forms a trio: a wrap and 2 stitches, wrap and 2 stitches, etc. Counting this way, groups of 3 stitches, when I get to the end, there is still one single stitch left which would be a wrap, followed by 3 stitches which would be k1, p1, K1.
Please help. I believe I’m doing the wraps correctly. I knit to 3 stitches before previous wrap, wrap that next stitch, turn work, purl.
Why am I left with a single stitch on the final repeat of rows 8/9?
I hope this doesn’t sound crazy.
Hoping to get a reply soon. Thanks Lili!
Hi Zulma,
No worries at all, I’m just glad that you’re on the right track now! There should indeed be 3 (unwrapped) stitches left after your final repeat of Row 9, so it sounds like what you’re observing is correct.
But because the first stitch on Row 54 is a knit, rather than a purl, you can omit the final step of the typical wrap + turn on the final repeat of Row 9. Instead of bringing the yarn to the back before turning your work, just leave it on the front. That way, when you turn your work, it will be in the back, right where you need it to work that first knit stitch of Row 54!
All the best,
Lili
Thank you so very much Lili. I’ve started again on the repeats of rows 8 and 9. I’m only on the 3rd repeat. Maybe this time when I reach row 53, I’ll have 3 stitches left. I appreciate your patience.
Hi Lili,
Just to let you know that I’ve completed the first wedge. I did have that one single stitch left which would require a wrap. I followed your instructions and omitted the full wrap. Since I left the yarn in the front, that single stitch looked as if it had a wrap anyway. I did the 3 stitches of row 54. On row 55, I knitted that stitch with the “fake” wrap as if it had been a regular wrp-t. I hope that was correct because I’ve started on my first repeat of short row wedge. Please advise about that.
Also, if this single final wrap was going to be worked differently, I didn’t see any special note on the pattern. Haven’t other knitters encountered this issue? I would not instinctively think of leaving the yarn on the front and would assume, as I did,
that I had made a mistake. I wouldn’t have unraveled the 22 repeats of rows 8/9 had there been a note on the pattern. Or…is it that I did something wrong somewhere and ended up with that single stitch which shouldn’t be there? As I continue with the repeats of the wedges I assume that I’ll continue to end up with that single stitch which will need a modification. Right?
Please let me know that it was correct to knit that modified wrap along with the stitch as if it was a full wrap.
If all is well, then I am on my way to do the 23 repeats. I hope I didn’t drive you too nutty every time you saw a message from me. I live in NYC and would have gone to the lovely Purl Soho store for help instead of driving you nutty. Thank you for always responding, acknowledging my issues and being so helpful.
Be well, Zulma
Hi Zulma,
It sounds like you’re doing everything correctly! I want to reassure you though that this final wrap + turn is a “real” wrap + turn–it’s just different from how you’d typically do one in stockinette stitch. Our tutorial shows how to do wrap + turns in stockinette, but there are many other stitch patterns that you can do short rows in that require a slightly different procedure. For example, the way you need to do the wrap + turn on the final short row of this pattern is exactly how you work wrap + turns in garter stitch, since you’re working with knit stitches on both the right and wrong sides there as well.
But I passed along your message to our design team, and they agreed that we should update the NOTES section of this pattern to reflect this difference. They omitted the “Bring yarn to back” part of those instructions, since you shouldn’t do that step on the final wrap + turn. On all the other wrap + turns, you’ll just need to remember to bring your yarn to the front of your work before purling!
All the best,
Lili
Hi Lili,
Thank you for your detailed response about that final wrp-t and for passing along the issue to the design team.
I started off so wrong with this pattern and now that I’ve completed 3 wedges, I see how wonderfully uncomplicated the pattern is. I love it!
Thanks again for your help/patience.
Have a great summer.
Zulma
You’re very welcome, Zulma! Glad to hear that you’re on your way with the pattern now.
All the best,
Lili
Hi Lili,
I found six skeins of Season Alpaca which I had bought at the shop some time ago to make a sweater. I decided against the sweater and was hoping I could use this yarn for the Wheelwright shawl. Will the different weight work with this pattern?
Thanks for your help,
Hi Nélida,
Thanks for writing in! I think you could definitely use Season Alpaca for this pattern. The gauge (20 stitches and 32 rows = 4 inches in stockinette stitch) is a little bit on the large side for Season Alpaca, so I’d recommend knitting up a gauge swatch to determine which needles allow you to achieve this gauge.
Alternatively, if you’d like to knit the pattern at a smaller gauge, then you can adjust the number of stitches that you cast on!
To figure out your cast-on number, you will want to first knit a gauge swatch in pattern. Once you know how many stitches you are getting per inch, you can multiply that number by the width (15.25 inches) and cast on the nearest multiple of 3 + 1. Then you can follow the pattern essentially as written! The only other thing you’ll need to adjust is how many times you repeat Rows 8 and 9, but for this, you can simply keep repeating them until you have only 3 stitches to the left of the final wrap.
Hope this helps!
All the best,
Lili
Thank you Lili for the helpful suggestions. I think I’ll go with the first option and report back on my results. So glad I can use the Season Alpaca yarn which is so soft and lovely.
Best regards
Nélida
You’re very welcome! Let us know how it turns out!
All the best,
Lili
Lili,
I’m really impressed by your patience (and math skills!) in handling all these questions! One more…I’m thinking I’d like to make a bigger wrap and accomplish that by using a heavier weight yarn and bigger needles…say 5mm and worsted. Do you see any pitfalls (say impact on the neck opening? Can you recommend a Purl Soho yarn that would work well!
Hi Raquel,
Thanks for reaching out! You can definitely make this pattern with a larger yarn–that’ll be super cozy! Using a larger yarn will make the neckline ever-so-slightly larger, since the row gauge will be a bit larger. However, I don’t think this will impact the fit of the shawl very much, since you can always just wrap it tighter around you, and any difference won’t be noticeable. Other than that, the pattern should work out perfectly. Hope this helps!
All the best,
Lili
I have finished this shawl, loved the pattern and the results. But blocking…..that is giving me some problems. Have tried single layer, and doubled over, but am not happy with either. It is laid out on a bed and my blocking pins don’t even want to cooperate. Any suggestions?
Hi Cheryl,
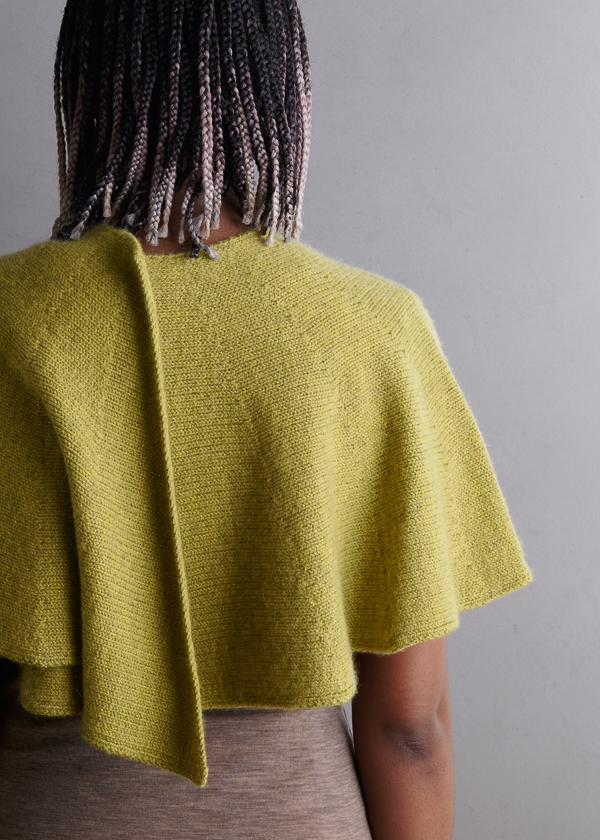
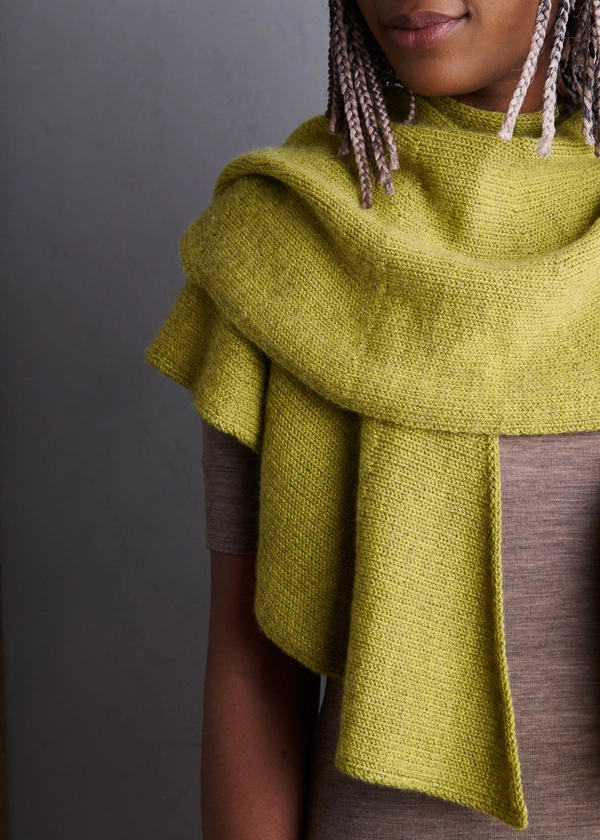
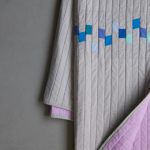
Thanks for reaching out! Due to the construction of this pattern, you will need to block it in two layers, so that all the fabric can lay flat. I would recommend either laying it out in a large circle and letting the ends that want to overlap do that, or folding it in half (like is shown in the 3rd picture on the pattern page). It’ll take slightly longer to dry due to the multiple layers, but no longer than a typical sweater, which would also be two layers! I’d also recommend holding off on using blocking pins unless absolutely necessary. The knit fabric, once wet, should have enough weight to lie flat as it dries!
All the best,
Lili
Lili, so the recommended blocking approach is to soak the shawl first? Then, fold in half (as shown in the 3rd photo on the pattern page) and lay flat without pins?
Hi Diane,
Yes, that method would work perfectly!
All the best,
Lili
I’ve just finished knitting this pattern with the Cashmerino yarn. Can you advise the best way to block this wrap? Soak it and pin? Or steam? Or some other suggestion? Thank you.
Hi Diane,
Thanks for writing in! You can definitely use a variety of methods for blocking this yarn. We generally use wet blocking for most of our projects, and I believe that’s how we blocked this one. Wet blocking works particularly well with Cashmere Merino Bloom because of the yarn’s tendency to “bloom.” The water will really help open up the stitches and allow the fibers to bloom and interlock with one another for a super cozy and fluffy knit fabric!
All the best,
Lili
Not sure if I am doing the wrap and turns correctly.
What does knit to 3 stitches before wrap look like? Are there 4 stitches together at that point?
And what does 3 stitches remain to the left of the final wrap …. look like?
Thanks,
Jeanne
Hi Jeanne,
Thanks for writing in, and I’m happy to help clarify the wrap + turn short rows! When you’ve knit to 3 stitches before the wrap, you should have the following stitches on your left needle (counting from right to left): 3 regular stitches, 1 wrapped stitch (and then all your other stitches). Then, you work the wrap + turn on the first regular stitch!
In answer to your other question, “3 stitches remain to the left of the final wrap” means that once you turn your work after working the final wrap + turn, you should have only 3 stitches on your left needle. These will be the 3 stitches you work in Row 54!
I hope this helps explain things, but please let me know if you have any other questions.
All the best,
Lili
This is a lovely pattern and I’m off to a good start. I’m sure with practice I will begin to see the pattern, but for right now I have a question. I just finished row 7: K2, p1, knit 69 stitches, wrp-t and row 8.
For row 9, do I K2, p1, knit 66 stitches, or 65?
Thanks!
Hi Diane,
Thank you for writing in! For row 9 you will want to identify your last wrap and turn and then work the row as follows: Row 9: K2, p1, knit to 3 stitches before wrap, wrp-t. If you are having trouble identifying your wraps, you will want to gently stretch your stitches to see exactly where the slight gap is and mark that stitch with a removable marker so you can knit to exactly 3 stitches before that point. Some knitters find it helpful to place removable markers each time they complete a wrap and turn so that they know exactly where their stopping point is. This is also helpful to know how many wrap and turns you have completed. I hope this helps!
Happy knitting,
Gavriella
Hi, I’m just about to start the wheelwright shawl but I want to make it longer to reach my waist or hips. How many sts do I need to cast on so it measures either 20 1/4″ or 22 1/4″ from inner to outer edge? (5″ or 7″ longer than indicated in the pattern). Many thanks in advance for your help.
Hi Patricia,
Thank you for writing in! To modify this pattern you will want to begin with a gauge swatch. You will then measure your stitches per inch by the desired height (finished width from inner to outer edge) of your shawl, in this case 20 1/4″ or 22 1/4″. One thing to keep in mind is you will want to make sure your cast on number is a multiple of 3+1 for this pattern to work out correctly and once you get to your short rows, instead of repeating Rows 8 and 9 just 22 more times, you will need to continue repeating them until there are only 3 stitches to the left of the final wrap.
I hope this helps but please let us know if you have any other questions!
Happy knitting,
Gavriella
Hi Gabriella
OK. I’ve worked out that for 20″ I will need to cast on 103 sts (102+1) or 112 sts (111+1) for 22″. I knocked off the 1/4 ” to make things easier. Did I get it right? I love the pattern! Thanks in advance for your help.
That is exactly correct! Your numbers look great and you should be all set to start your shawl! Please let me know if you have any other questions along the way!
Happy knitting,
Gavriella
Many thanks Gabriella! I live in Madrid and it’s now nearly 9 p.m. so I will start knitting tomorrow, as it’s time for dinner… :)) Really looking forward to making the lovely shawl!
Many thanks!