


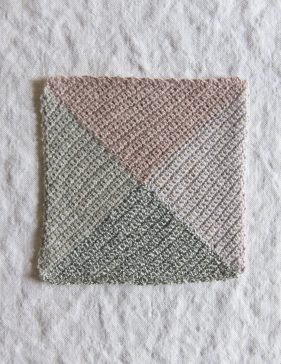
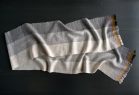
Crochet Four Points Baby Blanket
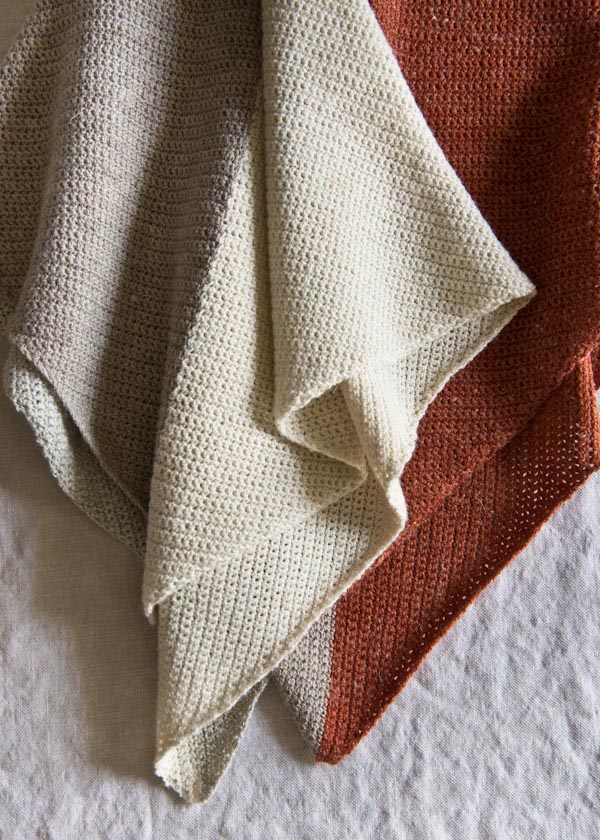
Each and every stitch of a handmade baby blanket expresses excitement and care. And what makes the process even more special is finding just the right yarn and design to represent all this love. Our Crochet Four Points Baby Blanket in Purl Soho’s Linen Quill is the perfect find!

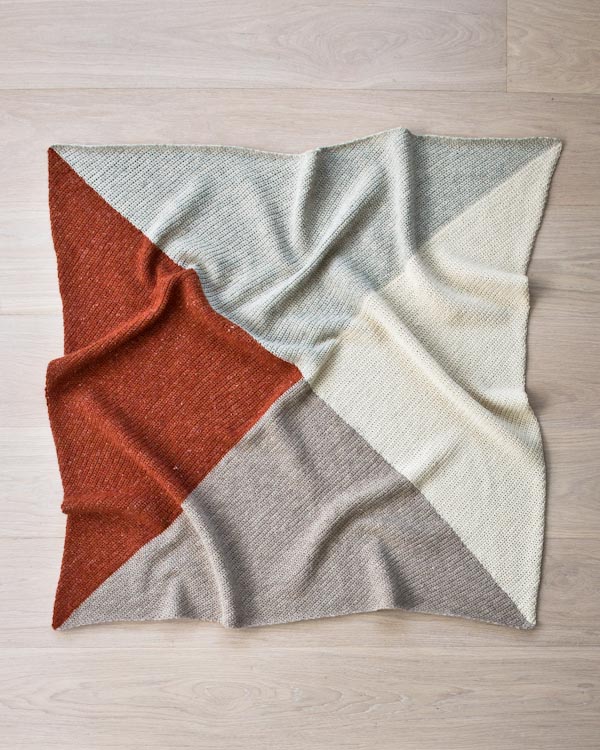
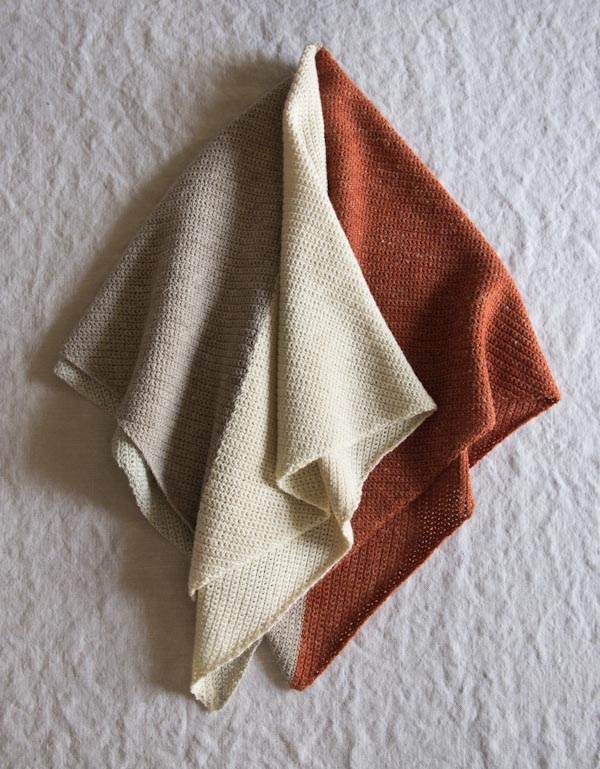
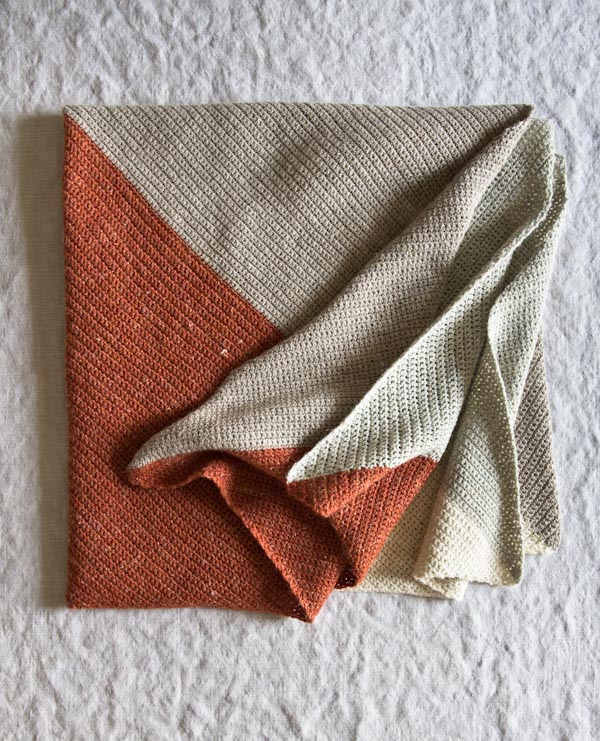
Our new Linen Quill in classic single crochet creates a smooth and supple fabric, with linen and highland wool providing sturdiness and alpaca ensuring softness. Get all four skeins you need with our Four Points Baby Blanket in Linen Quill Bundle (no longer available). Veering from the beaten path of traditional pinks and blues, the kit comes in four earthy palettes, each one inspired by the Andean mountaintops, perhaps a refreshing change for a baby… and his or her parents!
Yarn lovers, if you adore the yarn used in this project, you’ll love exploring all of our other yarn collections! Discover over 45 thoughtfully designed yarns in nearly every natural fiber and in every spectacular color you can imagine. Only available here at Purl Soho’s online yarn store, where every skein is created with care and your creativity in mind!
Amazing colors, beautiful yarn, and a thoughtful design, this Crochet Four Points Baby Blanket is surely a labor of love, something beautiful to enjoy for many years to come! -Kristy

Update: Two Knit Versions
February 23, 2018

We took special notice of your requests for a knit version of our Four Points Baby Blanket, and here they are! In Wild Radish, a new soft and gentle palette of our Four Points Baby Blanket in Linen Quill Bundle (no longer available), the Knit Four Points Baby Blanket is just as simple and beautiful as the original!
And for extra squishiness we’ve reconfigured the math of the knit version of this pattern to suit our thick and squishy Super Soft Merino! It’s an ideal weight to bundle up baby for a bracing stroller ride or to plop her down for some play time on the floor… Not that those over the age of two are prohibited from cuddling up in this wonderfully cozy blanket! In nine intriguing color combinations, the Four Points Baby Blanket in Super Soft Merino is a fun math game and a very clever knit!
Share your progress and connect with the community by tagging your pics with #PurlSoho, #PurlSohoBusyHands, #PurlSohoFourPointsBabyBlanket and #PurlSohoLinenQuill. We can’t wait to see what you make!
Materials

Our Four Points Baby Blanket in Linen Quill Bundle (no longer available) includes…
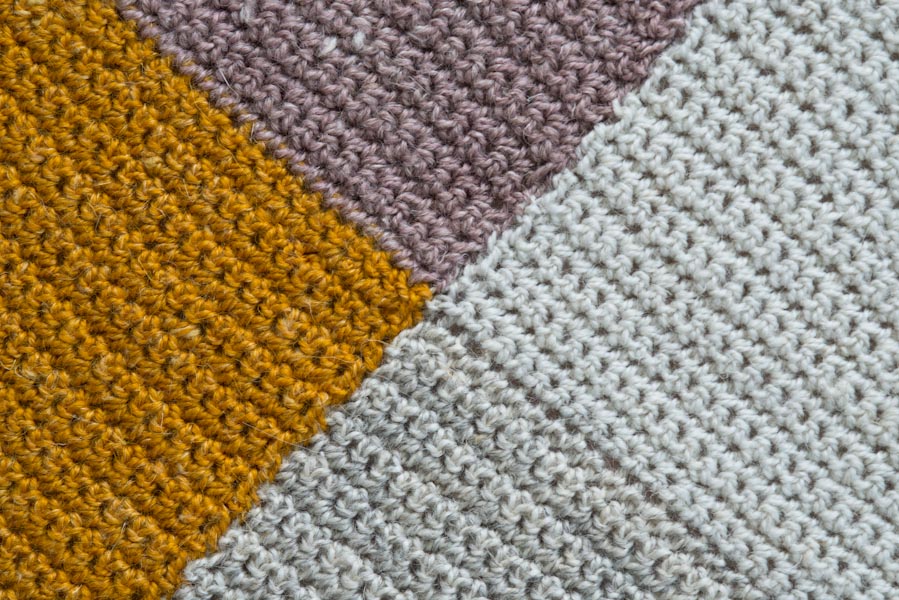
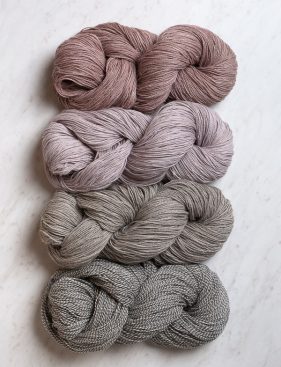
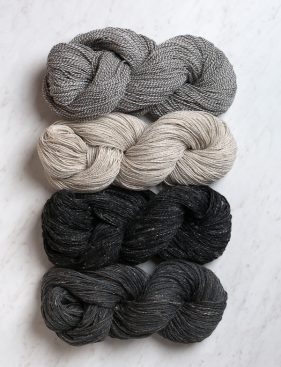
- 4 skeins of Purl Soho’s Linen Quill, 50% fine highland wool, 35% alpaca, and 15% linen. Each skein of this fingering weight yarn is 439 yards/ 100 grams; approximately 439 yards per color. We used the palette Hearth (above) for our sample blanket, but be sure to check out the three additional palettes below.
- Color A: Kiln Red
- Color B: Pale Mushroom
- Color C: Oatmeal Gray
- Color D: Pale Oats
You’ll also need…
- A size D (3.25mm) crochet hook
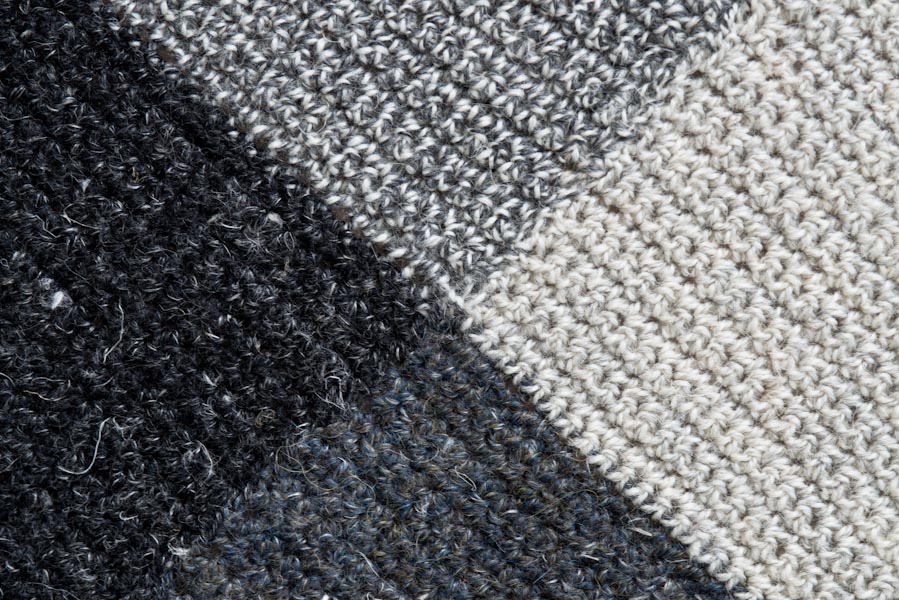
THISTLE: Color A: Rose Granite, Color B: Lavender Opal, Color C: Stonewall Gray, and Color D: Salt and Pepper
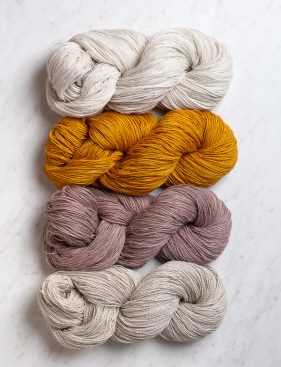
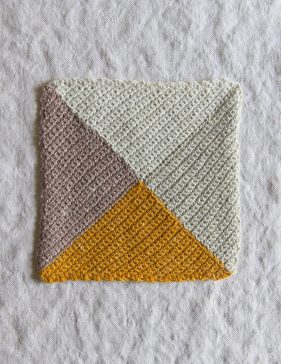
DESERT MARIGOLD: Color A: Turmeric Yellow, Color B: Rose Granite, Color C: Oatmeal Gray, and Color D: Pale Oats

SPECKLED FEATHER: Color A: Kettle Black, Color B: Salt and Pepper, Color C: Stillwater Blue, and Color D: Oatmeal Gray
Gauge
21 stitches = 4 inches in single crochet
Size
Finished Dimensions: Approximately 36 x 36 inches
Notes
Sc dec (Single Crochet Decrease): For instructions and a photo tutorial on how to work a single crochet decrease, please visit our Single Crochet Decrease Tutorial.
Pattern
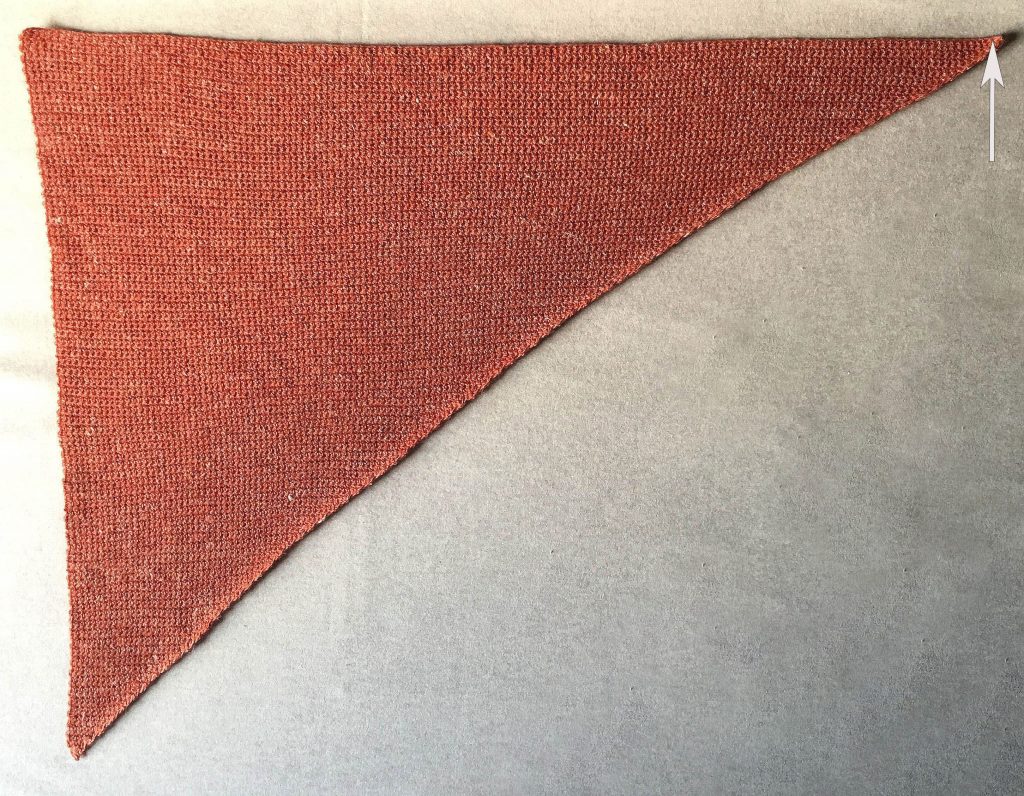
Triangle 1
If You Are a Beginner Crocheter…
With Color A, chain 143.
Foundation Row 1: Starting with second chain from hook, make 1 single crochet into each chain stitch, chain 1, and turn work. [142 stitches]
If You Are a More Experienced Crocheter…
With Color A, make a Foundation Single Crochet of 142 stitches.
Everyone…
Row 1 (wrong side): Make 1 single crochet (sc) into each stitch to last 2 stitches, 1 sc dec (see Notes, above), chain 1, and turn. [1 stitch decreased]
Row 2 (right side): 1 sc dec, make 1 sc into each stitch to end of row, chain 1, and turn. [1 stitch decreased] (Note: To help you keep track, you may want to mark the right side of the fabric with a removable stitch marker or piece of scrap yarn.)

Repeat Rows 1 and 2 until one stitch remains.
Cut yarn and pull through remaining loop.
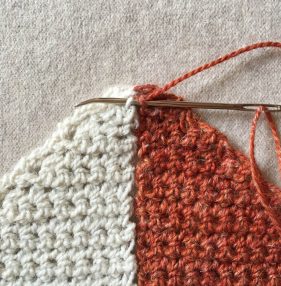
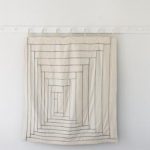
Triangle 2
With the wrong side facing you and starting at the right end of the foundation edge, join Color B and make 1 sc in each stitch along the foundation edge, chain 1, and turn. [142 stitches]
As with Triangle 1, work Rows 1 and 2 until you have one stitch left.
Cut yarn and pull through remaining loop. Set aside Triangles 1 and 2 for now.
Triangles 3 + 4

Repeat the instructions for Triangles 1 and 2 to create Triangles 3 and 4. Make Triangle 3 with Color C and Triangle 4 with Color D.
Join Triangles 1 + 2 with Triangles 3 + 4
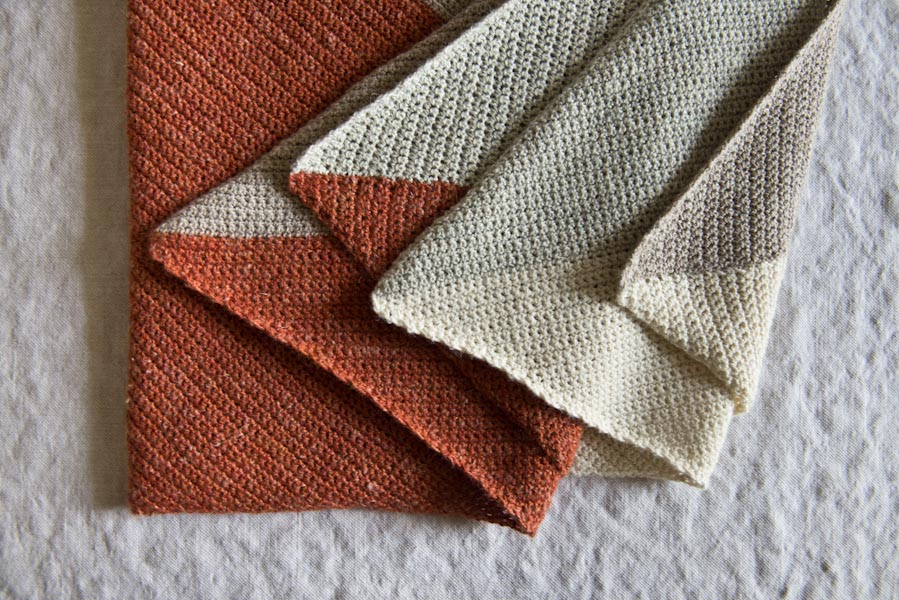
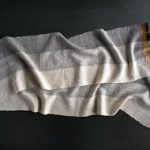
Note: Now is a good time to lightly steam or wet block both pieces. Shape each into a neat right angle triangle.
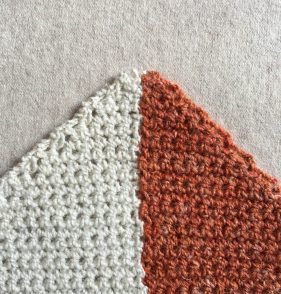
With the right sides facing up, align the two finished pieces along the edges that are half one color and half another color, so that Triangle 1 abuts Triangle 3 and Triangle 2 abuts Triangle 4.
Thread a tapestry needle with Color A and using a whipstitch, join the edge of Triangle 1 to the edge of Triangle 3. Using Color B, join the edge of Triangle 2 to the edge of Triangle 4 in the same way.
Finish
Weave in ends and block again, if desired.

Learn About Linen Quill + All Our Beautiful Yarns
We designed this pattern project to highlight the uniquely beautiful qualities of our Linen Quill, a wonderful fingering-weight yarn that is blend of 50% wool, 35% alpaca, and 15% linen. It feels amazing in your hands, and in over 60 jaw-droppingly gorgeous colors, Linen Quill is the candy store of yarn!
More Free Knitting + Crochet Patterns
- Be sure to explore our vast collection of (mostly free!) Linen Quill knitting + crochet patterns and cast on!
More Fingering Weight Yarns
- Shop our entire collection of fingering-weight yarns
- If you want to use a different yarn, be sure to take the time to get the correct gauge. Need help? Check our All About Gauge Tutorial!
More Yarns With Similar Fiber
- Shop wool yarn
- Shop alpaca yarn
- Shop linen yarn
Looking for more inspiration? Explore all of our crochet patterns and crochet tutorials, buy one of our many kits and yarn bundles, and shop for beautiful yarn. We have over 35 gorgeous natural fiber yarns in 100’s of magnificent colors, designed to bring integrity, beauty, and joy to your next crochet or knitting project and only available at Purl Soho!


i love everything about the Hearth blanket.
We’re so glad that you like the blanket, Stephanie! Thanks for writing!
Kristy
I will definitely will do this, looks simple enough. I’m a knitter, I can crochet but xmcant follow pattern but this sounds easy enough to do. Thank you
Hi Carlota!
Thanks for writing! Hopefully you’ll find the pattern easy to follow, but if you get stuck in any way, please just let us know!
Kristy
I am already in love with this blanket!! Purl soho , you guys are amazing. I have been waiting for a crochet project from you for a long time. My aunt recently got married and I forsee a baby coming soon. This pattern would be perfect. Thanks for all of your hard work!!
Thanks so much for your kind comments, Coletta! That’s great that you’ll be making the blanket and we’d love to hear how it goes! Thanks for writing!
Kristy
It’s a lovely pattern , but…Sorry to be a maths geek- but you need to press and block into a RIGHT ANGLED TRIANGLE, not an EQUILATERAL triangle. If you did equilateral triangles, you would have six meeting at the centre and end up with a hexagonal blanket [now there’s a thought….]
Hi Angela,
You’re absolutely right! Thanks for your keen eye, we’ll be sure to make the change to the text!
Kristy
I have attempted to make the 4 point baby blanket,
however, I have a question: Should the pattern
be decreased at the beginning and the end of
each row?, I believe Angela above has it. Have
you made any changes to the text of this pattern
would appreciate your input.
Thanks so much,
Linda
Hi Linda,
For this pattern, you will decrease at the end of Row 1 and decrease at the start of Row 2. I hope this helps clarify! We have made no changes to the text of the pattern. Please let us know if you have any further questions and thanks for writing with this one!
Kristy
Thanks so much, Kristina
I’ve forgotten my high school mathematics,
I understand now.
Linda
Gladly Linda! Good luck with the blanket!
Kristy
Is there enough yarn to make this a little bigger, like a lap blanket? Or would I need to buy additional skeins?
I’m also a knitter, not a crocheter, but this looks like an amazing beginner’s project!
Hi Liz!
We designed the blanket to use one skein of each color, and although, depending on your gauge, you may find that you have some yarn left over, it won’t be enough to increase the size of the blanket significantly. The yardage of the Linen Quill is generous (439 yards per skein) and so yes, with a second skein per color, you’d be able to have greater leeway. In order to double the size of the blanket, you would need 4 skeins total per color. Worked entirely in single crochet, the blanket really is a great beginner project, and we’re always here to help answer an questions you may have along the way! Thanks for writing!
Kristy
I would love to make this as an adult size throw. Do you have any suggestions for enlarging it? Yarn amounts? I have been looking for a single crochet throw project and this blanket (and the colors) is just beautiful.
Hi Teresa,
The pattern would be very easy to make larger — initially I had calculated that an adult size 72 x 72 inch blanket would require one additional skein, but for that size, you will need 3 more skeins of each color (for a total of 4 skeins per color). I hope this helps and please let us know if you have any further questions!
Kristy
Thanks for your reply. I think I would like to use Kiln Red, Turmeric Yellow, and Rose Granite plus one other color. Maybe one of the grays: Oatmeal Gray, Stonewall Gray or Salt and Pepper. I also thought of going darker with Trout Brown. Would you think the first three colors would work together, and if so, which neutral would you use? It’s hard to judge without seeing the yarn in person.
Hi Teresa!
This is definitely the fun part! I just lined up three balls of the first three colors you mention (Kiln Red, Turmeric Yellow and Rose Granite) and they are lovely together! The Rose Granite seems especially pretty next to the Kiln Red! For a fourth color, the Oatmeal Gray seems to help compliment the richness of the Turmeric Yellow and Kiln Red in a very nice way, or if you wanted to go darker, the Trout Brown would also be a great choice! I hope this helps somewhat! I honestly don’t think you can go wrong with any of the neutrals above! They are truly a win-win! Please let us know if you have any further questions and thanks for writing with this one!
Kristy
OK, I think I’ve narrowed it down to either Pale Mushroom (which I didn’t mention previously – LOL) or Stonewall Gray. Which one would you chose to compliment the other 3 colors? I’m getting excited to place my order and begin!
Hi Teresa,
Although you can’t go wrong with either of those colors, there’s a warmth to the Pale Mushroom that would look really nice with the other colors you chose. I hope this helps and good luck with the blanket! Thanks for writing!
Kristy
Wouldn’t you need four skeins of each color for a 72 X 72 blanket? A 72 X 72 blanket is equal in size to four 36 X 36 blankets (two across and two down). Actually, that could be an interesting pattern too – make four or even several smaller versions and attach the squares to make a larger blanket.
Hi Susan!
Thanks for writing, you’re absolutely right! One would think that doubling the size of the blanket would also mean doubling the amount of yarn, but that’s not the case, it would need to be quadrupled (four skeins of each color instead of two)! I will be sure to make the change to my initial response and very much appreciate your keen eye! Thanks again!
Kristy
Yummy blanket!!…any plans to create a knit version?
Julie
Hi Julie! We’ll definitely keep a knitted version in mind going forward! Thanks for writing!
Kristy
I second that (suggestion)! I would love to make the knit version of this blanket.
Hi LS,
Thanks so much for the suggestion! We do have a knitted version of the blanket in the works so please stay tuned! Thanks for writing in!
Kristy
Is there anyway I can do this wonderful pattern without having to sew it together? My finishing isn’t that great. This looks like a perfect project to work while traveling. Love your patterns and great, easy to follow instructions and photos
Hi Helen,
We tried a few different constructions for the blanket and found that we were able to neatly crochet two triangles together but not all four. I completely understand your reservations on having to sew, but I think you’ll find the edges of the triangles are very forgiving and that with the fine weight of the Linen Quill you’ll be able to get a tidy seam that looks purposeful and good. Thanks for writing, and please let us know if you have any further questions along the way!
Kristy
This pattern is lovely. Would it work using the line weight yarn?
Hi Autumn,
The blanket would be beautiful in Line Weight, and you will likely be able to get very close to gauge! Thanks for your kind comment and for writing in!
Kristy
This is completely fantastic! Thank you so much!
Hi – I really love the simple nature of this pattern. Do you have a yarn for this that would be machine washable and dryable? I don’t want my niece to feel like it’s too pretty to actually use or cause her angst over caring for it.
Thanks so much,
nancy
Hi Nancy, thanks for writing!
Three beautiful superwash yarns that you might consider choosing from as an alternative to Linen Quill, (and that should allow you to get very close to the pattern’s gauge) would be Anzula Squishy (https://www.purlsoho.com/yarn/knitting-crochet/squishy.html), Anzula Cloud (https://www.purlsoho.com/yarn/knitting-crochet/cloud.html) or Tosh Merino Light (https://www.purlsoho.com/yarn/knitting-crochet/tosh-merino-light.html). All three of these yarns also come in gorgeous palettes! We hope this helps and please let us know if you have any further questions!
Kristy
So i know you recommend hand washing for linen quill, but babies and hand washing usually don’t mesh. how disastrous would it be to put this in a delicate cycle in the wash and line dry?
Hi Stephanie!
Although it’s best to wash the Linen Quill by hand with cold water, and we would not recommend putting it in the washer or dryer, there are several superwash yarn substitutions to suggest! You could try Anzula Squishy (https://www.purlsoho.com/yarn/knitting-crochet/squishy.html), Anzula Cloud (https://www.purlsoho.com/yarn/knitting-crochet/cloud.html) or Tosh Merino Light (https://www.purlsoho.com/yarn/knitting-crochet/tosh-merino-light.html), and all three should allow you to get close to the blanket’s gauge. I hope this helps and please let us know if you have any further questions! Thanks for writing!
Kristy
I love this pattern. Do you have a “baby-proof” yarn that this would work with? Something she can wash and dry in the machine.
Thanks, Nancy
Hi Nancy!
It’s a great question, and yes, there are three yarns that quickly come to mind! Anzula Squishy (https://www.purlsoho.com/yarn/knitting-crochet/squishy.html), Anzula Cloud (https://www.purlsoho.com/yarn/knitting-crochet/cloud.html) or Tosh Merino Light (https://www.purlsoho.com/yarn/knitting-crochet/tosh-merino-light.html), with an array of beautiful colors to choose from, and all washer friendly. I hope this helps and please let us know if you have any further questions!
Kristy
I love those yarns – but do you have experience with putting items made with those in a dryer? They all say machine washable but Tosh says ‘dry flat’. I don’t want to experiment with an expensive yarn – call me chicken.
thanks, Nancy
Hi Nancy,
We checked the labels on the three yarns mentioned above, and although they are superwash yarns and can be washed cold in the machine, they do recommend drying pieces flat and not putting items in the dryer! Thanks for writing and for helping us clarify!
Kristy
So I have purchased yarn recommended, downloaded pattern. Started crocheting. Now have a question.
Instructions state all the decreasing are on the same side .
Decrease end of wrong side, then turn and start next row with a decrease. Is this correct? Is ther a decrease only at one end of triangle?
Thank you for reply,
Carol S
Hi Carol!
Thanks for writing and yes, that is correct! The decreases occur on one side of the triangle (to form the hypotenuse). I hope this helps clarify and please let us know if you have any additional questions!
Best,
Kristy
I love everything about Purl Soho! I am a published knitwear designer and would like to offer up my designing (or test knitting)skills should you desire any knitted patterns to go with your amazing yarns! Please feel free to contact me and I look forward to hearing from you at your earliest convenience. All the best from Lee Gant
I’m also interested in a knitted blanket in this design. Somehow the pattern just looked like a natural design for knitting. Please let me know if one is available.
Hi Helen,
Thanks for your interest in this pattern! We are currently working on a knitted version of the blanket and hope to have it available soon! Stay tuned! Thanks for writing in!
Kristy
Do you decrease on both row 1 and 2? I am a little confused.
Thanks, Floree
Hi Floree,
Yes, you’ll decrease at the end of Row 1 and then at the beginning of Row 2. This will help shape the hypotenuse of your triangle. I hope this helps clarify and please let us know if you have any further questions! Thanks for writing!
Kristy
I absolutely love the linen quill yarn, it is so beautiful! I am also really enjoying this pattern. I am a knitter so I am figuring this out bit by bit and have a question. I have just started my second triangle and started with the wrong side facing me per the instructions, but it doesn’t look quite right. The seem where I attached the new yarn looks seamless on the wrong side and I see the little “v’s” on the right side. Can you help me understand if I attached my new color correctly? It also sets me up for row 2 (instead of row 1) because the right side is facing me but I’m on the side with the straight edge so I wouldn’t want to decrease here. It seems I should have attached my new color on the opposite end, but to do that I would have to start with the right side facing me. It looks like I should keep working the straight edge in the same way as I continue with the new color correct?
Hi Tonya,
We’re so glad that you’re enjoying the Linen Quill and the pattern! The image that might be the most helpful in understanding where to attach your yarn when starting your second triangle can be found just under the heading “Triangle 2.” Starting at the edge indicated by the white arrow, you will make 1 sc in each stitch along the foundation edge, then chain 1, and turn. You will not decrease on the first row after joining. As with Triangle 1, you will then work Rows 1 and 2 until you have one stitch left. Please let us know if this helps clarify! Thanks for writing!
Kristy
I’ve got it, thank you!
Hi Kristy! Many thanks for this sweet and beautiful pattern. I ordered the materials from your shop and started it this morning. I am really surprised as the blanket is growing very quickly! I hope my little girl (due in June) enjoys it as much as I am enjoying making it. Thanks again and keep up sharing these great projects!
Hi Silvia,
Thank you so much for writing in! We’re really glad to hear that you’ve been enjoying the blanket pattern! I too was surprised by how quickly the stitches seem to fly off my hook and it’s really great to hear that you’ve felt the same! Congratulations on your little girl due in June — how special to be making her the blanket! Thank you again for your kind comments and sending best wishes!
Kristy
Hi Kristy,
Thank you so much for your kind reply. I finished the blanket today and it is beautiful.
Best regards.
I love this blanket! I’m wondering how you don’t have any lines though. Are you working through both loops?
Hi Sam,
Thanks so much for writing in! Yes, I worked through both loops when working the single crochet and not just one (which can create the line you mention). I hope this helps clarify!
With my best,
Kristy
Awesome! Thank you!
I am in love with this blanket. I was just wondering. If I want to make it a bit larger, should I start up with 145, 147, 149, 151, 153 or doesn’t it matter if it’s an odd or even number? I just want to make sure I get the wrong and right side right.
Majbritt, DK
Hi Majbritt,
Thanks for writing! For this blanket, you’ll need to create a foundation row of an even number of stitches. So you’ll chain an odd number of stitches to start and, beginning with the second chain from your hook, you will make 1 single crochet into each chain stitch across. Your starting number of chain stitches will be odd, but for Row 1, you will be working an even number of stitches. I hope this helps clarify! Please let us know if you have any further questions! Good luck with the blanket!
Kristy
That was very much clarifying. Thank you very much. I did as described with 111 st i foundation row and 110 back as the yarn I’m using are a bit thicker. The next problem are the rolling edges. How do you suggest I block them, so they don’t roll up again?
🙂
Hi Majbritt!
I found that wet blocking the blanket did wonders to help every lay nice and flat. I would suggest getting the blanket completely wet, gently wringing out the excess water and laying it flat to dry. This should definitely do the trick! Good luck and thanks again for writing in!
Kristy
I finally finished and wet-blocked my blanket aswell. It worked 100 %
I uploaded the finishing result on instagram with #purlsoho and #fourpointsbabyblanket. Thank you so much for your help and lovely pattern.
Wonderful, Majbritt, great to hear and thanks so much for uploading and sharing images of your finished blanket!
Shouldn’t the two sides of the right angle be the same length? I’m practicing with heavy yarn and a large hook and each time the cast on side is quite a bit longer than the vertical side. I wonder if it’s the thick yarn that is distorting the stitch size. Thanks – I enjoy your friendly answers to the questions.
Hi Helen,
Technically, yes, the sides of the right triangles should be the same length, (the cast on sides should be the same lengths as your vertical sides). That said, I found, in making our sample, that the triangles can have a tendency to bias slightly or not appear completely even until you block them. You may be experiencing the same thing! And although I can’t be sure, you could try lightly steaming your blanket into shape and seeing if that helps. Please let us know if it does — I hope so! Thanks for writing in!
Kristy
Hi – I need some help. I’m a left-handed crocheter who’s about to start the 2nd triangle……….am I correct in thinking I have to start with the right side (RS) facing me so that the small point is on my left and then I can crochet a foundation of SC and then a Row 1 with a decrease at the end? I marked the WS when I started and it’s backwards for me.
Thanks!
Hi Nancy! I’m a lefty too and it can be confusing, but very easy to fix! In the image under the heading “Triangle 2” you can start your first row at the other side (starting on the left instead of the right — so ignore the arrow shown in the image and start on the top left instead) and begin with Row 1 (instead of crocheting one row of single crochet). This should orient you in the proper direction, also for the remaining triangles. I hope this helps and please let us know if this is in any way unclear! Good luck & thanks for writing in!
Kristy
Wow – such a simple solution! Never would have thought of it because I assumed I ‘needed’ that extra row of SC to make the triangle fit properly.
Thanks so much!
Hi Nancy!
Wonderful — I’m so glad you wrote!
Best,
Kristy
And another benefit to doing it your way is that it makes that pointy corner much neater and less bulky. So that’s a double thanks!
Hi! What a beautiful blanket, I’m planning on making it for my cousin who has just announced that she is pregnant. I have a question: Does each section use the whole skein of yarn? I’m trying to source yarn and see what I can use for my stash. Do I need to make sure I have ~400 yards of each colour? Thanks!
Hi Thomas,
Yes! Each section takes just one skein of yarn, which is about 439 yards each. Thanks for writing, and best of luck with the blanket!
Kristy
Any idea when you may have a knitted version of this blanket? Thanks much. It is really lovely.
Hi Gerry!
Thanks for writing and for your interest in this pattern! We are currently working on a knitted version of the blanket and should have it ready soon! Thanks again,
Kristy
This is a super cute and modern pattern that my daughter-in-law would love! I would like to make this in a dk weight and a bit bigger, about 48″ by 48″. Can you tell me how much yarn I would need for each color if I did that?
Hi Susan,
Do you know specifically what yarn you would like to use for this project? That would help us provide the best guess for the amount of yarn you might need! Thanks for writing in!
Kristy
I was going to use Berroco Vintage DK. I think I’ve figured that I need 3 skeins of each color but it would be great if you could let me know if I have my math right.
Thanks, Susan
Hi Susan,
3 skeins of each color in Berroco Vintage DK should definitely be enough yarn (864 yards). To be certain, it would be helpful for you to work up a small swatch in single crochet to see how many stitches you are getting per inch, but 3 skeins should be plenty! For a finished dimension of 48 inches x 48 inches, you will need an approximate starting foundation chain of 36 inches. I hope this helps! Please let us know if you have any further questions — best of luck with the blanket!
Kristy
Thanks so much for the answers! Should be cute!
Is the 36″ cast on also for the foundation single crochet method?
Hi Susan,
Yes! That is correct! You’ll need a starting foundation chain of 36″.
Best,
Kristy
I have crocheted two triangles and am ready do the next two. But the outer edges, where the single crochet decrease was done at the end of one row and the beginning of the next row are longer and do not form a right angle. If I then connect the two parts of the pattern it will not form a four colored square. It will look like two cones put together. What am I doing wrong?
Hi Nirelle,
Hmm, I think the best way to get to the bottom of this is to send a picture of your project to [email protected]. There I can examine the picture and see if I catch anything out of the ordinary. Let me know!
-Adam
Hi, I am in the process of making this wonderful blanket as a gift for my sisters’ first baby. I am halfway through now, just finished the first 2 triangles. It looks good, however the outsides of the blanket (where we decrease) tends to curl a lot. Do you have any tips, tricks to solve this?
I am using DROPS Baby Merino 100% Merinowool (Weight/yardage: 1.8 oz (50 g) = approx 191 yds (175 m)). I am using double thread and needle size 5 mm.
Hi Annelies,
Thank you for writing in! Crochet does tend to curl a little bit, but it’s nothing a little steam or wet blocking can’t work out. I suggest doing this when you are finished with the project. It will definitely help.
Best of luck!
-Adam
For the life of me, I cannot get a right angle that’s even close to the same size on the bottom and side (one without the decreases). The difference on mine was six inches, so blocking wouldn’t help. It’s the bottom that’s wider than the side. Same thing happened on the second one, and I’m at my wit’s end. If it’s that my stitches are wider than they are tall, I don’t know how to fix that. I even tried changing the stitch to half-double. I made all kinds of test swatches, using different yarns. It’s frustrating because this is a gift for a friend. She bought the yarn. The baby is due any minute, and I am getting nowhere fast here. This pattern is so simple that I didn’t think twice about agreeing to make it. I’m not inexperienced, either – I’ve been crocheting for over 30 years, and very few patterns intimidate me. Anyone have any idea where I’m going wrong?
Hi Dannie,
Thanks for writing in and sorry for the late response! From the sample in the shop, I can tell you that the blanket’s sides are not quite equal in length. From the picture in the pattern, you should pick up for the second triangle on the long side (top side in the picture). After you complete the second triangle, go ahead with the third and fourth, but before you attach 3 and 4 to 1 and 2 you should block them to equal length. I think this can be achieved with some hot water, soap and heavy pinning. Don’t be afraid to over stretch it because it will bounce back when you steam out the pin marks. Let me know how it goes and please comment back if you have any other questions!
-Adam
Hi, If I was to crochet this as a 48 x 48 inch throw rug, how many skeins of each colour would I need? How many stiches would I need for the foundation chain? It’s so lovely but would be a tad small in this size I think, for an adult throw rug. Do you agree?
Hi Julie,
Thanks for writing in! You would need two of each color to get a 48×48″ rug. Now, for the cast on, it isn’t quite exact because the triangles aren’t quite equilateral. Since you want to make the blanket about 30% larger, I would cast on about 30% more stitches, which is 185 total stitches. I hope this works out! Best of luck!
-Adam
Hello, I recently finished the fist triangle, but now I’m facing a problem: One side of the triangle measures approx 24 inch, the other side 17,5 inch. This difference is huge and I think something went terribly wrong, although the first triangle pictured in the photo above also looks as if the two sides vary in length. Do you have any suggestions why this problem appears and is there any chance to solve it? Thank you!
Hi Marianne,
I think that this is normal, as I’ve gotten a few comments about this very issue. It also seems that in the picture the sides are uneven. I think that blocking with warm water, soap and lots of pins before sewing up the blanket will help a lot with the difference in lengths.
Best,
Adam
Thanks for your response, but blocking couldn’t fix this huge difference. At least 1 inch difference didn’t go away with blocking, and the triangle already looks really…stretched and crooked. Really sad because I love the pictures of the blanket and especially ordered the yarn to Europe. Ribbed it out and started the knit version, in the hopes it turns out better, although I definitly like the crochet version more. Perhaps you shoud’ve given a row gauge.
Hi Marianne,
So sorry this didn’t work out and I hope that the knit version goes better for you! Best of luck on the project and please feel free to write back in if you should have any other problems!
-Adam
Approximately how many yards of each color are needed?
Hi Lauren,
Each triangle takes approximately 439 yards. Thanks!
-Adam
I love the simplicity of this pattern, but that it’s still so interesting! I’m in the process of making it for a friend’s new baby and have a question regarding curling edges… I just finished the first triangle and the entire hypotenuse edge is completely curled up onto itself. Any tips on how to make it lay flat? I was thinking that adding a border along the curled edge might help, or maybe blocking it? (Although I’ve never properly blocked anything in my life!) Any advice you can give would be very helpful! Thank you!!
🙂 Carrie
Hi Carrie,
Thank you for writing us! I suggest blocking it in warm water and soap. If you lay the blanket flat to dry, the curling will resolve itself.
All the best,
Adam
Hi I just found your site and what a lovely work of art. ..beautiful. I’ve been crocheting for over 50 year and still gets excited when I see a beautiful piece. Thank you for sharing.
Blessings
I’m more of a visual person, is this on youtube or is there a video somewhere?
Thank you
Hi Carla,
Thanks for writing in! We do not have a video for this pattern but we do have a variety a pictorial crochet tutorials here: https://www.purlsoho.com/create/crochet/tutorials/
I hope that this helps!
Cassy
I love this pattern and it looks easy enough for a beginner like me, however I have a question. I’m almost done with the first triangle and still don’t understand how exactly to start the second triangle. If I start with the wrong side facing me and begin at the place indicated by the white arrow, then when I finish that row of sc in the chains, chain 1 and turn, I’m starting row 1, where you decrease at the end but the right side is facing me. Is that correct? Are the sides really not that different? I’m hoping you can clarify.
Hi Nella,
Thanks for writing in! You are correct! While the sides are not all that different, it is important to have a wrong side and a right side so that you will be beginning the next triangle in correct place as well as ensuring that the join rows are all on one side to create a cohesive look. I like to use a locking stitch marker on the right side so that I don’t have to question which is the right and wrong side!
Best,
Cassy
Can u use a different kind of yarn on this
Hi Janice,
Are line weight would work well with this pattern it is a wool, or if you wanted something that you could put in the washing machine Anzula squishy would be nice. Any fingering weight yarn can be used for this pattern.
Enjoy,
Melissa
How do you mail?
Hi Darcy,
Thanks for writing in! We can be reached at [email protected] for any questions or inquiries!
Best,
Cassy
Hello,
I’ve started to knit the four points blanket (with your wonderful yarn) and as I am a beginner my question might seem stupid… Well, when you start a row, as you have chained one, do you make the first single crochet (or single crochet decrease) in the first stich of the row or in the second stich?
Thanks a lot for your help, it’s a very challenging projet for me and I really would like to succeed!
Hi Clémence,
Thanks for writing in! Don’t worry, this isn’t a stupid question at all! There is a lot of variation in how crochet patterns are written and expect you to deal with the turning chain and first stitch so I’m not surprised you are confused. In this and in all of our crochet patterns, we want you to begin working in the first stitch of the row. If in doubt, it is always a good idea to count your stitches after each of the first few rows to make sure you are ending up with the correct amount.
Best of luck and happy crocheting!
Julianna
Hello Marion,
Thank you for reaching out! We do not currently have a video tutorial specific to this pattern, but I will certainnly pass along your request!
Warmly,
Marilla
I am so confused am i suppose to decrease at the each corner. It seems like on the same corners i am suppose to decrease i would have thought to decreAse at eaxh corner not on the same corners can you please clarify for me please.
Hi Marion,
Thanks for reaching out! After you have completed your set up row, you will then be decreasing at the end of every wrong side row, or Row 1, and decreasing at the beginning of each right side row, or Row 2. This should result in all the decreases being on the same side of the triangle. When viewing the triangle from the right side, the left edge should be straight and the right edge should be diagonal to create a right triangle.
I hope that clears things up!
Julianna
Hi, I wanted to crochet this blanket using Lantern yarn as two triangles instead of four. Any insight on how I can do this? I’m assuming I would start triangle 2 from a different side of triangle 1. Also, how many stitches would I start with to get the same size?
Hello EJ,
Thank you for reaching out! The first thing you will need to do is crochet a gauge swatch. This will tell you how many stitches per inch you are getting which will in turn tell you how man chains you will need to begin. I would loosely estimate that you will need 2 skeins for each color.
I hope this helps and let us know how it goes!
-Marilla
Do you decrease only from same corner of row 1and2
So it only decreases from one side
I am asking four point purlsoho blanket
I would like guidance in this please
Thanks
Hello Saroj,
Thank you for reaching out! You are correct, to create each triangle you will be decreases on just one side to create your angle. This means you are decreases every other row.
I hope this clears things up and let us know if you have any further questions!
-Marilla
Hi! I started this blanket and I realized some ways through that the bottom edge curls up probably from some inconsistent stitches, and there are a few waves in the middle of the crochet fabric. Should I frog and start over or should blocking fix it? Thanks!
Hello Mai,
Thank you for reaching out! This is really up to you, while blocking will certainly help it will not eliminate the issue. It really depends on if it will bother you or not, the finished blanket will be a beautiful either way!
Happy knitting,
Marilla
I need help with instruction of how many stitches to cast on each triangle for a crochet four points blanket 30″ x 30 ” . I am doing it with Seasonal Alpaca Yarn.
Hello Gitty,
Thank you for reaching out! The first thing you will need to do is crochet a gauge swatch so that you know how many stitches per inch you are getting. Once you know this you can use it to figure out how many stitches yo cast on to alter the pattern.
I hope this helps and happy knitting!
-Marilla
I am getting 5 stitches per inch. Still don’t know how big each triangles should be to get a 30 x 30 crochet blanket? Also do I decrease by end of every second row or by beginning and end of same side?
Hi Gitty,
Thanks for reaching out! To make a 30 inch by 30 inch blanket at your gauge, you will need to start with 105 stitches for each triangle.
Happy crocheting!
Julianna
I see contradicting instructions for the crochet blanket. In the original instruction it says decrease by end of second row AND beginning of 3 row. However someone asked you, and you replied only end of event other row. Which is the correct way?
Hi Gitty,
Although the knit version of our Four Points Baby Blanket is shaped with decreases on every other row, you are correct that the crochet version has a decrease on every row, though they will always be at the same edge of the triangle. On Row 1, your decrease will be at the end of the row, and on Row 2, your decrease will be at the beginning of the row.
I hope that clears things up!
Julianna
I am so lost so at the end of the third row i do not decrease and then i decreAse at the end of the fourth row and then decrease at the beginning of the fifth row? Is that right.
Hello Marion,
Thank you for reaching out! It sounds like you have the basic idea, hope I can help to clarify. For row 1 our decreases stitch is at the end of your row, while for row 2 your decrease is at the beginning of your row. You will then repeat theses two rows until 1 stitch remains. This means that for all odd rows you are decreasing at the end of your row and all even numbered rows your decreases will be at the beginning.
I hope this helps and happy knitting!
-Marilla
Hi! What’s the best way to adjust this pattern with a thicker yarn? I have a medium yarn that calls for size G crochet hook. My test swatch came out to 16.8 stitches per 4 inches. Thanks in advance!
Hi Rachel,
Thanks for reaching out! At your gauge, I would suggest starting with 113 chains, or 112 foundation single crochets, to make a baby blanket the same size as ours.
Happy crocheting!
Julianna
Hi there! I’m so close to finishing this beautiful blanket but I’m not sure how to finish or knot (or not knot) the yarn from sewing the two sides together. I’m not sure how to finish it off without it having a hard spot where I knotted it. Any help would be much appreciated!
– Elise
Hello Elise,
Thank you for reaching out! There is no need to tie a knot- all you need to do is weave in your ends.
I hope this helps and happy stitching!
-Marilla
Hello, I am new to crocheting, this may seem like a ridiculous question but I’m a bit confused on how to determine which is the “wrong side” of the FSC to start row 1. I’ve got the 142 stitches finished with my hook on the left, the end with the slip knot tail is on the right. To start row 1, I would have to turn my work, (so I would be working right to left) the tail will then be on the left which in all the videos I’ve watched say this would be the “right” side of your work. I can’t find anything about “right” or “wrong” sides starting with the FSC. Is there another way to tell “right” and “wrong” sides? Possibly by the direction of the “V’s ” of the chains? Or, at this point, is it determined by the start of the project and marking it as such…. I’m not sure if i’ve over complicated this. I’m using a size D hook and thin yarn so it’s definitely more challenging for a beginner. I love this blanket and I’m determined to make it for my grandbaby due in Oct. Thank you!
Hi Andrea,
Great question! Technically while you are working the foundation single crochet the right side is facing you, so when you turn to start row 1, the wrong side is now facing, which is how our pattern is written; however, for future projects like this that are worked back and forth and result in a fabric that looks the same on both sides, either side could technically be the right or wrong side, so you would just want to mark the right side with a removable marker based on where you start the first row of the pattern and use that marker for reference throughout.
I hope that helps and happy crocheting!
Julianna
Hi Julianna,
Yes, this does help me understand. I’ve completed the blanket and Can’t wait to give it to my daughter!
Thank you!
Re crochet pattern – could you please give the stitch height gauge. The pattern just says “ 21 stitches = 4 inches in single crochet” which I presume is the width. Single crochets are not exactly square (same height as width) so the gauge in 2 dimensions is important. I don’t want to have to instruct the recipient to block and manipulate the blanket every time it is washed, so I want to be able to achieve a square blanket – by adjusting if necessary (the symmetry is part of its charm).
Thanks for your help.
Sally
Hello Sally,
Thanks for reaching out! This is a great question- Your width and your hight are both 21 stitches per 4 inches.
I hope this helps and let us know if you have any other questions!
Happy crafting!
-Marilla
Hello, I am interested in knitting this four point baby blanket but I would like to work with a yarn that is machine washable. Instead of using Liner Quill, I would like to use “Posy” which is machine washable. Please tell me what is the converted (from Liner Quill to Posy) instructions. I can also crochet but I think this blanket looks amazing knitted. Thank you!
Hello Selena,
Thank you for reaching out! You can knit up the knit version of this blanket with Posy. No need to make any alterations!
Happy knitting!
-Marilla
I really love the look and simplicity of this pattern. This blanket will be for my 4th grandchild! I will say though that the edges are REALLY curling up. I am doing the crochet version. Do you think it would help to add a edging all the way around? My thinking is it would help it from curling and make it lay a little straighter….? What is your advise on this?
Thanks so much for the free pattern!
Hello Sherri,
Thank you for reaching out! This is not a bad idea, and could certainly help. I would suggest blocking your blanket first to see if the eliminates the issue. There may be no need to add a border.
I hope this helps and happy knitting!
-Marilla
LOVE the photos of this gorgeous blanket! I’m keen to crochet it for my 3rd grand baby. Before I start this project I would like to know the gauge. Hoping you can help. Many thanks!
Hello P,
Thanks for this question! The gauge for this blanket is 21 stitches per 4 inches in single crochet.
Best,
Marilla
After much searching I’ve found a sport/fingering weight superwash yarn that I’d like to crochet this in for my first baby. Do you remember if you used the whole skein of each colour? The one I want to use (Malabrigo Mechita) is a 100g skein but only 384m, rather than the 410m from Linen Quill. I’d like to use only one skein of each colour to keep the project affordable, especially if I only end up using a wee bit of the second skein. Thank you!
Hi Amy,
Thanks for writing, and congratulations on the new addition! We did use almost the entire skein of each color of Linen Quill – including the yarn used for seaming the blanket took a total of 1,750 yards, or 1600 meters. If you don’t mind the blanket coming out a little smaller, you could probably get by with just four skeins of your yarn. For a 32 inch square blanket, each triangle would start with either 121 foundation single crochets or 122 chains to work 121 single crochets.
I hope that helps, and happy knitting!
Julianna
What would happen if I were to do two of the triangles in a different stitch, say hdc? I want to say it would be to add some interest to the blanket, but I’m 1/4 of the way through my first triangle, and at this rate I think I’ll finish when I’m dead. Thanks for any advice you may have to help move this project along!
Hi Gina,
Thanks for writing in! Since different crochet stitches are different shapes, this may throw off the shape of your blanket. The rate of decreases in these triangles is meant to go along with single crochets, which are a bit wider than they are tall, so substituting something like a double or treble crochet, which is shaped more like a tall narrow rectangle, would result in a longer triangle and it wouldn’t fit along the side of the single crochet triangle. A half double crochet specifically might be alright, since they aren’t too much taller than single crochets, but I would definitely recommend crocheting a small swatch to make sure your stitch and row gauge will match the single crochet triangles.
Best of luck and I hope that helps!
Julianna
I’ve been working on mine for 2.5 years. Just tore out the darkest color for the third time. It keeps being too small. The other three went great. It’s a nightmare.
Hi Taylor,
We’re so sorry to hear that you’ve been having such continual difficulty with this pattern! We’d love to help figure out what the problem is so that you can finally finish up your blanket. Could you let us know some more about how the fourth triangle is turning out too small? For example, are the stitches themselves smaller than the stitches in the other triangles? Or are you running out of stitches before you reach the point of Triangle 1?
I’ll keep an eye out for your reply, and then we can help figure this out from there! It would also be useful for us to see a photo of your work so far, so if you could send one along to [email protected], that will really help us visualize what’s going on.
All the best,
Lili
I just got the yarn for this blanket yesterday, but have a question about gauge. The gauge is listed as 21 stitches = 4″. However with the blanket being 142 stitches across that would make it 27″x27″ instead of 36″x36″. Am I missing something here?
Hi Karis,
Thanks for reaching out! The starting chain is one of the diagonal lines of the blanket, not the outside edge. It is a bit tricky to visualize until you have knit the first triangle, but the outside edge of the triangles do end up wider than the starting chain!
I hope that clears things up!
Julianna
Should there be a chain 1 at the end of the row of 142 foundation single crochets before turning one’s work and starting row 1? Thanks!
Hello Gina,
Thanks for reaching out! Yes, in the foundation row you start with the second chain so you will then chain 142 stitches.
Best,
Marilla
I would like to get the pattern for this Four Points Baby Blanket to KNIT. On ravelry it says pattern is free. I would like to knit it with DK yarn, not fingerling. I do not want to buy the bundle. Can I just buy the pattern or is it free.
thank you
Julie
Hi Julia,
Thanks for asking! Here is the link to the free knitting pattern for the Four Points Baby Blanket in Linen Quill: https://www.purlsoho.com/create/2016/08/12/knit-four-points-baby-blanket/
And the version in Super Soft Merino can be found here: https://www.purlsoho.com/create/2018/02/23/four-points-baby-blanket-in-super-soft-merino/
Happy Knitting!
Cassandra
Hi, I’m just a little confused. To make the two halves meet with triangle 3 meeting with triangle 1, wouldn’t I have to flip it so that the wrong side is up? Unless I start triangle 3 with colour D.
Hi Amy,
Thanks for writing in! Yes, that is correct, you will have to flip Triangle 3 + 4 over to seam it to Triangle 1 + 2 to keep the colors in the same arrangement as ours, but the right and wrong side should be identical in this stitch. If you prefer, you could start with Color D instead and then rotate the triangle instead of flipping it to assemble the blanket!
Best,
Julianna
The way I read the pattern we are repeating the 1 sc dec on every row in order to create the triangle. What I came up with is a VERY lopsided triangle. I can’t imagine that my gauge is that far off. Any help would be appreciated.
Hi Amelia,
Thanks for reaching out! Yes, you are decreasing every row in order to get the triangular shape! If you are coming up with a lopsided triangle I would recommend working up a gauge swatch just to be sure, and if you are still having issues it may be something you can fix when blocking the blanket!
I hope this helps but please feel free to reach out with any more questions going forward!
Gianna
My daughter would love for me to make this crochet baby blanket into an adult version for her. Is there a configuration to make the triangles larger? We are thinking that, after making the middle square, we can then change the shape into a rectangle by adding larger borders on two sides and a small edge all around to trim it off. Possibly using a combo of colors for a stipe effect for the borders.
Hi Rainey,
Thanks for reaching out! Unfortunately we don’t currently haven’t this pattern available in a larger size but thank you for expressing you interest and I will be sure to pass this along! I think it would be fairly easy to make this larger by doubling the pattern, using 2 skeins of each color instead of 1 and starting out with either a chain of 285 or a foundation single crochet os 286! You could then add a border on to add even more length and width!
I hope this helps!
All the best,
Gianna
Hi,
I was wondering if I need to ch 1 after the sc foundation row (the one for experienced crocheters) before beginning my next row?
Hi Ruth,
Thanks for writing in! For the more experienced crocheters section, after making a Foundation Single Crochet of 142 stitches you move directly on to Row 1 (wrong side) where you will Make 1 single crochet (sc) into each stitch to last 2 stitches, 1 sc dec (see Notes, above), chain 1, and turn. [1 stitch decreased]
I hope this helps, happy crafting!
Gianna
Hi there, do you only crochet in second stitch for the foundational row and not row 1/2 when you turn your work ? Thanks
Hi Katie,
Thanks for reaching out! For Row 1 (wrong side) you will make 1 single crochet (sc) into each stitch to last 2 stitches, 1 sc dec (see Notes), chain 1, and turn. [1 stitch decreased] and then for Row 2 (right side) you will 1 sc dec, make 1 sc into each stitch to end of row, chain 1, and turn. [1 stitch decreased]
I hope this clarifies things!
All the best,
Gianna
Hello! I LOVE this blanket, I can’t wait to try it out.
I would like to make it using a worsted weight yarn. Is there a specific formula I should use to figure out how many chains to start with? Thanks for your help!
Hi Michelle,
Thanks for reaching out! I would recommend working a little swatch with the worsted weight yarn and then you can figure out how many chains to start with from there!
All the best,
Gianna
Do you have suggestions on how I could make this a throw size? Could I just use a heavier weight yarn and make a swatch to see how much bigger it would be?
Hi Sarah,
Thanks for reaching out! Yes you can easily adjust this pattern to be a larger throw size! If you would like to use a heavier yarn you can, like you said the best way would be to work a gauge swatch and adjust the pattern from there!
I hope this helps and please feel free to reach out with any more questions!
Warmly,
Gianna
I’ve enjoyed knitting this in the Supersoft Merino and would like to try crocheting it with that yarn. Two questions:
1. What size crochet needle would you recommend for Supersoft Merino (larger) yarn? 2. How long should the starting chain be with the heavier yarn? Would it work to just take the knitting math and transfer it over, so doing a starting chain that is about 60? I’m guessing you’re going to recommend crocheting a swatch and measuring gauge. 😉
Hi Alicia,
Thanks for reaching out! I think following the knitting math should work great, starting the chain about 60! We suggest a L – M (8 – 9 mm) crochet hook for Super Soft Merino and yes, I always suggest working a gauge swatch to get an accurate measurement before beginning any project!
I hope this helps and please let us know how this turns out!
Warmly,
Gianna
This is such a beautiful blanket! I’m looking online at the recommend Linen Quill yarn, and the color selection is limited (I assume due to high demand for this beautiful yarn!). Is there another similar Purl Soho yarn (I’m okay if it’s a slightly larger gauge) that you would recommend for this blanket which has more color availability? It will be for a baby, so softness is key. But so is washability! Can this blanket be washed?
Hi Carolyn,
Thanks for reaching out! Linen Quill is one of our most popular yarns so it is in need of a restock (hopefully the out of stock colors will be back soon!) We recommend hand washing this yarn but it may be possible to machine wash it with cold water on a gentle/hand wash cycle and then laid flat to dry. If you plan on doing so, I would recommend working a swatch and washing it in the machine to be sure! I would also recommend our yarn Posy, which is a superwash yarn (machine washable) and it is a fingering weight like Linen Quill! I would also recommend MADELINETOSH Tosh Merino Light, another superwash fingering weight yarn! I do always suggest working a gauge swatch whenever using a different yarn. than what the pattern calls for to insure you are consistent before beginning!
I hope this helps and please feel free to reach out with any more questions!
Warmly,
Gianna
Hello,
I am working on the crochet version of 4 points Baby Blanket – I am starting 2nd triangle – your instructions state:
‘With the wrong side facing you and starting at the right end of the foundation edge, join Color B and make 1 sc in each stitch along the foundation edge, chain 1, and turn. [142 stitches]
As with Triangle 1, work Rows 1 and 2 until you have one stitch left.’
But if you have ‘wrong side facing you’ starting 2nd Triangle – when you turn Row 1 is the ‘right side’ – whereas in start of Triangle 1 Row 1 is supposed to be ‘wrong side’! Please help!
Hi Patty,
Thanks for reaching out! That is correct, you begin picking up stitches and working the SC along the edge of triangle 1 while working on the wrong side, this will count as your first row (wrong side) you will then move directly to row 2 (right side) and then go back to repeating rows 1 and 2 until you have one stitch left.
I hope this clarifies things!
Warmly,
Gianna
I’m not clear on the Row 2 instruction.
1 sc dec, make 1 sc into each stitch to the end of the row, chain 1 and turn. [1 stitch decreased] this is where I’m not understanding the pattern. 1 stitch decreased? What is the pattern telling me to do? Turn and then 1 sc dec.
I did the foundation single crochet stitch. Will I crochet a sc dec stitch on both ends of the rows to form the triangle shape?
Thanks. This pattern is beautiful.
Hi Christina,
Thanks for reaching out and for your kind words! I am happy to help- so basically, you will be working the decreases on only one of the sides of the triangle, not both! So after you make the foundation row, you will Make 1 single crochet (sc) into each stitch till you reach the last 2 stitches, 1 sc dec (see Notes), chain 1, and turn. [1 stitch decreased] You will then turn the row, 1 sc dec, make 1 sc into each stitch to end of row, chain 1, and turn. [1 stitch decreased]
I hope this clears things up!
Warmly,
Gianna
Hi there— working on this for a friend and got stuck… my triangles are quite thin! When adding triangle 1 and 2 it’s clear they won’t make a right angle at the point. Do you have rough dimensions on how long the side that doesn’t have a decrease should be? I think that will be a good way to tell if I was decreasing too fast (although I think I was pretty close, 1at the end of a row and one that the beginning of the next). Any tips to avoid skinny triangles is appreciated— I think I have to start over!
Hi Kaylen,
Thanks for reaching out! The side of the triangle should be approximately 25 1/2″! It sounds like you are working the decreases correctly, so you should be on the right path! I would just be sure that you are completing the full amount of single crochets down the line to insure you aren’t incidentally missing one causing the triangle to shrink. You may also be able to get the triangle to the right dimensions by blocking them once you have finished.
I hope this helps and please let me know if you have any other questions!
Warmly,
Gianna
Love this blanket… I would like to adapt it so that it is similar to the Half and Half Triangles wrap! I love how interactive you when answering questions …. Thank you
Hi Amy,
Thanks for writing in! That is a great idea! You can follow the pattern for the Half and Half Triangle Wrap and adjust the stitch count to achieve your desired size for a blanket or you can adjust this pattern! If you are interested in doing that, I would suggest starting with a larger amount of stitches and then work up, decreasing on both sides to create one triangle, and then do the same process for the other side! You can then stitch the two together along the starting edges!
I hope this helps and please let me know if you have any more questions!
Warmly,
Gianna
Hello PurlSoho,
My foundation chain is 64 cm long. But at the end of the second row, the work has grown to 67 cm. And, as you can see, this is too long.
Of course, I did make a swatch. The gauge has the perfect measure: 21 stitches = 4″ (10 cm) in single crochet. Based on this gauge, the work with 142 stitches has a length of 26.6″ (67.6 cm).
In the COMMENTS ON, “CROCHET FOUR POINTS BABY BLANKET”(Gianna says: March 18, 2021, at 1:18 pm), I found this reply: “The side of the triangle should be approximately 25 1/2″ (64.7 cm)”. Because the individual parts of the blanket look like isosceles right triangles, I assume the foundation chain is the second leg of this triangle, consequently also 25 1/2″ (64.7 cm) long. The hypothenuse is the side with the decreases. Now I’m confused and at a loss. I have no igniting idea of how to escape from this thought trap. I would be happy and thankful if you could rescue me from this trap.
Hi Cristina,
Thanks for reaching out! Since this is an isosceles right triangle, the base of the triangle (the decrease edge) is 36″ and for the two legs to be of equal size, they should both measure approximately 25.5″. This is a calculation based on the 36″ long base, and for both legs to stay the same a 26.6″ long leg would change the proportions, either making the other leg smaller or it would increase the base which is also not accurate.
After the foundation row, you should be decreasing in both rows 1 and 2, so the work should not be growing at all, it should actually be getting smaller after the 1st row and even smaller after the 2nd row.
I may have misinterpreted your message, but I hope this clears things up based on what I gathered!
Gianna
Hi I’m aware that I need to have 21 per 10 cm (aka 4″) but how many rows of SC per 10 cm/4″ should I have in order to know I’ve hit true gauge please??
Hi Marie,
Thanks for reaching out! Unfortunately, since this is an older pattern I don’t have the exact measurement for the row gauge. However, a colleague of mine has estimated that the row gauge should be approximately 52-56 rows per 4″ based on the original sample.
I hope this helps, happy crafting!
Gianna
Thank you very much Gianna, this helps immensely! 🤍
Bought yarn for this pattern a week ago. Looking forward to making this! I’m still new to crochet, but wondering if center single crochet could be used for this instead? I didn’t read EVERY comment but did a text search and didn’t see it mentioned anywhere. Just curious for an opinion! Thanks.
Hi Michael,
Thanks for writing in. While I haven’t tested it out myself, I think you could absolutely use center single crochets for this pattern! I don’t see any reason why this wouldn’t work, so I’d recommend making some smaller swatches to see for sure. Let me know how it goes!
All the best,
Lili
Hello,
Thank you for this beautiful pattern!
I finished the first triangle and feel that it’s too small. I have more yarn left, and wondering what is the best way to enlarge the triangle. Making border maybe? if so- making it now or when I finish the rest triangles? I wish there is a different option than crochet borderline because I don’t like the way it looks like very much though.
Thank you!
Eliya.
Hi Eliya,
Thanks for writing in! We’re so glad you’re a fan of this pattern and would be happy to help you figure out how to use the rest of your yarn. To start, can you please let us know if you’re using the original Linen Quill or something else? This would help us get a better idea of how much yardage you have left.
If you were okay with restarting, you can chain a few extra stitches at the very beginning of each triangle to use up more yarn, but you do run the risk of running out of yarn if you chain too many stitches. The border idea is a great way to not only finish your blanket edges and hide your seams, but to also add to the overall size. You could even crochet the border in corresponding or contrasting colors to add to the overall visual effect of the finished blanket.
I hope that helps give you ideas in the meantime! I’m sure we can find a separate project to use up the yarn as an alternative so we’ll keep an eye out for what yarn you chose.
Best,
Margaret
Hello,
Loving this pattern! I made a mistake and started the project with color B – pale mushroom. I think that I should attach color D – pale oats with Color B to make the first half of the blanket in order to get the same color pattern. Please just verify that this is correct.
Thank You!
Mary Pat
Hi Mary Pat!
Thank you for your comment! Color/Triangle A and Color/Triangle C should be on either side of Color/Triangle B, so you can choose between either of these for your next triangle.
The other two colors you have will form the other half of the blanket, which means you will have A+B and C+D, or B+C and A+D for your blanket halves!
I hope this helps, but please feel free to reach out to us at [email protected] if you have any other questions!
All the best,
Margaret
Hi Gianna,
This is such a beautiful pattern and I am happily making it for a friend of mine who just had her first baby after many losses. Unfortunately, I’m still very much a beginner. When creating triangle 2, I’m a bit confused on where to begin. You marked the white arrow as the beginning place for triangle 2. Should I join the next color above the arrow on the top line? Or on the bottom line below? In the picture following this one, it looks as though Triangle 2 was added above the arrow on top, but (I think?) my foundation chain is the line below the arrow. Please help! 🙂 I’d love to get through as much this weekend as I can, but don’t want to start in the wrong place. 🙂 Thank you for the beautiful pattern!
Hi Michelle,
Thanks for reaching out, and I’d be happy to clarify this pattern for you! The stitches for Triangle 2 should be added on the top edge, not the bottom one. The bottom edge is the edge where you worked all the decreases (which created the slope of that edge!), so it is not the one with the foundation chain.
The best way to figure out which edge is the correct one to begin Triangle 2 on is to measure them! The correct edge will be the second-longest edge (and also second-shortest, since there are only 3 edges). Hope this helps!
All the best,
Lili
This is so helpful Lili! Thank you! I really appreciate your response 🙂
I’ve started mine but is it normal that the bottom of the first triangle seems to curl I cut imagine getting it to lie flat have I maybe started off wrong ?
Hi Jenna,
Thanks for reaching out! It is normal for crocheted fabric to curl significantly at the beginning of a project, especially when the starting chain is so long. This will diminish as you continue working on the triangle, and blocking your blanket at the end will also minimize the curling significantly!
All the best,
Lili
Hi! I’m having a hard time with this pattern. I did the first two triangles and they are longer along the foundation edge than the edge that is half one color, half the other. I figured no big deal, it’ll just be more of a diamond than a square. But I started on the third triangle and the foundation edge is longer by 1.5 inches than the other one. Not sure what to do. Can send pictures and more measurements if it helps.
Hi Kathryn,
Thanks for reaching out, although I’m sorry to hear that his pattern is giving you trouble! It is actually normal for the legs of the triangles to be slightly different lengths at first. This will create a diamond-shaped blanket, but you should be able to block it so that it becomes much more square once you’re completely finished!
All the best,
Lili
Hi! I’m not sure if this question went through yesterday. I’m struggling with the blanket because the triangles are ending up longer on the foundation side than the other side. It’s ending up more like a diamond than a square. No big deal, but I started on the third and fourth triangles, and they are 1.5 in longer across the foundation than the first and second ones. Should I just start over? What am I doing wrong?
Hi Kathryn,
I can confirm that your first comment came through, and I replied to you yesterday! In case you haven’t seen that yet, here’s what I wrote:
Thanks for reaching out, although I’m sorry to hear that his pattern is giving you trouble! It is actually normal for the legs of the triangles to be slightly different lengths at first. This will create a diamond-shaped blanket, but you should be able to block it so that it becomes much more square once you’re completely finished!
If you’re noticing that some of your triangles are coming out even longer than the others, along the same edge, then it’s likely that your gauge has changed slightly. I’d recommend going down a hook size in order to even that out so that the foundation edges of all the triangles match!
All the best,
Lili
Could you double the beginning chain and maybe use a heavier yarn to create 1 triangle shawl? I’m working on lap blankets and shawls for nursing home angel gifts.
Hi Lynette,
That’s a wonderful idea, and it will absolutely work to make a triangular shawl! We’d love to see how your shawls turn out if you try this!
All the best,
Lili
Hi, I’m a great purlsoho fan. The challenge some seem to have with this pattern of the two triangles not matching in size happened to me, as well. My discoveries may be elementary, but if they help anyone, worthwhile.
First, when joining the second color to the already worked triangle, those foundation stitches need to be heeded carefully so you pick up every single one.
Second, don’t miss the instruction to only begin decreasing after row two of the new color.
These few potentially missing stitches can make all the difference over the whole triangle. In any case, these were my mistakes.