
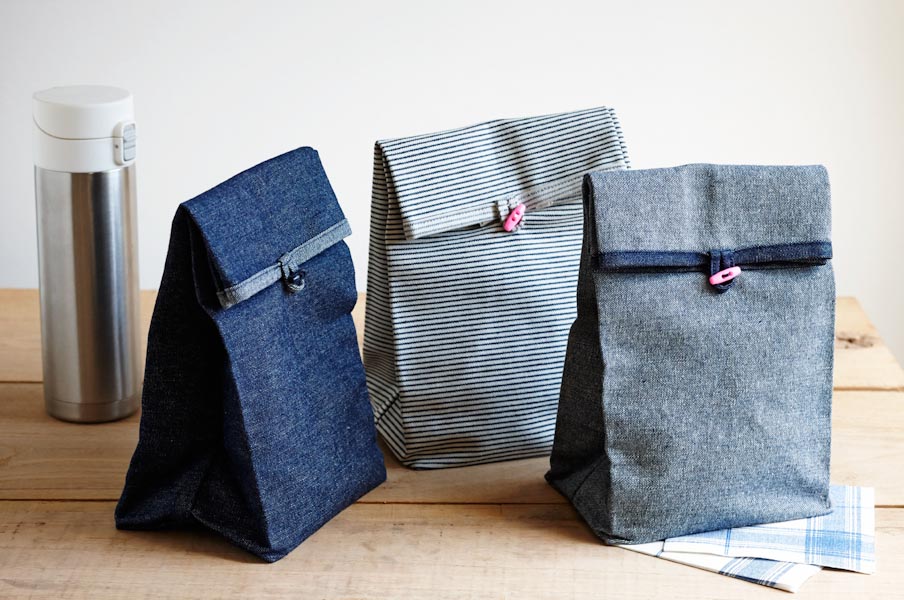

Button Lunch Bags
In The Great Gatsby Jordan Baker assures Daisy that “Life starts all over again when it gets crisp in the fall.” I couldn’t agree more! This time of year always feels like a new beginning to me, a good time to make small resolutions. This year I’m vowing to stop buying takeout sandwiches for lunch and to start making them, and so I made these simple Button Lunch Bags to get me started!
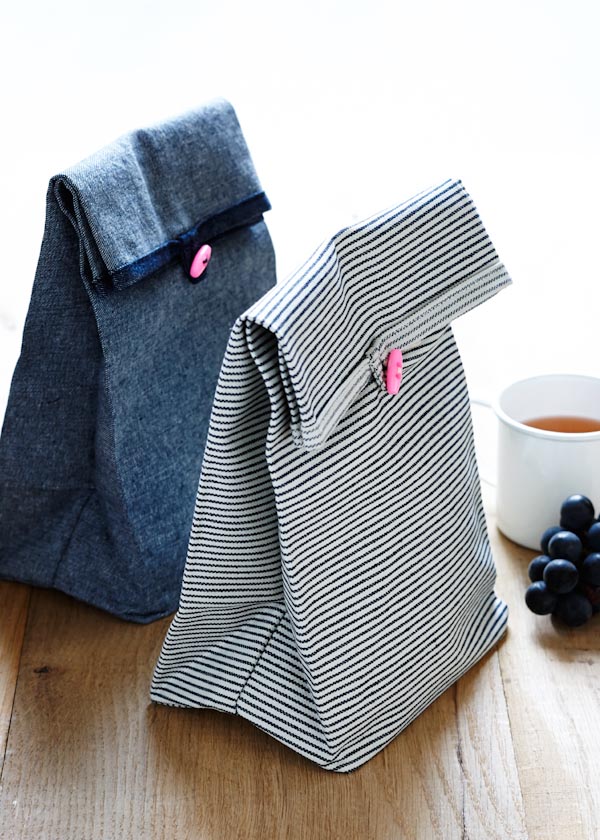
Sewn up in sturdy, washable cotton fabric, each bag is finished off with a sweet little button to keep your sandwich safe. These sacks are so pretty, in fact, you might want to use them for more than lunch!

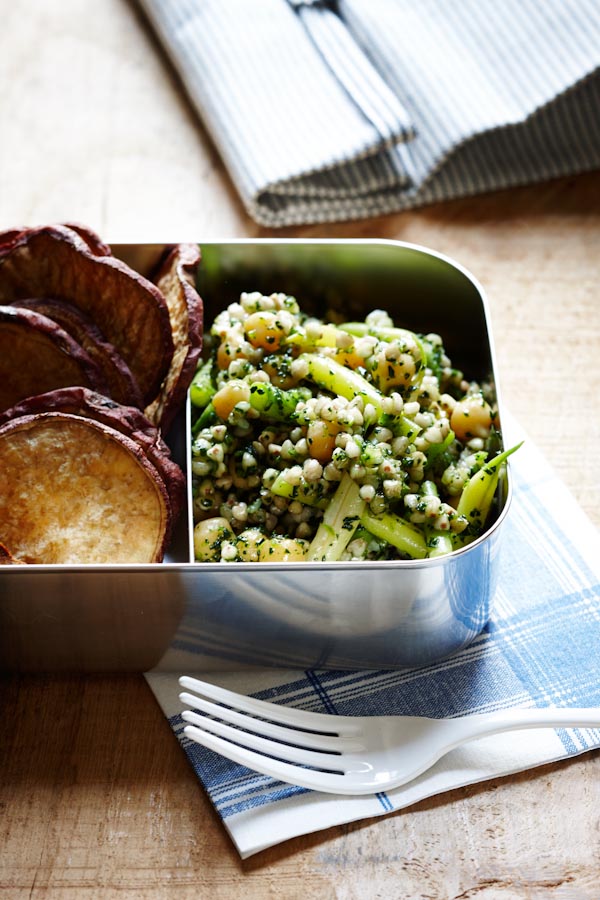
To figure out what to pack in our Button Lunch Bags we turned to our friends Frances Boswell and Dana Gallagher and their great new blog, Kitchen Repertoire. Chock-full of delicious lunch (and breakfast, dinner and dessert) ideas, Kitchen Repertoire aspires to make cooking (and eating!) joyful with recipes that are approachable, unfussy, and very tasty. Even if you can’t boil water, Dana Gallagher’s photographs are so mouth-watering you’ll feel compelled to learn! We’re so excited that Dana took these beautiful pictures and that Frances has cooked up some lovely back to school lunch recipes to go with our lovely new Button Lunch Bags… find these lovely lunch recipes right here on Kitchen Repertoire today!
Happy fall and happy lunch! -Molly
Materials
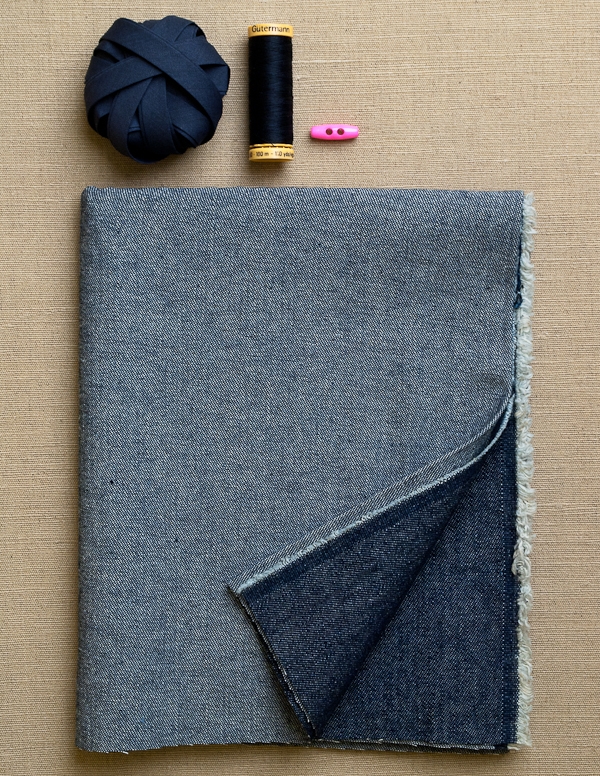
To make one Button Lunch Bag you will need…
- ½ yard of sturdy fabric. I used Robert Kaufman’s Denim- 8 oz in Indigo Washed and Robert Kaufman’s Railroad Denim in Deluxe Twill Stripe Indigo.
- A package of Captain 88’s Solid Linen Cotton Bias Tape to match your fabric. I used Navy and Natural.
- Two 110-yard spools of Gutermann’s Cotton Thread to match your fabric and bias tape. I used colors 6210 and 1040.
- One of Purl Soho’s Oblong Buttons. I used Fuchsia and Marine.
Size
Finished Dimensions: 6 inches wide, 11 ½ inches tall when open, 8 ½ inches tall when closed and 4 inches deep.
Notes
Prewash and dry the fabric but not the bias tape. If your fabric is double sided like the fabrics I used, you can pick which side you’d like to be the right side and wrong side. For the example in these photos I used the lighter side as the right side.
Pattern
This pattern is also available as a printer-friendly PDF. Just click here!
Cut
From the fabric cut:
- One 11 ½ by 29-inch tall rectangle.
- One 1 X 5-inch strip. This will be the Button Loop.
Make the Button Loop
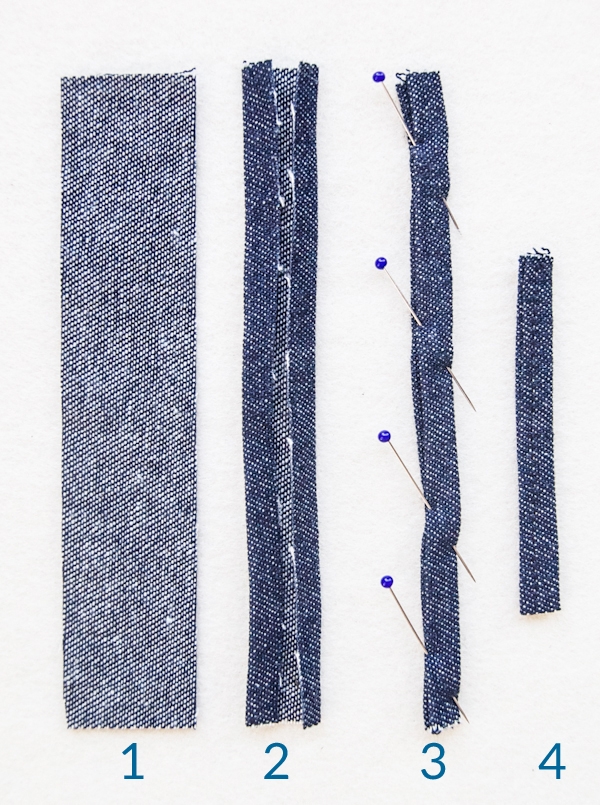
- Press the 1 x 5-inch strip flat with the right side facing up.
- Press both of the long sides ¼ inch towards the center of the strip, right sides together.
- Press the two long, folded sides together, thus encasing the raw edges. Pin the two long sides together.
- Edgestitch the two folded edges together and cut the strip to 2 ¾-inches long.
Sew
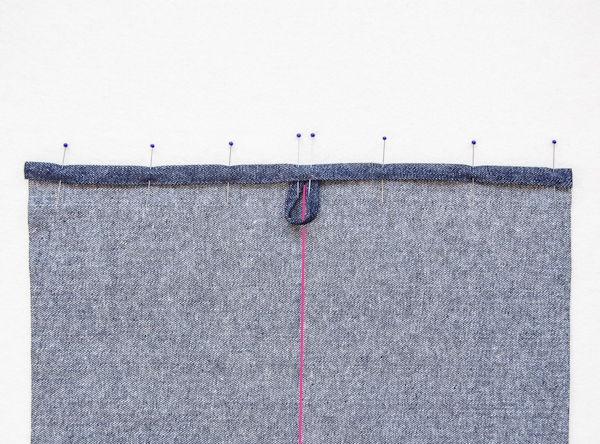
Fold the large rectangle in half lengthwise so that a middle crease runs the long way down the center of the rectangle (highlighted in pink in the photo above).
Fold one of the short sides of the rectangle over ½-inch twice towards the right side and press and pin the fold down.
Pin the raw ends of the Button Loop under the fold so that the ends are at either side of the center crease. Here is a more close-up shot….
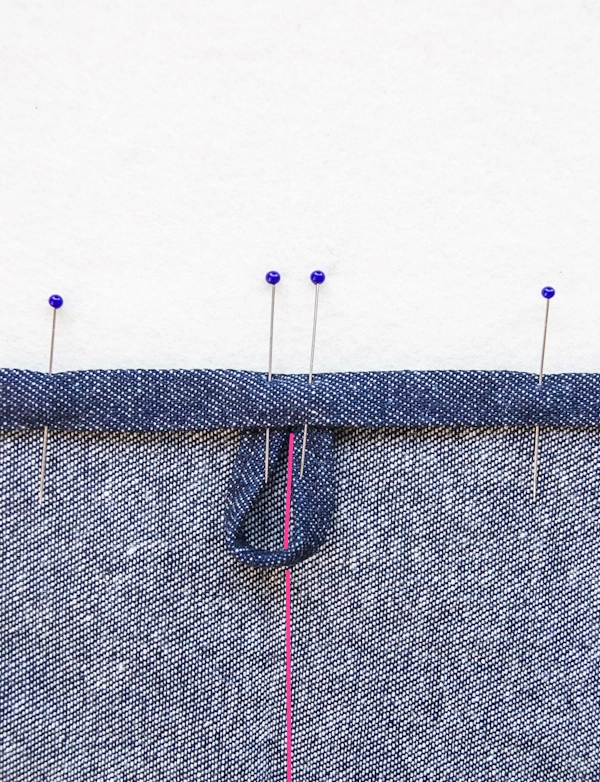
Make sure that the Button Loop isn’t twisted and that both sides are lying flat under the fold and are meeting at the center crease.
Edgestitch this fold down, thus sewing the Button Loop in place.

Press the Button Loop upwards, away from the fabric, and pin it in this new orientation.
Sew over the Button Loop, along the path of the previous seam. Go forwards and backwards a few times in order to really secure the Loop in place.
Hem the second short side of the rectangle in the same way but without the Button Loop: Fold the edge over ½ inch twice towards the right side, press and edgestitch the fold down.

Now press the piece in half, right sides together, so that the hemmed edges meet up. Pin in place along the two long sides.
Sew the two long raw sides together with a ½-inch seam allowance.
Orient the bag so that the opening is at the top, the fold is at the bottom and the raw edges of the fabric are at the left and right.
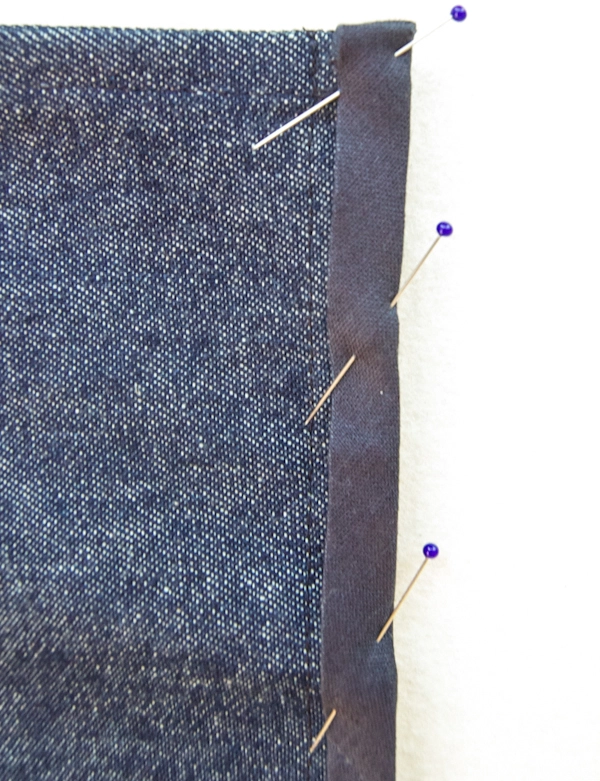
Pin the bias tape around both of these raw left and right sides. Start at the top, tucking the end of the bias tape under itself so that no raw bias tape edges show, then pin the bias tape along the length of the edge. Don’t worry about tucking the ends of the bias tape at the bottom of the edge; just trim the tape flush with the end of the seam.
Edgestitch this bias tape into place, making sure to catch both sides as you sew.
Make the Boxed Bottom
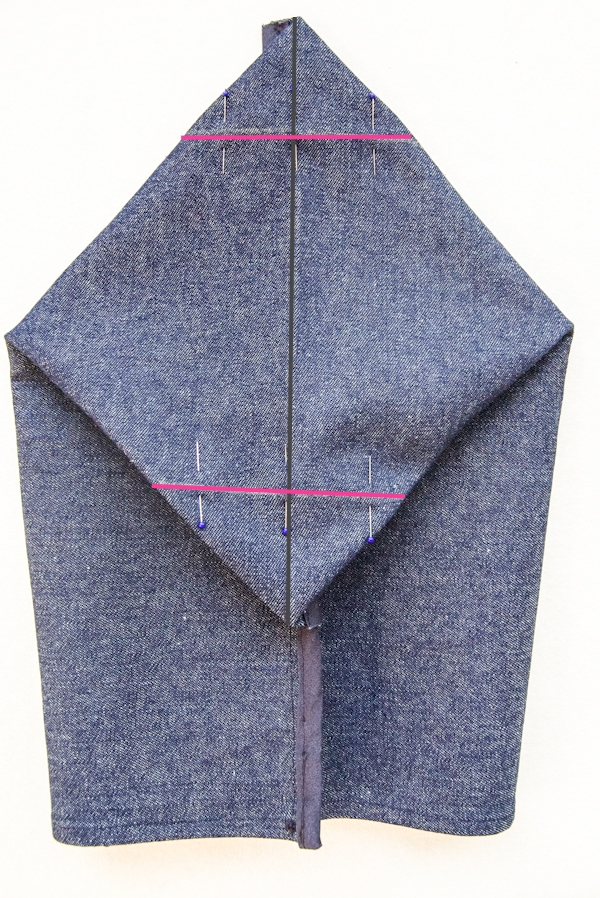
With the wrong side still facing out, pull the two layers of fabric away from the corners and away from each other until the bottom forms a diamond shape with the bottom fold (represented in gray, above) going straight down the center.
Mark a line at each corner perpendicular to the center fold, 2 inches away from the corner and 4 inches across (represented as pink lines, above).
Pin the two layers of fabric together along these 4-inch long markings, making sure that the fabric isn’t bunched up or gathered and that the bias tape covered seams are lying flat.

Sew over these markings and then cut off the corners, leaving a ½-inch seam allowance.
First, press the bias-taped side seams over to one side. Then, pin the bias tape over the two 4-inch raw edges, making sure the unfinished ends of the side seams get pinned inside the bias tape. Trim the bias tape so it is a little longer than the 4-inch sides and tuck the ends of the tape inside so that no raw edges are showing.
Edgestitch the bias tape into place, making sure you catch both sides as you sew.
Finish

Turn the bag right sides out. On the side of the bag without the Button Loop, mark a spot 5 inches below the top edge and 5 ¼ inches from either side seam. Sew on the button here.
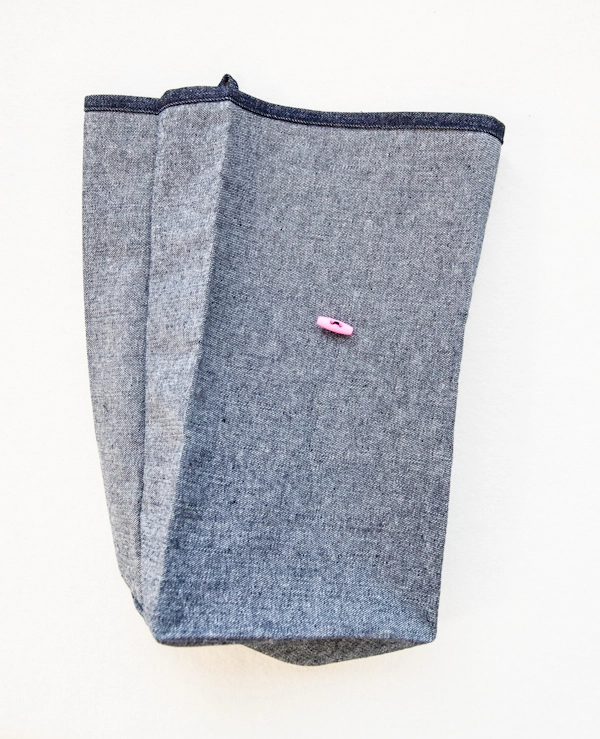
Press the bag into a lunch bag shape by pressing a vertical crease up from each bottom corner to the top of the bag. Then press a horizontal crease from each bottom corner to the next bottom corner.
Bon Appetite!


Too cute!
Great simple bag tut to use up some scrap fabric and single buttons – Thank you!
Thank you for the pattern–I love it’s joyful simplicity! Have you ever thought of making those little fabric snack bags? I have wanted to for years but cannot find the easy to wipe down, almost laminated food-safe fabric that I see used in the commercial ones. Any ideas?
Hi Solange-
That’s a great idea! We don’t currently carry any laminated fabric that would be appropriate but if we ever do we will surely keep this in mind. You might try searching online for “oilcloth” if you’d like to give it a try yourself.
Thanks
Molly
to line fabric lunch or snack bags, try the stuff they use to line baby bibs
I have also been researching this food bag idea and found that it’s not all that straightforward to source food-safe laminated fabrics for making your own food bags. My understanding is that oilcloth is not considered all that ‘food safe’ for this use, although it’s fantastic for other non-food related projects. It would seem that it pays to tread a bit cautiously when hunting out laminated fabrics to use for food bags. Good luck, Solange, and I’d love to hear if you manage to source suitable fabric!
Hi Anne-
Thanks so much for this information!
Best-
Molly
I made mine using plain ol’ quilting cotton and beeswax. Melt the wax onto the fabric in a warm oven then sew into a simple bag, or leave flat to shape around your food. Safe, natural and compostable to boot! Only downside is they can’t really be sterilized (wash in cool soapy water only) so aren’t suitable for raw meat, for example.
What a great idea.
Also, I believe the commercial bags are made of polyurethane laminate (PUL) which is designed for hospital use (i.e., medical-grade and sterilize-able) and is sold in fabric stores with the diaper-making supplies.
Yes, I realize this post is dated a couple years ago! But the material for the inside is ripstop and can be found at Joanns! I also had the search dilemma when I wanted to make some.
I use oilcloth that can be found in fabric departments. People use it to make “plastic” tablecoths?
amo tudo q vcs fazem, muito bom gosto. parabéns! obrigada pelas idéias.
Angélica
I made similar snack bags using coffee packaging. I simply doubled the fabric with the material from the packaging ( metal coated plastic, very sturdy and food proof at the same time!). Rice bags (Tilda, for example) also worked well. Sometimes you can use the packaging as it is, if it is a good size and cut, and line the fabric bag with it. Simply put the two together and close the top rim with a strip of diagonally cut of fabric, like shown above.
Wow! Schöne Dinge können durchaus nützlich sein. Was für ein tolles Design!
Thank you! Merci beaucoup pour toutes ces choses simples et élégantes dont vous nous faites si gentiment profiter.
That’s a great idea!Very good tutorial! I recommend you on my fb page.I hope you don’t mind.
https://www.facebook.com/pages/My-Chic-Adventure/141340329364494
Just discovered purlbee, what lovely site and full of the most amazing ideas. I now have an even longer list of things to make for friends and family. Inspiring x
My bags are very floppy….did you use some kind of stabilizer or sizing? Also had anyone ever tried to insulate these?
Hi Michelle-
No, these bags were made exactly as described in the pattern here. However our bags are made with denim which is thicker and more stable than regular quilting cotton. If you’re using a lighter weight fabric you could certainly use some stabilizer or two layers of fabric.
Thanks for getting in touch and please let us know if you have any more questions!
Molly
Lovely!
What about sewing those foil emergency blankets to help with keeping it cool.
Hi Lynanne-
That sound like a good idea! If you end up doing it and having luck with it, please let us know!
Molly
Insulbrite would work great for this. I would use it as a batting, it would also give it more structure,
An alternative to using bias tape is to sew the seam wrong sides together, trim close to the edge, then turn the bag inside out (right sides together) and stitch about 1 cm in, encasing the 1st seam. Sorry if that’s confusing, I know there is a name for this (maybe French seaming?) but I can’t remember it offhand.
Hi R-
You are right, you are describing French seams and that technique would work great for this project!
Thanks for getting in touch!
Molly
I love <3 the togggle button. Cute lunch bags!
PUL fabric (Polyurethane Lined) is sold at Joann Fabrics. It’s used to make waterproof diaper covers.
Thank you so very, very much for putting this adorable pattern into printable form! So many times I want to make something but it only comes in the ‘tutorial’ form and I don’t have a computer by my sewing machine. SO thank you!!
You could also make this wonderful bag as is, and put a small gel cold pack in the bottom before packing your lunch, or a put a frozen juice box in with your sandwich. It always seemed to work just fine in paper bags, or plastic lunch boxes for me. 🙂
Pattern is not pulling up
Hi Amy-
The pattern is here, above the comments section. You can easily print or save using the PRINT button! If you’re on a desktop version of the site, you will find the Print icon in the right margin just below the Save to Favorites button. If you’re on a mobile version of the site, you will find the Print icon below the pattern and above the comments.
Follow the easy on-screen instructions to delete whichever parts of the pattern you don’t want to print or save. For example, you may decide to shorten the pattern by omitting certain images or the list of materials.
Molly
Some where I saw the directions for making your own food grade oil Cloth but I don’t remember what kind of oil used. Maybe olive oil.
finally! a way to use my jean stash. Cute, functional, upcycle idea. i also have tons of scrap cotton quilt batt if i decide to line and insulate? might be too thick. first, trying like directions.
Hello D,
Thank you for writing in and your kind words! Let us know how it goes!
Warmly,
Marilla
i was wondering if this would work with a felt like material
Hi Gwendalyn,
Thanks for writing in! It may be harder to wash a felt lunch bag if you have concerns about possible food spills, but otherwise felt would be a great option for a sturdy bag. You would also be able to skip the bias tape to finish the seams since felt will not ravel. If you try it out please let us know how it goes!
Warmly,
Julianna
Has anyone tried using Purl Soho’s mineral linen?
Hi Val,
Thanks for reaching out! We have not seen these lovely little bags made in our Mineral Linen. The only thing to keep in mind with the lovely fabric is that after repeated washes, the shiny quality will slowly wear off to be quite a bit duller than the unwashed fabric!
Best,
Cassy
Just made this and it is roomier than I thought! I did make the bottom 5 inches instead of 4 and I absolutely love it. Waxed canvas gives it a rustic look and my husband loves it.
Hey i love these bagssssss im in a class doing it and cant wait to get it done……. :))))) yeee
Thank you for the Button Lunch Bag pattern. My girlfriends and I have been doing brown bag lunches outdoors, with masks, and social distancing. This is exactly the type of bag I need and cleverly simple.
As an alternative, I tried to make this pattern with the long sides French-seamed instead of bias tape binding the raw edges. I used a quilting cotton weight fabric and it worked out pretty well, but if you’re using a much more study fabric I don’t know whether the seams would be too bulky. Thought I’d share in case anyone was thinking about it!
Loved making these; so cute, can’t wait to share with family and friends! 🙂 Thanks so much for the pattern!!
Hi Clare,
Thank you for reaching out! I am so glad to hear that you enjoyed making these Lunch Bags and thank you so much for sharing your tips, it is much appreciated!
Happy crafting!
Gianna