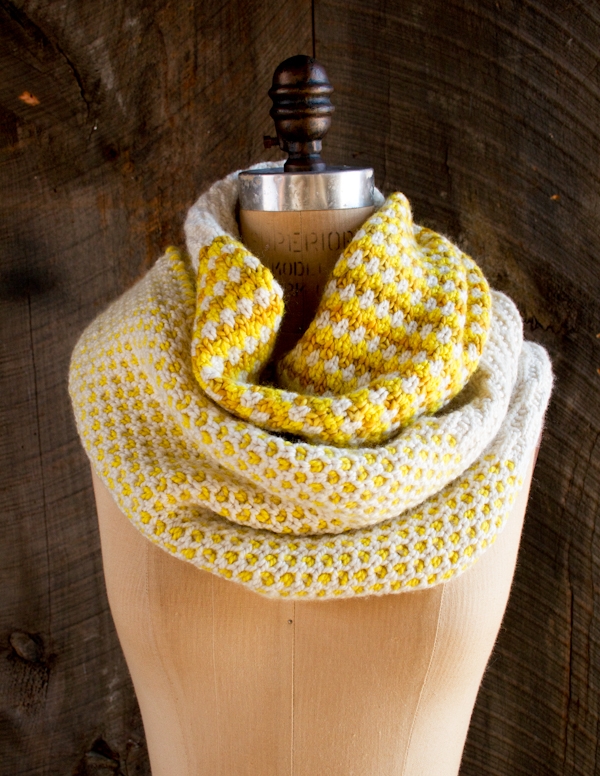
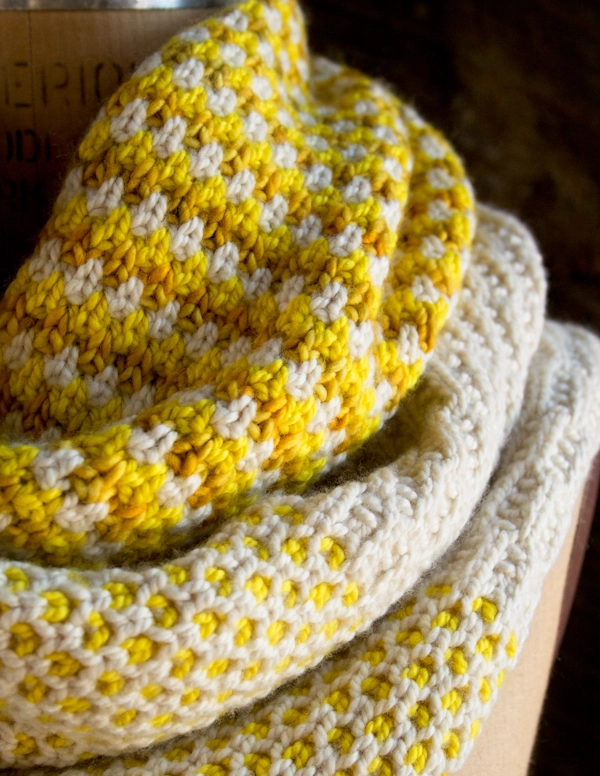
Stitch Block Cowl
Knitters who have made their fair share of garter stitch scarves, ribbed hats and stockinette sweaters, will understand the hankering to shake things up a bit. I love the rhythm and certainty of the basic stitches, but every now and then I relish the challenge of stitch patterns that unfold in surprising ways, that teach me yet something else about the wondrous potential of knits and purls!

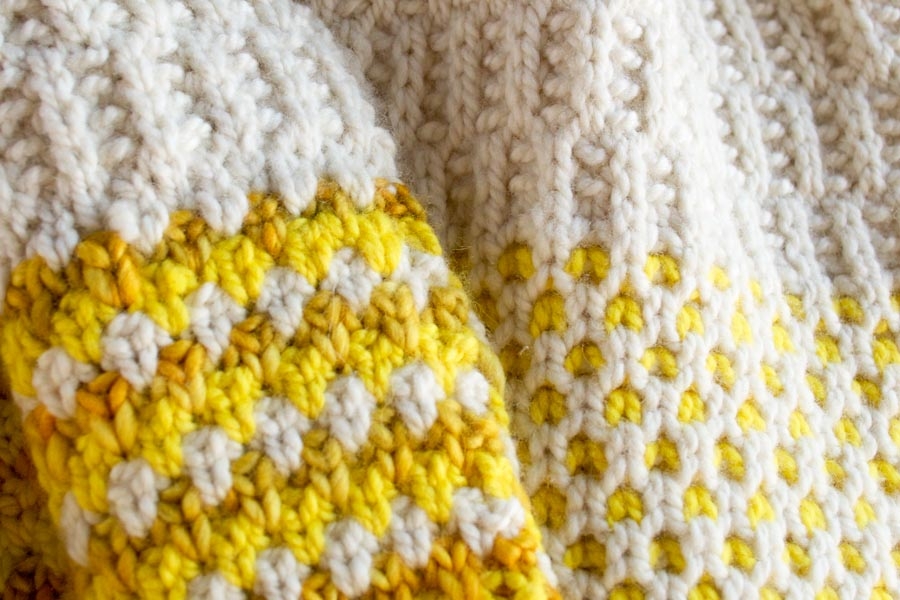
I’ve done a lot of knitting in my life, so much that I sometimes wonder if there are any stones left unturned, but this Stitch Block Cowl took me into new terrain. I’ve knit colorwork and I’ve knit “in the row below”, but I’ve never done the two together. It’s terrifically easy and proves, once again, that knitting is inexhaustibly interesting.

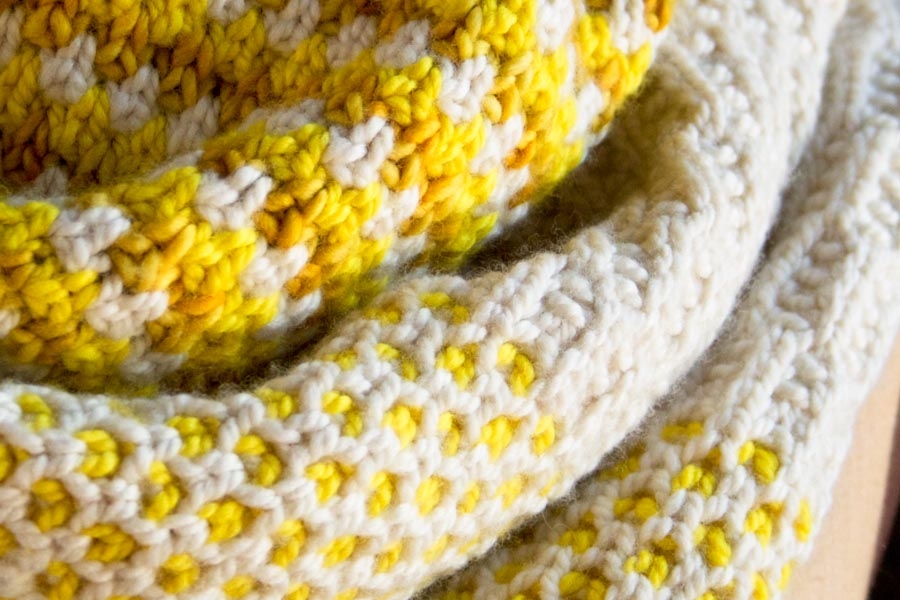
Each of the three stitch patterns in our Stitch Block Cowl employ this simple technique of knitting stitches in the row below (don’t worry, we explain what that means in the pattern with photos and everything!). This is ultimately a lot like slipping stitches and has the same effect of creating a very cozy fabric with a whole lot of squish and depth. Add to that the remarkably soft merinos of Purl Soho’s Worsted Twist and Madelinetosh’s Tosh Merino and you’ve got one voluptuous cowl!

Ready to take your own journey into uncharted knitting territory? Make sure you pack materials to knit your very own Purl Soho’s Stitch Block Cowl, in this warm and sunny Yellow or any other of our pretty palettes. And don’t forget to send a postcard! -Whitney
Designed by Purl Soho designer, Whitney Van Nes.
Share your progress and connect with the community by tagging your pics with #PurlSoho, #PurlSohoBusyHands, #PurlSohoStitchBlockCowl, and #PurlSohoWorstedTwist. We can’t wait to see what you make!
Materials
To knit your own Stitch Block Cowl, you will need five skeins in the following breakdown…
- Color A: 3 skeins of Purl Soho’s Worsted Twist, 100% merino wool. Each skein is 164 yards/ 100 grams; approximately 492 yards required. (NOTE: We no longer offer Worsted Twist, but choose from one of our other worsted/aran weight yarns.)
- Color B: 1 skein of Worsted Twist; approximately 164 yards required.
- Color C: 1 skein of Madelinetosh’s Tosh Merino, 100% superwash merino. Each skein is 210 yards/ 100 grams; approximately 60 yards required.
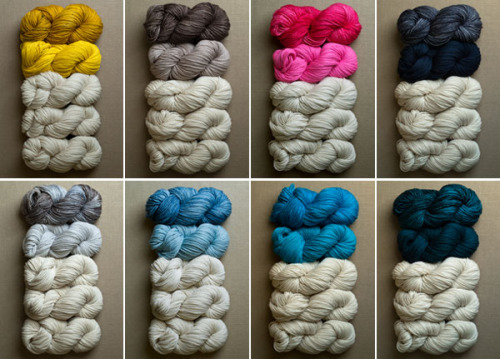
The eight colorways are, clockwise from the top left corner…
Yellow
- Color A: Worsted Twist, Heirloom White
- Color B: Worsted Twist, Yellow Yellow
- Color C: Tosh Merino, Candlewick
Oatmeal
- Color A: Worsted Twist, Heirloom White
- Color B: Worsted Twist, Sea Salt
- Color C: Tosh Merino, Weathered Frame
Pink
- Color A: Worsted Twist, Heirloom White
- Color B: Worsted Twist, Super Pink
- Color C: Tosh Merino, Pop Rocks
Navy
- Color A: Worsted Twist, Heirloom White
- Color B: Worsted Twist, Timeless Navy
- Color C: Tosh Merino, Charcoal
Aegean
- Color A: Worsted Twist, Heirloom White
- Color B: Worsted Twist, Peacock Blue
- Color C: Tosh Merino, Esoteric
Aqua
- Color A: Worsted Twist, Heirloom White
- Color B: Worsted Twist, Dragonfly
- Color C: Tosh Merino, Oceana
Pale Blue
- Color A: Worsted Twist, Heirloom White
- Color B: Worsted Twist, Ice Blue
- Color C: Tosh Merino, Well Water
Gray
- Color A: Worsted Twist, Heirloom White
- Color B: Worsted Twist, Oyster Gray
- Color C: Tosh Merino, Whiskers
Please note, we are no longer carrying the pre-built bundles for this project as several of these colors have been discontinued but a range of options are still available for inspiration in Worsted Twist and Tosh Merino!
You will also need…
- US 7 (4.5 mm), 24-inch circular needles (You need a circular needle because one of the stitch patterns requires you to slide the stitches from one of the needle to the other.)
Gauge
5 stitches = 1 inch in garter stitch, using the Color A.
4 stitches = 1 inch in any of the three stitch patterns.
Size
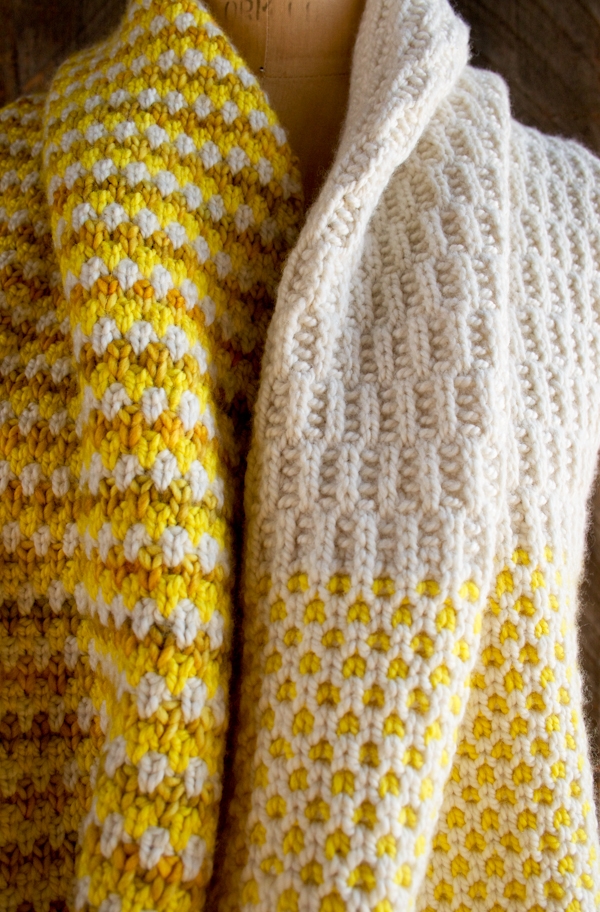
Finished Dimensions: 12¾ inches wide by 60 inches around
NOTE: To change the width of the finished cowl, cast on any odd number and follow the directions as written.
Note
All three of these stitch patterns use the technique of “knitting into the row below.” Here’s how to do it…
Insert the right needle into the center of the stitch below the first stitch on the left needle. The place to insert the right needle is indicated below by the arrow.

And here is the needle going into that place…

Now knit as normal, bringing the working yarn around the right needle in a counter clockwise direction and pulling through a stitch. When you allow the stitch to fall off the left needle, it will actually be two stitches: the one from the previous row and the one from the row before that. It may feel like you’re doing something dreadfully wrong, but if you’ve properly inserted the right needle, then all will be well!
Pattern
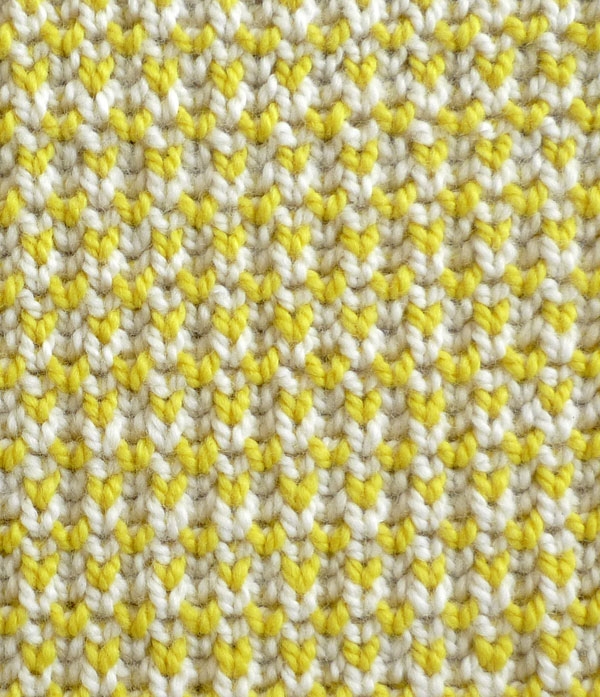
Block #1, Rambler Pattern
Here’s the right side of the finished Rambler Pattern:

And here’s the wrong side:

With Color A, use a Provisional Cast On to cast on 51 stitches. (Why a provisional cast on? So that at the end of the project you can graft together the two ends, avoiding a seam. However, if you find a Provisional Cast On a bit overwhelming, then just use a regular long tail cast on, and when you’re done, you can sew the two ends together. Your cowl will still be beautiful!)
Row 1 (wrong side [ws]): K2, *p1, k1, repeat from * to last stitch, k1.
Row 2 (right side [rs]): K1, *k1 in the row below, p1, repeat from * to last 2 stitches, k1 into row below, k1. (See Pattern Note, above, for “k1 in the row below” instructions.)
Rows 3-8: Repeat Rows 1 and 2 three more times.
Row 9 (ws): K1, *p1, k1, repeat from * to end of row.
Row 10 (rs): K1, *p1, k1 in the row below, repeat from * to last 2 stitches, p1, k1.
Rows 11-16: Repeat Rows 9 and 10 three more times.
Repeat Rows 1-16 until piece measures 20 inches from cast on edge, ending with Row 14.
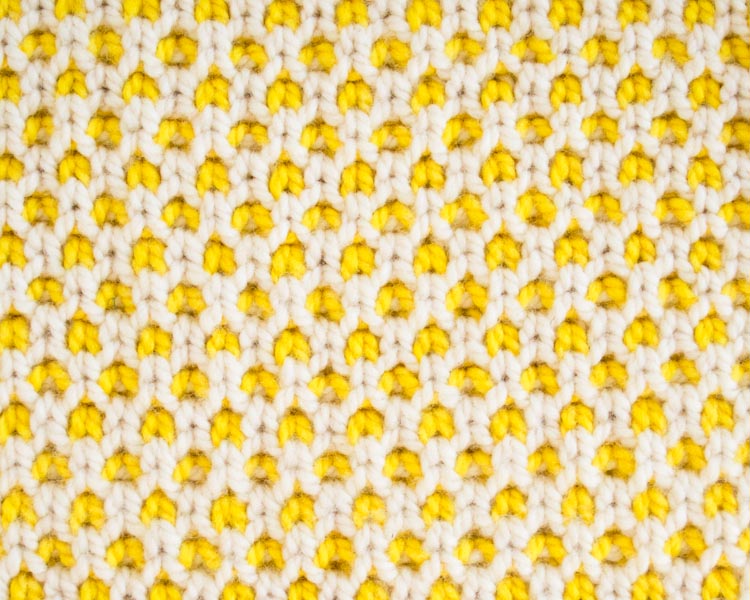
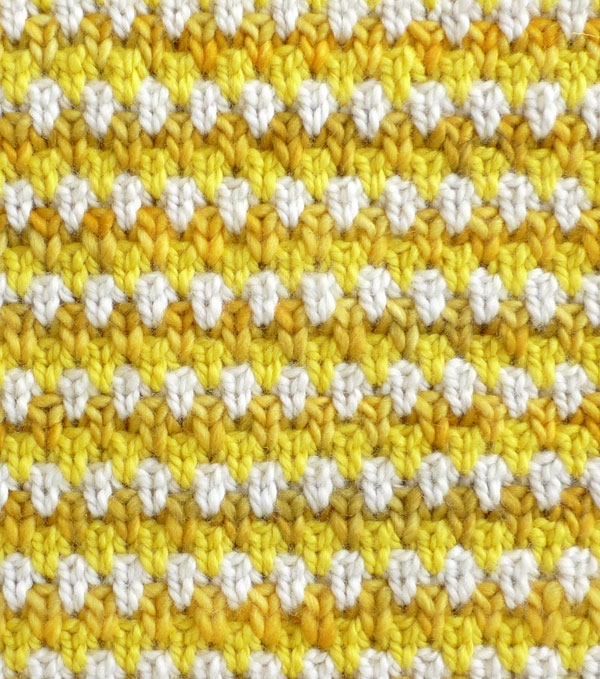
Block #2, Checked Rose Fabric
Here’s the right side of finished Checked Rose Fabric:

And here’s the wrong side:
Row 1 (ws): With Color A, k1, *k1 in the row below, k1, repeat from * to end of row.
Row 2 (rs): With Color A, k2, *k1 in the row below, k1, repeat from * to last stitch, k1.
Row 3 (ws): With Color B, repeat Row 1. Do not turn the work at the end of the row.
Row 4 (ws): Keeping the wrong side of the work facing you, slide the stitches to the right end of the needle and with Color A, repeat Row 2. Turn the work.
Row 5 (rs): With Color A, repeat Row 1. Do not turn the work.
Row 6 (rs): Keeping the right side of the work facing you, slide the stitches to the right end of the needle and with Color B, repeat Row 2. Turn the work.
Repeat Rows 1-6 until piece measures 40 inches from cast on edge, ending with Row 5.
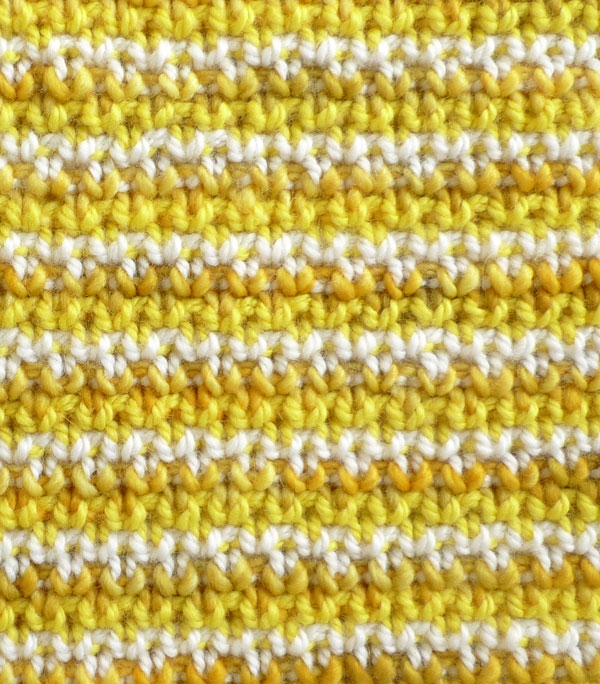
Block #3, English Rose Tweed
Here’s the right side of finished English Rose Tweed:
And here’s the wrong side:
Set-Up Row (ws): With Color A, k1, knit into front and back, knit to end of row. (52 stitches)
Row 1 (rs): With Color B, k1, *p1, k1 in the row below, repeat from * to last stitch, k1.
Row 2 (ws): With Color B, knit.
Row 3: With Color C, k1, *k1 in the row below, p1, repeat from * to last stitch, k1.
Row 4: With Color C, knit.
Rows 5 and 6: With Color A, repeat Rows 1 and 2.
Rows 7 and 8: With Color B, repeat Rows 3 and 4.
Rows 9 and 10: With Color C, repeat Rows 1 and 2.
Rows 11 and 12: With Color A, repeat Rows 3 and 4.
Repeat Rows 1-12 until piece measures 60 inches from cast on edge,…
If You Used a Provisional Cast On
…ending with Row 4.
Next Row (rs): With Color A, k1, *p1, k1 in the row below, repeat from * to last 3 stitches, k2tog, k1. (51 stitches)
Cut all the yarns, leaving a 32-inch Color A tail.
Put the Provisional Cast On stitches onto a second (preferably smaller) needle.
Thread the Color A tail onto a tapestry needle. With wrong sides together (being careful to not twist the cowl), hold the two circular needles parallel to each other and use the Kitchener Stitch to graft together the cowl’s two ends.


If You Used a Long Tail Cast On
…ending with Row 5.
Next Row (ws): With Color A, bind off in purl.
Cut all the yarns, leaving a 32-inch Color A tail.
Thread the tail onto a tapestry needle and with wrong sides together and making sure the cowl isn’t twisted, sew together the two ends. Sew under one cast on stitch and then across under a bind off stitch, continuing back and forth until you’re done!
Either Way…
Weave in the remaining ends and gently block your cowl, if desired. Then wrap yourself up!


Hi there! I just received the yarn for this pattern and I’m really excited to start! I am stuck however right out of the gate!
I used a different color yarn for the provisional cast on and followed the instructions for row 1. When I get to row 2, I am having a hard time finding the “row below”. Any tips on how to find the row below with so few rows?
Thank you!
Hello Sherry,
Thank you so much for your question. I completely understand, the first row can be a bit tricky. The best way I have found to work into the row below (with so few rows worked) is to pull the fabric down with your hand so that you can really see the stitches below. You won’t have many options of where to put your needle at this point. You will want to put your needle into the stitch directly below the stitch on the needle. I hope that helps! Please let us know if you have any other questions.
Happy knitting,
Allison
Hello! Thanks for your pattern. I’ve finished Block 1 with no problems but am seriously confused in starting Block 2.
If we are knitting on the WS, then we are getting the “bumps” on the RS and looking at the pictures this just doesn’t seem right. I’m also worried that when I join in colour B on the WS it’s going to be visible on the RS of the fabric.
Have I done sonething wrong?
Oh…um…never mind! You know that thing where you just follow the instructions and it turns out…? That. 🙂
Hi, Katie!
We are so delighted that it turned out! Thanks for writing in and as always if you have any questions please let us know!
Best wishes,
Kumeko
In block 3, rows three and four, it does not say which is ws and which is rs. I am too afraid to guess :/
Help! Please!
I cannot wait to finish!
Hi Natalie,
Thanks for writing in! In the third block all the odd rows are the right side and the even rows are the wrong side. Good luck and enjoy!
Best,
Adam
I am completing block 1 with no problems so far, but am confused with the addition of color B?
Hi Janet,
Thanks for writing in. In block 2 you will be working with two colors, each in a 2 row repeat. You add color B as if you are starting a new ball of yarn — nothing different. I hope this helps.
Best,
Adam
Hi!
I am a beginner and have a very simple question about this cowl. I am doing the provisional cast on with color A.
After casting on 51 stitches, do I need to crochet a few stitches, make a loop and cut the yarn and then knit 51 stitches (like a row zero before row 1) on the provisional cast on?
Thanks!
Hi Ada,
Thanks for writing us. You want to be sure to do your provisional cast on with a contrasting color so you can see it. Also, if you are doing the one step method you will only need to cast on what you need and then chain a few stitches to differentiate which end is which. For the two sep method you will also chain a few more than your cast on.
Best,
Adam
Hello! I was wondering how many yards of each color I would need to complete this beautiful cowl?
Hi Katy,
Thanks for writing us! Here are the approximate yardages:
Color A: 275 grams / 451 yards
Color B: 97 grams / 160 yards
Color C: 34 grams / about 55 yards
Good luck on this project! It’s lovely and quite fun to knit!
-Adam
Hi, I’m finally getting to the 3rd section of the cowl and I don’t know if I’m reading the pattern right or not, but my question is, at the end of section 2 it says ending with row 5 which is a right side row, but then the set up row for section 3 is a wrong side row, so do the ws and the rs end of switching or is the set up row for the 3rd section supposed to happen in place of row 5 on section 2?
Hi Mackenzie,
Thanks for writing us! Hopefully I can clear this up! For section two you will end on row 5, which is a right side row. Row 5 says to not turn the work because of the stitch pattern in section two, but when switching to section three you will turn the work after row 5 and the wrong side will be facing. I hope this clears things up! Happy knitting!
-Adam
Hi there!
I made a couple of mistakes in the checked rose portion and was wondering if there was any way to put in a lifeline after the fact. I haven’t been able to figure it out after spending a ton of time examining!
Hi Mari,
Thanks for writing in! A lifeline in a knit below pattern is tricky, but doable if you are super careful about where you are threading your waste yarn. I suggest looking up on YouTube some tutorials about how to rip back “fisherman’s rib” or “knit below” before trying to take apart your work. If this doesn’t work, it’s probably best to have someone help you in person, like someone at a knitting shop, as this can be a pretty tricky process. If you’re in the NYC area, drop by Purl and we’ll help you out!
Best,
Adam
Muy bonita bufanda podría poner video para ver como se trabajan los diferentes colores.y como se trabajan las puntadas. Gracias!
Hi Jose,
Thank you for contacting us! We don’t have the resources to add a video right now, but we’ll keep your request in mind for the future!
Thanks,
Adam
When the pattern states ending with row 14, does that mean I knit row 14 or stop after I’ve knitted 13? I’ve practiced this pattern a couple of times and have had issues with block 2 and I want to get it right since I purchased your yarn.
Thanks,
Kimberly
Hello Kimberly,
Thank you for contacting us! Ending with row 14 means that you complete row 14 and then stop. Best of luck on the pattern and let me know how it turns out!
-Adam
Hi Purl Soho
I’m loving my cowl (winter in Australia). I’d love to try using the checked rose stitch in a project where I’ll be knitting in the round. Before I stretch my grey matter around trying to convert it, I thought I’d ask if it is indeed possible? Do you happen to have instructions for this? Nothing came up in my google search.
Thanks heaps, I hope you can help. Xx Fi
Hi Fiona,
So glad that you are loving your cowl! I have checked quite a few resources and I have been unable to find a way to convert this stitch pattern to in the round. We did have one customer in the store who attempted it but I never heard back about his results. Additionally, I did a bunch of swatching and I am unable to recreate the stitch pattern in the round successfully. You can certainly give it a go! Please do let us know if you figure out the puzzle!
Happy knitting!
Cassy
Hello! Just bound off in purl as I used the long tail cast on…wondering if you could reference a link on seaming with wrong sides together? I usually seam using mattress stitch…Wondering if that’s an option as well?
Hi Jill!
Glad you made it to the end! If you bound off in purl then you essentially want to “whip stitch” the two ends together. Holding your pieces wrong sides together, you will insert your tapestry needle into from the far side of the cast on and pull it towards you, going through both cast on legs. Next you’ll insert your needle into the adjacent cast on stitch and pull the yarn towards you. Keep doing this until you’ve sewn the whole piece! Best of luck and let me know if you have any other questions!
-Adam
Hello! I have almost completed Block A. I want to put in a lifeline. I have never used a lifeline before. Would you suggest I put it in the last row of Block A or first row of Block B? Likewise moving from Block B to Block C which one would you use-last row of Block B or first one of Block C? Thanks for your help!
Hi Carol,
Great idea! A lifeline can be a life saver! In this case, I would suggest putting the life line through the last row of a section. That way, if you have difficulties in the next section, you can pull back the whole section and start from the beginning of that section!
I hope that this helps!
Cassy
Hi Carol,
Thank you for your question! I would put a lifeline in the first row of the new block you are working on. Sometimes its also helpful to put a lifeline in midway through the block. Let me know if you have any other questions about this!
-Adam
So….after ripping out the scarf a number of times I got frustrated (multiple times). I’m now using the yarn to make a scarf in the English rose tween stitch. It’s coming out quite nice but I’m concerned about quantity of yarn. I ordered the kit. Can you help me with yardage since its seems to call for equal amounts of each color? I think I may need to order more yarn in the other two colors (not white).
Hi Carol,
Thanks for writing in! Sorry the pattern frustrated you! I recommend one more of each contrast color and you should be all set. Thanks!
-Adam
On block 2, row 4, I don’t understand how to slide the stitches to the right end of the needle as it’s already on the right side. Would you clarify?
Hi Mary,
Thanks for reaching out. Once you’ve finished Row 3, your stitches should be at the left end of your needle! If you’re seeing that they’re already on the right end, then you may have turned your work. I’d recommend turning your work back so that the wrong side is facing you again, and then you can slide your stitches to the other end of your circular needle, keeping the wrong side facing you. Also, I noticed that there isn’t a concise definition of “slide work” on this project page, so I’ll include one that we’ve used in other patterns below!
“Slide work” means to keep the same side of the work facing you and to push all the stitches to the right end of the circular needles. Without turning the work, start the new row as you normally would.
I hope this helps clarify things!
All the best,
Lili
Beautiful!
I am absolutely stumped. I’ve had this beautiful cowl finished for months now, but I cannot figure out how to convert the provisional cast on to live stitches. I cast on one row using my crochet hook, then went straight into the first section’s pattern. When I look at the stitches on the waste yarn, I can’t figure out where to put my needle to grab the stitches. (I’ve even swatched mini versions 3 times, and still no luck.) I’d love a visual to see where to pick up those tricky stitches. If one isn’t available I think I’m ready to sew the two ends on my sewing machine and steek. It’s a beautiful cowl, and I’m dying to wear it.
Thanks!
Hi Johanna,
I’m sorry to hear you’re having trouble with this part! The stitches you want to pick up are directly below your waste yarn. You’ll weave your needle in and out of each stitch and when done you’ll rip out the waste. If you are having a hard time visualizing this, look at the provisional cast on and locate the bumps where your main yarn is meeting the waste. These bumps look like purl stitches in your main yarn and this is the stitch you want to pick up. If it’s too difficult to pick up these stitches, you can rip a few stitches of waste yarn out and string your body yarn stitches that popped out on to a needle. You’ll do this over and over again until you’ve restrung your entire cast on.
All the best,
Adam
Hi! I love this pattern but my edges look so messy. Is there a method of carrying the yarns to keep the edges looking nice and neat?
Thanks for any suggestions,
Jean
Hi Jean,
Thanks for writing in! Carrying colors together can sometimes be a bit of a challenge. For this lovely cowl and many other projects, I twist the yarns together a the beginning of each row where they are being carried up and this helps to hide them in the selvedge a little better.
I hope that this helps!
Cassy
Hello!
I’m trying to work on Block #1, but I can not seem to achieve the same texture as yours (raised knit stitches, depressed in-between)! I’m hoping to send a picture (I can’t figure out how to attach one here) and get some advice on whether I’m doing the stitching wrong, or whether something about my technique is causing the block to be more “flat” looking than yours.
Thanks in advance for any help!!
Amber
Hello Amber,
Thank you for reaching out. If you want to send us a picture to store@purlsoho.com we would be happy to take a look!
I hope we can help,
Marilla
Hi!
I was wondering if you could provide a video or photo to show the best way to switch between colors for block 2 & 3. I’m working on block 2 and my edges look awful. I’m hoping to make another as a gift and would like it to look a little better. Thank you!!
Hillary
Hi Hillary,
Thanks for writing in! While we do not have a video or photo for this technique at present, I think that I can help! When carrying colors up the side of your work, it is helpful to twist the working yarn around the yarn that you are carrying up along the edge each time you come to the right side of the front of the work. If you twist in the same direction each time, you should come up with a pleasing edge. You can get a glimpse of it if you check out the last picture before the materials list.
I hope that this helps!
Cassy
I was wonderingif it really matters what row you stop on after each block, as I am not getting thd exact gauge on the length! Thank you in advance!
Hi Maureen,
Thanks for writing in! Row gauge can certainly be a challenge! To get the tidy transitions that you see in the images, you should end on the row that we suggest. However, you can certainly call it quite early if you are happy with the look. I would just be sure that you are beginning a new section on the same side to maintain the right side and wrong side textures. Depending on the block and how much longer your section is than noted, you may be able to simply cut out a repeat and end on the row suggested.
I hope that this helps and happy knitting!
Cassy
I have a question about the provisional cast on. When i pick up a chain from the crochet chain, do I follow row 1 with the knits and purls or should I just knit into the crochet chain?
Hi Anne,
Great question! After chaining a few more stitches than you will need and cutting the yarn and pulling it through, you will use your knitting needle to pick up the back of each bump until you have the correct number of stitches on the needle. Once this is complete, you will begin with row 1 of the pattern. There is no need to knit an initial row before doing so. Additionally, beginning with row 1, will give you a clean join when you come to finishing off this lovely cowl!
I hope that this helps!
Cassy
Un video seria de mayor utiidad
Hi Marciel,
Thanks for writing in! We will keep your request in mind!
Best,
Cassy
About to begin the 3rd “tweed” section of this cowl. How does it go from 51 stitches to 52 in the set up row?
Hi Laura,
Thanks for writing in! I think that I can help! You increase 1 stitch in the set-up row on the second stitch that you work. You will knit the first stitch of the row and then knit into the front and back of the next stitch thereby increasing by 1 stitch!
I hope that this helps!
Cassy
Thank you for your speedy response!
Hi guys! So I have made two of these scarves (one with blue the other gray and pink) but I’ve used different yarn. I finally wanted to splurge and buy the yarn you suggest but it’s not available in the yellow color. What other yarn do you recommend to replace it with so it will give the same look without messing up the pattern and keeping with the same size needles for all the yarn involved. Thanks.
Hi Lisa,
Great question! I would recommend substituting Linen Quill Worsted in Mustard Seed for the discontinued yellow color of Worsted Twist. It is the correct weight for the pattern, and even has the same yardage per skein, so it should work out just fine!
Best,
Julianna
Hi,
I was wondering if you can suggest some updated color combinations. I see a few of Tosh Meirno are currently out of stock, though, and maybe you won’t know if or when you will get more.
Could Tart pair with Red Pine? Still Water Blue with Thunderstorm? Is the idea to pair two colors that are very similar?
Hi Natalie,
Thank you for reaching out! There are a few options for you to play with while considering your color combinations for this project since the darkest color will only be used in one section. While it does look like much of the Tosh Merino is sold out, I think Tart would pair beautifully with Red Pine, or Candlewick with Fresh Pickle or Red Panda for something with a bit more contrast. Our new Linen Quill Worsted has some beautiful options, like Bright Flamingo with Peony Pink, Juniper Green with Fresh Pickle, or High Tide with True Turquoise. Maxima would also work as a substitute for the Tosh Merino and has a wide range of vibrant colors. Some possible combinations are Prince with Mountain Rose, Cherrywood with Red Pine, or Ultramarine with True Turquoise.
I hope this gives you some ideas!
Gaby
Thanks Gaby! I’m sure I can find another beautiful option.
However, I was very attracted to those yellows!
Is it ok to use the contrast colors both in different yarn than the main white color? -one in Linen Quill Worsted and the other using the Tosh Merino? I do see that Candlewick is out of stock though. Also, in the reply to the comment above, you suggested the Linen Quill Worsted in Mustard Seed. I don’t see that name/color. Were you referring to one of the yellows?
Hi Natalie,
Thanks for writing back! It should be just fine to use other types of yarn for your contrast colors as long as they are the same weight, so feel free to use Linen Quill Worsted, Tosh Merino, or both. I did find the comment you were referring to in which Julianna recommended the Mustard Seed colorway, and I believe she meant to say Dandelion Yellow as that is the closest to the old Worsted Twist color. If you’re really a fan of the yellows, Linen Quill Worsted in Dandelion Yellow and Turmeric Yellow would be just perfect!
Best,
Gaby
Thanks for the help.
Could the Tosh Merino also replace the Worsted Twist white color? I was thinking about using the color “Antler.”
Hi Natalie,
Yes, absolutely! Worsted Twist and Tosh Merino knit up to the same gauge, so you could mix and match the two yarns however you like to choose colors for this cowl!
Best,
Julianna
Bought the aqua set and completed it 2016. It was a challenge but so glad I did it. The wool is just amazing and I still get compliments on how stunning the cowl looks. Thanks for putting up this free pattern. You are my all time favourite shop.
Trés beau modéle. Je le tricote pour une fillette. Pour avoir la bonne largeur, j’ai changé de taille d’aiguille (+ 0 .5) pour le block 3 et ajouté 2 mailles et il faut faire attention à la lisière des 3 fils quand le tricotage est serré. Épinglé dans mon Pinterest. Je pense faire un snood 2 tours avec une finition en crochet pour les lisières. Merci aux artistes !
hi, can I knit the rambler pattern in the round?
Hi Wanda,
Thanks for reaching out! I think it would be fairly easy to adjust the pattern to work the stitch pattern of the Ramble Wrap in the round! Just take into consideration you will only be working on the front side of the fabric and not the back side!
All the best,
Gianna
Hi, thank you. Merry Cristmas to you and your family!
Wanda
What would you classify the difficulty of this pattern?
Hi Anette,
Thanks for writing in! I would consider this an advanced beginner to intermediate pattern, there are a few more advanced techniques, and for this, we have added photos to show the process! If you try this out and have any issues we are happy to help here in the comments section or you can write to our customer service team directly at customerservice@purlsoho.com
I hope this helps, happy knitting!
Gianna