Shawl Collar Cowl

A few days ago a friend of mine sent me a picture of some wool socks with an accompanying message, “Today is the greatest day.” Now, these socks weren’t a gift from me or made by me; they weren’t even handmade at all. But I knew exactly why he was so excited. I knew, because it’s how I feel about neckwear: Fall is here! I get to wear wool again!

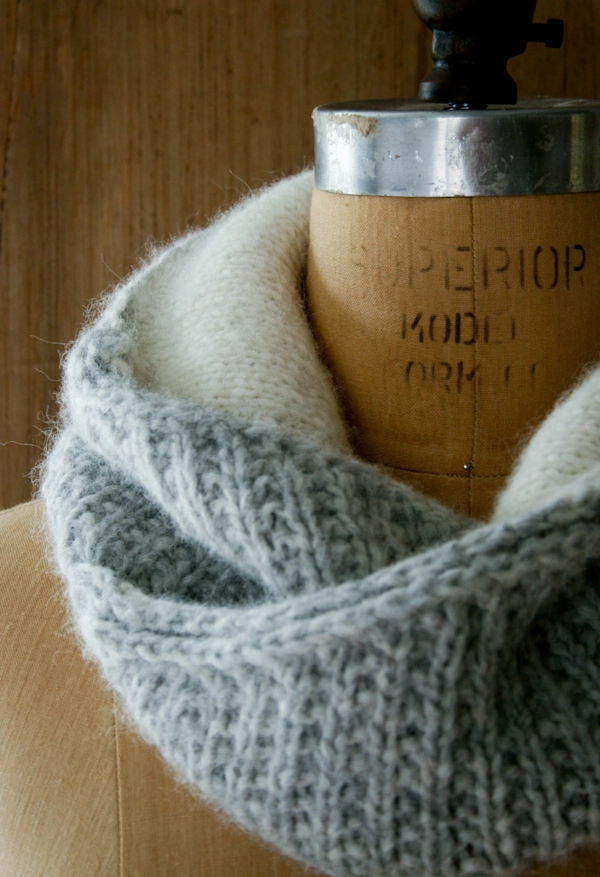
While Brian is happily slipping his feet into thick cozy socks, I am joyfully layering up with my new Shawl Collar Cowl. Unabashedly inspired by my college days of yore, this piece harkens back to treking across campus for early morning class, tailgating for the big game, apple picking and other such quaint and collegiate autumnal activities.

The Shawl Collar Cowl shamelessly conjures the classic ‘New England professor’, if there is such a thing. The gray ribbed exterior transitions into a smooth, creamy white stockinette interior. Folded over and wrapped around, you’ll be outstandingly warm, but not weighted down! This cowl is knit up in the nearly weightless Blue Sky Techno, a feather-light cloud of baby alpaca, extra-fine merino and silk.
It may not be quite cold enough here in New York for wool socks, but it certainly is for some knit neckwear. You won’t catch me without a scarf or cowl, shawl, or dickie for the next six or so months. If you want to add the Shawl Collar Cowl to your woolen accessory collection, you can find the full pattern just below!
Designed by Purl Soho designer, Laura Ferguson.
Share your progress and connect with the community by tagging your pics with #PurlSoho, #PurlSohoBusyHands, and #PurlSohoShawlCollarCowl. We can’t wait to see what you make!
Materials
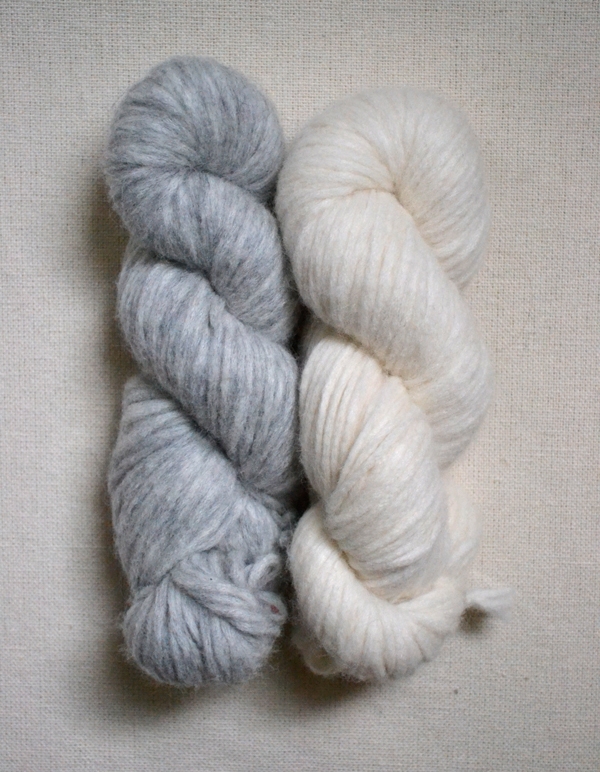
- Main Color (exterior): 2 skeins of Blue Sky’s Techno, 68% baby alpaca, 10% extra fine merino, and 22% silk. Each skein is 120 yards/ 50 grams; approximately 240 yards required. I used the color Metro Silver as the Main Color.
- Contrast Color (interior): 1 skein of Blue Sky’s Techno. Approximately 120 yards required. I used the color Fame as the Contrast Color.
- US 10½ (6.5 mm), 24 or 32-inch circular needle
- US 9 (5.5 mm), 24 or 32-inch circular needle
- Scrap yarn for a provisional cast on
- A crochet hook appropriate for your scrap yarn
Gauge
16 stitches = 4 inches in rib pattern on larger needle
15 stitches = 4 inches in stockinette stitch on smaller needle
Size
Finished Dimensions: 25 inches in circumference at bottom edge of cowl x 8 inches tall
Notes
Make 1 Right pulwise (m1R-purlwise) on the wrong side: pick up the bar between the last stitch you worked and the one you’re about to work, bringing the needle from the front to the back, then purl into the back of this stitch.
Make 1 Left purlwise (m1L-purlwise) on the wrong side: pick up the bar between the last stitch you worked and the one you’re about to work, bringing the needle from the back to the front, then purl into the front of this stitch.
Pattern
Begin the Exterior Rib
Use the provisional cast on method, the Main Color and the larger needle to cast on 151 stitches.
Row 1 (wrong side): *P1, k1, repeat from * to last stitch, p1.
Row 2 (right side): K1, p1, ssk, knit to last four stitches, k2tog, p1, k1. (2 stitches decreased)
Row 3 (wrong side): P1, k1, p2tog, (k1, p1) to last five stitches, k1, p2togtbl, k1, p1. (2 stitches decreased)
Repeat Rows 2 and 3 four more times. (131 stitches)
Continue the Body and Add Darts
DART Row 1 (right side): K1, p1, ssk, k36, place marker (pm), ssk, k7, k2tog, pm, k29, pm, ssk, k7, k2tog, pm, knit to last four stitches, k2tog, p1, k1. (125 stitches)
Row 2 (wrong side): P1, k1, p2tog, (k1, p1) to one stitch before first marker, k1, slip marker (sm), p2, (k1, p1) 3 times, p1, sm, (k1, p1) to one stitch before nextmarker, k1, sm, p2, (k1, p1) 3 times, p1, sm, (k1, p1) to last five stitches, k1, p2togtbl, k1, p1. (2 stitches decreased)
Row 3 (right side): K1, p1, ssk, knit to last four stitches, k2tog, p1, k1. (121 stitches)
Row 4: Repeat Row 2. (119 stitches)
DART Row 5: K1, p1, ssk, knit to first marker, sm, ssk, k5, k2tog, sm, knit to next marker, sm, ssk, k5, k2tog, sm, knit to last four stitches, k2tog, p1, k1. (113 stitches)
Row 6: P1, k1, p2tog, (k1, p1) to last five stitches, k1 p2togtbl, k1, p1. (2 stitches decreased)
Row 7: K1, p1, ssk, knit to last four stitches, k2tog, p1, k1. (109 stitches)
Row 8: Repeat Row 6. (107 stitches)
DART Row 9: K1, p1, ssk, knit to first marker, sm, ssk, k3, k2tog, sm, knit to next marker, sm, ssk, k3, k2tog, sm, knit to last four stitches, k2tog, p1, k1. (101 stitches)
Row 10: P1, k1, p2tog, (k1, p1) to one stitch before first marker, k1, sm, p2, k1, p2, sm, (k1, p1) to one stitch before next marker, k1, sm, p2, k1, p2, sm, (k1, p1) to last five stitches, k1, p2togtbl, k1, p1. (2 stitches decreased)
Row 11: K1, p1, ssk, knit to last four stitches, k2tog, p1, k1. (97 stitches)
Row 12: Repeat Row 10. (95 stitches)
Continue the Body and Add Interior Darts
DART Row 1 (right side): K1, p1, ssk, knit to first marker, remove marker, ssk, k1, k2tog, remove marker, knit to next marker, remove marker, ssk, k1, k2tog, remove marker, knit to last four stitches, k2tog, p1, k1. (89 stitches)
Row 2 (wrong side): P1, k1, p2tog, (k1, p1) to last five stitches, k1, p2togtbl, k1, p1. (2 stitches decreased)
Row 3: K1, p1, ssk, knit to last four stitches, k2tog, p1, k1. (2 stitches decreased)
Repeat Rows 2 and 3 nine more times. (49 stitches)
Repeat Row 2 one more time. (47 stitches)
Increasing for the Interior
Cut the Main Color, join the Contrast Color, and change to smaller needle.
Row 1 (right side): Purl.
Row 2 (wrong side): P1, k1, m1R-purlwise (see pattern notes above), purl to last 2 stitches, m1L-purlwise (see pattern notes above), k1, p1. (2 stitches increased)
Row 3: K1, p1, m1R, knit to last 2 stitches, m1L, p1, k1. (2 stitches increased)
Repeat Rows 2 and 3 nine more times. (87 stitches)
Repeat Row 2 one more time. (89 stitches)
DART Next Row (right side): K1, p1, m1R, k26, pm, m1R, k1, m1L, pm, k31, pm, m1R, k1, m1L, pm, knit to last 2 stitches, m1L, p1, k1. (95 stitches)
Next Row (wrong side): P1, k1, m1R-purlwise, purl to last 2 stitches, m1L-purlwise, k1, p1. (2 stitches increased)
Next Row: K1, p1, m1R, knit to last 2 stitches, m1L, p1, k1. (99 stitches)
Repeat the last wrong side row one more time. (101 stitches)
DART Next Row (right side): K1, p1, m1R, knit to first marker, sm, m1R, knit to next marker, m1L, sm, knit to next marker, sm, m1R, knit to next marker, m1L, sm, knit to the last 2 stitches, m1L, p1, k1. (107 stitches)
Next Row (wrong side): P1, k1, m1R-purlwise, purl to last 2 stitches, m1L-purlwise, k1, p1. (2 stitches increased)
Next Row: K1, p1, m1R, knit to last 2 stitches, m1L, p1, k1. (111 stitches)
Repeat the last wrong side row one more time. (113 stitches)
Repeat last four rows one more time. (125 stitches)
DART Next Row (right side): K1, p1, m1R, knit to first marker, sm, m1R, knit to next marker, m1L, sm, knit to next marker, sm, m1R, knit to next marker, m1L, sm, knit to the last 2 stitches, m1L, p1, k1. (131 stitches)
Next Row (wrong side): P1, k1, m1R-purlwise, purl to last 2 stitches, m1L-purlwise, k1, p1. (133 stitches)
Next Row (right side): K1, p1, m1R, knit to last 2 stitches, m1L, p1, k1. (135 stitches)
Repeat last two rows 4 more times. (151 stitches)
Cut yarn.
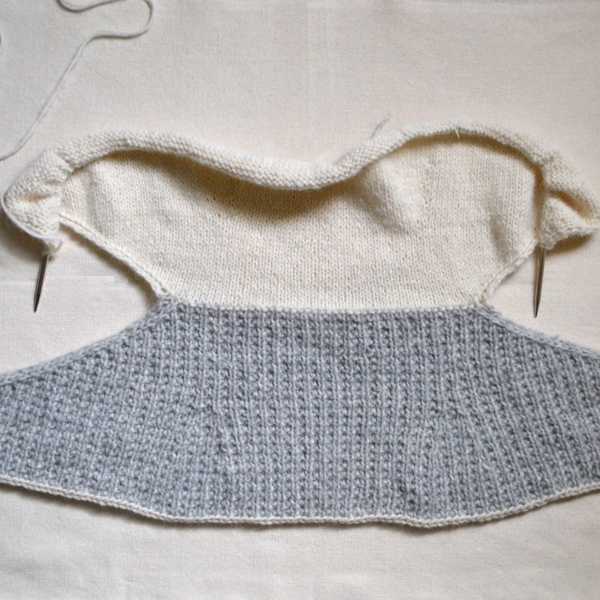
Fold and Finish
Remove the provisional cast on and put the live Main Color stitches on the larger needle.
Fold the knit piece along the purled edge so the wrong sides are facing each other. With the Main Color side facing you, hold the two circular needles parallel and join the Main Color. You will knit across both needles at once, placing markers as you go: K50, pm, k51, pm, knit to end.
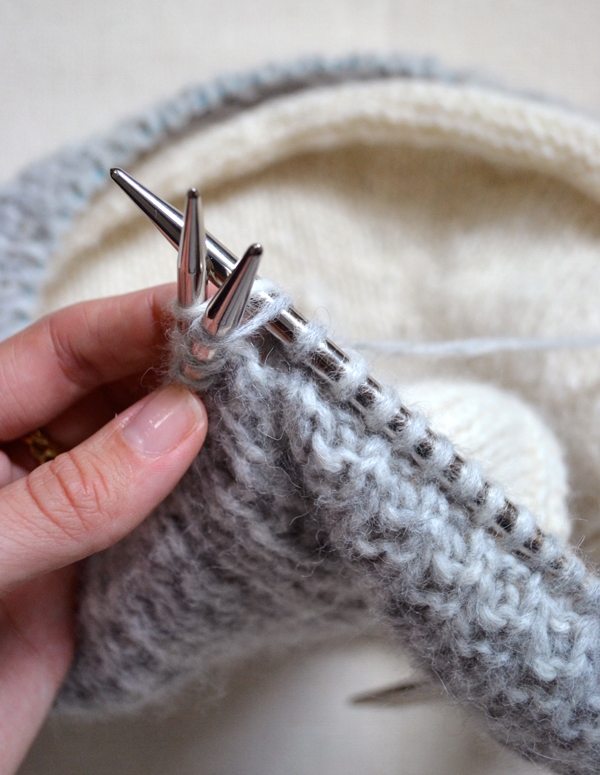
Here is how: with the yarn in back, use the larger circular needle and insert it knitwise into the first stitch on the front needle and then into the first stitch on the back needle. Knit the stitches together, pulling the needle back through both the back and front stitches. This Row:
With the Main Color side facing and the live stitches along the top, place the far right 50 stitches on the smaller needle.
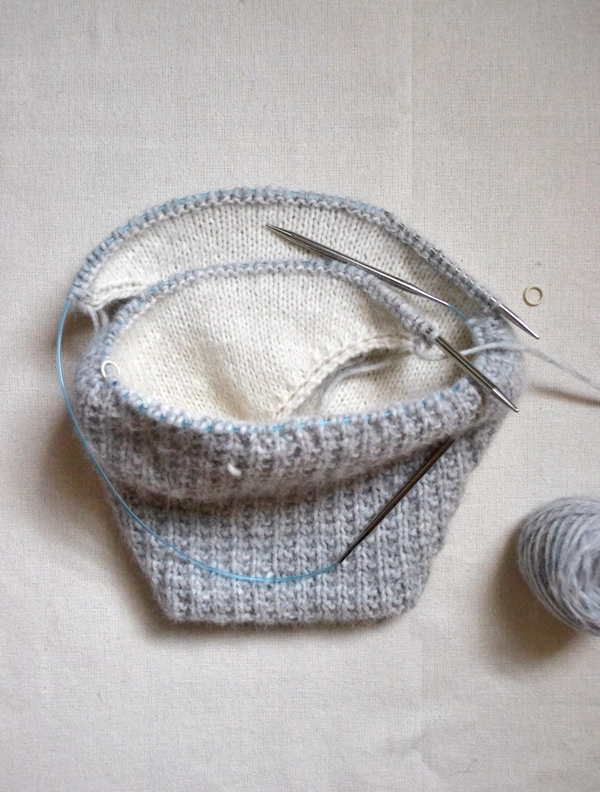
Fold the far left stitches under and the far right stitches under those, as pictured above.
Holding the two circular needles parallel, use the larger needle to do a three-needle bind off of the first 50 stitches. Here is how: with the yarn in front, use the larger circular needle and insert it purlwise into the first stitch on the back needle and then into the first stitch on the front needle. Purl the stitches together, pulling the needle back through both the front and back stitches. Repeat this. Now there are two stitches on your right needle, slip the first stitch up and over the second stitch and off the needle, just like a normal bind off. Continue. After you’ve bound off those first 50 stitches, removing the markers as you go, you will continue binding off, purlwise, the remaining stitches.

Sew up the diagonal edge, attaching the stockinette interior to the ribbed exterior edge. Repeat for second diagonal edge. Sew in your ends and you are finished!


It's a great pattern. It looks like it can be worn by both men and women. Is it a unisex pattern?
Hi Thamomma16,
This is definitely a unisex pattern!
Thanks for writing in.
Laura
I love this cowl, but here in Sunny California it isn’t practical in wool. Can you recommend some other type of yarn that I could use?
Hi Gamma930!
You could substitute it with Blue Sky’s Worsted Cotton:
https://www.purlsoho.com/purl/products/item/721-Blue-Sky-Worsted-Cotton
It is the same gauge and still cozy, but won’t be as warm!
Laura
Hi! I was recently at Cascade Alpacas and Foothills Yarn & Fiber in Oregon and bought some gorgeous baby alpaca. The gauge on 10.5 needles is 3 sts= 1″ and 100 grams = approx 110 yards. Does this sound like it will work for this beautiful cowel? I have 2 different colors and I would LOVE to make it.
Hi Sharon.
Thanks for writing in. What a fun trip!
How many skeins of each color do you have? If you have 2 of each color or even 2 of one color and 1 of the other, I think you’ll be good to go! But if you only have one skein of each color of this baby alpaca, you will be short on yarn.
I used 2 skeins of Blue Sky’s Techno which are 120 yards each for the exterior. The interior yarn used only one skein.
Let me know if I can answer any more questions for you!
Thanks for writing in.
Laura
love knitting! made all my Christmas gifts last year and they were so enthusiastically received, I’m doing the same thing this year. Looking for unusual patterns of useful items. ie Cowls, etc
Hi! I want to make this collar, I’m in love with it since I saw it a few months ago, my sister in law is in NYC this week and she is going to the store to buy me some yarn, I want to make it in your brand, if it’s possible, because techno is available in spain, but your yarn isn’t, how many skeins do you think I need in super soft merino? Maybe 2 of each or in the exterior color may I need 3 skeins?
Love your work.
Thanks!
Hi Sofia.
Wow, you’ll have to let us know how it turns out. What a fun yarn substitution. The Super Soft Merino is a bit thicker than the Techno, but I think you’ll be able to achieve gauge and can make it work beautifully.
Techno is 120 yards / skein.
Super Soft Merino is just 87 yards / skein.
So…
for the exterior you’ll need 3 skeins
for the interior you’ll need 2 skeins
Please let us know if you have any other questions at all!
Thanks,
Laura
I am stuck on the interior on the M1L and R purlwise. I looked it up as a video to make sure I was doing it correctly and it tells me the opposite of what you have listed in the notes. Your instructions for M1R pw are what they show for L and visa versa. Please help! It just doesn’t look correct on the interior.
Hi Victoria.
Thanks for writing in. There are so many ways to do techniques that all have the same or similar name. I think that maybe the video you watched doesn’t align with the increases I did here. In this pattern, the directionality of these increases is referring to the direction of the slant on the right side or knit side of the fabric. Please let me know if you have any questions.
Laura
what is the yardage needed for this shawl collar cowl?
Hi Laurie.
I am so sorry for the delayed response.
The cowl weighs approximately 97 grams and requires approximately 230 total yards give or take 10% of that depending on the knitter. 255 yards should be amble!
Hope this helps.
Thanks for writing in.
Laura
Could you please explain why you use M1R (instead of M1L) for the third stich in Row 3 after changing colors? And why is there M1L as the third stitch before the end of the row instead of M1R? My confusion comes from watching your M1L-M1R video. In the video, you show a M1L as the third stitch in the row and leave the M1R for the third-to-last stitch, to be invisible. (We are increasing as we knit up with the second color, just as you do in your tutorial),
Thank you
Hi Christine.
Sure, I’d love to explain! You can use m1L and m1R anywhere! Sometimes I choose for the increased stitch to lean towards the edge of my fabric and sometime I choose an increase that will lean away from the edge towards the body of the fabric.
If you prefer to switch them… by all means do! It’s just a small design detail.
The m1L and m1R video tutorial was made a couple/few years after this pattern was posted. In it we simply indicating one way to use the increase technique, but there are several!
Please do not hesitate to write us back if you have any questions!
Thanks.
Laura
Hi!! I’m soooo excited to knit this project! I’ve just finished the main color part. Which is the best way to weave the end? Should I weave first before I start the second color part? Should I weave the end along rows or stitches? Thanks. 🙂
Hi May,
Thanks for writing in and our apologies for the delayed response. We have a great tutorial for weaving in ends, complete with many pictures. It can be found here: https://www.purlsoho.com/create/2011/07/14/weaving-in-your-ends/
I hope that this helps!
Cassy
Sorry I’ve realized that I posted really silly question. Forget about it! I was just so happy because I’ve just finished the main color part and wanted to talk with you!
Hi Laura
I made it and I love it. It’s a fantastic pattern and has been my favorite knitting project so far. Thank you!
Johanna
i love this pattern, but I crochet only! Have you got a crochet pattern the same or similiar please? Many thanks
Hi Nicola,
Thanks for your kind words! We do not have a crocheted version of this pattern. A full list of the crochet patterns that we have available for free can be found here: https://www.purlsoho.com/create/category/crochet/crochet-view-all/
I’m sorry to say that we do not have the resources to convert this sweater to a crochet pattern at the moment, but we will definitely keep it in mind for the future!
Best,
Cassy
This is one of my favourite of your patterns. Over the past couple of years, I have continued to return this page and re-review the instructions. Thus far, I have not attempted to knit this cowl, however, I believe I may give it a go this fall. Thank you so much for this site, all of your wonderful yarns and patterns, and for your generosity in sharing so much. With best regards, Anna
This cowl is the best and the most beautiful I e ver knit. Perfect pattern! Thank you so much!
Hello, I just finished now it comes to sewing/knitting together and I’m a bit confused. Knitting over both needles?
Hi Wendy,
Thanks for reaching out! This technique is almost identical to working a Three Needle Bind Off – the only difference is that, rather than binding off as you go, you will just keep knitting along.
I hope that tutorial helps!
Julianna
I got it! All finished and beautiful, thank you.
Hello I was wondering if u have a video to look at for help I am at the end but where do the stitches come from on second needle (the first or main color)
Hello,
Thanks for reaching out! We do not have a video, but I will certainly pass along the suggestion. When you are connecting the two colors you will remove the provisional cast on and put the live Main Color stitches on the larger needle. This means that your stitches are coming from your cast on.
I hope this helps, but let us know if you have any further questions!
Happy knitting,
Marilla
I am totally confused. I have knit the two sides together but can’t figure out what to do next. When you say to place the far right stitches on the smaller needle, what do you mean? With the right side facing me, I put the 50 right stitches on the smaller needle, but it doesn’t line up as in your photo.
Wow! Right after I posted that note, it became clear to me. I’ve finished it and it is beautiful!
I have a question regarding to this part of the pattern:
DART Row 1 (right side): K1, p1, ssk, k36, place marker (pm), ssk, k7, k2tog, pm, k29, pm, ssk, k7, k2tog, pm, knit to last four stitches, k2tog, p1, k1. (125 stitches)
Do I understand it correct, when it says K36 ? I have knitted everything else on this part K1,P1 or is it only in one row, I knit only K ? I do appologize my bad English, and I´m not an experienced knitter 😉
Hi Jeannie,
Thanks for reaching out, and no need to apologize – I hope I can clarify this section! This row is just knitting between the decreases. The stitch pattern previously should have been alternating K1, P1 rows with all knit rows, and you should end with a K1, P1 row before Dart Row 1 so that it fits into the established pattern.
I hope that helps!
Julianna
Hi, Juliana-
I am really excited to try this pattern Can I use straight needles for this pattern, or can I use straight needles?
Thank you,
Dena
Hi Dena,
Thanks for reaching out! Since the pattern is written and only available for working in the round I would recommend sticking with the two recommended circular needles, keep in mind you will need a US #10 ½ , 24 or 32-inch circular needle and a US #9, 24 or 32-inch circular needle!
All the best,
Gianna
Nice – danish please
Hi Yvonnr,
Thanks for reaching out. We currently are only providing our patterns in English, and we unfortunately do not have the time and resources to translate them ourselves. We’re so sorry for the inconvenience!
All the best,
Lili
I loved this pattern, thank you very much.