Apple Coasters

When I was a kid I dreaded the day that I would start seeing commercials for school supplies and my mom would suggest we go buy a new backpack. I didn’t even want to think about giving up my summer freedom. Sometimes, to add insult to injury, the first day of school would be on my birthday!
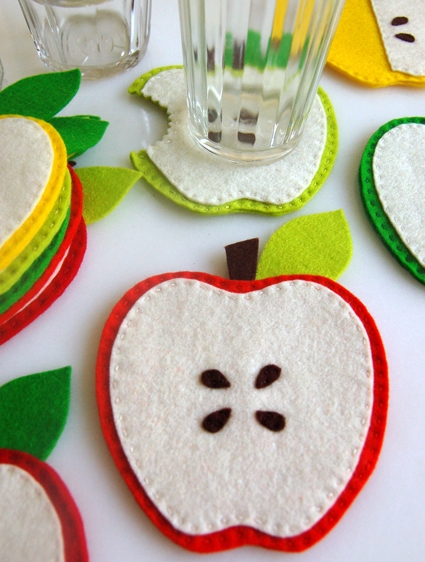
But these days, with first-days-of-school far behind me, I actually look forward to this time of year more than any other. I love the crisp weather, the foliage, my birthday, and I really love apples! Since apples are so quintessentially autumn and because they’re so graphically appealing, I was inspired to celebrate this beautiful time of year with a super cute set of Apple Coasters. They’ll add a barrel of autumnal cheer to any table! Or start your kid’s school year off right with the perfect teacher gift.
The Apple Coasters are close cousins to my summertime Citrus Coasters, which is to say that they are a total breeze to make, no fancy stitches or skills required. For this season’s version we chose our favorite reds, greens, and yellows for our new 100% wool felt Apple Bundle. I just love the way they look all together, so fresh and bright!
Designed by Purl Soho designer, Molly Schnick. Click here to see even more of Molly’s work!
Materials

To make 10 coasters:
- One Apples Felt Bundle
- DMC Embroidery Floss in colors to match the felt. I used: Ecru, 606 (bright red), 743 (yellow), 166 (light green), 905 (dark green), 3031 (dark brown)
- An Apple Coaster Template printed out and cut, available for free download here
Special Equipment:
Pattern
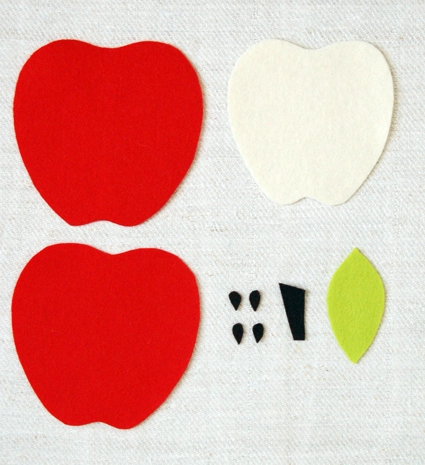
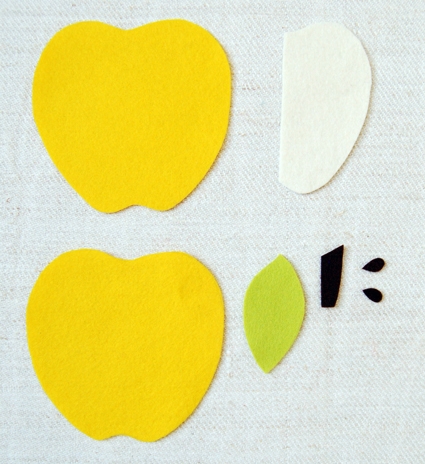
Cutting
There are three versions of these coasters: The Basic Apple, The Apple with a Bite, and the Segmented Apple. Before you cut out all of the pieces figure out how many Segmented Apples you want to make because they require different cutting.

For each coaster you will need 2 outside pieces. From each piece of the green, red, and yellow felt cut 4 outsides. You will have enough to make 2 coasters from each color. To get four full outside pieces from the felt trace the outside templates as shown above (disregard the leaves if you’re cutting from the red or yellow.)
Cut 10 leaves from a combination of the light green and dark green felt. You can fit up to 6 leaves on each of the green felt pieces as shown above.

Cut 10 total apple insides from the ecru felt some regular insides and some half apple insides. If you trace the templates as shown above you can get up to six full insides from each piece.
Cut 10 stems from the brown felt. Cut 4 seeds for each Basic Apple and Apples with a Bite. Cut 2 Apple Seeds for each Segmented Apple.
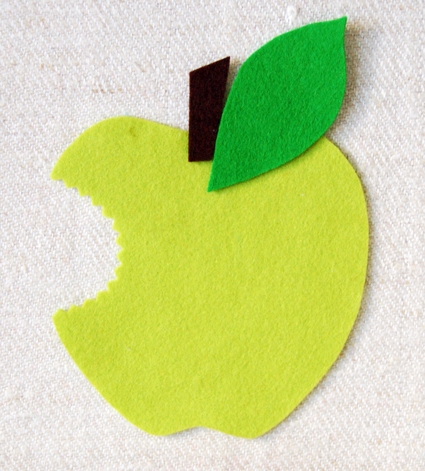
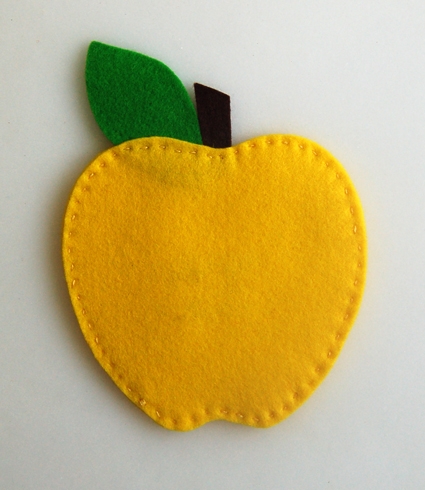
Basic Apple
You will need:
- 2 apple outside pieces in the same color
- 1 inside piece
- 4 seeds
- 1 stem
- 1 leaf
- embroidery thread in ecru, dark brown, and in a color to match the outside. Please note, you need to separate the embroidery thread into two strands before you sew with it.

Center the inside on one of the outside pieces and pin it in place.
Using the ecru thread and starting from the back sew the inside to the outside along the edge with a small running stitch.
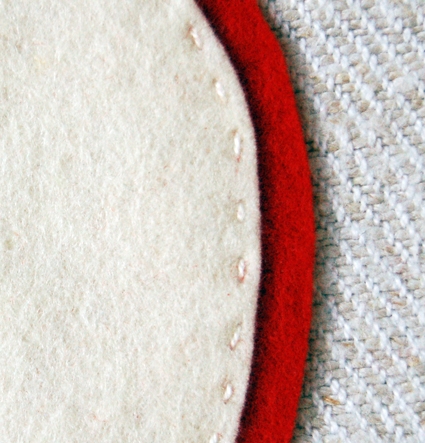
Make the stitches very neat and small like in the picture above.

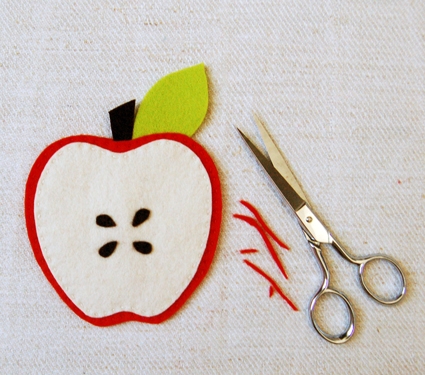
Center the four seeds and pin then in place.
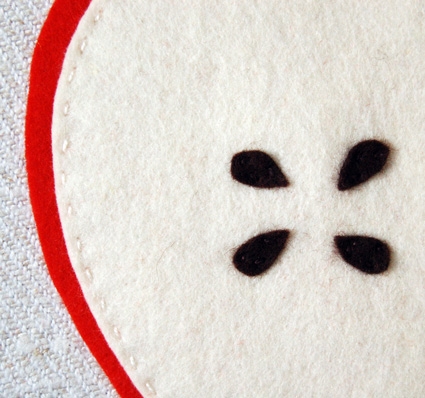
Using the dark brown embroidery thread stitch them on with a small running stitch.
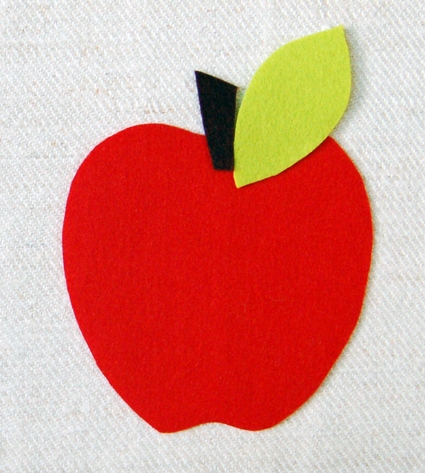
Place the stem and leaf at the top of the second outside piece as shown above.
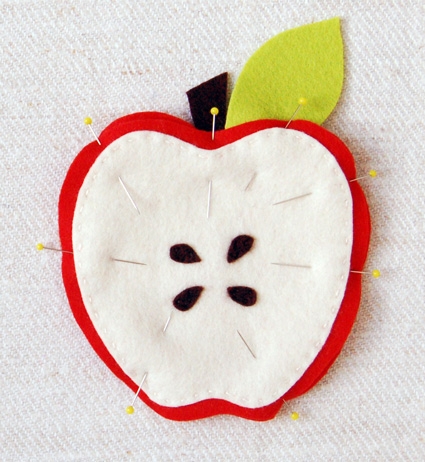
Pin the first outside piece (with the inside and seeds sewn on it) to the second outside piece, sandwiching the stem and the leaf inside the two. Make sure the pin the stem and leaf in place.

To sew the two outsides together use the matching colored thread and enter between the two outsides, thus hiding the knot.
Sew around the entire perimeter with a small running stitch. When you get all the way around tie a small knot in the back and then hide the thread end between the layers.
Trim the outside edges so they are flush with one another and you’re all done!
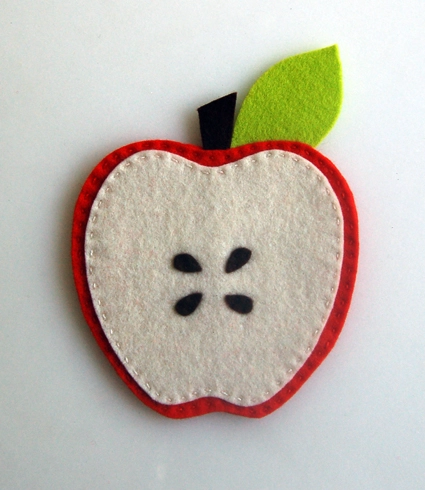
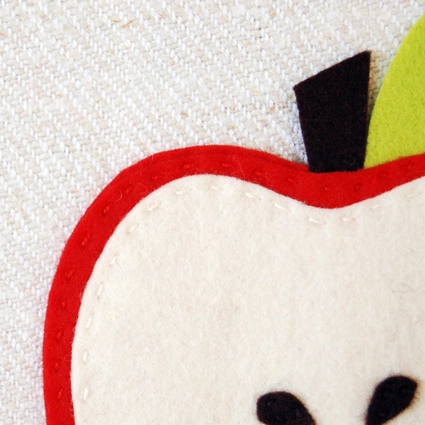
Here is a picture of the front side of the coaster.
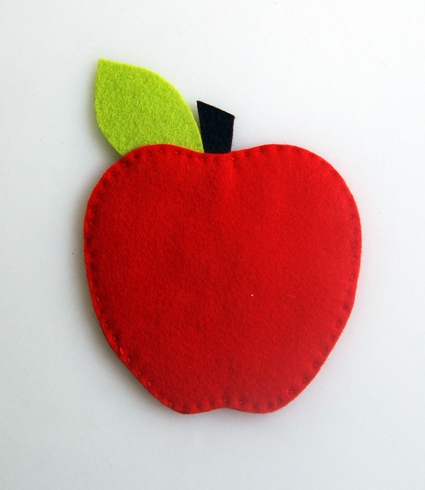
And here is the back.
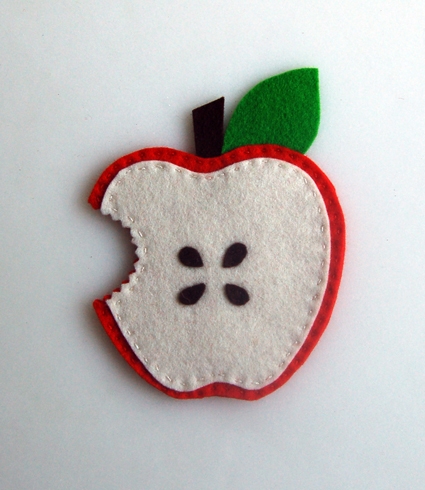
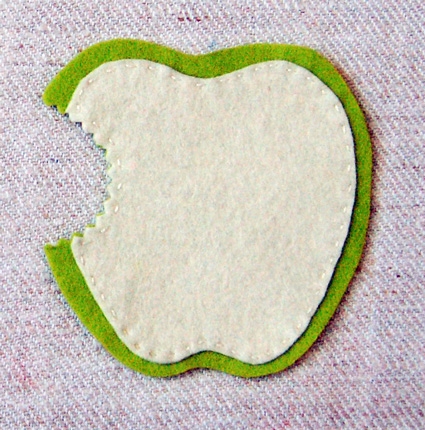
Apple with a Bite

You will need:
- 2 apple outside pieces in the same color
- 1 inside piece
- 4 seeds
- 1 stem
- 1 leaf
- embroidery thread in ecru, dark brown, and in a color to match the outside. Please note, you need to separate the embroidery thread into two strands before you sew with it.
- a bite template
Place both of the outside pieces on top of one another so they are flush.
Center the inside piece on top of the two outside pieces and pin all three layers together.
Trace the bite template on the left side of the pined pieces.
 Using pinking shears cut through all three layers of felt at the same time along the marked bite mark.

Take away the bottom (second) outside layer and put it aside for now.
Pin the inside to the first outside layer making sure to keep the zig zag of the bite mark lined up.
Using the ecru thread stitch the inside to the outside along the inside edge with a small running stitch.
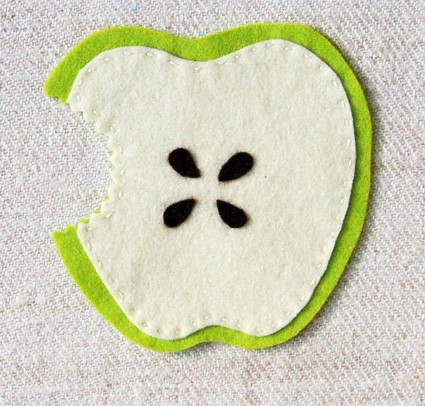
Center the seeds, pin them on, and then stitch them on with the brown embroidery thread using a small running stitch.
Arrange the stem and leaf at the top of the second outside piece.
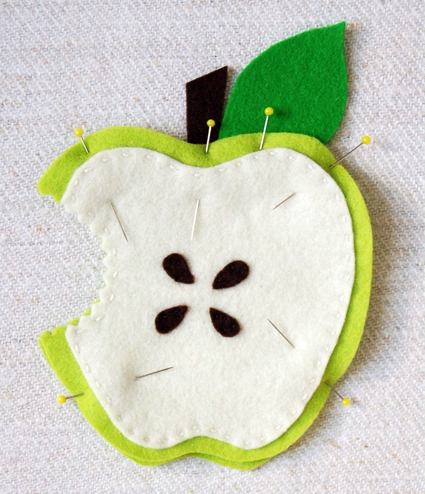
Pin the second outside to the first, wrong sides together, sandwiching the stem and leaf between the layers. Make sure to pin the stem and leaf in place and that the bite marks are lining up neatly.

Hiding the knot between the two layers stitch the outsides together using a small running stitch and the matching embroidery thread.

When you get to the bite stitch along the back, just going through the colored outside layers and not poking through to the ecru layer on the front. The felt is pretty thick so this isn’t very hard to do, just pay attention.

When you get past the bite area continue sewing with the regular small running stitch.

Once you get all the way around tie a small knot in the back and then pull the thread through the center of the coaster and cut the thread end at the exit point to hide it.

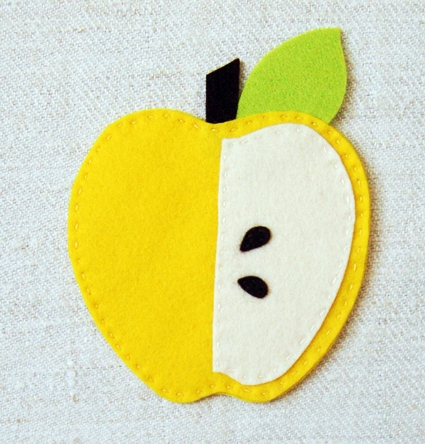
Here is the finished front:

And here is the back.
Segmented Apple
You will need:
- 2 apple outside pieces in the same color
- 1 half inside piece
- 2 seeds
- 1 stem
- 1 leaf
- embroidery thread in ecru, dark brown, and in a color to match the outside. Please note, you need to separate the embroidery thread into two strands before you sew with it.

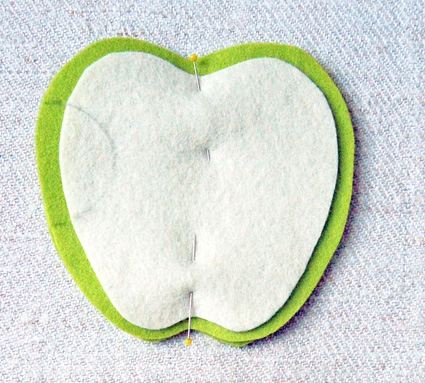
Center and pin the half inside piece onto the first outside piece.
Using the ecru thread sew the inside to the outside with a small running stitch.

Center the two seeds onto the half inside piece and sew them on with the brown embroidery thread and a small running stitch.

Arrange the stem and leaf on top of the second outside piece as shown above.

Pin the second outside to the first, wrong sides together, sandwiching the stem and leaf between the layers. Make sure to pin the stem and leaf in place.
Using the matching thread stitch the two outside pieces together around the entire perimeter.
Once you get all the way around tie a small knot in the back and then pull the thread through the center of the coaster and cut the thread end at the exit point to hide it.


very creative and colorful. i love this idea…
I linked to your tutorial on my blog – thanks for sharing!
doro K.
I made one of these today! It's so cute and it was really easy. 🙂
these coasters are so flippin cute, i love them. the colors so bright, the tutorial wonderful.
Sooo, cute! I might have to try these with my kids. I think they will enjoy making them. Thank you for the tutorial.
I made some of these yesterday. Easy and fun!
Love these! Looking forward to making. Quick question – why put the seeds on after you stitch the inside on? I think I must be missing something because I don't see the stitching on the backside before you put the outside piece on. Thanks for the help!
Hi Lauren-
I stitched the seeds on in that order because it was the easiest way to make sure they were properly placed. You won't see the stitching on the back when the entire piece is done because you sew on the backing piece on after you sew the inside and the seeds.
I hope this helps. If it doesn't make sense I would recommend just trying to sew one and I think it will all become clear : )
Thanks for your question- Molly
So adorable!! Thanks for the project idea!
this is so cute and the colours make happy!
XOXO Kerstin
Thanks for another great tutorial–I linked to your page from my blog. My daughter and I enjoyed making the apple coasters. Happy fall!
I love these! Sweet without being sickly (just like apples!) Will have to get hold of some felt and make them. I want to make the ones with the bite, but my pinking shears are so stiff and jammed that they're essentially useless 🙁
Very beautifu., thanks.
congratulations from Brasil
Eles são fofos! Já guardei as fotos para fazer para mim. Beijos.
Genial, es precioso, me encanta, todos los diseños, y lo facilito q esta explicado
I made these with leftovers from a fuscia bundle. Very pop-y. Wish I could share a picture!
I love apples too! Wonderful tutorial, thank you. These apples would be so cute for an appliqué too – lots of use other than the coasters 🙂
These are amazing. I used them as inspiration for some football themed ones I did and linked back to you.
I would love you to pop by for a peek
http://babiesbuttonsandbows.blogspot.com
amy x
These are so adorable!! Do you sell them? Because you should! I am a teacher and I know lots of teachers would absolutely adore them!!
Hi Molly-
We don't sell any of our finished projects but we do sell all the materials to make them, linked in the “materials” section!
Thanks for your kind words about the project!
Molly
So cute. Such a great idea and execution. I linked to you from my blog so my readers can find your tutorial:)
Thanks for sharing this fun tutorial!!! I had a blast making these apples. I did a running stitch around the leaves and stem to tie it in with the rest of the piece … so cute!!!
I'll be working on the citrus slices next.
Beautiful
I'm the Editorial Assistant for Fun Family Crafts and I wanted to let you know that we have featured your apple coasters! You can see them here:
http://funfamilycrafts.com/apple-coasters/
If you have other kid-friendly crafts, we'd love it if you would submit them. If you would like to display a featured button on your site, you can grab one from the right side bar of your post above. Thanks for a wonderful project idea!
I wonder if there is a quick and easy way to make these into garland? I am going to have to think on that!
Hi, loved this I made the lot, plus following your idea I made a
Pumpking place matt to put my big pan at the table, looks awesome
Has a funny face too.
Thanks for the great ideas!!
Love your crafts. I am teaching myself to crochet (hard, because I am left handed), but I want to try your felts too. Signed up for you newsletter. Thanks. PAT
Just wanted to let you know that I featured this post on my Facebook page during April and people loved it. It made it into the top 20 for the month, of which I always do a round up. So today I've featured you on my blog as well (link below). Thanks for such an awesome post! http://craftsbyamanda.com/2014/05/great-craft-ideas-may-2014.html
I will definitely try this, it is a wonderful tutorial!
Very cute I have to try these, seems fun to make
I made these for the people in the office (coffee mugs on desks) and everyone loved them!
I would love to do these with senior citizens in a nursing home. Can I use glue instead? They wouldn’t be able to handle the needle/thread. Thanks!
Hi Mary-
Glue would work great here!
Thanks for getting in touch and please let us know if you have any more questions!
Molly
Thank you so much for the tutorials. I am a teacher and will be integrating hand sewing for my high school students this year. I am so happy you provided this option.
I am planning to make these into name tags for a women’s retreat. Instead of the felt stem I’m going to use a looped ribbon and then put a cord through that for hanging around their necks. If I had more time I would embroider their names on one side, but I think I will just put their names on card stock & glue it on.