Adjustable Apron

I wear aprons all the time, and I’m not kidding when I say “all the time”. My typical at-home outfit involves a bandana to keep my hair back and an apron to keep at bay all of the thread and fabric fuzz that follow me everywhere. When friends stop by unexpectedly they are always surprised by my house frau attire, but nobody wants a lint brush for a best friend!

As you might imagine, I have a good collection of aprons, many of them vintage and quite feminine. Some of my favorites include a pink one from the 50s made out of a feedsack and one with ruffles and a pie shaped pocket that my sister made for me. Even though I love them all, these fanciful aprons don’t come in very handy when it’s time to roll up my sleeves and get messy in the kitchen, nor does my husband really appreciate his options. So I decided to make a rugged, adjustable apron for both of us to use in the kitchen. It’s big enough to be worn by a 6 foot tall guy but can easily be folded up to fit a 5 foot 4 gal like myself. Plus the no-nonsense styling means neither of us will risk batter-splattered ruffles!

The Adjustable Apron is an update of a pattern I designed way back in 2008 called the BBQ Apron. Although this version is perfect for Labor Day grilling, its classic design and super simple construction make it useful well beyond the BBQ pit. I used some amazing new fabric, Kokka Canvas Ticking, which seems like it was born to be an apron. It’s both soft and strong and will wear and wash beautifully. I love its classic denimy feel and its subtle colors. Best of all this apron is beyond simple to make. It’s so easy that I think I might make two so my husband and I don’t have to share!
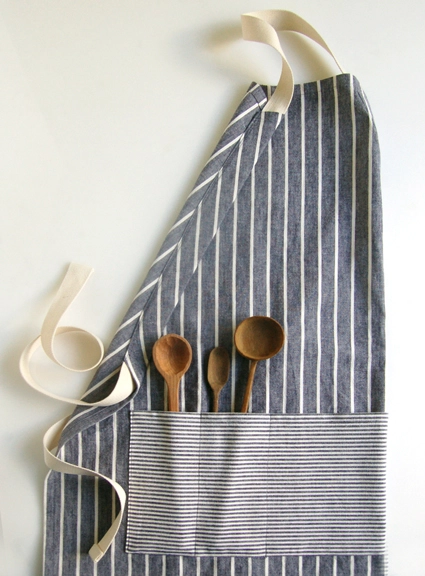
(P.S. The beautiful wooden spoons in the pictures above can be found at Timber from Live Wire Farm right here.)
Update: February 2012
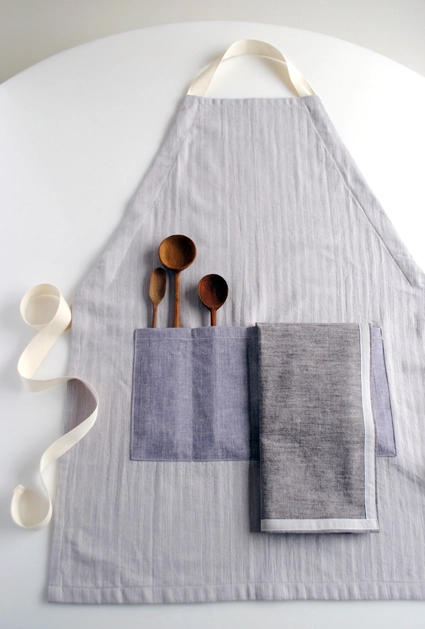
In February 2012 we made a a new version of this fantastic apron! For more images of the new version plus the pattern for the matching dishtowels, click here.
Designed by Purl Soho designer, Molly Schnick. Click here to see even more of Molly’s work!
Materials
For the Original Adjustable Apron
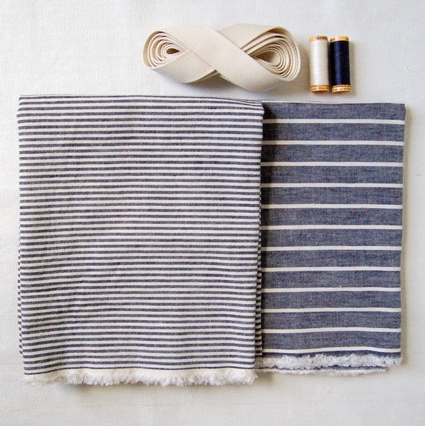
- 1 1/4-yard Kokka Canvas Ticking in Navy Thick for the body of the apron. (This particular fabric is no longer available, but please check out all of our current upholstery weight fabrics for some great alternatives!)
- 1/2-yard of Kokka Canvas Ticking in Navy Thin for the pocket. (This particular fabric is no longer available, but please check out all of our current upholstery weight fabrics for some great alternatives!)
- 3-yards Cotton Webbing in Natural
- 100% Cotton Thread in color 7400 (to match the apron fabric) and 1040 (to match the webbing)
Pattern
Marking and Cutting

Press the main body fabric in half lengthwise, selvedge to selvedge. Trim the top of the fabric so it makes a clean 90 degree angle with fold.
Using tailors chalk or an erasable fabric marker make a 1-inch vertical mark at the top of the fabric, 6 1/2-inches from the fold. This is mark A and is shown in red in the picture above.
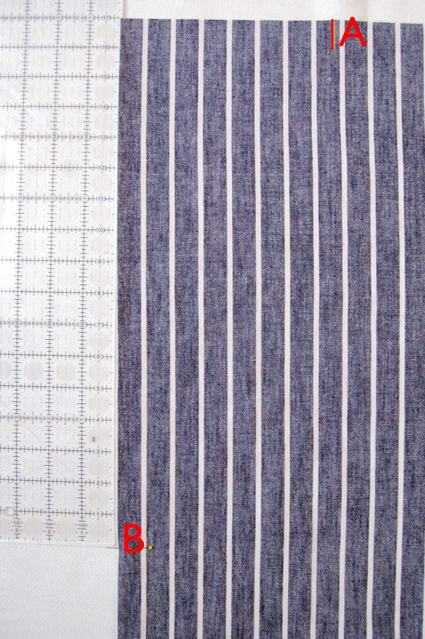
Place a pin along the fold, 17-inches from the top of the fabric. This is mark B.
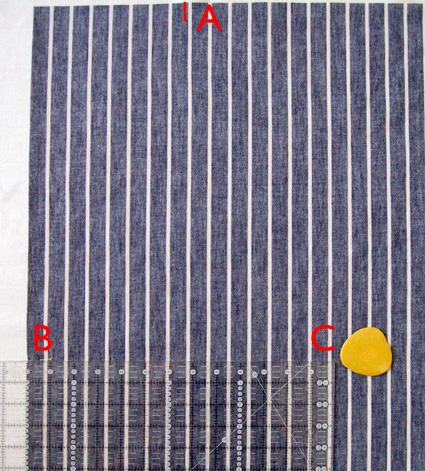
Make a mark using the chalk 13-inches from the fold and directly perpendicular to mark B. This is mark C.

Make a mark on the fold 20-inches below mark B. This is mark D.
Make a mark 20-inches vertically below mark C. This is mark E.
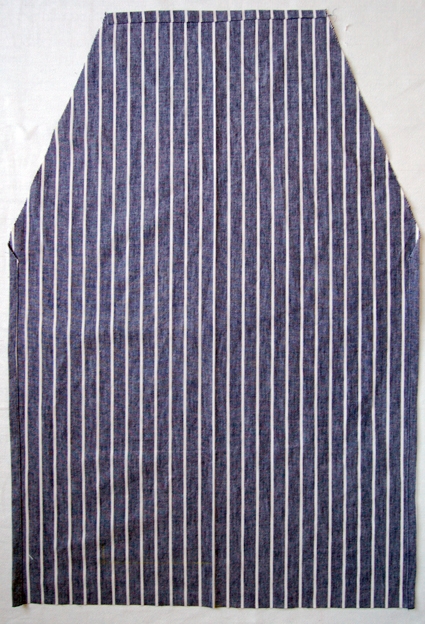
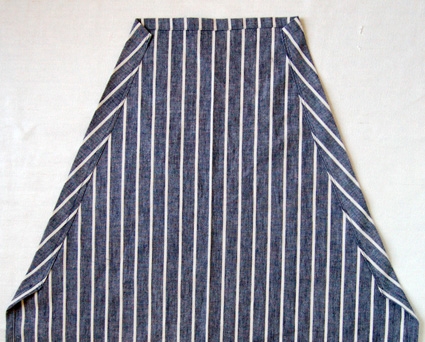
Using the chalk connect these marked lines together with straight lines as shown in red above, going from the bottom of mark A diagonally to mark C, then down to mark E and over to mark D.

Cut the apron out following along these lines. Here is a picture of it cut out but still folded down the middle.
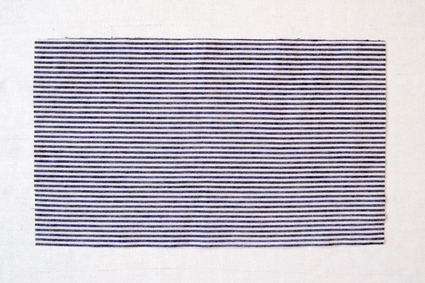
Cut a 17-inch by 10-inch rectangle, with the stripes running horizontally for the pocket.
Sewing the Apron
Unfold the main apron piece.
Using the darker thread hem the top and straight sides by folding them over 1/2-inch twice towards the wrong side and edge stitching the folds down.

Hem the bottom in the same manner.
Zig zag stitch along the diagonal sides.
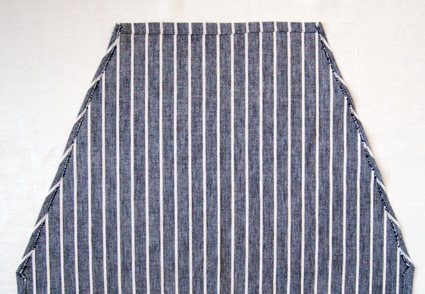
Press the diagonal sides down 1/4-inch to the wrong side and edge stitch them down.
Press the diagonal sides down 1-inch to the wrong side and edge stitch them down. This will form a scant 1-inch channel along the diagonal sides that the cotton webbing will be threaded through later.
Attaching the Pocket

Hem the top of the pocket by pressing it down 1/2-inch twice towards the wrong side and edge stitching the fold down.
Zig zag stitch along the three other sides.

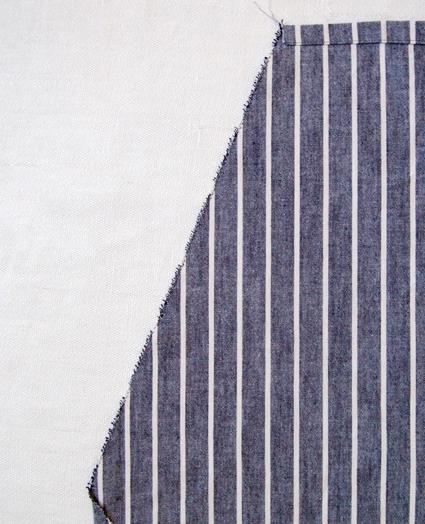
Press the right and left sides towards 1/2-inch towards the wrong side and then press the bottom edge up 1/2-inch towards the wrong side as well.

Tuck the extra fabric of the corners inside of the pressed folds forming little miters as shown above.
Press the pocket flat.
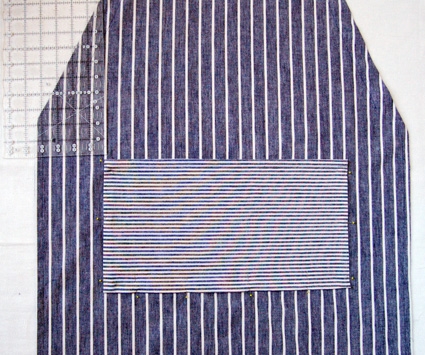
Pin the bottom, left, and right sides of the pocket to the main apron panel, 2 1/2-inches below where the diagonal sides start and 4 1/4-inches from either side. Make sure it’s straight and centered.

Edge stitch the pocket on around the left, right, and bottom sides.

Using a Hera Marker or erasable fabric marker mark vertically along the pocket 3 1/2-inches from the left side and then 3 1/2-inches to the left of that mark.
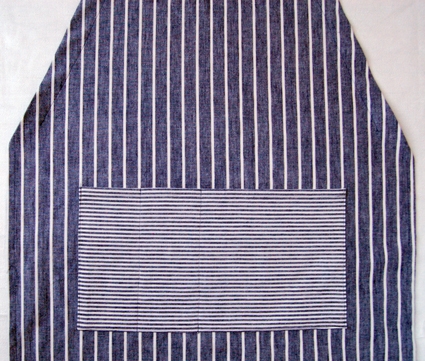
Sew along these marks to form two pocket divisions for cooking tools.
Adding the Tie

Cut the cotton webbing to be 97-inches long.
Press the ends 1/2-inch to the wrong side twice.
Using the off white thread edge stitch these folds down.

Using a knitting needle or another long sharp opject pull one end of the webbing through the bottom left diagonal channel with the wrong side of the apron facing up.

When you reach the top of the apron turn pull the webbing out at the top and turn the apron to the right side. Being careful not to twist it thread the webbing into the opposite diagonal channel from the top, pulling it all the way through to the bottom of the channel.
Pull the webbing until both sides are equal and you’re all done!


Hello,
Love the look of this apron and the clear instructions. Gathering materials to make for a dear friend. Could you please clarify the size of the cotton webbing strap? Is it 1” wide? Thank you!
Hi Vanessa,
Thanks for reaching out! What a great gift this will be! Yes, the cotton webbing is an inch wide and you can find our PURL SOHO Cotton Webbing here!
Warmly,
Gianna
Hi, I want to make an apron with your pattern. However, I want to make it 30″ wide. If I alter the width, will the top (bib) part still be ok? I don’t want it to bunch up underneath my arms.
Thank you, Mechthild
Hi Mechthild,
Thanks for reaching out! The original width is approximately 26″ wide, so I think extending it to 30″ wouldn’t make too much of a difference for the top half!
Warmly,
Gianna
Love this pattern so much. Do you have measurements for kids sizing?
Hi Jacinta,
Thanks for reaching out! We only offer this pattern in one size, but I think you could easily adjust the dimensions to fit a kid depending on their measurements!
I hope this helps, happy crafting!
Gianna
I love this pattern! It’s cute, easy to see how simple it is use. Great for Christmas gifts! I;m just getting better from a very serious illness and can’t wait to start on my crafting. Thank you so-o-o much!!
Can’t wait to make this apron. Please clarify. If the webbing is 1″ why are you folding over only 1/2″ for the casing. What am I missing?
Hi Debby,
Thanks for reaching out! For the casing, you will actually press the diagonal sides down 1/4-inch then you will press the diagonal sides down 1-inch to the wrong side and edge stitch them down. This will form a scant 1-inch channel along the diagonal sides that the cotton webbing! You can find this information under the SEWING THE APRON section of the pattern!
I hope this clears things up!
Gianna
Hi! Could this work with 1 yard of fabric?? I have a fabric I’m looking to use that’s only 1 yard…! I would love to use it if it would work!! Love this pattern idea!
Hi Riley,
Thanks for reaching out! This pattern requires 1¼ yards of the main fabric, but you may be able to get away with a yard! You may have to adjust the dimensions of the pattern pieces slightly, but just be sure to measure everything out prior to cutting the fabric!
I hope this helps!
Gianna
I absolutely love this pattern and have started making them for all the women in the family in readiness for birthdays and Christmas presents …. plus a few extra to put in as raffle prizes . Thank you so much for sharing.
I love this pattern and plan on making several . Thank you so much very easy to follow and understand . One question instead of using the webbing , could fabric be used to make tie ?
Hi Penny,
Thanks for writing in! That is a great question, I think you could definitely use fabric instead of webbing!
Happy crafting!
Gianna
This is the best pattern I have seen. So happy to have clear instructions. Thank you.
Hi Kathy,
Thanks for writing in and for your kind words! We’re so happy to hear that you’re a fan of this pattern and hope you’re having fun making it!
Have a great day!
All the best,
Cat
I like the design but am not savvy enough to pare it down for a 9yr old’s birthday gift!
Hi Maureen!
Thanks for writing in. While this apron does not have kid’s sizing, I can recommend our Kid’s Ric Rac Apron, which is sized for children age 2-10 years!
I hope this helps!
All the best,
Margaret
I would love to make this pattern as a Christmas gift. Considering this is an apron, I fully expect my husband will need his washed at some point. Did you prewash and dry your fabrics? Does the yardage required take any shrinkage into account? Which of your current fabrics would you recommend for this project?
Thanks!
Hi Elli,
Thanks for writing in! We did prewash and dry the fabric for our sample of the apron, and the yardage does take into account any shrinkage.
I’d recommend using Robert Kaufman’s Essex as a substitute fabric. Essex is a sturdy, yet soft, fabric, so it will be similar to the original fabric used! Another option for a sturdy fabric would be Merchant & Mills’s Dry Oilskin, which is treated for water resistance and is great for outerwear, totes, and daily accessories. Hope this helps!
All the best,
Lili
I will be making this apron a a gift to the chef at my wedding! I hope to get it done in under an hour> I had a different pattern but this one seems so simple I will be using it instead. Hope it come out ok.
What great directions! This is, I believe, the 4th time making it! THANK YOU. I did make the channels for the cotton webbing 1.5 inches which worked out perfectly.
A KEEPER PATTERN!
Thank you for this fabulous, easy pattern! I am about to make this apron for a good friend, and I am sure she’ll love it.