Mimi Kirchner’s Hand Sewn Felt Doll

The beautiful handmade dolls pictured above were created from a pattern developed for The Purl Bee by the incredibly talented, brilliant and generous Mimi Kirchner. When we first discovered Mimi’s blog, Doll, we were in absolute awe of her work and knew we must invite her to create a doll pattern for our readers. We were so pleased when she accepted our invitation and even more thrilled when she brought the dolls with her to New York City and we finally got to meet her. We loved Mimi just as much as we love her dolls!
PS. Be sure to check out Mimi’s Blog by clicking this link to see all of her beautiful work!
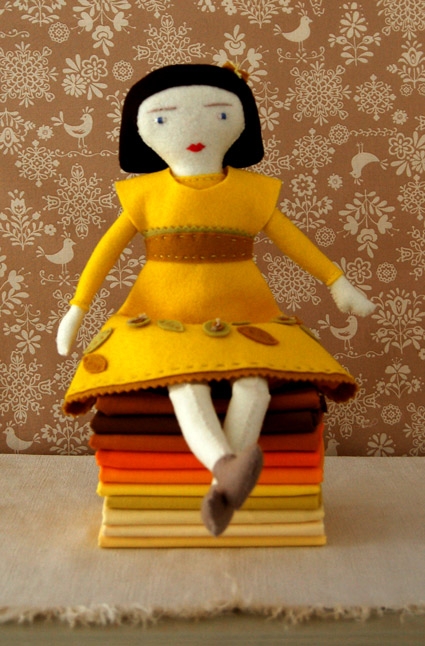

Finished Measurements
Approximately 14-inches tall from heel to top of head.
Materials
- You’ll need one piece of our Wolvitz 100% Wool Felt for each color used to make your doll. You’ll have enough felt left to make a second doll except for the dress (unless you piece the dress together from remaining scraps). Here are the colors we used for each doll:
Yellow Doll: # 2, 12, 13, 33, 36, 91
Green Doll: # 9, 14,19, 22, 42, 43, 51, 40
Pink Doll: # 8, 10, 14, 25, 35, 43, 40
Taupe Doll (in how-to photographs below): # 6, 19, 22, 34, 35, 36, 91
- Cotton embroidery thread in colors that blend with felt
- Silk embroidery thread (for hip joints)
- Two 1/2-inch, two-hole buttons
- Small snap
- Stuffing
- Freezer paper (available at your local grocery store)
Tools
- Hemostat Forceps for stuffing
- Fabric Shears
- Pinking Shears
- Water soluble fabric marker
- Straight pins
- Embroidery scissors or other small pointy scissors
- Embroidery needles or Doll Needles
Pattern Templates
Download Mimi’s Handsewn Doll templates here, the 4 pages include:
- Body
- Dress
- Hair styles 1, 2 and 3
- Face template and embroidery notes
Prepare Pattern Pieces
Pick which hair style you want.
Print out pattern and transfer pieces to matte side of freezer paper using a sunny window.
Cut out freezer paper pattern pieces.


Iron the pattern pieces, shiny side down, onto the felt with your iron at wool setting. After ironing, pin the pattern pieces to felt to hold the layers together. (The photo above shows all three hairstyles, you’ll only need to use one of them). Note that most of the pieces are cut from a double layer of felt, which you can see in the photo below.
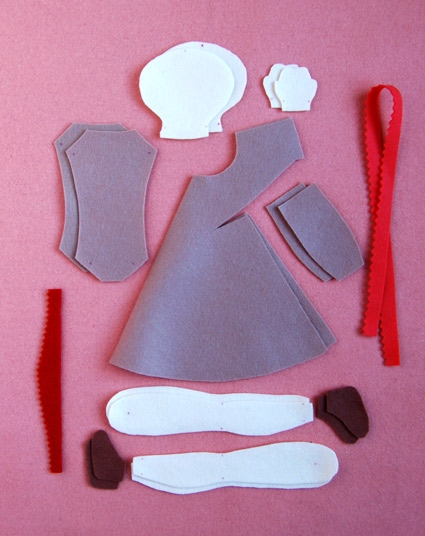
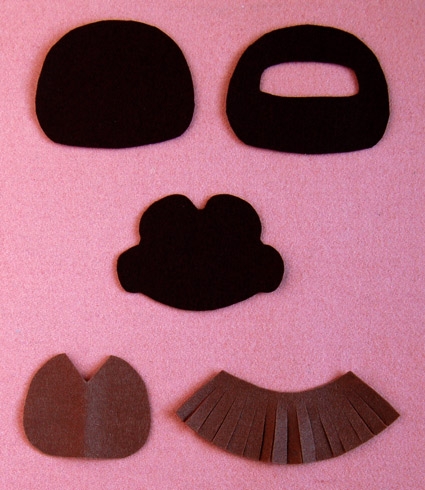
Cut around pattern pieces. Save scraps for decorating the dress and hair later on.
Note: there are no seam allowances so cut carefully!
Mark all dots on felt with a water soluble marking pen.
Assemble Doll
When you make your doll, use embroidery thread that matches your felt. You will note in our photos that we’ve used a contrasting thread so that you can see it.
Arms
 Backstitch, click here).
Fold arm, right side out, and continue up the arm with a whip stitch. Do not cut thread at the end, you will use it later. (For help with Whip Stitch, click here).
Begin stitching the hand from the top down toward the wrist, stuffing as you go to ensure a firm wrist.
Complete stitching to wrist.
Stuff arm using forceps to within 3/4-inch from the end of the arm.
Repeat for second arm.
Body

Attach head to torso by backstitching across the neck at the stitch line, do not cut thread, continue onto opposite side of torso.

Stitch around head and stuff, making sure neck is stiff.

Stitch down one side of torso starting at neck and ending at crotch on one side.
Stitch down other side of torso stopping at top of hip.
Stuff body and stitch closed.
Legs

Overlap boot over leg at dots.
Attach boot and leg by backstitching across ankle at the stitch line. Do not cut thread.
Picking up the same thread, repeat with other side of boot and leg. Stitch around both sides of boot stuffing as you go along to ensure firm ankle.
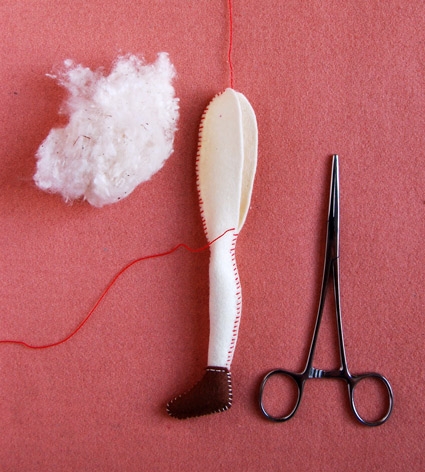
Stitch up front of leg and stop at top.
Stitch up back of leg to 1/2-inch past knee dots. Do not cut thread.
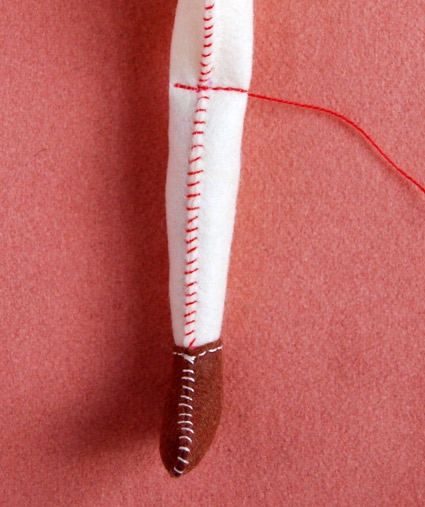

Stuff leg up to knee. Pinch leg so seams meet at center of leg. Using a new piece of thread stitch across knee and then back again using backstitch or running stitch.
Picking up thread where you left off, continue stitching up back of leg until 3/4-inches remains. Stuff leg and stitch closed.
Repeat for second leg.
Assemble body

Attach Arms
Mimi warns that attaching the arm is hard to explain, but easy to do!
To attach arms to body, fold felt 1/4-inch to the inside at top of each arm.
Pinch opening closed so arm seam is in the middle as pictured above.
Stitch across opening using whipstitch. Don’t cut thread.

Pinch top of arm into v-shape.
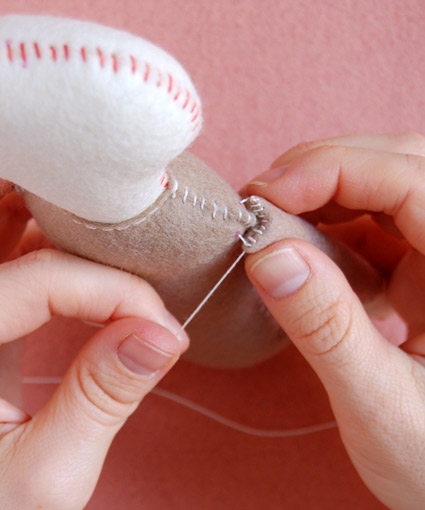
Poke needle and thread from arm through dots on both sides of torso and then back through other side of V on arm. Repeat several times until arms is securely fastened to torso.

Tie off under arm, poke needle back in and out of torso and snip end.

Repeat for other arm.
Attach Legs
Note: Mimi warns that you may think its nuts to use such a long piece of thread for this step, but we promise you will need it!
To attach legs to body, cut a 40-inch piece of silk embroidery thread (or nylon upholstery thread). Warning: Only silk embroidery thread or nylon upholstery thread are strong enough for this step!
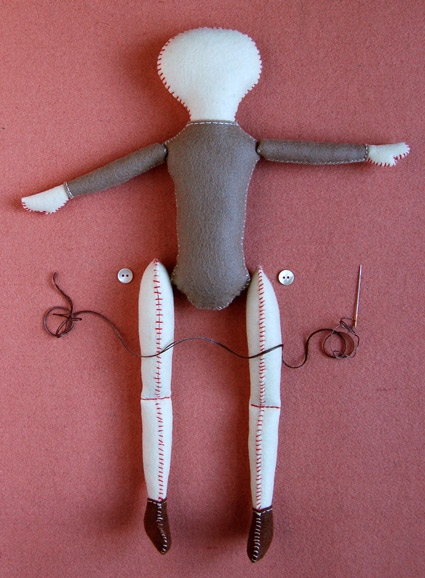
Arrange pieces on flat surface as follows from left to right…. button, left leg, torso, right leg, button. Make sure toes are pointing up!
Thread needle, double the thread and tie two ends together.
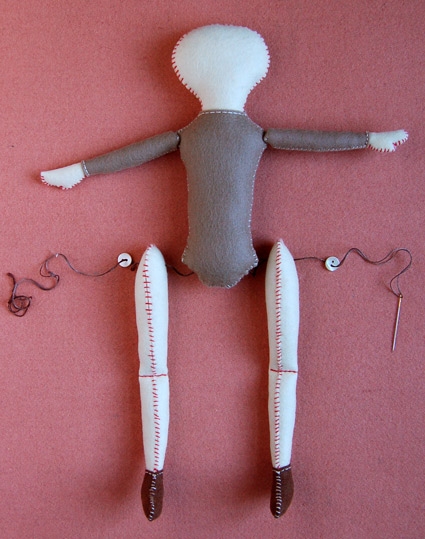
Put needle through left button, left leg at dots, torso at dots, right leg at dots, and right button.
Pull thread through enough to make it all the way back, but leave at least 6 inches of thread on side you started from as pictured below.

Go back through everything in reverse. Note: Leave approximately 1/16-inch between first thread trail and second so thread doesn’t catch on itself inside.

Pinch hips and legs, pull thread tight and tie in a square knot (for help with a Square Knot, click here). Note: If tied tight enough, doll should sit up by itself.
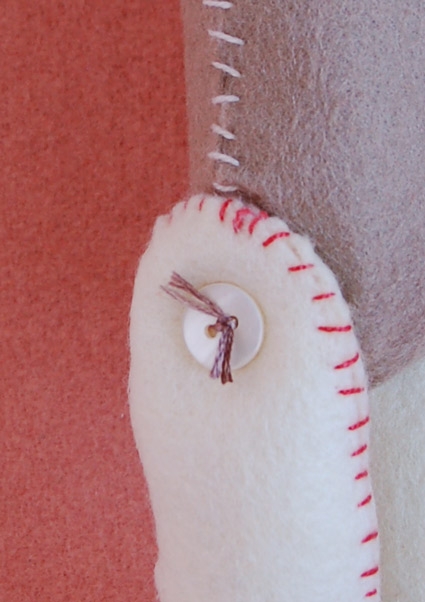
Snip thread ends.
Hair
The hair can be tricky because of varying head shapes resulting from stuffing. With a little fiddling all will be fine.
Wig #1
Cut out 2 pattern pieces. Cut out center piece on ONLY one piece.
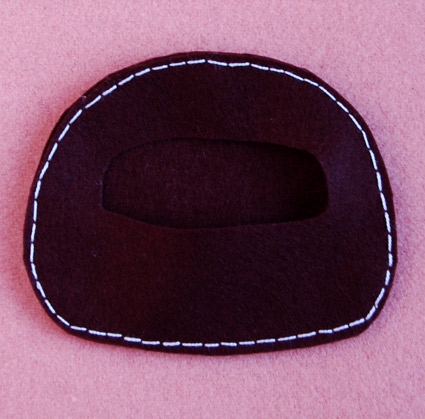
Using back stitch, sew around edge of hair with a 1/8-inch seam allowance.
Turn rightside out and iron flat.

Slip hair over head like a hat with raw edges of felt framing top and sides of face. The bottom of the cut out oval is flat against back of head.
Pin hair in place.
Stitch hair to face using whip stitch.
Wig #2
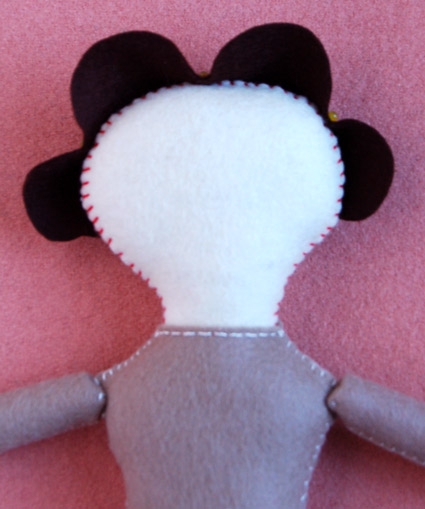
Center wig on head by just overlapping center of wig on center of seam on head.

Pin wig along side head seam and across bottom of back of hair.

Stitch along bottom.
Pin side flaps as flat as possible to face. Equally distribute any puckering or pleating. It is also okay if pieces of the wig overlap where front meets back.

Stitch side panels in place.
Pin top panels to face easing any extra fabric into a pleat at the top of the “part”.

Stitch in place.
Wig #3
Cut out both pieces.
mark center of cap piece and center of fringe piece. match up bottom of cap and top of fringe using the marks just made. Overlap cap over fringe 1/4-inch.
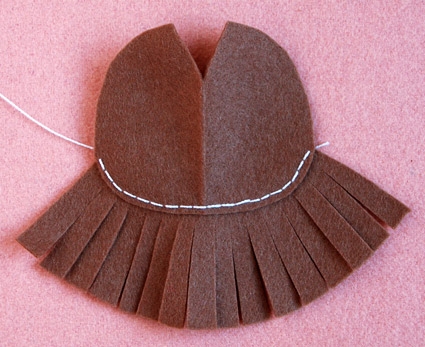
Stitch along cap edge using back stitch.
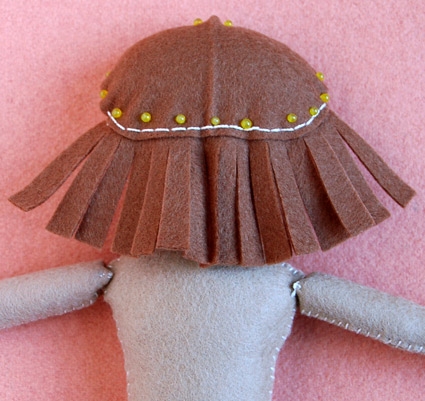
Place wig on head while holding the “part” together. Once centered, pin two sides of the “part” in place.
Smooth the part with fingers. Pin at center back first and then all along back cap edge.

Holding the front “hair line” down with your finger curved over the top of the head, pin the front of the hair in place. Any puckering will work itself out when you stitch the hair in place.
Start stitching at the back of the “part” and go around one side and stop at the fringe.
Go back and do other side the same way only this time stitch across the fringe right under where it is overlapped by the cap.
Dress
Cut out all dress pieces including optional pieces below:
- A second waist band with smooth edge to go over pinked waist band
- Ten 1-inch long leaves
- Six 3/4-inch circles (flowers)
- Six 1/4-inch circles (flower centers)
Pin hem trim, flowers and leaves in place
Attach hem trim and leaves using a running stitch.
Attach flowers by running embroidery thread through the center and back out again.
Tie the thread in a square knot and trim to approximately 1/2-inch long.
Overlap the back edge of the bodice with the waist by 1/4-inch.
Sew together using a running stitch.
Sew the back seam of the dress closed using a running stitch or back stitch. Stop stitching 1 1/4-inches down from the waist to allow room to slip the dress on.
Sew small snap at top of collar back overlapping felt just enough to fit the snap.
Face
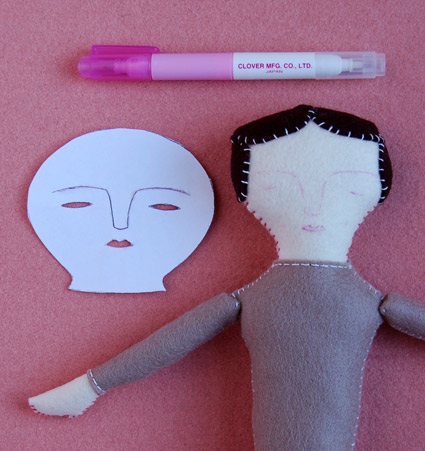
Cut out face template.
Cut out face features. (Note: for eyebrows and nose just cut a line without removing any paper.)
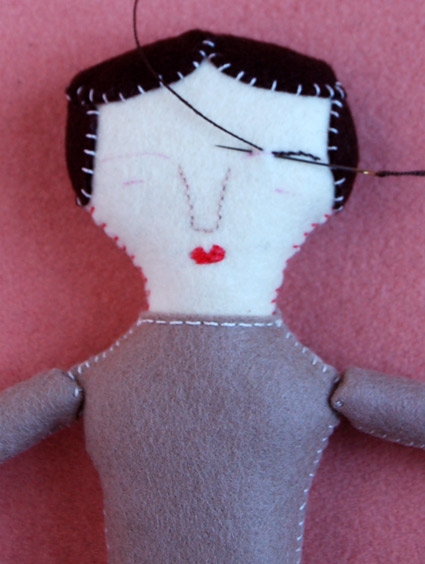
Center template on face and trace features using water soluble marker. (Note: placing pins in the eyes and mouth after tracing helps determine if everything is in the right place.
See face embroidery illustration (page 4 of the pattern) for detailed stitching directions.

When you’re all through, hug doll!




Hermoso trabajo, gracias por compartirlo.
Saludos
MUUUUUCHISIMAS GRACIASSSSS
Soooooo Awesome!! Thank you. Its so wonderful to see that people are still creating.
Am so happy! I completed a doll in just a short time and am thrilled with her. I am fascinated by your work and would love to catch a workshop sometime….
I love this pattern! But how do you secure the thread when stitching the dolls face? I only know how to secure a thread on the backside of a fabric, and since the doll is already assembled when I stitch I don’t know how to proceed. Thanks in advance!
Hi Veronika-
You can tie a small knot at the back of your stitching and then pull the thread through the stuffing and out about an inch from where you inserted it. Then snip the threads end to hide it.
I hope this makes sense. Please let me know if you have any more questions!
Molly
This is such a beautiful tutorial. Your work is very neat. Thanks so much for sharing!!
Thank you , I think I will have fun making these doll for my 2 GD.
Thank you so much for the tutorial. My 9-year-old daughter is working her way through it right now. I love watching her discovery the magic of sewing!
Bonsoir,
c’est magnifique ! le choix de couleurs est si harmonieux…c’est lumineux . Un régal pour les yeux. Merci beaucoup de l’avoir partagé.
Hello,
it’s beautiful! the choice of colors are so harmonious … and bright. A feast for the eyes. Thank you very much for sharing .
Hi there! I love this doll. I was wondering when you draw the thread through the torso when attaching the legs, do you run the stitch through the front first then the back side of torso?
Hi Nancy,
It seems that you can either go front to back or back to front. Let me know how it works out! Thanks!
-Adam
thank you.
Thank you for being so generous in sharing your techniques. Very helpful and appreciated.
Thankyou your dolls are lovely
I love the way you put together this tutorial from start to finish. Many years ago, I taught myself to sew on my grandma’s treadle machine (at age 7) and have been sewing ever since. Your approach to doll making has an appealing simplicity in design, an ease in assembly, and elegance in appeal, appreciated by this seamstress. Thanks for sharing your talent.
Hi Martha,
Thanks so much for your kind words and appreciation for our patterns! I’m so happy to hear that we inspire experienced and beginner crafters alike!
Best,
Cassandra
Great directions, but I don’t see anything about adding the waistband. Am I missing something?
Hi Diane,
Thanks for writing in, and I apologize that the instructions for the waistband weren’t included! The waistband should be stitched on after overlapping and sewing the back edges of the bodice.
Best,
Julianna
if I wanted to have a wired doll and also wanted to use this pattern how would I make the arms so that I could insert the wire into them?
Hi Candice,
Thank you for commenting! If you wanted to add a wire to the arms of this doll, all you’d have to do is insert the wire in the middle of the stuffing before you attach the arm to the body.
I hope this helps!
All the best,
Margaret
I had so much fun making a Halloween witch with this doll pattern – it turned out beautifully. The pattern is great and the expert instructions with detailed photos provided everything necessary to complete this project with ease. I sure would like to post the photo
What a clever idea to make a witch! I’d love to see your doll and wish you could post it too. I’m making my doll now and enjoying the process.