Finishing with Hemstitch
One of our favorite ways to finish hand woven fabric is with a hemstitch. It’s simple, secure and very beautiful! Here’s how to do it…
When you begin to weave your project, be sure to leave a tail of weft yarn about 3 times the width of the warp. This will really come in handy when it’s time to hemstitch the beginning edge!
Once you’ve finished weaving, cut the weft yarn to about 3 times the width of the fabric, and thread the tail onto a tapestry needle.
Before you begin, decide how you’d like to divide the warp ends, in groups of 3, 4, 5, or even 6. In this example, there are 154 warp ends, and so, the warp is divided by 4, with two groups of 5 at the end.
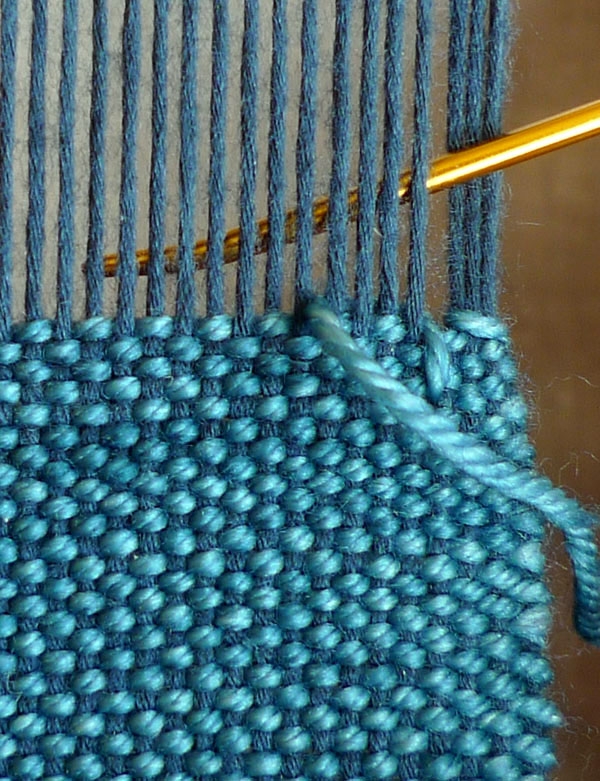
Bring the needle under the first group of warp ends. Depending on how you warped the loom, you may need to go over the first end (and under the rest of the group) in order to secure it in the bundle.
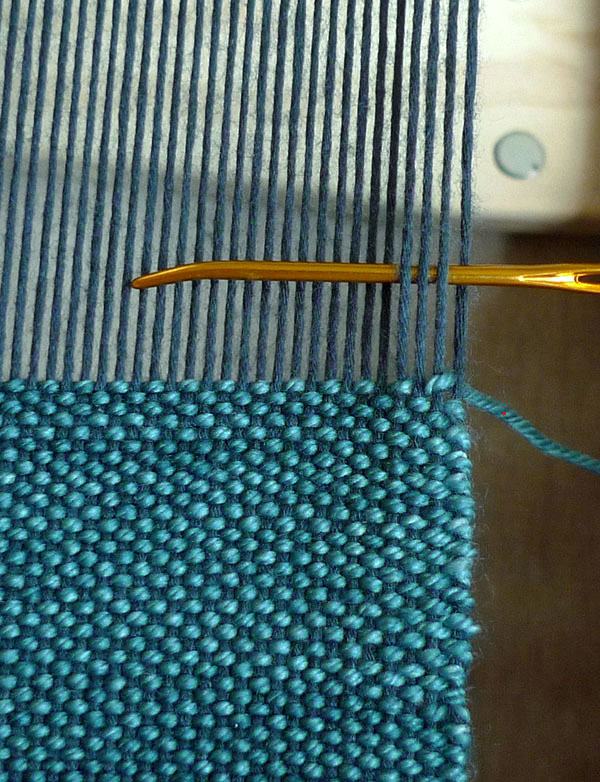
Now bring the yarn back over the bundle, to the right.

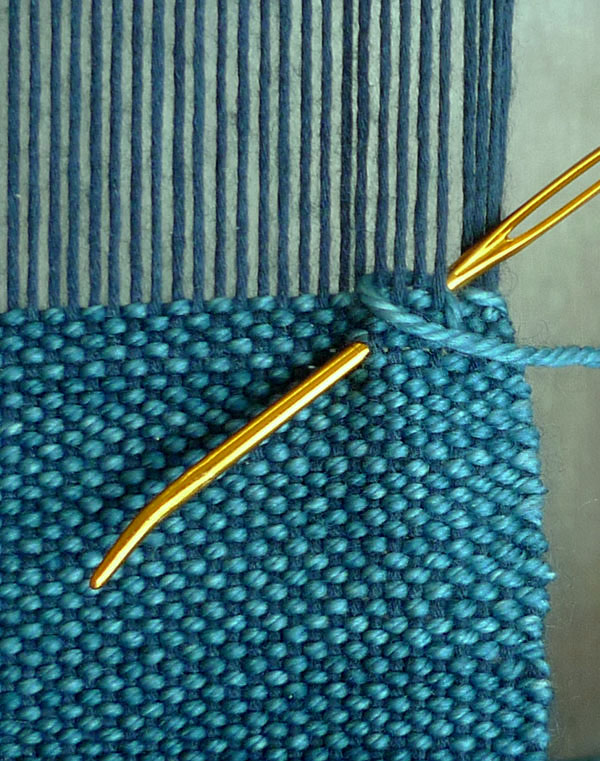
And wrapping the yarn under the entire bundle, bring the needle out the front of the fabric 4 ends to the left and 3 picks (i.e. rows) down.
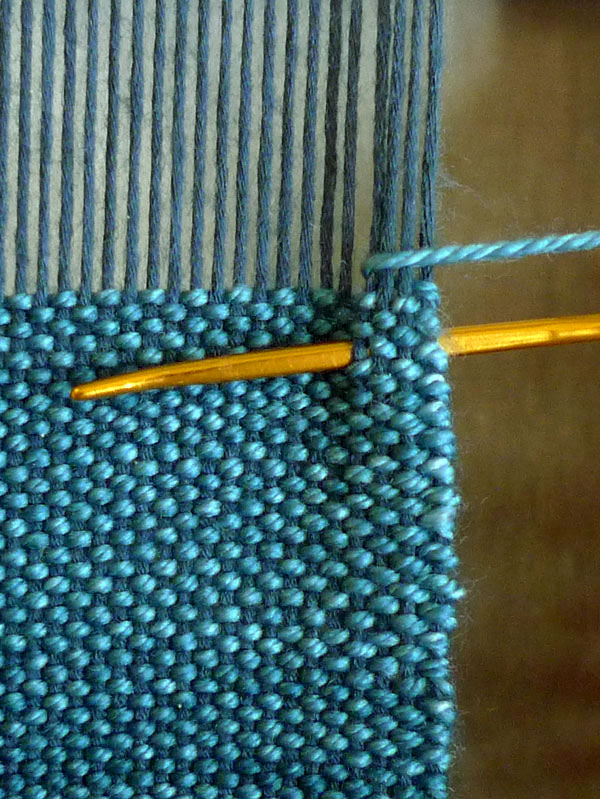
Repeat this process, bringing the needle under the next 4 warp ends…
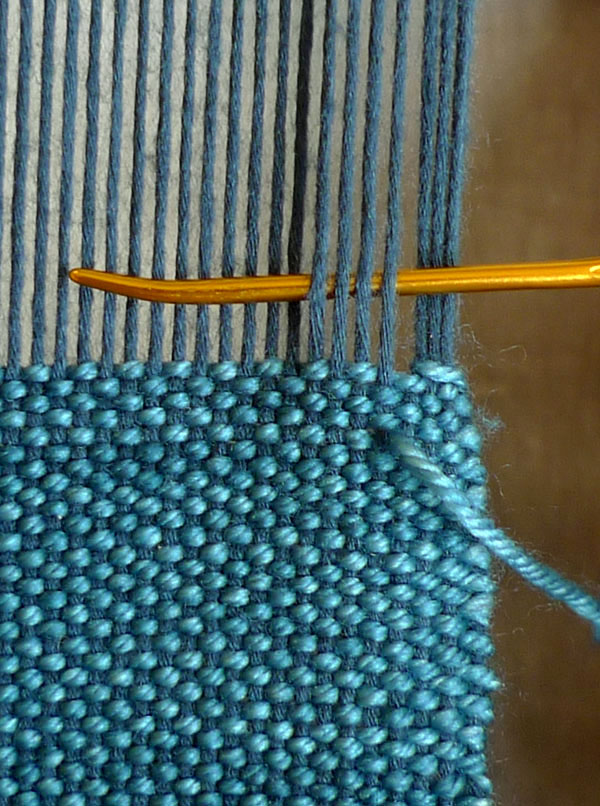
…wrapping it around the top and back under the bundle…
…and bringing the needle out the front of the fabric 4 ends and 3 picks away.
When you get to the end of the warp, instead of bringing the needle up through the fabric, bring it up through the loop of yarn created by wrapping.
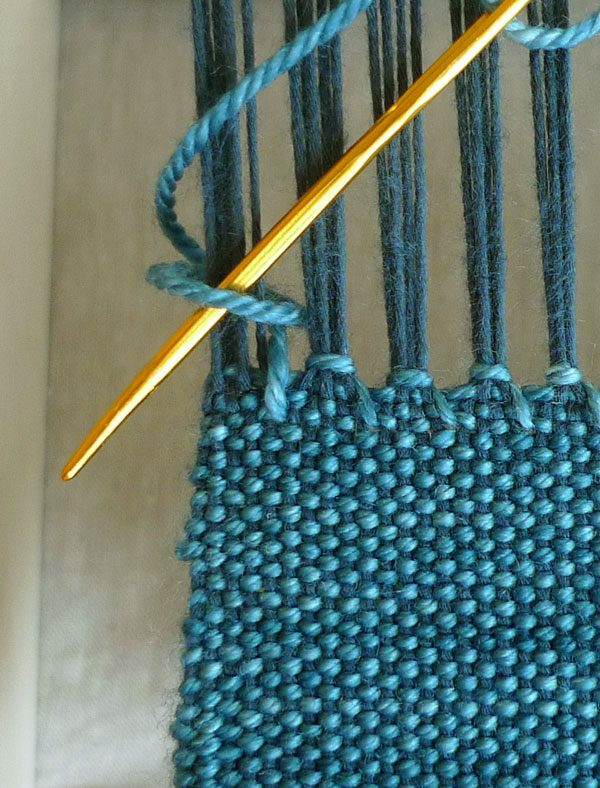
Secure the tail with one more knot.
Cut the tail and weave it into the fabric.
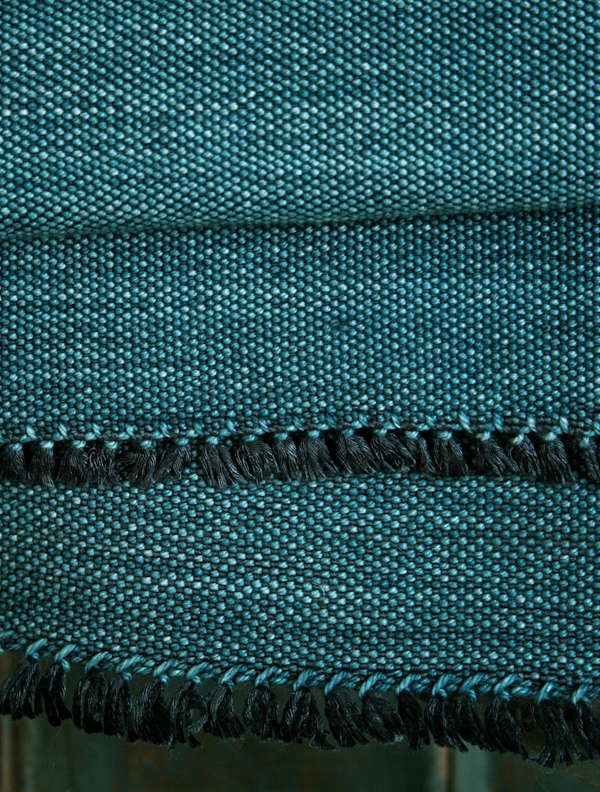
Here’s what hemstitch looks like!

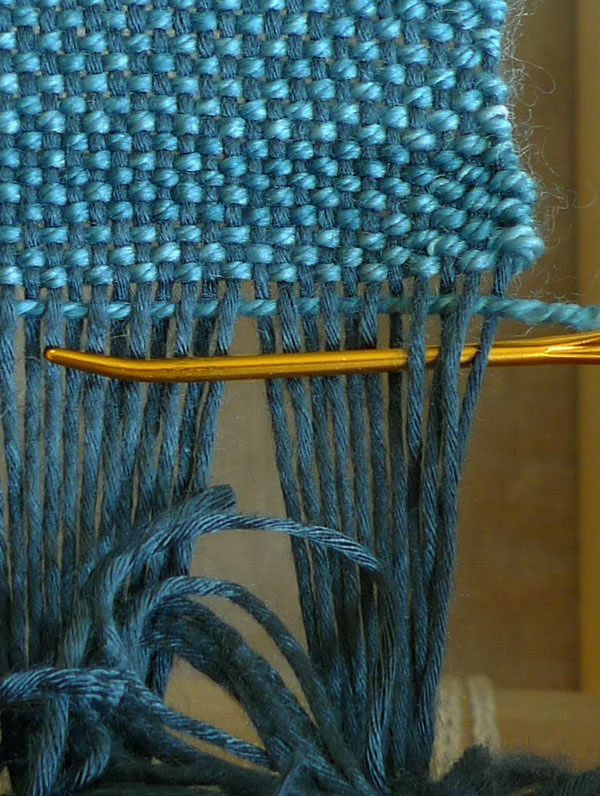
Now decide how long you’d like your fringe and cut the fabric off the loom at the point.

Unroll the finished fabric back to the beginning and repeat the hemstitch at that end. In this case, you can see that it’s not necessary to go over the first stitch to secure it. Instead, just bring the needle under the first 4 ends.
And here’s how the beginning looks all neatly hemstitched:

Cut the fabric off the loom and you’re all finished!
PS: The project shown here is our Woven Scarf. Get all the how-to’s right here!


Intresting, I like iit.
Cheers!!!
Thank you from a first time weaver, I'm off to take my first piece off my loom now. After I've stitched it, now that I've got such clear instructions.
Magnífico
Great instructions. Pics make all the difference!
Thank you, Thank you!
I’m only doing very basic weaving. I want to make items that don’t have fringes. I’m using quite thick yarn that wouldn’t work if you cut into it, so the ends have to be finished off in some way that means the warp threads are secure enough to be cut closely. The edge of a bag for instance would not have a fringe on it and might be turned under into a hem, but how when those fringed ends just get in the way? I’ve tried and tried to find out how I would deal with it, but find no solution!
Hi Sara,
Have you considered machine sewing a hem? I would cut the piece off the loom, zigzag stitch across the finished edge, then fold it over and straight stitch a hem. There are some photos of some of these steps in the course of making a French seam for our Pearl Cowl right here: https://www.purlsoho.com/create/2014/04/13/whits-knits-woven-pearl-cowl/
I hope this gives you some ideas! Please let us know if you have any other questions and thanks so much for this one!
Whitney
Thank you so much, I’ve been working my way up to this, your instructions and photos as so simple and clear!
Is it easy to learn?it seems very easy,its something that i would like to learn to do.
Hi Betty,
Yes! If you can warp a loom, you can definitely sew a hemstitch! I hope you do learn and that you let us know along the way if you have any questions!
Whitney
Lovely and clear. Thank you!
I like this hemstitch … the first one I learned has a very different look on the right side / wrong side. There is no photo of the other side here but I am guessing that doing it this way it will look similar on both sides?
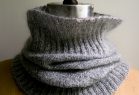
Now I just noticed that the intro picture shoes both sides of the fabric! Very nice … I’ll use this method next time for hemstitching!
Hello Eileen,
I believe the first picture on the post shows both sides of the finished edging. I’m not a weaving expert, so let me consult our staff and we will get to the bottom of this! -Alyson
I’ve read all the comments about finishing with a hemstitch or zig zag stich if I want a smooth edge with no fringe. However, I don’t have or know how to use a sewing machine. Can this be done by hand? Any other options for hand finishing without a fringe? I just got my first loom (Cricket) and I’m so excited!
Hi Lesley,
My best suggestion for you would be to sew the hemstitch as we describe, then cut your piece off the loom with a very short fringe. Then, fold the hem over twice (encasing the fringe), press, pin and hand sew the hem in place. Although I admit I’ve never done it, I’ve read about other people doing it, and it sounds like a good plan to me!
Please let us know how it works out and if you have any other questions! And thank you for this one!
-Alyson
Hi folks. Isn’t it easier, and more effective, to do the hemstitching at the beginning of the piece? That way the fabric is under tension. Here’s what to do:
–start the weaving as usual, leaving a long tail for hemstitching
–weave about 3 inches
–do the hemstitching on the end you just started
Then finish the weaving and do the hemstitching at that end. Much easier. No unrolling and trying to hemstitch fabric that’s no longer under tension on the loom.
Nancy
Hi Nancy,
Thank you for the suggestion! I’ll certainly pass it on next time we do something with hemstitch. It makes a lot of sense! Doing the hemstitch at the beginning while the warps are still taut is a great option, but there are many ways to do everything and this is the option we chose at the time. Thanks for the tip and we will keep it in mind for next time!
-Adam
I am still a relative knitting novice, but I am guessing that a reason to wait until the end of the project to hemstitch the beginning end is that as you work and roll the newly knitted fabric onto the dowel, the hemstitched fabric will be lumpy, and could stretch and distort your newly knitted fabric. If you keep it smooth and flat, your fabric will stay smooth and flat. I could be wrong, I have not tried it myself, but the idea of hemstitching at the beginning had occurred to me, too, until I thought about the lumpiness. Is this not actually a problem?
Hi Lia,
Thanks for reaching out! This is actually a finishing technique for weaving and not knitting (knitting does not involve finishing techniques like this since you bind off stitches, rather than sewing them like you need to do with weaving.) And that is why we recommend waiting till you have finished weaving before working the Hemstitch! You could work the hemstitch at the beginning but you would have to wait until you are finished to cut the warp yarn off the loom, if you were to cut it right away you would not be able to continue weaving!
However, wether you work the hemstitch at the beginning or end has nothing to do with lumpiness since the fabric coming off the loom will be very flat and taut.
I hope this clears things up!
Warmly,
Gianna
I just ordered a Cricket 15-inch loom. So glad to find some information on how to do things with it. Thank you!
Thank you so much, simple and beautiful!
Hi! I am very curious about the fringe. Is there a way to end without fringe? I prefer dish towels without fringe.
Thanks!
Hi Melissa,
Great question! There are methods out there for ending without fringe but sadly we do not have a tutorial for this. I would suggest checking YouTube for a tutorial for this method and we will certainly keep this kind request in mind for the future!
Best,
Cassy
Hi!
I was wondering what yarn type you used in these pictures? I’m a first-time weaver too, so I’m trying to figure out what yarn to use when weaving.
Best regards, Johanne
Hi Johanne,
Thanks for writing in! These images are from our Woven Scarf pattern, which uses Habu Dyed Bamboo for the warp and Anzula Squishy for the weft. For some more yarn ideas, you might want to check out our other weaving patterns, which can be found here!
Best,
Julianna
This is the best visual I’ve seen. I will use it many times I’m sure!
Thank you, thank you for the very easy and concise instructions! I am dyslexic and this is the first tutorial that I have been able to follow. I’ve been weaving for almost a year, and this is my first completed hemstitch, and it looks lovely.
I’m a happy weaver😊,
Carol
Hi Carol,
We’re so glad to hear that the tutorial has been helpful! Thanks for your lovely feedback, and happy weaving!
Warmly,
Kelsey
I’m on my first weaving. I was able to do the hemstitch but it’s Alittle loose. Any suggestions? Thanks. I’m worried since it’s not super tight it will “fall apart” At
Some point. Thanks
Hi Susan,
Thanks for writing in, and that’s a great question! I would recommend starting at the end where you began the hemstitch and gently tugging the yarn to tighten up each stitch. You’ll end up being able to redistribute the yarn so that each stitch is a bit tighter and so that the excess yarn is removed!
All the best,
Lili
Oh my goodness why can’t everyone make instructions as wonderful, perfect, clear, understandable as you do? Who said a picture is worth a thousand words? Thank you, thank you . I have read and watched videos but when I went to do the stitch it wasn’t right. This worked so beautifully. This new weaver thanks you
Best explanation of the hem stitch that I’ve seen! Thank you ❣️
Best pictures and explanation ever.