Elizabeth Zimmermann’s Better Bind Off
Knitting guru,. Elizabeth Zimmermann often pointed out that the common method of binding off is big-time unsatisfying. If it’s tight enough to look neat, the edge is taut and inflexible. If it’s loose enough to be elastic, the edge is lumpy and messy (see below… untidy!). Our Better Bind Off Tutorial shows you an alternative way!

Zimmermann developed the method she calls “Casting On/ Casting Off,” so named because it ends up looking just like a long tail cast on. I think it’s kind of a confusing name, so I’m calling it the Better Bind Off. You can use the Better Bind Off on any edge, but I’m showing it on a ribbed edge because I especially like this technique for neck and button bands.
A Better Bind Off Tutorial

An important note is that this bind off is worked from left to right, the opposite of knitting. So, for flat knitting, do not turn the work over to begin. And for circular knitting, work back the way you just knit.
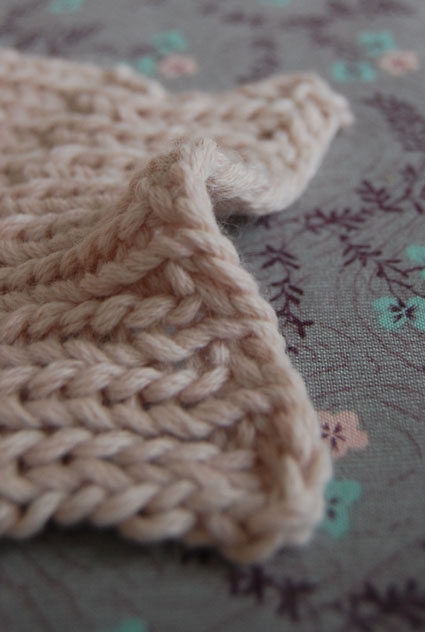
First cut a long tail, 3 or 4 times the length of the edge you’re binding off, and thread it through a tapestry needle.
Allow the first 2 stitches off the knitting needle. Sew the tail through the 2 stitches (as if you’re purling), right hand stitch first.

Gently pull the yarn through the two stitches.
Let the next stitch off the knitting needle, and sew the tail through it and the stitch just to the left of it (except for the first stitch, every stitch gets sewn twice).

And pull the yarn through. Repeat this to the end of the row or round, being sure to keep the tail up and out of the way.

You may need a little practice to get the tension right, but in the end you might have a new favorite bind off! –Whitney
Looking for more inspiration? Explore all of our free knitting patterns and knitting tutorials, buy one of our many knitting kits and yarn bundles, and shop for beautiful yarn. We have over 35 gorgeous natural fiber yarns in 100’s of magnificent colors, designed to bring integrity, beauty, and joy to your next knitting project and only available at Purl Soho!


I'm a little confused with this bind off, to be honest. I searched it up on Youtube and the way they do it is different. They keep the project in the left hand (as if they're going to knit), then they take the tail through 2 stitches and then through the front of the first stitch.
The needle pointing to the left is definitely throwing me off, not the same as the YouTube tutorials at all, which I just called a sewn bind off.
I agree somewhat confusing.
The reason for this confusion likely comes from the fact that EZ had two different “sewn” type bind offs, and you’re finding video tutorials for the other. This one she called the “casting on cast off” and it’s worked left to right, as indicated. The “EZ sewn bind off” on the other hand is worked just a bit differently and is done just as Ada described. So this tutorial is clear and accurate, it’s just a different method from many of the videos you’ll find so don’t try to mix them!
I agree with the comment above. This tutorial isn't clear at all. Is there a video somewhere demonstrating the correct way EZ did this?
I am confused too… I maybe would need to see a video or maybe contrasting color yarn to demonstrate the bind off.
Thank you for explaining this. I will have to try it on my next project!
I felt that this tutorial was easy to follow and this is my first time using it. It is stretchy and easy to use.
Thank you! Well illustrated and easy to follow.
I am a little confused. I tried the above instructions with poor results. I hurried to the library the next day to check out Zimmerman’s book, “Knitting without Tears.” The instructions in the book are different.
Hi Jamie,
Elizabeth Zimmermann has lots of bind off techniques! Every book I own of hers describes a slight variation on the sewn bind-off; in fact, no two are alike! I find this one from A Knitting Glossary the most straightforward and useful, but if you find the Knitting Without Tears version easier to execute, then definitely go with that one. Each variation has its pros and cons!
Thanks so much for asking and good luck with whatever bind off you use!
Whitney
I’ve always dreaded binding off because it’s so easy to ruin an entire project that way (flashback to the hats that’ll never fit correctly). I look forward to trying this!
This is a great bind-off, here’s the way it worked best for me (because I kept losing track of my stitches once they were worked once and off the needle):
After the first two, work the third one but leave it on the needle. Work the fourth stitch and the third again, then drop the third off the needle.
Stretch out the bound off stitches every so often to keep things from getting too tight.
This is exactly how I did it to keep track of stitches. I will say that my long tail that I cut was 4x the length plus a little extra and I only had about 6″ left when I finished. Be generous with the long tail. Results in a nice stretchy bind off.
Thank you for this explanation, I could see it perfectly the way you described it.
Exactly how I do mine but from right to left! Love the look 🥰
I think she has it turned this way bc as most ppl are right handed, it seems more intuitive for your right hand to be picking off the stitches with your needle facing this direction. Was EZ left handed?
Hi Amy,
Elizabeth Zimmermann shares techniques for binding off that go left to right AND others that go right to left. Knitting, after all, is handed-ness blind! It’s interesting question, though… I’m afraid I don’t know the answer, but I’m sure some of our readers do… hint, hint!
Whitney
I can’t wait to use this bind off! I do agree, the traditional bind off can be tricky when it comes to tension. Thanks for the tutorial!
Thank you for sharing this technique. I found the instructions and illustrations extremely easy to follow step by step. I’m sure I’ll use this method of casting off many times in the future.
I love it, thanks!
I’m a beginner and finished my second project (a scarf made with two strands of super bulky yarn). This stitch was easy and made the finished edge just as smooth and neat as the casting on edge. It looks and feels so nice.
Thanks!
I like this. I’m a new knitter and bind offs confuse me in general. I never think I’m getting the right result. My question is what do you do when you get to the very end? Stitch through the last 2 stitches and cut off the remaining tail? Weave it in to the other stitches you just made? Thanks for your help!
Hi Annette,
Thank you for the comment. You are correct when you get to the end go through the last 2 stitches and then weave in the ends. This should be a secure way to finish up your knitting.
Hope this helps!
Goodluck!
Jake
Worked perfect and it looks great, this would have to be the best bind off ever!! Great tutorial very easy to understand, Thank You so much
I had to read the tutorial a few times before it made sense, but I think I got this! I’ll be trying it on a scarf I’m about to finish. Thank you for showing this great bind off.
Worked great for me, thanks for the tip!
Beautiful and simple BO! You have totally changed my knitting for the better. Thank you, Purl family! As always, your site is my go-to for all things crafty.
How do I cast off to make buttonhole ??
Hello Joan,
Thank you for writing in. This cast off is for binding off only — not buttonholes. We do not have a buttonhole tutorial on our site, but I have pasted a link to a YouTube tutorial for a buttonhole below. Happy knitting!
https://www.youtube.com/watch?v=EY4vBzLo-Xs
Best,
Adam
what is the best cast off for a long tail cast on? The border rows are k1, p1 or seed stitch.
Hi Connie,
Thanks for writing in! The best cast off for the long tail cast on is the pass over bind off. You knit one, knit one more and then pass the first stitch over the second. You continue on with knitting one and passing the second stitch on the right hand needle over the most recently knit stitch until the work is all bound off. I suggest doing this with a larger needle (usually one to two sizes up) because it can get quite tight. Also, if you have a k1 p1 pattern, you will “bind off in pattern”, meaning that in seed stitch you will purl the knits and knit the purls (in a rib you knit the knits and purl the purls in pattern). I hope this works out for you!
Best,
Adam
Too confusing need video
Hi Judith,
Thank you for your suggestion! At the moment, we do not have the resources to create a video for this technique but we will certainly keep your suggestion in mind for the future!
Best,
Cassy
This is exactly what I’m looking for but found this to be very confusing. Any chance you could do a video to better describe the process?
THX
Hi Jacque,
Thanks for writing us. Unfortunately we don’t have the resources to do a video on this right now, but maybe for the future! Thanks!
-Adam
I ended my project on a purl row. Do I use the same bind off method as for the knit row which is shown above? Thanks.
Hi Jeanne,
Thanks for the question. If you are knitting stockinette flat, ending on a purl row means that you are now working the knit side of the fabric. This means that you’ll bind of in knit, not purl. If the purl side was facing you, then you’d bind off in purl. Best of luck!
-Adam
Thank you so much for showing and explaining this technique. I’ve been looking for a twisted looking bind off. It matches perfectly my cast on. Can not thank you enough, thankyouthankyouthankyou!!
This is a wonderful video tutorial of this technique. https://youtu.be/DM40GtSq6aU
Thanks for the video – it was wonderfully clear!
Oh! I know another method very similar to this one but not identical, specially for edges, I´m using my method on my new open cardigan knitting pattern.
thank you
Lilia
Someone posted a link to a tutorial of ‘this method’. It doesnt appear to me to be the same, regardless of doing it left handed or right handed. In video, 1st stitch on needle, then 2nd stitch on needle are worked as if to purl, then tail is pulled thru, then turn the darning needle and enter 1st stitch again from opposite side, pull yarn thru then remove that stitch from knitting needle. However, in description above, it seems similiar except for position of needle needle has not been turned. Therefore when they first go to work a stitch as if to purl…it is actually 2nd stitch on the needle is entered, Then 1st stitch ‘as if to purl’. Which makes no sense as if you turn the darning needle around to reenter the appropriate stitch…you are in the 2nd stitch on needle . This is when you would be removing the stitch except 1st stitch on needle is in the way. Not the same the way im understanding it from what i read. I found the video clear. I guess now ill need to check out ms zimmermans books to see the actual “casting on casting off”. I may be missing something.
Hi Diana,
Thanks for writing in! The method that you describe sounds a bit different than the method that we are describing here! For this method, every stitch will be worked twice save for the first stitch. We are working this bind off over a 1×1 rib which may account for some of the difference that you see here. I find that I found this tutorial much easier to follow by making myself a small gauge swatch and saying the directions out loud as I did them. I then got a very neat and clean bind off! The amazing thing about knitting is that there are so many different ways of doing things and sometimes this is a small difference that may work better for you!
I hope that this helps!
Cassy
I used this bind-off on the neckline of an Icelandic sweater (knit from the bottom up) and it worked beautifully. Thank you!
Incredibly tedious, rough on my cotton yarn and exactly what I was looking for! Perfect, thank you!
You need to provide a video of this method. Your title doesn’t match any video Elizebeth Zimmerman shows, nor does it match any of the dozen’s of her videos showing your method.
Hi George,
Thanks for writing in! I will certainly pass your request for a video along to the design team!
Best,
Julianna
This was the bind off method I need. Thank you so much for the post. When I first read it, it sounded confusing; but, I did a test swatch and then followed the directions step-by-step and it all came together beautifully. I often find that to be the case when I am trying something new with knitting.
Will this work for a p1, k3 rib?
Hi Tricia,
Thanks for reaching out! Yes! You can use this on a P1 K3 Rib, it works on any edge!
Happy knitting!
Gianna
So if you are as confused as I was look up cast on cast off Zimmerman. There is a great video.
This BO is not for the beginning knitter. These are things I learned:
1/I left way too much extra yarn for working bindoff..other comments scared me…if working something like a large cowl, too much yarn is very cumbersome.
2/flip working yarn towards back after each stitch to orient as in the pictures…that will create the “looped” edge you want
3/leaving stitches on needle while working will not give you this neat edge.
4/stabilize the 2 sts. you are pulling yarn thru with thumb and middle finger of rt. hand while using index finger to help guide excess yarn thru sts smoothly…lots of yarn flying around until at least 1/2 way thru sts to be worked.
5/think of edging as looped sts over edge. that is how the yarn should sit.
You need to take time and concentration to do this correctly and neatly – then it is great.
Yes, probably will not work for my mobius scarf! Much too long of a tail, unless I work it in sections, which I think would make too many ends to weave (or sew) in for the yarn I am using.
Thanks for sharing a tutorial about this much less-known EZ sewn bind-off. I have her books and this one is described in not much detail. My expert knitting friend first showed it to me and one of its main uses is to create a bound-off edge that looks the same as the longtail cast-on edge, great for scarves, blankets or anything where you want the edges to be similar. Most tutorials on line show the “other” more common EZ bind-off.
I’m confused! The instructions clearly say to work from left to right, yet the illustrations are the opposite–the way we’d normally do a bind off. What am I missing?
Hello,
Thanks for reaching out! Hmm, I’m seeing that the photos do show the bind-off being worked from left to right, as the instructions indicate. The loose stitches that the darning needle is going through are the left-most in each photo, showing that you begin with those stitches and work your way to the right. Hope this helps clarify things!
All the best,
Lili
I LOVE THIS BIND OFF! When in doubt, go to an Elizabeth Zimmerman method! What I like the most is that I can control the tension easily as I go. Also, if for some reason I have to put my work down before I am finished, I can tell exactly where I was, and how to start up again. Thank you Purl Soho, for always having the answers!