Your basket is empty.
Continue Shopping
Stitchwork Blanket
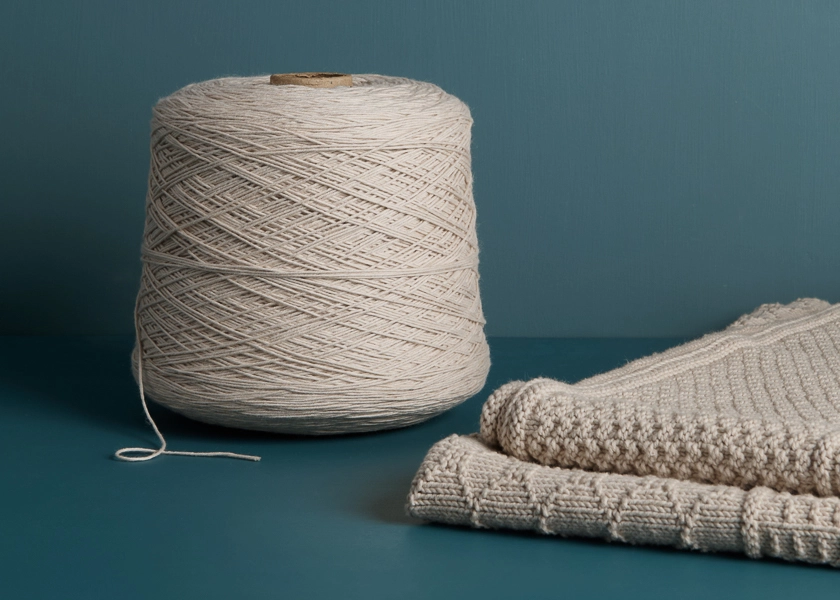
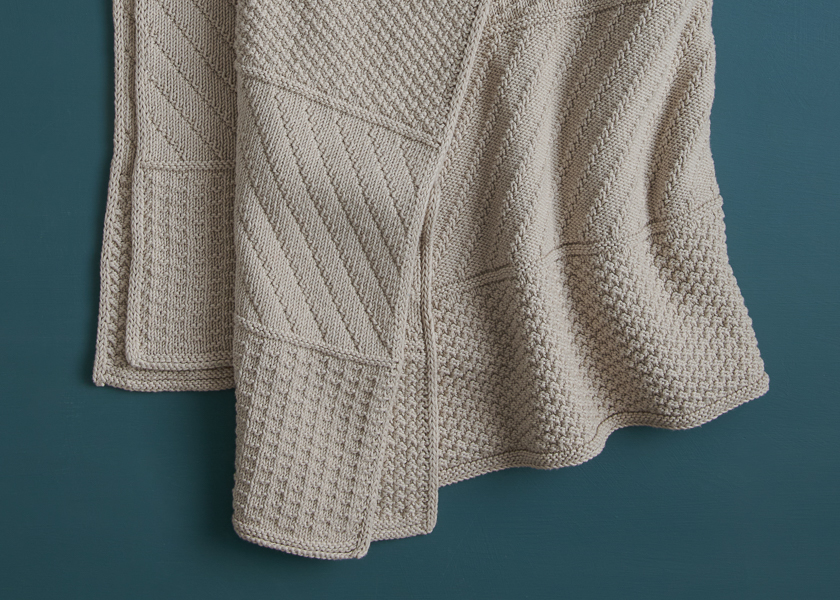
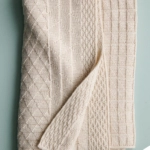
Our beginner-friendly Stitchwork Blanket pattern gives you all the satisfaction of intricate-looking stitches… But without the intricacy! Knit through 6 engaging patterns created entirely from simple knits and purls, all in our classic Cotton Pure On A Cone, a whopping 1,000 grams of absolutely beautiful, organically grown cotton yarn.
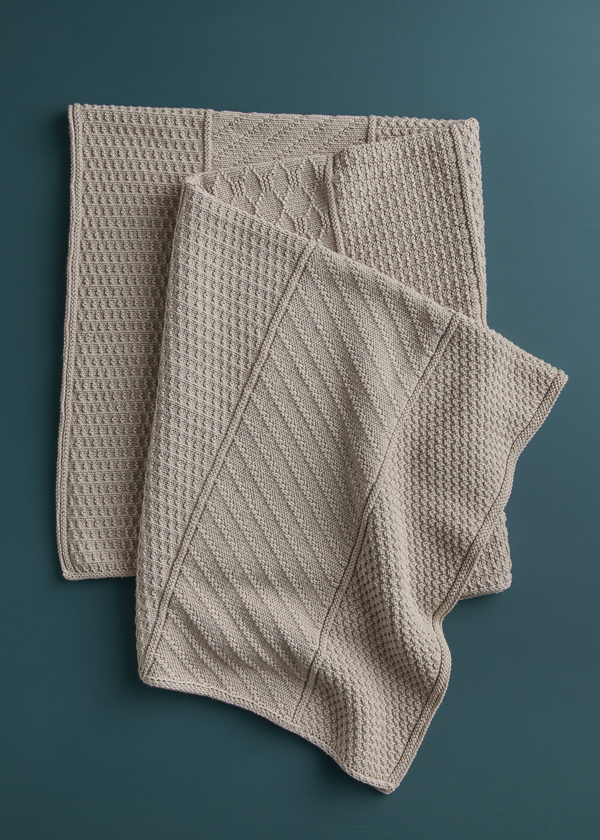
Beginners and seasoned knitters alike will enjoy the novelty of knits and purls combining in ever new ways, savoring each section while looking forward to the next. Throughout, you can choose whether to work from charts or written instructions… Whichever works for you!
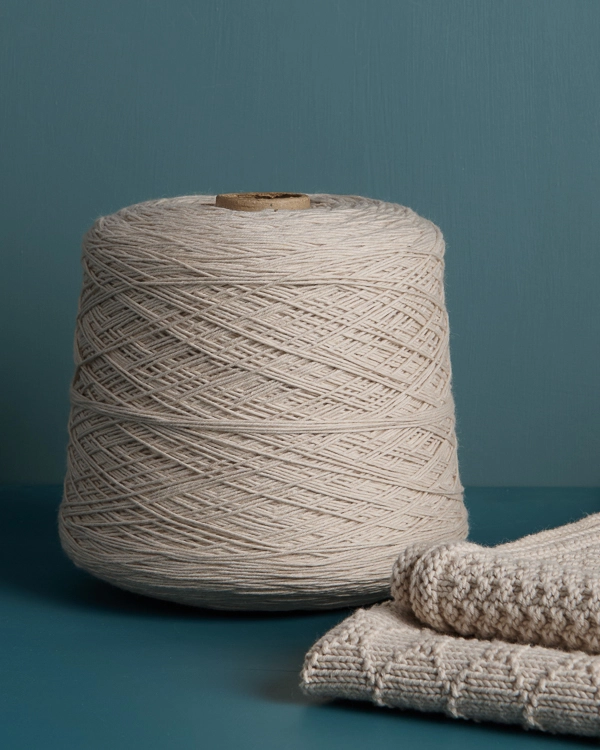
Cotton Pure On A Cone is the perfect yarn to express these rich textures, and just one 1,000-gram cone makes the Throw size… No skeins to wind and only two ends to weave in! This sport-weight cotton yarn has a supple, multi-strand structure that makes it a pleasure on the needles and gives the Stitchwork Blanket its smooth feel and clear stitch definition. It’s machine washable, too, so the finished blanket is as practical as it is lovely.
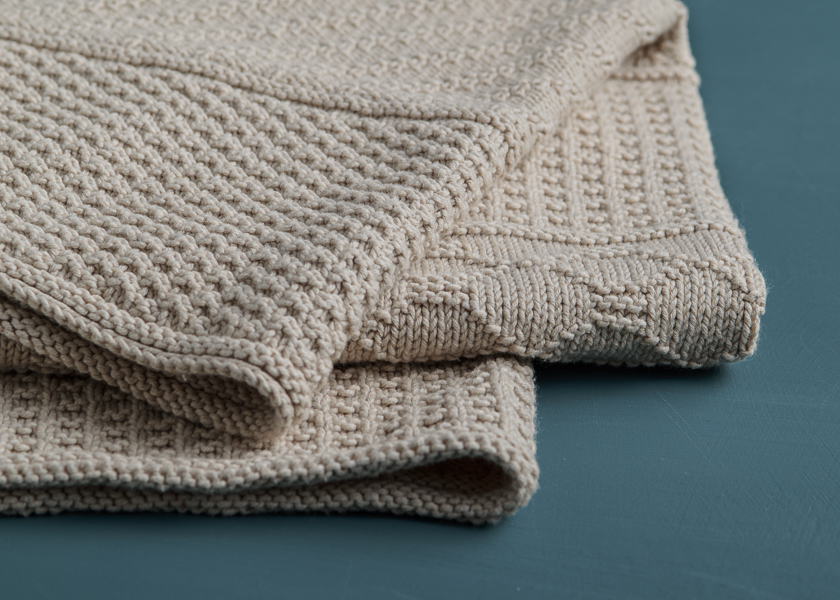
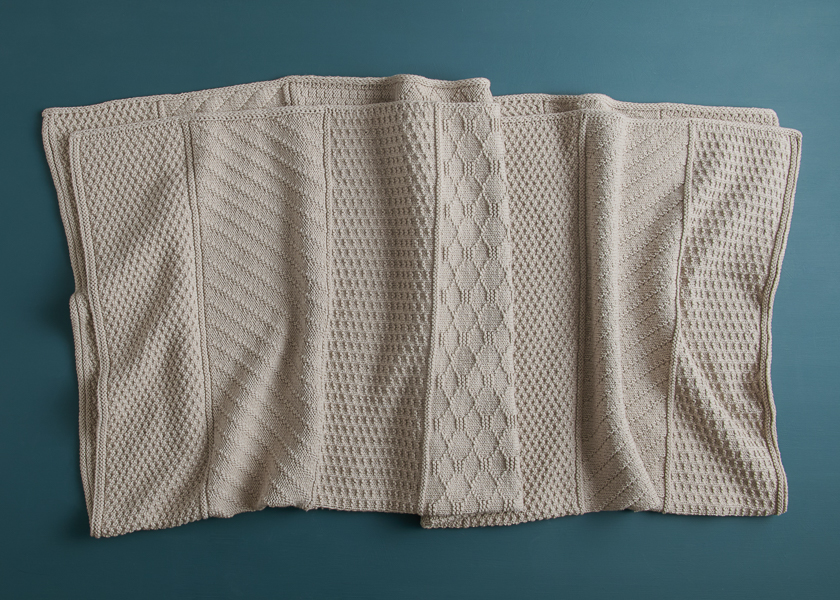
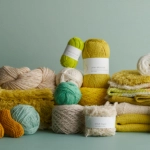
Choose from 30 stunning colors drawn from a full-bloom landscape, each with a soft matte finish—a product of the beautiful unmercerized cotton we use to make this yarn. Pick the color you want to spend some quality time with… We chose warm Alabaster Cream.
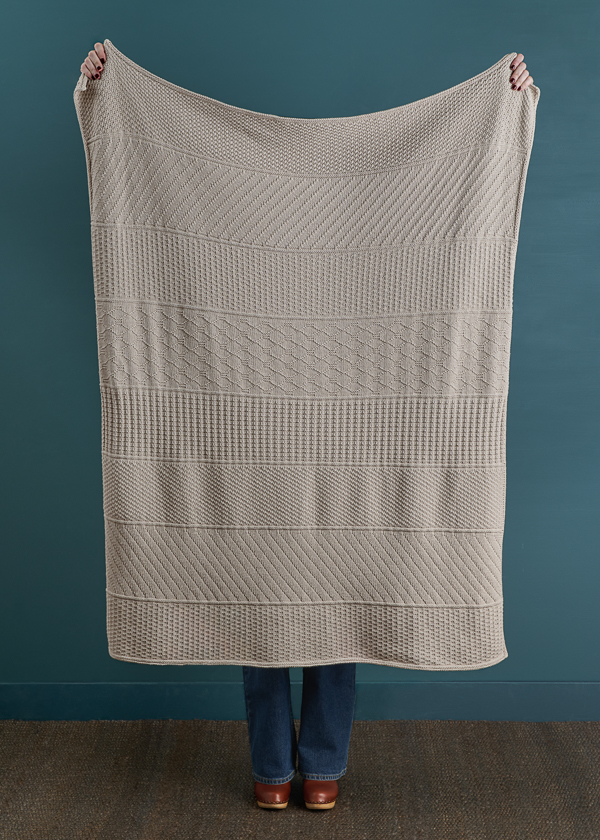
Cast on for the Stitchwork Blanket pattern and delight in the rhythm of each new section as you work your way through your absolutely gorgeous Cotton Pure On A Cone. By the end, you’ll have a blanket full of sumptuous stitchwork and a whole new appreciation for just how much knits and purls can do!
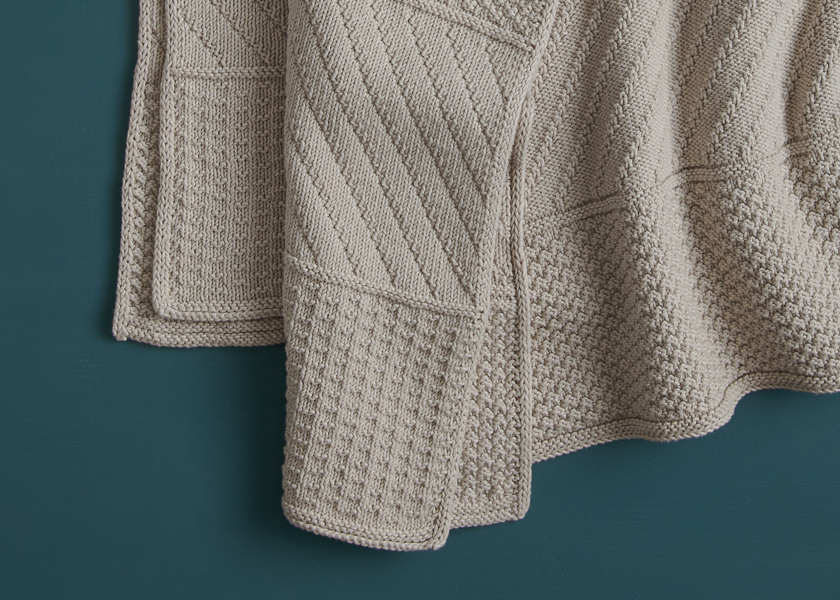
Pattern designed and written by Purl Soho designer, Hiromi Glover. See even more of Hiromi’s work on her Instagram!
Story written by Andrea Lotz for Purl Soho.
Want to print this pattern? On desktop, find the “print” icon in the right margin, and on mobile, scroll to the end of the pattern for it. Use the on-screen instructions to remove anything you don’t want to print!
Materials
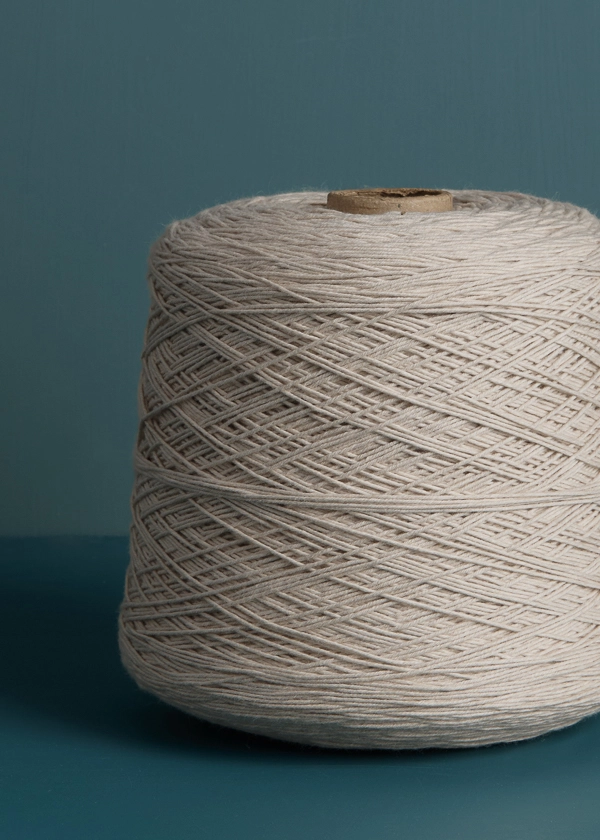
- 1 of Purl Soho’s Cotton Pure On A Cone, 100% organically grown cotton yarn. Each cone of this sport-weight yarn is approximately 2,789 yards/ 1,000 grams; approximately 1,585 (2,575) yards required. We used the color Alabaster Cream.
- US 4 (3.5 mm), 32- or 40-inch circular knitting needles
- Stitch markers
NOTE: If you prefer skeins, you’ll need 6 (10) skeins of Purl Soho’s Cotton Pure.
GAUGE
25 stitches and 40 rows = 4 inches in Double Alternating Andalusian Stitch (see Notes), blocked or machine laundered
NOTE: All the patterns used in this blanket have slightly different gauges, but if you can achieve the gauge listed above, your blanket will turn out the correct size!
SIZES
Crib (Throw)
Finished Dimensions: 30 inches wide x 40¼ inches long (39½ inches wide x 49¾ inches long)
SAMPLE: We knit the Throw size.
NOTES
STITCH MULTIPLE
This pattern works over a multiple of 12 + 8 stitches (a multiple of 12 + 2 stitches for the stitch patterns, plus an additional 6 stitches for the selvages).
SLIP STITCHES
Slip all stitches purlwise with yarn in front.
DOUBLE ALTERNATING ANDALUSIAN STITCH (FOR GAUGE SWATCH)
Cast on a multiple of 6 plus 4 stitches.
Set-Up Row (wrong side): K1, purl to last stitch, k1.
Row 1 (right side): Knit to end of row.
Row 2 (wrong side): K3, *p4, k2, repeat from * to last 7 stitches, p4, k3.
Row 3: Repeat Row 1.
Row 4: K1, p3, *k2, p4, repeat from * to last 6 stitches, k2, p3, k1.
Repeat Rows 1–4 for pattern.
PATTERN
Cast on 188 (248) stitches. We used a basic Long Tail Cast On.
Set-Up Row (wrong side): Slip 1, (see Notes), k1, slip 1, purl to last 3 stitches, slip 1, k1, slip 1.
Continue to work either from Written Instructions or Chart, both below.
STITCHWORK PATTERN: WRITTEN INSTRUCTIONS
NOTE: Because you’ll be referencing some sections multiple times throughout the pattern instructions, we highly recommend printing this pattern out so you don’t have to scroll back and forth. You’ll find some helpful tips for printing above the Materials section!
BORDER ROWS
Row 1 (right side): K1, slip 1, knit to last 2 stitches, slip 1, k1.
Row 2 (wrong side): Slip 1, k1, slip 1, purl to last 3 stitches, slip 1, k1, slip 1.
Row 3: K1, slip 1, k1, purl to last 3 stitches, k1, slip 1, k1.
Row 4: Slip 1, k1, slip 1, knit to last 3 stitches, slip 1, k1, slip 1.
Rows 5 and 6: Repeat Rows 1 and 2 one more time.
SECTION A: DOUBLE ALTERNATING ANDALUSIAN
Rows 1 (right side): K1, slip 1, knit to last 2 stitches, slip 1, k1.
Row 2 (wrong side): Slip 1, k1, slip 1, k2, *p4, k2, repeat from * to last 3 stitches, slip 1, k1, slip 1.
Row 3: Repeat Row 1.
Row 4: Slip 1, k1, slip 1, *p3, k2, p1, repeat from * to last 5 stitches, p2, slip 1, k1, slip 1.
Repeat Rows 1–4 nine (12) more times.
Repeat Rows 1–2 one time.
Work Border Rows section one time.
SECTION B: DIAGONAL
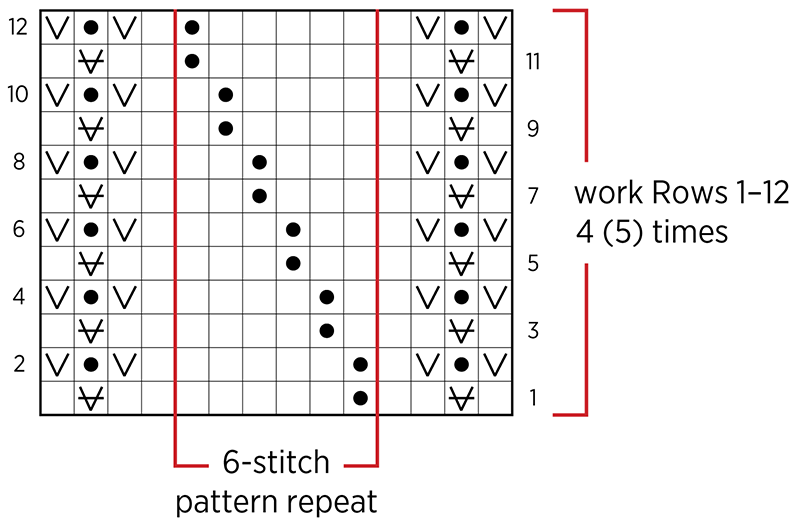
Row 1 (right side): K1, slip 1, k2, place marker (pm), *p1, k5, repeat from * to last 4 stitches, pm, k2, slip 1, k1.
Row 2 (wrong side): Slip 1, k1, slip 1, p1, slip marker (sm), *p5, k1, repeat from * to marker, sm, p1, slip 1, k1, slip 1.
Row 3: K1, slip 1, k2, sm, k1, p1, *k5, p1, repeat from * to 4 stitches before marker, k4, sm, k2, slip 1, k1.
Row 4: Slip 1, k1, slip 1, p1, sm, p4, k1, *p5, k1, repeat from * to 1 stitch before marker, p1, sm, p1, slip 1, k1, slip 1.
Row 5: K1, slip 1, k2, sm, k2, p1, *k5, p1, repeat from * to 3 stitches before marker, k3, sm, k2, slip 1, k1.
Row 6: Slip 1, k1, slip 1, p1, sm, p3, k1, *p5, k1, repeat from * to 2 stitches before marker, p2, sm, p1, slip 1, k1, slip 1.
Row 7: K1, slip 1, k2, sm, k3, p1, *k5, p1, repeat from * to 2 stitches before marker, k2, sm, k2, slip 1, k1.
Row 8: Slip 1, k1, slip 1, p1, sm, p2, k1, *p5, k1, repeat from * to 3 stitches before marker, p3, sm, p1, slip 1, k1, slip 1.
Row 9: K1, slip 1, k2, sm, k4, p1, *k5, p1, repeat from * to 1 stitch before marker, k1, sm, k2, slip 1, k1.
Row 10: Slip 1, k1, slip 1, p1, sm, p1, k1, *p5, k1, repeat from * to 4 stitches before marker, p4, sm, p1, slip 1, k1, slip 1.
Row 11: K1, slip 1, k2, sm, *k5, p1, repeat from * to marker, sm, k2, slip 1, k1.
Row 12: Slip 1, k1, slip 1, p1, sm, *k1, p5, repeat from * to marker, sm, p1, slip 1, k1, slip 1.
Repeat Rows 1–12 three (4) more times, slipping Row 1 markers instead of placing them.
Work Border Rows section one time.
SECTION C: TWO-STITCH CHECK
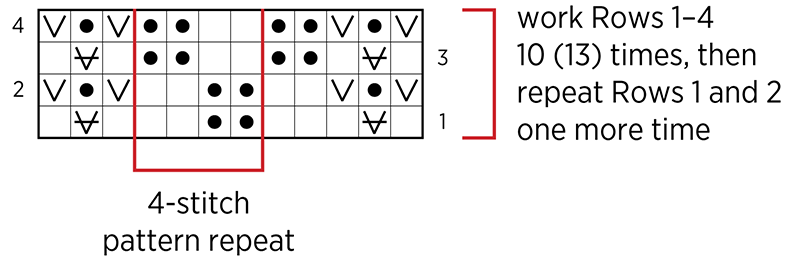
Row 1 (right side): K1, slip 1, k3, *p2, k2, repeat from * to last 3 stitches, k1, slip 1, k1.
Row 2 (wrong side): Slip 1, k1, slip 1, p2, *k2, p2, repeat from * to last 3 stitches, slip 1, k1, slip 1.
Row 3: K1, slip 1, k1, p2, *k2, p2, repeat from * to last 3 stitches, k1, slip 1, k1.
Row 4: Slip 1, k1, slip 1, k2, *p2, k2, repeat from * to last 3 stitches, slip 1, k1, slip 1.
Repeat Rows 1–4 nine (12) more times.
Repeat Rows 1 and 2 one time.
Work Border Rows section one time.
SECTION D: INTERRUPTED RIB
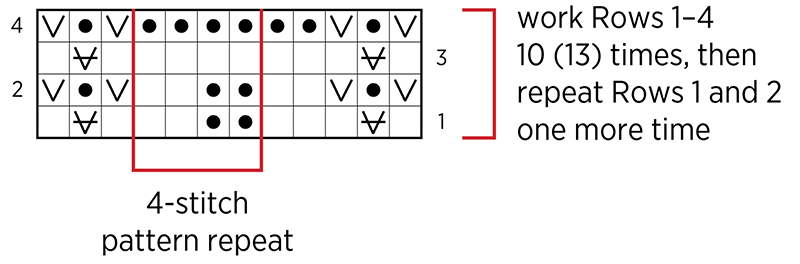
Row 1 (right side): K1, slip 1, k3, *p2, k2, repeat from * to last 3 stitches, k1, slip 1, k1.
Row 2 (wrong side): Slip 1, k1, slip 1, p2, *k2, p2, repeat from * to last 3 stitches, slip 1, k1, slip 1.
Row 3: K1, slip 1, knit to last 2 stitches, slip 1, k1.
Row 4: Slip 1, k1, slip 1, knit to last 3 stitches, slip 1, k1, slip 1.
Repeat Rows 1–4 nine (12) more times.
Repeat Rows 1 and 2 one time.
Work Border Rows section one time.
SECTION E: TILES
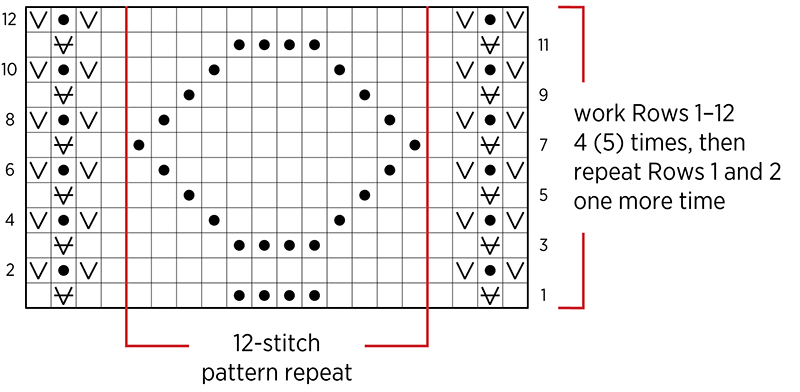
Row 1 (right side): K1, slip 1, k2, pm, k4, p4, *k8, p4, repeat from * to last 8 stitches, k4, pm, k2, slip 1, k1.
Row 2 (wrong side): Slip 1, k1, slip 1, p1, sm, purl to marker, sm, p1, slip 1, k1, slip 1.
NOTE: Whenever you repeat Row 1 for the remainder of this section, slip the markers as you come to them, rather than placing new ones.
Row 3: Repeat Row 1.
Row 4: Slip 1, k1, slip 1, p1, sm, p3, k1, p4, *k1, p6, k1, p4, repeat from * to 4 stitches before marker, k1, p3, sm, p1, slip 1, k1, slip 1.
Row 5: K1, slip 1, k2, sm, k2, p1, k6, *p1, k4, p1, k6, repeat from * to 3 stitches before marker, p1, k2, sm, k2, slip 1, k1.
Row 6: Slip 1, k1, slip 1, p1, sm, p1, k1, p8, *k1, p2, k1, p8, repeat from * to 2 stitches before marker, k1, p1, sm, p1, slip 1, k1, slip 1.
Row 7: K1, slip 1, k2, sm, p1, k10, *p2, k10, repeat from * to 1 stitch before marker, p1, sm, k2, slip 1, k1.
Row 8: Repeat Row 6.
Row 9: Repeat Row 5.
Row 10: Repeat Row 4.
Row 11: Repeat Row 1.
Row 12: Repeat Row 2.
Repeat Rows 1–12 three (4) more times.
Repeat Rows 1 and 2 one time.
Work Border Rows section one time.
SECTION F
Repeat Section A one time, slipping markers as you come to them.
SECTION G: REVERSED DIAGONAL
Row 1 (right side): K1, slip 1, k2, sm, *p5, k1, repeat from * to marker, sm, k2, slip 1, k1.
Row 2 (wrong side): Slip 1, k1, slip 1, p1, sm, *p1, k5, repeat from * to marker, sm, p1, slip 1, k1, slip 1.
Row 3: K1, slip 1, k2, sm, p4, k1, *p5, k1, repeat from * to 1 stitch before marker, p1, sm, k2, slip 1, k1.
Row 4: Slip 1, k1, slip 1, p1, sm, k1, p1, *k5, p1, repeat from * to 4 stitches before marker, k4, sm, p1, slip 1, k1, slip 1.
Row 5: K1, slip 1, k2, sm, p3, k1, *p5, k1, repeat from * to 2 stitches before marker, p2, sm, k2, slip 1, k1.
Row 6: Slip 1, k1, slip 1, p1, sm, k2, p1, *k5, p1, repeat from * to 3 stitches before marker, k3, sm, p1, slip 1, k1, slip 1.
Row 7: K1, slip 1, k2, sm, p2, k1, *p5, k1, repeat from * to 3 stitches before marker, p3, sm, k2, slip 1, k1.
Row 8: Slip 1, k1, slip 1, p1, k3, p1, *k5, p1, repeat from * to 2 stitches before marker, k2, sm, p1, slip 1, k1, slip 1.
Row 9: K1, slip 1, k2, sm, p1, k1, *p5, k1, repeat from * to 4 stitches before marker, p4, sm, k2, slip 1, k1.
Row 10: Slip 1, k1, slip 1, p1, sm, k4, p1, *k5, p1, repeat from * to 1 stitch before marker, k1, sm, p1, slip 1, k1, slip 1.
Row 11: K1, slip 1, k2, sm, *k1, p5, repeat from * to marker, sm, k2, slip 1, k1.
Row 12: Slip 1, k1, slip 1, p1, sm, *k5, p1, repeat from * to marker, sm, p1, slip 1, k1, slip 1.
Repeat Rows 1–12 three (4) more times, removing markers on final row.
Work Border Rows section one time.
SECTION H
Repeat Section C one time.
Go on to Finishing section, below.
STITCHWORK PATTERN: CHARTS
NOTE: New to reading charts? Unravel the mysteries with our Reading A Chart Tutorial!
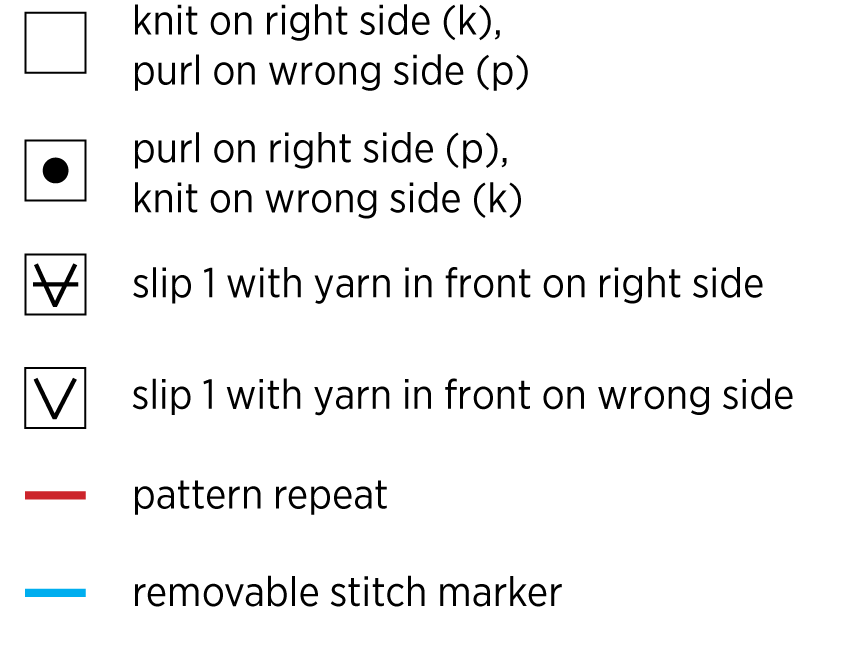
Starting in the bottom right corner of each chart below, work right-side (odd number) rows from right to left and wrong-side (even number) rows from left to right.
Begin with the Border Rows chart, then work through the charts for Sections A through H, working the Border Rows chart between each section. End by working the Border Rows chart, then go on to the Finishing section, below.
KEY
CHARTS
BORDER ROWS
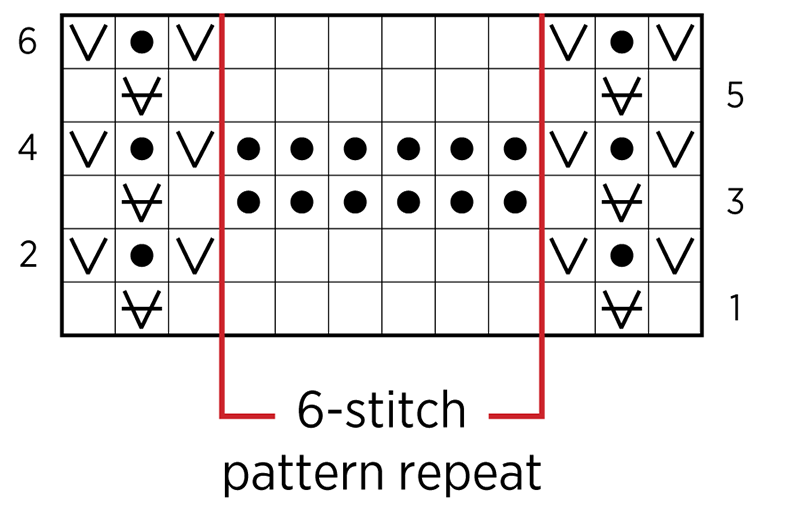
SECTIONS A + F: DOUBLE ALTERNATING ANDALUSIAN
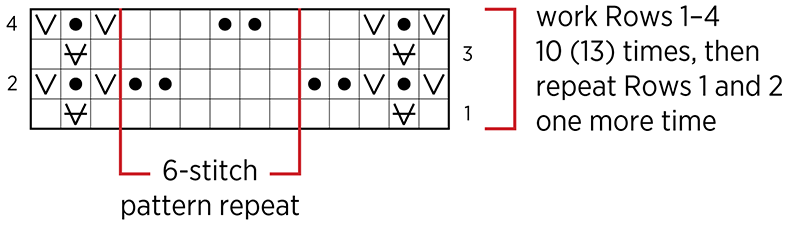
SECTION B: DIAGONAL
SECTIONS C + H: TWO-STITCH CHECK
SECTION D: INTERRUPTED RIB
SECTION E: TILES
SECTION G: REVERSED DIAGONAL
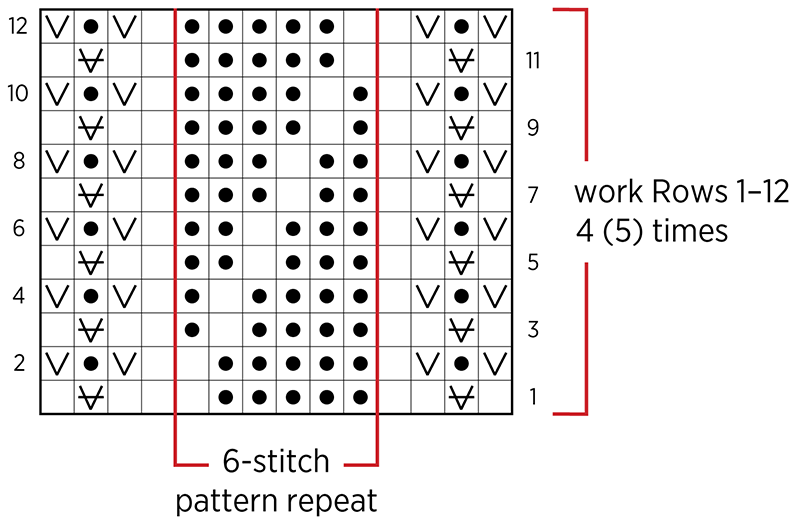
NOTE: Want to see it bigger? Download this chart (and key) as a PDF!
FINISHING
With right side facing you, bind off in pattern as follows…
Knit 1, slip 1, pass first stitch over second stitch, bind off knitwise to last 2 stitches, slip 1, pass first stitch over second stitch, knit 1, pass first stitch over second stitch, cut yarn and pull through.
Weave in all ends and gently wet block, or machine wash and dry as desired.
Share your progress and connect with the community by tagging your pics with #PurlSoho. We can’t wait to see what you make!
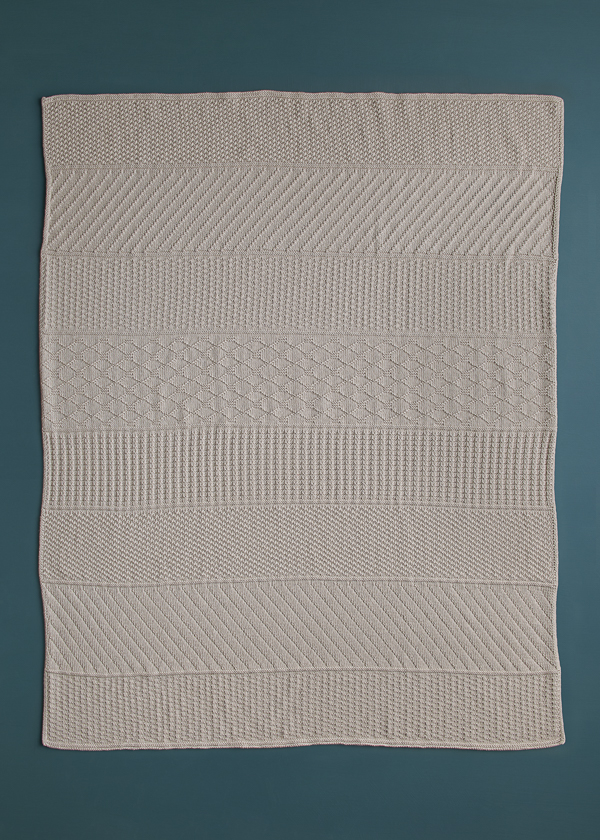
Learn About Cotton Pure On A Cone + All Our Beautiful Yarns
Cotton Pure On A Cone is the ultimate yarn for amazing cotton blankets and garments! 2,789 whopping yards of 100% organically grown cotton yarn, you’ll have only two ends to weave in when you’re done… Music to every knitter’s ears! Cotton Pure is also a true natural beauty. This sport-weight yarn feels wonderfully soft and supple and comes in tons of gently heathered colors you won’t find anywhere else! Need some contrast colors or not quite so much yarn? Shop our collection of Cotton Pure 100-gram skeins, too!
More Free Knitting Patterns
- Be sure to explore our vast collection of (mostly free!) Cotton Pure knitting patterns and cast on!
More Sport-Weight Yarns
- Shop our entire collection of sport-weight yarns (What is sport-weight yarn, really? Learn all about sport-weight yarn in our deep-dive article!)
- If you want to use a different yarn, be sure to take the time to get the correct gauge. Need help? Check our All About Gauge Tutorial, our Yarn Substitution article, and our Complete Guide To Yarn for lots of helpful information.
More Yarns With Similar Fiber
- Shop cotton yarn (What helps cotton keep its cool? Learn all about this soft, natural fiber in our guide to cotton yarn!)
- Shop machine-washable yarn
- Shop plant-based yarn
Looking for more inspiration? Explore all of our knitting patterns (including tons of free knitting patterns) and knitting tutorials, buy one of our many knitting kits and yarn bundles, and shop for beautiful yarn. We have over 55 gorgeous natural fiber yarns in 1,000s of magnificent colors, designed to bring integrity, beauty, and joy to your next knitting project and only available at Purl Soho!

Just on my second Porto blanket and this is my next project. Musing the colours…
Hi Helena,
Congrats on working on your second Porto Blanket! We’re so glad to see you’re considering the Stitchwork Blanket as your next project.
Please don’t hesitate to reach out with any questions about the pattern or for help with choosing a color!
Happy knitting,
Hills
Thanks Hills,
I just wish there was a hot pink in the cotton!
Oooh! Duly noted, Helena. I would like that too! I’ll be sure to mention it…
Thanks for the suggestion!
Kindly,
Hills
Hi question I am doing crib size for this blanket and wanted to know what size circular needles I need and what length
Pls lmk ready to buy!
Hi Nancy,
Thanks so much for writing in. You can use either size since this pattern is worked flat. It might be a bit cramped to use the smaller size for the larger blanket, but you can use either size for the smaller! Whichever is most comfortable for you ought to do the trick.
Please feel free to reach out anytime, and I hope you love working on the Stitchwork Blanket!
Kindly,
Hills
I’m thinking about making a scarf or wrap with fewer multiples of the stitch pattern than the blanket calls for, but I don’t fully understand the Stitch Multiple note. I follow the 3 stitches for each of the two selvages. Would you explain how one arrives at these figures: “This pattern works over a multiple of 12 + 8 stitches (a multiple of 12 + 2 stitches for the stitch patterns).” Thank you.
Hi Judith,
Thanks so much for reaching out! This pattern would look really lovely as a scarf! I’m happy to help with the stitch multiple note.
The note says:
The multiple is 12 + 8 because the 2 stitches are included to meet the pattern repeat requirements, and 3 extra stitches are tacked onto either edge for the selvage. For example, let’s say you would like to knit a scarf about 14 inches wide. The gauge is listed at 6.25 stitches per inch. If you multiply 6.25 stitches per inch by 14 inches, you’ll get 87.5 stitches. It isn’t easily divisible by our multiple requirements, so let’s divide 87.5 by 12 to see how many times we can complete the full 12-stitch repeat (7.29). You’d want to cast on a multiple of 12, 7 times… 12 x 7 = 84, add 8 and you’ll get 92. For a scarf 14 inches wide, to meet the pattern multiple and the selvage stitch count, you would need to cast on 92 stitches.
I hope this helps and that you love the pattern! Please circle back with any other questions!
Happy knitting,
Hills
Thank you, Hills, for your most helpful reply. I’m reminded by this lovely pattern that I had meant to make a throw or a scarf or wrap in the Porto pattern. Now you’ve motivated me to choose and get on with it!
Oooh, that sounds so lovely, Judith! We can’t wait to see what you make next!
Feel free to reach back out anytime!
Kindly,
Hills
Is one cone enough to make the larger size? You give two sizes but only mention that you used one cone to make the smaller size.
Hi Katie,
Thank you so much for reaching out! I’m so glad to see you’re interested in knitting up the new Stitchwork Blanket, and I’m so happy to help.
It looks like there are 2,789 yards in a cone of Cotton Pure. The larger pattern calls for 2,575 yards, so you should be good to go with just one cone! Yay!
Please feel free to reach back out with any other questions you might have.
Happy knitting!
Hills
Another beauty from Hiromi Glover! I’m considering doubling the yarn, holding to strands of Cotton on a Cone together (and using 2 cones) to give the blanket a bit more heft. Any reason you know that I shouldn’t do this?
Hi Kelly,
Thank you so much for your kind words! Hiromi designs such beautiful and interesting patterns, I’ll be sure to pass your praise along…
I’m so glad to see you’re considering the Stitchwork Blanket for your next project, and this sounds like a really neat idea. I would recommend knitting and blocking a gauge swatch with the yarn doubled so that you can see if you like the look and feel of the finished fabric and determine which needles work best for you.
The only thing you might consider is the weight of the finished blanket. Cotton lacks a certain amount of elasticity, which often makes it heavy and drape more loosely. One interesting idea, though, is that if you were to hold the yarn doubled, it would likely increase the elasticity of the overall fiber as though it were being plied. You may find this works out really well for you! I’d definitely encourage you to give this a try; we would love to see the finished blanket!
Please reach back out with any other questions… I hope this is helpful and you love the project!
Happy knitting,
Hills
Id love to see this too! Or even how your swatch turns out!?
I love the stitch work pattern. Your comment in the gauge section concerns me a bit…different patterns being different gauges. Do I have to knit them differently?
Also, in past I’ve not been a fan of cotton. Love that this is wash/dryable. Is this a great cotton to knit with?
Hi Susan,
Thanks so much for reaching out! I totally understand your hesitation here, and I’m happy to clarify!
So long as you’re able to achieve 25 stitches and 40 rows = 4 inches in Double Alternating Andalusian Stitch, blocked or machine laundered, then the rest of the stitch patterns ought to work out at the same tension you knit with for the gauge swatch. You shouldn’t need to adjust your tension for any specific pattern within the blanket.
Cotton Pure is definitely a fan favorite! A few tips for knitting with cotton yarn: use a pillow or a table to support your elbows, loosen your grip a bit, try metal needles for smoother knitting, take frequent breaks (with some hand stretching!), and consider rotating to smaller projects for a bit of a break. Some folks also find that going up a needle size helps, though you would want to check your gauge!
I hope this is helpful! Please reach back out with any follow-up questions!
Happy knitting,
Hills
Looking over the instructions I wondered why the I cord edge is slightly different from the edge on the Porto blanket(which I am almost finished).
Could this blanket be done with the merino wool on the cone?
Although I have been a knitter for almost 60 years, Porto blanket is my the first project I’ve been able to do by chart. I can crotchet all day long from charts but have never been able to do so knitting. It made the Porto so much easier. I wish I had been able to “get it” years ago.
Hi Jeanne!
Congratulations on figuring out how to read charts! That’s a wonderful achievement, and I hope you’re proud. Not everyone can knit and crochet, so please take a bow!
This is a great question regarding I-cord edges. The (slip 3) style I-cord used on the Porto Blanket creates a thicker tube, whereas the (slip 1, k1, slip 1) style I-cord edge creates a flatter tube. We chose this I-cord edge to mesh best with the cotton yarn as it provides a little extra structure and reduces any puckering or rippling at the sides.
Unfortunately, we haven’t tested the (slip 3) style I-cord edge on this blanket, so I can’t guarantee the results if you were to substitute the edges. It would probably work, though… I would just be mindful of how it might impact the behavior of the selvage edge.
Knitting Yarn DK on a cone may be a bit thick, so I would suggest knitting and blocking a gauge swatch to check your gauge. It would also be a great time to see how the wool knits up into this fabric. You might consider checking out Good Wool or Daily Wool Sport, as they are a bit thinner to better match the Cotton Pure. (Don’t forget to swatch with any yarn substitutes!)
I hope this is helpful for you! Please reach back out anytime!
Happy knitting,
Hills
If I wa nted to make this a rainbow blanket with a neutral color for the “border rows” throughout, how many fewer rows of each pattern could I make with indiviual cotton pure hanks? Approximately how much smaller would it be if I reduced each panel that way? Or to avoid making it smaller would you recommend repeating one of the panels in an eighth color?
Hi Jean,
Thanks so much for reaching out! This sounds like a really interesting project! I bet it will look really beautiful.
I can only really offer very rough estimates as a starting point; Each section is a different number of rows and a different stitch pattern, so they will each use a different amount of yarn. I’d recommend finding an average for the sections by dividing the yardage by 8.
The crib size uses 1,585 yards, and the throw size uses 2,575 yards. There are 279 yards in a skein of Cotton Pure. We note that you can make the blanket with 6 or 10 skeins of Cotton Pure, respectively.
With this in mind, it looks like you ought to be able to work the crib-sized blanket with one skein of each color. For the throw size, I would recommend two skeins. I’d also suggest working with 8 different section colors rather than the 7 in the standard rainbow, to further simplify this math. Your blanket should still reach the same size as our sample!
I hope this proves to be a good launch point for you! We can’t wait to see what you make!
Happy knitting,
Hills
Is the feel (hand) with Cotton Pure on a cone as soft as acrylic or wool or is it rougher? I’m thinking of knitting the stitchwork blanket for someone who has very sensitive skin.
Hi Maryjane,
Thanks for reaching out! That’s a great question, and I understand wanting to find the right yarn/project for sensitive skin.
I think Cotton Pure is a great candidate, as it feels lovely in the hand, is wonderfully soft to knit with, and provides a smooth stitch. I don’t find it to be rough or toothy like some acrylic or wool yarns can be when laying close to the skin.
I hope this helps you make a decision for your project, but please don’t hesitate to reach back out if you have any other questions!
Happy knitting,
Sam
Is Cotton Pure machine washable and dryable? I want to make a baby blanket as a gift and want to make it easy for new parents to keep clean!
Thanks,
Ellie
Hi Ellie,
This sounds like such a thoughtful gift! Congratulations to the parents-to-be!
I’m very glad to report that Cotton Pure can be Machine washed on cold and tumble dried on low! Should be perfect for the growing family…
Please let me know if you have any other questions. I hope this very considerate blanket is used with love for years to come.
Happy knitting,
Hills
Hello, Can this blanket be made on the DK 100% wool cone?
Hi Pam,
Thank you so much for your question!
Knitting Yarn DK on a cone may be a bit thick, so I would suggest knitting and blocking a gauge swatch to check your gauge. It would also be a great opportunity to see if you like how the wool knits up into this fabric. You might consider checking out Good Wool or Daily Wool Sport, as they are a bit thinner to better match the Cotton Pure. (Don’t forget to swatch with any yarn substitutes!)
Please reach out again with any other questions you might have! We’re always here and happy to help.
Happy knitting,
Hills
Do you make sections and sew them together? No my favorite thing to do.
Hi Dee,
Thank you so much for reaching out!
Rest assured, there is no seaming in the Stitchwork Blanket. To finish this blanket, you’ll only need to weave in all ends and gently wet block, or machine wash and dry as desired.
I hope this is helpful. Please feel free to reach back out anytime!
Happy knitting,
Hills
Hi Hi,
I was soooo excited to see this. I have just finished the Porto in Pepper and it’s gorgeous (stalling on sewing in the ends:). I was looking on ravelry last week to try to find a similar blanket or shawl that switches out patters like this — hard to design one myself because of all the gauge issues. Then lo and behold I popped onto your site to find a shawl to make with my new Santolina end there is the new multistitch blanket. I do hope you will continue doing these periodically. It is such a soothing way to knit without getting bored and keeping the wrists and fingers from repetitive stress!!
If I want to use Santolina would you advise that I hold it double or just make it wider? I found Porto in pepper to be a bit thick but okay since it’s wool and has a lot of stretch and loft. Maybe I should make it in Daily wool sport which I just bought a bunch of instead of Santolina? That looks close to cotton pure (279 yards to 300). .
Hi Jane!
Thank you so much for your kindness. I’m thrilled to see how much you enjoy these meditative projects focusing on fun stitch patterns, and really happy to see you found us! Welcome!
I totally understand wanting to work the Stitchwork Blanket in Santolina, and I think it would look beautiful.
These interesting textures do have a bit of a hard time playing nicely if they don’t meet the stitch multiple. I’d suggest knitting and blocking a gauge swatch in Santolina first.
Once you have your swatch, you can check your stitch count. Let’s say you’re knitting at 7.25 stitches per inch (we knit our swatch at a slightly tighter tension than the original yarn called for in the Andalusian Stitch). If you wanted to knit the smaller-sized blanket (which is 30 inches wide x 40¼ inches long), you would need to cast on 217.5 stitches to reach 30 inches. This pattern is worked over a multiple of 12 + 8 stitches. The closest number that fits these requirements would be 212 stitches. We used 1,585 yards to reach this area of 1,207.5 square inches. You would need more yarn to knit the same amount of distance.
You can find the total weight of the Santolina skein and total yards on the skein’s label. This will give you a yard/gram measurement if you divide the numbers. Then, consider how many of your swatches it would take to fill the same 1207.5 square inches. You can divide the area of the blanket by the area of the swatch to find a ratio. As an example, if your output is 1/10, you would need 10 swatches to make the blanket.
With this ratio (the area of the blanket divided by the area of the swatch), you can multiply it by the weight of your swatch to get the total grams needed. Finally, divide that by the grams per skein….voila! You now have the yards required.
If you would like to use Daily Wool Sport, I’d also suggest working a swatch first. If you can reach the same gauge listed in the pattern, you would need the same amount of yardage.
I hope this helps! Please feel free to reach out anytime.
Happy knitting,
Hills
I just finished your Porto blanket, what a fun a beautiful project. I’m looking for my next adventure (stitch variety is where it’s at) which brought me to this pattern.
I noticed it’s done with cotton yarn and some of the other comments have asked about doing this with the same yarn as the Porto blanket, which is wonderfully soft and great to work with. You suggested closely checking gauge first, including after blocking, and adjusting if needed. I also read your article about cotton yarns and it stated that one benefit of cotton is “clear stitch definition and textured stitches”. Is that something that would be important with this pattern and possibly jeopardized with wool?
Thanks for the great pattern, I look forward to your advice.
Hi Elizabeth,
Thank you so much for reaching out! I am really glad to see that you found the Stitchwork Blanket after the Porto Blanket! These stitch patterns are too much fun.
I don’t think you would run into too much trouble with stitch definition switching from cotton to wool. Knitting Yarn DK also has fantastic definition, as you saw from the Porto Blanket and can see in the Blueprint Blanket, as well. I would suggest knitting and blocking your gauge swatch, as you referenced. This will also help ensure you like the look and feel of the finished fabric.
Please feel free to reach back out anytime, and I hope this was helpful for you.
Happy knitting,
Hills
Hi there. This blanket sounds great. I can tell that most of it is written out, but I see the word chart and then more rows. I can’t see and am wondering if the charts are needed or if I can just use the written instructions?
Thanks.
Hi Lovette,
Thanks so much for reaching out. This is a great question.
We include the charts for visual learners and for folks to be able to compare the written instructions, should there be any confusion. You can totally work just from the written words! If you ever decide you’d like to try out the charts (which do travel nicely!), you could take a look at our handy article on Reading a Chart!
I hope you enjoy your Stitchwork Blanket! Please feel free to reach back out with any other questions you might have as you’re working.
Happy knitting,
Hills
I’m interested in making this a coverlet for my King size bed. The standard coverlet sizes I’m seeing are108″ x 92″ which is approx three times what the throw is for this pattern or about 6 lbs.
Does that sound about right and would this make it unmanageable from a washing perspective?? Perhaps a different yarn?
Hi Beverly,
This would be stunning as a bed coverlet… What a lovely idea!
For a size that large, the yarn required would be a bit more than that initial estimation. To make a blanket 108in x 92in you would need approximately 13,020 yards of yarn, or 5 cones of Cotton Pure. As for washing a knitted blanket of this size, you should be fine as long as your washing machine can currently handle a king-size blanket! Cotton Pure can be machine washed and dried, so I think it’s a great yarn for the job.
I hope this helps, and wish you luck on your project!
Kindly,
Sam
I’m curious about the A and C sections on the repeat. I was thinking it was going to be the mirror image doing C first and ending with A. I like the reverse section and the end. Was there a specific reason for this order?
Hi Carol,
Thanks for writing in! I’m really glad to read that you liked working these sections, and thank you very much for your truly thoughtful question.
This is typically a design choice! I’ve noticed that the designer, Hiromi Glover, loves to keep these beautiful stitch patterns interesting throughout the project and enjoys highlighting the beauty of asymmetry within their work.
I hope this helps! Please feel free to reach back out anytime.
Kindly,
Hills
I’m interested in making this blanket as a college throw for my grandson at James Madison University whose colors are purple and gold. I think Ube Purple and Honey Yellow are good enough matches, but I need advice both about how to use each color in this design and how much of each color to buy. Your advice?
Hi Cheryl,
Thank you so much for reaching out! This sounds like a really meaningful project, and I’m very glad to help!
I would recommend staggering your sections by color for the easiest translation into a two-color blanket. You can split your yardage estimate in half and add an extra skein to each to create a safe buffer. Sadly, I just don’t have yardage estimates for each section of the blanket to lend more accuracy here, and there may be yardage differences across sections.
The pattern originally calls for 2,575 yards (10 skeins) for the larger size. Split down the middle, that’s 1,287.5 yards, or 5 skeins. I’d suggest picking up 6 skeins of each color to allow room for any variation among sections and for how much yarn they each use.
I so hope your grandson loves this very thoughtful gift and has a wonderful time at JMU! Please feel free to reach back out with any other questions!
Kindly,
Hills
Hills, thanks so much for your helpful and quick response!
Cheryl
I just received my yarn.It is beautiful and I cannot wait to start it. I am planning on making the Stitchwork blanket in charcoal gray for my grandson for college. I would like to add 10 – 12 inches in length. He is 6’4” tall. Do you have any suggestion for adding length? Also what would you suggest for additional yarn? Thank you for your help!
Roberta Prokop
Hi Roberta,
Thank you so much for reaching out! I’m really glad the Stitchwork Blanket caught your eye!
The only way I can really see to lengthen this pattern would be to work each section for an additional inch and a half. There are 7 stitch patterns, and adding an inch and a half to each would be 10.5 additional inches.
Sadly, the Charcoal Gray cone doesn’t have a matching Cotton Pure skein. You might consider Gray Shale, though…
Otherwise, you could either pick up an extra matching cone or reach out to us at [email protected] to exchange for a version of Cotton Pure that has a matching skein color (like Warm Rock). Because each of these stitch patterns uses a different amount of yarn, it can be a little tricky to recommend an exact yardage estimate for each section.
We worked the larger sample with 2,575 yards to reach a width of 39.5″ and length of 49.5″. To work an additional 10.5 inches, you would need 3,122 yards. A cone has 2,789 yards, so you would need an additional 547 yards. Two skeins of Cotton Pure ought to do the trick, but would be cutting it a bit close, and you might consider picking up an additional 3 skeins.
I hope this helps point you in the right direction, and that your son loves his very thoughtful gift! Please feel free to reach out anytime.
Kindly,
Hills
I missed this yarn being on sale! Now I’m ready and it’s full price. Any idea if it may be on sale in the future?
Hi Helena,
I’m so sorry to read you missed the sale! I know how disappointing that can be… Could you kindly reach out to us at [email protected] for further assistance? We’ve got you covered! 🙂
All the best,
Hills
I have started the blanket with the recommended cotton on a cone and am almost finished with Section A. The beginning border rows are now a rolled edge. Is that intended or will I be trying to flatten that edge when finished during blocking? I assume the final border rows will do the same.
thank you 🙂
Hi Carol,
Great question! You are right that the rolled edge is an intended and thoughtful part of the design. You will see the Border Rows section repeated throughout the blanket as a way to break up the various stitch pattern sections, and you will indeed end the blanket with the same Border Rows to cap off both ends the same way. Because of this, you won’t need to flatten the border during blocking. Thank you for asking about this design element in this project!
Happy knitting!
Mia