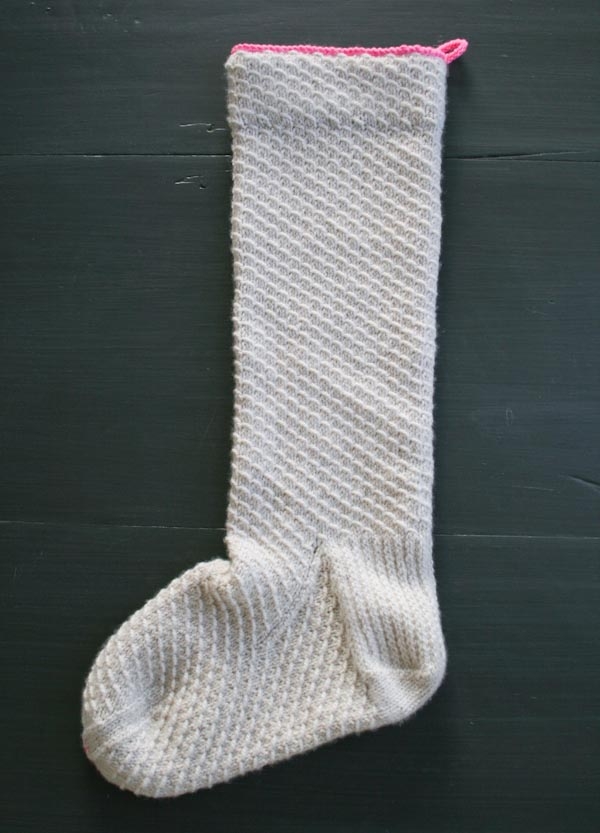
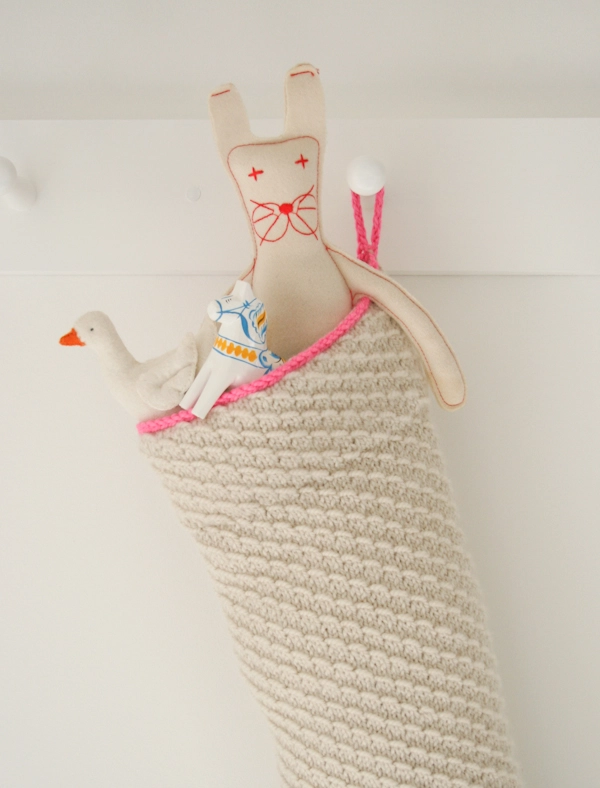
Heirloom Christmas Stocking
When it came to appraising Christmas stockings when I was a kid, I was sure grateful that my grandma was a knitter. A knit stocking meant lots of stretch, and lots of stretch meant… well, lots of stuff. Santa still fills my stocking, and nowadays, I’m not as appreciative of getting piles of loot as I am of having a treasured hand knit from my dear ol’ gram.

I count the Christmas stocking as one of knitting’s most gratifying projects. It is one of the only things you can knit that is practically guaranteed to be cherished year after year, indelibly marking the memory of its owner every Christmas season. What a payoff!
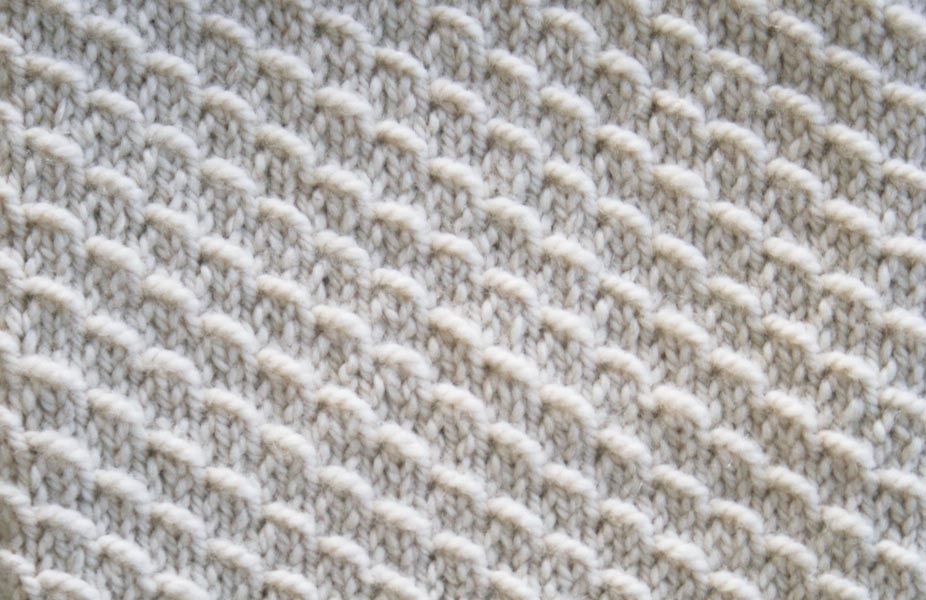
For my Heirloom Christmas Stocking I wanted to reflect the quiet beauty of winter with a stitch pattern that evokes windswept fields of snow, rows of icicles hanging from the eaves, and scalloped patterns of frost on the window. I also wanted this stocking to look like it could have been plucked from a mantle sixty or eighty or a hundred years ago. And that it could grace a mantle a hundred years from now.

Knitting an heirloom definitely inspires me to choose my yarn with care. I want the yarn to be beautiful and pure, to be so special that fingers a generation from now will appreciate its quality. And so I chose Purl Soho’s Worsted Twist, our 100% merino wool that is as soft as Santa’s beard and as special as Christmas itself!

May your version of our Heirloom Christmas Stocking be just that: everlasting, classic, and most importantly, loved! -Whitney
Designed by Purl Soho designer, Whitney Van Nes.
Share your progress and connect with the community by tagging your pics with #PurlSoho, #PurlSohoBusyHands, #PurlSohoHeirloomChristmasStocking, and #PurlSohoWorstedTwist. We can’t wait to see what you make!
Materials

- Main Color: 3 skeins of Purl Soho’s Worsted Twist, 100% merino wool. Each skein is 164 yards/ 100 grams; approximately 492 yards required. This color is Heirloom White. (NOTE: We no longer offer Worsted Twist, but choose from one of our other worsted/aran weight yarns.)
- Contrast Color: 5-10 yards of worsted weight yarn. I used Purl Soho’s Worsted Twist in the color Super Pink.
- US 7 (4.5 mm), 16-inch circular needles
- US 8 (5 mm), 16-inch circluar needles
- A set of US 7 double pointed needles
Gauge
23 stitches = 4 inches in Diagonal Scallop Stitch, on smaller needles
Size
- Circumference at Cuff: 14½ inches
- Circumference at Ankle: 12½ inches
- Length from Cuff to Heel: 20 inches
- Length from Heel to Toe: 11½ inches
Note
Diagonal Scallop Stitch (DSS)
Round 1: Knit.
Round 2: *K2, with the right needle pick up the bar between the stitches from back to front, k2, pass the bar over the 2 stitches, repeat from * to end of round.
Round 3: Knit.
Round 4: *With the right needle pick up the bar between the stitches from back to front, k2, pass the bar over the 2 stitches, k2, repeat from * to end of round.
Repeat Rounds 1-4.
Here is the “bar between the stitches”:
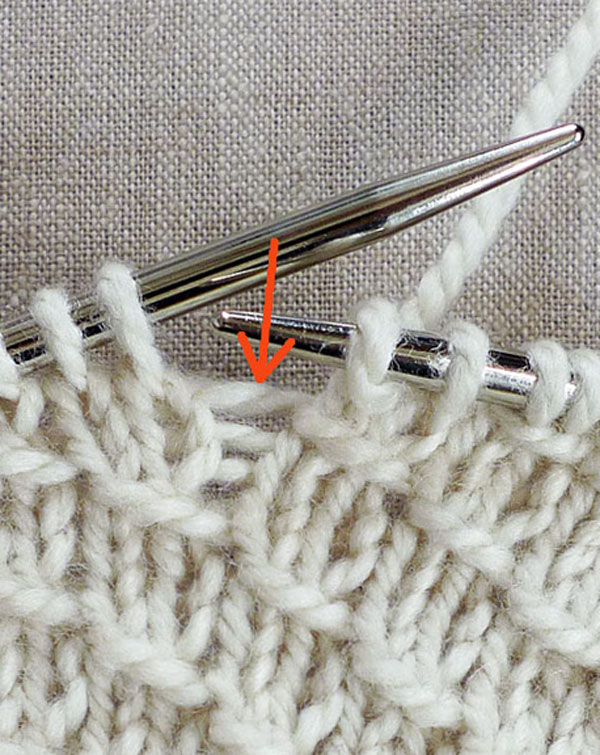
Here is the right needle picking up the bar from back to front:
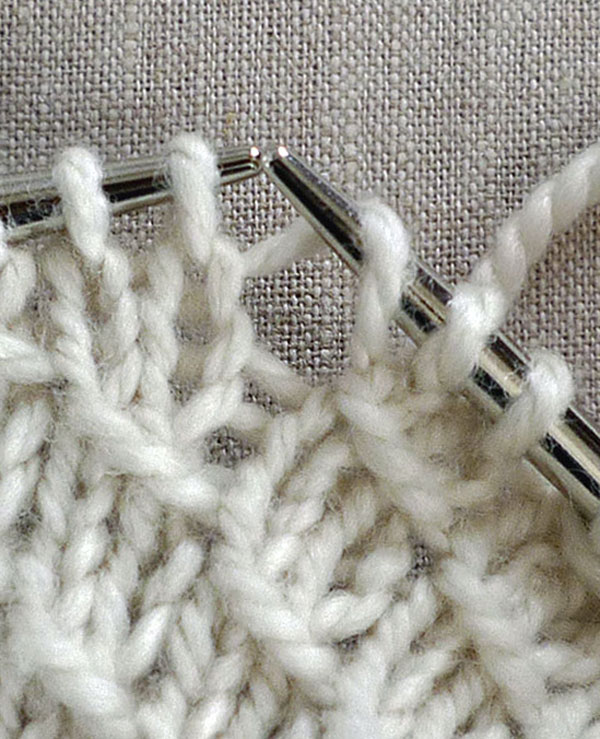
And here is passing the bar over the 2 stitches:

Pattern
Cast On
With the Main Color and the smaller circular needle, use a Provisional Cast On to cast on 64 stitches.
(If you’re intimidated by the Provisional Cast On, feel free to just use a regular long tail cast on and sew the cuff down at the end. Instructions are in the pattern!)
The Cuff
Place a marker and join for working in the round, being careful to not twist the stitches.
Knit every round until the piece measures 2 1/2 inches from the cast on.
Next Round: *K7, knit into front and back (kfb), repeat from * to end of round. 72 stitches
Next Round: Purl.
Change to bigger circular needle.
Work the Diagonal Scallop Stitch (DSS, see Note above) until piece measures 2 5/8 inches from the purl round, ending with Round 2 or 4.
If You Used a Provisional Cast On…
Slip the cast on stitches onto the smaller circular needle, removing the scrap yarn as you do. Fold the stockinette piece inside the Diagonal Scallop Stitch piece, wrong sides together.

Holding the two left needles parallel, use the front right needle to *[knit first stitch on front needle together with first stitch on back needle] 8 times, knit 1 stitch (alone) from front needle, repeat from * to end of round. 72 stitches.
If You Used a Regular Cast On…
Work the next row holding a piece of contrast sewing thread alongside the working yarn.
The Leg
Continue working the 4-round DSS as established until the piece measures 7 inches from the purl round.
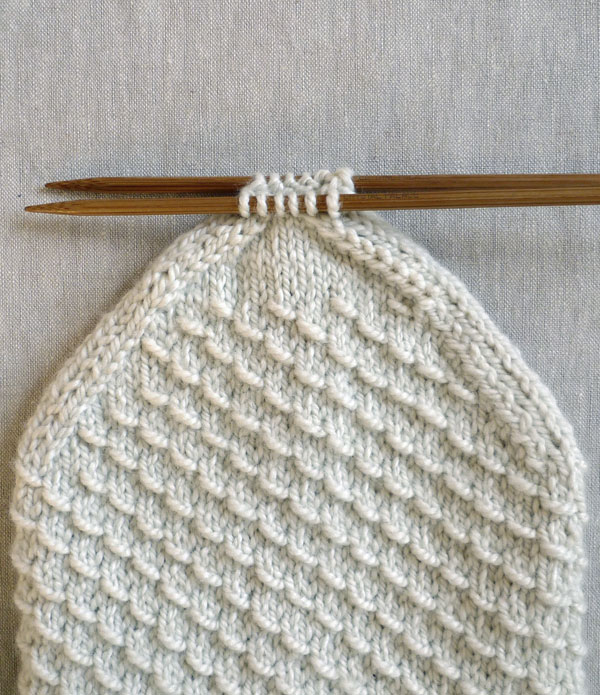
Change to the smaller circular needle and continue working the DSS until the piece measures 15 3/4 inches from the purl round, ending with Round 2 of the DSS.
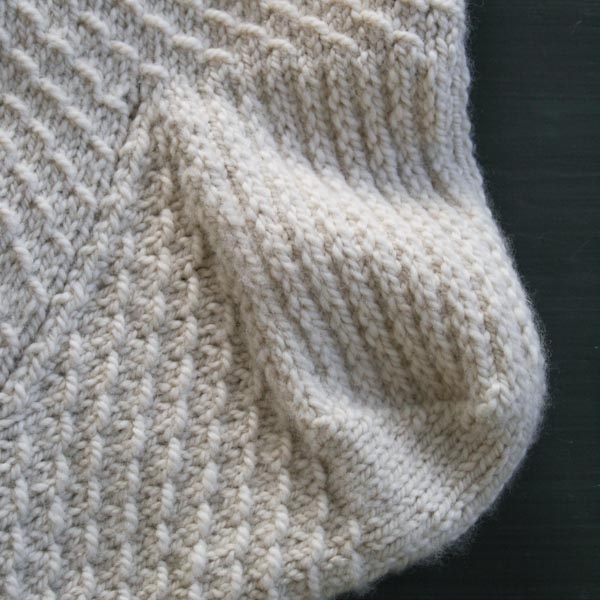
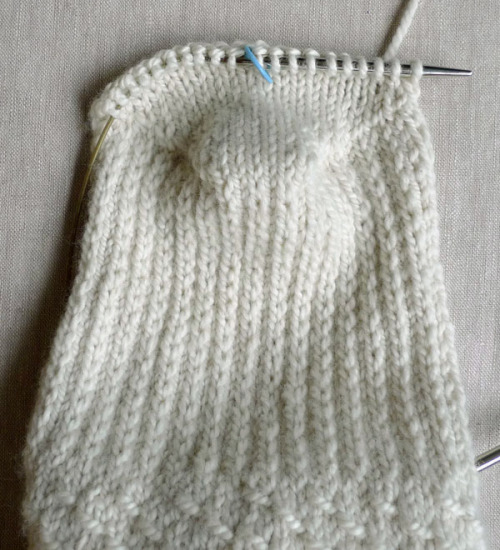
The Heel Flap
Knit 18 stitches and turn the work so the wrong side of the fabric is facing you.
Purl 36 stitches.
NOTE: The 36 stitches that you just purled are the Heel Flap stitches. For this section, you will be working back and forth on just these 36 stitches, turning the piece at the end of each row. Leave the end-of-the-round stitch marker where it is. Also, it’s okay to leave the 36 stitches you aren’t currently working on the needle. Just ignore them as you work the Heel Flap and the Heel.
Row 1 (right side): *Slip 1 purlwise, k1, repeat from * to end of 36 stitches, turn the work.
Row 2 (wrong side): Slip 1 purlwise, purl to end of 36 stitches, turn the work.
Repeat Rows 1 and 2 seventeen more times.

Turn the Heel
Still just working the Heel Flap stitches…
Row 1 (right side): Slip 1 purlwise, K19, ssk, k1, turn the work so the wrong side is facing you and there are 22 stitches on the left needle and 13 stitches on the right needle.
Row 2 (wrong side): Slip 1 purlwise, p5, p2tog, p1, turn the work.
Row 3: Slip 1 purlwise, knit to 1 stitch before the gap, ssk (with the stitch before the gap and the stitch after the gap), k1, turn.
Row 4: Slip 1 purlwise, purl to 1 stitch before the gap, p2tog, p1, turn.
Repeat Rows 3 and 4 until all the heel stitches have been worked and 20 stitches remain on the needle. (For the last repeat, you will end Row 3 with ssk and Row 4 with p2tog.)
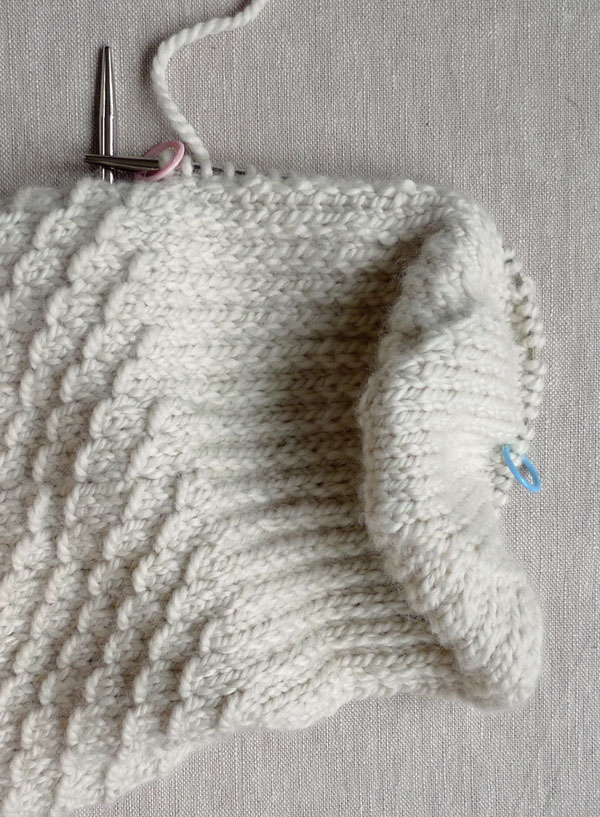
The Gusset
Knit across the 20 heel stitches.
With the right side facing you, use the right needle to pick up 20 stitches along the Heel Flap.
Place a marker that is a different color than the end-of-the-round marker.
Continuing to use the right needle, knit across the 36 instep stitches that have been on hold.
Place another marker that is a different color than the end-of-the-round marker.
Still with the right needle and the right side facing you, pick up 20 stitches along the other side of the heel flap.
Knit 10 stitches to the end of the round.
You are now ready to work the DSS in the round again with 96 stitches on the circular needle. The end-of-the-round marker is at the middle of the heel.

Round 1: (Starting with picking up the bar between the stitches) work DSS to 2 stitches before first marker, k2tog, slip marker, (starting with k2) work DSS to next marker, slip marker, ssk, (starting with picking up the bar) work DSS to end of round. 2 stitches decreased
Round 2: Knit.
Round 3: (Starting with k2) work DSS as established to 3 stitches before next marker, k1, k2tog, slip marker, (starting with picking up the bar between the stitches) work DSS to next marker, slip marker, ssk, k1, (starting with picking up the bar between the stitches) work DSS to end of round. 2 stitches decreased
Round 4: Knit.
Repeat Rounds 1-4 until 72 total stitches remain, ending with Round 3.

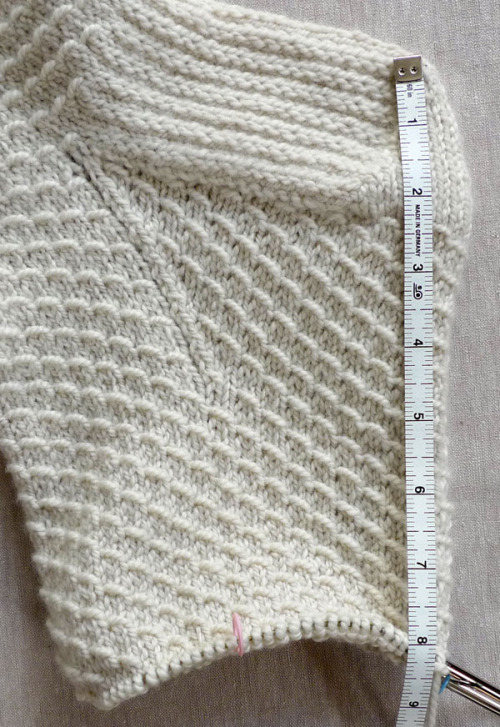
The Foot
Keeping the three stitch markers in place, start with Round 3 of the DSS and work the DSS until piece measures 8 1/2 inches from the back edge of the heel, ending with Round 1.
The Toe
Round 1: (Starting with k2) work DSS to 4 stitches before first marker, [k1, k2tog, k1, slip marker, k1, ssk, k1, (starting with picking up the bar) work DSS to 4 stitches before next marker] two times, work in pattern to the end of the round. 4 stitches decreased
Round 2: Knit.
Round 3: (Starting with picking up the bar) work DSS to 3 stitches before first marker, [k2tog, k1, slip marker, k1, ssk, (starting with k2) work DSS to 3 stitches before next marker] two times, work in pattern to the end of the round. 4 stitches decreased
Round 4: Knit.
Round 5: (Starting with k2) work DSS to 4 stitches before first marker, [k1, k2tog, k1, slip marker, k1, ssk, k1, (starting with k2) work DSS to 4 stitches before next marker] two times, work in pattern to the end of the round. 4 stitches decreased
Round 6: Knit.
Round 7: (Starting with picking up the bar) work DSS to 3 stitches before first marker, [k2tog, k1, slip marker, k1, ssk, (starting with picking up the bar) work DSS to 3 stitches before next marker] two times, work in pattern to the end of the round. 4 stitches decreased
Round 8: Knit.
Repeat Rounds 1 -8, changing to double pointed needles when necessary (leave the stitch markers in place). 40 stitches
Next Round: *Knit to 3 stitches before next marker, k2tog, k1, slip marker, k1, ssk, repeat from * , knit to end of round. 4 stitches decreased
Repeat last round until 12 stitches remain.
Knit 3 stitches.
Removing stitch markers, arrange next 6 stitches onto one double pointed needle and remaining 6 stitches onto another double pointed needle.
Cut the yarn and bring it to the inside of the stocking.
Finish
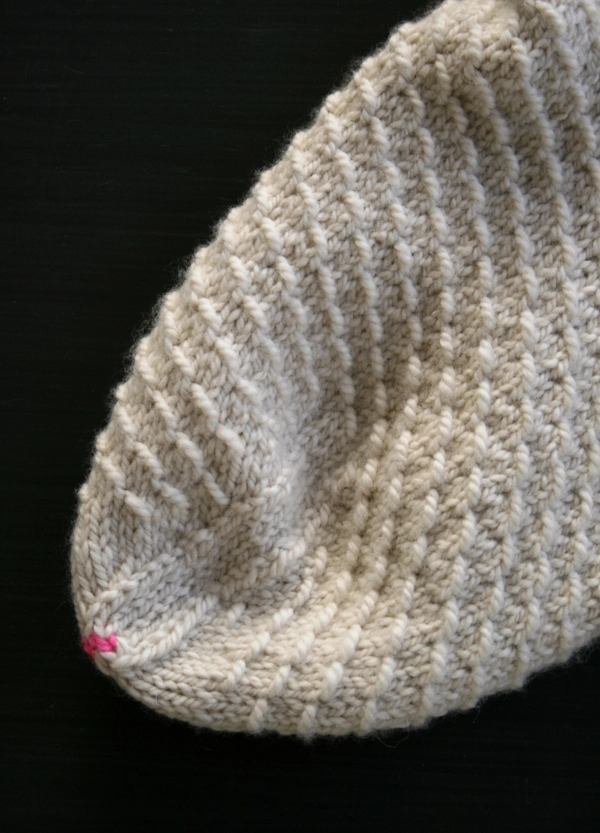
Toe
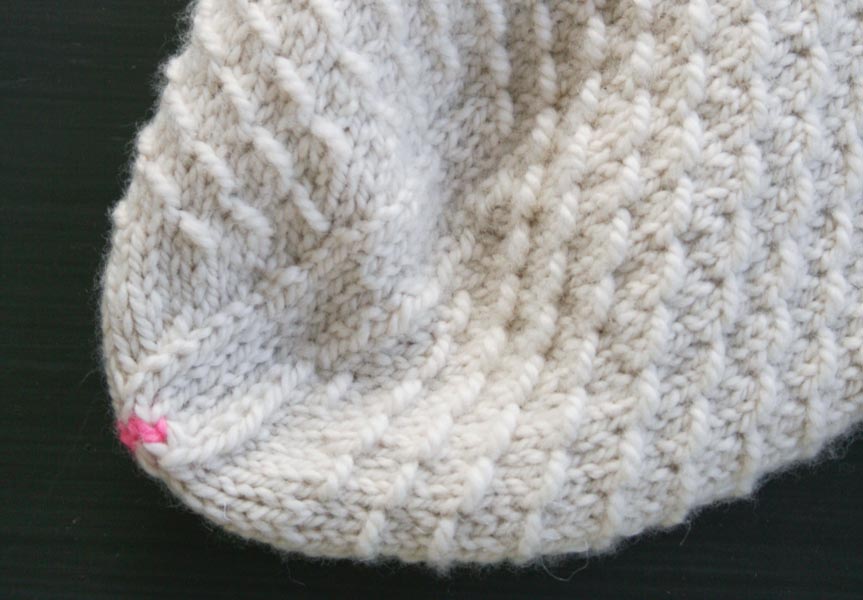
Thread a 24-inch piece of Contrast Color (CC) onto a tapestry needle, and holding the two double pointed needles parallel, use the Kitchener Stitch and the CC to graft together the toe.

Cuff, If You Used a Long Tail Cast On
At the purl round, fold the cuff to the inside and sew the cast on edge to the round marked by the sewing thread, removing the thread as you work.
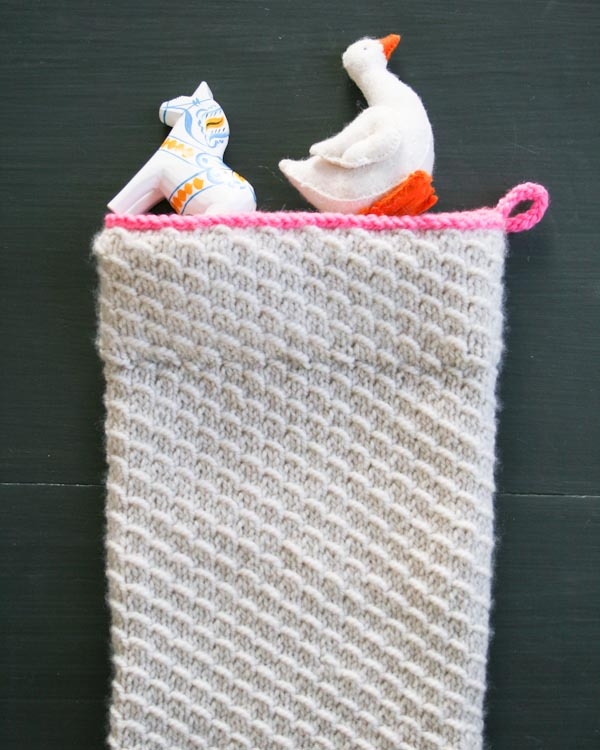
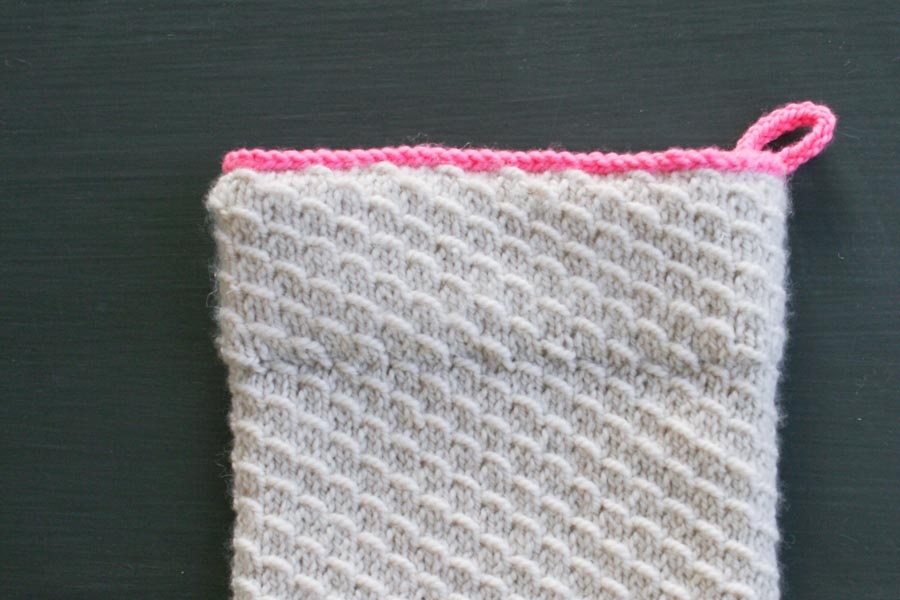
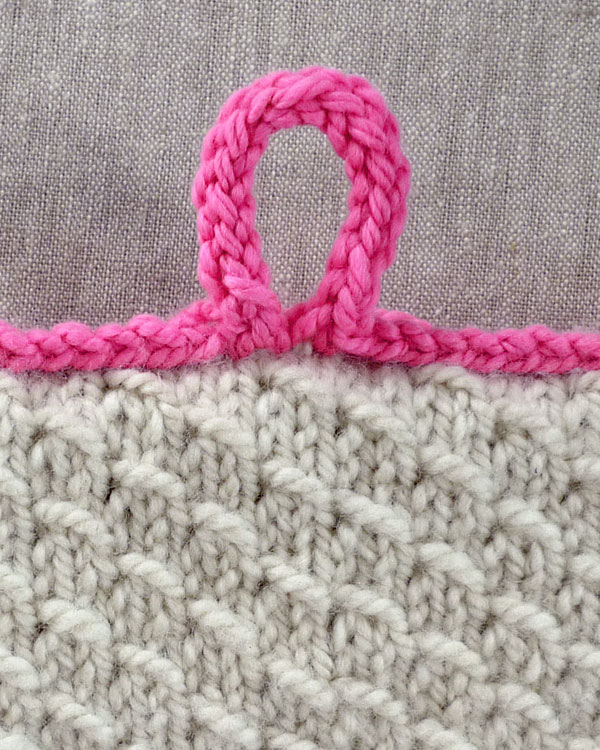
Top Trim and Loop
Using the CC and the smaller circular needle, start at the middle back of the top edge of the stocking (where the end of the round was) and pick up and knit each bottom purl bump, ending with 72 stitches.

With the right side facing you, use the larger circular needle to bind off each stitch until 2 stitches remain (1 on left needle and 1 on right needle). Knit the last stitch.
Using the CC and two double pointed needles, with the 2 remaining stitches knit a 3-inch I-cord.

Pass the first stitch over the second, cut the yarn and pull it through the remaining stitch.
Creating a loop, sew the end of the I-cord to the top edge of the stocking.
Weave in all the ends and have a merry Christmas!


I am at this part:
“Turn the Heel
Still just working the Heel Flap stitches…
Row 1 (right side): Slip 1 purlwise, K19, ssk, k1, turn the work so the wrong side is facing you and there are 22 stitches on the left needle and 13 stitches on the right needle.
Row 2 (wrong side): Slip 1 purlwise, p5, p2tog, p1, turn the work.”
I am very confused as to why I would turn the work in the middle of row. Am I supposed turn the work in the middle and then start on Row 2 in the middle of Row 1?
I was hoping you could clarify this part of the pattern.
Thanks!
Hello Caitlin,
Thank you for writing in. Turning a heel can be quite the confusing situation, but do not fear! After you finish this project you will be making socks all the time. If you visualize a sock, you will notice that the cuff goes straight down and then the direction of the knit magically turns at a 45 degree angle. This is because you “turn the heel” and the directions you are reading are modified “short rows”. A short row is when you knit a portion of the round and then turn the work to work backward, creating more fabric in one section of the round and not the other sections. I hope this makes sense. In relation to your stocking, this means that you will knit a certain amount, decrease at the gap and then then turn your work at a certain section of the work to concentrate only on the heel portion. If you follow these directions word-by-word, turning the work as it tells you to, you will not be disappointed. Please let us know if you have any more questions!
Best,
Adam
Hi there! I made this stocking twice a couple of summers ago–I’d like to make a third one for this holiday season, but I’d love to make it a little smaller. What’s the easiest way to adjust the pattern to do a smaller stocking? Thanks for your help!!
Hi Kristin,
Thanks for the question! The easiest way to go about this is to use smaller yarn and smaller needles. I’d go with a sport weight yarn and knit on a US 5 to get a good-sized, smaller stocking. Hope this helps!
-Adam
Any recommendations for a good way to fasten off the yarn for the I-cord loop? I thought I wove in the ends securely but as soon as the stocking is hung and a little bit of weight put on it, the yarn tail comes loose.
Hi Leslie,
Thank you for writing in! If you have a tail the is long enough, you can weave it through a few inches of the edging making sure that the end of the tail is facing the inside. I would also be sure to wait to clip the end of the tail until you have put some weight on it, that way you can be to clip it towards the inside of the stocking.
I hope that this helps and happy knitting!
Cassy
Hi there! I’m just trying to finish the top and am confused at the folding down and sewing. I’m confused by the “remove sewing thread”. Please clarify. Thanks!
Hi Kathy,
Thanks for the question. If you used a long-tail cast on, the directions say to use some thread to mark a certain round when you need to fold the top. This is only for the long tail cast on and not for the provisional though. If you did not use thread to mark the round, then I would just string some thread through the round you want to attach to in order to make it easier to see. Hope this helps!
-Adam
-Adam
Hi,
I’m making this for my sister and am confused about the part where you turn it down and sew it. Am I supposed to sew it using regular sewing thread or yarn? Is there a technique for this?
Thanks for your help!
Hello Wendy,
Thank you for writing in! If you used a long-tail cast on then you will fold the cuff to the inside and sew the cast on edge to the round you’ve marked using the tail of your long-tail cast on. Does that make sense? Please let us know.
Best wishes,
Kumeko
Hi!
Just curious, is it possible to do this pattern with 2 colors?
Thanks!
Camille
HI Camille,
Thanks for writing in! You certainly can use two colors here. Due to the stitch pattern, you will not get clear stripes but I think that it could be quite lovely. There are a few examples on Ravelry where knitters striped colors and they are quite nice indeed!
Best,
Cassy
I am working on Turning the Heel (I did this pattern once before and was successful;)) and am having trouble.
First question: is the “gap” in Row 3 mentioned actually the stitch marker? Or something else? I know you have some stitches on one needle and then the other from row 1…..
If I keep turning when it says I run out of stitches and it seems to be too rapidly condensing in on itself and doesn’t look right. Can you help?
Hello Nicole,
Thank you for reaching out! The “gap” refers to the gap created when you turned your work in Row 1- this means that when you knit Row 3 the gab is where you had previously turned your work in row 1. This you fix the rest of the issues you are having. I hope this makes sense and please let me know if I can clarify anything!
Happy knitting,
Marilla
I’m knitting this for my sister. She said she wanted a “prettier” stocking and she’s in for a treat! This is beautiful! It’s a pleasure to knit and I already know that I will make more. Thank you for such a stunning design.
Hi! I’m knitting the heel flap and am having a little trouble with the slip stitches looking like the picture.
For Row 1: *slip1 purlwise, knit1* should the slip stitch be with yarn in front or in back?
Same question for Row2, slip with yarn in front or in back?
One way it looks like stockingnette and another I have a weird bar. Sorry if this question has already been asked! Thanks for your help
Hi Ali,
Thanks for writing in! Working a heel for the first time can be a bit confusing! In the heel section, you will be slipping purlwise with the yarn in the back. The look of the heel will be a bit like bunched up stockinette stitch. Your knitting should look like the picture underneath the “The Heel Flap” section.
I hope that this clears things up!
Cassy
Hello! I want to make these for Christmas, but I want to add a monogrammed letter do you think that is possible?
Hi Sarah,
Thanks for writing in! I love this idea, and the easiest way to add text or a monogram to a knitted object is with Duplicate Stitch; unfortunately, duplicate stitch doesn’t work very well over textured stitches such as the Diagonal Scallop Stitch. You could either plan ahead and leave a rectangle in the center of the stocking as stockinette stitch to work the duplicate stitch on, or find a pattern for a crocheted or knitted freestanding letter to applique on to the stocking when it is finished.
Best of luck and happy knitting!
Julianna
I am at the heel turning point I read all the comments about the turn I still don’t understand how could the stitched decreased to 20 stitches since you would keep on turning but only knitting the 8stitches that mentioned in the row2. And turn the work before reach to the “gap” (it was answered to one comment referring to the gap at row1)so how could one knit stitches before and after it. It really don’t add up for me I am giving up looking for other people’s turning heel tutorials
Hi Emily,
Thanks for reaching out! Heel turns usually seem quite mysterious at first, so you are not alone in your confusion! Each short row ends with either a P2tog, P1 or a SSK, K1, which decreases one stitch each time you turn, so you will be decreasing down to 20 stitches by the time you are done with the heel turn. Although it is a bit scary, the best thing to do when turning a heel is to trust the pattern and follow it row by row – I promise it works even if it is difficult to visualize when reading through the pattern!
I hope that helps!
Julianna
I’m interested in making it smaller. If I knit it on the smaller needles recommended in the comments, how big does the stocking measure? Is it still the same length and circumference?
Hello Camilla,
Thank you for reaching out! This will all depend on your gauge. If your gauge is smaller than the original pattern the circumference will be smaller, but you can knit to any length you would like.
I hope this all makes sense and let us know if you have any further questions!
-Marilla
I would love to knit this stocking but make it wider and longer. Is there a way to do this? If I use larger needles and larger yarn, can you please recommend a larger yarn that will offer the same look of this yarn (and which needle size I should use)? I will purchase the yarn from Purl–I really appreciate it!
Hello Victoria,
Thank you for reaching out! If you want to make a bigger version I would recommend checking out either our Big Good Wool or our Super Soft Merino. I hope this helps and happy knitting!
-Marilla
Hello! I started knitting this pattern in a size 7 needle wanting it to be a denser knit… Now I see where it says to go down to a smaller size about halfway down the leg, Why does it say to do this? Is it just to make the foot more dense? I’m thinking I should probably net the whole thing in a size 7, what do you guys think?
Hello Rose,
Thank you for reaching out! This is a simple way to add shaping to the project. However, if you prefer the denser look you can certainly switch to the smaller needle sooner!
Happy knitting!
-Marilla
Hello, I love your Christmas stocking patterns, but am interested in making one with a fingering-weight yarn. To my knowledge, you don’t have a pattern like that on your website. Would you be interested in either converting one of your existing patterns or creating a new one? (I would like to try some colorwork, so if the pattern was a plain stockinette stitch, that would be the easiest to follow.) 🙂
Thanks for all the free patterns and projects on your site! They’re so inspirational.
Hi Kerry,
Thanks for writing in! Unfortunately, we don’t have a stocking pattern for fingering weight yarn – I’m so sorry about that! I will certainly pass your request along to our design team, but in the mean time, you may be able to find a pattern on Ravelry or by searching for “Fingering weight Christmas stocking pattern” in your preferred search engine.
I hope that helps!
Julianna
Can you please condense the print version of this pattern for those of us who are trying to be environmentally responsible but need something to look at offscreen?
Hi Vicki,
Thanks for writing in! Our Print function allows you to pick and choose whichever portions of the pattern or pictures you want to print! If you’re on a desktop version of the site, you will find a “print” icon in the right column just below the “Save To Favorites” button. If you’re on a mobile version of the site, you will find a “print” icon below the pattern and above the comments.
Follow the easy on-screen instructions to delete whichever parts of the pattern you don’t want to print or save. For example, you may decide to shorten the pattern by omitting certain images or the list of materials. To remove images, click the drop down next to the image icon and change from 100% to 0%.
I hope that helps!
Julianna
This is so pretty and such a fun stocking to knit. When knitting the toe, the first round reads two times, work in pattern to the end of the round. 4 stitches decreased. Does that mean start at the beginning of round one for decreases on either side of the markers?
Hi Jana,
Thanks for reaching out and for your kind words! I am so glad to hear you are enjoying this pattern! Basically, you should have 2 markers placed on either side. You will then DSS to 4 stitches before first marker, then you will k1, k2tog, k1, slip the marker, k1, ssk, k1 so there will be a decrease on either side of the marker. You will then again work DSS to 4 stitches before the next marker k1, k2tog, k1, slip the marker, k1, ssk, k1 again! Then you will continue in patter to the end of the round. This will be a total of 4 stitches decreased, 2 decreases on either side of each of the stitch markers!
I hope this helps, happy knitting!
Gianna