The Forty Minute Tote

I love straightforward, well-constructed projects that yield something practical. I know this might sound a bit boring, but the efficiency and elegance of simple design really gets me excited. So it’s no surprise that one of my favorite all time projects (if I do say so myself) is my Twenty Minute Tote. It’s something I go back to again and again, any time I want to highlight a special fabric. I love its streamlined engineering and the fact that it really does only take 20 minutes!

And so, in this same spirit of economic design, I thought I’d expand the Purl Bee’s family of quick totes with a new roomier bag, the Forty Minute Tote. As useful and everyday as the original, this one has the added features of an inside pocket, a boxed bottom and a linen lining.

The Forty Minute Tote comes together in a quick, clear way, and it features a new favorite fabric, Robert Kaufman’s Cotton Linen Denim. This fabric is a beautiful deep indigo blue reminiscent of your favorite pair of jeans, but with a slouchy drape perfect for a bag. I also used our very cute Reversible Webbing for the handles and the soft-but-sturdy Waterford Linen as the lining. And of course, true to its name, it takes only 40 minutes to make. I promise!
ps- The lovely wooden hooks featured in these pictures can be found here.
Materials

To make one tote bag:
- 2 yards of Reversible Webbing in Orange and Camel
- 1/2-yard of Cotton Linen Denim for the outer bag. Wash and dry this fabric before sewing with it. It’s a very dark denim and might rub off on your clothes if it’s not pre-washed.
- 1/2 yard of Waterford Linen in Natural for the lining
- 100% cotton thread in color 1240 to match the lining fabric
- 100% cotton thread in color 1720 to contrast with the outer fabric and match the webbing
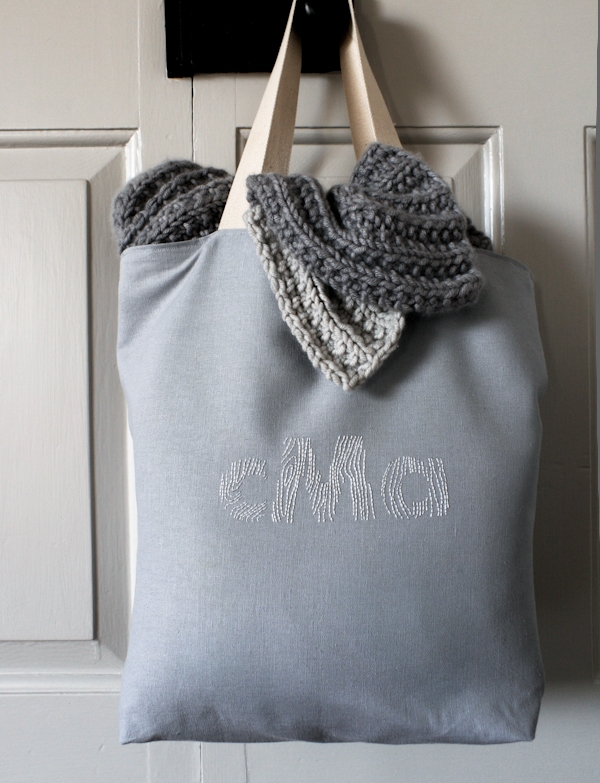
To make the embroidered version of this tote from November, 2012 you’ll need the following materials:
- 1/2 yard of Essex in Grey for the outside fabric
- 1/2 yard of Essex in Ivory for the lining
- DMC Embroidery Floss in color 3865
- Sangle Cotton Webbing in Natural
- 100% cotton thread in colors 1040 (to match the lining) and 4900 (to match the outside fabric)
- A 4 Seasons of Embroidery Packet
Embroider the initials onto the outside fabric before you cut it and then proceed as directed in the pattern below.
Size
Finished Height: 15 inches tall
Finished Dimensions of Opening: 14 inches wide, measured flat, or 28 inches circumference
Finished Dimensions of Bottom: 11 inches wide x 5 inches deep
Finished Strap Length: 20 inches
Cutting
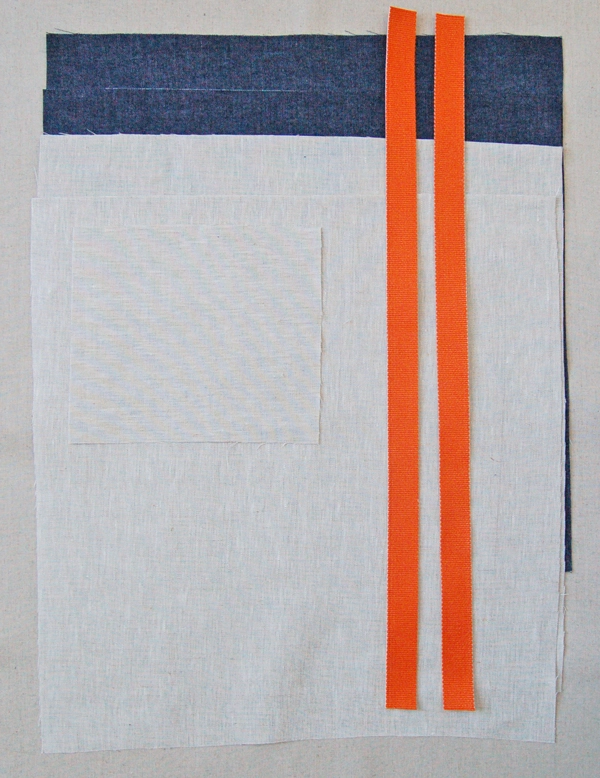
From the outer fabric:
- Cut two rectangles 17-inches by 18-inches.
From the lining fabric:
- Cut two rectangles 17-inches by 18-inches.
- Cut one rectangle 8-inches by 7-inches for the pocket.
From the webbing:
- Cut two lengths, 22-inches long.
Attaching the Pocket

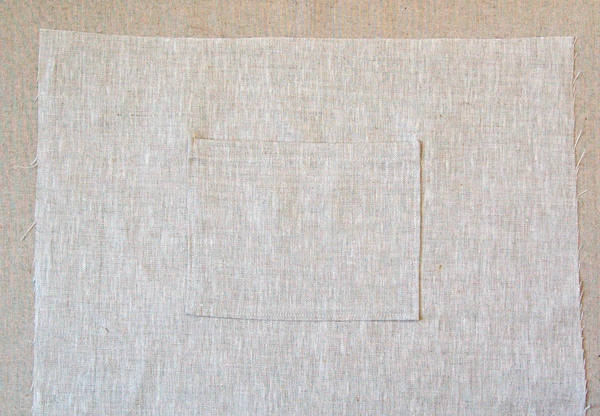
Using the thread that matches the lining zig zag around three sides of the pocket piece, leaving one of the long sides unsewn.
Press and fold the unsewn side down a 1/2-inch twice. Top stitch this fold down. The folded side is now the wrong side.
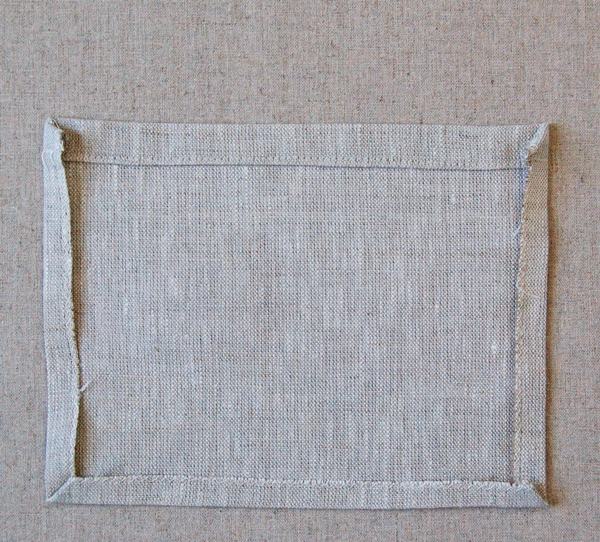
Press the zig zagged sides in a 1/2-inch towards the wrong side. Tuck the corners in.
Pin the pocket, right side facing out, onto one of the larger lining pieces, 3-inches from the top edge and 5-inches from each side. The folded edge should be at the top.
Top stitch the pocket onto the lining piece along the sides and bottom, leaving the top open. Make sure to back stitch at the beginning and end of this seam.
Note- the side of the fabric with the pocket sewn on it is the right side.
Sewing the Outer Bag

Pin the outer fabric pieces right sides together along the two long sides and bottom short side.
Sew the pieces together with a 1/2-inch seam allowance.

Open up the bag and press one of the bottom corners so that the side is directly on top of the bottom seam and the corner forms a sharp point as shown above. Make sure the seam allowances of the side and bottom are facing the same direction and laying flat.
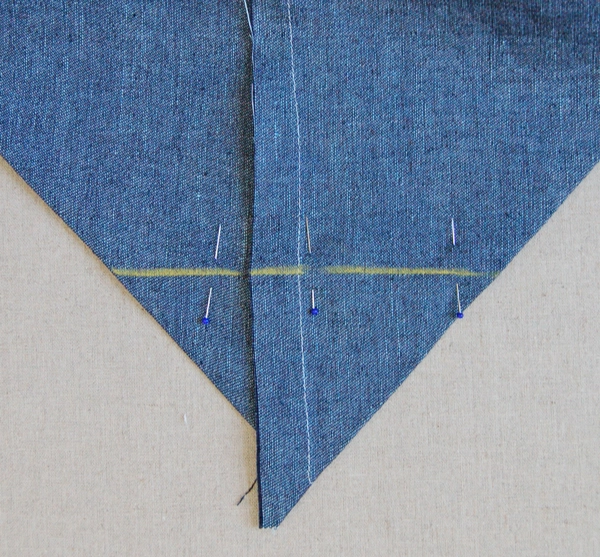
Mark a line perpendicular to the side seam at the point where the corner is 5-inches wide as shown above.
Sew along this marked line and snip off the outside triangle of the corner.
Repeat for the second bottom corner making sure to keep the seam allowances going in the same direction.

Once both of the side are sewn and the corners are trimmed off your bag will have a boxed bottom as shown above.

Turn the outer bag right side out and press out the creases that were created when you made the boxed bottom.
Press the top raw edge 1/2-inch towards the wrong side of the bag.
Sewing the Lining

Repeat the previous steps on the lining pieces:
- Sew the linen pieces right sides together with a 1/2-inch seam allowance.
- Create a 5-inch wide boxed bottom by pressing the corners out, sewing the marked sides, and cutting off the corners.
Then, keeping the wrong sides facing out, press out the creases. Press the top raw edge 1/2-inch towards the wrong side.
Sewing the Bag Together
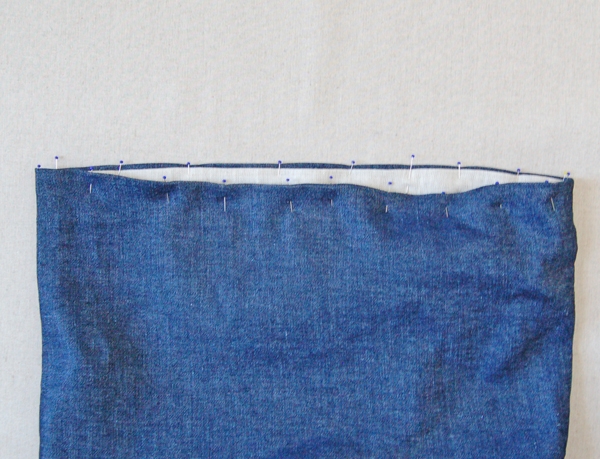
Slide the lining inside the bag matching up their side seams. Push the lining just a hair lower than the outer section. Pin the lining and the outer sections together along their top folds.

Mark the ends of the webbing pieces 1-inch from their ends.

Slip the ends of the webbing in between the lining and the outer fabric 4 1/2-inches from the left and right side seams. Line up the 1-inch markings with the folded edge of the bag so the end of the handles are 1-inch deep. Make sure not to twist the handles. Pin the handles in place.
Put the contrasting thread in the top of the machine, and the lining-matching thread in the bobbin. With the outer fabric facing up start at a side seam and stitch the lining and outer sections together, 1/8-inch from the fold, back stitching at the beginning and end of the seam. Make sure that this seam catches both the lining and the outer sections all the way around (and thus sews the handles into place as well.) If this seam isn’t neat and straight tear it out and do it again, it’s the only really visible seam so you want it to look nice.
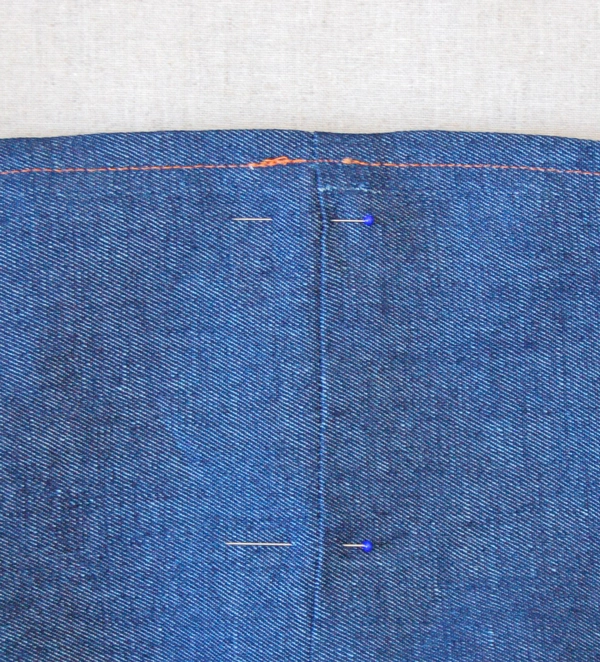
Pin the the lining and outer sections together along their side seams stopping 4-inches down from the top edge.
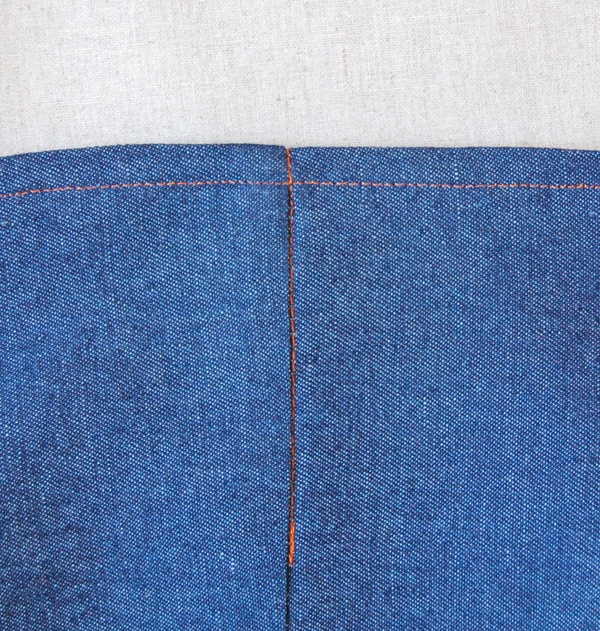
Sew this section together, keeping the stitching on the lower side of the seam as shown above. This will anchor the lining and outer sections together.
You’re all done and ready to take your tote out on the town!



Love this! I would like to use the blue/taupe webbing. Do you have thread suggestions for this webbing? Thanks!
I love it, it will be the perfect gift for my girlfriends when we meet again! Thanks so much!
Awesome tutorial! I make totes with similar construction – but the last little “anchor stitching” in the seam is inspired!!!
Hi Jenn-
The blue and taupe webbing would be beautiful! I would use thread color 7730 for the thread.
Thanks for your question!
Molly
I committed to providing favors for a baby shower this coming weekend. Meanwhile, I'm in the middle of moving across the country. Yikes. I'll have my sewing supplies accessible on Tuesday. I will take you on your word of 40 minutes and see if I can whip them out by the event on Saturday. Thanks for the tute!
Hi Margaret-
Sounds like a good plan! If you find yourself super short on time you might want to check out the 20 minute tote as well: http://purlbee.squarespace.com/the-twenty-minute-tote/
Also, you can cut down on the time if you're sewing more than one by making them assembly line style.
Good luck and thanks for writing in!
Molly
Hi Molly,
Great bag and even better creation time!!
Why would you not make the front and back from one piece folded over – that is, with no seam at the bottom of the bag? Wouldn't it be stronger that way as well as having one less bit to sew?
I sometimes carry a lot of stuff with me and I'm not sure about providing a possible escape route through a bottom seam!! I'm also looking at this as a book bag for my daughter and school books can be very heavy plus they have those pointy corners.
Thanks for all the inspirations.
Hi Linda-
I made it the way I did for a two reasons:
1. I find it harder to cut a 35-inch piece as straight as two 18-inch pieces.
2. If you were making it with a printed fabric you would need to cut two pieces to make sure that the pattern was facing the same direction on both sides of the bag. Since I like to reference these patterns over and over I thought it would be best to make it so it could work with any fabric.
With that said I totally understand your point and you could certainly make it that way! Best of luck with it and thanks for writing in!
Molly
How timely! I just posted a lined bag with pockets on my bag of the week blog at ogno.blogspot.com. I'll have to add a link to your tutorial.
Thank you for this tote pattern! I bought oilcloth for making a lined tote just like this, so now I will have a guide to go by! Plus, I have a lot of fabric in my stash to make other totes as well!
Thanks again!
Thank you so much for sharing this tutorial–your idea will help me put to use some linen I somehow came home with–intended for a skirt! I'll get more use out of the tote, I believe. Thank you again.
I have a feeling this tutorial is going to show up in a lot of my posts. I did it again with bags for teachers at year's end. (http://ogno.blogspot.com/2012/06/week-23-or-book-bags.html) I made it a 60-minute bag by adding a (too long, but still useful) shoulder strap from side to side.. And then 80 minutes by embroidering the teacher's name on the front.
I made this bag over the weekend and it turned out great! I used blue and white striped linen on the inside. It took me a little over an hour, but I'm slow and methodical — I'm sure the next bag will take me less time. One hint if you're working with denim: I could see that I'd havetrouble getting over the seams when topstitching along the top of the bag. My Viking machine doesn't like bulk. A couple years ago I bought this little plastic device called a “Jean-a-Ma-Jig” that slips under the presser foot and helps you get over those seam humps. Worked like a charm; the topstitching is flawless.
Awesome!
It took me ages to make the 40-min-tote, but that's because i was out of practice. (and being a german using metric measurements i had to convert all yards and inches first…)
Having discovered this amazing blog only this week it immediately rekindled my sewing and crafting aspirations so i have spent the last two days neglegting all necessary washing-up-replying-to-emails-having-my-watch-fixed-cleaning-the-flat-business and i won't regret a minute of it!
will definitely try out a lot more of your tutorials as often as possible.
also, i was thinking whether it's possible to make broad friendship bracelets to use as handles for the tote. i'll keep you informed once i managed to try it out.
thank you for your effort to make these tutorials such an easy peasy instruction,
enthusiastic greets from germany,
viviane
I just made this for my mom for christmas (shhh!). I used navy & white chevron for the outside, pink with tiny white polka dots for the lining and bright yellow straps. Super fun & cute! This was my first tote bag (i'm a sewing beginner) and this tutorial was fantastic! thank you so so much!
Thank you for the tutorial! I just finished making this bag and I am SO happy with the result. I am a real beginner so this actually took me a few hours to make but I'm sure with practice it would be quicker. I also made my own straps rather than using webbing so that took extra time. I used black cotton drill for the outside and bright purple cotton with little white stars for the lining and I love my bag. thanks again
Thank you so very much for this – I am a beginner sewer, and this turned out so lovely, I am delighted. Word to other novices though … give yourself more than 40 minutes if you are pressed for time! This, for me, was definitely a “Ninety Minute Tote”. :o) I plan to make a few more, so hopefully with practice I will be whipping them off in true 40-minute fashion. Thank you again, I just love the site so much and truly appreciate the patterns and infinite inspiration.
I have now made this three times-love it-thank you so much for the tutorial!
I made a bag which was loosely based on the 40 minute tote and I think it turned out great, I gave it to a friend for her birthday and she loved it. I am definitely going to make it again! ( http://pfsvintage.blogspot.ca/2013/01/tote-ally-fun-birthday-bag.html )
Hi Molly,
I realize this question defeats the idea of the “40 minute” tote, but I would love to add something to give it more stability – like fusible webbing? Can you recommend what I should use? Thanks.
Hi Sarah-
You could use fusible webbing to give it some extra body.
Craft Fuse would work well if you want it very stiff: https://www.purlsoho.com/purl/products/item/3949-Pellon-Craft-Fuse-808P-WHT
Or this lightweight fusible interfacing would work well if you just want t little extra shaping: https://www.purlsoho.com/purl/products/item/2140-Pellon-Lightweight-Fusible-Interfacing-906fp
Thanks for your question!
Molly
Thanks, Molly! I know what to buy now – and I just washed up my fabric. Can't wait to get started 🙂
Sarah
This would be just what I am looking for If it had a zipper! May have to experiment.
Just want to thank you for the wonderful tutorial. 🙂
I just finished this tote with some old curtain fabric and I absolutely love it! Thank you for the tutorial!
Thank you for your great tutorials! I made the 20 minute tote today and this one will be next tomorrow. The 20 minute tote was my first sewing project in 45 years! I usually have problems following tutorials but your written instructions plus pictures are spot on. Thanks again!
I love this easy to understand and easy to do! I just finished my first project!
In fact that I like the most is simple and fashionable.
Just finished my second ever sewing project – this tote – and am totally in love with the bag, the craft, and the purl bee! Thanks for making great patterns available for free online – I’m admittedly starting off with cheap materials I can live with destroying, but I can’t wait to graduate to the good stuff you guys sell!
Love this tutorial, thankyou!
I made the bag this weekend, using natural linen and some pretty floral cotton instead and it worked great! I also added an inside and outside pocket and covered one side of my strap with the printed fabric. Mine was more of a 5 hour tote than a 40 minute one though! 🙂 You can have a look at my bag here: http://little-booker.tumblr.com/
Love the reversible webbing….and the fabulous 40-minute tote!
I can´t open the link to the reversible webbing or to your 20-minute tote. Help! Yours is the only site which I keep being re-directed back to for the reversible webbing…are you able to share the store name where you bought it?
Thanks in advance!
Vicki
Hello Vicki!
Here is the link to the 20 minute tote: https://www.purlsoho.com/create/2010/05/07/mollys-sketchbook-the-twenty-minute-tote/ So sorry it wasn’t working for you!
If you are interested in purchasing a large quantity of the reversible webbing, we’d be happy to help you place that special order! Please feel free to email customerservice AT purlsoho DOT com your request! Happy sewing! -Alyson
Trying to think of a way to only have one strap?
I would like to make it a little wider. Would that mess up any dimensions in sewing?
HI Kim,
Great question! Were you to box off the bottom of the bag more severely so as to create a wider bag, it would make the front and back narrower. TO counteract this, you could cut your fabric a few inches wider so as not to loose any width on the front and back!
I hope that this helps!
Cassy
Hi there. I made two of the 20 minute bags, with lining and pockets, so a little longer than 20 minutes, and they turned out so cute! I can’t stop thinking about bags, bags, bags! Now I want to make the Easy 40 minute bag with lining/pocket.
I want to make it 15″ tall by 17″ wide finished with 5″ gusset box. By my calculations, I should cut my pieces 17″ tall by 21″ wide to accommodate extra 3″ in width. Is that correct? I hope you are still reading and answering this blog!!
Thanks, Nicci
Hi Nicci,
Thanks for writing in! We’re definitely still keeping track of comments and answering them as soon as we can. So long as you aren’t changing the depth of the bag, you just have to add 3″ to the width of the rectangle to add 3″ to the width of the bag. With that in mind, your new rectangle should be 20″ wide rather than 21″ wide.
I hope that helps and please let us know if you have any other questions!
All the best,
Zha Zha