Four Corners Baby Blanket
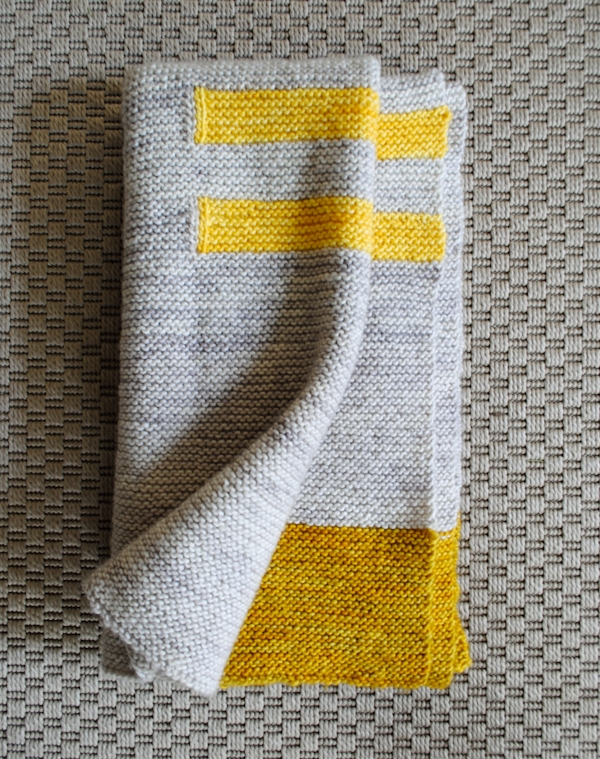
Babies tend to inspire soft and gentle designs with petal pinks and cloudy blues, big-eyed bunnies and fuzzy elephants. Babies are, after all, pretty soft and gentle. But for this Four Corners Baby Blanket, I decided to throw convention to the wind, opting instead for something a little different, something for the kind of baby (and parents!) who might have an eye for quirky colors and spare, modern design.

The beautiful hand dyed colors of Madeline Tosh Merino DK are the perfect paints for your palette. Complex yellows, unusual neutrals and a whole fascinating spectrum in between, you’ll love choosing the pops for your own version of the Four Corners Baby Blanket! -Whitney
Designed by Purl Soho designer, Whitney Van Nes.
Share your progress and connect with the community by tagging your pics with #PurlSoho, #PurlSohoBusyHands, and #PurlSohoFourCornersBabyBlanket. We can’t wait to see what you make!
Materials

- 6 total skeins of Madeline Tosh DK, 100% machine washable merino wool. Each skein is 225 yards/ 115 grams; approximately 1,350 yards required. (NOTE: We no longer offer Madeline Tosh DK, but choose from one of our other light worsted/dk weight yarns.)
- 4 skeins of the Main Color. I used Antler (right). Approximately 900 yards required.
- 2 skeins of Contrast Colors. I used Candlewick (left) for the corners and Butter (center) for the stripes. Approximately 450 yards required. (One skein would be enough to make both the corners and the stripes. And two skeins is enough for two blankets.)
- A US 7 (4.5 mm), 24 or 32 inch circular needle
Gauge
22½ stitches = 4 inches in garter stitch
Finished Size
28 inches by 31 inches. Keep in mind that garter stitch tends to stretch vertically, so with use, the length will grow a bit.
NOTES
Intarsia Tips (Changing Colors)
Changing Colors on the Right Side
When switching from one color to the next on the right side of the work, bring the first color in front of the second so that it is “trapped” between the new working yarn and the knitted piece. Knit the first stitch of the new color normally.

The right side “seam” will look like this:

Changing Colors on the Wrong Side
When changing colors on the wrong side of the work (between purl stitches), “trap” the first color by bringing it behind the new working yarn. Purl the first stitch of the new color normally.

Here’s what the wrong side “seam” looks like:

Pattern
NOTE: When you’re winding your skeins into balls, be sure to wind the yarn you will use for the corners (“Yarn A”) into two relatively equal balls.
Corners 1 and 2
Using a basic Long Tail Cast On with Yarn A (Candlewick), cast on 32 stitches. Then use Yarn B (Antler) to cast on 94 stitches. With a second ball of Yarn A, cast on 32 stitches. 158 stitches total
(At this point, the three sections are not attached to each other, but as you work the intarsia they will be!)

Row 1 (right side): With Yarn A, k32; with Yarn B, k94, with second ball of Yarn A, k32. (See Intarsia Tips above for how to properly switch colors.)
Row 2 (wrong side): With Yarn A, k31, p1; with Yarn B, p1, k92, p1; with second ball of Yarn A, p1, k31. (Again, the above Tips will help you change colors correctly.)
Repeat Rows 1 and 2 until piece measures 4 inches from cast on edge, ending with a wrong side row.
Cut all three yarns.
Joining Yarn B, knit every row until piece measures 10 inches from the cast on edge, ending with a wrong side row. Cut the yarn.
Here’s what the right side looks like:

And here’s the wrong side:

Stripes 1 and 2
Row 1 (right side): Joining Yarn C (Butter), k100; joining Yarn B, k58.
Row 2 (wrong side): With Yarn B, k57, p1; with Yarn C, p1, k99.
Row 3: With Yarn C, k100; with Yarn B, k58.
Repeat Rows 2 and 3 until stripe measures 1 1/8 inch (or for 6 garter stitch ridges / 12 rows), ending with a wrong side row. Cut both yarns. **
Joining Yarn B, knit every row for 1 1/4 inches (or for 7 ridges / 14 rows), ending with a wrong side row. Cut the yarn.
Repeat from Row 1 to **.
Joining Yarn B, knit every row until piece measures 27 inches from cast on edge, ending with a wrong side row. Cut the yarn.
Corners 3 and 4
Row 1 (right side): Joining Yarn A, k32, joining Yarn B, k94, joining second ball of Yarn A, k32.
Row 2 (wrong side): With Yarn A, k31, p1; with Yarn B, p1, k92, p1; with second ball of Yarn A, p1, k31.
Row 3: With Yarn A, k32; with Yarn B, k94, with second ball of Yarn A, k32.
Repeat Rows 2 and 3 until corner squares measure 4 inches, ending with a wrong side row.
Bind Off
Bind Off Row (right side): With Yarn A, bind off to the end of color A (1 stitch of Yarn A remains on the right needle). Cut Yarn A and pull it through the remaining stitch. With Yarn B, bind off to the end of color B (1 stitch of Yarn B remains on the right needle). Cut Yarn B and pull it through the remaining stitch. With Yarn A, bind off to end. Cut yarn and pull it through the remaining stitch.
Finish
Weave in all the ends. Use the cast on and bind off tails to sew closed the gaps between colors. Gently block or machine wash (and lay flat to dry) if you’d like!


I fell in love with this pattern as soon as I saw it, but didn't think I'd have time to knit it in time for my friend's baby shower. I used bulkier yarn in bolder colors and think it's a great alternative to the more delicate version in the pattern. I'm new to intarsia, so the tips really helped!
I posted my version on my blog:
http://percolatingdesign.wordpress.com/2012/05/13/diy-baby-gifts/
I finished it! and i love it. ii'm telling anyone who will listen that i made this afghan. 🙂 its larger than it looks in the photo, especially for someone like me who refuses to use a measuring tape until its clear something is growing out of control. its large enough for baby and mom to curl up in.
a picture of my finished product can be found at this link:
http://www.ravelry.com/projects/getchrisitelove/four-corners-baby-blanket
What cast on method is best for this pattern?
what is the best cast on method for this pattern?
Hi Megan,
I almost always use a long tail cast on for nearly everything I make. Some knitters prefer other methods depending on what stitch pattern follows, but for garter stitch I've never heard of there being a special cast on… Cue the cast on experts!
Thank you so much for asking and good luck!
Whitney
i'm in the process of starting this blanket for my own baby and having a difficult time starting the intarsia knitting. i've made the super easy baby blanket and have the garter stitch down but am new to intarsia. any tips for this beginner would be greatly appreciated! 🙂
Hi Brynne,
Did you see the tips and photos at the beginning of the pattern that explain the intarsia techniques for this blanket? If so and you're still having trouble, here is what may be a helpful overview of intarsia, taken from our Intarsia Tutorial:
Intarsia knitting isn't hard, but there are some basic rules to know.
Unlike fair isle knitting, the yarn is not stranded across the back of the work in intarsia knitting. Instead, you have a separate ball of yarn for each area of color. If you have a lot of color changes in one row, you may want to wind the separate colors onto bobbins to help you stay organized.
The other important rule to keep in mind is that when you switch from one color to the other you have to “twist” the yarns in order to avoid holes. I like to think of it as “trapping” the yarn, because you put the yarn you're finished using in front of the new yarn, trapping it between the new yarn and the knitting. This manoeuvre is always done on the wrong side of the work.
If none of this sets you on the right path, please let me know where you're getting hung up and I'd be happy to help!
Thanks for your question!
Whitney
hi whitney! thanks for your quick response. i did read those instructions and have looked up quite a few tutorials and for whatever reason am just struggling, embarrassingly enough. the trouble i'm running into comes right off the bat on my first row of knitting.
so i cast on my initial stitches and begin each color with a slip knot (yellow, grey and then my second ball of yellow). the colors should not be connected at this point, right? so after casting on, i begin knitting the next row. for some reason, i think my slip knots are preventing the intarsia from working. the yarn on the slip knot slips through properly when i initially make it but once i try to combine the colors on my first row, the loop from the slip knot stretches out and stays in a large loop rather than coming back together with the new color after being knitted. does that make sense?
i appreciate your help and hope my explanation makes sense!
Hello Brynne, I realise this reply is a few years too late, but it might help someone else who may be having the same issue. If your slip knot is becoming too loose when you knit it, it may have to do with which way you have made your slip knot. If, when you make your slip knot you tighten it up by pulling the yarn tail (rather than the working yarn that is attached to the ball of yarn) then it will loosen as you work it. So it’s always recommended to make your slip knot so that it tightens up when you pull on the working yarn, rather than the tail. That way, as you work it tightens up, and cannot become loose again. This is recommended when making the initial slip knot for crocheting as well. It is a little difficult to describe in writing how to tie a slip knot so that it tightens when you pull on the working yarn, so you’ll need to do a little bit of experimentation. Tie a slip knot and see which yarn end you need to pull to tighten it, if it’s not the working yarn, try again, paying careful attention to which way you have your yarn. I find that if I have the yarn tail hanging towards me, and I use the working yarn to wrap around, and the working yarn is the piece I use the pull through as the “loop” of the slip knot, this will be successful. It might sound confusing, but give it a try and it will soon make sense! I hope you were able to make the blanket eventually, as it’s so beautiful 🙂
Hi again Brynne,
My big question for you is, have you knitted beyond the first row yet? Or have you been too concerned with the looseness of the slip knots to try the second row?
I recall that there may be some inevitable looseness in the cast on that is very effectively fixed when you weave in the ends (similar to what happens when you join for working in the round). By the second row the wonkiness should have resolved itself.
What do you think about that? Does this sound like it might get you on the right path? Let me know!
Whitney
Hi Whitney –
I'm thinking of using Blue Sky Worsted Cotton for this. Do you think I need to change the number of stitches I cast on? Or the number of rows?
Thanks!
Hi Isabel,
Blue Sky's Worsted Cotton is quite a bit thicker than the yarn I used here, so if you follow the pattern as is, you'd get a bigger blanket (probably around 40 inches wide). You would, of course, need more yarn and bigger needles.
If you'd like to maintain this size (28 x 31 inches), then you would cast on the number of stitches you get per inch with the Worsted Cotton times 28. So if your gauge is 4 stitches to the inch, you would cast on a total of 4 x 28 = 112 stitches (23 for each corner color). The length measurements would remain the same.
Please let me know if you need more help making these conversions! And thanks for asking!
Whitney
Do you do commission work? I'd like to pay you to knit a custom baby blanket for me. Wondering if you do they sort of thing?
Hi Sheetal-
We don't do custom knitting but if you call our NYC store they might be able to put you in touch with a custom knitter,
Thank you!
Molly
Hi Whitney!
your project is very very nice!
I'm an italian knitter and I can't find the Madelinetosh wool….could you suggest me a wool alternative?
thanks!
Federica
Hi Federica,
We do ship our products overseas. Our shipping policies and rates are right here: https://www.purlsoho.com/purl/shop/shipping
Otherwise, any DK weight yarn would work great! Here are some more options: https://www.purlsoho.com/purl/products/3-knitting-crochet-yarn?filters%5B%5D=5
Thank you so much for your question and please let us know if you have more! Ciao!
Whitney
Love love love this. Can I get instructions for throw-size. I'm a rooky knitter and need help with the calculations. Thanks so much. And love your web-site too.
Me again – could you give me calculations for bulky yarn please?
Hi Valerie,
Without knowing exactly what your plan is, I suggest that you cast on the number of stitches you get per inch (for example, 2 stitches) by the desired finished width (say, 48 inches, for a cast on of 96 stitches). You'd then have to calculate how many stitches wide to make the corner squares and stripes based on the proportions of your finished blanket.
I hope this gets you off on the right foot! Please let us know if you have any other questions and good luck!
Whitney
Thanks so much for your quick response.
Hi Whitney,
I saw this blanket on pinterest and I definitely want to make this my next project. I was just curious to know what ply of yarn did you use? Also what size needles do you think work the best?
Thanks
Hi Stephanie-
All the information on the needles and yarn can be found under the "Materials" section of this pattern. The yarn would be equivalent to an 8ply weight but the important thing is that you get the correct gauge, which is listed at the beginning of the "Pattern" section.
Thanks for getting in touch and please let us know if you have any more questions.
Molly
Hi …. Hoping you can help with yardage? I am planning to do this blanket in the Madeline Tosh single strand yarn but in worsted weight. I can adjust cast number of stitches as mentioned in an above post to keep it the same dimensions. But how much yardage do I need for the main color and for the contrast colors? So I know how many skeins to buy.
Thanks, Bev
Hi Bev!
I know that you will still only need 1 skein of each Contrast Color. As far as the main color goes, I’m not sure that the difference will be enough to need any fewer or more skeins. I would probably get 4 skeins (or perhaps 5 to be super safe, since a the thicker yarn has fewer yards).
Thanks for your question!
Thomas
Hi … I thought I was on gauge, but at 10 inches done (haven’t done the first stripe yet), the width of the blanket is 30.5 inches. So, to keep it looking proportional, what do you suggest? How much length to add and where? Thanks, Bea
Hi Bea-
Your width is only 2.5″ wider than the pattern specifies so I would just add 3 inches in length. If you knit 11″ before the first stripe and add another 2″ after the second stripe the proportions should work themselves out.
Thanks and good luck with your blanket!
Jake
What size needles did you use?
Hi Brianna,
We recommend a US #7, 24 or 32-inch circular needle, if you’re using this same yarn and if you get our same gauge with that size needle. All of this information is posted right before the pattern begins, by the way, if you want to see it there!
Please note that this is the needle size we “recommend.” Perhaps you knit a bit tighter or looser than we do, so it’s possible you’ll want to use a bigger or smaller needle than we did!
Thank you so much for your question and please let us know if you have any others!
Whitney
Hi I’ve knitting this blanket for few days and I just finished the first corner part. And to do next it says cut off all three yarn and join yarn B and knit.
But I’m stack here because I don’t know what exact thing to do.
If you cut off the yarn what do I do with those loose yarn? Do I knit together with yarn B when I joining in??
Hello Mio!
Once you’re done with the blanket, you can weave in the tails of yarn securely. You can take a look at our tutorial for this technique here: https://www.purlsoho.com/create/2011/07/14/weaving-in-your-ends/ Sometimes knitters prefer to knit the previous color with the new colored yarn, but I find that it creates a little pucker and a visible jog of the previous color. I prefer to weave them in at the end!
Best of luck! -Alyson
I love this pattern! I’m really new to knitting and have never worked two colors before. When I go to connect the two colors for the squares, I keep ending up getting an additional stitch. I put the old color to the front to “trap” it but it ends up coming through in the loop I make with the new color (working the right side). I know I’m just not understanding, but I have not been able to find a single online tutorial about how to connect two colors mid row. Can you help? Even a link to a video would be fantastic. It’s just not translating for me.
Hello Kirsten!
This definitely can be a more tricky technique. Its usually referred to as Intarsia, and we have a tutorial here: https://www.purlsoho.com/create/2008/06/30/intarsia/
Take a look at it and please don’t hesitate to write in again if you have any other issues! Thanks so much for writing! -Alyson
Thanks so much! After following your link, I realized I was making it harder than it needed to be. After a few test runs, I think I have it! I was afraid I would just have to give up on this one. Glad I don’t have to! Thanks again for your help!
I’m so glad it helped you! Enjoy! -Alyson
I’m so glad it helped you! Happy Knitting! -Alyson
HI Purl Bee,
I’m new to knitting but seem to be managing quite well with this one 🙂 I’m nearly at the end of the 2 corners section, in the instructions it says to “cut all 3 yarns”, Do we bind off at this stage then join along the top with the grey yarn? Please help! 🙂
Hi Kristin,
Thanks for writing in! When you are nearing completion of the 2 corners section, you will cut all three yarns and then join yarn B and continue knitting. You will not bind off here as you will continue knitting on the live stitches with yarn B.
I hope that this clears things up!
Cassy
My project is 3 years old, but I thought you might be interested. I had 3 weeks to come up with a wedding present for a friend’s daughter. That’s not enough time to make a blanket, but I love this pattern! I did some calculations, and made a set of Four Corners Dishcloths. (And matching wine glass slippers. And an open top box for whatever.) But the dishcloths were a hit with the bride, and I think they came out great. (And I learned to Intarsia! Bonus!)
You can see them on Ravelry: http://ravel.me/SuBethJimBob/fcbb
Hello Su,
Wow! Those are stunning! Thank you so much for sharing.
Warmly,
Marilla
Hi Purl Soho,
I would like to make this blanket but the Madeleine Tosh is unavailable. I can see from a previous post that any DK will do. The information about yarns on your website usually gives yardage of each skein which helps if a change of yarn is necessary. Do you have this information about Madeleine Tosh skeins, please?
Also which of your current DK yarn would you recommend for this and which colours – the yellow/grey combo is really lovely and I’d like to replicate that if possible.
Many thanks
Hi Margaret!
Thank you for writing in to us! Madeline Tosh DK comes in skeins of 225 yards each, which means this blanket needs about 1,350 yards to make. Instead of Madeline Tosh DK, I can recommend using Morning, which is also a DK weight yarn that is perfect for baby blankets. Since this yarn comes in skeins of 191 yards each, you would need 7 skeins of Morning for this blanket. We have it in the colors Stone Cottage, Grassland Gray, and Yellow Apple, too, which are very similar to the colors used in the Madeline Tosh version!
I hope this helps, and happy knitting!
All the best,
Margaret