Crocheted Striped Hand Warmers
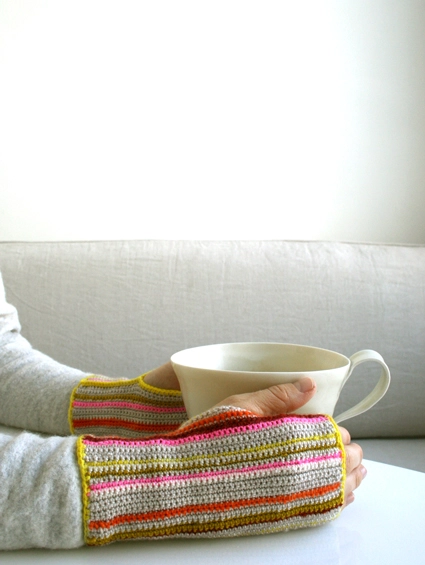
I’ve knit lots of hand warmers for the Purl Bee, but this is actually the first time I’ve crocheted a pair. What an oversight! The tight, durable fabric created out of single crochets is the perfect cold weather defense. Plus, there’s a looseness and spontaneity to crocheting that I love. To embrace this freedom, I decided to follow my fancy with some no-sense striping, a bit of pink here, a dash of olive there, color everywhere!
And with Koigu’s new KPM Needlepoint yarn all of this striping is actually possible without breaking the bank. Each mini skeins is 11 yards and only a few dollars, so you can indulge in all sorts of whimsical color play and creative experimentation. With over a hundred colors to choose from, treat yourself to a cozy afternoon with whatever colors are on your mind!
The Materials
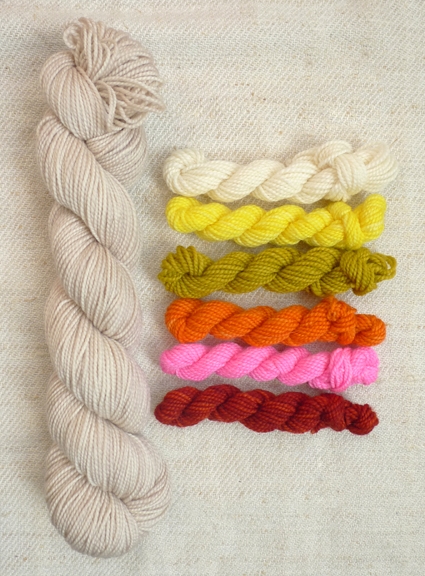
- 1 skein of Koigu’s KPM, 100% Merino Wool. This color is #2390.5.
- 7 skeins of Koigu’s KPM Needlepoint Yarn, 100% Merino Wool. From the top, I used one skein of #0, two skeins of #2100, and one skein of each of the following: #2335, #2200, #1155, and #1110. In the pattern I call these colors: WHITE, YELLOW, OLIVE, ORANGE, PINK, and RUST.
- A size D crochet hook
NOTES ON THE MATERIALS:
- To make a pair of basic hand warmers without stripes you only need one skein of the KPM. You could also use 1 skein of the KPM Needlepoint Yarn to crochet the hand warmers together with a contrasting color.
- To create your own stripe patterns keep in mind that each skein of KPM Needlepoint Yarn makes 7 rows as long as you don’t cut extravagant tails. Keep them about 2 inches long to be on the safe side.
Gauge
7 3/4 single crochets = 1 inch
Size
6 1/2 inches in circumference, stretching to up to 8 inches in circumference
6 3/4 inches long.
PATTERN
Foundation Row: Chain 51 stitches. Inserting hook into 2nd chain from hook…
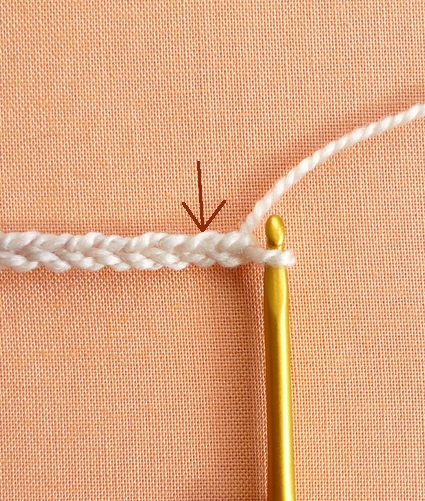
…make 1 sc into next 50 chain stitches.
Turn the work.
Row 1: Ch 1, insert hook into 2nd stitch from hook…
…and make 1 sc into next 50 stitches, making the last sc into the ch from the previous row.
Turn work.
Repeat Row 1 until piece measures 6 1/4 inches from the Foundation Row.
Cut the yarn and pull it through the last stitch. If you didn’t weave in the ends as you crocheted, you can do it now.
Make a second piece just like this one.
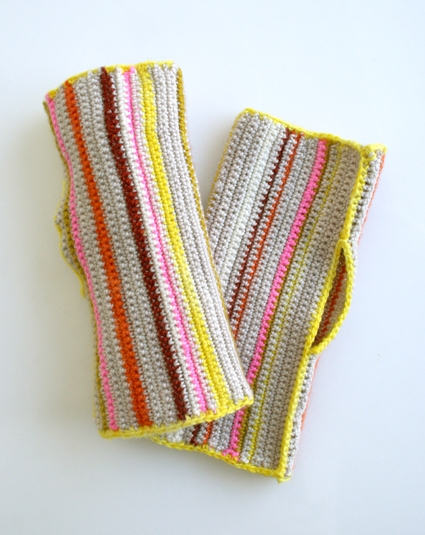
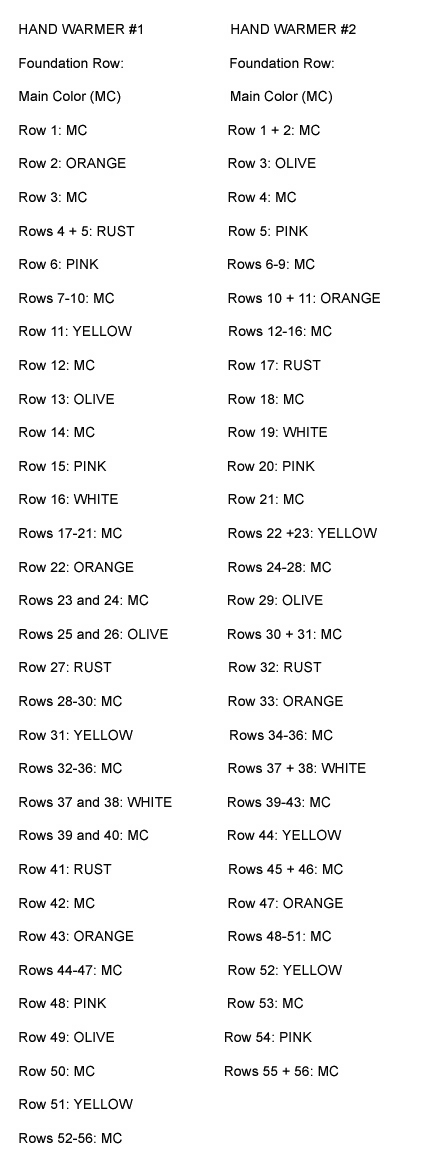
Stripe Sequence
If you’d like to follow the stripe sequences exactly as I did them, here they are. (Remember to leave short 2 inch tails so that you’ll have enough yarn for all these stripes! Also, you’ll save yourself a lot of trouble if you crochet over the ends as you work rather than weaving them all in at the end.)
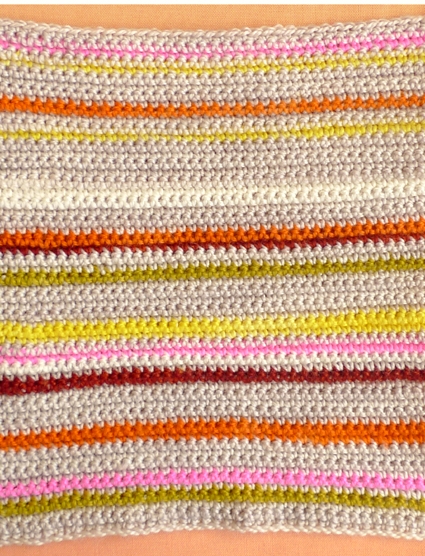
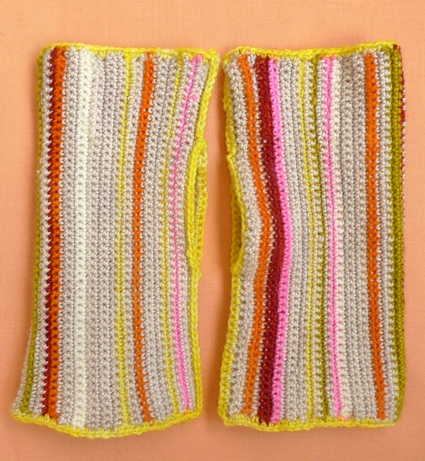
Each side will look slightly different. Here’s my preferred side of Hand Warmer #1 (the Foundation Row is at the bottom of the photo):
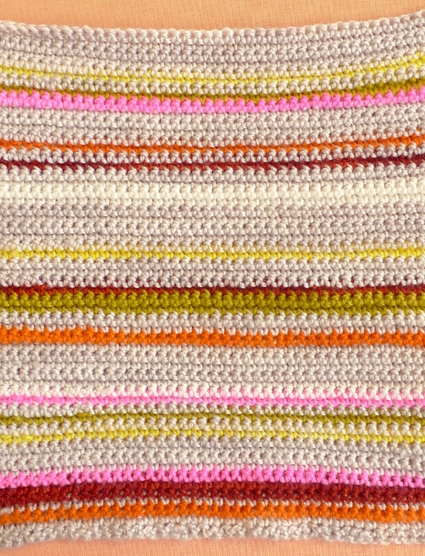
And here’s Hand Warmer #2:
How to Change Colors
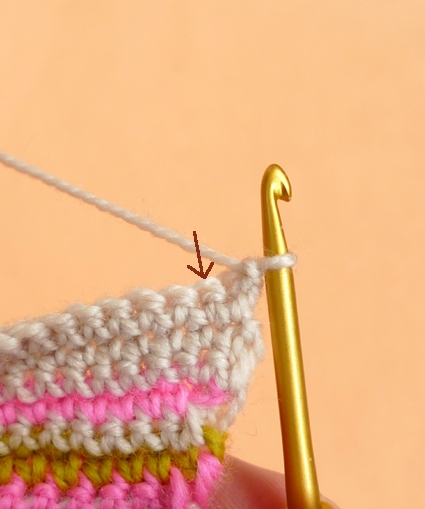
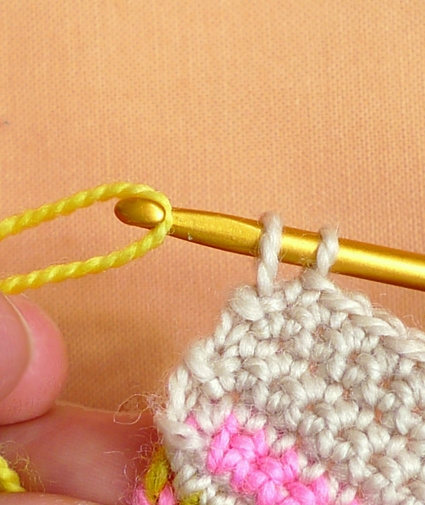
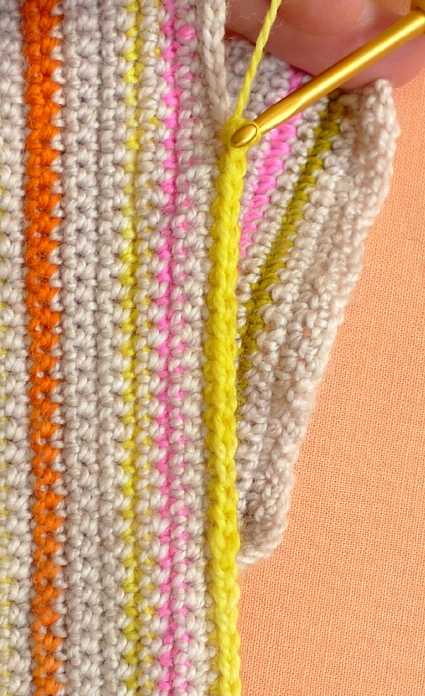
To change colors, crochet to the last stitch on the row. Start the last stitch by inserting the hook into the chain from the previous row and pulling a loop through.
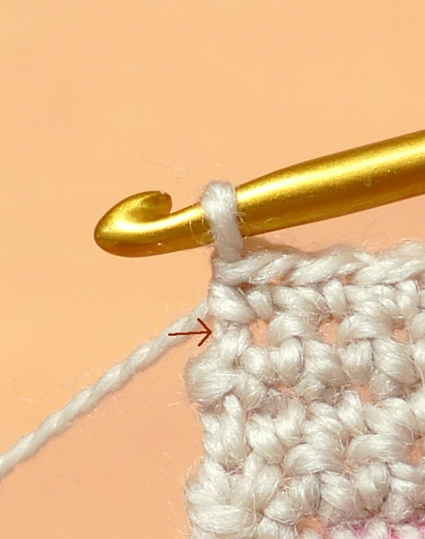
Now, with the new color, finish the single crochet by bringing a loop through the 2 stitches on the hook.
Turn the work and continue with a chain 1.
How to Crochet the Hand Warmers Together
Choose your favorite side of the hand warmer and also choose the yarn you want to use as the edging.
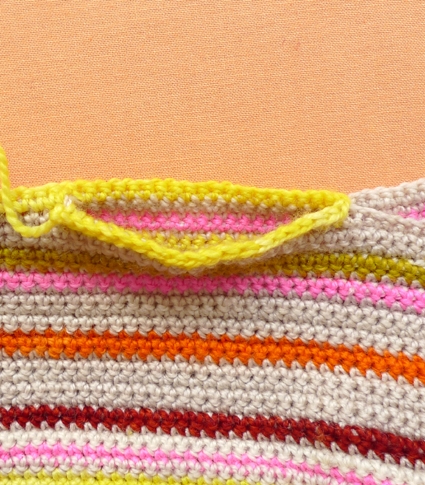
With your preferred side facing you, insert the hook into the top right corner. Chain 1 and make a sc into the same space. Then make 45 more single crochets across this side of the work.
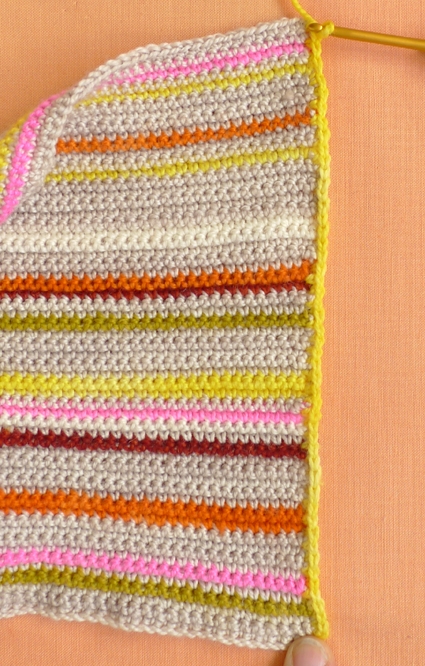
Connect the end of this row with the beginning by making a single crochet into the first stitch of the row.
Now crochet the two sides of the hand warmer together. Insert your hook through both layers of the fabric and make 22 single crochets up the side (3 inches).

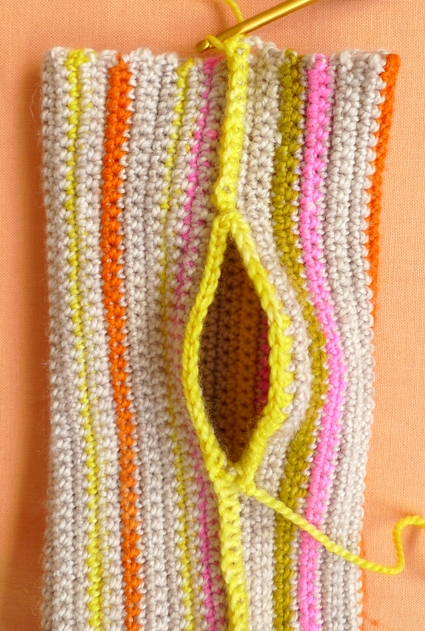
Start the thumbhole by making 18 single crochets (2 1/2 inches) along just the layer of the hand warmer that is closest to you.
Connect the two sides by making a single crochet in the same place as the last single crochet and also through the other side of the hand warmer, making sure that you line up the corners of the fabric as you do this.
Turn so the other side of the hand warmer is facing you.

Make 18 single crochets along this second side of the thumbhole.
Cut the yarn, pull it through the last stitch, and use the tail to sew closed the gap at the bottom of the thumbhole.
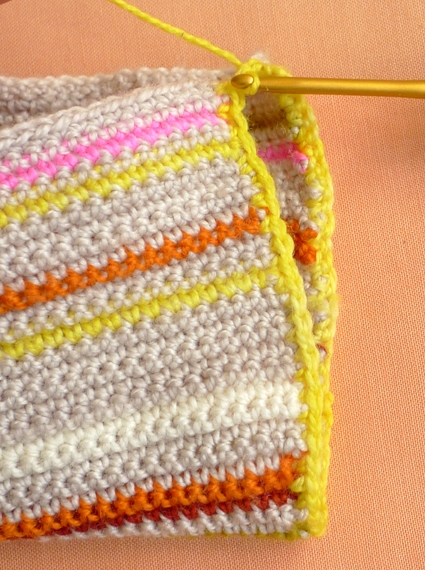
Now rejoin the yarn at the top of the thumbhole by inserting the hook through both layers of fabric. Chain 1 and make a single crochet into the same space. Connect the two layers by making 10 more single crochets to the end of the row.
Complete the hand warmer by making 46 single crochets around the remaining edge. Cut the yarn and pull it through the remaining stitch. Use the tails to close any gaps in the edging and weave in whatever tails remain.

Crochet the second hand warmer together in the same way and you’re all done!


Love them and love the colors. I have been on an handwarmer knitting craze lately-how about an easy knitted version-I absolutely cannot crochet.
ah, beautiful. I started them immediately with scrap yarn leftovers from my Koigu sock knitting adventures. Perfect gift for my mum's birthday in two weeks.
Love the colors and the pattern! Is there any way I could knit these hand warmers instead of crocheting them? I guess I would need to work in the round, but could you recommend a needle size? How would I need to adapt the pattern to circular needles? Thanks so much for being so creative and sharing all these projects.
So cute!
@ Laurence – You could knit them flat and seam them; a lot of handwarmers are knit that way. I would be willing to bet that a quick peek on ravelry would reveal some patterns that are constructed that way, and then you could adapt them for the striping.
@ Whit – Could you tell me where that teacup is from? I love its shape!
Thanks for the super cute pattern! I love the colours and am happy to see more crochet!
Hi Eva-
The teacup is from the amazing ceramicist Mardi Wood. Here is some more info on her:
http://www.mardiwood.com/node/13
Thanks!
– Molly
Hi there! I'm new to crochet and I think this would be a great starting project (the basic one- without stripes that is). But i have a question- when starting a new row, do you have to chain one and start with the second stitch everytime or just the once?
Please, please tell Meredith that for single crochet it is NOT usual to skip the first stitch of the row and work into the turning chain!
As a teacher of the CYC's crochet teaching certification program, I am concerned that those unfamiliar with crochet will think this is the usual way to work. For single crochet, the norm is to work into every stitch and to ignore the turning chain.
For double crochet and taller stitches, the method described in this tutorial IS the usual way. For these taller stitches, one has to work into the turning chain to make straight edges–if you don't, the turning chains create a scalloped edge. But for shorter stitches like single crochet it is easier, and usually doesn't matter, if you just ignore the turning chain.
I love these, they are so cute and simple…. I've made them my new crochet project. Thank you for sharing.. 😀
Thanks for a great pattern! I am workng on them now and they are a great intro to crochet. I thought I would just pass on that the stripe sequence doesn't print completely because it is in a text box that is larger than the page. I had to copy the text box and put it on 11×17 paper in order to get the whole sequence. I was glad to figure it out, though, because I was getting worried my hands would ever fit in to the little rectangle I made!
Hi Eileen-
Thank you for your comment. Sorry to hear you had trouble printing it out. It sounds like you worked it out but for anyone else with a similar issue you might want to click “scale to fit” in your print options and see if that works.
Enjoy the pattern!– Molly
BIG thanks to Molly for a super cool crochet pattern! I'm a crocheter and am always really excited to see a crochet pattern on Purlbee! Love, love, love! Hope to see many more!
How to make the prettiest things with a bit of yarn and a crochet hook! You have wonderful recipes for making one feel good, and the patterns are great too 🙂
Great photos! I've been crocheting for years, and if I'm not careful I can make the nicest angled sides you ever did see! My first afghan (rows and rows of double crochet) almost had scalloped edges because I didn't always make that last stitch in the row.
Hi Kelly-
Thanks so much for the nice comment. But just wanted to clarify that Whitney designed this pattern… I can't crochet at all!
Thank you!
Molly
If you hadn't already said you were a knitter, I would have known when I read:
“How to Change Colors To change colors, knit to the last stitch on the row.”
I'm pretty sure it would work better if you crocheted to the last stitch instead of changing to knitting!! Great pattern and very timely since I'm looking for something small and easy for a gift for next week. Thanks.
Hi Linda,
Ha! You're right, knitting was my first love, but crochet is also near and dear. I hate to give the impression that I'm like an evil stepmother to it!
Anyway, thank you for pointing out the error. I'll change it right now!
Whitney
Such a nice idea! I'm starting to crochet some of this kind of hands warmers because I have some clients who live or work on very cold weather.
Thanks for sharing your idea and expirience.
Greatings from Venezuela!
Perfect! I loved to crochet it.
For a mild winter as we have in Brazil, these hands warmers are perfect.
Your projects are great.
Can I ask, are the instructions using US stitches – in other words in UK stitches I should be using double crochet for this pattern? Many thanks.
Hi Jill,
Yes, the instructions use US crochet terms. And, yes, in UK terms the stitch used here is a double crochet.
Thanks for asking and please let us know if you have any more questions!
Whitney
Many thanks! My cold hands need these. Will start on them today.
Thank you. Practical beautiful and stylish.
Thank you. Practical beautiful and stylish. Effective for cold days.
Very nice warmers! I made something similar last year, only I used heavier yarn and bigger hook. I also work them so the thumb will be more covered. I much prefer a solid color (or ombre) to do them as it means fewer ends to mess with working in.
Also, when I do rows of sc, I ignore the turning ch1 and just work in each sc across. As one poster already said, it’s just with taller sts where the turning ch counts as a stitch. But as we all know, people have different ways of doing things and no one person is right or wrong.
I absolutely love hand/wristwarmers so that my fingers stay free to do other tasks (like typing or knitting or crocheting)
I love Purl Soho and have bought ridiculous amounts of your yarn but I am puzzled with this pattern…yet it seems so simple! I am using worsted wool, so my gauge is obviously different. As a result, I am relying on following what the finished dimensions of the flat piece should be before sewing the one long seam together. Are these REALLY just 6.25″ wide by 6.75″ long?? In the pictures, they seem several inches longer. Please straighten me out!
Hi Deborah,
Thanks for reaching out! The dimensions are given for the rectangle before folding and seaming it into the hand warmer – once it is seamed, it will measure about 3 1/4 inches wide by 6 3/4 inches long when measured flat on a table!
I hope that clears things up!
Julianna