Cowl Vest

The original inspiration for this sweater came from Joelle. She envisioned an elegant vest with a cowl whose main virtue would be its simplicity. For me, the challenge (and the fun part) was figuring out how to pare the design down to its bare essentials without sacrificing the details that make a sweater flattering. The result is a seamless tunic with waist shaping and long, loose lines.
We pictured a vest that would pour over the body, that would drape effortlessly, that would hang with an understated ease. The only yarn to answer such a tall order is Jade Sapphire’s 2 Ply Cashmere Silk. The feathery lightness of the cashmere is beautifully weighed down by the substance of the silk. I love this yarn for its year round practicality and its decadent softness.
This sweater is a perfect no fuss, no brainer kind of summer project. Sip your lemonade, dip your toes, take your time – your vest will come together just in time for fall!
Designed by Purl Soho designer, Whitney Van Nes.
Share your progress and connect with the community by tagging your pics with #PurlSoho, #PurlSohoBusyHands, and #PurlSohoCowlVest. We can’t wait to see what you make!
Materials

- 3 (3, 3, 4, 4) skeins of Jade Sapphire’s 2 Ply Cashmere Silk, 45% Chinese Cashmere, 55% Silk. This color is “Latte”. (To determine if you need three or four skeins, see the Finished Measurements section below.) (NOTE: We no longer offer Jade Sapphire’s 2-Ply Cashmere, but choose from one of our other fingering weight yarns.)
- A US 6 (4 mm), 24-inch circular needle
- A US 6, 16-inch circular needle
- 5 stitch holders
Gauge
24 stitches = 4 inches in stockinette stitch
Sizes
32½ (35½, 38½, 41½, 44½)
- Hip Circumference: 34 (37, 40, 43, 46) inches
- Waist Circumference: 30½ (33½, 36½, 39½, 42½) inches
- Chest Circumference: 32½ (35½, 38½, 41½, 44½) inches
- Length from Lower Edge to Waist: 12 inches
- Length from Lower Edge to Underarm: 18½ inches
- Length from Lower Edge to Shoulder: 27 inches
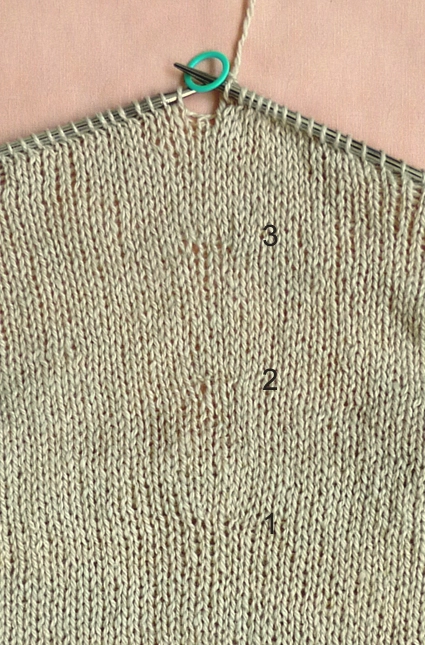
Sample: The sample shown here is size 38½.
Notes
How to Adjust the Length Measurements…
There are three places in the pattern to conveniently shorten or lengthen the given measurements.
- At the beginning of the pattern where it says to knit until the piece measures 6½ inches from the bottom edge: instead, measure from your waist to where you want the bottom edge of the sweater to be and subtract 5½ inches from that number. This is how many inches you should knit before starting the waist shaping.
- At the waist where you knit 24 rounds: if your waist is shorter or longer than 3½ inches, you can subtract or add rounds at this point.
- At the Back where you knit until piece measures 9½ inches from underarm: measure from the underarm to the very top of your shoulder (I recommend trying the sweater on to make this measurement) and adjust the length accordingly. Make sure that you knit the Front 1½ inches shorter than whatever length you decide to knit the Back.
Pattern
The Body
With the 24-inch circular needle, cast on 204 (222, 240, 258, 276) stitches. We used a basic Long Tail Cast On.
Place a marker and join for working in the round, being careful to not twist the stitches.
Knit every round until the piece measures 6½ inches from the bottom edge (unroll the edge to measure).
Next round: K 102 (111, 120, 129, 138), place marker, knit to end of round.
*Decrease Round 1: Knit to last 3 stitches, ssk, k1. (1 stitch decreased)
Decrease Round 2: K1, k2tog, knit to 3 stitches before first marker, ssk, k1, slip marker, k1, k2tog, knit to end of round. (3 stitches decreased)
Knit 6 rounds.**
Repeat from * to ** four more times. [184 (202, 220, 238, 256) stitches]

Knit 24 rounds. (If you prefer measuring than counting, knit to 3½ inches from the last decrease.)
*Increase Round 1: Knit to last stitch, make 1 right (m1r), k1. (1 stitch increased)
Increase Round 2: K1, make 1 left (m1l), knit to 1 stitch before first marker, m1r, k1, slip marker, k1, m1l, knit to end of round. (3 stitches increased)
Knit 12 rounds. **
Repeat from * to ** two more times. [196, (214, 232, 250, 268) stitches]
Dividing Round
Knit to 7 stitches before first marker, bind off 12 stitches (removing marker)…
… knit to 7 stitches before end of the round, bind off 12 stitches (removing marker), knit 85, (94, 103, 112, 121) stitches to first bind off, put next 86 (95, 104, 113, 122) stitches on stitch holders. [86 (95, 104, 113, 122) stitches on hold for front and 86 (95, 104, 113, 122) stitches for back]

The Back
Now working just the stitches remaining on the needle, turn the work between rows.
Row 1 (wrong side): Purl.
Row 2 (right side): K1, slip slip knit (ssk), knit to last 3 stitches, k2tog, k1. (2 stitches decreased)
Repeat Rows 1 and 2 three more times. [78 (87, 96, 105, 114) stitches]
Next Row: Purl.
Next Row: Knit.
Next Row: Purl.
Next Row: K1, ssk, knit to last 3 stitches, k2tog, k1. (2 stitches decreased)
Repeat last 4 Rows one more time. [74 (83, 92, 101, 110) stitches] **
Next Row: Purl.
Next Row: Knit.
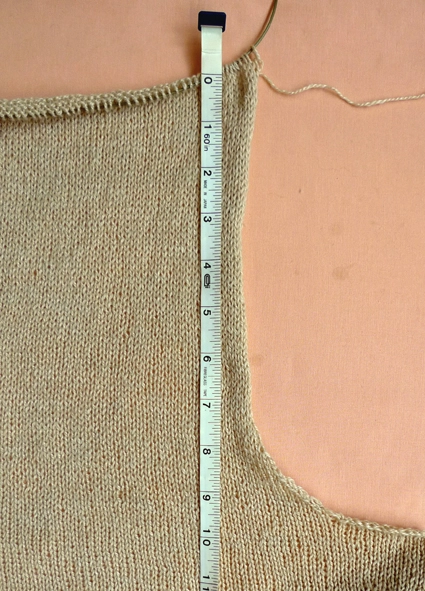
Repeat last 2 Rows until piece measures 9½ inches from underarm.
Cut the yarn. Slip the first 11 (15, 20, 24, 29) stitches onto a stitch holder, the next 52 (53, 52, 53, 52) stitches onto another holder, and the final 11 (15, 20, 24, 29) stitches onto a third holder.

The Front
With the wrong side facing you, join new yarn and start at Row 1 of the Back. Repeat the Back instructions until the **.
Next Row: Purl.
Next Row: Knit.
Repeat last 2 Rows until piece measures 8 inches from underarm, ending with a purl row.
Next Row: K 15 (19, 24, 28, 33), slip these stitches onto a stitch holder, k 44 (45, 44, 45, 44), slip these stitches onto another holder. [15, (19, 24, 28, 33) stitches remain on needle]

Right Front Shoulder
Working just the stitches on the needle and turning at the end of each row,
Row 1 (right side): K1, ssk, knit to end of row. (1 stitch decreased)
Row 2 (wrong side): Purl.
Repeat Rows 1 and 2 three more times. [11 (15, 20, 24, 29) stitches]
Knit 1 row.
Purl 1 row.
Knit 1 row.

Cut a 24 inch tail and, with the wrong sides facing each other, use the Kitchener Stitch to graft the Right Front Shoulder to the corresponding back 11 (15, 20, 24, 29) stitches.
Left Front Shoulder
With the right side facing you, join new yarn.
Row 1 (right side): Knit to last 3 stitches, k2tog, k1. (1 stitch decreased)
Row 2 (wrong side): Purl.
Repeat Rows 1 and 2 three more times. [11 (15, 20, 24, 29) stitches]
Knit 1 row.
Purl 1 row.
Knit 1 row.
Cut a 24 inch tail and, with the wrong sides facing each other, use the Kitchener Stitch to graft the Left Front Shoulder to the corresponding back 11 (15, 20, 24, 29) stitches.

The Cowl
With the right side facing you, using the 16 inch circular needle, join new yarn and knit the Back 52 (53, 52, 53, 52) stitches.
Pick up 11 stitches down the Left Front Shoulder.

Knit the Front 44 (45, 44, 45, 44) stitches.
Pick up 11 stitches up the Right Front Shoulder.
Place a marker for the beginning of the round and join for working in the round. [118 (120, 118, 120, 118) stitches]
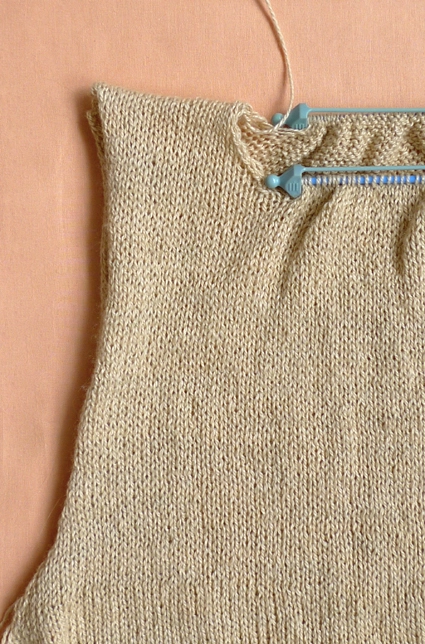
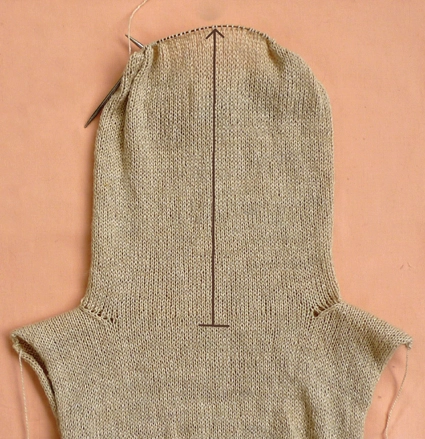
(By the way, this photo shows a 20 inch circular needle, which works, but I soon switched to a 16 inch needle realizing that it would be a lot easier.)

Knit every round until Cowl measures 10½ inches from the center of the Front neckline.
Bind off VERY loosely. To ensure that my bind off wasn’t too tight, I used a US 9 needle and I knit loosely. Don’t worry if the edge looks a little messy because it will curl under and won’t be visible.
Weave in your ends and your vest is ready to go!


Great pattern and pictures! you are amazing. Thank you for sharing it, I live in Chile i will try to find a yarn to knit it and to wear it on spring!.
Paola
Wow what a wonderful clear pattern! The pictures are so informative. And the sweater is lovely!
I follow your blog for quite a while and just love your patterns and the explanations very good indeed. I made a fingerless gloves from your pattern to my mother and my niece and they are great. Thanks
Wow, what a lovely sweater and what a great choice of yarn. Very elegant in cashmere.
Absolutely gorgeous!
So beautiful! Thank you!
Beautiful — is this going to be loaded on Ravelry? Pretty please with sugar on top? I want to add to my queue and am planning to cast on as soon as I get the yarn! xo
I just finished the cowl vest last night and am so pleased! I used the Jade Sapphire yarn in “bloodred”. It was a delight to work with. I made a few adjustments to accommodate my figure. The math couldn't have been easier. I'm looking forward to wearing this into early fall.
wish i could afford the jade sapphire. ):
would it be ok to substitute with a cotton 2-ply?
This is going into my will be knitted pile starting in January to be sure I have all my spring knitting finished for these HOT Oklahoma springs we've been having. I've gone onto PurlSoho and not found a spring-like color in the suggested yarn. Do you feel the Swan Island – Lace would make a good substitution? Online it seems to have a similar gauge and feel.
Hi Andrea,
Swans Island's Lace is so thin that you would probably be better off with their Fingering weight. Its drape won't be quite as heavy as the cashmere/silk blend I used, but I think it will have a very nice breezy fee! Here it is: https://www.purlsoho.com/purl/products/item/6281-Swans-Island-Fingering.
A couple of other beautiful options would be Spud & Chloe's Fine: https://www.purlsoho.com/purl/products/item/5884-Spud-Chloe-Fine or Anzula's Sebastian: https://www.purlsoho.com/purl/products/item/8197-Anzula-Sebastian .
Thanks so much for your question and good luck!
Whitney
Hi, I have a question for this pattern. Just before starting on the back, the instruction says put next 86 stitches on stitch holders, between brackets it says 86 stitches for the front and 86 stitches for the back. Does this mean to put twice 86 stitches on stitch holders? Starting at the back, the instructions say to keep working on the stitches on the needle, turn the work between rows. Could you specifiy this? I'm having trouble doing this… Thanks in advance.
Hi Chenling,
I see why you're confused! I just changed that instruction to clarify that 86 of the stitches are on hold for the front and 86 are ready on the needle for the back.
Thank you so much for asking and good luck with the your vest!
Whitney
Can this be knit in another weight yarn?
Hey Sis,
Thanks for the comment! If you were to knit this in another yarn that is a heavier weight it would make the piece come out larger. If you were planning on making one of the larger sizes you could use a heavier weight yarn and follow the pattern for a smaller size to achieve the larger dimensions. If you were intending to make the smaller size in a heavier weight yarn it would require some reconfiguring of the pattern, if you are comfortable with that.
I hope this helps and feel free to write back if you have any more questions!
Happy Knitting!
Jake
I love the easy to follow step by step directions. Thank you for sharing.
How did you get the armholes to look so finished? Is it just blocking or is there a seam binding or some other finish?
Thanks.
Hi Lisa,
Thanks for writing us! The armholes are not actually finished at all. This whole vest is stockinette, so the armholes are just curling under. Thanks again!
-Adam
How do I adjust the pattern for size 32 1/2?
Hi Jane,
Thanks for writing in! No need to adjust this pattern as the smallest size is a 32 1/2. You can knit the pattern as written for the smallest size!
Happy knitting!
Cassy
I have 650 yards of Wildwood yarns Tonal Pima Silk–will this be enough for the vest in 40″ bust size? The gauge on the label says 5-5 1/2 st=1″ on #4-6 needles
Thanks
Hello Leslie,
Thank you for writing in! For size 41.5 this pattern calls for 4 skeins of Jade Sapphire’s 2 Ply Cashmere Silk which has approximately 400 yards. This means that you will need closer to 1,600 yards of fingering weight yarn. I hope this helps!
-Marilla
Thank you, I was looking yardage info on the discontinued yarn
I would love to make this but do not want to use an animal derived wool. Please can you recommend the best vegan alternative?
Thank you
Hello Jennifer,
Thanks for writing in! I think the best plant based substitute would be Habu’s Natural Linen. This will, of course, have a very deferent texture, but the gauge should the same.
I hope this helps!
-Marilla
Hi Purl Soho I’m so excited to have discovered your amazing site. Thank you for all the incredible patterns etc. I have some Susan Schaefer Yarn sitting in my basket that I think will be perfect for this vest. My question is…..I find the top too long for my figure, do you think it’s possible – and how can I – take 3 inches off the length? Thank you for your help, Abbe
Hello Abbe,
Thank you for writing in and for such flattering words! I’m so happy to hear how much you are enjoying our site. To shorten this vest all you need to do is start the decrease earlier on in the pattern. The first step in the pattern is to knit in stockinette until your fabric measures 6 1/2 inches so If you want to take 3 inches off you will knit until your fabric measures 3 1/2 inches. I hope this helps! Let me know if you have any further questions.
-Marilla
Hi, I finally finished this project. This is my first knitted top, took me over 6 months, but it’s so worth it! I used purple Malagrigo silkpaca lace, everyone loves it!
The silk blend added a good weight to it even it’s so airy. I’m going to make a second one with the bottom longer so it will look like a sweater dress. Would you consider making a version with cap sleeves? Thank you so much for the pattern, I really enjoy making it!
Hi Cindy,
Thanks for writing in, and I’m so glad you love your new top! While we don’t have plans at the moment to create a sleeved version of this vest, I will certainly pass your suggestion along to the design team!
Happy knitting!
Julianna
Hello,
If I were to make this cowl vest in the smallest size using Cattail Silk, how many skeins would I need? And would Cattail Silk work well with the pattern?
Thanks for your help!
Hello M,
Thank you for reaching out! I think this Vest would be stunning in Cattail Silk. You will just need 2 skeins to knit up the smallest size.
Happy knitting!
-Marilla
Hello! I’m looking to make this soon and I’m struggling to find a yarn of similar weight/drape as pictured here (I’m on the hunt for something with a brown option). Any suggestions? Thanks for your help and beautiful pattern!
Hi Joy,
Thanks for reaching out! Although it doesn’t come in a dark brown, I think Anzula Cloud would be a good option for this cowl! Not only is it the same weight as the original yarn, but it should also bloom similarly when blocked and has a lovely drape. If you don’t mind a bit of extra sparkle, you could also try combining a strand of Mineral Silk with a strand of Sweetgrass Fine! You might have to do some extra swatching to match our gauge, but Mineral Silk will provide weight and fluid drape, while Sweetgrass Fine will fill in the gaps and add a tiny alpaca halo!
I hope that helps, and happy knitting!
Julianna
Hi. Would you have a row gauge for this pattern? Thanks.
Hi Meredith,
Thanks for reaching out! Unfortunately since this is an older pattern we don’t have the row gauge available but the stitch gauge is 6 stitches = 1 inch in stockinette stitch!
All the best,
Gianna
Hello, I love this pattern – so simple and elegant. I like the idea of turning it into a sweater dress (size small) size small – how would I adjust the pattern and how many skeins of Anzula Cloud would I need. Wonder site. Thank you in advance
Hi Brigitte,
Thanks for writing in! Under the NOTES section we offer instructions for lengthening or shortening the pattern! I would recommend 2 or 3 extra skeins depending on how long you plan on extending the pattern! I recommend leaving 1 or 2 of the skeins unwound and if you don’t end up using all the yarn you can return it for store credit within 6 months!
I hope this helps, happy knitting
Thank you for your quick response
Hi, I’m a beginner knitter, having knitted just a scarf before with a lot of mistakes, but I really want to try this even if it might not turn out wearable.
Anyway, so it says, “Knit every round until the piece measures 6 1/2 inches from the bottom edge (unroll the edge to measure).
Next round: K 102 (111, 120, 129, 138), place marker, knit to end of round.”
How do I make lesser stitches (than the no. of stitches cast on) the next round after the piece measure 6 1/2″?
Also, is there a purl soho blog for total noobs because as much as you’ve simplified the knitting pattern and I’m grateful for that, there are still a few things I’m not able to wrap my head around doing?
anyway, thanks, you’re wonderful!
Hi Sneha,
Thanks for reaching out! So after you K 102 (111, 120, 129, 138), place marker, knit to end of round you will then begin the decrease rounds! The first round you will Knit to last 3 stitches, ssk, k1. (1 stitch decreased) We have an excellent Slip Slip Knit (ssk) tutorial to demonstrate exactly how to work this decrease!
We do not have a separate blog from this website, however the comment section below every pattern is an excellent resource to use! There are so many comments from knitters of all experience levels and answers from members of our team that can be so helpful in understanding any of our patterns or tutorials! You can also leave a comment or question any time and we will get back to you as soon as possible.
Warmly,
Gianna