Fuzzy Easter Chicks and Mini Easter Eggs

It’s been a very long, very snowy winter in New York and, so, Easter is especially welcome to me this year. I can’t wait for a holiday that celebrates spring’s harbingers: baby chicks and lambs, budding daffodils, the bright colors of a warm, sunny day. To get the feeling started early, I made these Fuzzy Easter Chicks and Mini Easter Eggs. They fill me with anticipation and the hope that, yes, spring will actually come. I was excited to use Alchemy Yarn’s latest inspiration called Kozmos. A fascinating blend of silk, mohair, cotton and wool, this yarn is unlike any other. Each yarn absorbs the dye differently, creating a complex depth of color that seems to shimmer and glow. The diaphanous halo of sweet fuzziness is perfect for the creation of a baby chick.
Happy Easter! –Whitney
Designed by Purl Soho designer, Whitney Van Nes.
Share your progress and connect with the community by tagging your pics with #PurlSoho, #PurlSohoBusyHands, and #PurlSohoFuzzyEasterChicksAndMiniEasterEggs. We can’t wait to see what you make!
The Materials
For the Chicks
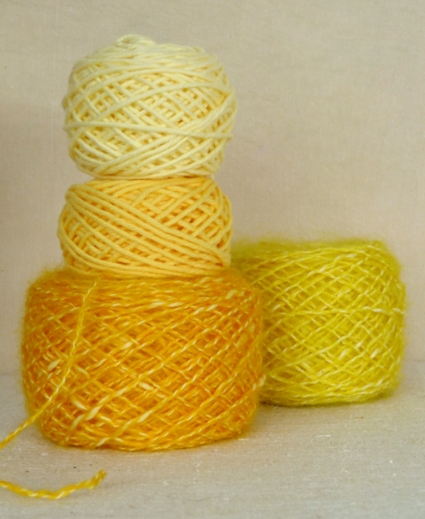
- Main Yarn: 1 skein of Alchemy’s Kozmos, 30% silk, 26% mohair, 31% cotton, 13% wool. You need one skein for each chick. I used the colors “Michelle’s Marigold” (foreground) and “Canary” (background).
- Contrast Yarn: A small amount of coordinating DK weight yarn for the beak and legs. I used Rowan’s Handknit Cotton, 100% cotton. These colors are #336 Sunflower (bottom) and #325 Primrose (top).
- A very small amount of scrap yarn for the eyes
- A set of US 7 (4.5 mm) double-pointed needles
- A set of US 5 (3.75 mm) double-pointed needles (for the beak and legs)
- Stuffing
- A very small amount of fabric (about 8 inches by 8 inches) in either a neutral color or the color of your chick. The fabric is for the bean bag that goes inside the chick to weigh it down. I used Robert Kauffman’s Kona Cotton in the color “Lemon”.
- A handful of lentils for the bean bag.
For the Mini Eggs
- Small amounts of fingering weight yarn. I used Koigu’s Premium Merino, 100% merino wool. I’m not sure exactly which colors I used because they came from my label-less stash, but any assortment of pretty Easter colors will be great.
- A set of US 3 (3.25 mm) double pointed needles
- Stuffing
The Chick Pattern
Gauge
24 stitches = 4 inches in stockinette stitch with the Main Yarn
Finished Size
About 5 inches high
The Bean Bag
The chick is weighed down by a small bean bag filled with lentils. You won’t use it until a little later, but it’s kind of satisfying to have it ready to go when you do need it.
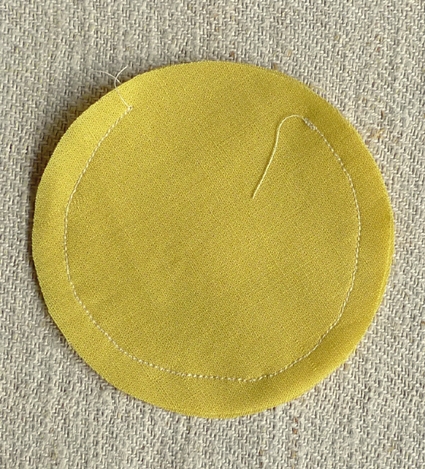
Fold the fabric in half with its right sides facing each other. Trace a 3 1/2 inch circle onto the fabric, and cut the circle out, giving you two identical circles.
Sew the circles together with about a 1/4 inch seam allowance, leaving a 1 1/2 inch opening (Don’t worry about perfection here. No one will ever see it!)
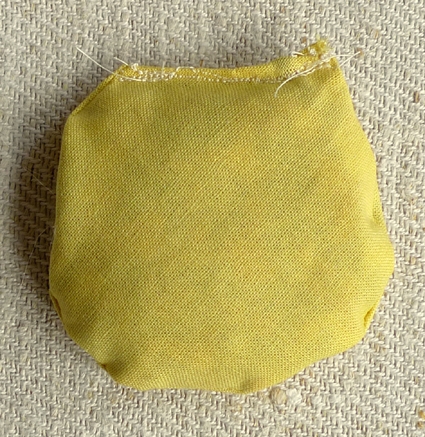
Turn the circles right side out and fill the pouch with lentils, using a funnel or a piece of paper taped into a cone.
Sew the opening closed however you want, or, in my case, however you can.
Now you can set the little bean bag aside and start knitting!
The Body
NOTE: The pattern begins at the chick’s tail and makes its way to the beak.
With US 7 double pointed needles and the Main Yarn, cast on 6 stitches.
Join for working in the round, being careful to not twist the stitches.
Round 1: Knit.
Round 2: *Knit into the front and back (kfb), repeat from * to end of round. (12 stitches)
Round 3: Knit
Round 4: *K1, kfb, repeat from * to end of round. (18 stitches)
Round 5: Knit
Round 6: *K2, kfb, repeat from * to end of round. (24 stitches)
Round 7: Knit
Round 8: *K3, kfb, repeat from * to end of round. (30 stitches)
Round 9: Knit
Round 10: *K4, kfb, repeat from * to end of round. (36 stitches)
Round 11: Knit
Round 12: *K5, kfb, repeat from * to end of round. (42 stitches)
Round 13: Knit
Round 14: *K6, kfb, repeat from * to end of round. (48 stitches)
Round 15: Knit
Round 16: *K7, kfb, repeat from * to end of round. (54 stitches)
Knit 8 rounds.
Next Round: K24, slip slip knit (ssk), place a marker, k2, k2tog, knit to end of round. (52 stitches)
Next Round: Knit to 2 stitches before marker, ssk, slip the marker, k2, k2tog, knit to end of round. (2 stitches decreased)
Repeat the last round 11 more times. (28 stitches remaining)
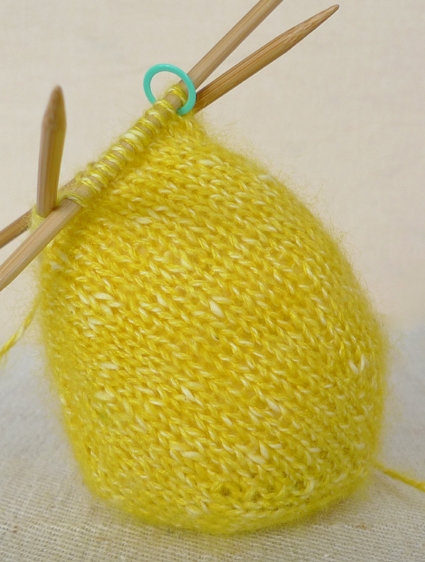
Now is a good time to start stuffing your chick. First place the bean bag in the area between the tail and the beginning of the decreases. (The dotted lines are outlining where I put my bean bag.)
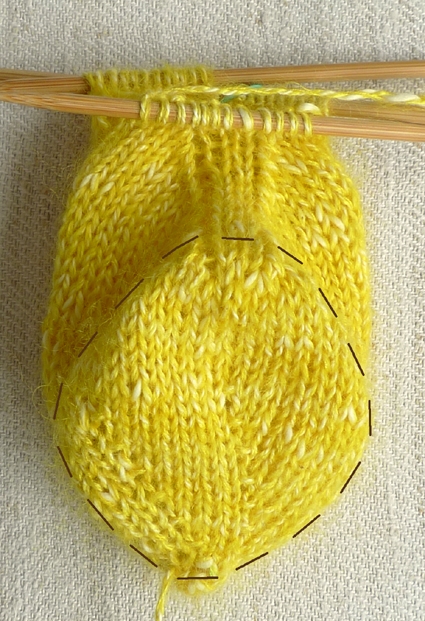
Fill in the rest of the body with stuffing, keeping in mind that the lines of decreases are the chick’s chest. Make the chick nice and plump!
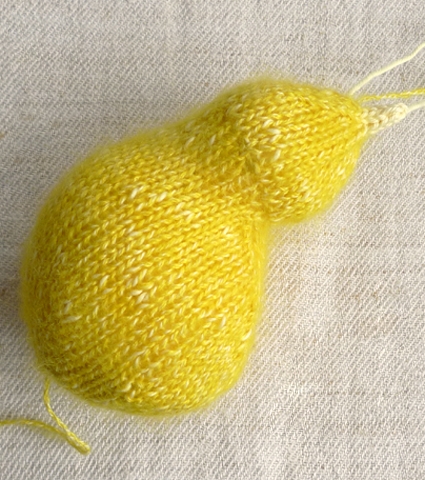
The Head
NOTE: Because the opening will get smaller and smaller as you knit the head, be sure to stuff as you go. Also, try not to overstuff the neck area.
Round 1: Removing the stitch marker when you get to it, *K2, k2tog, repeat from * to end of round. (21 stitches)
Round 2: [K1, kfb] 3 times, [kfb] 9 times, [k1, kfb] 3 times. (36 stitches)
Knit 6 rounds.
Round 9: *K4, k2tog, repeat from * to end of round. (30 stitches)
Round 10: Knit.
Round 11: *K3, k2tog, repeat from * to end of round. (24 stitches)
Round 12: Knit.
Round 13: *K2, k2tog, repeat from * to end of round. (18 stitches)
Round 14: Knit.
Round 15: *K1, k2tog, repeat from * to end of round. (12 stitches)
Round 16: With US #5 double pointed needles and the Contrast Yarn, knit.
Round 17: *K2tog, repeat from * to end of round. (6 stitches)
Knit 3 rounds.
Round 21: *K2tog, repeat from * to end of round. (3 stitches)
Cut the yarn, and thread it through the remaining stitches.
Weave all the tails into the inside of the chick.
The Wings
Using just two US 7 double pointed needles and the Main Yarn, cast on 3 stitches. (Leave an 8 inch tail.)
Row 1: K1, purl to last stitch, k1.
Row 2: K1, make 1 right (m1R), k1, make 1 left (m1L), k1. (5 stitches)
Row 3: K1, purl to last stitch, k1.
Row 4: K2, m1R, k1, m1L, k2. (7 stitches)
Row 5: K1, purl to last stitch, k1.
Row 4: K3, m1R, k1, m1L, k3. (9 stitches)
Row 5: K1, purl to last stitch, k1.
Row 6: K4, m1R, k1, m1L, k4. (11 stitches)
Row 7: K1, purl to last stitch, k1.
Row 8: Knit.
Row 9: K1, purl to last stitch, k1.
Row 10: K5, m1R, k1, m1L, k5. (13 stitches)
Row 11: K1, purl to last stitch, k1.
Row 12: Knit.
Row 13: K1, purl to last stitch, k1.
Row 14: K6, m1R, k1, m1L, k6. (15 stitches)
Row 15: K1, purl to last stitch, k1.
Rows 16-18: Knit.
Row 19: K1, purl to last stitch, k1.
Row 20: K5, ssk, k1, k2tog, k5. (13 stitches)
Row 21: K1, purl to last stitch, k1.
Row 22: Knit.
Row 23: K1, purl to last stitch, k1.
Row 24: K4, ssk, k1, k2tog, k4. (11 stitches)
Row 25: K1, purl to last stitch, k1.
Row 26: Knit.
Row 27: K1, purl to last stitch, k1.
Row 28: K3, ssk, k1, k2tog, k3. (9 stitches)
Row 29: K1, purl to last stitch, k1.
Row 30: K2, ssk, k1, k2tog, k2. (7 stitches)
Row 31: K1, purl to last stitch, k1.
Row 32: K1, ssk, k1, k2tog, k1. (5 stitches)
Row 33: K1, purl to last stitch, k1.
Row 34: Ssk, k1, slip the first stitch over, k2tog, slip the remaining stitch over. (1 stitch) (If this row confuses you, think of it as the cast off row with simultaneous decreases.)
Cut the yarn so there is an 8 inch tail.
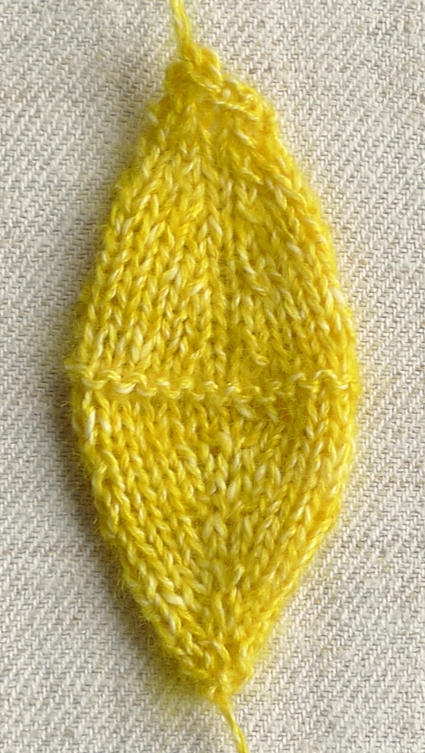
Fold the wing in half at the purl ridge (purl sides facing each other), and use the tails to sew the edges of the wings together.

Make another wing identical to the first.
Use one of the tails to sew the first wing to the chick’s body. You can put the increase or decrease side up, just make sure you do the next one the same way.

Sew the second wing on as symmetrically to the first as you can.
The Legs
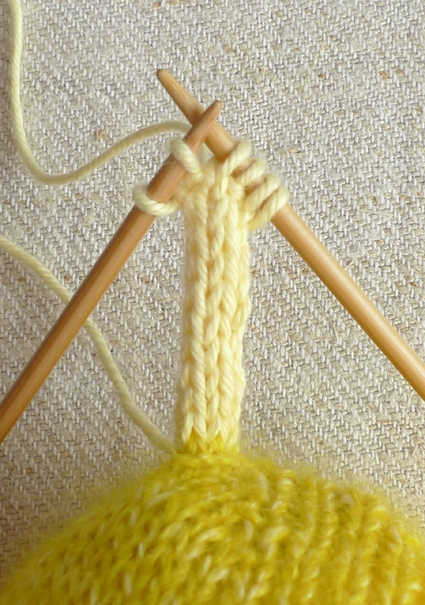
With a US 5 needle and the Contrast Yarn, pick up 4 stitches along the bottom of the chick, slightly to the left or right of center.
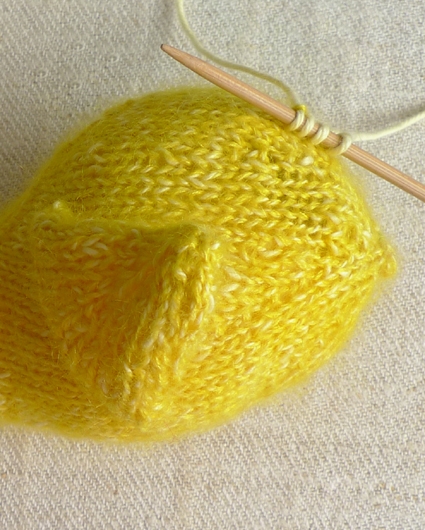
Make a 1 1/2 inch I-cord.
Next Row: K1, [kfb] 2 times, k1. (6 stitches)
Without turning the work, slip the first 4 stitches off the right end of the needle onto an extra US #5 needle.
With the 2 stitches remaining on the left needle, * work 3 rows of an I-cord. Slip the first stitch over the second, cut the yarn and pull it through the last stitch.**
Slip the next 2 stitches off the left end of the needle onto an extra needle. With those stitches and new yarn, work from * to **.
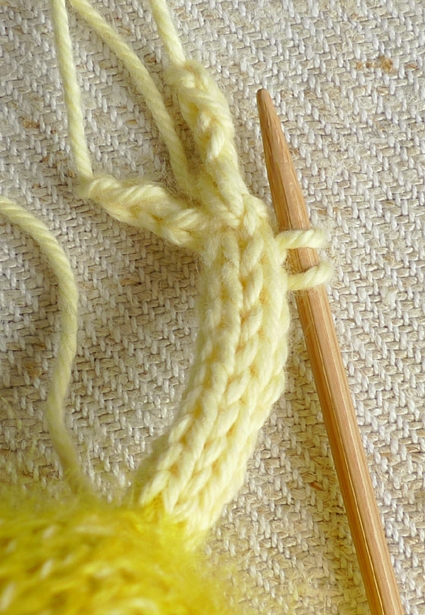
With the final 2 stitches and new yarn, work from * to **.
Weave in the ends.
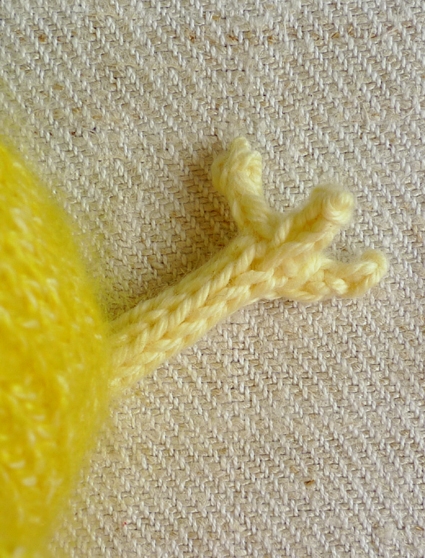
Make an identical second leg on the other side of center.
The Eyes
With some white scrap yarn, sew three parallel lines for the first eye.
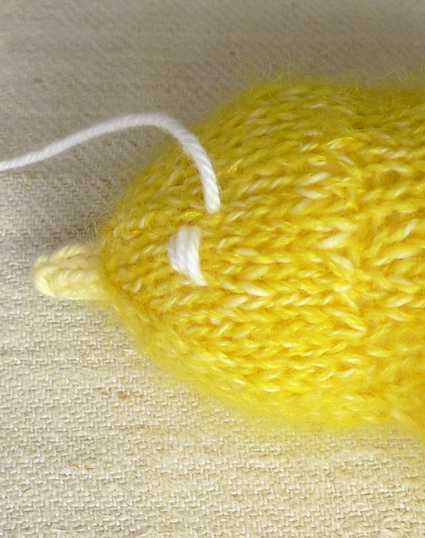
Thread the yarn through to the other side of the head and sew the second eye.
Use a contrasting color to sew two lines perpendicular to the white lines.
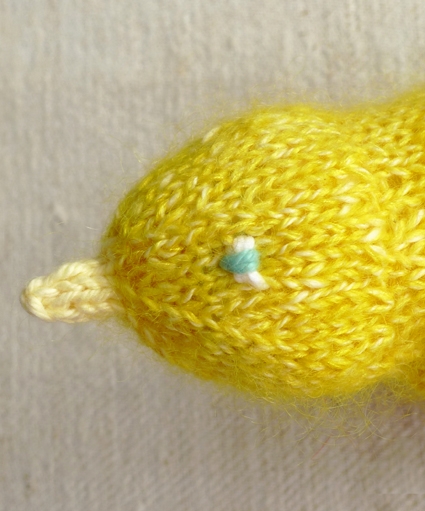
Bring that yarn to the other side of the head and finish the second eye.

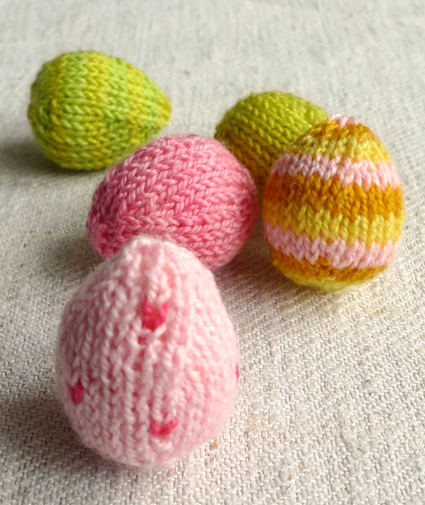
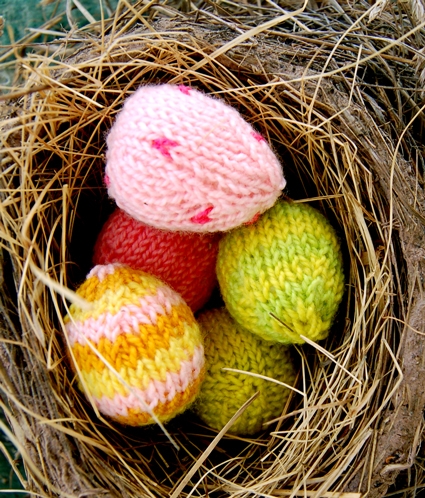
Mini Easter Egg Pattern
Gauge
28 stitches = 4 inches in stockinette stitch
Finished Size
About 1 1/2 inches tall and 3 3/4 inches in circumference
The Egg
With US 3 double pointed needles and fingering weight yarn, cast on 8 stitches.
Join for working in the round, being careful to not twist the stitches.
Round 1: *K1, kfb, repeat from * to end of round. (12 stitches)
Round 2: *K2, kfb, repeat from * to end of round. (16 stitches)
Round 3: *K3, kfb, repeat from * to end of round. (20 stitches)
Round 4: Knit.
Round 5: *K4, kfb, repeat from * to end of round. (24 stitches)
Rounds 6-10: Knit.
Round 11: *K4, k2tog, repeat from * to end of round. (20 stitches)
Round 12: Knit.
Round 13: *K3, k2tog, repeat from * to end of round. (16 stitches)
Round 14: Knit
Round 15: *K2, k2tog, repeat from * to end of round. (12 stitches)
Round 16: Knit.
Round 17: *K1, k2tog, repeat from * to end of round. (8 stitches)
Cut the yarn and thread it through the remaining stitches, but do not pull it tight yet. First fill the egg with stuffing, then you can pull the tail tight and weave in the ends.
You can keep your eggs plain and simple, or knit some stripes into the pattern, or try some duplicate stitching to create polka dots, vertical stripes, or any other embellishment you can think of.


i made eggs almost exactly the same way!!!: http://rhythmofthehome.com/spring-2010/wooly-eggs/
Superb! Thank you for sharing.
Whitney, Your precious and GENIUS creations continue to delight and inspire me! Thank you for the delightful pictures, the superb turtorials, and most of all, for sharing your whimsical and talented creations with us! You are the BEST!!!
Wonderful step-by-step instructions, the photos are a big help!
So cute! I will definitely make this. Thanks for the instructions.
Hi. Adorable chicks! Couldn’t wait to knit them. I noticed that under “The Wings” section that the instructions go from Row 14 (15 st) to Row 7 and then continues thru to Row 26. Figure it must be a typo since the wings don’t come out like pictured. Could you review that part? Thanks so much for all the inspirational projects!
ok, genius. I just ran out to get yarn and dpns and will try to whip some out tonight.
seriously, these are gorgeous. thanks so much for the pattern.
Hi Karen –
You’re totally right! Thank you so much for pointing that out. It was indeed a (big) typo, but it should be correct now. Sorry to have led you and anyone else astray!
Thanks-
Whitney
I can’t imagine how these little guys could get any cuter. Thanks for the design and the pattern. I know what I’ll be doing tomorrow. I’ll also be linking. Thanks again!
¡que lindos! voy a intentar los huevecitos …
un abrazo y gracias por tu lindo blog,
SIONA
Hi Purl Bee,
This is fabulous and I promptly ordered it as soon as I could. Unfortunately though I have never worked with double pointed needles and I cannot make it past the second instruction! (Join for working in the round, being careful to not twist the stitches.) Does this mean that I get another dp needle and join yarn to that? I’ve got 6 stitches casted on but can’t go any further as I don’t understand what I’m joining what to what! I feel very foolish and silly and am hoping that someone can explain what this means. I’ve tried looking for tutorials online but not having any luck. Any help as soon as possible would be so gratefully received.
WIth many thanks
Penelope
Those chicks and eggs are incredibly cute. It's January in Wyoming and that means cold, cold, cold and like you the thought of knitting something springy puts a smile on my face! I can't wait to get started. I'm going to link to this on my blog when it gets a bit closer to Easter.
I'm in love with these little eggs. They really work up quickly. What a great way to use left over yarn! Thank you!!
LOVE LOVE LOVE!!!
I am so into miniatures and I absolutely love what you have created.
We have not gotten much snow in the northland until this past week, so about 3 weeks ago, I found a precious small bird nest outside…..saved it, and now, I have a wonderful project to create.
Thank you for your generosity in sharing this project.
This pattern is so cute!! Can you please tell me the weight of the yarn used here, or a suggested yarn weight for the bird bodies? Thanks!
Hi Elise,
Thanks for the wonderful comment! I suggest a DK or worsted weight for this pattern! Both work well!
-Adam
As soon as I saw the egg pattern I had to make one. Thank you for sharing. When I finished the first egg I realized it would the perfect shape for an animals ear and will use this when I made the bear faced hat. To finish the egg I pulled the tail of the yarn through the egg and out the other end. Then it looked like a mouse with a tail. A very useful pattern indeed.