New Year’s Garland

New Year’s is all about celebrating the the passing of an old year, and toasting to a bright future ahead. I wanted to make a fun garland to decorate my apartment as I ring in 2010, one that reflected the bubbly exuberence of the holiday!
Materials

- Nine pieces of colored wool felt. I used: Bright Orange, Lime, Melon, Grass, Magenta, Yellow, Light Yellow, Tomato, and Pink
- One piece of Ecru Wool Felt
- Invisible Thread
- One New Year’s Garland circle template, available for free download here, printed and cut out
- Small or medium sized paper bag
Cutting
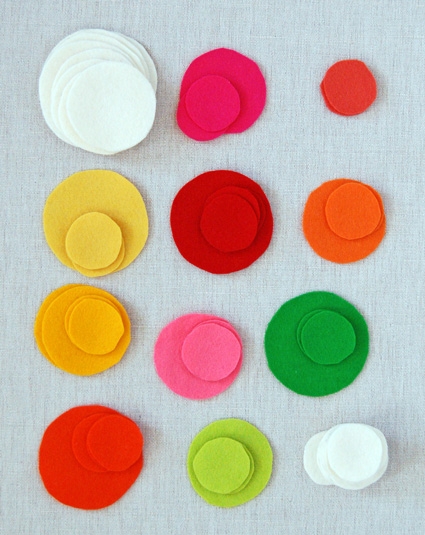
Using the circle templates, cut your felt into as many circles as you desire. Cut a varied assortment of shapes and colors.
The three circle templates vary in size from 2-1/2-inches to 1- 1/4-inches so you can figure you will get an average of about 2-inches per circle you cut: if you cut 200 circles your garland will be roughly 400-inches (or about 11-yards) long.
Sewing

Place all your circles into a paper bag and shake it up really well.
Pull out a few circles at a time and sew them, one after another, down their middles, using the invisible thread.
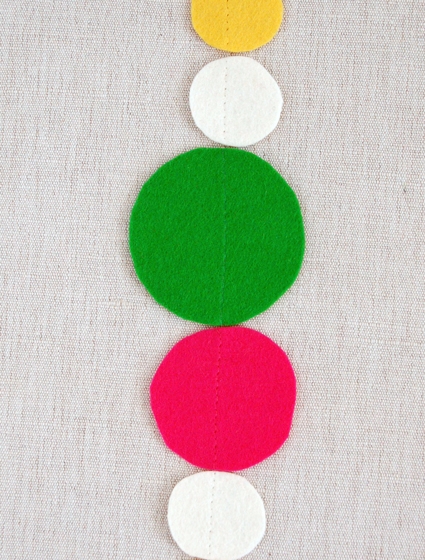
The invisible thread is super strong, and as you can see from the picture above, super invisible!
Don’t worry too much about sewing through the exact middles of the circles, just try to keep them semi centered as you go. You don’t need to back stitch at the beginning and end of each piece, just sew them one after the other, like you would for chain piecing. There should be no space in-between each piece.
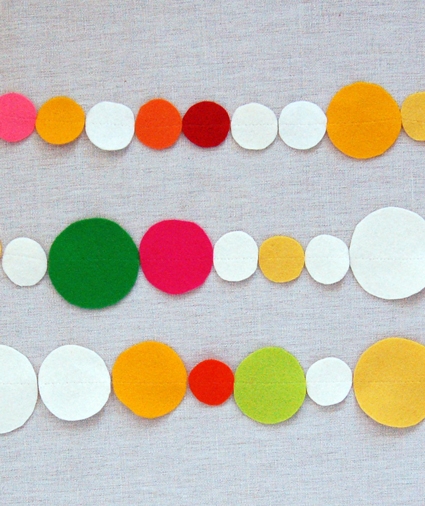
Continue to pick random pieces from the paper bag and sew them together, end to end until you run out of pieces.
Now hang your garland and get ready for the countdown….
THREE, TWO, ONE, HAPPY NEW YEAR from all of us at The Purl Bee!


So pretty! I bet you could do this wqith paper circles or shapes if you were on a budget! Cute!
As for what the reader above said…I do paper circles handing on string and hang them in the doorway of my kids’ rooms when it’s their birthday. I may have to try it with felt for the next birthday. Very cute idea. Thanks.
Been looking for a garland for my daughter’s wedding! Thanks!!
I came here via LittleMissFirefly and LOVE this idea! Now I really do need to get a sewing machine 🙂 Thank you for sharing such a cute, creative idea!
This is simply beautiful! I think I want to make one to keep in my daughter’s room!
beautiful! where did you get your dinning table?
I just made this and used some leftover linen yarn to string it together! Thanks for the inspiration.
So cute! I think I will make one for my daughter’s first birthday. Thanks for sharing this.
I really enjoyed following the instructions.The best part was… Place all your circles into a paper bag and shake it up really well. It was very cute and funny.
Thanks for sharing!
Thank you very macuh. So easy, so festive! Happy New Year!
I love this!! Adorable and super festive.
Cheers to keeping it simple for the New Year!
wonderful! So simple, so beautiful, so inspiring! And so versatile! I am definitely making one, and will make excuses to put it up very often! Happy New Year to all Purl Bees, and thanks for all the ideas you provide us with!
Came here via Patty’s Pip Stitch. What a fun and pretty simple idea! So festive.
I love this! It looks fantastic! I posted a couple pictures of my finished garland here http://www.flickr.com/photos/lepetitmeggplant/4234884935/ I’m totally addicted… I too want to have one for every occasion; but I need to invest in some circle cutters… cutting all those little pieces of felt by hand was awful!
Gorgeous. Simply gorgeous.
Thanks so much for the tutorial! I gave it a go, here is my result:
http://www.quaintliving.com/2010/01/felt-chain-decoration/
: )
How pretty! Thanks for the great decoration idea. 🙂
happy 2010!! this is wonderful – fabulous colors, what fun!
it’s wonderful!! i love how the circles are all different sizes. adds a great touch.
This is just adorable. I want to come to a party in your cute little kitchen. I just used your picture as inspiration, but saw it on another blog. I decided to track it down. I made a garland of yours last year that had small pennats and flowers made of fabric for a baby shower. I love your projects.
Oh…I just love it!!!! So bright and fun and I like the bag shaking too! Found you via the interior styling group and glad I did!
I love these. So fun and vibrant!! I bet it gets addictive–you just want to make more and more!!
So pretty. So easy. Definitely on my ‘To Do’ list for 2010.
Thank you for this great tutorial. It was so pretty I just had to make one for Valentine’s. You can see it on my blog if you like.
http://piccolinadesigns.blogspot.com/2010/01/new-color.html
I have a potentially silly question that hopefully someone can help me with. Do you handsew these, or on a machine? I’m trying to pin down the logistics of it all. Thanks!!
Hi Bee, it’s done on a machine. You just keep sewing without picking up the foot and when you’re done they’ll all be connected. Hope this helps!
Thanks!
What a beautiful and simple project!
As my favorite colour is orange, I’m thinking of orange thread instead of invisible, with white, taupe and orange circles in varying shades….
Hi, I love this project so so much! I blogged it here:
http://unofficialfiction.blogspot.com/2010/05/diy-project-festive-garland.html
and on my facebook fan page:
http://www.facebook.com/paperandribbons
I LOVE this idea! I think I will. Make a Halloween version, since we are throwing a Halloween bash, and it is around the birthdays of one of my boys! Thanks for the fun post!
I LOVED your circle garland and featured it here.”>http://sprik.blogspot.com/2010/10/brief-bits_21.html”>here. So cute!
Love this! Thank you. Came here by way of 100 Layer Cake. Going to make this for my new home celebration!
Thank you!! I made tons of this garland in all white, various sizes. It makes a fabulous “snowball” garland for our family Christmas tree. Sew cute!!!!!
That looks so colourful! 🙂
I made this in fuchsia for valentines day and I'm totally in love with the finished product! I never decorate for holidays, but I'm definitely getting spring green for st paddy's day, spice for fall, water for a cool feeling in summer….such fun!
This is such a fun and simple way to teach a young one how to sew!! My daughter's birthday party was this week, so I put her to work on cutting out circles … then she started sewing! We did a little variation! She sewed between 12 & 18 circles at a time then we hung these dropped randomly around the room from the ceiling … then we draped a couple on the chandler. It was to fun and easy! Thanks for sharing your wonderful idea!
I love your idea of pulling them out of a bag 🙂 good way to save time thinking too hard about it 😉
Found this via Pinterest and love it! Just made a bunch to use for my son's 1st birthday as something cuter than regular old streamers. Not any more expensive, and it's even reusable! Thank you!
You get a little over a yard of garland length for every standard sheet of felt (9×12″), which helps to know when buying your felt.
Lovely and very colourful garland!! I found it via Pinterest! Thank you for the tutorial!
I have linked it in my blog. Feel free to visit it!
gemma
http://www.melimelum.cat