The Twenty Minute Tote
Updated September 2011
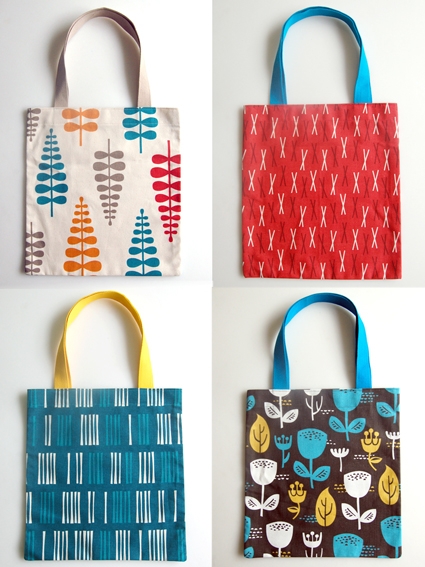
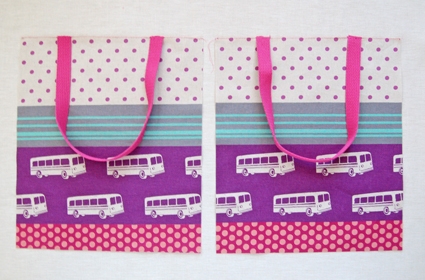
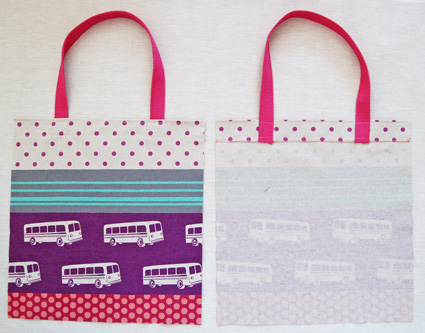
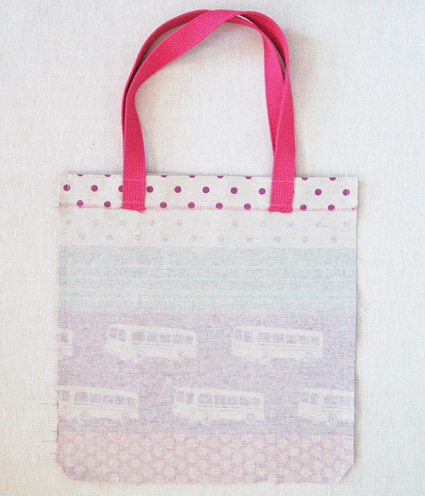
We have remade these awesome, simple bags for fall! This time around, I used a gorgeous new collection of upholstery weight cotton called Outside Oslo. These bold, stylish prints are sophisticated without being serious and come in a rich palette of colors perfect for fall. I added some sturdy contrasting cotton webbing handles for a pop of color, and I love the way they came out! The new materials are as follows:
To make one tote bag:
- 1/2- yard of Outside Oslo Fabric. I used (clockwise from top left): Dawn Frond, Dawn Sticks, Dusk Wildflower, and Dawn Picket
- 2 yards of 1-inch cotton webbing to compliment your fabric. I used (clockwise from top left): Taupe, Turquoise, Turquoise, and Yellow.
- Cotton thread to match your fabric
- Cotton thread to contrast with the inside of the bag
Updated February 2011
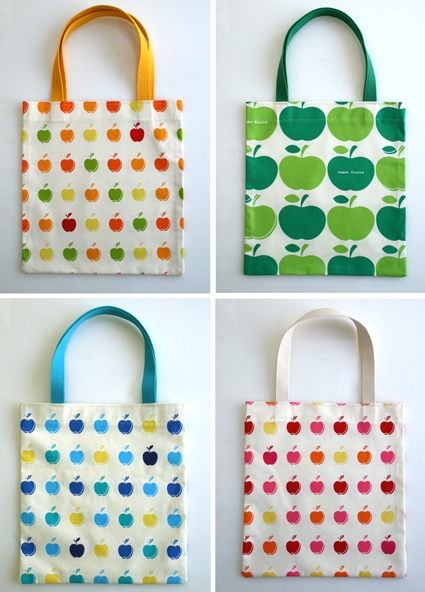
These totes really do come together in 20 minutes a piece which makes them a great, quick, way to add a little Springtime color and excitement into the dull end of Winter months. To make one tote bag:
- 1/2-yard of Kokka Apples. I used Pink Mini Apples, Orange Mini Apples, Blue Mini Apples, and Green Large Apples
- 2 yards of 1-inch cotton webbing to compliment your fabric. I used Natural, Yellow, Turquoise, and Green
- Cotton thread to match your fabric
- Cotton thread to contrast with the inside of the bag
UPDATE: NOW IN GARMENT-DYED TOWELING
AUGUST 2022
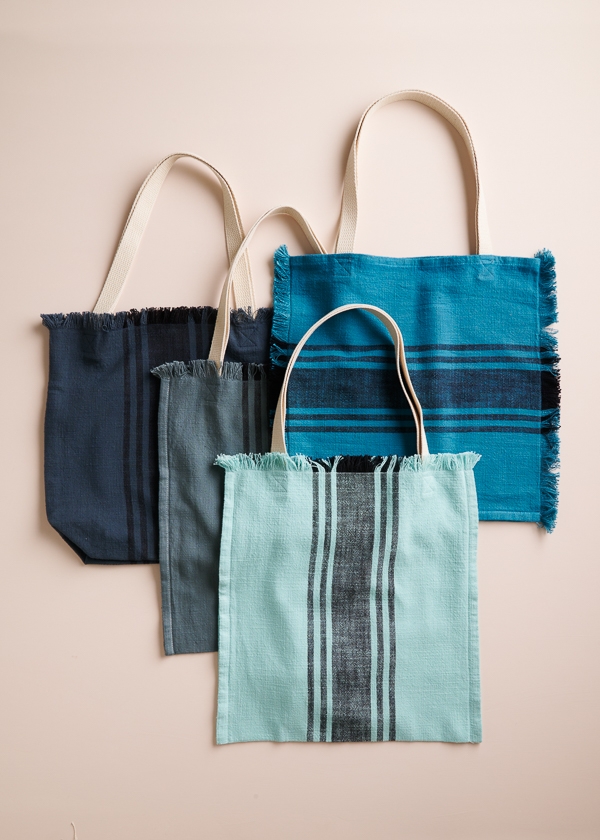
Our Garment-Dyed Toweling Totes put a spin on our classic Twenty Minute Tote pattern! Garment-Dyed Toweling simplifies the tote-making process with its double-fold hems along both selvages, and its distinctive stripes lend some flair. You only need a yard of toweling for each tote, or you can pick up one of our four-color Garment-Dyed Toweling Bundles to make a full set. Happy sewing!
Designed by Purl Soho designer, Molly Schnick. Click here to see even more of Molly’s work!
The Original
The fabric in these how to shots is from Echino and is now out of print but you can see more from the same designer, Etsuko Furuya here.
Cutting
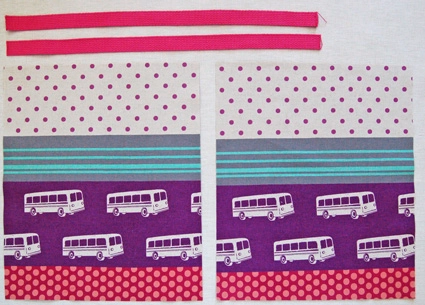
Cut two 16-inch tall by 14-inch wide panels from the fabric. Make sure the pattern is going the correct direction on both panels.
Cut two 22 1/2-inch long pieces from the webbing.
Attaching Handles and Hemming the Top

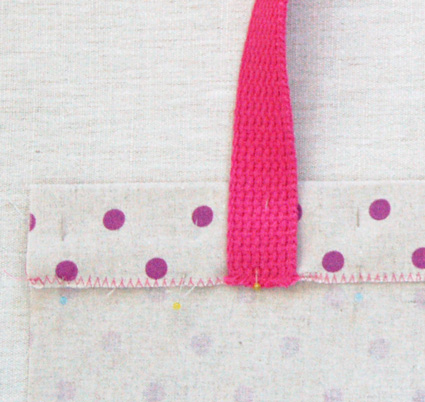
Pin the handle pieces to the top raw edge of the right side of each panel 3-inches from the sides. The raw edges of the handles should match up with the raw edge of the top of the panel so the handles will be facing down as shown in the picture above. Make sure the handles aren’t twisted.
Using the contrasting thread sew a zig zag stitch across the top edge, sewing the handle to the top edge in the process.

This zig zag stitch should be right at the edge of the fabric as shown above.
Turn the panels so their wrong sides are facing up. Press and pin their top edges with the handles down 1 1/2-inches
Make sure to pin the handle so it’s perpendicular to the horizontal sides.
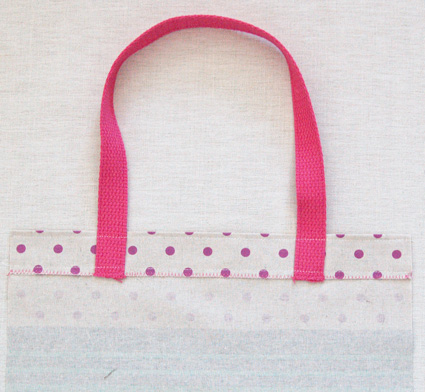
Sew this fold down with the matching thread a 1/4 inch from to top edge and then with a second seam 1/4-inch from the bottom zig zag stitch.
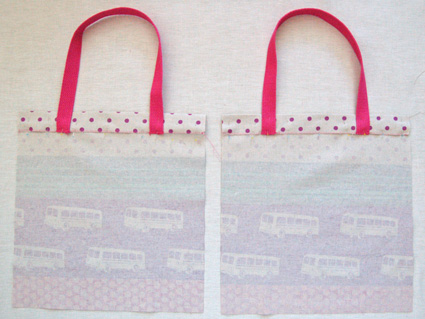
The handle will now be attached and the top hem sewn down on both panels. You’re now ready to sew the bag together.
Sewing the Bag Together
Pin the panels right sides together and sew along the sides and bottom 1/2-inch from the raw edges using the matching thread. Back stitch at the beginning and end of each seam.
Snip off the bottom corners.
Using the contrasting thread zig sag stitch along the raw edges of the sides and bottom of the bag.

Make sure to stitch right along the edge to contain the threads from the raw edges.

Turn the bag right sides out press the corners and you’re all done!
Similar Posts You Might Enjoy:


Similar Posts You Might Enjoy:
151 comments on “The Twenty Minute Tote”
Thank you so much! This is the best tutorial for a simple tote I have found! I'm excited to get started on making gifts for friends & family! ,thanks again!
I am a textiles teacher who teachers sewing at a fabric store in Geelong(Australia ). I plan to teach some young students how to sew a tote very similar to your The twenty Minute Tote that features on your website. I have adapted your version somewhat. The students will use 2 fabrics rather than one, so I have written the pattern in my own words. My question is, am I allowed to include some( not all) of the tote construction photos in my pattern? I am not selling the pattern and I am happy to promote the origin of the tote I.e.www.purlsoho.com/create.
I look forward to hearing from you,
Sonia Walder
Hi Sonia,
Thanks so much for checking in with us about this. We regret to inform you that our photos may not be reproduced in your pattern. We simply have too many similar requests from readers and so any exception to the rule becomes unfair to everyone else.
You are more than welcome to send your students to our blog to look at our photos and pattern and have them print out a copy for themselves.
Best wishes,
Purl Bee
Thank you for allowing the pattern to be printed. I will be using this great pattern to teach my 13 year old Granddaughter to sew. She will be making this for her Moms birthday present. I realized recently when I took her into a fabric store she had no idea about how to sew anything. I grew up with this talent a very much part of my life, thanks to my Mom and Grandmother. I hope this art will continue for future generations.
Thanks
Kathy Nemitz
Thank's the tutorial!I love it the simple. 🙂
Fabulous fabric choices! This a really cute (seems to be simple) design. I'm a new sewer, so I may just try this out 🙂 Thanks for sharing!
Thank you so much for the tutorial. I am a newbie to sewing and your tutorial is so easy to follow. I made two totes for my friend's daughter and changed the measurements to fit little girl. I mentioned your tutorial on my blog today.
http://www.sophiealamode.com/2013/02/princess-tote-and-bento-lunch-bag.html
Lovely, many thanks! Wonder if you would consider including metric system measurements in your tutorials, for your European fans.
Hi pukekome-
We probably won't be able to do this any time soon (although I know the metric system makes a lot more sense that ours!) So until we catch up to the rest of the world, you might want to use an easy conversion calculator site like this one:
http://www.globalrph.com/conversions.htm
Thanks for writing in!
Molly
What a great idea! I got married in January and really wanted to make a ton of hand-made stuff for the guests! Honestly, had I more time, I would have wanted to make all of the wedding favors… anyway, I ended up just making cookies for the out-of-town guests, putting them in pretty paper bags from a craft store, along with other goodies from my hometown (Bethlehem, PA)… I wish i had thought to do this, though! What an awesome last-minute gift! (ps – best wishes on your upcoming wedding!!)
Love this idea! As a new sewer, this looks like something I could easily do! How fun!
i can’t wait to try this! i really like quick sewing projects, that aren’t overwhelming!
This is such a fabulous idea! Just wondering how much can the tote bag hold .. hrm.. Definitely must try this out one day!
You did good, girl. I did/do the same thing…bite off more that I can chew and then I’m a rag when the final stuff needs to get done. NO MORE OVEREXTENDING! only you will know, right? BUT ..those of us who make stuff…it wouldn’t be special if we didn’t have something handmade that was made by us!! I hear ya on that one. …so….you did great with this one, very nice gifty…..I would certainly love one of those…and the timing thing you did…bravo!…so you knew how much time you needed to sew them all (so you can say “Forgettaboutit!”)
I love your tutotial!
Brilliant! I love the simplicity in using the zig-zag stitch. Thanks for sharing! And have fun making lots of bags! 🙂
Very sweet! I love the fabric…is it like canvas or ????
These will make awesome gift bags. Thanks for sharing.
I made one of these today using the Kokka Tiny Prints Black Cat print. It did take me longer than 20 minutes but I am a beginner. Now it’s a hepcat bag! Thanks for the tutorial.
What a great bag! I would like to use this instead of paper gift bags.
Love your tutorials!
Congratulations the wedding!
I love these bags and I think I could actually make them. Thanks for the tutorial.
I just finished my bag and I had my doubts along the way. I am a beginner sewer and this was my second project. It came out really cute! I’m so pleased. I’m using it instead of a gift bag for my niece’s birthday gift. I’m so inspired by this website! Keep the tutorials coming!!
Have been thinking about bags for my knitting projects (instead of lumping them all together). I think in Decor-weight fabric (to protect a little from needle poke-through) these will be perfect!
those prints are so cool! i’m definitely going to try a version of this.
What a great tutorial ! thanks for sharing
I made one today – so easy! It took me around 40 minutes, if you include cutting and pinning time. You can click the link in my name if you want to see how my bag turned out.
Thanks so much for sharing this.
This looks like a fun and quick project to try!
This a great idea! I'm including it in the handmade gift roundup at somedaycrafts.blogspot.com on Friday
this was on my to-do-list since months, last week i tried one. And now I´m addicted, i have done 8 totes!
a new idea for me, thanks a lot 🙂
I just finished making this bag a few minutes ago, and I love love love love it! It looks like the ones they sell in stores! Thank you so much 🙂
A really neat and easy idea. I do believe I will make several for friends . However using the serger should simplify several steps for me.
I just found this “the twenty minute tote” and eager
to try it. Could someone let me know how this can
be done on a serger. Am interested in the best
type of material not overly expensive.
Hi Shorty Annie-
Thanks so much for your comment. None of us at the Bee have experience with a serger but it might be something we explore in the future so stay tuned! In the meantime maybe one of our knowledgeable readers can help you out?
Thanks again!– Molly
thanks so much for this pattern!! i hand sewed this lovely bag with some cheap scrap giraffe patterned fabric and it turned out awesome!
that fabric is amazing.
i used your tutorial to make my first bag ever!
super fun.
cheers.
http://flytothewall.blogspot.com/2011/02/day-8-and-i-totalllly-want-to-make-this.html
I”m totally trying this. Thanks for the tutorial!
Shorty Annie
Anywhere that zig zag stitch was used you could use a serger. I still recommend using the straight stitch. The serger will “trim” any excess fabric off and make the ends look neat and trim and help keep the fabric from fraying. Zig Zag stitches here look GREAT and neat trim though so if you are that amazing with a zig zag it might just be easier to use one singular sewing machine instead of alternating between serger and normal (for your straight stitch)
Jana, Thanks for the info. on the Twenty Minute Tote
sewing the tote with a zigzag verses a serger.
Shortie Annie
thank you i am blogging this tomorrow
When I think of the money I spent buying different bags that didn't always please me and that now I see I could make them myself and create a huge collection of different bag designs… It seems so easy to make them!
I love this tutuorial!
I have never really done any sewing before so i am a total newbie. I really want to make party bags for my nieces 4th birthday party. She is having a pyjama pizza party so hopefully i can find some material to suit the theme.
I just wanted to ask which material should i look for to use? is there a specific type of material? (I am in cape town, south africa).
Also has anyone else tried this and can give me some useful tips to make it easier. I need to make around 30 smallish bags for the 18th September.
Love the whole blog and especially this pattern!
Hi Tami-
Thanks for the kind words about the blog and pattern!
This will work best with a heavier weight fabric like any of these upholstery weight fabrics here: https://www.purlsoho.com/purl/products/12-sewing-patchwork-fabric?filters%5B%5D=532
Good luck with your project!
– Molly
Hi Molly,
Thanks for replying so quickly.
I really love those fabrics but i need to buy them here in cape town. What kind of fabric should i ask for in the store? An upholstery fabric? As it is for a kids party pack I want it to be durable but not the best or most expensive. Is there any other type of fabric i should ask for?
There really is nothing like this in cape town so i am exicited to do something unique for my niece.
Thanks and hopefully it works out – i will let you know.
Hi Tami-
Upholstery Weight is a good thing to ask for, or canvas.
Thanks for your questions!
Gogeous bags, sorry I am too lazy to make this – Where can I buy one or two of these. I want one asap.
Hi Donna-
We don't sell these already sewn but we if you call Purl Soho in NYC they can recommend someone who could sew it for you. Their number is 212-420-8796.
Thank you!- Molly
Wow, these are GREAT!! I have featured this tutorial at:
http://happyinred.blogspot.com/2011/10/tribute-to-tote.html
I hope that's okay? If not: please contact me and I'll take care of things asap!
Esther.
This is the cutest DIY ever!!!!!
This is such a a great simple tutorial! Thanks for sharing!
I included this post in a tutorial link list on my blog today. Enjoy. 🙂