Intarsia
“Intarsia” is color knitting comprised of large areas of color. This Stars + Stripes Felted Hot Pad is a typical example of intarsia knitting:

Some Basic Rules
Intarsia knitting isn’t hard, but there are some basic rules to know.
Unlike fair isle knitting, the yarn is not stranded across the back of the work in intarsia knitting. Instead, you have a separate ball of yarn for each area of color. If you have a lot of color changes in one row, you may want to wind the separate colors onto bobbins to help you stay organized.
The other important rule to keep in mind is that when you switch from one color to the other you have to “twist” the yarns in order to avoid holes. I like to think of it as “trapping” the yarn, because you put the yarn you’re finished using in front of the new yarn, trapping it between the new yarn and the knitting. This manoeuvre is always done on the wrong side of the work.
Here are all the scenarios you will encounter knitting intarsia:
Vertical Lines
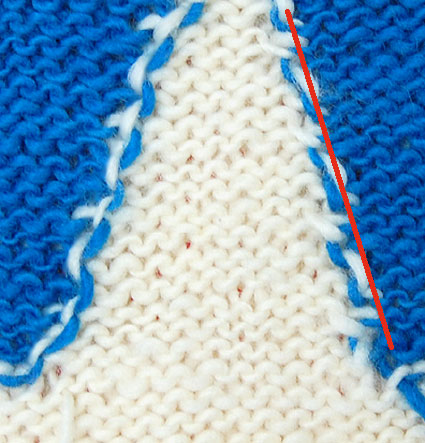
The red lines in this picture show color changes that form vertical lines:

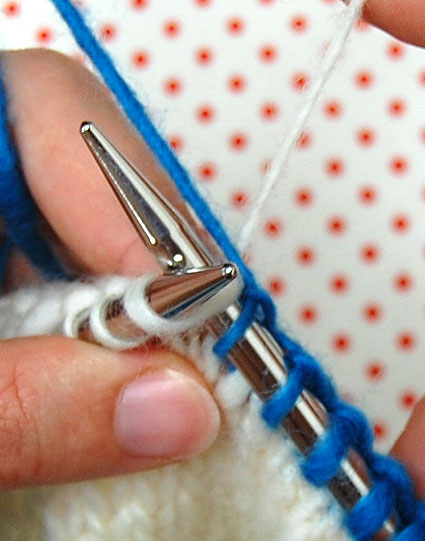
When the color change forms a vertical line, knit to the change, bring the old yarn in front of the new yarn (again, on the wrong side of the work), and knit the new color stitch.
Here is what that looks like when you’re knitting a right side row:
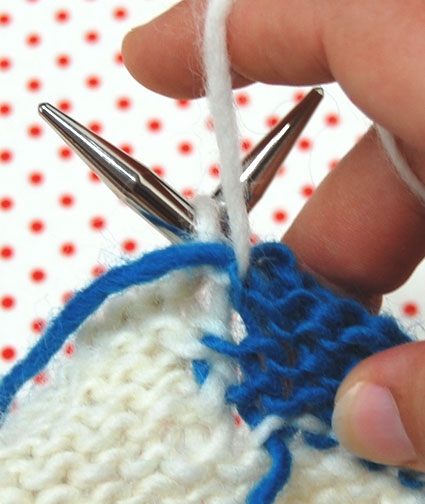
And here it is purling a wrong side row:
Diagonal Color Changes
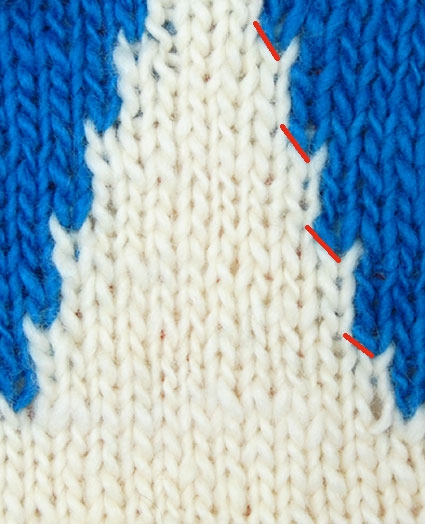
When the color design is at a diagonal, twisting depends on if the design is slanting to the right or to the left. If it is slanting to the RIGHT as you’re looking at it, you need to twist the yarns, regardless of whether you’re on the knit or the purl side of the piece.
The moments marked in red are right slants on the knit side:

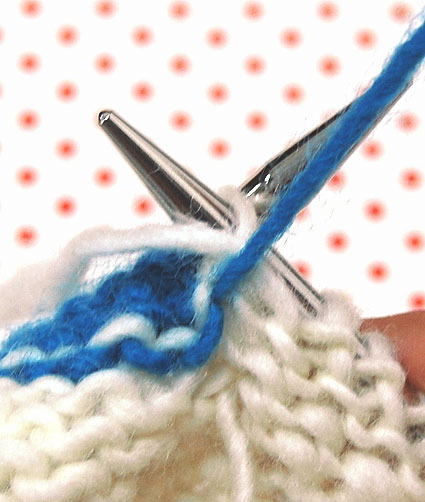
The twist in that case would look like this:

On the purl side, the right slant color changes happen along this red line and also require a twist:

The twist on the purl side looks like this:
If the design is slanting to the LEFT, like this:
Or like this:
You don’t need to twist the yarns at all. You can just drop the old yarn and start knitting or purling with the new yarn.
If you find this right versus left slant confusing (sometimes I do!), it’s fine to just always twist the yarns. When in doubt, twist!


This is probably a dumb question, but…
Since there is blue on both sides of the star, will there be a blue bobbin for both sides with blue yarn? ie: blue bobbin, white bobbin, blue bobbin?
Also, when at the end of the pattern, do you just drop one of the blue bobbins and the white bobbin and start knitting again with all blue?
Thanks in advance!
Hi Terry,
There is no such thing as a dumb question in knitting!
Yes, you will need two bobbins in white and three in blue at the bottom of the star.
At the end, just drop the bobbins and knit with all blue.
how do you choose the most appropriate lining material for an intarsia project. For example, a baby blanket in intarsia might have an ugly wrong side. Assuming the yarn cannot be ironed (but is machine washable) what kind of lining material would be best??
Hi,
This was so useful,i forgot to check your tutorial before i started the baby hat pattern.Im following Amy Barht”s baby hat pattern which has this intartia technique.Im almot done with the hat and now im seeing there is a lot oF puckering on the right side of the wrk.Is there a way i can make it straight??I was thinking of cutting the yarn and tieing knots at the back.Please help!
I want to thank you for all of your helpful tutorials. I always know I can come to your site to find the answers I need. You have made me feel more confident in knitting. You have the best pictures, too!
Thanks for making this tutorial, it will help my knitting to look more professional.
Thank you so much for your helpful tutorial. Could you help me clarify something on my pattern? I have an afghan that says, “[Cast on 2 sts with MC, cast on 2 sts with CC] 28 times,” in the beginning instructions. Further instructions state, “Do not carry/strand yarn across back of work. Use separate balls of yarn for each area of color.” Now, because I am using each of the two colors 28 times, I will have 28 balls or bobbins of yarn. The pattern is a cable knit from beginning to end with no top or bottom border, so it is the cabling with will kind of “tie” the stitches together. Am I right?
Hi Michelle,
The cabling might help, but the main thing to do, even though you are not carrying the yarn across the stitches, is to twist the new color up around the old color before you start knitting with it. This will secure the two colors together. Hope this helps!
Thank you. That helps a lot.
This intarsia tutorial is very helpful. Thank you!
I just have one question: how can you distinguish between the diagonal twist and the vertical twist? I have this patter I am doing, it’s a phoenix bird, but I can’t seem to find when the vertical twists are and when the diagonal twists are. Please respond when you get a chance. Thanks so much!
This is a great tutorial! Thanks for the awesome pictures!
Hi, Thank you for posting this tutorial. I'm trying to see how to bring the old yarn across (maybe fair isle?) when adding more than 1 stitch to each side of a change. For example, I have 3 balls of yarn, blue-green-blue. I have say 5 stitches of green & need to add 3 to each side so the green totals 11 stitches. I can't twist the yarns because the blue is too far away from the green when the change is made. Do you have a suggestion?
I've looked in books & on the web but can't find anything about this.
Thanks for any help you can give.
Hi Ellie,
Let's say you're on the knit side, knitting along with the blue. You would stop where you want to change colors, twist the yarn following the tutorial's instructions for a right slanting twist (just leaving a little slack for the short distance the green has to travel), knit the green until 3 stitches past the blue, and continue to knit with the blue, again leaving a little slack, this time in the blue (no twist necessary because it's a left leaning color change!).
In this case, three stitches is not a very long way for your yarn to travel, but if the distance gets significant, you may need to start a new ball.
I hope this helps clarify! If not, please ask again and we'll work it out!
Whitney
Hi Purl Bee!
Any advice for if you realize a few rows later that you didn't wrap for a row or two of color change? I have a big old nasty hole that I REALLY don't want to have to rip down to fix.
Hi Kate,
If there are is a tail nearby, you could use it to sew up the holes. Or you could use a new piece of yarn to sew them up, weaving in its ends when you're done.
I hope this helps! Thanks for asking!
Whitney
how did you handle the bottom middle of the star, where the 2 legs meet in the center? it seems like you'd have to start another blue right there just for one stitch, then it would be used for the center of the 2 legs? now that i “talk” my way through it, seems like the star is easier than what i'm doing lol.
I'm knitting an “M”, so i'm going to have the “v” that's formed in the middle of the M, at the top of it and at the bottom of it, and I'd tested stranding for a few stitches til it was wide enough to use intarsia, but then.. this is going to be a blanket so i dont want it to have any strands. i'm not sure i'll be able to avoid just a a few short places of stranding in that area.
Thanks!
Hi Cassie,
I'm not sure I totally understand the problem, but you can start a third ball after just one stitch of the “M” color. Or if you have to, I think stranding across one (or even two) stitches would hardly be visible on the wrong side.
Please let me know if you have any more questions or if we can clarify this one!
Whitney
Question regarding this tutorial:
Hello. My name is Melanie. I work and teach classes at The Yarn Lounge in Richmond, Virginia. I am teaching an Intro to Intarsia class soon and was wondering if I might get permission to print and give this tutorial to the students in my class. It would not be distributed to anyone else.
Best regards,
Melanie Snellings
Hi Melanie-
Thanks for getting in touch about this. Yes, you may use this tutorial as long as you make sure that each copy has our logo and and website address clearly printed at the top.
Good luck with your class!
Thanks!
Molly
In a pattern I am following, I knit some rows in one color, then begin intarsia. I use blue, white, and blue. How do I add the two blues when I am ready to begin the intarsia? The white, I assume, I make bobbin-like wrap like you did, then begin with that when I'm ready to begin the technique. How do I put the blues on either side of the white? Thank you; help is appreciated.
Hi Evelyn,
For that section, you'll be working with three bobbins (or balls) of yarn. Start the intarsia row with a bobbin (or ball) of blue yarn, join the bobbin of white, and then join another bobbin (or ball) of blue.
I hope this puts you on the right path. Please let us know if you have any more questions and thanks for this one!
Whitney
I've been searching for instructions for a knitted intarsia diamond, Argyle, patterend throw. I'm on my second week of searching, can you help ? I need to know how many stitches to form the diamond shape. I wanted to make the diamonds quite large with a single stitch for the cross stitch, which intersects the diamond. I do know how to knit intarsia.
Hi Elizabeth,
I don't know of any argyle blanket patterns currently available, although I have come across them in the past in vintage magazines and books.
Generally speaking, you can make the diamonds any number of stitches. I would decide how wide across I want my diamonds to be (choose an odd number); cast on that number times the number of diamonds I want, plus the amount of space I want between the diamonds; and then start the diamonds with one stitch at bottom center of each proposed diamond area, adding a stitch on either side of the center stitch every other row or so.
And as you suggest, the intersecting line is usually done at the end with duplicate stitch, cross stitch or some other kind of embroidery.
I hope this gets you on the right path! Thanks for asking and good luck!
Whitney
Know that years after you wrote this, it's still helping knitters out there who are learning this new-to-them technique. This makes it so clear and will be kept on-screen as I begin my first intarsia project. Thanks so much.
I get it!! Thank you for the intarsia information. I could not figure out why my colored knitting was taller than the other knitting. Your illustration on what the back should like like showed me that I had it very wrong. I did not understand that you have to have a bobbin for each change. Thanks!
I found the tutorial useful. The pattern I am knitting is a sweater on circular needles. I am trying to figure out how to knit intarsia when I don't have any purl rows. Do I carry my colors all around the sweater?
Hi Barbara,
In general, people work an intarsia pattern only when they're knitting something flat (turning the work at the end of each row). As you have discovered, when you're knitting something in the round, intarsia poses the difficulty that the ball is left on the left side of the design, making it inaccessible when you knit around to the right side of the design!
However, there are some tricky techniques to overcome this problem. A quick search of "intarsia in the round" turned up many tutorials on the subject.
Thanks so much for asking and good luck!
Whitney
When weaving in intarsia ends, you want to make sure that the first direction you go with the yarn end is the natural direction the yarn would have been pulled if you had continued knitting with it. In the photo, the yarn would have been pulled up by the next stitch if I hadnt switched to blue, so I wove the end in so the yarn is pulled up.
If you are thoughtful about weaving in your ends, it will help your knitting look more even at the color changes on the front of your work.
I have started a diamond shape using the intarsia method, but notice after a few rows that the first row of one stitch in alternate colour seems to have a small gap – I twisted the wool on RH sloping pattern but not on LH sloping side as per most advice sheets . Should I try twisting on this first row also ? Trying to catch in the tail ends of the alternate colour and the second ball of main colour ( on other side of diamond ), should this be done on alternate rows ?
Hi Susan,
Sure, try twisting on the first row to see if this solves your problem. And I would recommend weaving the tails in as usual, rather than trying to knit over them, since adding new balls of yarn also creates holes and weaving in their tails fixes that problem.
Thanks for your questions and please let us know if you have more!
Whitney
I'm trying to knit a hat with an intarsia heart and I'm having trouble finding step by step written/visual instructions on what to do. I found your post which is extremely helpful. Any advice for an advance beginner trying to do an intarsia heart on a hat in the round?
Hi Meryl,
I answered a similar question awhile back. Here's what I said…
In general, people work an intarsia pattern only when they're knitting something flat (turning the work at the end of each row). When you're knitting something in the round, intarsia poses the difficulty that the ball is left on the left side of the design, making it inaccessible when you knit around to the right side of the design!
However, there are some tricky techniques to overcome this problem. A quick search of "intarsia in the round" turned up many tutorials on the subject.
If you'd like to avoid all this difficulty, you could instead knit a fair isle hat with hearts going all the way around. We have a pattern for one right here: https://www.purlsoho.com/create/the-purl-bee/2013/1/24/whits-knits-soft-and-sweet-hats.html
Thanks so much for asking and good luck!
Whitney
I am interested in making the “Shadow Stripe” baby blanket. When I click on the link to the tutorial for making the changing color stripe, the result is “not available”. How do I access that particular tutorial?
Hi Patti-
Thanks for pointing that out! I have fixed the link, and you can find it here: https://www.purlsoho.com/create/2012/04/24/whits-knits-four-corners-baby-blanket/
Thank you!
Molly
Hi,
When I knit with two colors, I don’t know how to make a solid block of color. If I start with color 1, when I switch to color 2, the top of the stitch of color 1 is in the middle of the stitch of color 2 that it is connected to, and it ruins my pattern. How do I fix this?
Hi Hannah!
In order to get a seamless line between two colors, when you switch from one color to another, you need to be doing “knit” stitches on the right side. If you have any purls at all, then you will get the blip of the wrong color like you mentioned.
Hope this helps! Thanks for your question!
Thomas
I’m doing an intarsia knitting pattern and the first 5 stitches and last 5 stitches on every row are knit stitches. I knit 5 stitches then change color and purl the rest of the row until the last 5 stitches when I change color again but knit the last 5 stitches.
I understand how to do the joining of the new color when the row is all knit or all purl but is it done any differently when I have to change color and am going from a knit stitch to a purl stitch?
Hi Judith!
When you are changing from the knit stitch in color 1 to a purl stitch in color 2, I think you can follow the directions that we have for the “wrong side” purling. I think it would work to move the yarn from color 1 to the front (between the needles) first, and then pretend like you have just purled.
Hope this helps! Thanks for your question!
Thomas
I GET IT! Sorry for the shouting, but I had to squee there because I’ve been so confused about this for so long and your tutorial is just so clear. Thank you so much for this!
Do you have any free Intarsia Knitting patterns? please let me know.
Hello Cindy!
We have experimented with Fair Isle color work much more often than intarsia, but we do have one colorful baby blanket available using this technique! Its called the Shadow Stripe Baby Blanket and here is the link to the free pattern: https://www.purlsoho.com/create/2013/07/14/whits-knits-shadow-stripe-baby-blanket/. Enjoy!
Alyson
If I’ve knit row 1 of an intarsia pattern when I turn work to purl do I repeat the same colour pattern as I used in row 1? Or do I purl the colour pattern of row 2? I guess what I’m asking is, does an intarsia pattern chart show only the knit rows or both the knit and the purl rows?
Thanks so much for the tutorial!
Hi, Julie!
Thank you for writing in! Intarsia seems fancy, but it’s actually quite easy once you wrap your mind around the motions. As you know, you knit part of the row with one color, drop that color, and then continue the row with a new color. When joining a different color on the right side of the work, cross the old yarn over the new yarn and knit the next stitch with the new yarn. This twists and locks the colors together.
Now, on the wrong side, bring the old yarn to the front purl position and cross it over the new yarn. This also locks the yarns together, creating a visible “jog” on the back side of the piece.
Intarsia pattern charts show both Right Side (the knit row) and Wrong Side (the purl) rows. The Wrong Side row on the chart is read from left to right, whereas the Right Side row is read right to left. Does that make sense? Please let us know if you have further questions!
Best wishes,
Kumeko
i forget to twist my yarn when adding a new color (intarsia). how do i fix that without ripping back. i have down about four rows that way.
Hi Robyn,
Thank you for writing us! Unfortunately there is no good solution for fixing intarsia that hasn’t been twisted. You could try sewing the hole from the back with some scrap yarn, but this will create unevenness in the fabric. I suggest ripping back if it bothers you. It will make you feel better about the project in the end!
Best,
Adam
This is very helpful. I’m knitting a baby’s jacket with various colours and different stitches on each row and wasn’t sure how to do the twists. I now know to make sure that the ‘change loops’ only show on the wrong side. I’ll leave the back of the jacket as it is (doesn’t look too bad) but make sure that the fronts look OK.
I am knitting a mickey mouse face of a different color and that face will appear as purled on the knit side. how do I start it so it does not show the bump on the right (knit) side. the pattern says to change color on row 10 in the middle of the row which is a purl row and I do not want the bump on the knit side. The finished pattern of mickey mouse is raised on the knit side as a purled face.
Hi Diane,
Sorry for the late response! When doing intarsia you will always twist your yarns on the wrong side, which for you is the side with Mickey’s face in knit stitches. Even if you are doing a purl stitch and need to twist for the next knit stitch you will twist as normal and just put your yarn for Mickey’s face in back to continue in knits. I hope this makes sense!
Let me know if you have any other questions!
-Adam
Hi wondering if someone can help. I’m doing my first intarsia project.. Which is a baby blanket with different colour block circles. I understand how to change colour but as the main colour of blanket is white how do carry the yarn over without creating lines across the back?
Hi Anita,
Thanks for the question. When working intarsia you’ll need as many balls of yarn in work for the amount of color blocks you have per row. For example, if you have white followed by blue and then white again, you’ll need to have two balls of white and one ball of blue. This way you will be able to knit white, twist your yarns at the blue section, knit blue and twist your yarns for the second white section without a large float across the back. Hope this is clear!
-Adam
Fantastic tutorial as always! You have the most wonderful instructions on the net. Just wanted to point out that the link to bobbins in “you may want to wind the separate colors onto bobbins to help you stay organized.” in the basic rules section goes to a not found page. Your site is so beautiful and wonderful that I know you’ll want to fix it.
Hi Marian,
Thanks for the heads up! I have relayed this to our web team and hopefully it’ll be fixed soon.
All the best,
Adam
Do you have any advice for fixing a twisted stitch on the intarsia join about one inch back without frogging? (I’m working on the colour study blanket and think I dropped and picked up a stitch the wrong way and now have a purl looking stitch on the front face). I would like to avoid pulling out whole rows so ideally would like to unravel that one vertical row of stitches; however because it’s at the intarsia join, I assume I will have double the number of ladder rungs (from the intarsia twist) and am not sure how to deal with those. I hope you can help, I’m not confident to unravel all the rows when I’m using circular needles and worried I will drop even more stitches! I know one option is to leave the mistake (character?!) but after trying to ignore it and knit several new rows it’s still bugging me!
Hi Julie,
Thanks for writing in! Sadly, unraveling and reworking garter is a little tricky and unraveling and reworking along the intarsia join is also tricky….so double tricky here. My best advise is to try it on a swatch to see if you are confident and able to do it. With garter, you will need to switch sides that you are working the yarn from each row (as opposed to stockinette, where you can work from the knit side). I have not unraveled on the intarsia join before and again, I would recommend making a swatch and giving it a go there. Otherwise, I would recommend pulling back, you can do so one stitch at a time if you are not confident in picking loose stitches back up. Alternately, you may be able to find a video on YouTube that could be helpful.
Happy knitting!
Cassy
I am knitting a child’s sweater that has daisy-like flowers all over it. The instructions say to use a different skein for each motif, but the more vertically oriented petals of the daisies can be separated by 4-5 stitches near the outer edges of the flowers. Should I use a different skein for each petal and for each space between a pair of petals when they fall this way, or use one skein for each motif and carry the yarn behind. It seems an odd mix of intarsia and stranded knitting is required. The daisies vary in size from about 12 stitches in diameter to 7-8, so the individual petals are not large. Here’s a link to a picture of the sweater in case that helps. http://farm2.static.flickr.com/1301/847629951_b6c64d0e8c_n.jpg
Thanks for any help you can give.
Hi Christina,
Thanks for writing in! You can certainly alter the pattern if you wish, however, I tend to be a rule follower and figure that there is a reason that the designer that created a pattern has a reason that they did something that I am not aware of. Perhaps it is actually easier to use different skeins. That said, you are the boss of your knitting and if working stranded makes you happier, I say go for it!
Best,
Cassy
Hello: thanks for this useful information. Can you clarify please the right way to join together the cut end of a new color to incorporate it into a row next to one that is already knitted (I.e.: does it require a knot to hold the two together?) great thanks.
Hello Paula,
Thank you for writing to us! Are you asking about the moment in the middle of your row when you change colors? there is no knotting just twisting. When you get to the point in your row where you would like to start a new color all you need to do is twist (as pictured above) it over your original yarn to lock it in place and then just knit until you wish to go to the next color in the row.
I hope this clarifies things. Let me know if you have any further questions!
-Marilla
Like so many others, I find all the Purl tutorials clear and so helpful. My question concerns changing colors between a stockinet center section in light gray, with dark gray reverse stockinet on each side. On one side the changes are nice and tight, but on the other side they’re all loosy goosy. I’ve tried pulling those stitches extra tight, but it doesn’t help. I saw somewhere about knitting through the back loop but not sure how it was done. Do you know where I can find this?
Thank you so much!
Hi Norma,
Thanks for writing in! I am not sure what might be causing one side to be neat and the other side to be loose. You will see the transition more on one side than the other however, they should be equally tight. You certainly can try knitting into the back loop to see if that helps. While we do not have a tutorial for knitting throught the back loop, there are many great tutorials on YouTube. I would suggest searching either “ktbl” or “knitting through the back loop” to find a video that you could follow along with.
Best of luck!
Cassy
This is the most beautiful website ever!
I am a novice knitter and had a question about your little grey intarsia swatch. I want to knit it, to see if I will ever tackle a larger piece.
Cassy was so wonderful. She zipped out the directions for knitting the swatch, and I think I will be able to make it!
I also looked at the pictures showing exactly how the yarns work. Cassy said intarsia is not hard, and the pictures do make it look simple.
Thank you so much for the help and inspiration!
Sara Lemon
How do you cast on using intarsia? In other words, how do you cast on using multiple colors?
Hi Nora,
Great question! You actually can’t work the intarsia method when casting on, or even on the first row of joining a new color in the middle of the row. If you take a look at the instructions for our Shadow Study Throw, you will see that we have you simply cast on with the first color, set that yarn aside, and then cast on with the next color, and the two sets of stitches will not be joined at this point. On the first row following the cast on, you can start using the intarsia method to join the two colors together, which will leave a small gap in the cast on. All you have to do is close up this gap with your yarn tails when you’re ready to weave them in! Similarly, when you first join a new color in the middle of a row, there isn’t really a way to twist the yarns together, but can start doing so on the next row and close up the hole in the first row when you weave in your ends.
I hope that clears things up!
Julianna
omg thank you i do crochet and am working on my first knitting project i couldn’t find anything on color work i’ve just commited myself to sewing the holes closed