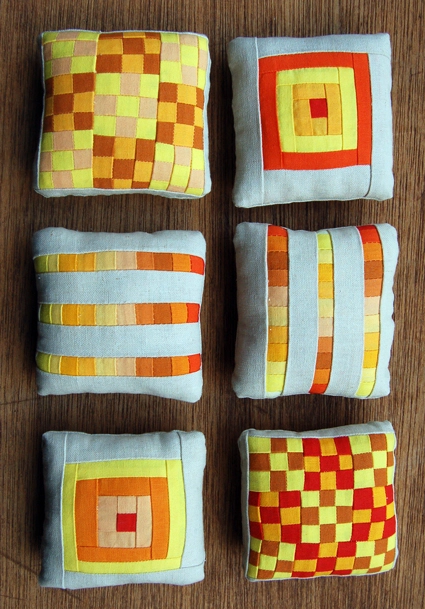
Miniature Patchwork Pincushions
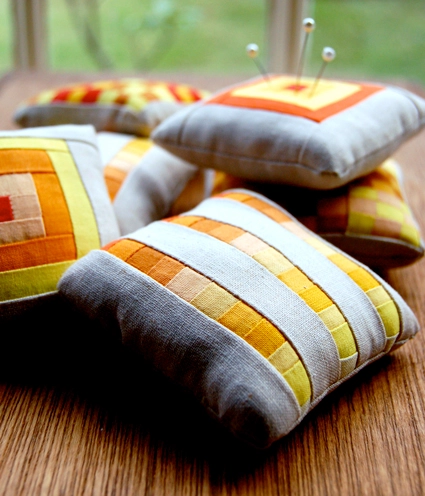
These little pincushions are the perfect gift for any quilter friends. Each one is like a tiny version of a larger quilt, but they are a lot quicker to make. Plus despite their delicate appearance they are really useful. They are stuffed with cotton and steel wool which will keep your pins and needles nice and sharp! –Molly
Designed by Purl Soho designer, Molly Schnick. Click here to see even more of Molly’s work!
Materials
To make at least six 3 1/2-inch square pincushions. (You will have fabric leftover.)
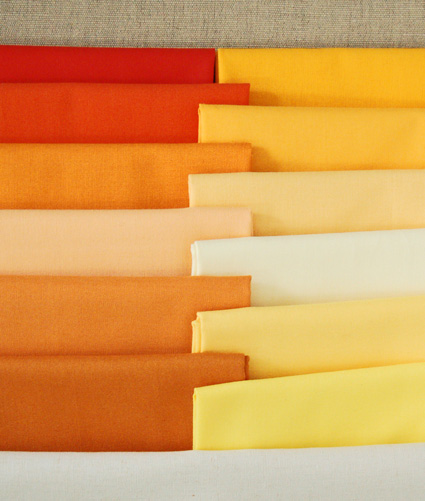
- One Spectrum Bundle. One bundle contains 12 fat quarters each in a different shade of gold, orange, and yellow. (NOTE: This bundle is no longer available, but choose from our 35-colors of Spectrum Cotton or full-range Spectrum Cotton Fat Quarter Bundle instead!)
- 1/2 yard of Essex linen cotton blend in Natural
- Cotton or Poly-Fil Stuffing
- One package, or at least 3 pads, of size #0000 steel wool (this can be found at almost any hardware store.)
Please note that all seam allowances are 1/4-inch unless otherwise noted. Also please use the small stitch on your sewing machine.
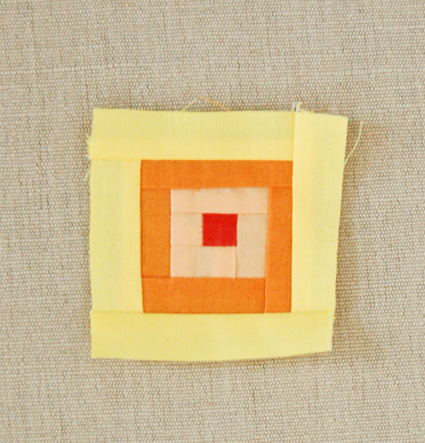
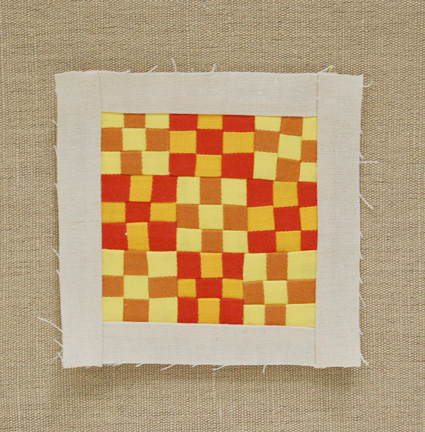
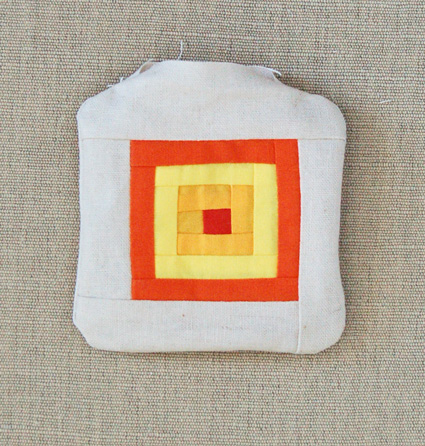
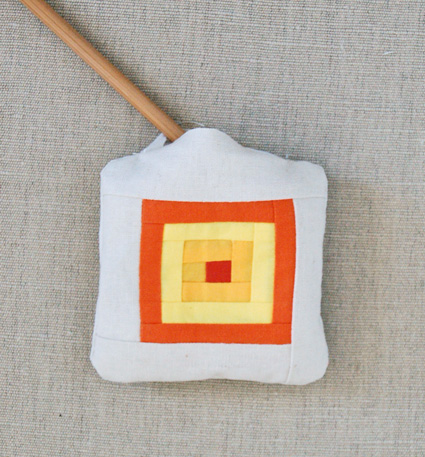
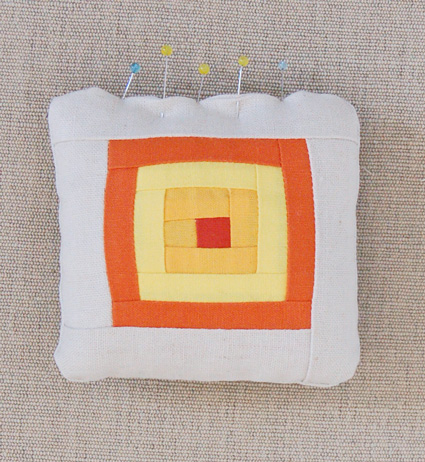
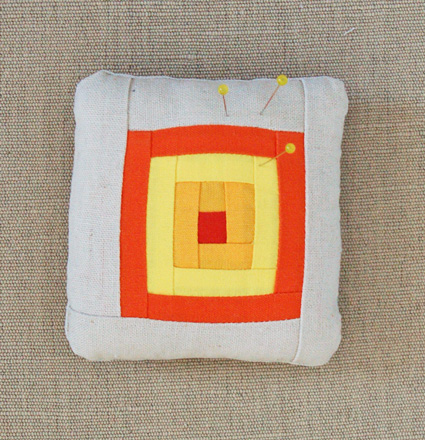
Log Cabin
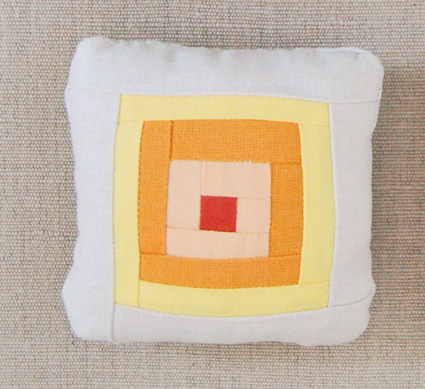
The log cabin block is a traditional and well loved pattern. Its concentric shape and interesting construction make it both beautiful and fun to make.
Start by picking four fabrics from the bundle. They will be the center, 1st tier, 2nd tier, and 3rd tier fabrics. Please see the picture of the finished block above to get some idea of how the fabrics will be arranged when you’re done. Traditionally the center of the log cabin block is red, to represent the hearth.
Cut one 3/4-inch strip from each of these four fabrics along the 18-inch width of the fat quarter.
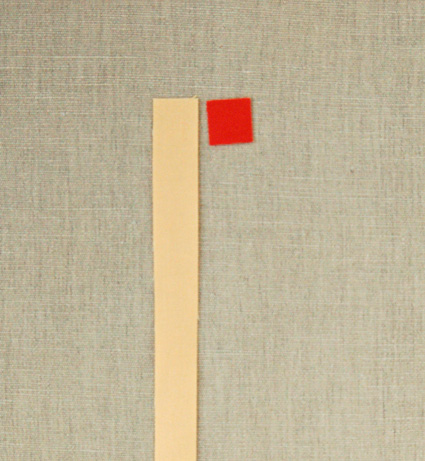
Cut a 3/4-inch square from the 3/4-inch strip of your center fabric.
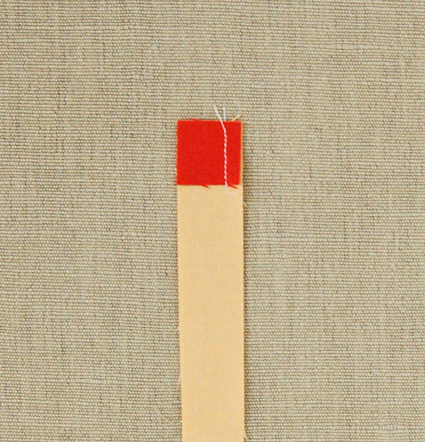
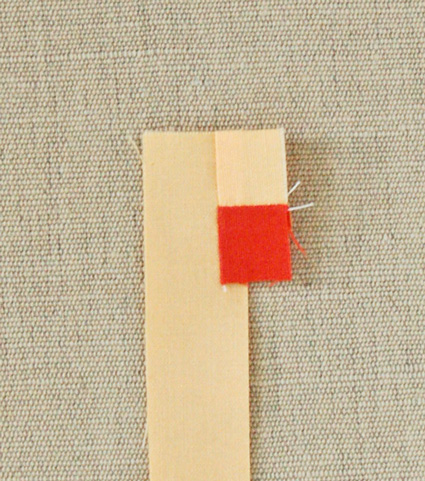
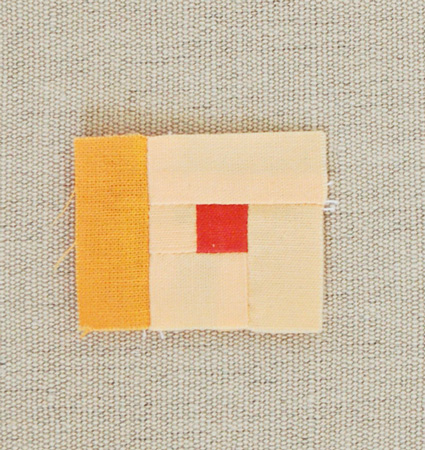
Sew the center square to the 1st tier strip along one side.
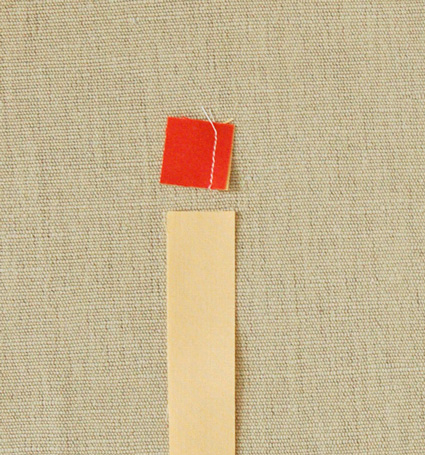
Then cut the 1st tier strip below the seam, so it lines up with the side of the center square.
Press open the little piece you just sewed together and rotate it to the right.
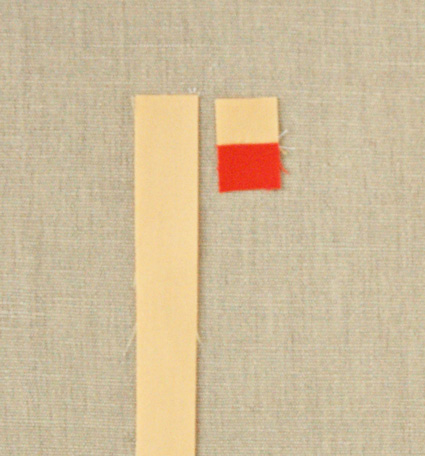
Place this sewn piece back on top of the 1st tier strip (right sides together) so it’s long edge matches up exactly with the outside edge of the strip. Sew the sewn piece to the strip along this far edge.
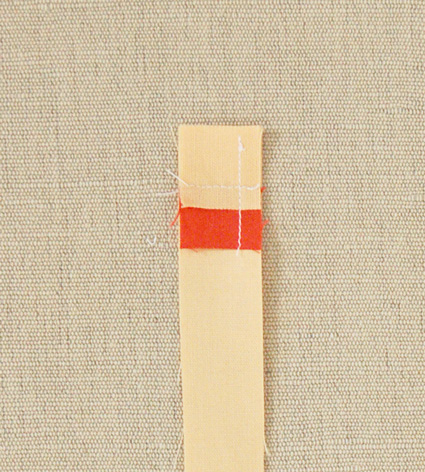
Press the piece open and cut off the excess from the strip.
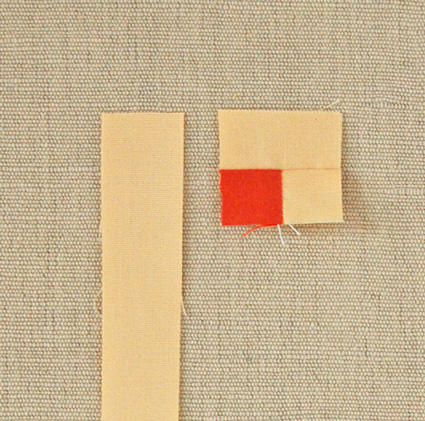
Rotate the sewn piece to the right as shown above.
Place the sewn piece on top of the strip right sides together again, as you did in the last step, and sew the strip to the sewn piece.
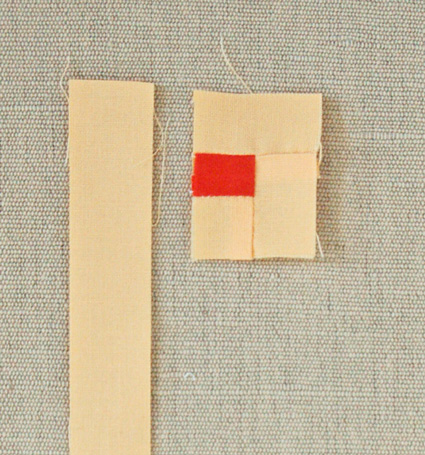
Once again, cut off the excess from the strip. Only one raw edge of the center piece will remain. Rotate the sewn piece to the right once again and sew it to the strip in the same manner that you did previously.
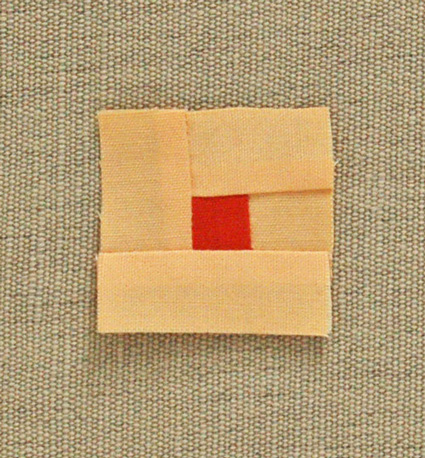
Your 1st tier is now finished.
Start the 2nd tier on the same side that you started the 1st. You will be adding the 2nd tier in the same way as the 1st. Just treat the 1st tier as you did the center square in the beginning.
Sew the 2nd tier strip along the first side and trim off the excess.
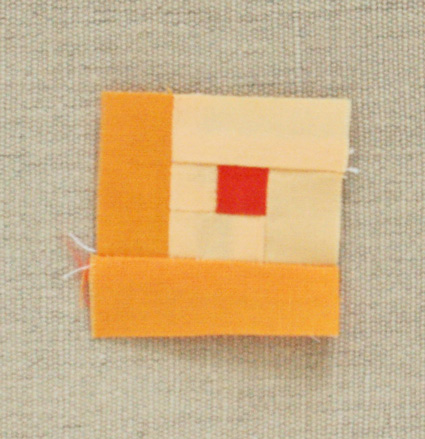
Rotate the block to the right, sew the strip to the second side, and trim it.
Rotate the block to the right, sew the strip onto this third side, and trim it.
And finally finish the 2nd tier by turning the block to the right, sewing on the strip, and trimming it.
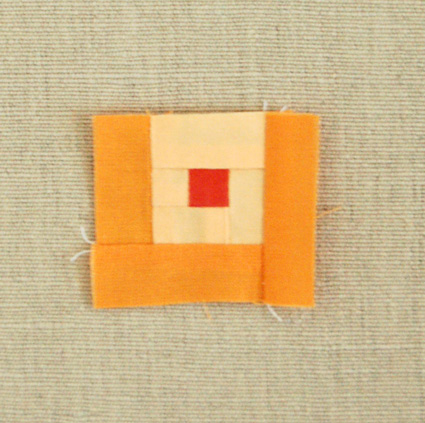
Sew the 3rd tier in the same way.
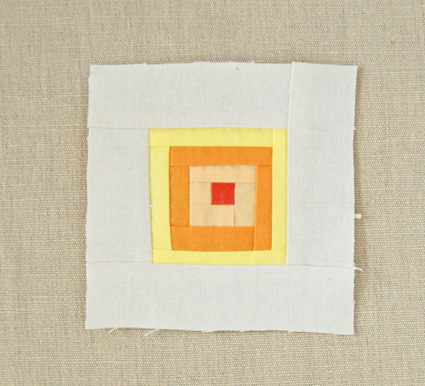
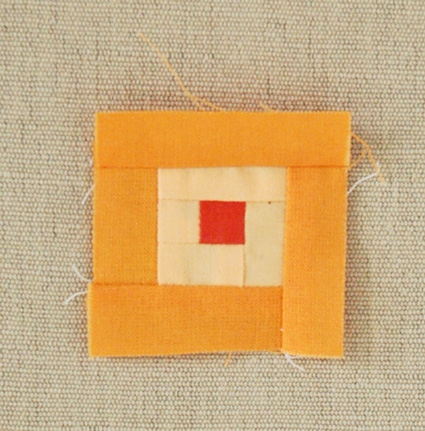
The final tier is made from the Essex.
Cut a 1 1/4-inch by 15-inch strip of the Essex. Attach it in the same way as all the other tiers. When you are done trim the square to be 4-inches square.
The top is now finished. Repeat for another log cabin top if you like.
For stuffing and finishing instructions please scroll down to the bottom of this story.
Nine Patch
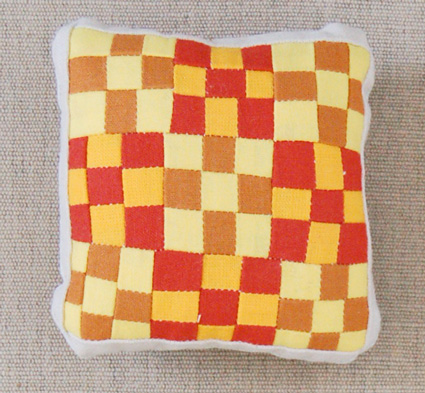
The nine patch is classic, simple block. This particular piece is made out of 9 mini nine patch blocks to create a little checkerboard pattern.

Pick out two groups (group 1 and group 2) consisting of two fabrics (fabric A and fabric B) each that contrast nicely.
Cut each fabric into three 3/4-inch by 12-inch strips.
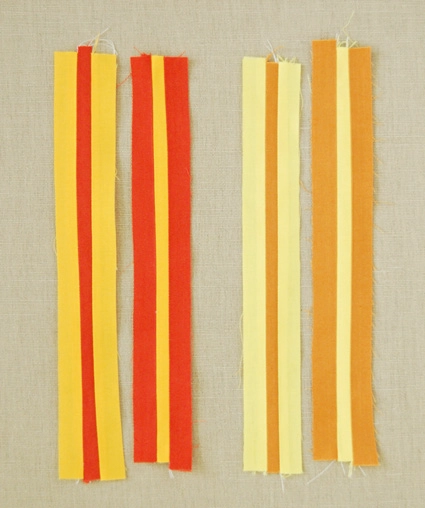
Sew the strips together along their long sides into groups of three as show above. You will have two strips per group, one with fabric A sewn on both sides of fabric B and one with fabric B sewn on both sides of fabric A.
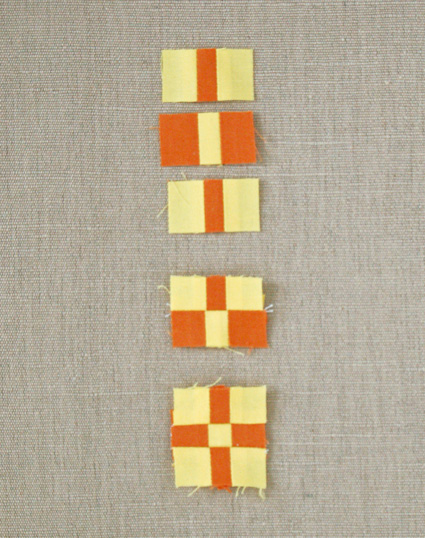
To make the mini nine patch blocks separate the two groups.
For Group 1:
- Cut ten 3/4-inch pieces from the width of one of your strips. Do this by cutting perpendicularly across the sewn seams.
- Cut five 3/4-inch pieces in the same manner from the second strip.
- Arrange these 3/4-inch pieces as shown at the top of this picture; a piece from the first strip, a piece from the second strip, and then a piece from the first again.
- Sew the pieces together in this order taking care to line up all the little seams as best you can. You will end up with a tiny little square made up of 9 even tinier squares.
- Repeat this for all the 3/4-inch pieces and you will have 5 mini nine patch squares
For Group 2:
- Cut eight 3/4-inch pieces from the width of the first strip.
- Cut four 3/4-inch strips in the same manner from the second strip.
- Sew these pieces together just as you did for Group 1. The only difference is that at the end you will have four mini nine patch squares, not five.

Press your nine nine patch squares as flat as you can.
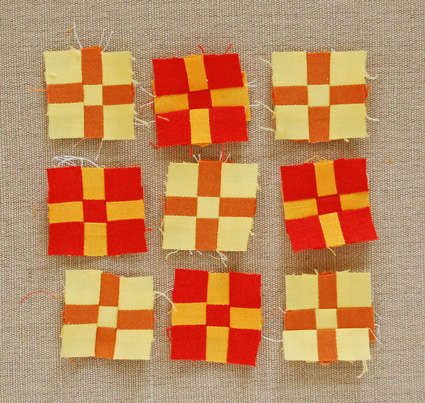
Arrange the squares as shown above.

Sew them together first into three horizontal rows…
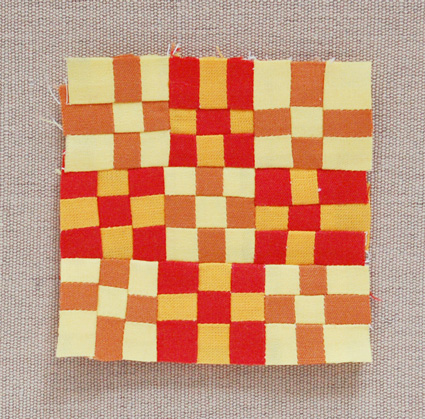
… and then sew the three rows to one another.
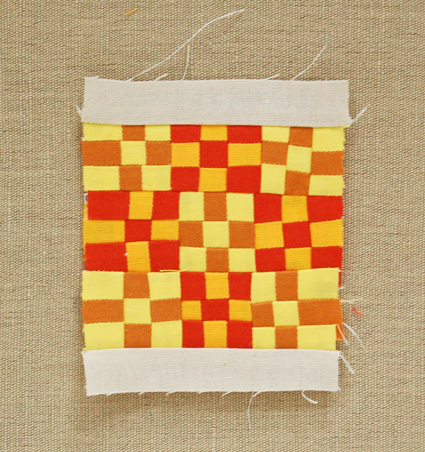
Cut two 1 1/4-inch by 2 3/4-inch strips from the Essex and sew them to the top and bottom of your checkerboard square.
Cut two 1 1/4-inch by 4-inch strips from the Essex and sew them to the left and right sides of your piece. Trim so the piece is exactly 4-inches square.
The top is done! Repeat for a second nine patch top if you like.
For instructions on stuffing and finishing please scroll to the bottom of this story.
Stacked Coins
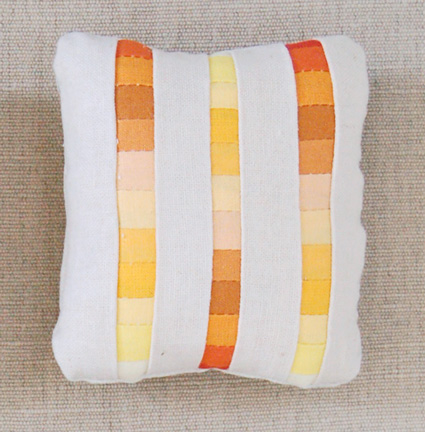
Stacked coins is another very traditional quilt pattern. In this version I used the lovely gradient of the Sunny Bundle to create a neat effect.
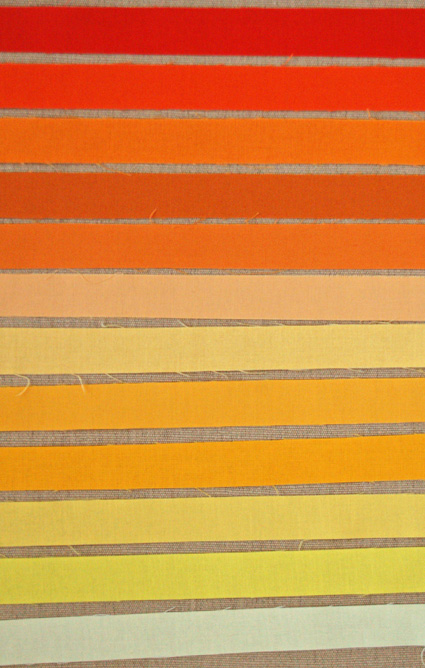
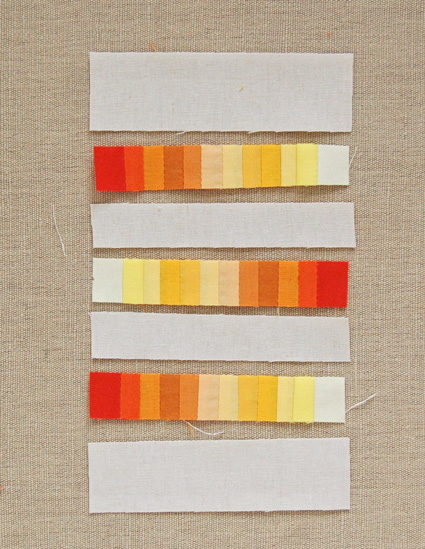
Cut a 3/4-inch by 8-inch strips from each of all the 12 colors in the bundle. Arrange the strips into a pleasing gradient.
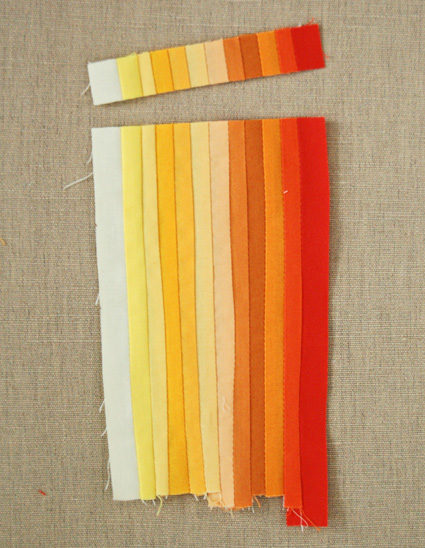
Sew the strips together, one at a time, in the order that you arranged in the previous step.
Cut three 3/4-inch strips perpendicularly (across all twelve strips and their seams) from the width of this piece. Cut three more for each stacked coin pincushion you plan on making.
Cut the Essex into two 1 1/4-inch by 4-inch strips and two 1-inch by 4-inch strips.
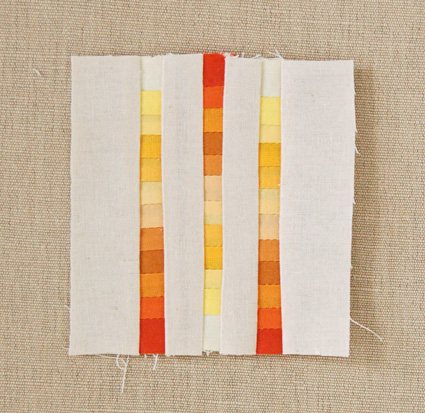
Arrange the Essex and the sewn colored strips as shown above: A 1 1/4-inch (wide) Essex strip, a colored strip, a 1-inch Essex strip, a colored strip flipped over, a 1-inch Essex strip, a colored strip, and finally a 1 1/4-inch Essex strip. Sew the pieces together in this order.
Trim the sewn piece to 4-inches square. (I realize that math-wise these colored strips should only come out to be about 3 1/2-inches long but with all the seams I found them to easily end up to be 4-inches or more)
Repeat all the steps to make a second Stacked Coins top if you wish. For my second one I arranged all the colored strips in the same direction.
Continue reading for instructions stuffing and finishing them.
Stuffing and Finishing
Now that all the tops are done it’s time to stuff and finish them!
Cut six 4-inch squares from the Essex.
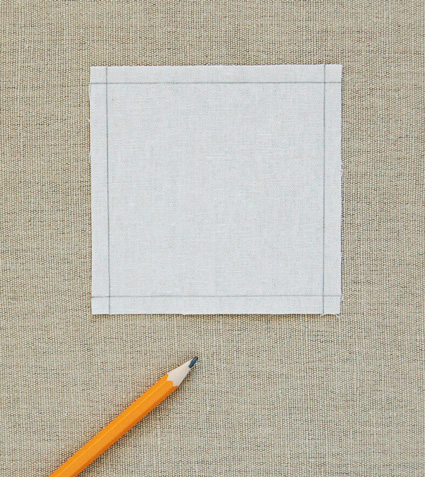
Draw a 1/4-inch line down all four sides of the square using a pencil or fabric marker.
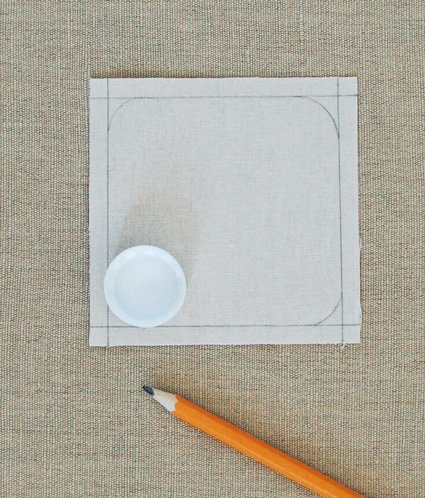
Using a plastic bottlecap as a guide, trace little curves inside the drawn lines of all four corners of the square.
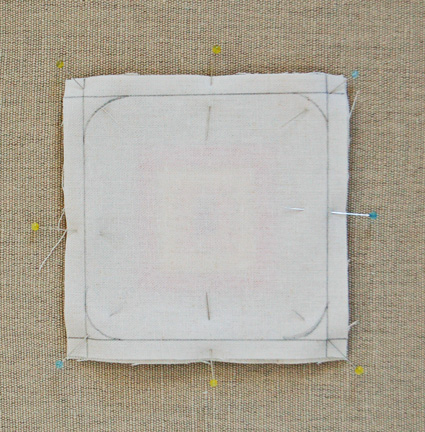
Pin the square to the pincushion top, right sides together. This drawn line, across the curves, will be the sewing line. The curves are there so the corners of the finished pincushions don’t splay out and look messy.
Sew along the drawn line around all 4 corners but leave one entire side open. Backstitch at the beginning and end of this seam.
Trim the seam allowance to a scant 1/8-inch. Do not trim around the open side.
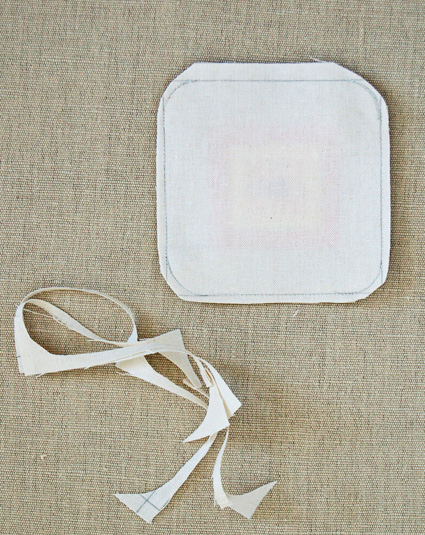
Turn the pincushion right side out
Poke out the corners with a knitting needle or other pointy object.
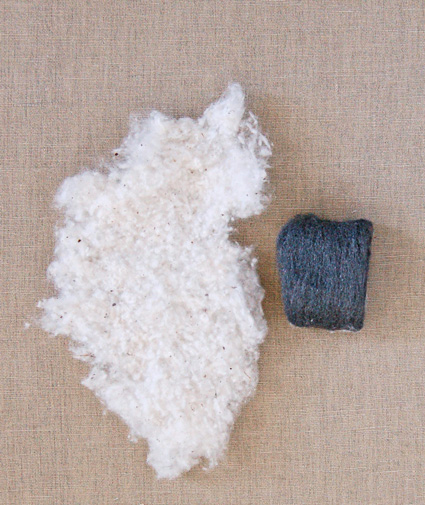
Wearing rubber gloves, tear one pad of the steel wool into two equal halves. Pull a roughly 5-inch piece from the cotton stuffing. The stuffing comes in loose sheets so try to keep the sheet together and as flat as you can.
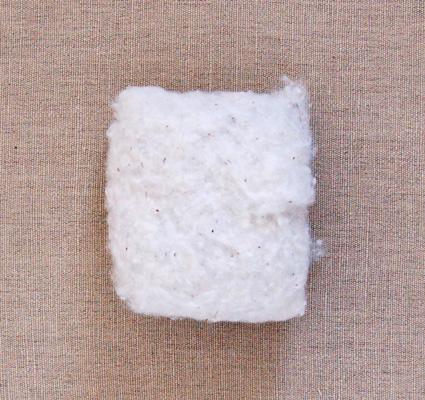
Loosely wrap one of the steel wool halves with the cotton stuffing. They should stick together pretty easily.
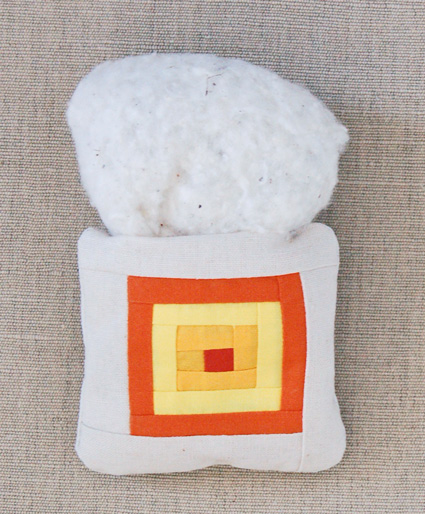
Now stuff the wrapped steel wool into the pincushion through the opening. After it’s in, use the knitting needle to arrange it correctly and also to add any extra stuffing to the sides and corners.
Fold the 1/4-inch raw edges of the opening inside of the pincushion and pin it shut. Hand stitch the opening closed using a slip stitch (there is a demonstration of slip stitch here.)
Repeat for all of the tops and you’re all done!
Update 2024: You can explore our current collection of beautiful fabrics and supplies on our page of Sewing Tools + Notions!


Ok, these are ridiculously cute! These would also make GREAT ornaments, all you would need to do is add a bit of ribbon to the top to hang them on the tree by! I can’t wait to get started on this!
Sarah
http://comeandseetheseitz.com
WANT! These are so freaking adorable…what a perfect use for scraps!!! 🙂
Angela
Its a really fantastic way from someone timid to start making quilts- or at least see how they are built! Really wonderful. Thankyou for sharing!
These are incredibly adorable! I might suggest using bronze wool (harder to find, I know) because it won’t rust, ever. Steel wool might pick up moisture from the air, or if you spill something on your pincushion, you’ll be sad.
Hi Ginger- Thanks so much for your suggestion. I found many bronze wool options when I googled it so it doesn’t seem too hard to find! I will definitely use it next time.
– Molly
great idea – i love these
These are really lovely, and I’m thrilled with the bronze wool tip (which I’d never even heard of). Just wondering what your seam allowance was. It looks like it was a scant 1/4-inch…?
Hi Kim,
The seam allowance for this project is 1/4-inch.
Thanks for your comment!
these are so ADORABLE!
Great tutorial! I have a question though: as a complete beginner in the crafting & sewing fields (I don’t even have a sewing machine, which sadly makes a number of glorious projects nearly impossible to make…), I don’t know why you need steel wool.
Could you “enlighten” me on that matter?
Thanks a lot.
Hi Line,
The steel wool helps keep your pins and needles sharp.
Thanks for your question!
Your blog is so inspiring. Thank you for sharing so many beautiful ideas and projects with instructions!
molly,
i am just finishing up the nine patch. i used robert kaufman’s kona cotton. it is so difficult to sew the three horizontal rows together. the squares hardly stay flat. they completely curl up. is the essex a thinner cotton? thank you for this great tutorial! -laura r.
Thanks again for such a lovely project and for the excellent instructions. I learned some new techniques!
Thank you so much for this turorial. I've been needing some help with a log cabin block and now I know. Thank you so much Molly!
*hugs*
you are really great architects!! thank you for your passion!!
linda from cologne germany
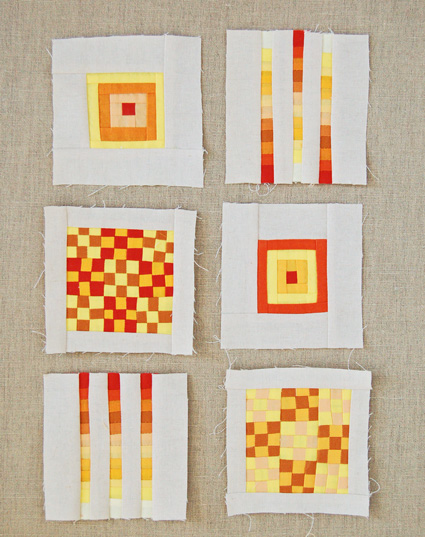
May I use the photo of the six finished pincushions in my blog? I will link it back to this wonderful post. I'm hosting a patchwork tote challenge and this tutorial would be a great inspiration to the participants. Thanks you!
Hi Rikka-
Yes, you can use the photo as long as you link it directly back to this post and say that it's from The Purl Bee.
Thank you for asking.
Best- Molly
Fantastic project! Thank you for sharing! ^ _ ^
This could be THE best tutorial I have ever seen. Thank you for explaining the foundation to these basic quilting patterns. I can't wait to get started!
So much FUN!!! The 9 patch was so hard at first, but once I got the hang of it, so much fun. I don't know if all people will do this, but I found that pressing the seams open helped with the bulk a lot.
Thanks for a great tutorial and my Xmas stocking stuffer idea for SURE!
Hallo!
Instructions would be easier to follow with accompanying photos.
I guess the page isn’t loading correctly. I tried to reload a couple times but no luck. Is it just me??
Hi Emi,
Thanks for letting us know about this! It seems like a little glitch in the website, and we’ll look into adding the pictures back as soon as possible. Thanks again!
All the best,
Lili