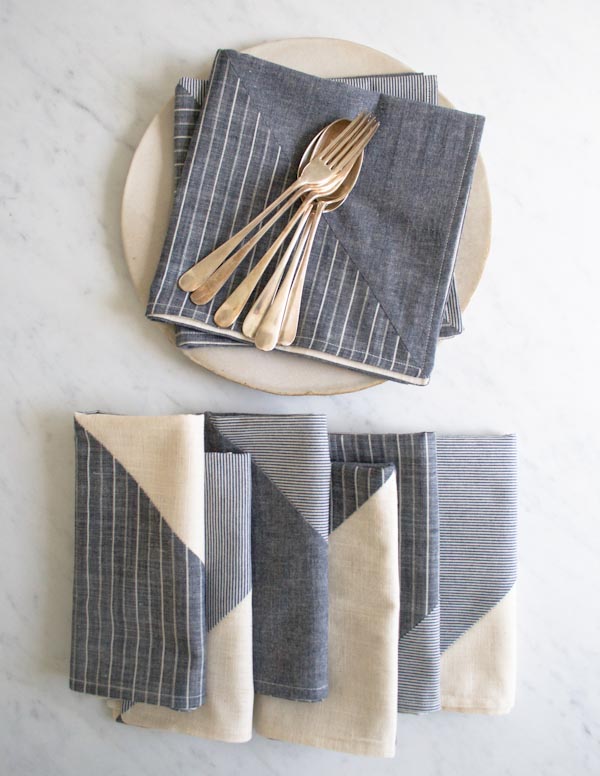

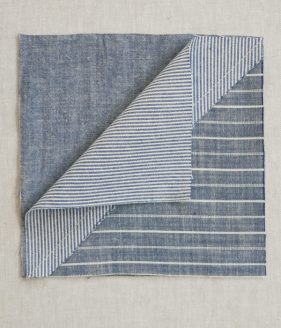
Pieced Napkins
Studies have shown that the human brain is naturally drawn to groups of three. Groups of two suggest conflict (yes or no; black or white), and four or more start to veer toward chaos, but three is just enough to allude to possibility (yes, no, maybe; black, white, gray). This rule is used in everything from speech writing to fine art… to napkin design!

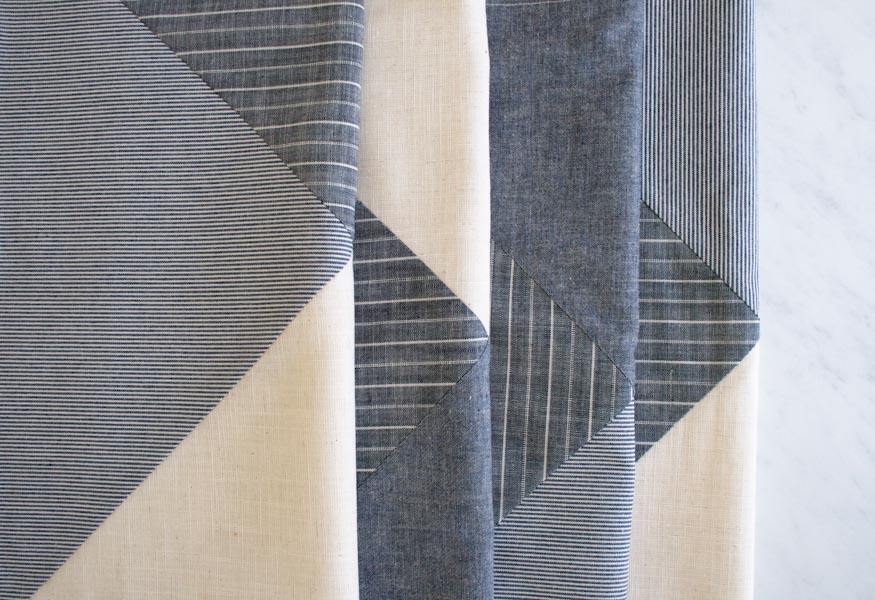
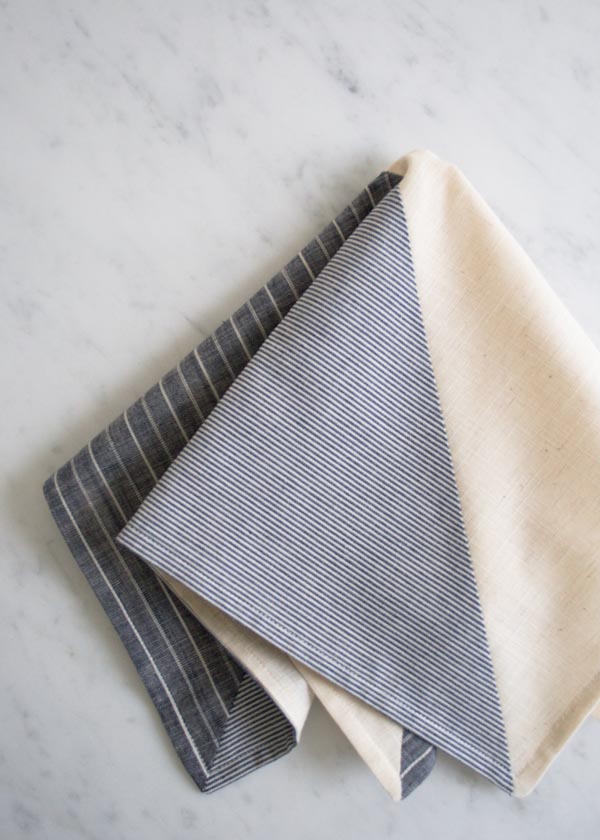
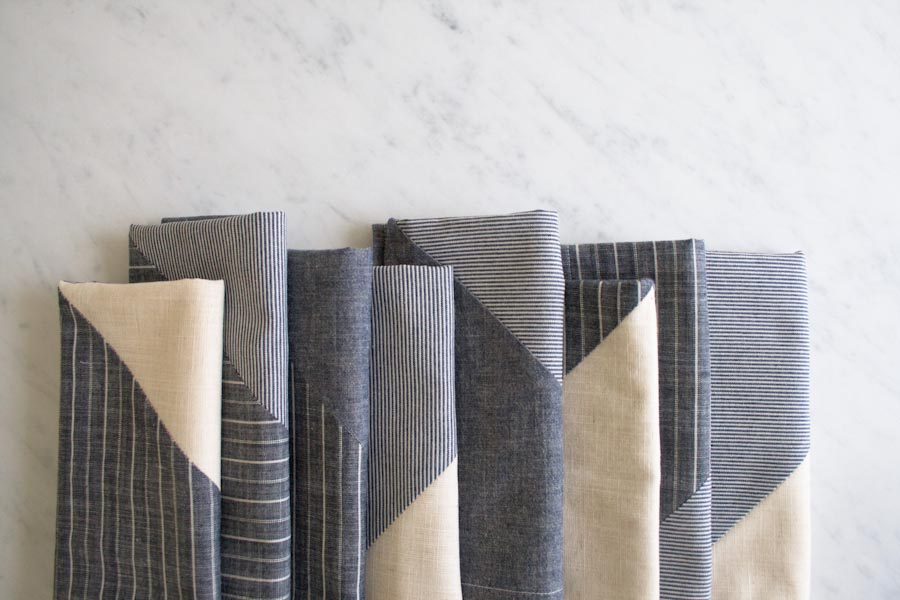
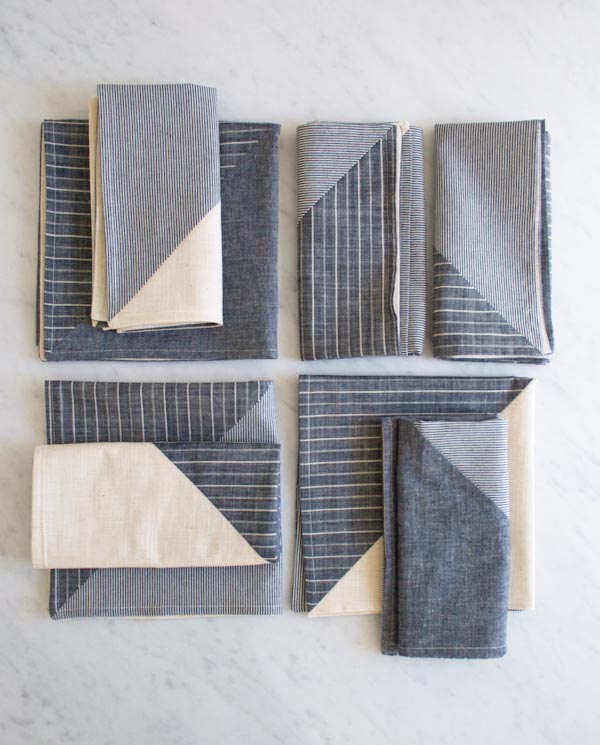
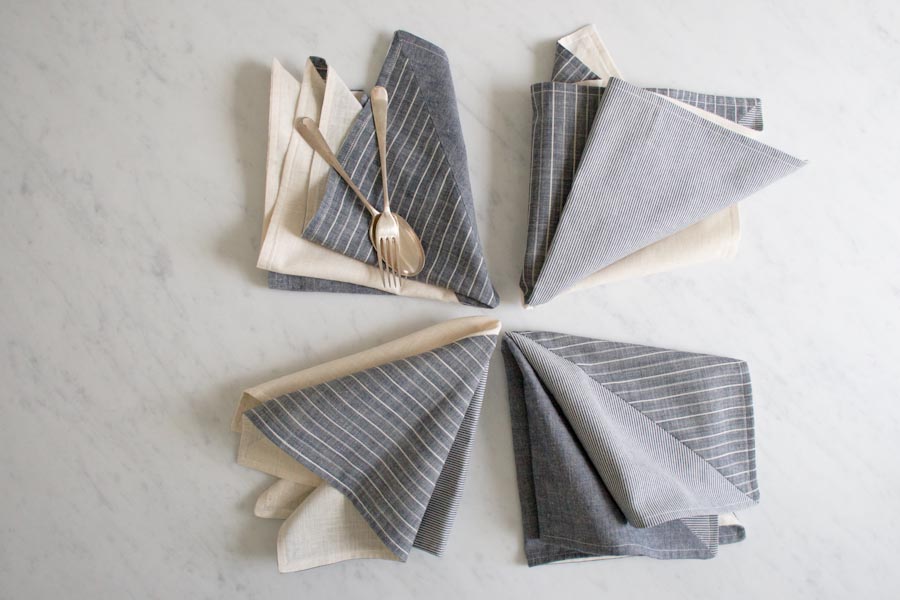
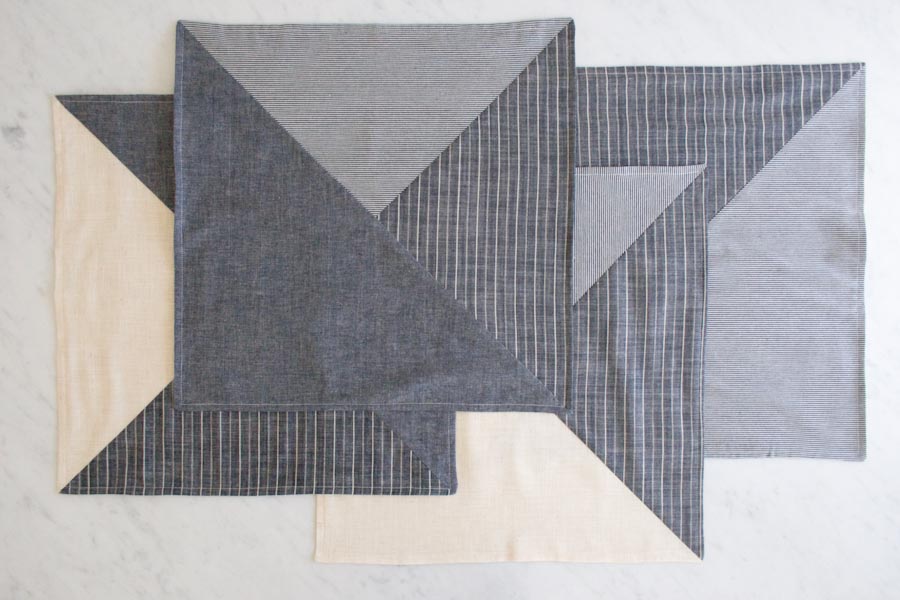
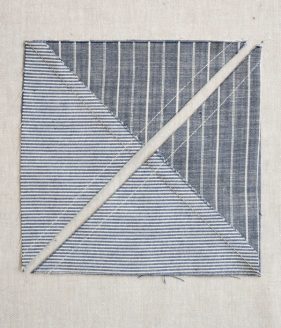
Composed of three right triangles, these Pieced Napkins exploit the brain’s natural affinity for three, as well as for all things beautiful! In Robert Kaufman’s striped Railroad Denims, plus two lovely, rustic solids (Robert Kaufman’s new Raw and Very Refined and Kiyohara’s Linen Blend Solids), this super-fun-to-sew set is instinctively right at home! – Corinne
Materials

- Fabric (shown from the top down)
- Color A: 2 ½ yards. I used Robert Kaufman’s Raw and Very Refined in Ivory, 88% cotton and 12% linen.
- Color B: ½ yard. I used Robert Kaufman’s Railroad Denim in Small Twill, Denim, 100% cotton.
- Color C: ½ yard. I used Kiyohara’s Linen Blend Solids in Navy, 85% cotton and 15% linen.
- Color D: ½ yard. I used Robert Kaufman’s Railroad Denim in Slub Stripe, Denim,100% cotton.
- A 274-yard spool of Gutermann’s cotton thread in color 1040
You will also need . . .
- A walking foot for your sewing machine
These are enough materials to make 8 dinner-size napkins.
Size
Finished dimensions: 16 ¼ by 16 ¼ inches
Notes
Prewash all fabrics before starting.
The fabrics used here have no clear right or wrong side. If you are working with these or similar fabrics, you may choose either side as the right side.
All the fabric pieces in the instructional photos are shown at approximately half size.
Pattern
Cut
Cut two 18 by 18-inch squares from all fabrics. You will have 8 squares total.
From Fabric A, also cut eight 16 ¾ by 16 ¾-inch squares.
Mark and Sew the Triangles: Step 1

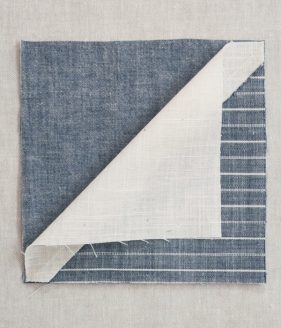
With right sides together, use Fabrics A and D to make two stacks of two squares. Orient the pieces so that all stripes run vertically.
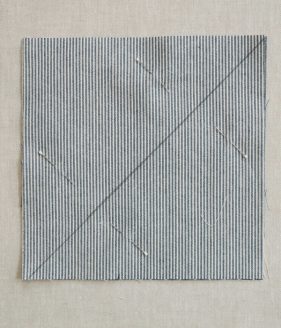
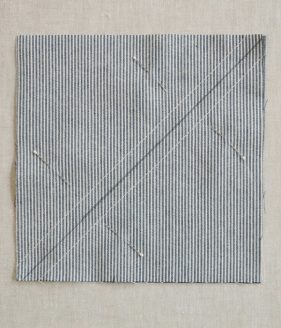
On each top fabric, use a pencil and a straightedge ruler to mark a diagonal line from one corner to another. Pin the fabrics in place on each side of this marked line.
Sew a seam ¼ inch along each side of the marked line.
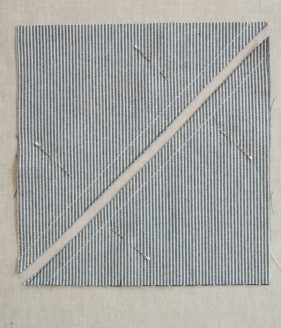
Cut along the marked line.
Open up the pieces and press the seams toward the darker of the two fabrics. Trim any seam allowance that extends beyond the corners.

You now have two identical pieces called Squares 1 and 2.

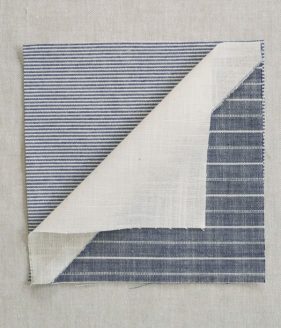
Repeat with Fabrics B and D. These are now called Squares 3 and 4.
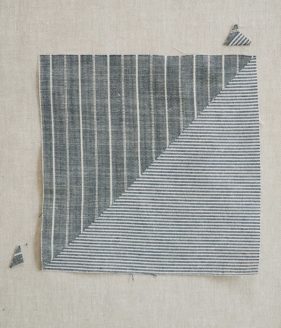
Mark and Sew the Triangles: Step 2

With right sides together, make four stacks of two squares, pairing Squares 1-4 on top of the remaining 18 by 18-inch squares. The top square will be slightly smaller than the bottom square. Push the top square into one corner, lining up two of its raw edges with two raw edges of the bottom square. Trim off the overhang from the larger square.
To make the combinations we made, match up the following fabric squares . . .
(shown clockwise from top left)
- Square 1 with Fabric A
- Square 2 with Fabric C
- Square 3 with Fabric B (Orient the fabrics’ stripes so that they are running in the same direction.)
- Square 4 with Fabric C
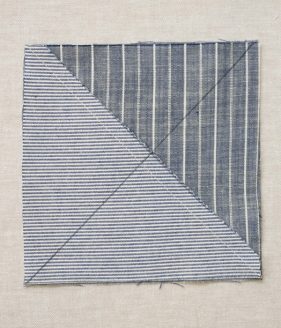
On each top fabric, use a pencil and a straightedge ruler to mark a diagonal line from one corner to another, bisecting the seam from the previous step. Pin the fabrics in place on each side of this marked line.
Sew a seam ¼ inch along each side of the marked line.
Cut along the marked line.

Open up the pieces and press the seams toward the darker side of the square. Trim any seam allowance that extends beyond the corners.
Repeat with the remaining stacks so that you now have 8 pieced squares.
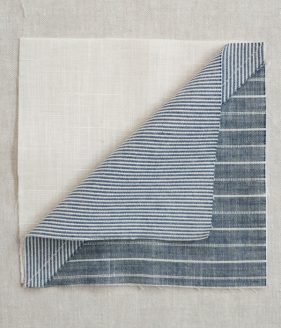
Piece the Napkins: Step 3

With their right sides together, stack one pieced square on top of one of the 16 ¾ by 16 ¾-inch Fabric A squares.
Pin along all four sides.
Using your machine’s walking foot and starting in the middle of one side, sew along the pinned edges with a 3/8–inch seam allowance. Stop about 3 inches from where you started, leaving an un-sewn gap.
Trim the corners.

Turn the Napkin right side out through the gap and press flat, making sure the corners are nice and pointy and that the seams run right along the folded edge.
Pin the two layers together along all four sides.
With the walking foot still attached, sew a topstitch along all four sides with a 1/4-inch seam allowance.
Repeat for the remaining seven napkins and enjoy them all!

Update 2024: You can explore our current collection of beautiful fabrics and supplies on our page of Sewing Tools + Notions!


Love these!
a great idea with lots of seasonal ideas
Thank you for the lovely free patterns you have offered me since I provided my email a few weeks ago. I would love to print them and collect them in a file for future use. I haven’t been doing that because they require so many pages to print. The pattern above needs 16 pages, even though it says it is “printer friendly”. It would be so nice if the pattern could use only a few pages instead. The way this pattern prints now, each picture is very large.
Thank you again.
Hi Nancy –
This is a great question. It’s true, the printing format that comes up when you select “print” from your browser’s toolbar is often long and cumbersome, so we’ve provided an easy print option within our site.
If you’re on a desktop version of the site, you will find a “print” icon in the right column just below the date and tags. If you’re on a mobile version of the site, you will find a “print” icon below the pattern and above the comments.
Follow the easy on-screen instructions to delete whichever parts of the pattern you don’t want to print or save. For example, you may decide to shorten the pattern by omitting certain images or the list of materials.
I hope this helps!
-Corinne
Oh my goodness! this was the best information !
I love that you can make a PDF :)))))
I don’t have to waste paper and ink and I can have it on my iPad to take it wherever I go.
Thanks a ton!
I just ordered the fabric and thread. I’m going to make it for a special get together <3
Rina
Thanks so much for the directions on how to do this. They are beautiful!
So simple and so cute! I especially liked your explanation of “3” vs. “2” or “4”.
These napkins are so great! Love this manual, thank you!
Especially love shades of colors…
Happy Easter! 🙂
I can’t wait to try this. This patterns has so many possibilities to create beautiful napkins. Thanks.
I love your site. I like the granny inspired scarf. I also love the napkins.
Where can I order the fabric from? I’d like to make them for my daughter’s wedding shower.
Hi Carolyn –
Thank you for your kind words!
If you’re looking for the specific fabrics that we used in this project, you can follow the links in the “Materials” section at the top of the Pattern.
If you would like to use other fabrics, all of the materials that we use in our projects (and much more!) can be found on the Purl Soho website:
https://www.purlsoho.com/purl
Please let us know if you can’t find what you’re looking for, we’re always happy to help!
-Corinne
looking forward to making these napkins!…
some for me & some for the bride in our family!!
I am just getting started on this project and hope they turn out! I am curious if the napkins need some quilting stitches or something to hold the two layers of fabric together closer to the center. Do you find that they still lay flat well with seams only around the edges? I am afraid they will get bunchy. Thoughts?
Hi Sarah,
Thanks for writing in! We find that because the napkins are so much smaller than a standard quilt, that the quilting is not needed. If you find the you would prefer some quilting you could use the method that we use on our Lap Duvets for a small tack in the middle to secure the two layers.
I hope that this helps!
Cassy
These are wonderful. My daughter orders her napkins from France. Can’t wait to surprise her.
Love this pattern… love your explanation about 2s, 3s and 4s. Going to make some test runs this weekend, but may make the testers out of old linen dresses and shirts till I perfect it.
Then I will order my linen, thank you!
Why do you need a walking foot? I have a 40 year old machine that doesn’t have one
Hi Amy,
Thanks for the question! The walking foot is for when you sew over multiple layers of fabric. There might be too many layers of fabric for your regular sewing foot to go over, so we recommend a walking foot. However, I think you might be able to sew past these layers without one. If the fabric starts bunching, I would ease the fabric through and also increase the stitch width for this area. Hope this helps!
-Adam
I like my table napkins varied for each setting. Fat Quarters would work for these – right? Each FQ would make 2 napkins?
Thanks.
Hi Nancy,
Yes, you could use fat quarters, each one measures 18×22 so you will get two napkins out of both.
Enjoy,
Melissa
What is the reasoning behind pressing the seams toward the darker side? Why not just press them open like on a quilt? I am a beginner at sewing, and curious why one approach would be used over the other.
Hi Allison,
Great question! Although there are two schools of thought, most quilts are made with the seams pressed to one side rather than pressed open, and the darker color is chosen so that the seam allowance won’t show through on the right side. Pressing to one side is supposed to create a stronger seam, and when piecing quilt blocks, you will often press each portion of the block to opposite sides so you can butt the seam allowances up against each other, which helps match up seams and corners. It does however create bulkier seams, so some quilt patterns do have you press the seam allowances open, and almost all garment patterns will instruct you to press the seam allowances open.
For these napkins, since there is no quilting to hold the backing to the pieced front, pressing to one side will probably help keep the center point where all the seam allowances are stacked flatter, and once they are finished and in use, you will not be able to press the seam allowances open after washing when they are encased in the napkin, so it will be quite tricky to get them flat.
I hope that clears things up!
Julianna