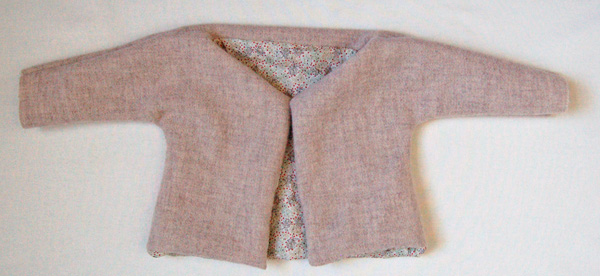
Felted Wool Baby Jacket

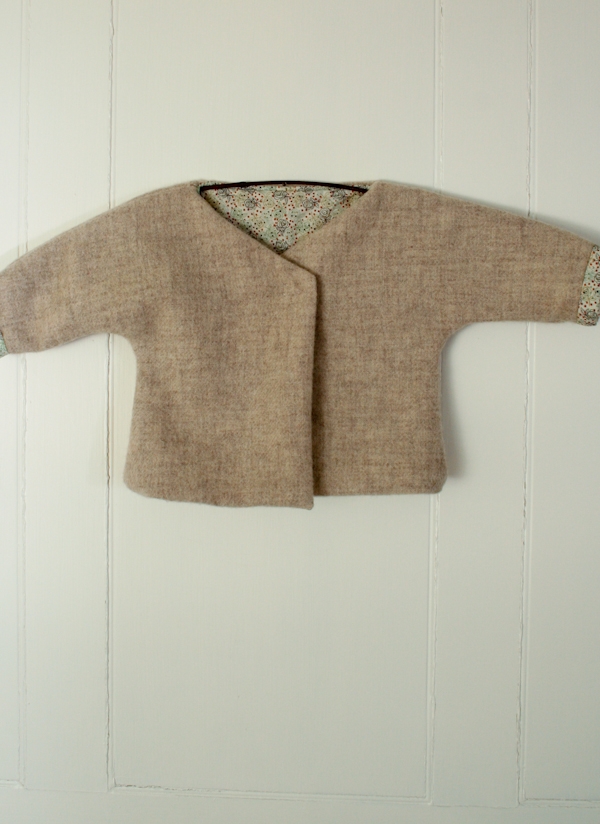
As soon as the leaves began to change color, I started getting my daughter all gussied up in fall finery. She had quite a collection of wool pants, knee high socks, and even a whole drawer full of hand knit sweaters. What she didn’t have, however, was a jacket! When I set about making one, I knew Purl Soho had the perfect fabric, Dorr Mill Wool Yardage!
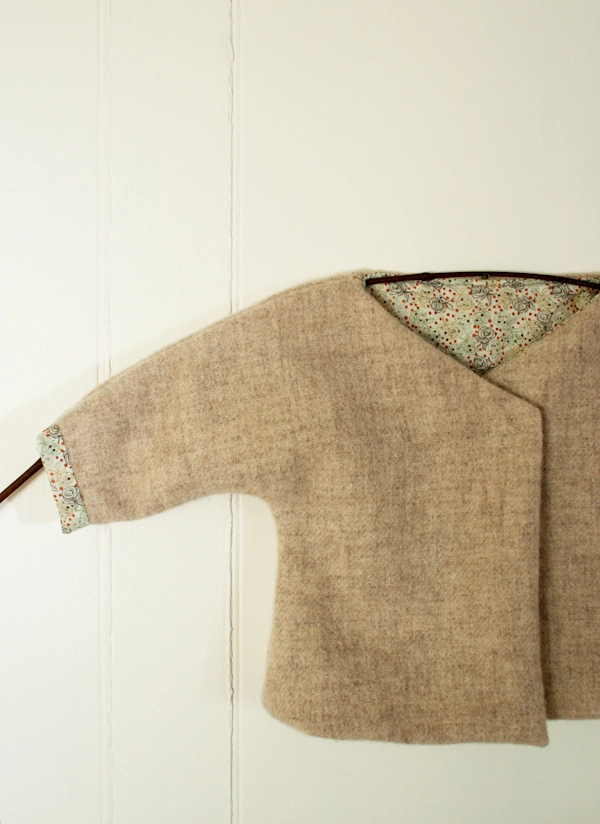
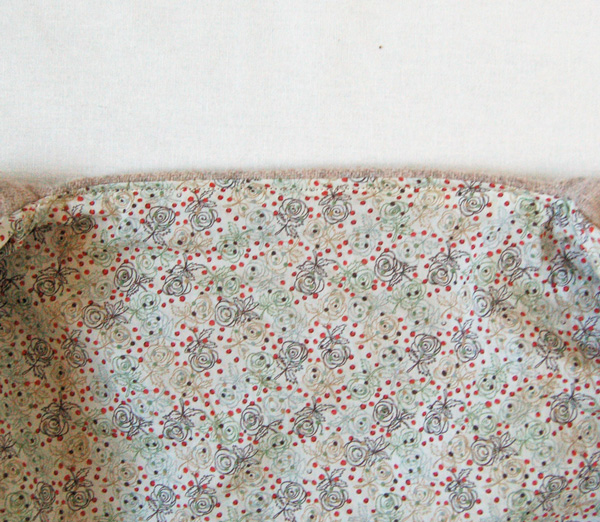
This wool has a lovely drape and a soft hand, plus it’s nice and warm. I wanted the lining to be just as special, and so I went right to Liberty of London’s Tana Lawn Seasonals. The Darcie print in green is so subtle and pretty with that signature silky Liberty feel.

Since I’m not an expert garment seamstress, I kept the shape of the jacket simple and chic, no collar or fussy sleeve seams allowed! In the end this little kimono style jacket is a perfect addition to Guadalupe’s fall wardrobe, warm, cute, and easy to get on and off with just one big sew-on snap. As far as I can tell, Lupe likes it a lot too… at least, she likes chewing on it!
Materials

To make one 0-6 month sized jacket:
- 1/2 yard of Dorr Mill Wool in Oatmeal
- 1/2 yard of Liberty of London Tana Lawn Seasonal in Darcie Green
- DMC Pearl Cotton in color 3033
- 1 package of Size 10 nickle plated sew on snaps
- 100% cotton thread in color 3310
- A Felted Wool Baby Jacket Template, available for free download here, printed, cut out, and taped together.
Before you start you will need to felt the wool by washing it in hot, rinsing it in cold, drying it for 20 minutes, and then pressing it flat.
Pattern
Cutting

Using the free template, cut out the following pieces:
From the outer fabric (the felted wool):
- One back piece. Cut this piece by folding the fabric and placing the template edge along the fold. Cut around the template. Your cut piece will have two sleeves.
- Two front pieces.
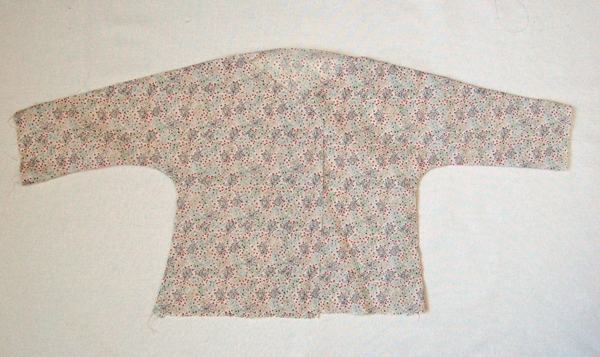
From the lining (the Tana Lawn) :
- One back piece, cut in the same manner as for the wool back piece.
- Two front pieces. Cut one with the right side of the fabric facing up and one with the wrong side facing up so that the two cut pieces will face in opposite directions.
Sewing the Outside and Lining

Pin the front pieces to the back piece of the wool along the top of the sleeves, the bottom of the sleeves, and the sides.
Sew the pieces together along the pinned sides with a 1/2-inch seam allowance.

Pin the front pieces to the back piece of the lining along the top of the sleeves, the bottom of the sleeves, and the sides.

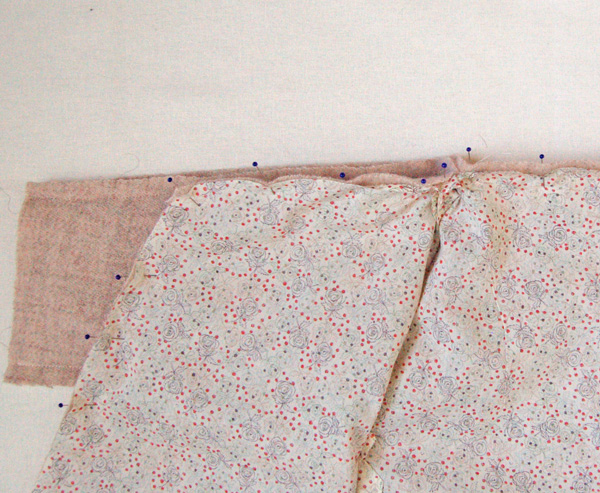
Make a mark 1 1/2-inches from the outer edges of the sleeves at both the top and bottom pinned sides of the sleeves.

Sew the pieces together along the pinned sides with a 1/2-inch seam allowance. when you get to the markings change the seam allowance to be 1/4-inch as illustrated above.
Cut notches three out of the seam allowance of the underarm curve.
Turn the lining right sides out and press it flat.
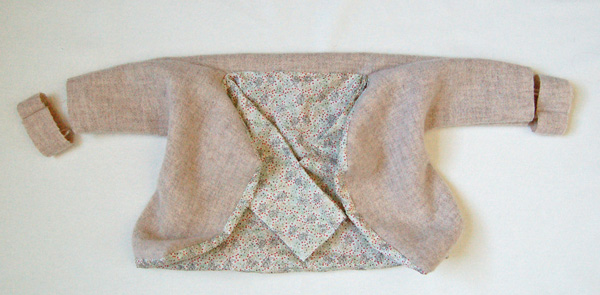
Attaching the Outside and Lining

Slide the lining inside the outer section, right sides together. Pin the lining to the wool all along the front openings, bottom, and neck.

Make sure to line up the shoulder seams of both the lining and wool sections. You might have to tear out a few stitches along both sides of the lining seams to get it to fit perfectly. Don’t worry about this- you’re about to sew over this section again so it will be fine in the end.
Make sure the sleeve sections of the lining are tucked into the sleeves of the outer jacket so you won’t sew over them.

Starting at in the middle of the bottom back sew all around this pinned area with a 1/2-inch seam allowance leaving a 3-inch gap between the beginning and end of the seam.

Cut notches into the underarm curves of the wool and trim all the corners of the seam allowance.
Turn the piece right sides out through the unsewn gap.

The lining section of the sleeves will still not be sewn to the wool. Pull them out of the wool sleeves.
Sewing the Sleeves
Cut 1 1/2-inches off of each of the sleeves from the wool section only.

Pull the sleeve sections of the lining through the wool sections as shown above.
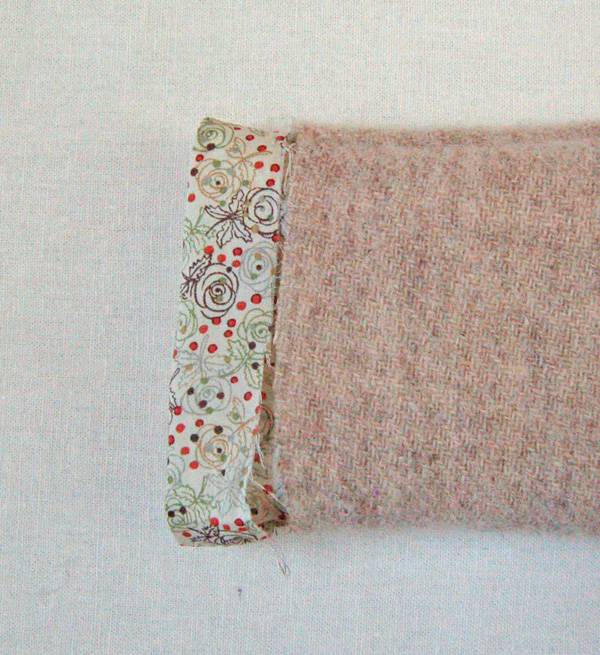
Fold the lining down once so that its raw edge meets the raw edge of the wool.

Then fold the lining over once again to hide the raw edges. Pin the lining in place making sure the top and bottom seams of the lining and wool are lined up with one another.
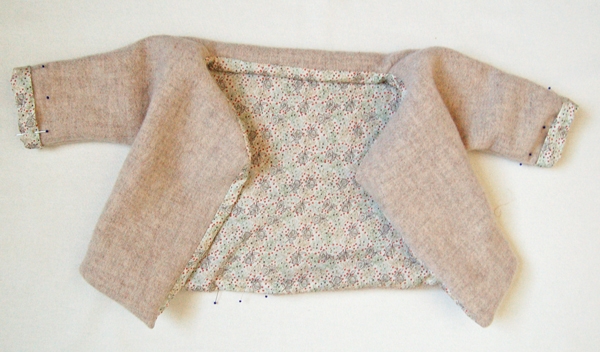
Pin both of the sleeves in this manner and then pin the 3-inch gap at the back of the jacket closed.

Stitch the lining to the wool using a slip stitch along the edge of the lining fold at the sleeves.
Stitch the gap closed in the same manner.
Finishing Up
At the back of the neck, between the shoulder seams, pin the outside to the lining. Edge stitch the two sides together along this section.

Close the jacket and mark where you would like to place your snap, at the top of the overlap.

Sew on the snap using the embroidery thread and you’re all done!


Oh my–this is adorable! If I'm feeling brave enough I might try making one for my little niece Penelope…
It's very pretty and your explanations very clear. MERCI!!
hi!
wondering if this is a 6 month size?
love it and want to make for my 1 year old.
thanks!
When you say “baby”… that could be newborn or a year and a half! Looking at the proportions, I'm guessing that it's for a child whose limbs have not yet done the ~6-9 month growth spurt, but it'd be nice to know. I have little enough time with my wee one to make something that fits — I can't imagine gambling with sizes.
Hi Lisa-
I certainly understand your concern about sizing as I have a 4 month old baby who is growing like a weed! This pattern is a 0-6 month size as stated at the beginning of the pattern, under the materials section.
Thanks so much for writing in!
Molly
Why didn't you explain about the piping at the back of the neck?
Hi Jaquine-
There is no piping at the back of the neck, just a row of topstitching to sew the lining and wool together at the back neck edge. This step is explained in the “finishing up” section of the pattern above.
Please let us know if you have any more questions and thank you for writing in!
Molly
This is super cute. I'll have to add this to the options for my SIL's first baby!
This is beautiful – so simple both in appearance and to make! Your directions, as always, are very clear and easy to follow. Thanks.
Love this pattern! Do you think it would be relatively straightforward to size it up to even like a 2T or 4T size? I think the style would look adorable on my 20 month or 3 year old, both of whom wear about a size bigger than their age.
Hi Angela-
Rather than sizing up these pattern pieces I think it would be easiest to make your own, since kids have different proportions than babies. You can trace the basic shape from something that fits your kids onto a piece of newspaper. This would be the back piece. Then cut the front pattern piece to match the arm length and underarm curve of the back piece. Once you get your pattern pieces set it will be put together in the same way and you can follow this pattern as written.
You might want to print the pattern pieces for the baby size out to get a sense of how they fit together. Also I'd sew one in scrap fabric or muslin before cutting into the wool.
Please let us know if you have any more questions or need help along the way!
Thanks for writing in!
Molly
This is so beautiful! I only wish my 3 yr old and 6 yr old were a bit smaller!
Thanks for the ever-inspiring ideas and projects!
Thank you so much for posting this! I'm past due with my first child, and I've been having the hardest time finding little baby-sized jackets! Okay, so she's not likely to be that little, but I feel like the options in stores, at least the affordable ones, are so limited in terms of jackets/outerwear until they're bigger… and I don't want to stuff her into a bunting all the time. This is really fantastic – a great nesting project!
I made this today with corduroy in place of the wool, and it came out just adorable. The shoulder seam thing is a little tricky, especially with such large seam allowances, but it turne out fine. Thank you!!!
My mom and I made these for my 6-week old and her soon to be cousin. We recycled a couple of grandpa's wool sweaters for the exteriors and lined with calico prints. We machine washed and dried the sweaters to felt them first. This worked well, but made for a bulkier weight fabric. We made sure to trim the seam allowances before turning out.
I had a little trouble with the shoulder seams and the overall neckline–mine came out really wide–so I triaged with an inverted box pleat in the back. We also top stitched around the outer edges, which helped our bulkier felt keep its edge.
The jackets came out cute and baby girl is already wearing hers. Warm and stylish…
Hello Kate,
I have the same problem as you had with the neckline. The jacket is finished but the opening is way to big. I’m afraid my little girl will get a cold like this… Coul you please explain me a bit more about how you resolved this? My english is not so good and i don’t know what an inverted box pleat is…
Thanks in advance!
Anne
I believe Jaquine's comment about the pipping at the neckline is the twig hanger that is more visible in the second photo. I also thought that it was pipping and since I had just been at the sew for baby site reading about projects that used bias tape I thought wow these folks really do like using bias tape since they've found an easy (and cheap) way to make it!
I am going to meet my first grandchild in April and have been looking at sites to see what Moms were making for their babies. Your comment about the different proportions between a baby and a toddler was something I had not thought of before and will keep it mind as I crank up the sewing machine again. Your instructions were very clear, Good Job!
A tip about getting both sides of the snap to meet up correctly is to sew on the nipple half first. Align the two front halves, and carefully so the fronts don't shift, lift the corner and rub chalk on the nipple, then put the fabric back down and rub the chalk onto the other side of the jacket front.
Agape, Susie Q ><>
would this completed garment be machine washable, using the listed materials? i've not worked with this felt before, so I'm not familiar with it. it's darling!
Thanks!
Hi Kalle-
This is not machine washable but it is hand-washable.
Thank you for your question!
Molly
what size should i say this is when i make it?
thanks
Hi dina-
It's a 0-6 month size
Thank you!
Molly
Love it! 2 new babies due soon in the family, what a cute light jacket. I will make one out of fleece so washing is not a concern. Thank you.
Hi,
I love this pattern and am planning to make it up for a friend who's just had twins. But sometimes I have a problem with my printer settings (sometimes 100% is not the right size) so could you tell me one measurement so that I can check I've got it right? The cuff width maybe?
Thanks!
This pattern is fantastic! I am in the middle of making one for friends baby due soon 🙂 the pattern is very clear and simple for a complete novice like me! Well done and thank you so much!!!
Hi Molly,
These are fantastic instructions for such a beautiful simple jacket. I love the Japanese-style simplicity and design of this little jacket, and will definitely have a go at sewing this for my daughter.
Thank you for sharing these designs and instructions!
Best wishes, Chrissie
Thank you for posting this super pattern. What a lovely jacket. The instructions were very clear, I normally struggle & didn't with this project. I enlarged the pattern to fit my 8 month old. My dodgy calculations, however, have meant it is one to grow into!
Hi. I have printed out this darling jacket. It appears to me with a 1/2″ seam allowance, my pattern is long for a baby jacket. The length from neck down is almost 12″. Is this right? I appreciate your help. Thanks.
Hi Kathryn-
This is meant to be a fairly roomy jacket since it should fit from 0-6 months. The finished jacket is 11-inches long.
Thanks for getting in touch and please let us know if you have any more questions!
Molly
Is a great jacket!
I’ve just bought my very first piece of Liberty fabric to use with this cute pattern, it’s for a friend who is expecting her first baby. I picked one of the ‘queue for the zoo’ patterns which is so incredibly cute. I think it’s a shame that this pretty fabric will remain hidden on the inside. With the method you’re using here it looks like it would work as a reversible piece as well, what do you think?
I’m not a very experienced sewer yet, so any advice or ideas would be welcome.
I’m using a soft fleece instead of the wool, so that would be okay for a baby’s skin. And I’m visualizing it as an indoor vest rather than an outdoor jacket (I live in a colder climate). I’d just have to look for a suitable closure method instead of the sew on snap.
Hi Rose-
Sure- you could certainly use the Liberty on the outside and the soft fleece on the inside or make it reversible. Perhaps a magnetic closure would help with the closure problem? https://www.purlsoho.com/purl/products/item/7207-Bohin-Magnetic-Snaps
Thanks for getting in touch and please let me know if you have any more questions!
Molly
I made two of these jackets for my baby, the pattern is really easy and super adorable. I just wanted to note for sizing for other sewists. My daughter was born 7 lb 3 oz and has consistently measured in the 50th percentile for height and weight, so suffice to say she’s very average.
The pattern as-is is very large — in my opinion it’s more of a 6-9 month size, if not larger. I made one jacket according to the pattern and, after seeing how large it was, I made another jacket in which I sized the pattern down by about 1 inch all around. The smaller sized jacket fits her at 2 months, with room to grow. I think it will fit until 3 months. I just wanted to note this as size makes a big difference in clothes for little ones, and you don’t want a warm jacket to end up fitting properly in July! I also made the winter and summer bonnets and found the sizing to be similarly very large.
The pattern is super cute and I used the Liberty “Queue for the Zoo” print on one, which I loved. I hope this information is helpful!
Hello Mercedes-
Thank you so much for this valuable information! The Queue for the Zoo print is one of my absolute favorites! I bet your jacket is stunning!
Thanks again for getting in touch!
Molly
I made this for my granddaughter and it’s adorable!! The fabric is divine and the fit is great for up to about 4 months. I made a matching bonnet and she looks spectacularly adorable in them!
Hi, would you please advice on how to felt the wool? Machine wash or hand wash, at what temperature and does dry for 20 minutes mean in the dryer? Thank you!
Hi Maria-
It should be machine washed on hot, machine rinsed in in cool, and then dried on hot for 20 minutes in the dryer. But it’s not really an exact science. You’ll be fine just machine washing it on any setting and drying it in a dryer.
Thanks for getting in touch!
Molly
Hi! Thank you so much for this pattern it is so beautiful in its simplicity. I have added a notched collar and it looks fabulous.
loved the pattern made it with l flannel and cotton left over from baby blankets since we live in warm climate
please keep posting sewing projects for children .
Loved this pattern. Thank you so much for putting it on here. My granddaughter was in need of a coat to go to Portland and so I made it and just added a couple details.
I wish I could add a photo but it won’t allow it.
Thanks again!
Gorgeous. I’m going to try and upsize this for my 5 year old. Thanks!
Echt heel mooi materiaal en een duidelijk patroon. Het is jaren geleden dat ik kleding heb gemaakt, maar dit nodigt uit om te maken. Leuk voor onze kleindochter als ze rond de 1jaar is. Dankjewel.?
Thank you for this pattern, it is brilliant making my second one.
Just made the jacket in loosely woven wool dress jacket material in black and white with a thin grey knit lining (cold climate). Since the material was so loosely woven I had to serge all the edges before I could start. I finished it with decorative bow buttons on the outside and large snaps inside. She will look like she has been dressed by Yeve San Laurent. I am very happy with the outcome. She is 4mos and it will not fit her for at least I month yet.
Hi Laurie,
Thanks for reaching out! This sounds so beautiful and I bet she will look absolutely adorable wearing it! Thank you for sharing your version of this sweet jacket with us!
Warmly,
Gianna
How exactly would i upsize this to 12-18 months?
Hi Kass,
Thanks for reaching out! Unfortunately, we don’t have alterations available to size this pattern up above the 6 month age size, but thank you for expressing your interest! I will be sure to pass this along to the rest of the team!
Warmly,
Gianna
Thank you ever so much for this posting and complimentary mentoring. I use to sew all my clothes but then had a full time job, part time job, and a family. I have a new grand son and made this from all items in my left over drawer.
I am now looking for the next project. You inspired me!
Brilliant pattern. Thanks so much. Will use fleece on outside instead of wool.
Hi Ellisen,
Thanks for writing in and for the incredibly kind words! We’re so happy to hear that you’re a fan of this pattern. Using fleece on the outside of this jacket sounds absolutely wonderful, and we hope you have a great time making it!
Have a great day and take care!
All the best,
Cat
I made this darling little jacket in an evening. Wish I could post a pic. Thank you for this wonderful pattern. I made the jacket with fleece, and it’s soft and cozy!
My only tip for beginners is the instructions for the lining assembly should say to put the pieces “right sides together“.
I will definitely be making more of these jackets in the future! I would think it would be easy to size down or size up this pattern by just drawing around the pieces and making a new pattern.
Hi Elaine,
We’re so happy to hear that your jacket came out so well! We’d love to see a photo, so feel free to email one to us at customerservice@purlsoho.com, or if you post one on Instagram and tag us, we’ll be sure to see it there too!
All the best,
Lili