Diagonal Slip Stitch
The Diagonal Slip Stitch pattern, used in our Diagonal Slip Stitch Blanket, is a gorgeous slanting all-over stitch pattern. Here’s our Diagonal Slip Stitch tutorial, where we show you how to do it.
Click To See Video Transcript
Hey guys, this is Laura from Purl Soho and I’m going to show you how to work Diagonal Slip Stitch. We use this stitch in our Diagonal Slip Stitch Blanket. This stitch pattern has a four-row repeat. I’m going to demonstrate two of those rows, and in those rows you’ll learn all the techniques you need to know to complete the blanket or the stitch pattern. I just want to make one note that we have three selvage stitches on each side here. But yeah, let’s get started.
First, I’m going to show you how to work row one. Row one is worked across the right side of the fabric. So yeah, let’s get started. The first thing I’m going to do is work my first three stitches, which are selvage stitches, and I’m going to slip three, one at a time, with my yarn in back. And I’m going to slip these stitches purlwise. The next thing I’m going to do is knit one. Now I’m going to knit two together and I’m going to continue knitting two together until I reach the last four stitches. So knit two together and just continue knitting two together until there are four stitches remaining. At which point I’m going to slip one with yarn and back and knit three.
Alright, now we’re ready to work row two. Row two is worked across the wrong side of the fabric, and to get started I am going to slip my three selvage stitches. This time I’m going to slip these stitches with my yarn in front, but still purlwise. So slipping one purlwise with yarn in front, a second one purlwise with yarn in front, and a third one purlwise with yarn in front. Now the next thing I’m going to do is purl one.
Okay, so now I’m ready to begin the repeat, which I’m going to work into the last four stitches of the row. And in preparation, I’m going to go ahead and take my yarn to the back. Now the next thing I want you to do is take a look at this next stitch. Because of all of the knitting two together you did on the previous row, you’re going to have two strands of yarn hanging off of this stitch or two purl bumps here. So what I want you to do is identify the one that’s kind of more obvious, it’s a bit more towards you. There’s one kind of hiding back there, but I want you to focus on that more obvious one. And I’m going to take the tip of my right needle and I’m going to insert my needle into it. So here you can see the one and the two. So I’m going to insert my needle into this knitwise, and I’m going to knit this stitch. Now I’m going to bring my yarn to the front and going to slip one purlwise. So that’s the repeat.
So let’s do that again. I’m going to take my yarn to the back and use the tip of my right needle, slip it underneath that more obvious of the two purl bumps here, knitwise in order to knit it, and then bring my yarn to the front and order to slip one purlwise with yarn in front. You’re going to continue doing this until the last four stitches of the row. When you get to those last four stitches, you’re simply going to slip one purlwise with the yarn in front, and then you’re going to purl three. Okay, so now we are really zoomed in here guys.
I just want to make sure that you can see the purl bumps that I’m talking about. So if you take a look at this stitch on your left needle, you can see that there’s one purl bump that’s really obvious and kind of closer to you, kind of on top or in front. And then there’s this other purl bump that’s kind of a little snugger to the stitch. A little harder to see. So I want to make sure when you come to these stitches that you’re working into this more obvious stitch that’s closest to you here, right here, and that’s the one you’re knitting into.
So here we can take a look at that one more time. Here we are again. Take a look at this stitch on the left needle. You can almost use your thumb here to separate the two stitches. Make sure you see them both. Here’s one, and then here’s the second one here. So I want to work into that first one I touched. Once you get the hang of identifying that stitch, you get really in a rhythm and it’s a lot less tedious, I promise.
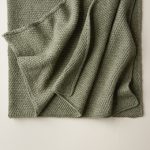
Alternating rows of knitting 2 together and picking up stitches, this densely knit twill-like fabric is perfect for a cozy blanket. Knit up in our very own Understory (NOTE: We no longer offer Understory, but choose from one of our other light worsted/dk weight yarns.), both the yarn and the stitch pattern really shine! Check out the free Diagonal Slip Stitch Blanket pattern to try it out for yourself!
Looking for more inspiration? Explore all of our free knitting patterns and knitting tutorials, buy one of our many knitting kits and yarn bundles, and shop for beautiful yarn. We have over 35 gorgeous natural fiber yarns in 100’s of magnificent colors, designed to bring integrity, beauty, and joy to your next knitting project and only available at Purl Soho!




Re Diagonal slip stitch tutorial: It says the pattern is over 4 rows. The video shows two. Are rows 3 & 4 a repeat of row 1 & 2?
Thank you!
CL
Hi Catherine,
Although the video only demonstrates two rows, the full stitch pattern is over four unique rows as written in the pattern. We only demonstrated two rows because they include all of the techniques you will need to knit the full pattern.
Thanks for your question!
Julianna
how to make good selvage edges in stockinet?
Hi Eunice,
Thanks for your question! This pattern has a built-in I-Cord edging which provides a lovely finished selvage. If you are asking in regards to plain stockinette, slipping the first stitch of each row will usually do the trick!
I hope that helps!
Julianna
Thanks for this lovely pattern
Thank you for doing this! I love this stitch and the edging is devine
The third row of the pattern after the cast on says to “pick up one and knit 1 stitch through the purl bump in the stitch below”. this is confusing because I haven’t been instructed to knit 2 tog yet.
Hello Candis,
Thank you for reaching out! You are correct the first row that you do this you only have one purl bump in the stitch below, that’s ok because you will just pick that one bump up. After you have done this on the first “row 3”, each “row 3” after there will be two purl bumps (from the k2tog) and you will just pick up the top bump.
I hope this clears things up and Happy knitting!
-Marilla
Are the 3 selvedge stitches (6 total) included in the total number of cast ons?
Hi Peggy,
Thanks for writing in! In our Diagonal Slip Stitch Blanket, we do include the selvage stitches in the cast on.
Best of luck and happy knitting!
I’m confused as to how to knit the purl bump if I knit continental. I would need to put it back on the other needle. Which way would I insert the left needle into the picked up stitch on the right needle? Back to front?
Hi Aubrey,
Thanks for reaching out! It should still be possible to knit through the purl bump without placing it back on the needle – I just gave it a shot while knitting continental and it felt about the same as knitting with the yarn in my right hand. If you find you are still having trouble, you will want to place the purl bump on the left needle from front to back, but be careful not to stretch it out too much!
I hope that helps!
Julianna
Hi! Love this pattern! How can I transfer this to knitting in the round on DPNs?
Hi Sarah,
Thanks for writing in! Unfortunately we do not have instructions for working this stitch in the round; however, I will be sure to pass your suggestion along to the design team!
Best,
Julianna
Hello, I am wondering if you’ve been able to provide the knitting directions/pattern for knitting in the round… I’d love to make it into a hat, for my youtube channel. Its so pretty! Thanks!
Hi Amanda,
Thanks for writing in! We haven’t been able to work up a circular version of this pattern unfortunately, but you might be able figure it out with a bit of trial and error! I would try out replacing the stitches in rows 1 and 3 with the purl versions to see if it looks the same on the right side!
Best,
Julianna