Intarsia in Garter Stitch
Want to add bold, seamless areas of color to your knitting? Intarsia knitting is a colorwork knitting technique for making large, distinct blocks of different colors, and it’s especially easy in garter stitch. Our Intarsia In Garter Stitch Tutorial shows you exactly how to do it!

Unlike Fair Isle knitting (aka stranded colorwork), where the unused yarn is stranded across the back of the work, in intarsia, you use a separate ball (or bobbin) of yarn for each area of color.
The key to successful intarsia? Always cross your yarns when switching colors! Similar to trapping floats for stranded colorwork, this easy step keeps the join between colors super smooth and strong, with no gaps or holes. By always working the cross on the wrong side of the work, you can ensure that the right side of your work looks neat and tidy. We’ll show you how it’s done below, and then you’ll be ready to try knitting intarsia in garter stitch!
Intarsia In Garter Stitch: Video Tutorial
Click To See Video Transcript
Hi, this is Whitney from Purl Soho. I’m going to demonstrate how to knit intarsia in garter stitch. Intarsia is a simple colorwork technique where you switch colors mid-row. Unlike stranded colorwork where you carry both colors along the entire row, for intarsia you pick up a new ball of yarn every time you change colors. The only trick here is to prevent holes in your knitting where you change the colors, and that’s really easy to do in garter stitch.
So this swatch of our Color Study Blanket pattern is a great place to learn the basics. I’m going to show you how to change colors on both the right and wrong sides of the work, and you’ll be ready to try it when we’re done.
We’re here on the right side of the work, and I am finishing up with the first color, knitting up to the point where we change colors. Now if I just dropped this yarn and started with the new color, we’d have a big gap in our knitting. So all you do to prevent that is you take the color you’ve been knitting with, and you cross it over the new color at the back side of your work like that. Now you pick up your new color and you knit the next stitch. That’s it actually. That’s all there is to it.
You can see here on the back side that we’ve tacked the old color down and they’ve kind of twisted around each other and made it so that this seam is nice and tidy and there are no gaps in the knitting. So then you just continue on and I will show you next how to do something similar on the wrong side of the work.
When you’re knitting a wrongside row you’ll do the same thing except you’ll do it at the front of the work instead of the back. So you knit up to the color change, and then you’re going to cross the old color over the new color, but instead of doing it at the back, you bring the color you’ve been using to the front of your work into the purl position and cross it over the color you’re about to knit with. Then pick up this color and then bring it to the back of your work since you need to knit the next stitch and knit that stitch as usual.
So again you have trapped the old color with the new color; you’ve bridged the two colors and you can see here on the back side of the work that you have this really tidy seam. And again, on the front side, you have really smooth transitions between the colors and no gaps at all, and it was super easy to do.
That is all there is to it…Knitting Intarsia in garter stitch!
Intarsia In Garter Stitch: Step-By-Step Instructions
Prefer still photos and text? Follow along here!
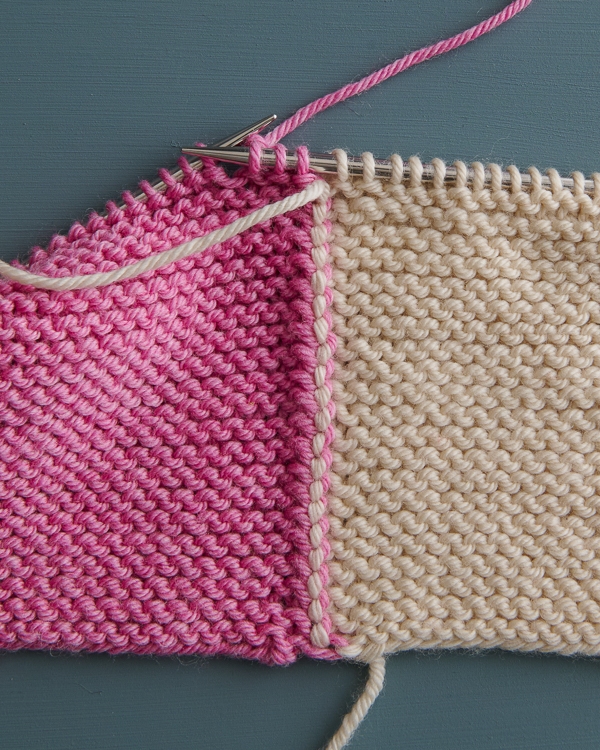
To work intarsia in garter stitch on the right side…
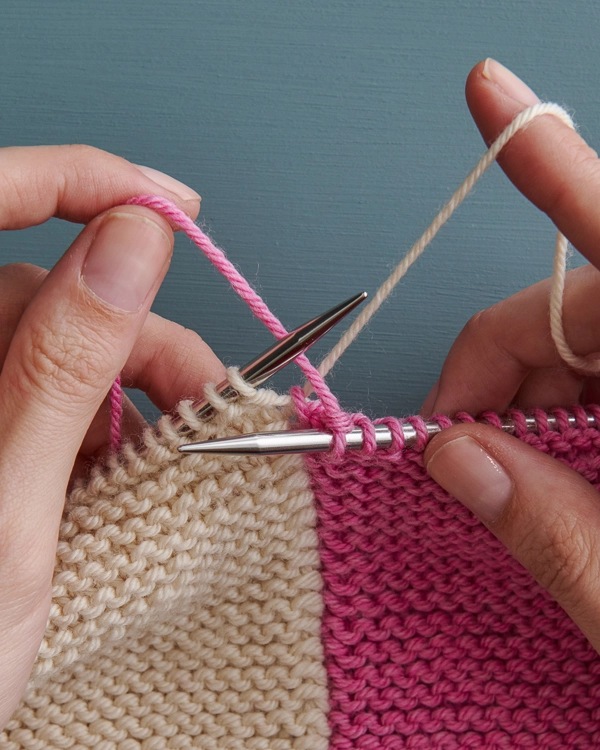
Knit up to the point where you need to change colors, then cross the old yarn (the pink yarn, above) over the new yarn (white)…
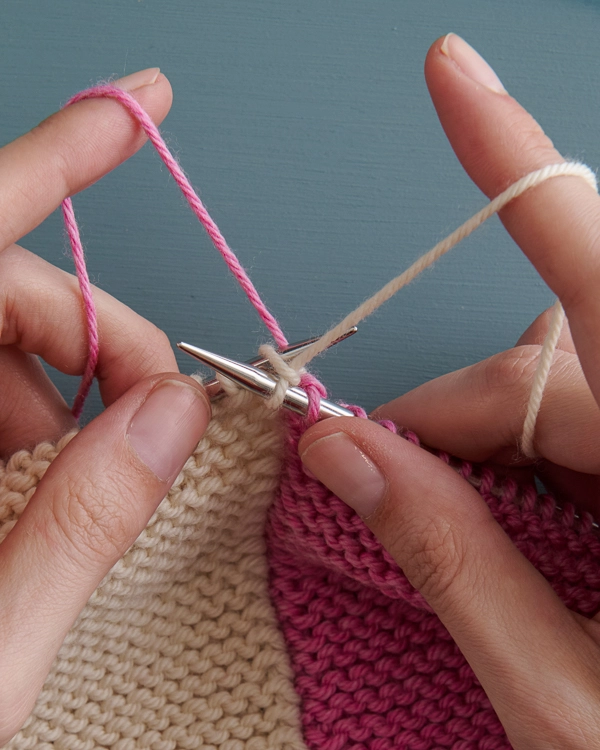
… and knit the next stitch with the new yarn. It’s that easy!
To work intarsia in garter stitch on the wrong side…
Knit up to the point where you need to change colors…
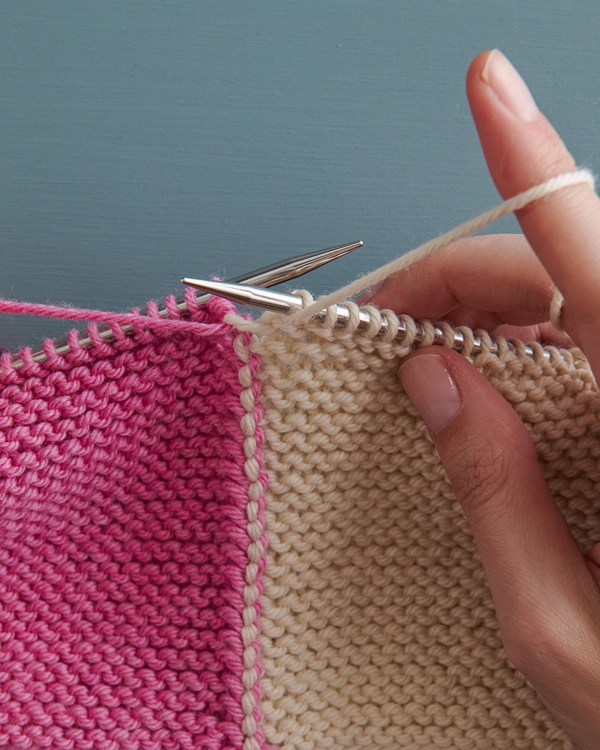
… then bring the old yarn (the white yarn, above) to the front purl position and cross it over the new yarn (pink).
Bring the new yarn to the back knit position and use it to continue knitting.
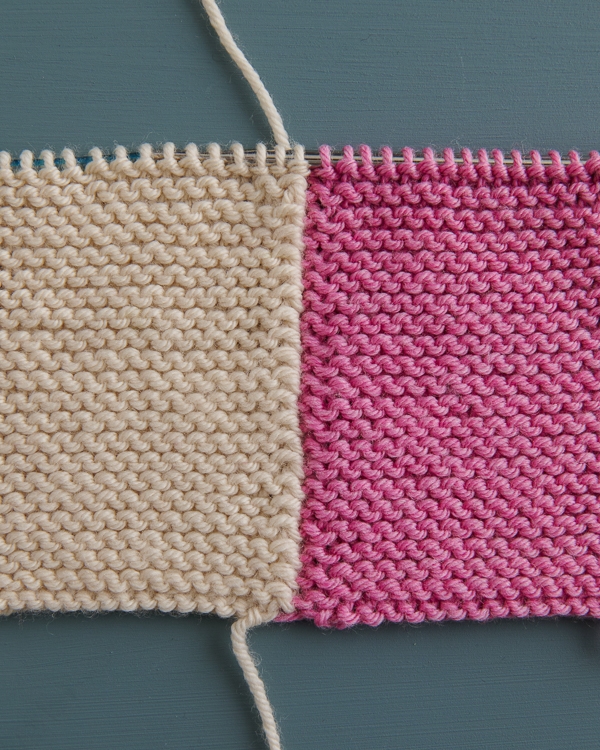
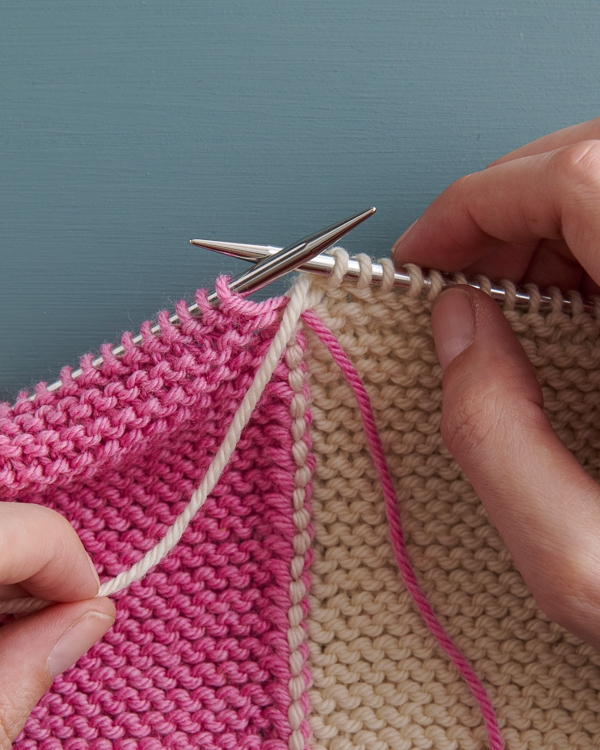
And that’s it… Here’s how it looks from the right side. You can see that the join is very neat, with the two colors smoothly transitioning from one to the other.

Our free Color Study Blanket pattern in Daily Wool
Start your first intarsia garter stitch project today… Get our free Color Study Blanket pattern and pick up some Daily Wool yarn to knit it! This plump, soft, machine washable wool yarn is such a great pick for knitting blankets, and you have so many beautiful palettes to choose from with our Color Study Blanket Bundles.
P.S. For tips on working intarsia in stockinette stitch, please visit our original Intarsia Tutorial.
Looking for more inspiration? Explore all of our free knitting patterns and knitting tutorials, buy one of our many knitting kits and yarn bundles, and shop for beautiful yarn. We have over 35 gorgeous natural fiber yarns in 100’s of magnificent colors, designed to bring integrity, beauty, and joy to your next knitting project and only available at Purl Soho!


Dear Purl Soho:
I love your yarn and your patterns, but I hate intarsia with the heat of a thousand burning suns. I don’t think I’m ever going to get it, but your directions are the best ones out there, so there’s some hope.
Love,
your customer
Hi Susan,
Thank you so much for your kind words! Intarsia is a tricky technique but we are so glad that our directions are helpful for you!
Happy knitting!
Cassy
Hi, I am excited to start my colour study blanket, however I am new to intarsia and am not sure which is the wrong and which is the right side in garter stitch. Is the first row after casting on the wrong or the right side? I’m not sure where to place the yarn on this first row. I tried over ( as if for the right side) but it seemed to leave a hole. Thanks in anticipation of your advice!
Hi Julie,
Thanks for the question! Garter stitch doesn’t have a wrong or right side technically, but in the Color Study blanket the row after the cast on is the right side. As for the hole, you could be twisting your yarn incorrectly. Make sure that you twist the yarn tightly and that you hold on to the dropped yarn if you think you might get a hole. Best of luck and let me know if you have any other questions!
-Adam
Thnaks Adam, that’s very helpful. I do have another question, if you have time to answer. The edges of your pictured colour study blanket look so neat and straight, whereas mine look very crooked and higgedly-piggedly, especially on the starting side ( the side with the starting tail). I am slipping a stitch knitwose at the beginning of each row but I’m not liking the look so far. Do you have any tips for keeping the edges nice and straight? Is it best to tighten that slipped stitch each row, or leave it a bit loose. I’ve only completed an inch or two and am considering starting again, but want to make sure that if I do, I get it right the next time. Thank you, Julie
Hi Julie,
Thanks for writing back! Edges can be difficult because they take a little practice. I maintain normal tension on edges but some people need to tense or loosen up. I’d stop the blanket and try a practice swatch to perfect your edges. It might take a little more time, but it’ll be worth it in the end. Also, there are tons of edging techniques you can try to nail down your preferred method. I’d go on YouTube and try to find one that works best for you. Best of luck!
-Adam
Thanks so much Adam – I’m back on track now!
I HAVE NOT HEARD OF THIS TECHNIQUE BEFORE. I AM NOT ADVANCED ENOUGH TO KNIT ADVANCED PATTERNS AS SEEM TOO DIFFICULT FOR ME. I WOULD LIKE TO TRY USE INTARSIA.
CAN YOU TELL ME DO YOU DELIVER TO SOUTH AFRICA?
OUR POSTAL SERVICE IS POOR SO MANY COMPANIES ONLY DELIVER TO U.S. I HAVE RECENTLY RECEIVED A COUPLE OF PARCELS DELIVERED BY COURIER SERVICE WHICH HAS BEEN VERY SUCCESSFUL . I LIKE THE COLOUR STUDY BLANKET AS WELL AS SHADOW THROW. ARE THESE ALSO FREELY AVAILABLE WITH THE PACKAGE OR NOT? I LOOK FORWARD TO YOUR EMAIL REPLY. BEULA
Hi Beula,
Thanks for writing in! We do ship world wide! Shipping details can be found here: https://www.purlsoho.com/shipping/
All of our free patterns, including the Color Study Blanket, are available free online!
Best,
Cassy
Hi Id like to know if you have the Begonia or Quince Bundle available for the color study blanket
Hi Debbie,
Thank you for your interest. Unfortunately those colorways have been discontinued, as some colors in those kits have also been discontinued, and we are unable to make these bundles. Please let us know if we can help with alternate colorways for you, and here’s a link to available colorways:
https://www.purlsoho.com/color-study-blanket-bundle.html
Kindly,
Anna
I have a question first I love this blanket , however I have never done this intrasa knitting before. As I finish the first section and I go to add 3 colors it comes out as if I was knitting one row and purling the next row not knitting across the pattern. So I’m doing something wrong when I knit with the new color
Hello Michele,
Thank you for writing in! This is very mysterious- it starts to come out in stockinette stitch? Are you knitting on circular needles? I wonder if you started on the wrong side of the blanket when beginning this section? This would create this effect. I hope this helps and let me know if you continue to have issues.
Happy knitting!
-Marilla
How do you join color c to A?
Hi Nancy,
Thanks for writing in! To begin working with color C, you will stop knitting with the color A when there are at least 8 inches of yarn remaining. To begin the color C, put the right needle into the next stitch. Leaving an 8-inch tail of the color C, begin knitting with the new yarn as usual. Do not tie a knot.
This leaves two tails. It also leaves stitches that seem loose and a small hole in your knitting, but never fear! You will fix this at the end of the project when you weave in the ends. At that point, you will cross the tails so that you weave the right tail to the left of the hole and the left tail to the right.
I hope that this helps!
Cassy
Thank you so much for this tutorial, I have found the technique easy to incorporate given these directions. However how do you cast on using this technique? I love the vest but am un sure of how to incorporate the intarsia into the cast on. Thank you.
Hello Kat,
Thank you for reaching out! For this technique you just cast on normally with your first color and then your second color, and then you use intarsia to incorporate the two different colors when you knit first row back across your cast on.
I hope this clears things up and happy knitting!
-Marilla
Yes that’s clears things up, thank you.
Hi, I am knitting the colour study blanket and am confused with how to join one colour to a new colour with intarsia at the ‘continue with two colours’ point – this is the last section of the pattern on the wrong side, when you begin the last small corner of the blanket with colour A. When I get to the point of joining colour A and dropping colour B, the instructions and this tutorial don’t explain how to do this. My problem is that I can’t work out how to intarsia colour B into the new work without leaving it hanging disconnected from the new stitches and thus leaving a hole. I have tried two different ways – firstly by leaving the dropped colour hang loose and crossing it in to the first stitch after adding the new colour, and secondly by leaving it hanging unconnected, but neither looks right. Can you explain the correct technique here please. I have no problems crossing two yarns, it is when introducing a third and dropping one colour that I run into problems. I hope I’ve explained this clearly and welcome your help!
Hi Julie,
Thanks for reaching out! It is totally normal to have a small hole on the first row when joining a new color in intarsia. On subsequent rows you can twist the colors together so there isn’t a hole, but it’s unavoidable on the first row. After you have completed the piece, or at least a few rows, when weaving the tails in, you can cross them over each other the same way you would when working the intarsia twists and then weave them in to close up the hole.
I hope that clears things up!
Julianna
Thanks very much for clarifying, Julianna. Good to know I wont be left with a hole! I found this part of learning instarsia the most confusing.
Hi do you have a video tutorial on how to do the Intarsia block colours for a blanket in Garter stitch please on how to join the colours on the right side and the wrong side Much Appreciated
Ilove the colour combinations of wool that you put together and your blanket looks beautiful I look forward to hearing from you soon have a lovely weekend Do you post away to New Zealand
Thanks
Elizabeth Rose 🌹
Hi Elizabeth Rose,
Thanks for writing in! We actually do have a intarsia for garter stitch tutorial, you can find that here: Intarsia in Garter Stitch
I hope this helps, happy knitting!
Gianna
I don’t like the look of the slip 1st stitch knitwise. I much prefer to use K1 for the first stitch of every row. Can I do that for the edges of the Color Study Blanket, or will my intarsia sections be affected. I’m talking about knitting the 1st stitch only on the edges. Please advise.
Hi Diana,
That’s a great question! The slip stitches are only used for the edges here so you are fine to skip those!
Happy knitting,
Gavriella
I’m trying to cast on for intarsia and can’t find directions
Hi Elaine
Thank you for writing in! To cast on an intarsia project, you will simply cast on each set of stitches in the color written into the pattern. I am including an example of some instructions from our Color Study Blanket that explain this pretty well:
With Color B, cast on 116 stitches. We used a basic Long Tail Cast On. Put Color B down (without cutting it). With Color A, cast 58 stitches onto the same needle. [174 total stitches] (At this point, the two colors are not attached to each other, but as you work the intarsia they will be!)
I hope this helps!
Happy knitting,
Gavriella