Smocked Summer Scarf

My one year old daughter and I recently went to Bethesda, Maryland to visit my in-laws. It was so nice seeing Lupe play with her extended family, but if I’m being honest, the best part of the trip for me was that I got to go to the movies by myself! While grandma and grandpa watched Lupe, I made my way in the sweltering heat to the movie theater down the street. I was giddy with excitement as I ordered my popcorn and milk duds. Then as I sat down, I realized I had made a grave miscalculation. I was freezing! It may have been July 4th weekend outside, but inside the theater it felt more like Christmas!
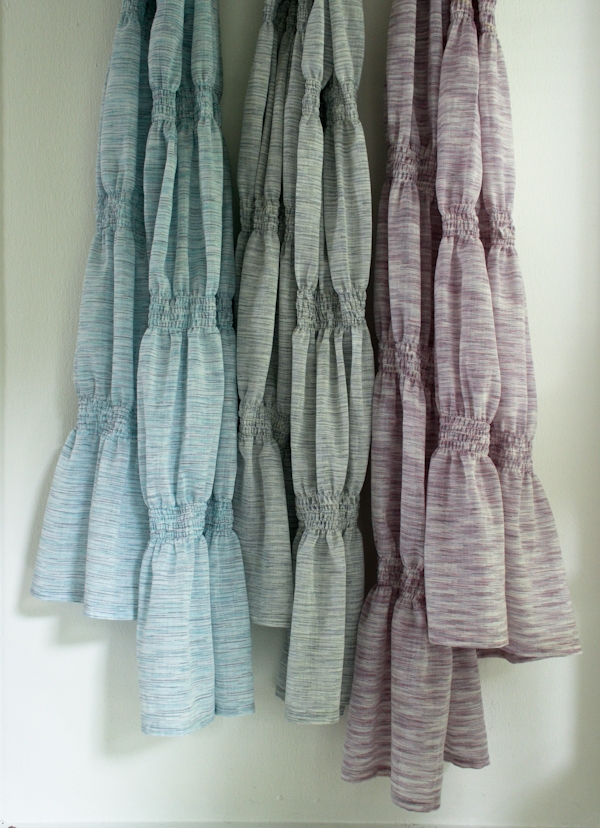
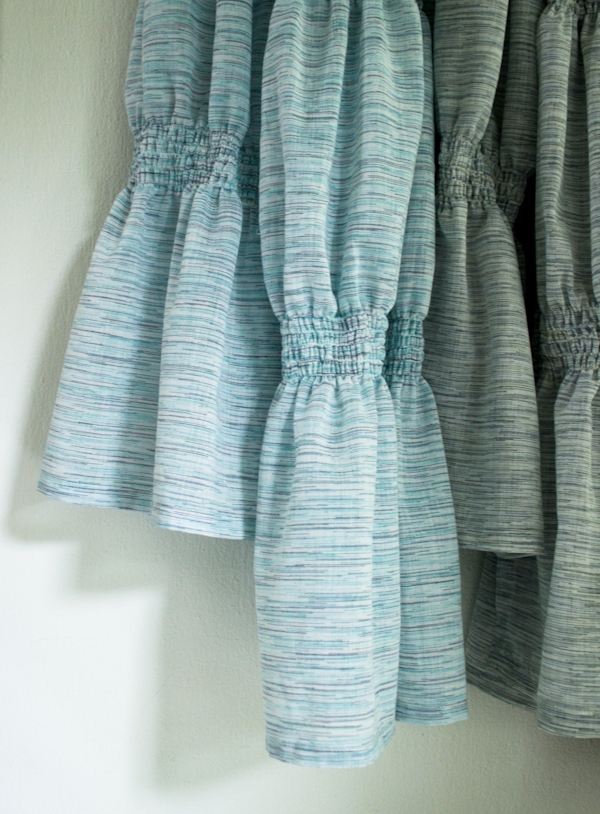
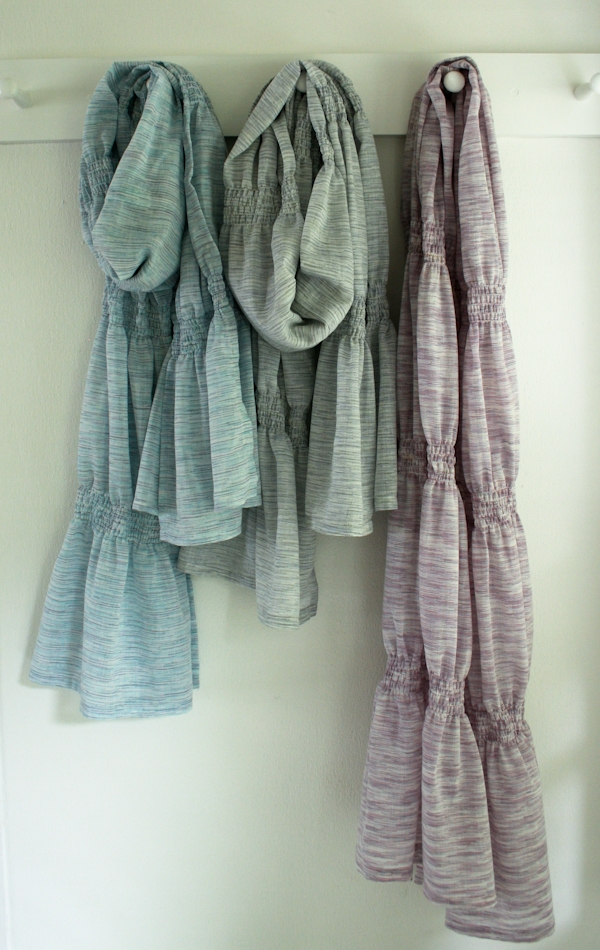
When I got home I whipped up this breezy Smocked Summer Scarf. It’s so lightweight you can easily slip it into your purse, ready for all of summer’s over air-conditioned moments. I made my scarf with whisper-light Veronica Voile and accented it with lines of elastic smocking to add unexpected texture and detail. It’s a snap to sew and a perfect introduction to the elastic smocking technique.
With fabric as special as this I had a hard time picking just one color… so I ended up making three! To make your favorite pick up our Materials for Smocked Summer Scarf kit here. It’s so delicate, airy and pretty, I bet you’ll even wear it outside the movie theater!
Materials

To make one scarf you’ll need a Materials for Smocked Summer Scarf kit containing…
- 1 yard of Robert Kaufman’s Veronica Voile in Grey, Pansy or Peacock (Please Note: We no longer carry Veronica Voile or the Smocked Summer Scarf Kits. To view our full fabric collection, click here!)
- 1 small spool of 100% cotton thread in color 1040
- 2 spools of elastic thread in white
Size
Finished Measurements: 25 inches wide by 69 ½ inches long.
Pattern
Cutting and Piecing Together
Press the fabric in half so that the selvages meet one another. Cut the fabric in half along this pressed fold so that you now have two pieces 36 inches by 28 inches.
Cut off 1 inch from the selvage edge of both pieces, removing the selvages. The pieces will now be 36 inches by 27 inches.
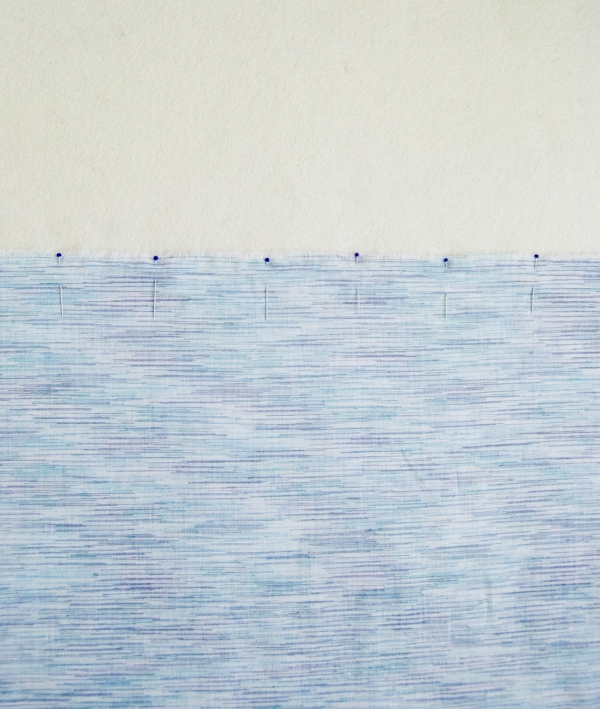
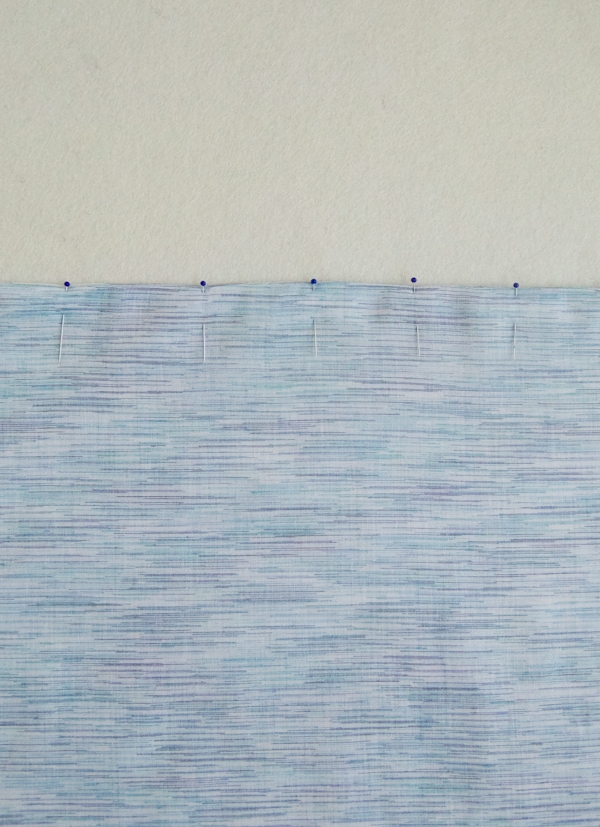
Pin the two pieces wrong sides together along a 27-inch side.
Using the cotton thread, sew this pinned side together with a ¼-inch seam allowance.
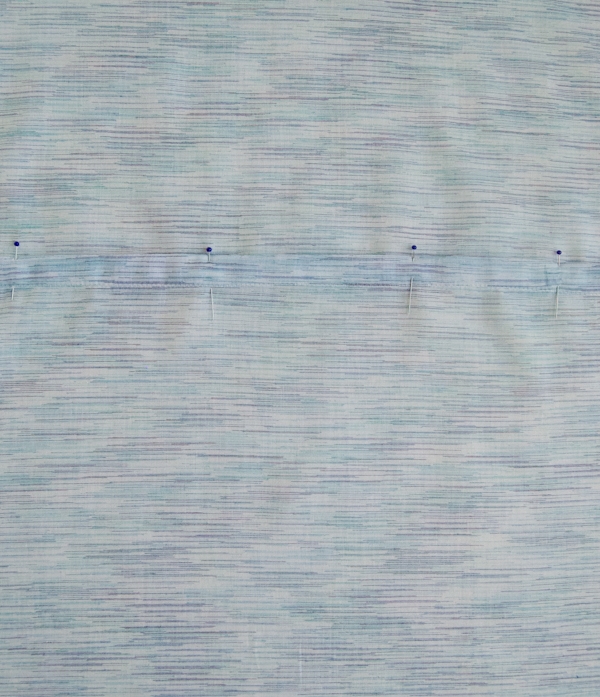
Press the fabric in half along the newly sewn seam, right sides together.
Pin the two sides together along the fold and sew it down with a ½-inch seam allowance. This will encase the raw edges of the seam, creating a French seam.
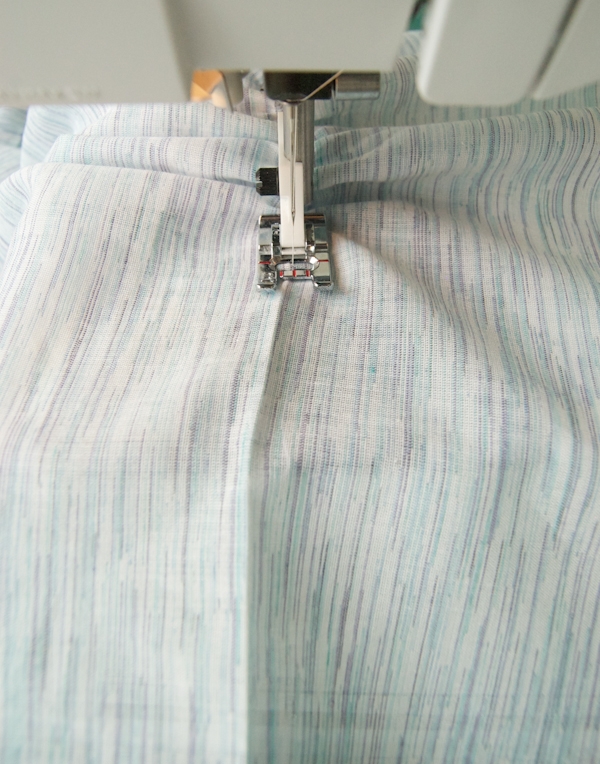
With the wrong side facing up, press the two sides open and pin the French seam flat to one side.
Edgestitch the pressed seam down.
The scarf will now be 70 ½ inches long by 27 inches wide.
To hem the ends of the scarf press each 27-inch edge ½ inch towards the wrong side twice and edgestitch down these folds.
The scarf will now be 68 ½ inches long by 27 inches wide.
Smocking
This scarf has six sections of smocking, three at each end. You will mark these sections by pressing creases along the width of the scarf.
First, press a crease horizontally along the width of the scarf 8 inches from a hemmed edge. Then press another crease 9 inches above the first one and a third 9 inches above that.
Repeat these creases for the second side. The scarf will now have 6 creases.
Elastic smocking is created by using elastic thread in the bobbin and regular thread in the top of the machine. To begin, wind the bobbin with the elastic thread. With my machine, winding the elastic thread on the machine works best, but many people have more success hand winding the bobbin while keeping some tension on the elastic. If you’ve never done elastic smocking before, you might want to do a test beforehand.
You will start the elastic smocking on the first crease at one end of the scarf. Load the elastic thread in the bobbin and the cotton thread in the top of the machine. Arrange the scarf so that the right side is facing up, the closest hemmed edge is to the right of the needle and the bulk of the scarf is to the left. Sew along the first crease as usual, making sure that the fabric is gathering as you sew.

When you get to a hair short of the edge, leave the needle down, lift up the foot and pivot the fabric around 180 degrees. Line up the previous row of smocked stitches to the left side of the presser foot. Lower the presser foot and sew back along the width of the scarf, keeping the previous row of stitches along the left side of the foot as a guide. Pull the previous row of smocked stitches flat before you feed the fabric under the needle.
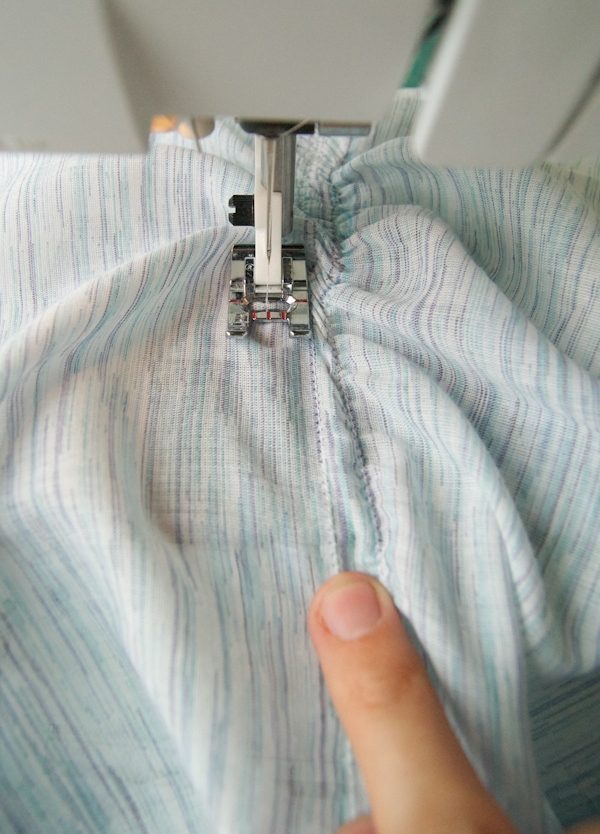
When you get to the end of that row, again leave the needle down, lift up the foot and pivot the fabric around 180 degrees. Line up the previous row of smocked stitches to the right side of the presser foot. Lower the presser foot and sew back along the width of the scarf, keeping the previous row of stitches along the right side of the foot as a guide. Pull the previous row of smocked stitches flat before you feed the fabric under the needle.

Repeat this process until you have 5 lines of smocked stitches. These rows should start at the first crease and move towards the center of the scarf. These 5 rows are the first Smocked Section.
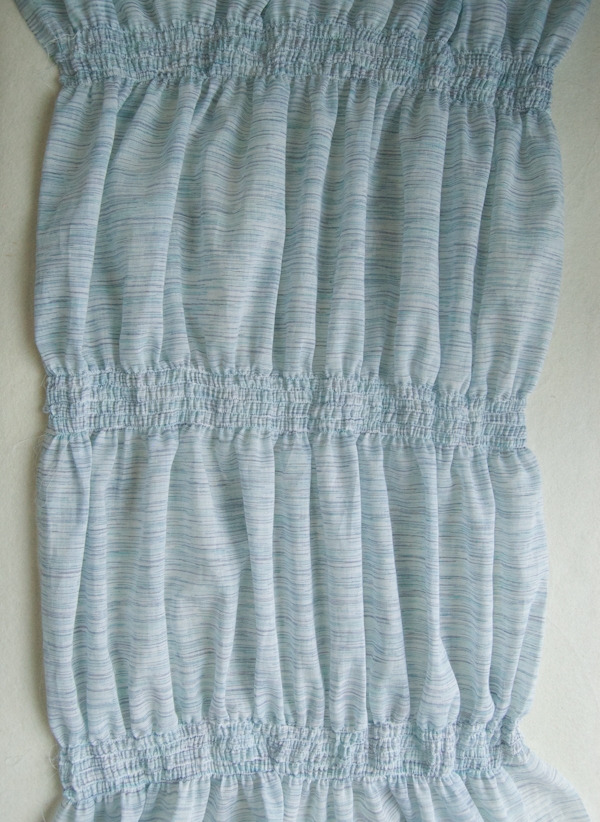
Create a Smocked Section at each crease on the first side.
Then flip the scarf around and create Smocked Sections at the three creases on the opposite side of the scarf. Remember that you will always start the first row at the crease and then add successive rows working towards the center of the scarf.
Hemming the Sides
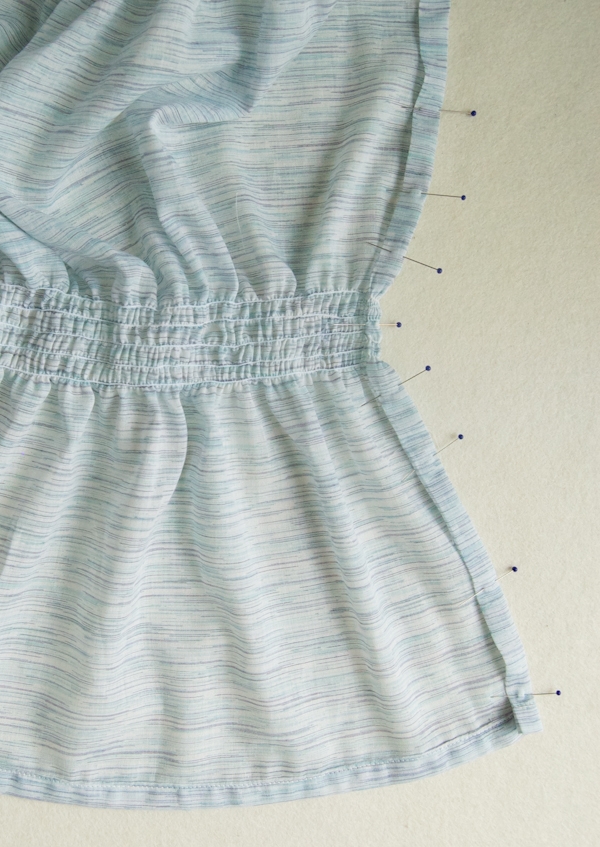
Trim off any excess threads.
Press one of the long raw sides ½ inch twice towards the wrong side of the scarf and pin the fold into place. At the edges of the Smocked Sections your folds will probably be more like ¼ inch. That’s okay, just let these sections fold where they want to in relation to the ½ inch folds. Edgestitch this fold down.
Repeat for the second raw side and you’re all done!


What a lovely, simple scarf! I'm curious, though, as to why you would hem the sides after smocking, and not before??
Hi Sue-
The hemming is done afterwards to encase the thread ends at the beginning and end of the smocking sections. The elastic is a little bit thick so the ends don't look very neat if you just backstitch.
Thanks for your question!
Molly
These are really pretty, and easy to make, too!
These are so pretty and look so easy. I think one of these would make a great gift for my mother-in-law. Thanks for planting the seed!
I have some beautiful Anna Maria Horner voiles that I have been stashing. This is a perfect project to use those babies up!! Thanks so much. I might alter the patten so that it smocks in the dead center with a wider smock so that it isn't too big around the neck. I'll let you know how that comes out 🙂 Thanks again!
What a fantastic idea. I actually have a shop-bought scarf that's almost identical to this, but somehow it had never occurred to me that I could replicate it, despite the fact that I adore smocking things. It works wonderfully in the Veronica voiles. Totally inspirational – thank you!
Movie theatres are the WORST! As a perpetually chilly person, I have to take a blanket to theatres. And I discovered this summer that wraps are the perfect thing to keep in my purse. I just made one with fringe! As always, your projects are beautiful.
I ordered one of the kits last night and can hardly wait for it to get here! I'm very new to sewing, but I *love* the look of smocking, so I'm super excited to try this. These scarves are just lovely. 🙂
Do you put the elastic filled bobbin into your machine the same way you do thread? You don't have to change the tension at all?
Absolutely love these, they look so posh!!! They would make such incredible gifts. I know what you mean about the indoor winter in the summer months, thanks for reminding me to be prepared!
Will you be restocking your white elastic thread?
Do you find that this elastic thread holds up over time? I have used an elastic thread in the (way) past and after a few years it quit being elastic — such that the smocking could be pulled out due to a "dry rot" of the elastic. Perhaps it's a better product now?
Hi Terry-
I know what you're talking about but I haven't experienced that with this thread. It's encased in polyester which protects the actual elastic part of the thread.
Thanks!
Molly
Hi Vicki-
Yes, we will be getting more in soon. If you'd like to be emailed when it comes back in stock please email customerservice AT purlsoho DOT com and let them know.
Thank you!
Molly
Hi Martha-
I didn't have to change the tension on my machine but each machine is different. I would suggest that you do a test on some scrap fabric first to work out the kinks.
Thank you for your question!
Molly
Beware trying to smock with elastic thread on a Brother machine. There is a hack on resetting your bobbin tension so you can do this on a Brother, but getting the tension back correctly can be challenging. So if you try to smock on a Brother, I would recommend getting a bobbin case to use only for smocking.
I have voile scarves but never thought to use elastic smocking on them. Great idea!
While this is a very nice scarf it is not "smocking" its shirring. Smocking is hand embroidered fancy stitches and not just gathered on a sewing machine.
Did you wash the fabric before starting this project? I'm still very new to sewing and am always worried about the fabric fraying. I ordered the kit, so I will be using the exact same fabric.
Hi Michelle-
I didn't pre-wash the fabric because I think any shrinkage will just add to the pretty gathered effect of the scarf. But it's really up to you!
Thank you for your question and good luck with the project!
Molly
Hi Sheila-
You are correct about this not being traditional smocking but this technique is commonly called "elastic smocking." It is also called shirring but we have chosen to call it smocking here. Thanks for pointing out the differences and for you nice words about the project!
Best-
Molly
Your scarfs are adorable, but I just have to correct you on the term. The correct term for what you did on them is called "shirring". I do hand stocking and when you said it was so easy I was intrigued! I am going to try your technique!
Hi Dena-
Thanks for writing in! Please seem my response above to Sheila and good luck with the project!
Best-
Molly
The scarfs are gorgeous! I love the light fabric and beautiful colours so much I couldn't resist making one for my self! ; ) The tutorial is great and I love my new scarf! Thank you so much!
Astrid
Okay, I'm stumped by the French seam. You say to stitch the two pieces with wrong sides together. Then press with right sides out (which is the same configuration, yes?) and sew again. Am I reading this wrong?
These are lovely and I want to do it right!
Hi Newbie-
Thanks so much for pointing out this mistake!
To sew this French seam you should sew it, wrong sides together, then right sides together, then press the seam down to one side and sew it down to the wrong side of the fabric. The pattern has been corrected. Please let me know if it makes sense.
Thank you so much for your careful reading!
Molly
These are pretty.I love the blue one.
Having trouble finding a fine enough needle that the elastic fits through and doesn't catch on the fine fabric-am I the only one??? Would love to finish this scarf!! Thx!
Hi Ann-
The elastic thread only goes in the bobbin, not in the top of the machine. You will use regular cotton thread in the top of the machine to go through the needle so any standard machine needle should work just fine.
Hope this clarifies things!
Thanks for writing in!
Molly
Just finished this project and love it! My backside didn’t turn out as tidy as I would have liked, so instead of hemming the sides, I just folded the right sides together, stitched a seam and turned right side out. It looks great and hides all my messiness. Thanks for all your great patterns!!
This is a pretty scarf and I have some lovely gauzy fabric I can use to make it, but — this is not smocking. I clicked on your link because I have some woven gingham that I though would look spiffy with smocking. What you have here is called shirring, a completely different kettle of fish. Both techniques have attractive results, but they look nothing alike. Here’s an excellent page to check out the language of fabric manipulations:
http://cindysorley.com/tag/needlepoint/
In a nutshell, shirring has parallel lines of gathered fabric with no surface decoration. Smocking is embroidery on top of vertically pleated fabric.
Hi Susan-
Thanks for getting in touch about this. Please see my response to Sheila in the comments above addressing the smocking/ shirring issue.
We do have a lovely Smocked Dress and Shirt Kit that uses traditional smocking on gingham: https://www.purlsoho.com/create/2013/08/15/corinnes-thread-smocked-dress-and-shirt-kits/
Thanks again for getting in touch!
Molly
Somehow, using my fabric I ended up with a nearly square scarf before I began the shirring I sewed the 27″ lengths together and did the french hem. Did I do something wrong. It seems that the finished length should have been longer.
Hi CT-
I’m so sorry to hear that you’re having a problem with this. Are you using the same fabric we used? If not your fabric may be a different width which would change the finished measurements.
If you are using the same fabric, were you using a full yard? If you started with two pieces 36 X 27 and then sewed the two 27″ ends together the finished length should be 69 1/2 inches after the French seam and both end hems. It sounds like maybe your original pieces weren’t 36 inches long or maybe that you sewed the 36″ side by accident? If this still isn’t ringing any bells you are welcome to send me a photo along with the dimensions and I’d be happy to try to get to the bottom of it! You can send that info to purlbee AT purlsoho.com
Thanks for getting in touch!
Molly